


English - 11
Select
No
pressing the ◄ or ► button, then press the
ENTER
button. Auto Store menu is displayed.
Press the
ENTER
button to start search the channels.
The channel search will start and end automatically. After
all the available channels are stored,
Clock Set
menu is
automatically displayed. Press the
ENTER
button.
➢
To stop the search before it has finished, press the
ENTER
button with
Stop
selected.
Press the ◄ or ► button to select
Month
,
Day
,
Year
,
Hour
,
or
Minute
. Set these by pressing the ▲ or ▼ button.
➢
You can set the
Month
,
Day
,
Year
,
Hour
, or
Minute
directly by pressing the numeric buttons on the remote
control.
10
Press the
ENTER
button to confirm your setting. The
message
Enjoy your viewing
is displayed. When you have
finished, press the
ENTER
button.
➢
Even if the
ENTER
button is not pressed, the message
will automatically disappear after several seconds.
11
Select
Yes
pressing the ◄ or ► button, then press the
ENTER
button.
Auto Store
menu is displayed.
1
Press the
ENTER
button to start search the analog channels.
The analog channel search will start and end automatically.
After all the available analog channels are stored, the screen
for searching digital channels is automatically displayed.
➢
To stop the search before it has finished, press the
ENTER
button with
Stop
selected.
1
Press the
ENTER
button to start search the digital channels.
The digital channel search will start and end automatically.
After all the available digital channels are stored, the screen
to select a time zone is displayed depending on the country.
➢
To stop the search before it has finished, press the
ENTER
button with
Stop
selected.
➢
If the DTV channel is updated, the Source in the source
list of the Input menu is automatically changed to DTV.
➢
For detailed descriptions about DTV channel update,
refer to page 34 of this manual.
14
Press the ▲ or ▼ button to select required time zone, then
press the
ENTER
button. The screen for setting the time is
displayed. Press the
ENTER
button.
15
Press the ◄ or ► button to select
Month
,
Day
,
Year
,
Hour
,
or
Min
. Set these by pressing the ▲ or ▼ button.
➢
You can set the
Month
,
Day
,
Year
,
Hour
, or
Min
directly
by pressing the numeric buttons on the remote control.
1
Press the
ENTER
button to confirm your setting. The
message
Enjoy your viewing
is displayed. When you have
finished, press the
ENTER
button.
➢
Even if the
ENTER
button is not pressed, the message
will automatically disappear after several seconds.
If you want to reset this feature …
1
Press the
MENU
button to display the menu.
Press the ▲ or ▼ button to select
Setup
, then press the
ENTER
button.
Press the
ENTER
button again to select
Plug & Play
.
The message
Start Plug & Play
is displayed.
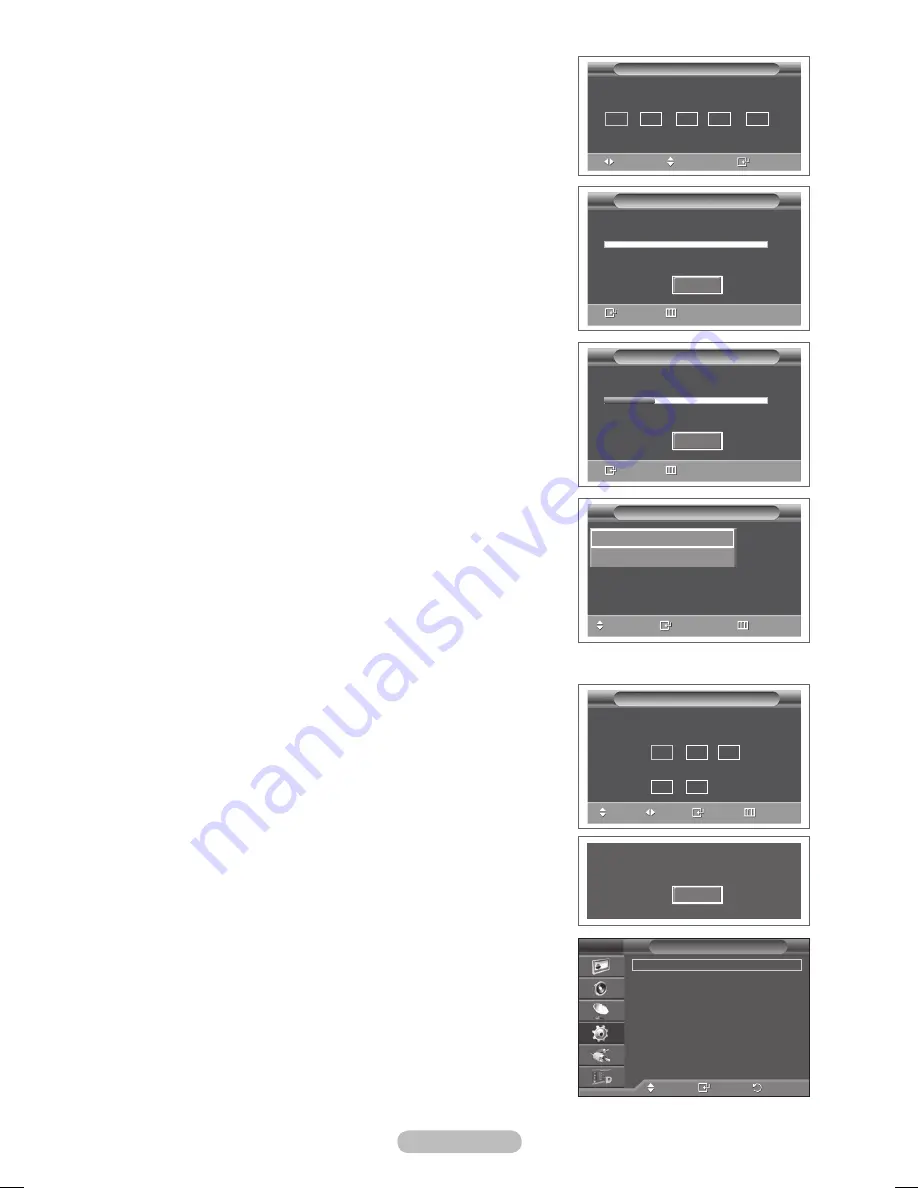
<Spain Only>
Plug & Play
Move
Adjust
Enter
--
--
----
--
: --
Clock Set
Month Day Year Hour
Minute
Plug & Play
Move
Select
Skip
The Iberian Peninsula and Balearic Islands
Canary Islands
Plug & Play
0%
Services found: 0
Channel: -
Enter
Skip
Start
Plug & Play
Scanning for digital services...
%
Services found:
Channel: 5
Enter
Skip
Stop
OK
Enjoy your viewing
Plug & Play
Set the current time.
Adjust
Move
Select
Skip
01
15
Month Day Year
Hour Min
00
1
00
Move
Enter
Return
Plug & Play
Language
:
English
Time
Light Effect
: In Watching TV
Wall-Mount Adjustment
Melody
: Off
Entertainment
: Off
Energy Saving
:
Off
Setup
T V
BN68-01422D-Eng.indb 11
2008-04-18 오후 1:26:58
Содержание PS50A476P1D
Страница 58: ...This page is intentionally left blank...


