background image

32

ENG

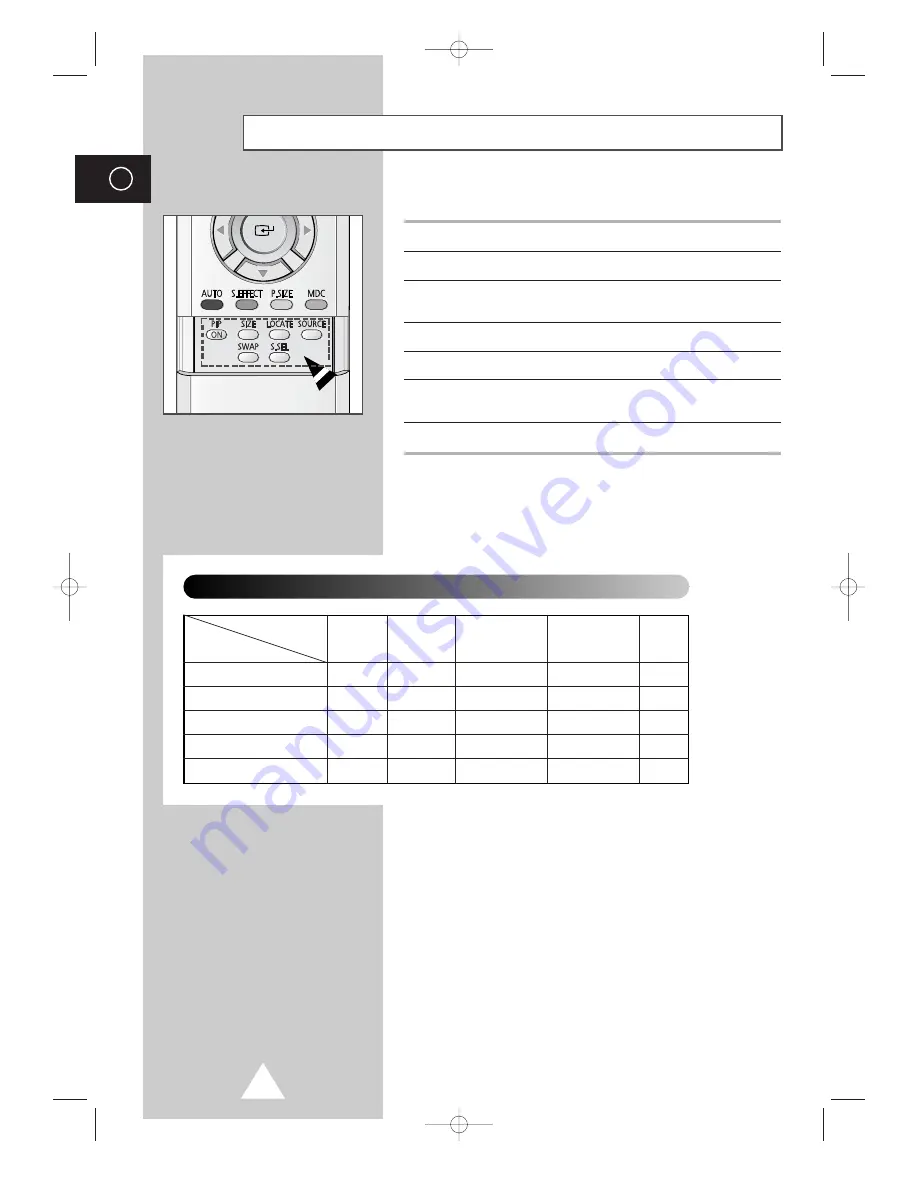
Easy functions of remote control.

Buttons

Feature

PIP ON

Used to activate or deactivate the PIP feature directly.

SIZE

Used to select a size of sub picture (

Large

Small

,

Double1

Double2

).

LOCATE

Used to move the sub picture counterclockwise.

SOURCE

Used to assign a source of sub picture.

SWAP

Used to interchange the main picture and the sub
picture.

S.SEL

Used to listen the sound of the sub picture.

Viewing the Picture In Picture (PIP) 

(continued)

Video

S-Video

Component

PC

DVI 

Video

S-Video

PC

Main picture

Sub picture

DVI

Component

Selecting the source of sub picture depending on the source of main picture

BN68-00528A-01_ENG  2003.11.20  4:14 PM  Page 32

Содержание PS-42P3ST

Страница 1: ...tions Before operating the unit please read this manual thoroughly and retain it for future reference ON SCREEN MENUS PICTURE IN PICTURE PIP MDC MULTIPLE DISPLAY CONTROL Intended for Commercial Use and Operation BN68 00528A 01_ENG 2003 11 20 4 13 PM Page 1 ...

Страница 2: ...cable ground shall be connected to the grounding system of the building as close to the point of cable entry as practical Caution FCC CSA regulations state that any unauthorized changes or modifications to this equipment may void the user s authority to operate it Caution To prevent electric shock match the wide blade of plug to the wide slot and fully insert the plug Attention pour eviter les cho...

Страница 3: ... text such as stock market reports video game displays station logos web sites or computer graphics and patterns should be limited as described above for all PDP displays Displaying stationary images that exceed the above guidelines can cause uneven aging of PDP Displays that leave subtle but permanent burned in ghost images in the PDP picture To avoid this vary the programming and images and prim...

Страница 4: ...this screen when displaying a still image Cell Defect The plasma display panel consists of fine cells Although the panels are produced with more than 99 9 percent active cells there may be some cells that do not produce light or remain lit Height The PDP can normally operate only under 2000m in height It might abnormally function at a place over 2000m in height and do not install and operate there...

Страница 5: ...hm gives brighter clearer much detailed image to you DNIeTM technology will fit every signals into your eyes Owner s Instructions Remote Control AAA Batteries Ferrite Cores for Speaker Wire 2EA Checking Parts A V Cable 1EA A V Cable 1EA Speaker Wires 2EA Power Cord User Instructions MDC Cable RS232C Install CD MDC Software RS232C PC Cable A Separated Sales BN68 00528A 01_ENG 2003 11 20 4 13 PM Pag...

Страница 6: ...necting Speakers 14 Switching On and Off 16 Choosing Your Language 16 USING YOUR DISPLAY Selecting the Color System Video or S Video Mode 17 Changing the Picture Mode 17 Adjusting the Picture Settings 18 Adjusting the Picture Settings PC or DVI Mode 19 Selecting the Picture Size 20 Activating Deactivating the Digital Noise Reduction Feature 20 Freezing the Current Picture 21 Changing the Sound Mod...

Страница 7: ...o the Sound of the Sub Picture 33 Viewing Pictures From External Sources 33 ADDITIONAL INFORMATION AND CONNECTIONS Connecting to the Audio Video Input 34 Connecting to the S Video Input 35 Connecting to the DVD DTV RECEIVER Input 35 Connecting to the DVI Input 36 Connecting to the RGB PC Input 36 Setting up Your PC Software Windows only 37 Pin Configurations 38 Input Mode PC DVI 39 Power Saver PC ...

Страница 8: ...n menu is not operated with source key MENU Menu display and exit VOL Volume adjustment Adjust an option value respectively VOL Enter to the selected menu SELECT Control the cursor in the menu I Press to turn the PDP on and off Speaker Speaker a b c a Power Indicator Power Off Red Power On Off Timer On Green b Remote Control Signal Receiver Aim the remote control towards this spot on the PDP c BN6...

Страница 9: ...VI output It is audio input for b d and e d RGB PC IN Connect to the video output jack on your PC e VIDEO IN Video and audio inputs for external devices such as VCR DVD video game device or video disc players or for external devices with an S Video output S VIDEO f COMPONENT IN Video Y Pb Pr and audio L R inputs for component g VIDEO OUT VIDEO L AUDIO R Used to output screen of Video or S Video in...

Страница 10: ... FOR THIS MONITOR CHANGE CONFIRMATION INFORMATION DISPLAY PIP FUNCTIONS PIP ON OFF SIZE SELECTION SIZE LOCATION SELECTION LOCATE INPUT SOURCE SELECTION SOURCE INTERCHANGE THE MAIN AND THE SUB PICTURE SWAP SOUND SELECTION S SEL PICTURE SIZE SELECTION PICTURE STILL SETTING THE TIMER AUTO ADJUSTMENT IN PC MODE PDP OFF ZOOM PANNING MENU DISPLAY ONLY PC MODE MULTIPLE DISPLAY CONTROL VOLUME DECREASE NEX...

Страница 11: ... the battery against on the remote control 3 Replace the cover by aligning it with the base of the remote control and pressing it back into place Inserting the Batteries in the Remote Control Assembling the Stand Base Fit the Stand Base into the guide hole on the bottom of the monitor and tighten the left and right sides using four screws for each side Two or more people should carry the PDP Never...

Страница 12: ...the arrow after assembling the bracket This wall mount bracket installation guide is for the following models WMN4230 This installation guide may be different from the PDP User s manual Please refer to the proper installation guide for your product Installation Notes Do not install the PDP on any place other than vertical walls To protect the performance of the PDP and prevent troubles avoid the f...

Страница 13: ...nd adjusting the angle Please tightly secure the wall mount bracket to the wall to avoid injury from a falling PDP 3 Tighten the screws of the plastic hanger to the back side of the PDP 4 Put the 4 pegs on the PDP in the grooves of the wall mount bracket and pull down on the PDP to secure it to the wall mount bracket Tighten the screws as shown so that the PDP cannot be separated from wall mount b...

Страница 14: ...e PDP 3 Tighten the PDP and the speaker bracket using the screws removed from the PDP When moving your PDP do NOT hold the speaker connected to your PDP It may damage the bracket clamping the speaker and your PDP together and result in a drop of your PDP and a risk of personal damage and injury BN68 00528A 01_ENG 2003 11 20 4 14 PM Page 14 ...

Страница 15: ... speaker audio cable to the external speaker output jack on the rear of the PDP matching the and ends of the cable with the diagram on the PDP The speakers MUST have to a power handling capability of 10 watts minimum impedance 8Ω When you connect the speaker wire to the external speaker out connector first bind the speaker wire round the ferrite core to secure it BN68 00528A 01_ENG 2003 11 20 4 14...

Страница 16: ... button to confirm your choice 16 ENG The mains lead is attached to the rear of your PDP 1 Plug the mains lead into an appropriate socket Result The Standby indicator on the front of the PDP lights up The main voltage is indicated on the rear of the PDP and the frequency is 50 or 60Hz 2 Press the I button on the front of the PDP or ON button on the remote control to switch the PDP on 3 To switch y...

Страница 17: ...ton Result The options available in the Picture group are displayed 2 Press the button 3 Press the or button to select Mode Select the option by pressing the œ or button Result The following modes are available depending on the input source Dynamic Standard Movie Custom Custom High Middle Low PC or DVI Mode You can also set these options simply by pressing the P MODE Picture Mode button Changing t...

Страница 18: ...h the settings press the button to store them 6 Press the MENU button Result The options available in the Picture group are displayed again 7 Press the or button to select Color Tone Select the option by pressing the œ or button The color tones are displayed in the following order Normal Warm1 Warm2 Cool2 Cool1 If you make any changes to these settings the picture mode is automatically switched to...

Страница 19: ... PC mode only Color1 Color2 Color3 8 Press the or button to select color Adjust Press the button Result The Color Adjust menu is displayed When select the Color Tone to Custom the Color Adjust menu is displayed The Color Adjust menu can not be selected in DVI mode 9 Press the or button to select the option Red Green Blue to be adjusted Press the œ or button Result The horizontal bar is displayed M...

Страница 20: ...tton Wide Normal PC or DVI Mode You can also set these options simply by pressing the P SIZE button Activating Deactivating the Digital Noise Reduction Feature If the signal received by your PDP is weak you can activate this feature to reduce any static and ghosting that may appear on the screen 1 Press the MENU button Result The options available in the Picture group are displayed 2 Press the but...

Страница 21: ... can select the type of special sound effect to be used when watching a given broadcast 1 Press the MENU button Result The main menu is displayed 2 Press the or button to select Sound Result The options available in the Sound group are displayed 3 Press the button Result The Mode is selected 4 Select the option by pressing the œ or button The sound effects are displayed in the following order Cust...

Страница 22: ...with the current option 5 Select the option volume balance equalizer to be adjusted by pressing the œ or button Press the or button to reach the required setting 6 When you are satisfied with the settings press the button to store them If you make any changes to the equalizer settings the sound mode is automatically switched to the Custom Equalizer Custom œ œ Move Adjust Store 100 300 1K 3K 10K R ...

Страница 23: ...ature lets you automatically adjust the volume of the desired channel by lowering the sound output when the modulation signal is high or by raising the sound output when the modulation signal is low Melody You can hear clear melody sound when the PDP is powered on or off Pseudo Stereo Virtual Surround Pseudo stereo feature converts a monaural sound signal into two identical left and right channels...

Страница 24: ... press the button to store 10 Press the MENU button Result The Image Lock menu is displayed again 11 Press the or button to select Zoom Panning Press the button Result The Zoom Panning menu is displayed with the Zoom selected You can also do simpley by pressing the ZOOM button 12 Press the œ or button to reach the required magnification 13 Press the or button to select Panning Move the magnified p...

Страница 25: ...6 Select the ID setup number by pressing the œ or button 7 Press the or button to select ID Input Enter ID input number by using the numeric buttons To operate the multi control function PDP1 and PDP2 should be set in the ID Setup mode When entering the ID Input number of PDP1 while the PDP is set in the ID Input mode only PDP1 is switched to the Menu screen and you can operate the remote control ...

Страница 26: ...t 9 When you are satisfied with the settings press the MENU button Result The Burning Protection menu is displayed again 10 Press the or button to select Signal Pattern Set to On by pressing the œ or button for removing the residual image 11 Press the or button to select All White Set to On by pressing the œ or button for removing the residual image after making the screen white The Signal Pattern...

Страница 27: ...requency and horizontal frequency are displayed Displaying the PC Information ENG PC Information Resolution 1024x768 V Frequency 60 H Frequency 48 Return Image Lock Key Lock œ œ Off Multi Control Burning Protection Information Setup Move Enter Return Mode Video Picture Dynamic Sound Custom Clock 11 45 You can view the setting status you select by pressing the INFO button on the remote control Disp...

Страница 28: ...e hour or minute by pressing the or button Set the clock first If you have not yet set the clock you can not set other options of the Time menu 6 Press the or button to select Clock Display Set to On by pressing the œ or button for displaying the current time You can also do simply by pressing the CLOCK DISPLAY button 7 When you are satisfied with the settings press the button to store them Settin...

Страница 29: ...matically by pressing the or button 8 Press the or button to select Off Time In the same above set the time at which you wish the PDP to be switched off automatically 9 When you are satisfied with the settings press the button to store them Absent Power Off Your PDP will automatically be turned off if you do not operate any controls during the 3 hours when the Timer is set to On and the On Time is...

Страница 30: ... select Function Result The options available in the Function group are displayed 3 Press the button 4 Press the or button to select Film Mode 5 Press the œ or button to change the setting On or Off If video source is not film set to Off Available in Video S Video and Component 480i modes Setting the Film Mode Language English Time Film Mode œ œ Off Function Move Sel Return BN68 00528A 01_ENG 2003...

Страница 31: ...ge 32 6 Press the or button to select Swap Press the button Result The main picture and sub picture are interchanged 7 Press the or button to select Size Select a size of the sub picture by pressing the œ or button Result The sizes are displayed in the following order Large Small Double1 Double2 8 Press the or button to select Locate Select a location of the sub picture by pressing the œ or button...

Страница 32: ...ounterclockwise SOURCE Used to assign a source of sub picture SWAP Used to interchange the main picture and the sub picture S SEL Used to listen the sound of the sub picture Viewing the Picture In Picture PIP continued Video S Video Component PC DVI Video S Video PC Main picture Sub picture DVI Component Selecting the source of sub picture depending on the source of main picture BN68 00528A 01_ENG...

Страница 33: ...ave connected up your various audio and video systems you can view different sources by selecting the appropriate input 1 Check that all the necessary connections have been made 2 Switch your PDP on then press the SOURCE button Result The input sources available are displayed 3 Press the or button to select the required input source 4 Press the button to store If you change the external source whi...

Страница 34: ...you have a second VCR and wish to copy cassettes tape connect the source VCR to VIDEO IN and the target VCR to VIDEO OUT so that you can redirect the signal from VIDEO IN to VIDEO OUT When you wish to record a programme connect the receiver to VIDEO IN and the VCR to VIDEO OUT so that you can redirect the signal from VIDEO IN to VIDEO OUT Whenever you connect an audio or video system to your PDP e...

Страница 35: ... of the PDP Camcorder VCR To play picture and sound both the S VIDEO and RCA connectors must be used and Connecting to the DVD DTV RECEIVER Input The COMPONENT IN and AUDIO connectors are used for equipment with a DVD DTV RECEIVER output 480i 480p 720p 1080i Rear of the PDP Y Pb Pr L R or Digital Set Top Box DVD BN68 00528A 01_ENG 2003 11 20 4 14 PM Page 35 ...

Страница 36: ...he DVI IN video and AUDIO connectors are used for equipment with a DVI output Personal Computer and Rear of the PDP The RGB PC IN and AUDIO connectors are used for interfacing with your PC Personal Computer Rear of the PDP BN68 00528A 01_ENG 2003 11 20 4 14 PM Page 36 ...

Страница 37: ...sequence Start Settings Control Panel When the control panel screen appears click on Display and a display dialog box will appear Select the Settings tab in the display dialog box The two key variables that apply the PDP PC interface are Resolution and Colours The correct settings for these two variables are Size sometimes called Resolution 640 x 480 pixels Colour 24 bit colour might also be expre...

Страница 38: ... M D S Data5 22 T M D S Clock Shield 23 T M D S Clock 24 T M D S Clock DVI Input Connector 24Pin Pin RGB PC IN 1 Red R 2 Green G 3 Blue B 4 Grounding 5 Grounding DDC 6 Red R Grounding 7 Green G Grounding 8 Blue B Grounding 9 Reserved 10 Sync Grounding 11 Grounding 12 Data DDC 13 Horizontal sync 14 Vertical sync 15 Clock DDC RGB PC Input Connector 15Pin Pin Signal 1 Carrier Detect 2 Receive Data 3 ...

Страница 39: ...a particular video card PIXEL PERFECT made by IMAGINE GRAPHICS Ltd A mark means that this mode is recommended VGA SVGA XGA WVGA SXGA WXGA 70 85 85 70 85 60 72 75 85 56 60 72 75 85 60 70 75 85 60 72 75 85 60 75 60 60 31 5 37 9 37 9 31 5 37 9 31 5 37 9 37 5 43 3 35 2 37 9 48 1 46 9 53 7 48 4 56 5 60 0 68 7 29 8 35 1 36 0 37 0 31 8 67 5 64 0 47 7 Resolution 640 x 350 640 x 400 720 x 400 640 x 480 800...

Страница 40: ...ntal Sync Vertical Sync Video Power Indicator Normal Operation Active Active Active Off Standby Mode Inactive Active Blanked Red Blinking 1 sec Interval Suspend Mode Position A1 Active Inactive Blanked Red Blinking 1 sec Interval Power off Mode Position A2 Inactive Inactive Blanked Red Blinking 1 sec Interval Power saving Function Mode This monitor automatically returns to normal operation when ho...

Страница 41: ...m selected is correct Plug your PDP into a different mains socket Replace the remote control batteries Clean the upper edge of the remote control transmission window Check the battery terminals Care and Maintenance Identifying Problems Do not put the PDP near extremely hot cold humid or dusty places Do not put the PDP near appliances that create magnetic fields Keep the ventilation openings clear ...

Страница 42: ...42 ENG Memo BN68 00528A 01_ENG 2003 11 20 4 14 PM Page 42 ...

Страница 43: ...43 Memo ENG BN68 00528A 01_ENG 2003 11 20 4 14 PM Page 43 ...

Страница 44: ...A 01 AFTER SALES SERVICE Do not hesitate to contact your retailer or service agent if a change in the performance of your product indicates that a faulty condition may be present BN68 00528A 01_ENG 2003 11 20 4 14 PM Page 44 ...

Отзывы: