background image

ŝ

43

Ş

ƈ

If you cannot obtain suitable exposure
conditions, you can change the metering
method to take better pictures.

ƈ

Metering methods

- Multi metering (          ) :

Exposure will be calculated based on each parts of the LCD divided into several parts. 
This is suitable for general use.

- CWA (Centre Weighted Average) metering (          ) :

Exposure will be calculated based on an average of the available light in the image area.
However, the calculation will be biased towards the centre of the image area.
This is suitable for taking a picture of small object like a flower or insects.

- Spot metering (          ) :

Only the cross marked area in the centre of the LCD will be metered for light.
This is suitable when the subject in the centre is exposed correctly, regardless of the back
lighting.

ſ

The + mark will be displayed when spot metering has been selected.

ƈ

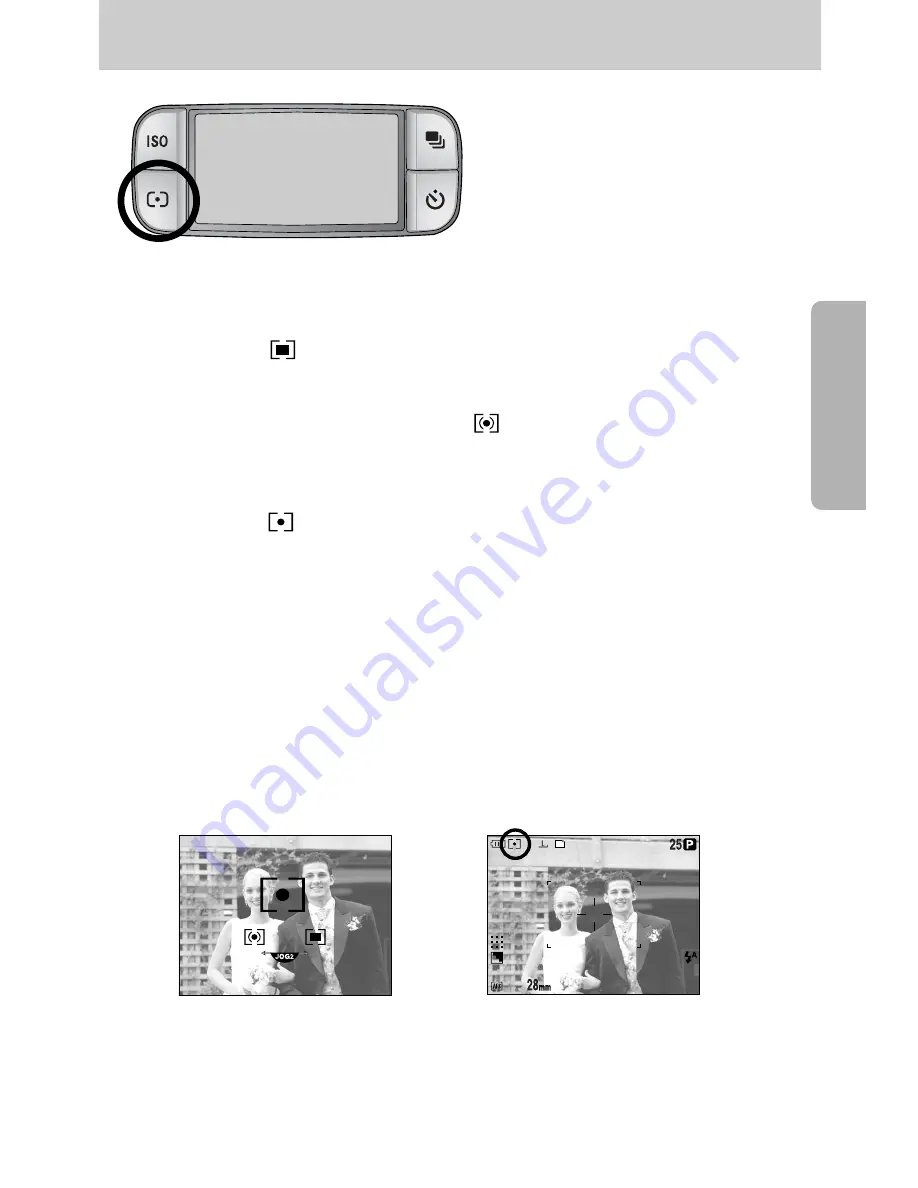
How to set the metering mode

1. Press the metering button and a metering icon will display on the LCD.
2. Select a desired icon by rotating the Rear jog dial (JOG2).
3. Press the OK button to set the setting.

[ Metering icons ]

[ Selecting the spot metering ]

Metering button

Содержание Pro 815

Страница 1: ...you for buying a Samsung Camera This manual will guide you through using the camera including capturing images downloading images and using the application software Please read this manual carefully b...

Страница 2: ...era s USB connection terminal p 144 Check the camera s power If the power is turned off press the camera button to turn it on Take a picture Check the camera s power Check Removable Disk Open Window s...

Страница 3: ...PROGRAM mode 30 How to use the APERTURE PRIORITY mode 30 How to use the SHUTTER PRIORITY mode 31 How to use the MANUAL mode 31 How to use the MySET mode 32 How to use the MOVIE CLIP mode 32 How to us...

Страница 4: ...o turning off the LCD 114 Language 115 Formatting a memory card 116 Setting up the Date Time 117 Setting up the date type 117 World time 118 Imprinting the recording date 119 Sound 120 LCD brightness...

Страница 5: ...sult in death or serious injury CAUTION CAUTION indicates a potentially hazardous situation which if not avoided may result in a minor or moderate injury Correct Disposal of This Product Waste Electri...

Страница 6: ...flash too close to your subject s eyes may cause eyesight damage When taking photographs never point the lens of the camera directly into very strong light This may result in permanent damage to your...

Страница 7: ...ously It may cause burns If you are using the AC power adaptor be careful when moving the camera After use always switch off the camera before unplugging the adapter from the wall socket Then make sur...

Страница 8: ...g dealer or Samsung service centre CF CompactFlash card p 20 DPOF compatible printer see p 103 Exclusive bounce flash Flash plate Camera case User manual Warranty card Camera strap Remote control Soft...

Страница 9: ...better is recommended Windows 98 98SE 2000 ME XP Minimum 64MB RAM XP 128MB 200MB of available hard disk space Over 1GB is recommended USB port CD ROM drive 1024x768 pixels 16 bit colour display compat...

Страница 10: ...Focus area selection AF A button Focus mode selection button Speaker Connector cover Memory card slot cover Pop up flash OPEN button Flash compensation button AF lock AF L button Remote control sensor...

Страница 11: ...ower button Power lamp Top LCD ISO button Metering button Hot shoe Flash status lamp Mode dial Speaker Shutter button EVC ExposureValue Compensation ring Focus ring Zoom ring Zoomscaleindicator Flash...

Страница 12: ...ard in use lamp LCD button Q XTIa 1VNWZUI QWV J WV Connector cover SCENE Delete button Back LCD Memory card slot cover Memory card eject lever Memory card slot 5 function button Play mode button Digit...

Страница 13: ...13 Bottom Battery chamber Battery chamber cover lock Tripod socket Battery holder Battery chamber Diopter adjustment ring Identification of features...

Страница 14: ...When the LCD is turned off Charging is complete Pressing the shutter button half way down The flash is being charged When the memory card is being used Red Blinking PC mode When the data is transmitt...

Страница 15: ...ON Model SLB 1974 Type Lithium Ion Voltage Capacity 7 4V 1900mAh Charging time Approx 180MIN Using the SBC L4 Number of images and battery life These figures are measured under Samsung s standard cond...

Страница 16: ...is inserted with the correct polarity 1 Turn the battery chamber lock in the direction of the arrow OPEN and open the battery chamber cover 2 Insert the battery taking note of the polarity 3 Close th...

Страница 17: ...r Turn the battery chamber lock in the direction of the CLOSE mark Important information about battery usage When the camera is not used turn off the camera power Please remove the battery if the came...

Страница 18: ...ttery is inserted with the correct polarity Check the battery charging status with the Charging LED of the charger Status LED Being charged Red LED is on Charging is complete Green LED is on Charging...

Страница 19: ...ort on the camera before using an AC adaptor AC adapter SAC 81 DC 8 4V The proper operating temperature of the charger is 0 C 40 C When you charge the battery under over the proper operating temperatu...

Страница 20: ...you may notice that the memory card is warm This is perfectly normal Do not use a memory card that is used in another digital camera To use the memory card in this camera first format the memory card...

Страница 21: ...8 3 2 15 29 42 3264X2176 17 32 46 3264X1840 20 38 54 2400X1800 27 50 71 1632X1224 54 94 124 1024X768 111 169 205 640X480 292 450 548 640X480 1Min 10Sec 1Min 57Sec 320X240 3Min 31Sec 5Min 51Sec 160X120...

Страница 22: ...d slot cover until you hear a click If the memory card does not slide in smoothly do not attempt to insert it by force Check the direction of insertion and then insert it correctly Do not insert the m...

Страница 23: ...on the camera as shown alongside 3 Fasten the strap as shown 4 Repeat steps 1 3 to attach the other end of the strap to the other eyelet 2 Thread the strap back through the strap ring as shown alongs...

Страница 24: ...case use the lens hood 1 Attach the lens adapter to the camera by turning the lens adapter clockwise as shown alongside You can use a general purpose filter 72mm after attaching the lens adapter 2 Att...

Страница 25: ...25 When you don t use the camera attach the lens cap You can attach the lens cap as show below Attaching the lens cap Before using the camera...

Страница 26: ...uttermode Camerashakewarning p 49 34 7 Voice memo p 76 8 Contrast p 73 9 Saturation p 74 10 Image quality p 71 11 Sharpness p 75 12 Focus Lock p 47 13 Focus mode p 47 48 Image Full status The LCD disp...

Страница 27: ...58 18 Date imprint p 119 19 Flash p 57 60 20 Macro p 55 56 21 White balance p 53 54 22 ISO p 42 23 Aperture value F2 2 p 30 31 24 Shutter speed 1 1600 p 30 31 25 Colour space p 77 27 Number of availa...

Страница 28: ...ure lock p 51 6 Aperture value F2 2 p 30 31 7 Saturation p 74 8 Sharpness p 75 9 Image size p 70 10 Image quality p 71 11 Number of shots remaining 25 p 21 12 Drive mode p 36 39 13 Metering p 43 14 Ba...

Страница 29: ...the power button to turn on the camera Date Time will display for about 3 Sec and disappear 3 Select the AUTO mode by rotating the mode dial 4 Point the camera towards the subject and compose the imag...

Страница 30: ...e PROGRAM mode Aperture priority mode How to use the APERTURE PRIORITY mode This mode will set the aperture value for automatic exposure depends on the brightness of the object by automatic shutter sp...

Страница 31: ...hutter Priority mode How to use the MANUAL mode The user can manually set both the aperture value and the shutter speed Steps 1 2 are the same as those for AUTO mode 3 Select the MANUAL mode by rotati...

Страница 32: ...an image Please see page 78 for details of the MySET shooting mode and menus MySET mode How to use the MOVIE CLIP mode A movie clip can be recorded for as long as the available recording time of the...

Страница 33: ...NE mode by rotating the mode dial 4 Press the SCENE button and scene menu will display as shown alongside 5 Select the desired Scene sub menu by rotating the Rear jog dial JOG2 and press the OK button...

Страница 34: ...fill in flash see page 59 spot metering see page 43 or exposure compensation see page 50 Avoid obstructing the lens or the flash when you capture an image Using the Rear LCD extensively will drain the...

Страница 35: ...ie clip Press the shutter button once and the movie clip is recorded for as long as the available recording time in the memory allows If you wish to stop recording press the shutter button again In ST...

Страница 36: ...e this menu if it is hard to decide exposure of the object The camera will take 3 or 5 shots with settings at below and above the set exposure Auto Focus Bracket Use this menu if it is hard to decide...

Страница 37: ...3 or 5 shots according to the selected exposure value How to set the AFB 1 Select the AFB icon by rotating the Rear jog dial JOG2 You can t select the AEB icon in the Auto recording mode and movie cli...

Страница 38: ...ss the shutter button to capture an image You can take 3 or 5 shots depending on the selected white balance value 3 Press the OK or Shutter button to set the focus value 4 Press the shutter button to...

Страница 39: ...n to set the setting 5 Select the Interval Number menu 6 Press the Right button and select a desired menu by pressing the Up Down button the interval can be set to any number of shots between 2 and 99...

Страница 40: ...imer function will be maintained after taking an image rotating the mode or pressing the play mode button cancels the self timer function Self timer Remote mode Off Self timer function is off 2 Sec Se...

Страница 41: ...remote control Rotate the cover as shown The remote control takes a CR 2025 3V battery If you operate the Mode dial and Self timer button during the self timer operation the self timer function is ca...

Страница 42: ...in high luminance The higher the ISO value the higher the camera s sensitivity to light is and therefore the greater its capacity to take pictures in dark conditions However the noise level in the im...

Страница 43: ...wards the centre of the image area This is suitable for taking a picture of small object like a flower or insects Spot metering Only the cross marked area in the centre of the LCD will be metered for...

Страница 44: ...Using both will offer a total zoom ratio of 30X or 60X Wide Tele Tele Wide Optical Zoom WIDE Rotate the Zoom ring to left This will zoom out from the subject i e the subject will appear further away O...

Страница 45: ...rning indicator will display When you select a higher optical or digital zoom we recommend using the Finder LCD and the tripod Take care not to press the lens as this may cause a camera malfunction Do...

Страница 46: ...e of frame Fixed spot AF The frame White will be fixed at the centre of the LCD Modifying the Spot AF position The frame will be yellowed and blink The frame position can be changed its position Setti...

Страница 47: ...his function is available in the AF S mode How to use the focus lock 1 Ensure the subject is in the centre of the auto focus frame 2 Press the AF L button The frame turns green and Focus lock icon wil...

Страница 48: ...and select Direct MF menu by pressing the Up Down button 3 Press the Right button and select a desired sub menu by pressing the Up Down button Off You can t change the focus manually On You can chang...

Страница 49: ...te that the noise level in the image will increase when you use the high speed shutter as the high speed shutter use higher ISO value If you select the high speed continuous mode or ultra high speed c...

Страница 50: ...that a positive exposure compensation value increases the exposure and the LCD will appear white or you may not get good pictures How to set the Exposure Value Compensation 1 Press and hold the AE L...

Страница 51: ...posure Value Compensation 1 Ensure the subject is in the centre of the auto focus frame 2 Move the focus frame to a subject that has the desired exposure value 3 Press the AE L button and the exposure...

Страница 52: ...makes the cursor shift to the left tab When the menu is not displayed on the LCD monitor the Left button operates as the FLASH button Right button When the menu is displayed on the LCD monitor pressin...

Страница 53: ...conditions DAYLIGHT For taking images outside CLOUDY For taking images under a cloudy and overcast sky Fluorescent H For shooting under daylight fluorescent types of three way fluorescent lighting Fl...

Страница 54: ...in effective until it is overwritten How to set the colour temperature Colour temperature is a simplified way to characterize the light source Low colour temperature implies warmer light more red whil...

Страница 55: ...ing at the S MACRO of the Zoom bar 2 Press the Macro Down button and the macro icon will display on the LCD 3 Select the super macro icon by rotating the Rear jog dial JOG2 4 Press the Macro Down butt...

Страница 56: ...it is possible that camera shake will occur If this is the case use a tripod to eliminate this When you take a picture within 10cm MACRO focus select the FLASH OFF mode When you take a picture within...

Страница 57: ...cally To use the flash press the Pop up flash button 4 Press the OK button to set the setting How to set the flash mode 1 Press the Flash button Left and flash mode icons display on the LCD 2 Select a...

Страница 58: ...up Direct MF Spot AE point 1st Curtain 2nd Curtain Custom Color Space Save Myset Flash Synchro Flash Pop up Direct MF Spot AE point 1st Curtain 2nd Curtain 1 Press the Menu button and select the P me...

Страница 59: ...osure When you take an image in a condition with poor light the camera shake warning indicator will display on the LCD We recommend using the tripod The flash fires regardless of available light The i...

Страница 60: ...batteries are weak the charging time will be longer During the continuous shot movie clip mode the flash function will not operate Take photographs within the flash range The image quality is not gua...

Страница 61: ...e rigged wheel of flash as shown alongside 3 The external flash icon will display on the LCD as shown alongside When using the external flash check the flash range displayed on the LCD panel of the fl...

Страница 62: ...K button to set the setting You can save your preferences in the Custom menu and load it by pressing the Custom button How to use the Custom button 1 After selecting a desired sub menu in the Custom m...

Страница 63: ...is off Pressing the LCD button Pressing the LCD button Pressing the LCD button Rear LCD is off Top LCD is on Icon Finder LCD is on Rear LCD is off Top LCD is on Icon Pre view Finder LCD is off 28 25 W...

Страница 64: ...igher on the left the image may be too dark If the lighting conditions are too bright to check the subject by using the LCD checking the histogram will enable more precise exposure control for the sho...

Страница 65: ...xample children Portrait To take a picture of a person Night Use this for shooting still images at night or in other dark conditions Close up shooting for small objects such as plants and insects For...

Страница 66: ...diopter The range is from 4 to 2 dpt Diopter 1 Select the Finder LCD by pressing the LCD button p 63 2 While looking though the Finder LCD rotate the diopter to the left or the right 3 When you can se...

Страница 67: ...following circumstances When another button is being operated While image data is being processed when the Card in use lamp blinks When there is no battery capacity INFORMATION Main menu Sub menu Cam...

Страница 68: ...Pics Interval Time 1 60 min Interval Number 2 99 pics Sharpness sRGB Adobe RGB Myset 1 Myset 2 Myset 3 Myset 1 Myset 2 Myset 3 Sharpness Voice memo p 72 p 73 p 74 p 75 p 76 p 39 p 62 p 77 p 78 Effect...

Страница 69: ...de Page 1st Curtain 2nd Curtain Auto Manual Off On Center Focus Area Menus are subject to change without prior notice p 58 p 57 p 48 p 79 Flash Synchro Flash Pop up Direct MF Spot AE Point Using the L...

Страница 70: ...S1 640X480 S2 640X480 640 320X240 320 160X120 160 Still image Movie clip The higher the resolution the lower the number of available shots will be because high resolution images require more memory th...

Страница 71: ...layed while saving a RAW or TIFF file to the memory card When you select a RAW or TIFF file type the image size is fixed as 3264X2448 The RAW and TIFF file format can t be selected in the SCENE mode T...

Страница 72: ...ge to black and white Sepia Captured images will be stored in a sepia tone a gradient of yellowish brown colours Negative Saves the image in negative mode Program mode Movie clip mode Spot AE point Si...

Страница 73: ...u button and select the P menu tab 2 Press the Right button and select the Contrast menu by pressing the Up Down button 3 Press the Right button and select a desired menu by pressing the Up Down butto...

Страница 74: ...on and select the Saturation menu by pressing the Up Down button 3 Press the Right button and select a desired menu by pressing the Up Down button Setting range 2 0 2 4 Press the OK button to set the...

Страница 75: ...Sub menu Icon Description The edges of the image are softened This effect is suitable for editing images on your PC The edges of the image are sharp This is suitable for printing The edges of the ima...

Страница 76: ...4 Press the OK button to set the setting 5 If the voice memo indicator is displayed on the LCD the setting is complete Press the shutter button The picture is stored on the memory card 6 Voice memo wi...

Страница 77: ...select the P menu tab 2 Press the Right button and select the Color space menu by pressing the Up Down button 3 Press the Right button and select a desired menu by pressing the Up Down button sRGB Ado...

Страница 78: ...he Mode dial to select the MySET shooting mode and press the Menu button 2 Press the Menu button and select the menu 3 Press the Right button and select the Load Myset menu by pressing the Up Down but...

Страница 79: ...nd select a desired menu by pressing the Up Down button Center The brightness is calculated based on the marked area placed on the centre of the Rear LCD Select this menu when the subject is in the ba...

Страница 80: ...ay mode button with turning on the Top LCD the last image stored on the memory is displayed on the Rear LCD Playing back a still image 1 Select the PLAY mode by pressing the play mode button 2 The las...

Страница 81: ...the Play Pause button will reduce the speed To stop playback of the movie clip press the Play Pause button and then press the Left or Right button How to capture the movie clip Steps 1 2 are the same...

Страница 82: ...PM p 117 6 Contrast p 73 7 Saturation p 74 8 Quality p 71 9 Sharpness p 75 10 Focal Length 28mm p 44 11 Exposure compensation p 50 The LCD displays shooting information about the displayed image Refe...

Страница 83: ...54 15 ISO p 42 16 Aperture value F2 2 p 30 31 17 Shutter speed 1 30 p 30 31 18 Colour space p 77 19 Play mode p 80 20 FoldernameandStoredimagenumber 100 0009 p 112 No Description Icon 1 Play mode 2 Ba...

Страница 84: ...ll increase the number of thumbnails 4 Rotate the Rear jog dial JOG2 or press the Up Down Left Right button to move to a desired image Image enlargement 1 Select an image that you want to enlarge and...

Страница 85: ...ed After completing the enlargement the image will be rotated horizontally INFORMATION Trimming You can extract part of the image that you want and save it separately 1 Enlarge an image by rotating th...

Страница 86: ...play mode button Pressing the Display Information button in the PLAY mode will change the display as shown below Refer to page 82 for more information about the shooting information The following is p...

Страница 87: ...he album 1 In the play mode press the Album Up button 2 Select the menu by pressing the Up Down button and press the Right button 3 Select a desired album by pressing the Up Down Left Right buttons an...

Страница 88: ...Right button 3 Select a desired sub menu and press the OK button Select Specific still images in the album can be removed All All of the still images in the album will be removed If Select is selecte...

Страница 89: ...eat the slide show after finishing the first cycle Effect Unique screen effects can be used for the slide show 3 Select the Start menu by pressing the Up Down button and press the OK button to start t...

Страница 90: ...ing press the Left button to select the menu tab to the left of the cursor When the menu is not displayed press the Left button to select the previous image RIGHT button While the menu is showing pres...

Страница 91: ...mage In the thumbnail mode the number of thumbnails are reduced by pressing this button Selectable number of thumbnails 4 9 16 25 Thumbnail button If an image is enlarged pressing this button will red...

Страница 92: ...de on the LCD 3 Select the Yes and press the OK button to delete the selected image Delete Yes No Delete OK Display Information button In play mode you can view the information of the selected image b...

Страница 93: ...r button Menu tab Main menu Sub menu Secondary menu Page Off On Slide Show p 98 p 99 p 100 p 96 97 1 3 5 10 sec Off On Off Effect 1 2 3 Right 90 Left 90 180 Interval Repeat Start DPOF Standard DPOF In...

Страница 94: ...old separately with a USB cable Menu tab Main menu Sub menu Secondary menu Page Auto Postcard Card 4X6 L 2L Letter A4 A3 Auto Full 1 2 4 8 9 16 Auto Plain Photo Fastphoto Auto Set Custom Set Images p...

Страница 95: ...Menu tab Main menu Sub menu Secondary menu Page Auto Draft Normal Fine Auto Off On Auto Off On Standard Index No Yes No Yes Print Custom Set p 108 p 108 p 109 p 107 File Name Date Print DPOF Print Re...

Страница 96: ...ired interval 3 Press the OK button to set the setting Repeat setting setting the slide show to repeat after the first cycle 1 Select the Repeat menu by pressing the Up Down button and press the Right...

Страница 97: ...displayed slowly from the centre outwards 3 Press the OK button to set the setting Start the slide show The slide show can start only in the Start menu 1 Select the Start menu by pressing the Up Down...

Страница 98: ...al JOG1 Protect release the image OK Button Your changes will be saved and the menu will disappear All Pics Protect release all saved images Lock Protect all saved images Unlock Unprotect all save ima...

Страница 99: ...ect a desired sub menu by pressing the Up Down button and press the Right button Select Selection window for an image to delete is displayed Rear jog dial JOG2 Select an image Front jog dial JOG1 Sele...

Страница 100: ...ow will be displayed as shown alongside 7 The recording can be stopped by pressing the shutter button again 8 The icon will be displayed on the LCD by pressing the Display Information button after voi...

Страница 101: ...X1840 16 9 image size files RAW TIFF and Movie clip AVI files can t be resized You can change the resolution of only those files compressed in the JPEG 4 2 2 format The resized image will have a new f...

Страница 102: ...e picture in a counter clock wise direction 180 Rotate picture 180 degrees Right 90 180 Left 90 4 Press the OK button and a confirmation window will display 5 Select the Yes menu and press the OK butt...

Страница 103: ...play mode press the Menu button 2 Select menu tab and press the Right button 3 Select the DPOF Standard menu by pressing the Up Down button and press the Right button 4 Select a desired sub menu by p...

Страница 104: ...e Menu button 2 Select menu tab and press the Right button 3 Select the DPOF Size menu by pressing the Up Down button and press the Right button 4 Select a desired sub menu by pressing the Up Down but...

Страница 105: ...et up the following settings from the PictBridge menu Images Select the pictures to be printed Auto Set Custom Set Setting up printing Print Printing pictures DPOF Print Printing the DPOF files Reset...

Страница 106: ...the Up Down button to select the number of prints When you select One Pic menu use the Left Right button to select another picture and select the number of prints for another picture After setting th...

Страница 107: ...Press the OK button again and all values in the Custom Set are automatically changed Some menu options are not supported in all manufacturer and printer models If the setting values are not changed i...

Страница 108: ...ssing the Up Down button and press the OK button No Cancel the printing Yes Directly print the file with the DPOF information Some menu options are not supported in all manufacturer and printer models...

Страница 109: ...ed sub menu by pressing the Up Down button If No is selected Settings will not be reset If Yes is selected Press the OK button and a confirmation window will display Press the OK button again and all...

Страница 110: ...114 ENGLISH FRAN AIS DEUTSCH ESPA OL ITALIANO P CCK PORTUGU S DUTCH DANSK SVENSKA SUOMI BAHASA Magyar POLSKI No Yes Date Time 2005 07 01 13 00 yy mm dd Date Type mm dd yy dd mm yy Cape Verde Tashkent...

Страница 111: ...Buenos Aires LA San Francisco Mid Atlantic Off Date Date Time Off Low Medium High Main LCD EVF Top LCD NTSC PAL Quick View Off 0 5 1 3 5 sec Off On Computer Printer No Yes World Time Video Out Imprin...

Страница 112: ...using the reset function the next file name will be set from 0001 even after formatting deleting all or inserting a new memory card 4 Press the OK button to set the setting The first stored folder na...

Страница 113: ...select the menu tab 2 Press the Right button and select the Power Off menu by pressing the Up Down button 3 Press the Right button and select a desired sub menu by pressing the Up Down button 1 3 5 m...

Страница 114: ...Press the Right button and select the LCD Off menu by pressing the Up Down button 3 Press the Right button and select a desired sub menu by pressing the Up button Off The LCD will not turn off 10 20...

Страница 115: ...n S Chinese T Chinese Japanese Russian Portuguese Dutch Danish Swedish Finnish 4 Press the OK button to set the setting There is a choice of languages that can be displayed on the LCD Even if the batt...

Страница 116: ...y card If you run Format on the memory card all images including the protected images will be deleted Be sure to download important images to your PC before formatting the memory card Be sure to run F...

Страница 117: ...g Setting up the date type You can change the date type that will be displayed on the captured images How to set the date type 1 Press the Menu button and select the menu tab 2 Press the Right button...

Страница 118: ...ld Time menu by pressing the Up Down button 3 Press the Right button and a world map will display as shown alongside Left Right or Rear jog dial JOG2 moves the red line to check the time of various ci...

Страница 119: ...ed on the image file Date Time The DATE TIME will be imprinted on the image file 4 Press the OK button to set the setting The Date Time are imprinted at the bottom right side of the still image The da...

Страница 120: ...o set the setting LCD brightness You can adjust the Rear Finder and Top LCD brightness How to set the brightness 1 Press the Menu button and select the menu tab 2 Press the Right button and select the...

Страница 121: ...weden Switzerland Thailand Norway When using a TV as an external monitor you will need to select the external or AV channel of the TV There will be a digital noise on the external monitor but it is no...

Страница 122: ...ct the menu tab 2 Press the Right button and select the Quick View menu by pressing the Up Down button 3 Press the Right button and select a desired sub menu by pressing the Up Down button Off The qui...

Страница 123: ...ess the Right button and select the Auto Rotating menu by pressing the Up Down button 3 Press the Right button and select a desired sub menu by pressing the Up Down button On The image will be rotated...

Страница 124: ...utton to set the setting Initialisation All camera menu and function settings will be restored to their default values However values for DATE TIME LANGUAGE and VIDEO OUT will not be changed How to se...

Страница 125: ...efault settings Menus are subject to change without prior notice Menu tab Main menu Sub menu Page Off Logo User Image Off Sound 1 Sound 2 Sound 3 Off Shutter 1 Shutter 2 Shutter 3 Off Effect 1 Effect...

Страница 126: ...y mode The start up image will not be deleted by deleting all images or Format function The User images will be deleted by Reset menu INFORMATION Sound Effect Start Image Start Sound Shutter Sound Set...

Страница 127: ...tart Sound Shutter Sound Sound Effect Start Image Off Sound 1 Sound 2 Sound 3 Shutter Sound Sound Effect Start Image Start Sound Effect 3 Off Effect 1 Effect 2 You can select a type of sound when the...

Страница 128: ...coastal dunes or other areas where there is lots of sand Doing so may result in failure or may permanently render the unit unusable Handling the camera Never drop the camera or subject it to severe s...

Страница 129: ...body with a soft cloth Do not allow this camera to come into contact with solvent materials such as benzol insecticide thinners etc This may damage the body shell of the camera and also affect its pe...

Страница 130: ...ry card Insert the memory card again Turn off the camera power and turn it on again Card Full There is insufficient memory capacity to take an image Insert a new memory card Delete unnecessary image f...

Страница 131: ...doesn t switch on There is low battery capacity Insert charged battery The camera power ceases while in use The battery is exhausted Insert charged battery The Camera is turned off automatically Turn...

Страница 132: ...out setting an appropriate macro mode Select an appropriate macro mode to take a clear image Taking a picture beyond the flash range Take a picture within the flash range The lens is smudged or dirty...

Страница 133: ...properly with the camera Check the connection cables There are incorrect files in the memory card Insert a memory card that has correct files When using the PC s explorer the Removable Disk file does...

Страница 134: ...1 5 3 0m ISO 100 Recharging Time Approx 5 sec ExternalFlash optional SEF 42A DC 6V 4 x AA Alkaline Sharpness Soft Normal Vivid Normal B W Sepia Negative Contrast adjust Saturation adjust Color Space...

Страница 135: ...USB 2 0 Audio Stereo Video output NTSC PAL user selectable DC power input connector 7 4V Rechargeable battery 7 4V Li ion battery SLB 1974 Charger SBC L4 AC Adaptor DC 8 4V 1 5A SAC 81 optional Inclu...

Страница 136: ...nd OS that has not been guaranteed by the manufacturer is not covered by the Samsung warranty Before reading this manual you should have a basic knowledge of computers and O S Operating Systems System...

Страница 137: ...n use the camera with Mac OS 10 0 or later Digimax Master This is the all in on multi media software solution You can download view edit and save your digital images and movie clips with this software...

Страница 138: ...r is installed automatically Close other programs before installing the application software Before installing the application software disconnect the USB connection INFORMATION 2 Installation is comp...

Страница 139: ...ow will open Click the Next N button 5 DirectX Installation is completed Click the Finish button and then the Digimax Master installation will be started The system will not reboot even if you click t...

Страница 140: ...ll I button and Digimax Master starts installing 10 A window will open asking you to choose a folder to which program icons will be added Click Next button If you want to choose another folder click B...

Страница 141: ...window will open Click the Next button Click 15 The Software License Agreement window will be displayed If you agree to this click Yes the window will then move to the next step If you disagree click...

Страница 142: ...the system requirements 18 To apply changes you must restart the computer Select Yes I want to restart my computer now and then click the OK button 19 After restarting the computer connect the PC to t...

Страница 143: ...ase cancel the Found New Hardware Wizard and disconnect the camera Install the camera driver and connect the camera to the PC again Should the computer not find the camera driver after installation pl...

Страница 144: ...the OK button 7 Connect the PC and the camera via the USB cable Insert the small plug of the USB cable into the camera USB connection terminal Insert the large connector of the USB cable into the USB...

Страница 145: ...ownload the still images stored on the camera to your PC s hard disk and print them or use a photo editing software to edit them 1 Connect the camera to your PC with the USB cable 2 On your computer s...

Страница 146: ...op up menu will open Click Paste 7 An image file is transferred from the camera to your PC By using Digimax Master you can see the stored images in the memory directly on the PC monitor and you can co...

Страница 147: ...ick Start Settings and click Control Panel 4 Click the OK button The camera is removed from the system 2 Double click System 3 Select Device manager Hard Disk Controller Samsung Digital Camera and cli...

Страница 148: ...k Add Remove programs 6 The Add Remove Programs Properties window will open Click Pro 815 and click the Add Remove button 7 Uninstallation is complete Click the Finish button and the window will disap...

Страница 149: ...hem Opening images directly from the removable disk may be subject to unexpected disconnection When uploading images from the PC to the camera ensure that the uploaded file names are not the same as t...

Страница 150: ...1 Check whether the camera and PC is transferring a file If the Card in use lamp blinks you have to wait until the lamp is turned off 2 Double click the Unplug or Eject Hardware icon on the task bar...

Страница 151: ...MAC Using the USB Driver for MAC Setting up the USB Driver for MAC 1 Double click a new icon on the desktop and the folder in the memory will be displayed 2 Select an image file and copy or move it t...

Страница 152: ...ownloading images 1 Connect the camera to your PC 2 A window for downloading images will display after connecting the camera and your PC To download the captured images select the Select All A button...

Страница 153: ...be downloaded Folder names can be made as you want and images will be downloaded After selecting a folder that was made before images will be downloaded 5 Click Next N button 6 A window will open as s...

Страница 154: ...Media type selection menu You can select image viewer image edit movie edit functions in this menu Preview window You can preview a image or a movie clip and check the multi media information Zoom ba...

Страница 155: ...ou can change image or insert effects on the image See the Help menu Drawing tools Tools for editing an image Image display window a selected image displays in this window Preview window You can previ...

Страница 156: ...n edit the RAW dng files as you want White Balance You can edit the colour temperature and saturation of the image Exposure You can edit the Exposure value Contrast and gamma value Sharpness You can e...

Страница 157: ...ou can save the edited multi media as a new file name You can select AVI Windows media wmv Windows media asf and movie clip for this camera avi MPEG 4 file types Frame display window You can insert mu...

Страница 158: ...the program click Start Programs Digimax Reader The following screen will appear How to use the Digimax Reader 1 Connect the camera and the PC with a USB cable and download the images that were stored...

Страница 159: ...lick the Area Analysis icon to scan the image 6 Part of the image you selected will be displayed as shown 7 Click the Character Recognition icon The part selected in the previous step will be recogniz...

Страница 160: ...if the USB connection malfunctions Case 1 The camera power is off Turn the camera power on Case 2 USB Driver is not installed correctly Install the USB Driver correctly Refer to page 138 Case 3 The U...

Страница 161: ...ersal Serial Bus controllers There must be USB Host Controller and USB root hub under Universal Serial Bus controllers In addition double click on the USB Universal Host Controller and the USB Root Hu...

Страница 162: ...Unknown Devices or Other Devices entries with a yellow question mark beside them or devices with an exclamation mark beside them Right click on the entry with the question or exclamation mark and sele...

Страница 163: ...port to disable and re start the PC The Legacy USB Support is in the BIOS setup menu The BIOS setup menu differs from the PC manufacturers and some BIOS menus don t have Legacy USB Support If you can...

Страница 164: ...nly UKServiceHotline 01932455320 www samsungcamera co uk SAMSUNGOPTO ELECTRONICSGMBH AMKRONBERGERHANG6 D 65824SCHWALBACH TS GERMANY TEL 49 0 6196665303 FAX 49 0 6196665366 www samsungcameras de SAMSUN...

Отзывы: