background image

Basic functions

  23

Transferring files to your computer (for Windows)

Transferring files to your PC

Once you connect the camera to your PC, the camera will be 
recognised as a removable drive.

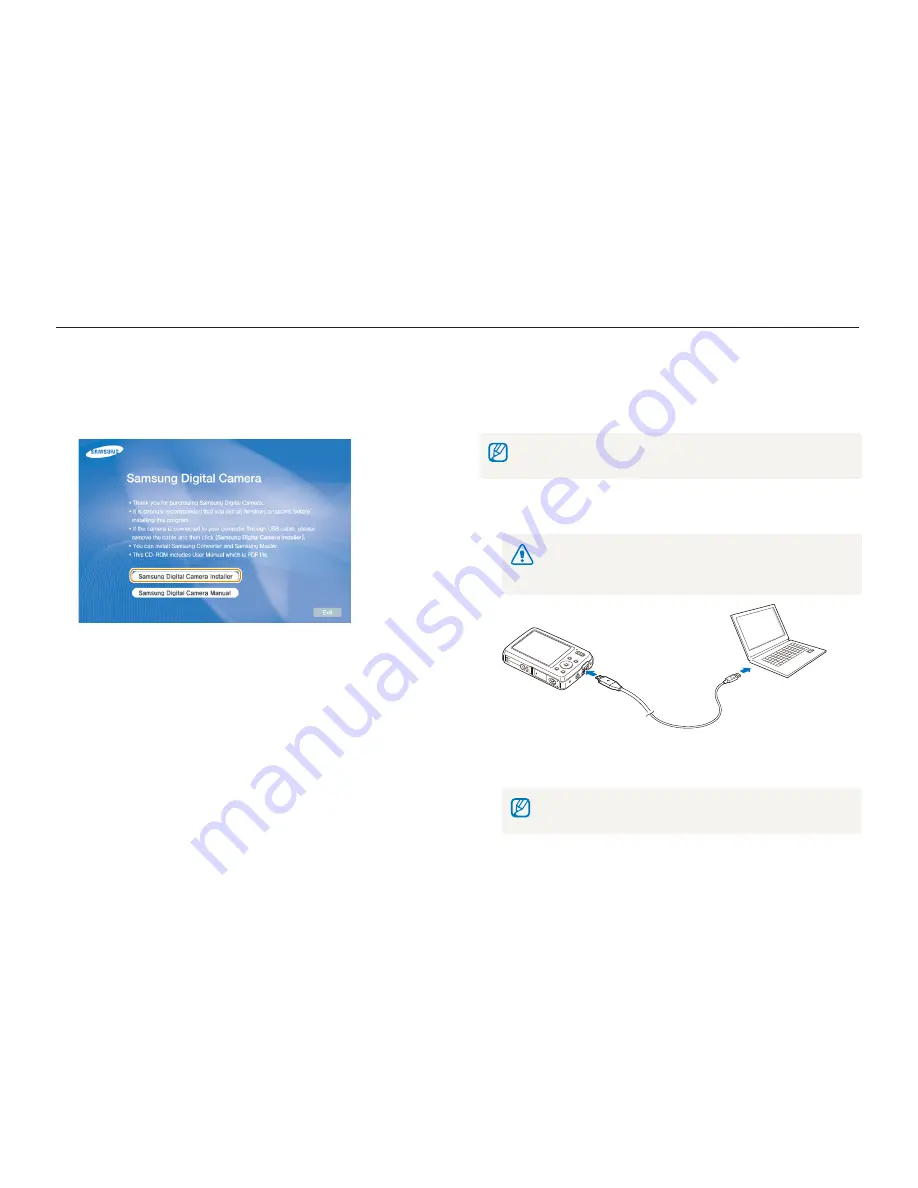
The battery will be charged while the camera is connected to a PC with the 
USB cable. 

Connect your camera to your PC with the USB cable.

You must plug the end of the cable with the indicator light (

S

) into 

your camera. If the cable is reversed, it may damage your files. The 
manufacturer is not responsible for any loss of data.

Turn on the camera.

The computer recognises the camera automatically.

t

If the camera fails to connect, a pop-up window will appear. Select 

Computer

.

Insert the installation CD in a compatible CD-ROM drive.

When the setup screen is displayed, click 

Samsung 

Digital Camera Installer

 to start installation.

Click 

Preview

 to check if a movie sample plays properly.

If the sample plays properly, select 

Do not install

 and 

click 

Next

If it does not, select 

t

Install the codec


program

 and click 

Install

. The codec program is installed.

Select programs to install and follow the onscreen 

instructions.

Click 

Exit

 to complete the installation and restart your 

computer.

Содержание PL10

Страница 1: ...ailed usage instructions for your camera Please read this manual thoroughly Click a topic User Manual PL10 Quick reference Contents Basic functions Extended functions Shooting options Playback Editing...

Страница 2: ...injury if swallowed Moving parts and accessories may present physical dangers as well Safety warnings Prevent damage to subjects eyesight Do not use the ash in close proximity closer than 1 m 3 ft to...

Страница 3: ...rger battery or memory card t Do not expose the camera to direct sunlight or high t temperatures for an extended period of time Prolonged exposure to sunlight or extreme temperatures can cause permane...

Страница 4: ...s of les or damage that may result from camera malfunction or improper use Use only Samsung approved accessories Using incompatible accessories may damage your camera cause injury or void your warrant...

Страница 5: ...nual Basic functions 10 Learn about your camera s layout icons and basic functions for shooting and how to transfer les to and from your computer Extended functions 32 Learn how to take a photo by sel...

Страница 6: ...ual Icon Function Additional information Safety warnings and precautions Camera buttons for example Shutter represents the shutter button Page number of related information The order of options or men...

Страница 7: ...t of a scene such as a person animal or still life Background t the objects around the subject Composition t the combination of a subject and background Exposure Brightness The amount of light that en...

Страница 8: ...to adjust exposure t f 53 ACB to compensate for subjects against bright t backgrounds f 53 Metering t f 54 AEB to take three photos of the same scene with t different exposures f 56 Applying a differe...

Страница 9: ...t 50 Taking a smile shot 50 Detecting eye blinking 51 Using smart face recognition 51 Basic functions 10 Unpacking 11 Camera layout 12 Icons 14 Turning your camera on or off 15 Selecting options 16 Se...

Страница 10: ...hotos 68 Rotating a photo 68 Applying photo styles 69 De ning your own RGB tone 69 Correcting exposure problems 70 Creating a print order DPOF 71 Viewing les on a TV 72 Printing photos with a photo pr...

Страница 11: ...ling programs 22 Transferring les to your PC 23 Disconnecting the camera for Windows XP 24 Transferring multimedia les to the camera 24 Using Samsung Converter 26 Using Samsung Master 27 Transferring...

Страница 12: ...rgeable battery Strap Software CD ROM User manual included Earphones Quick Start Manual Unpacking Check your product box for the following items Optional accessories Camera case A V cable Memory cards...

Страница 13: ...rself with your camera s parts and their functions Shutter button Microphone POWER button AF assist light timer lamp Flash Multifuntion jack Accepts the USB cable A V cable or earphone Tripod mount Ba...

Страница 14: ...h Photo Help Guide Get shooting tips and practice shooting s Scene Take a photo with options preset for a speci c scene v Movie Record a video u Multimedia Listen to MP3s Play videos and view text le...

Страница 15: ...ideo resolution Photo quality Frame rate Metering option Long time shutter Burst type Icons The icons displayed will change according to the mode you select or the options you set A Information Icon D...

Страница 16: ...mera on or off Learn how to start your camera Turning on your camera in Playback mode Press P The camera turns on and accesses Playback mode immediately Press and hold P to mute camera sounds Press PO...

Страница 17: ...ss t or o Press 3 m Functions Sound Display Settings EV White Balance ISO Face Detection Photo Size Quality ACB Exit Change Press 4 D or M to scroll to Functions and then press t or o In Shooting mode...

Страница 18: ...ing options Press 5 D or M to scroll to White Balance and then press t or o EV White Balance ISO Face Detection Photo Size Quality ACB Exit Back Press 6 F or t to scroll to a white balance option Dayl...

Страница 19: ...ds 1 2 3 The camera emits sounds Press 3 m to return to the previous mode Changing the display type Select a style of display for Shooting or Playback mode Press D repeatedly to change a display type...

Страница 20: ...de press 1 O Select 2 Auto Smart Auto Auto Program DIS Photo Help Guide This mode minimizes user settings for quick convenient shooting Align your subject in the frame 3 Half press 4 Shutter to focus...

Страница 21: ...ge The digital zoom is not available when using t S d s in some scenes and v modes and when used with Face Detection It may take longer to save a photo when using the digital zoom t Zooming You can sh...

Страница 22: ...ress 6 o to practice Press t D to return to the list Press t F to go back to the previous menu While practicing you cannot set shooting options or menus t In Shooting mode press 1 O Select 2 Photo Hel...

Страница 23: ...placed by the copyright holder saying it may be distributed under the terms of this General Public License For more information see the License documents http www gnu org copyleft gpl html Installing...

Страница 24: ...for any loss of data Turn on the camera 2 The computer recognises the camera automatically t If the camera fails to connect a pop up window will appear Select Computer Insert the installation CD in a...

Страница 25: ...ortuguese Dutch Danish Swedish Finnish Bahasa Polish Hungarian Czech Turkish A le type that is converted with Samsung Converter p 26 Subject to change without prior notice Duplicating multimedia les m...

Страница 26: ...an t be created Files saved in deeply nested subfolders may not be played or viewed You can save up to 200 les or 100 subfolders in each folder t You can save up to 200 total les and subfolders in com...

Страница 27: ...ify the folder path and le name for the converted le Convert the le Preview Cropping slider move to the point where you want the video to begin or end Pause and resume playback Set the frame size and...

Страница 28: ...of les click an image to download Using Samsung Master You can download les or edit photos or videos stored on your PC For details see the Help menu Downloading les using Samsung Master When you conne...

Страница 29: ...nformation about the program Click to enlarge or reduce the thumbnails in the list Change the mode t View mode t Edit mode for photos t Edit mode for videos Preview information about the selected le T...

Страница 30: ...2 The computer recognises the camera automatically and a t removable disk icon will be displayed Double click the removable disk icon 3 Create new folders named MP3 PMP and TEXT 4 Copy multimedia les...

Страница 31: ...ically set Focus frame Press t Shutter to take the photo if displayed in green Change the frame and half press t Shutter again if displayed in red Reducing camera shake Select the d mode to reduce cam...

Страница 32: ...nd the subject is too bright the subject is shiny the subject includes horizontal patterns such as blinds the subject is not positioned in the centre of the frame Use the focus lock Half press Shutter...

Страница 33: ...me guide 35 Adjusting the exposure in the Night mode 36 Using the DIS mode 37 Using the Program mode 37 Recording a video 38 Recording voice memos 40 Recording a voice memo 40 Adding a voice memo to a...

Страница 34: ...y not select a portrait t mode depending on the subject s position or lighting The camera may not select the correct scene depending on shooting t environments such as camera shake lighting and distan...

Страница 35: ...cial imperfections press m Using the Scene mode Take a photo with options preset for a speci c scene In Shooting mode press 1 O Select 2 Scene a scene Beauty Shot Frame Guide Night Portrait Children L...

Страница 36: ...me and press 3 Shutter Transparent guides will appear on the left and right of the t frame Cancel Frame OK Ask another person to take a photo 4 The person must align the subject in the frame by using...

Страница 37: ...ur photos from blurring Adjusting the exposure in the Night mode In the Night mode you can catch brief ashes of light as curved streaks by extending the exposure Use a slow shutter speed to extend the...

Страница 38: ...the frame and half press 4 Shutter to focus Press 5 Shutter to take the photo Using the DIS mode Reduce camera shake and prevent blurred photos with Digital Image Stabilisation DIS function Before co...

Страница 39: ...Press 11 Shutter again to stop recording Recording a video Record videos of up to 120 minutes in length The recorded video is saved as an MPEG 4 AVI le The zoom sound may be recorded if you use the z...

Страница 40: ...des To pause recording The camera allows you to pause temporarily while recording a video With this function you can record your favourite scenes as a single video Press o to pause while recording Pre...

Страница 41: ...s Voice Memo Align your subject in the frame and take a photo 3 You will begin recording a voice memo right after taking the t photo Record a short voice memo 10 seconds maximum 4 Press t Shutter to s...

Страница 42: ...49 Detecting faces 49 Taking a self portrait shot 50 Taking a smile shot 50 Detecting eye blinking 51 Using smart face recognition 51 Adjusting brightness and colour 53 Adjusting the exposure manuall...

Страница 43: ...ons Quality an option Option Description Super Fine Fine Normal The options may differ depending on the shooting mode a p d s Selecting a resolution As you increase the resolution your photo or video...

Страница 44: ...r Depending on the selected face detection option the timer is not t available or some timer options are not available In Shooting mode press 1 t Off Select an option 2 Option Description Off The time...

Страница 45: ...e more than 3 m away from the camera t your movements are too subtle t there is too much light or backlight t Using the motion timer 1 In Shooting mode press t Select 2 Press 3 Shutter Stand within 3...

Страница 46: ...g mode press 1 F Auto Select an option 2 Option Description Off The ash will not re t Camera shake warning t will be displayed when shooting in low light Auto The camera will select a proper ash setti...

Страница 47: ...based on the brightness of the subject and lighting The higher ISO speed you select the more image noise you may get t When t Motion Capture is set ISO speed will be set to Auto p Option Description...

Страница 48: ...ther than 80 cm Macro Focus on a subject 5 80 cm 50 80 cm when using zoom Auto Macro Focus on a subject farther than 5 cm farther than 50 cm when using zoom Super Macro Focus on a subject between 1 to...

Страница 49: ...area according to your subject s location in the scene In Shooting mode press 1 m Select 2 Functions Focus Area an option Option Description Center AF Focus on the centre suitable when subjects are l...

Страница 50: ...he rest t of the faces appear in gray focus frames The closer you are to the subject the quicker your camera will detect faces Face detection may not be effective when t the subject is far from the ca...

Страница 51: ...hot When your subject smiles broadly your camera can detect t the smile more easily Taking a self portrait shot Take photos of yourself The focus distance will be set to close up and your camera will...

Страница 52: ...press 1 m Select 2 Functions Face Detection Smart Face Recognition The priority of the faces will be shown by the level indicator t next to the frames Detecting eye blinking If your camera detects cl...

Страница 53: ...You can view registered faces in order of priority while in Playback t mode p 61 Even though faces are registered successfully they may not be classi ed in Playback mode If the camera recognises a ne...

Страница 54: ...is always on in the t a mode You cannot set burst options when this feature is on t p Adjusting the exposure manually EV Depending on the intensity of the ambient light your photos may be too bright o...

Страница 55: ...ightness and lighting of your photos will vary depending on the metering mode you select In Shooting mode press 1 m Select 2 Functions Metering Option Description Multi Your camera divides the scene i...

Страница 56: ...ion Auto WB Use automatic settings depending on the lighting conditions Daylight Select when taking outdoor photos on a sunny day Cloudy Select when taking outdoor photos on a cloudy day or in shadows...

Страница 57: ...n use the ash timer and ACB only when you select t Single When you select t Motion Capture the resolution will be set to VGA and the ISO speed will be set to Auto In Shooting mode press 1 m Select 2 F...

Страница 58: ...B Blue 3 Back Move Adjust the amount of the selected colour 4 less or more Applying photo styles Apply a different photo style to your photos such as Soft Vivid or Forest Soft Vivid Forest In Shootin...

Страница 59: ...sharpness and saturation of your photos In Shooting mode press 1 m Select 2 Functions Image Adjust Select an adjustment option 3 Contrast t Sharpness t Saturation t Select a value to adjust the select...

Страница 60: ...Applying photo styles 69 De ning your own RGB tone 69 Correcting exposure problems 70 Creating a print order DPOF 71 Viewing les on a TV 72 Printing photos with a photo printer PictBridge 73 Playback...

Страница 61: ...a registered face Available only when you use a memory card Folder name File name Starting Playback mode View photos or play videos and voice memos stored in your camera Press 1 P The most recent le...

Страница 62: ...e Press 5 o to return to the normal view Registering faces You can register faces in your photos to classify them by faces in Smart Album This feature is available only when you use a memory card In P...

Страница 63: ...select t All Lock Select the le you want to protect and press 3 o Press t o again to cancel your selection Select Set Press 4 f Viewing les as thumbnails Scan thumbnails of les In Playback mode push...

Страница 64: ...lete les when using the recycle bin function t If you format the internal memory all les in the recycle folder will be t deleted The recycle bin will hold up to 10 MB of les Once you exceed the t 10 M...

Страница 65: ...ed area and zoom ratio are indicated on the top of the screen The maximum zoom ratio may vary depending on the resolution Trim To Do this Move the enlarged area Press D M F or t Trim the enlarged phot...

Страница 66: ...to start a slide show with no effects t Option Description Images Set the photos you want to view as a slide show All t View all photos in a slide show Date t View photos captured on a speci c date in...

Страница 67: ...video will be saved as a new le t Capturing an image during playback Press 1 o at the point where you want to save a still image Press 2 M A captured image will have the same le size as the original...

Страница 68: ...1 o Use the following buttons to control playback 2 Press To F Scan backward o Pause or resume playback t Scan forward M Stop playback Zoom up or down Adjust the volume level Playing a voice memo adde...

Страница 69: ...0 Move Edited photos will be saved as new les t When you edit photos that are t or larger p 42 they will be automatically resized to a lower resolution except when resizing photos to to to Resizing ph...

Страница 70: ...colour R Red G Green B Blue 3 Back Move Adjust the amount of the selected colour 4 less or more Applying photo styles Apply a different photo style to the photo such as Soft Vivid or Forest Soft Vivi...

Страница 71: ...m Select 2 Edit Image Adjust Red eye Fix Hiding facial imperfections In Playback mode select a photo and press 1 m Select 2 Edit Image Adjust Face Retouch Select a level 3 As the number increases the...

Страница 72: ...nt order DPOF Select photos to be printed and set options such as number of copies or paper size The memory card can be taken to a print shop that supports DPOF t Digital Print Order Format or you can...

Страница 73: ...ay occur or part of an image may not t appear Images may not appear centred on the TV screen depending on your t TV settings You can capture photos or videos while the camera is connected t to a TV Se...

Страница 74: ...rinting quality Date Set to print the date File Name Set to print the name of the le Reset Reset the print options Some options are not supported by some printers With the printer on connect your came...

Страница 75: ...75 Using the Music mode 77 Playing music les 77 Using the Videos mode 79 Using the Text Viewer mode 80 Multimedia mode settings menu 81 Multimedia Learn to use Multimedia modes Music mode Videos mode...

Страница 76: ...an 100 les in the folder or several large les it t may take longer to access a mode Power save mode will not be active during playback except when t viewing text les with Auto Scroll or Back Music off...

Страница 77: ...ower save mode t Switching to another Multimedia mode Press 1 M while an MP3 or video le is being played or text le is being viewed Select 2 Multimedia a mode Music Videos Text Viewer This mode allows...

Страница 78: ...n Adjust volume O Change the mode MENU Change the Music mode settings D Open the playlist M Lock or unlock the buttons press and hold F Skip backward t Skip forward o Pause or resume playback f Change...

Страница 79: ...hile listening to music t Photos will be taken with the following settings t Resolution 3M Quality Fine Flash Auto Focus Auto Macro Your MP3 player will not function normally when taking photos t Star...

Страница 80: ...ist M Lock the screen press and hold F Skip backward t Scan backward while playing t t Skip forward t Scan forward while playing t o Stop or resume playback You can scan a le quickly to the point that...

Страница 81: ...ode type t you do not have to set the language to match that of text le Use the following buttons to control playback 2 Press To Zoom up or down Adjust volume if the background music turns on O Change...

Страница 82: ...once Repeat One t Repeat the current le Repeat t Repeat all les in the current folder Shuf e t Play les in the current folder in random order Default Menu Available mode Description Background U Sele...

Страница 83: ...lect a language to match that of the text le Delete All UVT Delete all les of a selected Multimedia mode Yes No Default Menu Available mode Description Player Display V Show or hide the playback contr...

Страница 84: ...85 Settings 86 Error messages 88 Camera maintenance 89 Cleaning your camera 89 About memory cards 90 About the battery 91 Before contacting a service centre 93 Camera speci cations 95 Index 100 Append...

Страница 85: ...the previous screen Accessing the settings menu In Shooting or Playback mode press 1 m Select a menu 2 Functions Sound Display Settings Exit Change Volume Start Sound Shutter Sound Beep Sound AF Sound...

Страница 86: ...to Dark Normal Bright Normal is xed in Playback mode even if Auto is selected Quick View Set the duration for reviewing a captured image or video before returning to Shooting mode Off 0 5 sec 1 sec 3...

Страница 87: ...ed in t one folder is 9999 The camera de nes le names according to the t Digital rule for Camera File system DCF standard If you change the names of les intentionally the camera may not play back the...

Страница 88: ...a to a computer for transferring les Printer t Connect your camera to a printer for printing les Default Item Description Imprint Set whether to display the date and time on your photos when printing...

Страница 89: ...6 Card Locked Unlock the memory card DCF Full Error File names do not match the DCF standard Transfer the les on the memory card to your computer and format the card p 86 File Error Delete the damaged...

Страница 90: ...solutions can damage the camera or cause it to malfunction Do not press on the lens cover or use a blower brush on the lens t cover Cleaning your camera Camera lens and display Use a blower brush to r...

Страница 91: ...716 2 059 2 376 V i d e o s Approx 30 9 Approx 35 54 Approx 69 52 Approx 47 24 Approx 92 12 The recordable time may vary if you use the zoom About memory cards Memory cards you can use You can use SD...

Страница 92: ...ra for 1 minute 4 Repeat steps 1 to 3 Videos Approx 130 min Record videos at 800 x 592 resolution and 20 fps MP3 Approx 330 min Play les with the screen turned off PMP Approx 250 min Play les with nor...

Страница 93: ...e indicator light blinks in red or does not illuminate reconnect the t cable or remove the battery and insert it again If you charge the battery when it is warm the indicator light may turn t orange C...

Страница 94: ...work The ash option may be set to t Off p 45 You cannot use the ash in the t d v or some s modes The ash res unexpectedly The ash may re due to static electricity This is not a malfunction of the came...

Страница 95: ...he USB cable and connect it again Situation Suggested remedies The date and time are incorrect Set the date and time in the display settings menu The display or buttons do not work Remove the battery...

Страница 96: ...al Soft Vivid Forest t Retro Cool Calm Classic Negative Custom RGB Image Adjust Sharpness Contrast Saturation t Image sensor Type 1 2 5 Approx 1 02 cm CCD Effective pixels Approx 9 0 mega pixels Total...

Страница 97: ...PEG DCF EXIF 2 21 DPOF 1 1 t PictBridge 1 0 Video AVI MPEG 4 t Audio WAV t White Balance Auto WB Daylight Cloudy Fluorescent_H Fluorescent_L Tungsten Custom Set Shooting Photos Modes Smart Auto Portra...

Страница 98: ...ttery and memory card Image size For 1GB SD Super ne Fine Normal 3456 x 2592 194 376 546 3456 x 2304 221 426 611 3456 x 1944 264 510 744 2592 x 1944 343 637 870 2048 x 1536 532 895 1 211 1024 x 768 1...

Страница 99: ...Appendixes 98 Camera speci cations Operating temperature 0 40 C Operating humidity 5 85 Software Samsung Converter Samsung Master Adobe Reader Speci cations are subject to change without prior notice...

Страница 100: ...osal of batteries in this product Applicable in the European Union and other European countries with separate battery return systems This marking on the battery manual or packaging indicates that the...

Страница 101: ...56 Motion capture 56 C Camera shake 30 Capturing an image 66 Cleaning Body 89 Display 89 Lens 89 D Date and time 86 Deleting les 63 in Multimedia mode 76 Digital Image Stabilisation 37 Digital zoom 20...

Страница 102: ...U button 13 Metering Centre weighted 54 Multi 54 Spot 54 Mode button 13 Motion timer 44 Movie mode 38 MP3 skin 81 Multimedia mode 81 Music mode 77 Text Viewer mode 80 Videos mode 79 Music mode 77 Muti...

Страница 103: ...9 DIS 37 Movie 38 Photo Help Guide 21 Program 37 Scene 34 Smart Auto 33 Shutter speed 36 Slide show 65 Smart Album 61 Smart Auto mode 33 Smart Face Recognition 51 Smile shot 50 Start image 85 T Text V...

Страница 104: ...refer to the warranty that came with your product or visit our website http www samsungcamera com for after sales service or inquiries The CE Mark is a Directive conformity mark of the European Commun...

Отзывы: