background image

English - 29

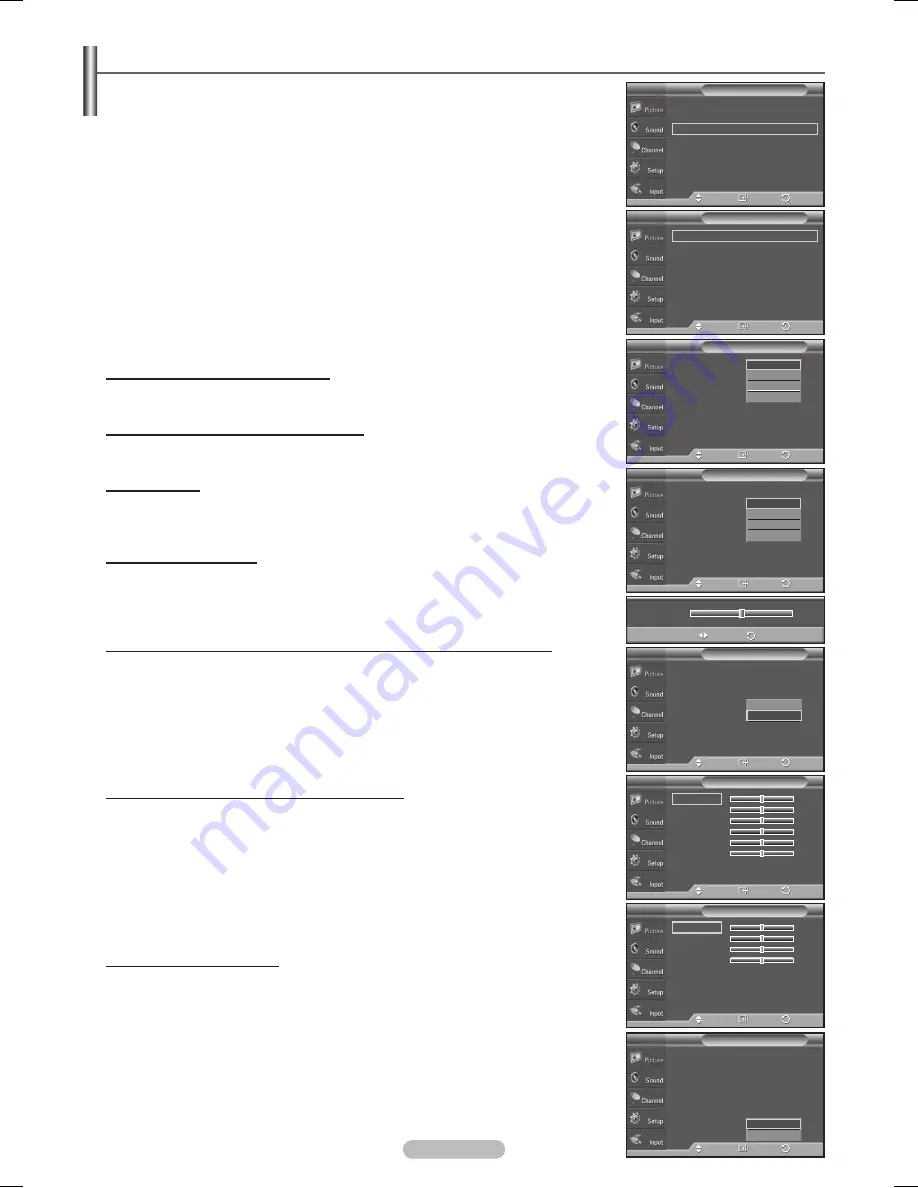
Making Detailed Picture Settings

You can set detailed picture settings.

Press the 

MENU

 button to display the menu. 

Press the ▲ or ▼ button to select 

Picture

, then press the 

ENTER

 button.

Press the ▲ or ▼ button to select 

Detailed Settings

, then press the 

ENTER


button.

Select the desired Detailed Settings option by pressing the ▲ or ▼ button, then 

press the 

ENTER

 button.

When you are satisfied with your setting, press the 

ENTER

 button.

  Press the 

EXIT

 button to exit.

  When the picture mode is set to 

Dynamic

Detailed Settings

 cannot be 

selected.

Black Adjust: Off/Low/Medium/High

You can directly select the black level on the screen to adjust the screen depth.

Dynamic Contrast: Off/Low/Medium/High

You can adjust the screen contrast so that the optimal contrast is provided.

Gamma: -3 ~ 3

You can adjust the middle brightness of pictures. 

Press the ◄ or ► button until you reach the optimal setting.

Color Space: Auto/Wide

Color space is a color matrix composed of red, green, and blue colors. Select your 

favorite color space and experience the most natural color.  

You can set the color reproduction space for the input signal to 

Auto

 or 

Wide

.

White Balance: R-Offset/G-Offset/B-Offset/R-Gain/G-Gain/B-Gain/Reset

You can adjust the color temperature for more natural picture colors.

R-Offset/G-Offset/B-Offset/R-Gain/G-Gain/B-Gain:

 Changing the adjustment 

value will refresh the adjusted screen. Select the desired option by pressing the 

▲ or ▼ button, then press the 

ENTER

 button. Press the ◄ or ► button until you 

reach the optimal setting.

Reset:

 The previously adjusted white balance will be reset to the factory defaults.

My Color Control: Pink/Green/Blue/White/Reset

This setting can be adjusted to suit your personal preferences.

Pink/Green/Blue/White:

 Select the desired color by pressing the ▲ or ▼ button, 

then press the 

ENTER

 button. Press the ◄ or ► button until you reach the optimal 

setting.

  When using the My Color Control Feature, the current picture remains in 

movement.

Reset:

 The previously adjusted colors will be reset to the factory defaults.

Edge Enhancement: Off/On

You can emphasize object boundaries.

 More

Color Tone 

: Cool1 

Detailed Settings     

Size 

: 16:9 

Digital NR  

: Auto 

Active Color 

: On 

DNIe 

: On 

Reset 

: OK 

Picture

T  V

Enter

Move

Return

Black Adjust 

: Off 

Dynamic Contrast  : Off 

Gamma 

: 0 

Color Space  

: Wide 

White Balance     

My Color Control     

Edge Enhancement : Off 

Detailed Settings

T  V

Enter

Move

Return

Black Adjust 

:

 Off 

Dynamic Contrast  : Off 

Gamma 

: 0 

Color Space  

: Wide 

White Balance     

My Color Control     

Edge Enhancement : Off 

Detailed Settings

T  V

Enter

Move

Return

Off

Low

Medium

High

Black Adjust 

: Off 

Dynamic Contrast  : 

Off 

Gamma 

: 0 

Color Space  

: Wide 

White Balance     

My Color Control     

Edge Enhancement : Off 

Detailed Settings

T  V

Enter

Move

Return

Off

Low

Medium

High

Gamma

0

Adjust

Return

Black Adjust 

: Off 

Dynamic Contrast  : Off 

Gamma 

: 0 

Color Space  

: Wide 

White Balance     

My Color Control     

Edge Enhancement : Off 

Detailed Settings

T  V

Enter

Move

Return

Auto

Wide

Enter

Move

Return

White Balance

R-Offset 


15

G-Offset 


15

B-Offset 


15

R-Gain 


15

G-Gain 


15

B-Gain 


15

Reset

Enter

Move

Return

My Color Control

Pink 


15

Green 


15

Blue 


15

White 


15

Reset

Black Adjust 

: Off 

Dynamic Contrast  : Off 

Gamma 

: 0 

Color Space  

: Wide 

White Balance     

My Color Control     

Edge Enhancement : Off 

Detailed Settings

T  V

Enter

Move

Return

Off

On

BN68-01131R-00Eng-1.indd   29

2007-04-02   ソタネト 4:08:02

Содержание PL-42Q91HDP

Страница 1: ...AY PL 42Q91HDP PL 50Q91HDP Owner s Instructions Register your product at www samsung com global register Record your Model and Serial number here for future reference Model _______________ Serial No _______________ ...

Страница 2: ...certain intellectual property rights of certain third parties In particular this product is licensed under the following US patents 5 991 715 5 740 317 4 972 484 5 214 678 5 323 396 5 539 829 5 606 618 5 530 655 5 777 992 6 289 308 5 610 985 5 481 643 5 544 247 5 960 037 6 023 490 5 878 080 and under US Published Patent Application No 2001 44713 A1 This license is limited to private non commercial...

Страница 3: ... as temperature or humidity This is normal and not a defect of the unit Cell Defects The PDP uses a panel consisting of 1 230 000 SD level to 3 150 000 HD level pixels which require sophisticated technology to produce However there may be a few bright or dark pixels on the screen These pixels will have no impact on the performance of the product Avoid operating the TV at temperatures below 5 C 41 ...

Страница 4: ...36 Automatic Volume Control 36 Selecting the Internal Mute 36 Adjusting the Melody Sound 37 Listening to the Sound of the Sub PIP Picture 37 CHANNEL CONTROL Selecting the Antenna 38 Adding and Erasing Channels 38 Setting Your Favorite Channels 39 Viewing the Channel Lists 40 Setting the Default Channel List Mode 40 Labeling Channels 41 Fine Tuning Analog Channels 41 Checking the Digital Signal Str...

Страница 5: ... items are missing contact your dealer RET URN FAV CH Remote Control BN59 00599A AAA Batteries 4301 000103 Power Cord 3903 000144 Owner s Instructions Quick Setup Guide Warranty Card Registration Card Safety Guide Manual Cloth Clean Cover Bottom Screws 2ea Refer to page 78 Ferrite Core for Power Cord 3301 001110 Ferrite Core for Side AV S VIDEO 3301 001305 Ferrite Core for Headphone 3301 001456 Th...

Страница 6: ...en menu of your TV s features 3 VOL Press to increase or decrease the volume In the on screen menu use the VOL buttons as you would use the and buttons on the remote control 4 CH Press to change channels In the on screen menu use the CH buttons as you would use the and buttons on the remote control 5 ENTER Press to confirm a selection 6 POWER Press to turn the TV on and off Power Indicator Blinks ...

Страница 7: ...ht audio from your DVI device Not compatible with PC 8 ANT 1 IN AIR ANT 2 IN CABLE 75Ω Coaxial connector for Air Cable Network 9 EX LINK Connect this to the jack on the optional wall mount bracket This will allow you to adjust the TV viewing angle using your remote control 0 AUDIO R L AV IN 1 Audio inputs for external devices such as a camcorder or VCR S VIDEO AV IN 1 S Video input for external de...

Страница 8: ...ur TV DVD STB CABLE box or VCR Press to backlight the VOL CH and active source button TV DVD CABLE STB VCR on the remote SOURCE Press to display all of the available video sources a PRE CH Tunes to the previous channel b WISELINK This function enables you to view and play photo JPEG and audio files MP3 from an external device Refer to page 63 JPEG 69 MP3 c REC This remote can be used to control re...

Страница 9: ... the antennas to the TV This procedure requires an optional combiner adaptor available at most electronics shops 1 Connect both antenna leads to the combiner 2 Plug the combiner into the ANT 1 IN AIR or ANT 2 IN CABLE terminal on the bottom of the back panel ANT 1 IN AIR ANT 1 IN AIR UHF VHF ANT 1 IN AIR UHF VHF Installing Batteries in the Remote Control 1 Lift the cover at the back of the remote ...

Страница 10: ...the cable that is connected to the ANT IN terminal on your cable box This terminal might be labeled ANT IN VHF IN or simply IN 2 Connect this cable to a two way splitter 3 Connect an Antenna cable between an OUTPUT terminal on the splitter and the IN terminal on the cable box 4 Connect an Antenna cable between the ANT OUT terminal on the cable box and the B IN terminal on the RF A B switch 5 Conne...

Страница 11: ...O L jacks on the TV If you have a mono non stereo VCR use a Y connector not supplied to hook up to the right and left audio input jacks of the TV If your VCR is stereo you must connect two cables Each VCR has a different back panel configuration When connecting a VCR match the color of the connection terminal to the cable VCR Rear Panel TV Rear Panel 2 Audio Cable Not supplied 5 Video Cable Not su...

Страница 12: ... your TV make it easy to connect a DVD Player Set Top Box to your TV 1 Connect Component Cables between the COMPONENT IN 1 Y PB PR or COMPONENT IN 2 Y PB PR jacks on the TV and the COMPONENT OUT Y PB PR jacks on the DVD Player Set Top Box 2 Connect Audio Cables between the COMPONENT IN 1 R AUDIO L or COMPONENT IN 2 R AUDIO L jacks on the TV and the AUDIO OUT jacks on the DVD Player Set Top Box Com...

Страница 13: ...Top Box via HDMI This connection can only be made if there is an HDMI Output jack on the external device This connection will provide the highest quality picture 1 Connect an HDMI Cable between the HDMI IN 2 on the TV and the HDMI OUT on the DVD Player Set Top Box What is HDMI HDMI or high definition multimedia interface is an interface that enables the transmission of digital audio and video sign...

Страница 14: ...onnecting a PC match the color of the connection terminal to the cable When using an HDMI DVI cable connection you must use the HDMI IN1 terminal PC TV Rear Panel PC Audio Cable Not supplied 2 D Sub Cable Not supplied 1 Connecting a Digital Audio System The rear panel jacks on your TV make it easy to connect a Digital Audio System to your TV 1 Connect an Optical Cable between the DIGITAL AUDIO OUT...

Страница 15: ...on to memorize the channels of the selected connection Press the ENTER button to select Start If the antenna is connected to ANT1 IN AIR select Air and if it is connected to ANT 2 IN CABLE select Cable If both ANT 1 IN AIR and ANT 2 IN CABLE are connected select the Air Cable In Cable mode select the correct analog signal cable system source from among STD HRC and IRC by pressing the or button the...

Страница 16: ...seconds Setting the Clock Automatically 9 Press the ENTER button Press the or button to select On or Off then press the ENTER button Select the time zone in which you live menu is automatically displayed 10 Press the or button to highlight the time zone for your local area and to move the highlight to the appropriate time zone on the map of the United States Press the ENTER button If clock is not ...

Страница 17: ...select channel 27 press 2 then 7 The TV will change channels when you press the second number Using the Button The button is used to select stations that broadcast a digital signal 1 For example for Channel 7 1 press 7 then then 1 HD indicates the TV is receiving a Digital High Definition signal SD indicates the TV is receiving a Standard Definition signal For quick channel change press the number...

Страница 18: ...l The TV will display the channel the type of sound and the status of certain picture and sound settings Press the INFO button once more or wait approximately 10 seconds and it disappears automatically Viewing the Menus 1 With the power on press the MENU button The main menu appears on the screen Its left side has five icons Picture Sound Channel Setup Input 2 Use the or button to select one of th...

Страница 19: ...e from among STD HRC and IRC then press the ENTER button If you have Digital cable TV select the cable system signal source for both Analog and Digital If you have Digital cable TV select the signal source for both Analog and Digital STD HRC and IRC identify various types of cable TV systems Contact your local cable company to identify the type of cable system that exists in your particular area A...

Страница 20: ...ress the SET button on your TV s remote control 4 Using the number buttons on your remote control enter three digits of the cable box code listed on page 23 of this manual for your brand of cable box Make sure you enter three digits of the code even if the first digit is a 0 If more than one code is listed try the first one 5 Press the POWER button on the remote control Your cable box should turn ...

Страница 21: ...ol Modes DVD When your remote control is in DVD mode the volume buttons still control your TV s volume Setting Up the Remote to Operate Your Set Top Box 1 Turn off your STB 2 Press the STB button on your TV s remote control 3 Press the SET button on your TV s remote control 4 Using the number buttons on your remote control enter three digits of the STB code listed on page 23 of this manual for you...

Страница 22: ... 018 026 037 070 025 038 025 081 082 083 021 056 059 007 008 018 021 026 037 062 006 036 073 074 075 076 021 006 021 024 025 034 005 019 041 075 Brand MITSUBISHI MONTGOMERY WARD MTC MULTITECH NEC OPTIMUS PANASONIC PENTAX PENTEX RESEARCH PHILCO PHILIPS PIONEER PORTLAND PROSCAN QUARTZ QUASAR RADIO SHACK REALISTIC RCA SANSUI SANYO SCOTT SEARS SHARP SHIMTOM SIGNATURE SONY SYLVANIA SYMPHONIC TANDY TASH...

Страница 23: ...rand ALPHASTAR ANAM CHANNEL MASTER CROSSDIGITAL CHAPARRAL DIRECT TV DAEWOO DISH NETWORK SYSTEM DISHPRO DRAKE DX ANTENNA ECHOSTAR EXPRESSVU GOI GE GENERAL INSTRUMENT HTS HOME CABLE HITACHI HUGHES NETWORK IQ IQ PRISM JANEIL JERROID JVC Code 023 043 018 034 019 035 015 016 017 019 022 045 060 061 062 065 066 067 068 074 069 070 069 018 024 032 027 025 069 070 071 069 069 065 046 047 048 063 064 069 0...

Страница 24: ...74 122 123 027 065 077 078 079 082 080 125 081 095 066 146 067 068 090 060 061 089 133 135 069 074 074 064 113 071 073 091 110 089 092 091 022 033 115 116 073 051 108 109 073 059 100 106 107 074 075 025 031 057 058 054 055 056 076 093 074 094 073 Brand NORCENT NEXT BASE NEC NANTAUS NESA OPTOMEDIA ELECTRONICS OPTIVIEW ONKYO PHILCO PRINCETON PROSCAN PANASONIC PHILIPS ROTEL RIO RCA RAITE ROWA SAMPO S...

Страница 25: ... selection easier 1 Press the MENU button to display the menu Press the or button to select Input then press the ENTER button Press the or button to select Edit Name then press the ENTER button 2 Press the or button to select AV1 AV2 S Video1 S Video2 Component1 Component2 PC HDMI1 HDMI2 or HDMI3 input jack then press the ENTER button 3 Press the or button to select VCR DVD D VHS Cable STB HD STB ...

Страница 26: ...d picture settings 3 Press the or button to select Contrast Brightness Sharpness Color or Tint then press the ENTER button 4 Press the or button to decrease or increase the value of a particular item Press the ENTER button Tint doesn t operate in PC mode In PC mode only the Contrast and Brightness can be selected Each adjusted setting will be stored separately according to its input mode When you ...

Страница 27: ...o select Picture 2 Press the or button to select Digital NR then press the ENTER button 3 Press the or button to select Off Low Mediunm High or Auto then press the ENTER button Press the EXIT button to exit The Digital NR function is available in all modes except PC More Color Tone Cool1 Detailed Settings Size 16 9 Digital NR Auto Active Color On DNIe On Reset OK Picture T V Enter Move Return More...

Страница 28: ...d Wide Fit can be selected In Zoom1 Zoom2 and Wide Fit modes you can move the picture on the screen by pressing the or button You can not change the picture size when PIP is set to Double When Double mode has been set in PIP the Picture Size cannot be set Wide Fit can be used when watching a Digital HD High Definition signal Wide Fit sets the optimum picture format by expanding it both horizontall...

Страница 29: ...he previously adjusted white balance will be reset to the factory defaults My Color Control Pink Green Blue White Reset This setting can be adjusted to suit your personal preferences Pink Green Blue White Select the desired color by pressing the or button then press the ENTER button Press the or button until you reach the optimal setting When using the My Color Control Feature the current picture ...

Страница 30: ... normal pictures on the screen for demonstration purposes Using this function you can view the difference in the visual quality 1 Press the MENU button to display the menu Press the ENTER button to select Picture 2 Press the or button to select DNIe then press the ENTER button This function doesn t work when the Input Source is PC 3 Press the or button to select Off Demo or On then press the ENTER...

Страница 31: ...n is displayed when there is no signal from an external device regardless of the Blue Screen Setting More Blue Screen Off Melody Medium PC Home Theater PC Off Light Effect In Watching TV Energy Saving Off More Setup T V More Blue Screen Off Melody Medium PC Home Theater PC Off Light Effect In Watching TV Energy Saving Off More Setup T V Enter Move Return Enter Move Return Setting the HDMI Black Le...

Страница 32: ...turn it on again the PIP window will disappear Press the PIP button on the remote control to activate or deactivate the PIP Analog TV signals can be viewed on the PIP screen while viewing the picture from an external source DVD Set top box PC etc connected to the Component 1 2 PC and HDMI 1 2 3 jacks on the main screen Changing the Size of the PIP Window 3 Press the or button to select Size then p...

Страница 33: ...the or button at the bottom of the remote to select the desired channel in the PIP window then press the ENTER button The channel can be active when the sub picture is set to TV Press the EXIT button to exit Press the PIP CH and CH and buttons on the remote control to change the PIP channel Freezing the Current Picture 1 Press the STILL button to freeze a moving picture Normal sound will still be ...

Страница 34: ... Press the or button to select a particular frequency to adjust Press the or button to increase or decrease the level of the particular frequency then press the ENTER button Press the EXIT button to exit R L Sound Balance Adjustment To adjust the sound balance of the R L speakers Frequency Adjustment 100Hz 300Hz 1KHz 3KHz 10KHz To adjust the level of different frequencies If you make any changes t...

Страница 35: ... the ENTER button 2 Press the or button to select Multi Track Options then press the ENTER button 3 Press the ENTER button to select Preferred Language Press the or button to choose the language English Spanish or French you want then press the ENTER button Press the EXIT button to exit You can only select the language from among the actual languages being broadcast Press the MTS button on the rem...

Страница 36: ...Stereo Multi Track Options T V Mono Stereo SAP Enter Move Return Return 1 Press the MENU button to display the menu Press the or button to select Sound then press the ENTER button 2 Press the or button to select Auto Volume then press the ENTER button 3 Press the or button to select Off or On then press the ENTER button Press the EXIT button to exit Automatic Volume Control Reduces the difference ...

Страница 37: ...symbol are trademarks of Dolby Laboratories TRADEMARK LABEL LICENSE NOTICE More Blue Screen Off Melody Medium PC Home Theater PC Off Light Effect In Watching TV Energy Saving Off More Setup T V Off Low Medium High Enter Move More Blue Screen Off Melody Medium PC Home Theater PC Off Light Effect In Watching TV Energy Saving Off More Setup T V Enter Move Return Return Mode Custom Equalizer SRS TruSu...

Страница 38: ... Channel List then press the ENTER button 3 Press the or button to select Added then press the ENTER button 4 Press the buttons to select a channel to add then press the ENTER button Press the or button to select Add then press the ENTER button to add the channel Press the RETURN button to return All added channels will be shown on Added menu Continued All Added Favorite Default List Mode All Chan...

Страница 39: ...et as a Favorite To cancel your Favorite channel selection press the ENTER button until the symbol disappears Press the EXIT button to exit Only memorized channels can be set as favorite channels All favorite channels will be shown on the Favorite menu To select the favorite channels you have set up press the FAV CH button on the remote control Antenna Air Auto Program Clear Scrambled Channel Chan...

Страница 40: ...ult List Mode then press the ENTER button Press the or button to select All Added or Favorite then press the ENTER button Select the Channel list you want to appear when you press the CH LIST button All Shows All the channels when you press the CH LIST button on the remote control Added Shows Added channels when you press CH LIST button on the remote control Favorite Shows Favorite channels when y...

Страница 41: ...og Channels Use fine tuning to manually adjust a particular channel for optimal reception 1 Press the MENU button to display the menu Press the or button to select Channel then press the ENTER button 2 Press the or button to select Fine Tune then press the ENTER button 3 Press the or button to adjust the fine tuning 4 To store the fine tuning setting in the TV s memory press the ENTER button To re...

Страница 42: ...exit the menu LNA Low Noise Amplifier If the TV is operating in a weak signal area sometimes the LNA function can improve the reception a low noise preamplifier boosts the incoming signal 1 Press the MENU button to display the menu Press the or button to select Channel then press the ENTER button 2 Press the or button to select LNA then press the ENTER button 3 Press the or button to select Off or...

Страница 43: ...alog Input mark means that this mode can be supported For the PL 42Q91HDP PC text quality is optimum in XGA mode 1024 x 768 60Hz For the PL 50Q91HDP PC text quality is optimum in WXGA mode 1360 x 768 60Hz Three pixels on left right top and bottom will be grayed out at the resolution setting of 1360x768 60Hz This is not a mechanical problem but a result caused by the pixel difference between the st...

Страница 44: ...ing alone then do the frequency adjustments to the utmost and fine tune again After the noise has been reduced re adjust the picture so that it is aligned on the center of the screen Change to the PC mode first 1 Press the MENU button to display the menu Press the or button to select Setup then press the ENTER button Press the or button to select PC then press the ENTER button 2 Press the ENTER bu...

Страница 45: ...previously adjusted settings will be reset to the factory defaults Image Lock Position Auto Adjustment Image Reset PC T V Enter Move Return Position T V Adjust Enter Return Image Reset is completed Image Lock Position Auto Adjustment Image Reset PC T V Enter Move Return Setting the Home Theater PC This function enables you to view higher quality pictures while in PC Mode After setting the Home The...

Страница 46: ...ss the or button to move to Month Day Year Hour Minute or am pm Set the date and time you want by pressing the or button then press the ENTER button Press the EXIT button to exit The current time will appear every time you press the INFO button You can set the Month Day Year Hour and Minute directly by pressing the number buttons on the remote control Continued Plug Play Language English Time Game...

Страница 47: ... the or button to select DST Daylight Saving Time then press the ENTER button Press the or button to select On or Off then press the ENTER button Press the EXIT button to exit Depending on the broadcast station and signal the auto time may not be set correctly If this occurs set the time manually Antenna or Cable must be connected in order to set the time automatically Continued Plug Play Language...

Страница 48: ...ned on by timer This function is only available in timer On mode and prevents overheating which may occur if a TV is on for too long time Setting the Sleep Timer The sleep timer automatically shuts off the TV after a preset time 30 60 90 120 150 and 180 minutes 1 Press the MENU button to display the menu Press the or button to select Setup then press the ENTER button Press the or button to select ...

Страница 49: ...he game console and connect another external device set Game to Off in the setup menu If you display the TV menu in Game mode the screen shakes slightly The mark appears on the screen which means that Game Mode is on with the selected source If Game Mode is On Picture Mode is automatically changed to Game and cannot be changed Sound Mode in the Sound menu is deactivated Adjust the sound using the ...

Страница 50: ... change the font you want The default is Default Foreground Color This option consists of Default White Black Red Green Blue Yellow Magenta and Cyan You can change the color of the letter The default is Default Background Color This option consists of Default White Black Red Green Blue Yellow Magenta and Cyan You can change the background color of the caption The default is Default Foreground Opac...

Страница 51: ...ptions This channel carries data that is intended to augment information carried in the program CC3 Secondary Synchronous Caption Service Alternate program related caption data typically second language captions CC4 Special Non Synchronous Use Captions Similar to CC2 Text1 First Text Service This may be various non program related data Text2 Second Text Service Additional data usually not program ...

Страница 52: ...the MENU button to display the menu Press the or button to select Setup then press the ENTER button 2 Press the or button to select Light Effect then press the ENTER button Press the or button to select Off In Standby In Watching TV or Always then press the ENTER button Press the EXIT button to exit Off The LED is always off In Standby The LED lights while in Standby mode and it turns off when you...

Страница 53: ...e time between movement of the picture in minutes 1 Press the MENU button to display the menu Press the or button to select Setup then press the ENTER button 2 Press the or button to select Screen Burn Protection then press the ENTER button 3 Press the ENTER button to select Pixel Shift then press the ENTER button Pressing the or button will alternate between On and Off You will also see the items...

Страница 54: ...xecuted for a long time approximately 1 hour to effectively remove after images on the screen If the after image is not removed after performing the function repeat the function again Press any key on the remote control to cancel this feature Pixel Shift White Scrolling Side Gray Dark Screen Burn Protection T V Enter Move Dark Light Return Reducing the Effects of Screen Burn If screen burn has occ...

Страница 55: ...rations Wall mount angle adjustment Tilt Up Tilt Down Move right Move left Reset Moves to the initial installation position Remembering the position and moving to the remembered position Remembers 3 positions with the Red Green and Yellow buttons Moves to the remembered position using these 3 color buttons For installation refer to the Installation Manual provided For product installation and the ...

Страница 56: ... drive Upgrades will be possible by connecting a USB drive to the USB port located on the side of your TV 1 Insert a USB drive containing the firmware upgrade into the USB Upgrade Port on the side of the TV 2 Press the MENU button to display the menu Press the or button to select Setup then press the ENTER button 3 Press the or button to select SW Upgrade then press the ENTER button 4 Press the or...

Страница 57: ...ntinued Plug Play Language English Time Game Mode Off V Chip Caption Menu Transparency Medium More Setup T V Enter Move V Chip T V 0 9 Enter PIN Enter PIN Return Return 3 The V Chip screen will appear Press the or button to select Change PIN then press the ENTER button The Change PIN screen will appear Choose any 4 digits for your PIN and enter them Re enter the same 4 digits When the message PIN ...

Страница 58: ... lock all TV ratings The TV Y TV Y7 TV G TV PG TV 14 and TV MA have additional options See the next step to change any of the following sub ratings FV Fantasy violence D Sexually suggestive dialog L Adult language The V Chip will automatically block certain categories that are more restrictive For example if you block TV Y category then TV Y7 will automatically be blocked Similarly if you block th...

Страница 59: ...audience no restriction PG Parental guidance suggested PG 13 Parents strongly cautioned R Restricted Children under 17 should be accompanied by an adult NC 17 No children under age 17 X Adults only NR Not rated The V Chip will automatically block any category that is more restrictive For example if you block the PG 13 category then R NC 17 and X will automatically be blocked also How to Set up Res...

Страница 60: ...ENU button to display the menu Press the or button to select Setup then press the ENTER button 2 Press the or button to select V Chip then press the ENTER button The message Enter PIN will appear Enter your 4 digit PIN number 3 The V Chip screen will appear Press the or button to select Canadian French then press the ENTER button 4 Press the or button to select an appropriate restriction Press the...

Страница 61: ...Humor Level etc and TV ratings for example DH MH H etc may differ depending on the broadcasting station How to Reset the TV after the V Chip Blocks a Channel Emergency Escape If the TV is tuned to a restricted channel the V Chip will block it The screen will go blank and the following message will appear 1 Enter your PIN To resume normal viewing tune to a different channel using CH or CH button Un...

Страница 62: ...rting your memory card or USB device into the TV please back up your files SAMSUNG is not responsible for any data file damage or data loss The data files in memory cards might be erased due to electrostatic discharge EST loose contact or dust Some memory devices may not be recognized when the TV is turned on and switched to WISELINK Mode If this occurs remove and reinstall the memory device in qu...

Страница 63: ...WISELINK button on the remote control Exit the screen by pressing the WISELINK button on the remote control and enter the WISELINK screen again Press the WISELINK button on the remote control to turn on the WISELINK mode Using the Remote Control Button in WISELINK Menu Button Operations Move the cursor and select an item Select the currently selected item Play or pause the Slide Show or MP3 file R...

Страница 64: ...such as gif or tiff will not be displayed Fifteen thumbnail photos are displayed per page The thumbnails are numbered from left to right and from top to bottom from 1 to 15 Folders are displayed first and they are followed by all JPEG files in the current folder The folders and JPEG files are sorted in alphabetical order If the photo is displayed in full screen you can zoom in and out or rotate th...

Страница 65: ...image When the JPEG image resolution is greater than the screen size you cannot use the Zoom function Zoom function is not available for the image files that have the resolution of 1280x720 or greater List Displays the stored files folders and file info The File Error message appears on the screen in the following situations When the file actually has an error If the target memory cannot be writte...

Страница 66: ...le this function MP3 files and other photo files must be located in the same folder on the memory device To run the slide show repeatedly change the setting by referring to page 71 Press the PLAY PAUSE button when a Photo icon is selected to start a Slide Show 5 Press the INFO button during slide show to set the option Slide show Speed Background Music Background Music Setting List 6 Press the or ...

Страница 67: ... not be played List JPEG files and existing folders are displayed To exit WISELINK mode press the WISELINK button on the remote control Press the EXIT button to switch to the WISELINK start screen where another memory card can be selected When selecting a photo file the photo file information is displayed on the left in the TV screen such as the resolution the size the date modified and the order ...

Страница 68: ...n rotating a photo the edge of the photo may not be displayed on the screen To exit WISELINK mode press the WISELINK button on the remote control The rotated file is not saved The Rotating function information icon Displayed at the top left of the screen Icon Current OSD Function Rotating 90 To rotate a photo by 90 degrees Rotating 180 To rotate a photo by 180 degrees Rotating 270 To rotate a phot...

Страница 69: ...formation icon Displayed at the top left of the screen Icon Current OSD Function Zoom x 2 Zoom in to a photo x2 Zoom x 4 Zoom in to a photo x4 Zoom x 1 Restore a photo to its original size Pan Down Pan down to view the lower part of a zoomed in photo Pan Up Pan up to view the upper part of a zoomed in photo Pan Right Pan right to view the right side of a zoomed in photo Pan Left Pan left to view t...

Страница 70: ... pressed the play stops The playing time of each MP3 file can be found in the file information When not found it may be displayed as 00 00 00 Music function information icon Displayed at the top left of the screen Icon Current OSD Function Music All Repeat When all music files in the folder are repeated Music All When all music files in the folder are played once Music Play Pause When pressing the...

Страница 71: ...epeat Music On Plays back a music file or all music files repeatedly Off Doesn t play back repeatedly Screen Saver Select to set the waiting time before the screen saver is run when no button is pressed You can select Screen Saver 5 min or Screen Saver 10 min Press the WISELINK button on the remote control to turn on the WISELINK mode Slide Show Speed Fast Background Music On Background Music Sett...

Страница 72: ...s Otherwise you can only listen to 2 channel stereo sound in other cases Make sure to connect the Digital Audio IN Optical of the home theater and the TV correctly to listen to TV sound through the home theater However you cannot listen to sound from the BD recorder that is sent to the home theater via the TV in 5 1 channel sound because the TV outputs only 2 channel stereo sound Please see the ma...

Страница 73: ...the or button to select to a particular device and press the ENTER button It is switched to the selected device 3 If you cannot find a device you want press the or button to select Searching Connections then press the ENTER button The message Configuring Anynet connection is displayed When searching devices completes the connected devices are listed in the Anynet menu Switching to the selected dev...

Страница 74: ...device while playing a file Backward search Forward search Stop Play Pause Device with built in Tuner After switching to the device when you are watching a TV program CH button Audio Device When Receiver is activated VOL button MUTE button Anyview2 When watching TV Play Pause The Anynet function only works when the remote control is set to TV The REC button works only while in the recordable state...

Страница 75: ...ck whether it is Anynet exclusive remote control Anynet doesn t work at a certain condition Searching channels Operating WISELINK When connecting or removing the HDMI cable please make sure to search devices again or restart your TV Check if the Anynet Function of Anynet device is set on I want to start Anynet Check if the Anynet device is properly connected to the TV and check if the Anynet HDMI ...

Страница 76: ...e image is too large or too small Adjust the Size settings The visual qualities of digital channels vary The visual qualities of digital channels may vary depending on the original production method analog or digital If the original production method is digital High visual quality If the original production method is analog The digital program displayed on the screen is originally an analog progra...

Страница 77: ...ll parts necessary for assembly are provided Do not use screws longer than the standard dimension as they may cause damage to the inside of the TV set For wall mounts that do not comply with the VESA standard screw specifications the length of the screws may differ depending on their specifications Do not use screws that do not comply with the VESA standard screw specifications Do not use fasten t...

Страница 78: ... 33 4 X 12 4 inches 1231 X 849 X 316 mm Weight Body With stand 67 5 lbs 30 6 kg 72 8 lbs 33 0 kg 91 7 lbs 41 6 kg 97 0 lbs 44 0 kg Environmental Considerations Operating Temperature Operating Humidity Storage Temperature Storage Humidity 50 F to 104 F 10 C to 40 C 10 to 80 non condensing 4 F to 113 F 20 C to 45 C 5 to 95 non condensing This device is a Class B digital apparatus Design and specific...

Страница 79: ...English 79 Dimensions PL 42Q91HDP TOP VIEW FRONT VIEW SIDE VIEW REAR VIEW JACK PANEL DETAIL 2 1 4 H x 18 3 4 W 5 3 4 UP FROM BOTTOM 41 5 37 0 26 0 12 6 21 1 12 8 27 5 30 0 3 7 1 2 5 2 7 3 12 4 23 6 15 7 ...

Страница 80: ...English 80 Dimensions PL 50Q91HDP TOP VIEW FRONT VIEW SIDE VIEW REAR VIEW JACK PANEL DETAIL 2 1 4 H x 18 3 4 W 5 3 4 UP FROM BOTTOM 48 5 43 7 26 0 14 5 24 6 14 5 31 1 33 4 3 7 1 2 7 3 5 2 12 4 23 6 15 7 ...

Страница 81: ...This page is intentionally left blank ...

Страница 82: ...This page is intentionally left blank ...

Страница 83: ...MA PL 42Q91HDP PL 50Q91HDP Manual del usuario Registre el producto en www samsung com global register Apunte aquí los números de serie y modelo para consultas futuras Modelo _______________ N º de serie _______________ ...

Страница 84: ...con este manual del usuario se suministra con licencia bajo derechos de propiedad intelectual de otras empresas En concreto este producto se suministra con licencia bajo las siguientes patentes de EE UU 5 991 715 5 740 317 4 972 484 5 214 678 5 323 396 5 539 829 5 606 618 5 530 655 5 777 992 6 289 308 5 610 985 5 481 643 5 544 247 5 960 037 6 023 490 5 878 080 y bajo el número de aplicación de pat...

Страница 85: ...de debido a un cambio ambiental de temperatura o humedad Este hecho es normal y no se trata de ningún defecto en la unidad Defecto de celda La PDP utiliza un panel compuesto de 1 230 000 nivel SD a 3 150 000 nivel HD píxeles que requieren una sofisticada tecnología para su producción No obstante puede que existan unos cuantos píxeles brillantes u oscuros en la pantalla Estos píxeles no influirán e...

Страница 86: ...lumen 36 Selección del silencio interno 36 Ajuste del sonido de la melodía 37 Audición del sonido de la imagen secundaria PIP 37 CONTROL DE LOS CANALES Selección de la antena 38 Adición y supresión de canales 38 Ajuste de los canales favoritos 39 Visualización de las listas de canales 40 Configuración del modo Lista de canales predeterminada 40 Etiquetado de canales 41 Sintonización fina de los cana...

Страница 87: ...levisor Si falta alguno póngase en contacto con su distribuidor RET URN FAV CH Mando a distancia BN59 00599A Pilas AAA 4301 000103 Cable de alimentación 3903 000144 Manual del usuario Guía rápida de la configuración Tarjeta de garantía Tarjeta de registro Manual de seguridad Paño de limpieza Cubierta inferior Tornillos 2 Consulte la página 78 Núcleo de ferrita para cable de alimentación 3301 00111...

Страница 88: ...ciones del televisor 3 VOL Púlselos para subir o bajar el volumen En el menú de la pantalla use los botones VOL del mismo modo que los botones y del mando a distancia 4 CH Permiten cambiar de canal En el menú de la pantalla use los botones CH del mismo modo que los botones y del mando a distancia 5 ENTER Se pulsa para confirmar una selección 6 Botón de encendido Púlselo para encender o apagar el T...

Страница 89: ... un dispositivo DVI No es compatible con un PC 8 ANT 1 IN AIR ANT 2 IN CABLE Conector coaxial de 75 Ω para antena o red por cable 9 EX LINK Toma de conexión para un soporte de montaje mural opcional Permite ajustar el ángulo de visualización del televisor mediante el mando a distancia 0 AUDIO R L AV IN 1 Entradas de audio para dispositivos externos como una videocámara o un aparato de vídeo S VIDE...

Страница 90: ...l y de cable o el aparato de vídeo Pulse para encender la luz de fondo de VOL CH y el botón de fuente activa TV DVD CABLE STB VCR en el mando a distancia SOURCE Púlselo para ver todas las fuentes de vídeo disponibles a PRE CH Sintoniza el canal anterior b WISELINK Esta función permite ver y reproducir archivos de fotos JPEG y de audio MP3 desde un dispositivo externo Consulte la página 63 JPEG 69 ...

Страница 91: ...elevisor Este procedimiento requiere un combinador adaptador opcional disponible en la mayoría de tiendas de electrónica 1 Conecte los dos cables de antena al combinador 2 Conecte el combinador en los terminales ANT 1 IN AIR o ANT 2 IN CABLE de la parte inferior del panel posterior ANT 1 IN AIR ANT 1 IN AIR UHF VHF ANT 1 IN AIR UHF VHF Instalación de las pilas en el mando a distancia 1 Levante la ...

Страница 92: ...erminal ANT IN de su decodificador de cable Este terminal puede estar etiquetado como ANT IN VHF IN o sencillamente IN 2 Conecte este cable al separador de señales de dos vías 3 Conecte un cable de antena entre un terminal OUTPUT del separador y el terminal IN del decodificador 4 Conecte un cable de antena entre el terminal ANT OUT del decodificador y el terminal B IN del conmutador RF A B 5 Conec...

Страница 93: ...rado para conectar las tomas de entrada de audio derecha e izquierda del TV Si el vídeo es estéreo tendrá que conectar dos cables Cada aparato de vídeo tiene una configuración diferente del panel posterior Cuando conecte un aparato de vídeo debe hacer coincidir los colores del terminal de conexión y del cable Panel posterior del vídeo Panel posterior del TV 2 Cable de audio no suministrado 5 Cable...

Страница 94: ...xión al televisor de un reproductor de DVD decodificador 1 Conecte un cable de componente entre las tomas COMPONENT IN 1 Y PB PR o COMPONENT IN 2 Y PB PR del televisor y las tomas COMPONENT OUT Y PB PR del reproductor de DVD decodificador 2 Conecte los cables de audio entre los terminales COMPONENT IN 1 R AUDIO L o COMPONENT IN 2 R AUDIO L del televisor y AUDIO OUT del reproductor de DVD decodific...

Страница 95: ...DVD decodificador a través de HDMI Esta conexión sólo se puede realizar si hay una toma de salida de HDMI en el dispositivo externo Esta conexión proporciona una imagen de la mayor calidad 1 Conecte un cable de HDMI entre la toma de entrada HDMI IN 2 del televisor y la toma de salida HDMI OUT del reproductor DVD decodificador Qué es HDMI HDMI o interfaz multimedia de alta definición es una interfa...

Страница 96: ... posterior Cuando conecte una PC debe hacer coincidir los colores del terminal de conexión y del cable Cuando se usa una conexión de cable HDMI DVI se debe conectar en el terminal HDMI IN 1 PC Panel posterior del TV Cable de audio de PC no suministrado 2 Cable D Sub no suministrado 1 Conexión de un sistema de audio digital Las tomas del panel posterior del televisor facilitan la conexión de un sis...

Страница 97: ...ulse los botones o para memorizar los canales de la conexión seleccionada Pulse el botón ENTER para seleccionar Iniciar Si la antena está conectada a ANT1 IN AIR seleccione Aire y si está conectada a ANT 2 IN CABLE seleccione Cable Si ANT 1 IN AIR y ANT 2 IN CABLE están conectadas seleccione Aire Cable En el modo Cable puede seleccionar la fuente del sistema de cable de señal analógica correcta en...

Страница 98: ...el botón ENTER Pulse los botones o para seleccionar Enc o Apag y a continuación pulse el botón ENTER Aparece automáticamente el menú Seleccione la zona horaria en la que se encuentra 10 Pulse los botones o para resaltar la zona horaria del área local y para mover la selección a la zona horaria apropiada en el mapa de Estados Unidos Pulse el botón ENTER Si el reloj no se configura automáticamente c...

Страница 99: ... 27 pulse 2 y 7 El televisor cambiará de canal cuando pulse el segundo número Uso del botón El botón se utiliza para seleccionar emisoras que emitan con señal digital 1 Por ejemplo para seleccionar el canal 7 1 pulse 7 y 1 HD indica que el televisor está recibiendo una señal digital de alta definición SD indica que el televisor está recibiendo una señal digital de definición estándar Pulse los bot...

Страница 100: ...cia El televisor mostrará el canal tipo de sonido y estado de ciertos ajustes de imagen y sonido Pulse el botón INFO otra vez o espere unos 10 segundos y desaparecerá automáticamente Visualización de los menús 1 Con el aparato encendido pulse el botón MENU En la pantalla aparece el menú principal En el lado izquierdo hay cinco iconos Imagen Sonido Canal Configuración y Entrada 2 Use los botones o ...

Страница 101: ...tiene un televisor de cable digital seleccione la fuente de la señal del sistema de cable analógica y digital Si tiene un cable digital seleccione la fuente de señal analógica y digital STD HRC e IRC identifican los distintos tipos de sistemas de TV por cable Póngase en contacto con su proveedor de cable para saber el tipo de sistema de cable existente en su zona En este momento ya se ha seleccion...

Страница 102: ...televisor 3 Pulse el botónSET del mando a distancia del televisor 4 Mediante los botones numéricos del mando a distancia introduzca los tres dígitos del código de decodificador de cable correspondientes a la marca de su decodificador que aparece en la lista de la página 23 de este manual Debe introducir los tres dígitos aunque el primero sea un 0 Si en la relación hay más de un código introduzca e...

Страница 103: ...tones de volumen seguirán controlando el volumen del televisor Configuración del mando a distancia para utilizarlo con el decodificador 1 Apague el decodificador 2 Pulse el botónSTB del mando a distancia del televisor 3 Pulse el botónSET del mando a distancia del televisor 4 Mediante los botones numéricos del mando a distancia introduzca los tres dígitos del código del decodificador correspondient...

Страница 104: ... 008 018 026 037 070 025 038 025 081 082 083 021 056 059 007 008 018 021 026 037 062 006 036 073 074 075 076 021 006 021 024 025 034 005 019 041 075 Marca MITSUBISHI MONTGOMERY WARD MTC MULTITECH NEC OPTIMUS PANASONIC PENTAX PENTEX RESEARCH PHILCO PHILIPS PIONEER PORTLAND PROSCAN QUARTZ QUASAR RADIO SHACK REALISTIC RCA SANSUI SANYO SCOTT SEARS SHARP SHIMTOM SIGNATURE SONY SYLVANIA SYMPHONIC TANDY ...

Страница 105: ...12 013 014 Marca ALPHASTAR ANAM CHANNEL MASTER CROSSDIGITAL CHAPARRAL DIRECT TV DAEWOO DISH NETWORK SYSTEM DISHPRO DRAKE DX ANTENNA ECHOSTAR EXPRESSVU GOI GE GENERAL INSTRUMENT HTS HOME CABLE HITACHI HUGHES NETWORK IQ IQ PRISM JANEIL JERROID JVC Código 023 043 018 034 019 035 015 016 017 019 022 045 060 061 062 065 066 067 068 074 069 070 069 018 024 032 027 025 069 070 071 069 069 065 046 047 048...

Страница 106: ...2 074 122 123 027 065 077 078 079 082 080 125 081 095 066 146 067 068 090 060 061 089 133 135 069 074 074 064 113 071 073 091 110 089 092 091 022 033 115 116 073 051 108 109 073 059 100 106 107 074 075 025 031 057 058 054 055 056 076 093 074 094 073 Marca NORCENT NEXT BASE NEC NANTAUS NESA OPTOMEDIA ELECTRONICS OPTIVIEW ONKYO PHILCO PRINCETON PROSCAN PANASONIC PHILIPS ROTEL RIO RCA RAITE ROWA SAMP...

Страница 107: ...net HDMI CEC Entrada T V Ingresar Mover Regresar Ingresar Mover Regresar Para editar el nombre de la fuente de entrada Puede dar un nombre al dispositivo conectado en las tomas de entrada de esta manera será más fácil seleccionar el dispositivo de entrada 1 Pulse el botón MENU para ver el menú Pulse los botones o para seleccionar Entrada y a continuación pulse el botón ENTER Pulse los botones o pa...

Страница 108: ...Pulse los botones o para seleccionar Contraste Brillo Definición Color o Tinte y a continuación pulse el botón ENTER 4 Pulse los botones o para aumentar o reducir el valor de una opción concreta Pulse el botón ENTER La opción Tinte no funciona en el modo PC En el modo PC sólo se pueden seleccionar las opciones Contraste y Brillo Cada valor ajustado se almacenará por separado según su modo de entra...

Страница 109: ...el botón ENTER 2 Pulse los botones o para seleccionar Digital NR y a continuación pulse el botón ENTER 3 Pulse los botones o para seleccionar Apag Bajo Medio Alto o Auto y a continuación pulse el botón ENTER Pulse el botón EXIT para salir La función Digital NR está disponible en todos los modos excepto PC Más Tono Color Frío1 Configuración detallada Tamaño 16 9 Digital NR Auto Color activo Enc DNI...

Страница 110: ...2 y Ajuste ancho se puede desplazar la imagen por la pantalla pulsando los botones o No se puede cambiar el tamaño de la imagen cuando PIP está ajustado como Doble Si se ha seleccionado el modo Doble en PIP el tamaño de la imagen no se puede definir La opción Ajuste ancho se puede usar cuando se ve una señal digital de alta definición HD La opción Ajuste Ancho ajusta el formato óptimo de la imagen...

Страница 111: ...se restablecerá con los valores predefinidos de fábrica Mi Ctrl de Color Rosa Verde Azul Blanco Reiniciar Este valor puede ajustarse para que se adapte a sus preferencias personales Rosa Verde Azul Blanco Seleccione el color deseado con los botones o y a continuación pulse el botón ENTER Pulse los botones o hasta llegar al valor óptimo Cuando se usa la función Mi Ctrl de Color la imagen actual per...

Страница 112: ...en 2 Pulse los botones o para seleccionar DNIe y a continuación pulse el botón ENTER Esta función no se activa si la fuente de entrada es PC 3 Pulse los botones o para seleccionar Apag Demo o Enc y a continuación pulse el botón ENTER Pulse el botón EXIT para salir Apag Desactiva el modo DNIe Demo La pantalla aparece a la izquierda antes de aplicar DNIe y a la derecha tras aplicar DNIe Enc Activa e...

Страница 113: ...imagen en el modo HDMI 1 Pulse el botón MENU para ver el menú Pulse los botones o para seleccionar Configuración y a continuación pulse el botón ENTER 2 Pulse los botones o para seleccionar N neg HDMI y a continuación pulse el botón ENTER 3 Pulse los botones o para seleccionar Normal o Bajo y a continuación pulse el botón ENTER Pulse el botón EXIT para salir Esta función sólo está activa cuando se...

Страница 114: ...elve a encenderlo la ventana PIP desaparecerá Las señales de televisión analógicas se pueden ver en la pantalla PIP mientras en la pantalla principal se ve una imagen procedente de una fuente externa DVD decodificador PC etc conectada a las tomas Component 1 2 PC y HDMI 1 2 3 Pulse el botón PIP del mando a distancia para activar o desactivar la función PIP Cambio del tamaño de la ventana PIP 3 Pul...

Страница 115: ...te inferior del mando a distancia para seleccionar el canal deseado de la ventana de PIP y a continuación pulse el botón ENTER El canal puede estar activo cuando la imagen secundaria esté configurada como TV Pulse el botón EXIT para salir Pulse los botones PIP CH y CH del mando a distancia para cambiar el canal de PIP Congelación de la imagen actual 1 Pulse el botón STILL para congelar la imagen e...

Страница 116: ...es o para seleccionar una frecuencia determinada con el fin de ajustarla Pulse los botones o para aumentar o reducir el nivel de una frecuencia concreta y pulse el botón ENTER Pulse el botón EXIT para salir Ajuste de balance de sonido I D Para ajustar el balance de sonido de los altavoces I D Ajuste de frecuencia 100 Hz 300 Hz 1 KHz 3 KHz 10 KHz Para ajustar el nivel de las diferentes frecuencias ...

Страница 117: ...botones o para seleccionar Sonido y a continuación pulse el botón ENTER 2 Pulse los botones o para seleccionar Opc Multi track y a continuación pulse el botón ENTER 3 Pulse el botón ENTER para seleccionar Idioma preferido Pulse los botones o para seleccionar el idioma que desee English Español o Francés a continuación pulse el botón ENTER Pulse el botón EXIT para salir Sólo se puede seleccionar un...

Страница 118: ...tones o para seleccionar Apag o Enc y a continuación pulse el botón ENTER Pulse el botón EXIT para salir Control automático de volumen Reduce las diferencias en el nivel de volumen entre las emisoras 1 Pulse el botón MENU para ver el menú Pulse los botones o para seleccionar Sonido y a continuación pulse el botón ENTER 2 Pulse los botones o para seleccionar Silenc Int y a continuación pulse el bot...

Страница 119: ... AV S Vídeo Salida de altavoces Silencio Silencio Componente PC HDMI Salida de altavoces Silencio Silencio TV Salida de sonido Salida de sonido Silencio AV S Vídeo Salida de sonido Salida de sonido Silencio Componente PC HDMI Salida de sonido Salida de sonido Silencio Audio Out Optical R L Out para el sistema de sonido 3 Pulse los botones o para seleccionar Apag o Enc y a continuación pulse el bot...

Страница 120: ...continuación pulse el botón ENTER 3 Pulse los botones o para seleccionar Agregados a continuación pulse el botón ENTER 4 Pulse los botones para agregar un canal y a continuación pulse el botón ENTER Pulse los botones o para seleccionar Añadir a continuación pulse el botón ENTER Pulse el botón RETURN para volver Todos los canales agregados se mostrarán en el menú Agregar Continúa Todos Agregados Fa...

Страница 121: ...ción de un canal como favorito pulse el botón ENTER hasta que el símbolo desaparezca Pulse el botón EXIT para salir Sólo pueden seleccionarse como favoritos los canales memorizados Todos los canales seleccionados se mostrarán en el menú Favoritos Si desea seleccionar los canales favoritos que ha configurado pulse el botón FAV CH en el mando a distancia Antena Aire Prog Auto Borrar canal encriptado...

Страница 122: ... a continuación pulse el botón ENTER Pulse los botones o para seleccionar Todos Agregados o Favoritos a continuación pulse el botón ENTER Seleccione la lista de canales que desee que se muestre cuando pulsa el botón CH LIST Todos Muestra todos los canales cuando se pulsa el botón CH LIST del mando a distancia Agregados Muestra los canales agregados cuando se pulsa el botón CH LIST del mando a dist...

Страница 123: ...ina para ajustar manualmente un determinado canal a fin de que la recepción sea óptima 1 Pulse el botón MENU para ver el menú Pulse los botones o para seleccionar Canal a continuación pulse el botón ENTER 2 Pulse los botones o para seleccionar Sintonía Fina y a continuación pulse el botón ENTER 3 Pulse los botones o para ajustar la sintonización 4 Para memorizar la sintonía fina en la memoria del ...

Страница 124: ...se Amplifier Amplificador de ruido bajo Si el televisor está funcionando en una zona con señal débil la función LNA puede mejorar la recepción un amplificador previo de bajo ruido refuerza la señal entrante 1 Pulse el botón MENU para ver el menú Pulse los botones o para seleccionar Canal a continuación pulse el botón ENTER 2 Pulse los botones o para seleccionar LNA y a continuación pulse el botón ...

Страница 125: ...SA y se basa en la utilización de una entrada analógica indica que se puede admitir este modo La calidad de texto del PC para PL 42Q91HDP es óptima en modo XGA 1024 x 768 a 60 Hz La calidad de texto del PC para PL 50Q91HDP es óptima en modo WXGA 1360 x 768 a 60Hz Los tres píxeles de la izquierda de la derecha superiores e inferiores se agrisan en una resolución de 1360 x 768 a 60 Hz Esto no es nin...

Страница 126: ...recuencia todo cuanto pueda y vuelva a realizar la sintonización fina Cuando se hayan reducido las interferencias vuelva a ajustar la imagen de forma que esté centrada en la pantalla Debe cambiar al modo PC en primer lugar 1 Pulse el botón MENU para ver el menú Pulse los botones o para seleccionar Configuración y a continuación pulse el botón ENTER Pulse los botones o para seleccionar PC y a conti...

Страница 127: ...valores ajustados previamente volverán a los valores predefinidos de fábrica Configuración de PC para Home Cinema Esta función permite ver imágenes de alta calidad en el modo PC Después de configurar PC para Home Cinema como Enc se puede ir al menú Configuración detallada y realizar los ajustes sin que éstos afecten a la configuración del modo TV normal 1 Pulse el botón MENU para ver el menú Pulse...

Страница 128: ... Pulse los botones o para ir Mes Día Año Hora Minuto o am pm Seleccione la fecha y la hora que desee pulsando los botones o pulse después el botón ENTER Pulse el botón EXIT para salir La hora actual aparecerá siempre que se pulse el botón INFO Puede ajustar directamente Mes Día Año Hora y Minuto con los botones numéricos del mando a distancia Continúa Plug Play Idioma Español Tiempo Modo Juego Apa...

Страница 129: ... y pulse el botón ENTER Pulse los botones o para seleccionar Apag o Enc y a continuación pulse el botón ENTER Pulse el botón EXIT para salir Según la estación emisora y la señal puede que el ajuste automático de la hora no se realice correctamente En este caso ajuste la hora manualmente La recepción mediante antena o cable debe estar conectada para poder ajustar la hora automáticamente Continúa Pl...

Страница 130: ...dor y evita el recalentamiento que se puede producir si el televisor está encendido durante demasiado tiempo Ajuste del temporizador de desconexión El temporizador de desconexión apaga automáticamente el televisor después de un período prefijado 30 60 90 120 150 y 180 minutos 1 Pulse el botón MENU para ver el menú Pulse los botones o para seleccionar Configuración y a continuación pulse el botón E...

Страница 131: ...o Juego como Apag en el menú de configuración Si ve la televisión en el modo de juegos la pantalla tiembla ligeramente La marca que aparece en la pantalla indica que la opción Modo Juego está activa con la fuente seleccionada Si Modo Juego está configurado como Enc El modo Imagen cambia automáticamente a Juego y los usuarios no pueden cambiar el modo El modo Sonido del menú Sonido se desactiva Deb...

Страница 132: ...a de Programado Estilo0 Estilo7 Puede cambiar el tipo de letra que desee La opción predeterminada es Programado Color Primer Plano Esta opción consta de Programado Blanco Negro Rojo Verde Azul Amarillo Magenta y Cián Puede cambiar el color del texto La opción predeterminada es Programado Color de Fondo Esta opción consta de Programado Blanco Negro Rojo Verde Azul Amarillo Magenta y Cián Puede camb...

Страница 133: ...n destinados a ampliar la información del programa CC3 Servicio de subtítulos secundarios sincronizados Datos alternativos de subtítulos relacionados con el programa típicamente subtítulos del segundo idioma CC4 Subtítulos especiales de uso no sincronizado Similar a CC2 Texto1 Primer servicio de texto Se puede tratar de varios datos no relacionados con programa alguno Texto2 Segundo servicio de te...

Страница 134: ...EXIT para salir Apagado El LED siempre está apagado En m espera El LED se enciende cuando el TV está en modo Standby En espera y se apaga cuando se apaga el televisor Viendo la TV El LED se ilumina mientras se está viendo la televisión y se apaga cuando el televisor se apaga Siempre El LED azul siempre está encendido Desactive la opción Efecto de luz para reducir el consumo de energía Plug Play Id...

Страница 135: ...R para seleccionar Cambio de píxel y a continuación pulse el botón ENTER Pulse los botones o para cambiar entre Enc y Apag También verá las opciones Punto horizontal Línea vertical y Tiempo Cambio de píxel Con esta función podrá mover píxeles de forma detallada en el PDP en sentido horizontal o vertical para evitar restos de imágenes en la pantalla 4 Pulse los botones o para seleccionar la opción ...

Страница 136: ...ija en la pantalla durante un largo tiempo Lateral gris Cuando se ve la televisión con una relación de pantalla de 4 3 ésta se puede proteger de un posible daño si se ajusta el balance de blanco en ambos extremos el izquierdo y el derecho Para prevenir que la pantalla se queme seleccione Oscuro o Claro Oscuro Cuando se establece una relación de pantalla de 4 3 con esta opción se oscurecen ambos ex...

Страница 137: ...n la pared Hacia arriba hacia abajo a la derecha a la izquierda Restablecer Vuelve a la posición inicial de instalación Memorización de la posición y movimiento a la posición memorizada Memoriza 3 posiciones con los botones rojo verde y amarillo Vuelve a la posición memorizada mediante estos 3 botones de color Para la instalación consulte el manual de instalación proporcionado Para la instalación ...

Страница 138: ...r 1 Inserte la unidad USB que contenga la actualización del firmware en el puerto de actualización USB del lateral del televisor 2 Pulse el botón MENU para ver el menú Pulse los botones o para seleccionar Configuración y a continuación pulse el botón ENTER 3 Pulse los botones o para seleccionar Actualización del software y a continuación pulse el botón ENTER 4 Pulse los botones o para seleccionar ...

Страница 139: ... Pulse los botones o para seleccionar Cambiar Código y a continuación pulse el botón ENTER Aparecerá la pantalla para cambiar el código Escriba un nuevo código PIN de 4 dígitos Vuelva a escribir los 4 dígitos Cuando se muestra el mensaje El PIN se ha cambiado satisfactoriamente el PIN se ha memorizado Pulse el botón EXIT para salir Si olvida el PIN pulse los botones del mando a distancia en la sig...

Страница 140: ...os los programas de televisión Las categorías TV Y TV Y7 TV G TV PG TV 14 y TV MA disponen de opciones adicionales Consulte el siguiente paso para cambiar cualquiera de las siguientes clasificaciones secundarias FV Violencia y fantasía D Diálogo de contenido sexual L Lenguaje adulto El V Chip bloqueará automáticamente ciertas categorías que son más restrictivas Por ejemplo si bloquea la categoría ...

Страница 141: ...quear todos los programas de televisión G Audiencia general sin limitaciones PG Se sugiere supervisión paterna PG 13 Menores acompañados de un adulto R Restringidos Menores de 17 acompañados por un adulto NC 17 Mayores de 17 años X Sólo adultos NR Sin clasificar El V Chip bloqueará automáticamente cualquier categoría que sea más restrictiva Por ejemplo si bloquea la categoría PG 13 también se bloq...

Страница 142: ...gitos 3 Aparecerá la pantalla V Chip Pulse los botones o para seleccionar Francés Canadiense y a continuación pulse el botón ENTER 4 Pulse los botones o para seleccionar la restricción apropiada Pulse el botón ENTER para activar la restricción seleccionada Se muestra el símbolo Pulse el botón EXIT para salir Perm Todo Se pulsa para desbloquear todos los programas de televisión Bloq Todo Se pulsa p...

Страница 143: ...l humor etc y las clasificaciones de televisión por ejemplo DH MH H etc pueden diferir según la emisora Cómo reiniciar el televisor después de que V Chip bloquee un canal Salida de emergencia Si el televisor sintoniza un canal restringido el V Chip lo bloqueará La pantalla quedará en blanco y aparecerá el siguiente mensaje 1 Escriba su código PIN Para volver al modo de visualización normal sintoni...

Страница 144: ...SAMSUNG no se hace responsable por cualquier daño en los archivos o pérdida de datos Los archivos de datos de las tarjetas de memoria se pueden borrar a causa de una descarga electrostática EST un contacto suelto o el polvo Cuando se enciende el sistema y se cambia al modo WISELINK si los dispositivos de memoria están insertados en todas las ranuras Paralelo USB Memoria algunos de ellos quizás no ...

Страница 145: ...NK en el mando a distancia Salga de la pantalla pulsando el botón WISELINK del mando a distancia y vuelva a acceder a la pantalla WISELINK Pulse el botón WISELINK del mando a distancia para activar el modo WISELINK Uso de los botones del mando a distancia con el menú WISELINK Botón Función Mover el cursor y seleccionar una opción Seleccionar la opción marcada Reproducir o interrumpir el archivo de...

Страница 146: ...sión es jpeg o jpg Los archivos con otro formato como gif o tiff no se muestran En cada página se muestran 15 fotos en miniatura Las miniaturas se numeran de 1 a 15 de izquierda a derecha y de arriba a abajo En primer lugar se muestran las carpetas y a continuación todos los archivos JPEG de cada carpeta Las carpetas y los archivos JPEG se clasifican en orden alfabético Si la foto se visualiza en ...

Страница 147: ...n de la imagen JPEG es mayor que el tamaño de la pantalla no se puede usar la función de ampliación La función de ampliación no está disponible para archivos de imágenes que tengan una resolución de 1280 x 720 o mayor Lista Muestra las carpetas y los archivos almacenados así como la información sobre éstos El mensaje Error de archivo aparece en la pantalla en las siguientes situaciones Cuando el a...

Страница 148: ...n si Música de fondo predeterminada está en Enc Para que esta función sea posible los archivos MP3 y otros archivos de fotos deben estar en la misma carpeta del dispositivo de memoria Para ejecutar una presentación repetidamente cambie la configuración para ello consulte la página 71 Pulse el botón PLAY PAUSE cuando un icono de foto esté seleccionado para iniciar una presentación 5 Pulse el botón ...

Страница 149: ...P3 y las carpetas del mismo directorio Seleccione una carpeta con los botones o y pulse el botón ENTER La carpeta seleccionada aparecerá resaltada Pulse de nuevo el botón MENU para volver a la pantalla de la presentación Se reproduce la música de fondo seleccionada Si Música de fondo está en Apag aunque haya establecido Configuración de la música de fondo ésta no se reproducirá Lista Se muestran l...

Страница 150: ...ando se gira una foto el borde quizá no se vea en la pantalla Para salir del modo WISELINK pulse el botón WISELINK en el mando a distancia El archivo girado no se guarda RETURN 709 x 531 2006 1 30 1 14 Secuencia Girar Zoom Lista Salir Photo 0001 File 2 File 4 File 9 File 10 File 11 File 12 File 13 File 5 File 6 File 7 File 8 None 1 10 Página Photo 400x340 53 KB may 1 2006 1 14 CELLDISK2 0 315MB 49...

Страница 151: ...Photo 400x340 53 KB may 1 2006 1 14 CELLDISK2 0 315MB 495MB libre Photo 0001 Selección Menú Foto Mover Ver Regresar Photo Music Setup CELLDISK2 0 315MB 495MB libre Photo Mover Ingresar Regresar Icono de información de la función de ampliación Aparece en la parte superior izquierda de la pantalla Icono Presentación en pantalla Función Ampliación x 2 Aumenta dos veces la foto Ampliación x 4 Aumenta ...

Страница 152: ...estos botones se detiene la reproducción El tiempo de reproducción de cada archivo MP3 se puede encontrar en la parte de información del archivo Si no se encuentra se puede mostrar como 00 00 00 Icono de carpeta Icono de la lista de música Icono para desplazarse a carpeta de nivel anterior Music CELLDISK2 0 315MB 495MB libre Music Setup Photo Mover Ingresar Regresar Music 5959 KB May 14 2006 6 14 ...

Страница 153: ...n archivo de música o todos repetidamente Apag Cancela la reproducción repetitiva Salvapantallas Se selecciona para establecer el tiempo de espera antes de que se ejecute el salvapantallas si no se ha pulsado ningún botón Se puede seleccionar Salvapantallas 5 min o 10 min Pulse el botón WISELINK del mando a distancia para activar el modo WISELINK Iniciar visionado automático Rápida Música de fondo...

Страница 154: ...de 2 canales Debe conectar correctamente la toma Digital Audio IN Optical del sistema de cine en casa y el televisor para escuchar el sonido del televisor a través del sistema de cine en casa Sin embargo no se puede escuchar el sonido del grabador BD que se envía al sistema de cine en casa a través del televisor en sonido de 5 1 canales ya que el televisor sólo cuenta con una salida de sonido esté...

Страница 155: ...ones o para seleccionar el dispositivo que desee y pulse el botón ENTER Se cambia al dispositivo seleccionado 3 Si no encuentra el dispositivo que desea pulse los botones o para seleccionar Buscando conexiones y pulse el botón ENTER Aparece el mensaje Configuring Anynet connection Cuando finaliza la búsqueda de dispositivos los dispositivos conectados aparecen en el menú Anynet El cambio a los dis...

Страница 156: ...lla Botones numéricos ENTER Botones de colores Botón EXIT Después de cambiar al dispositivo mientras se reproduce un archivo Búsqueda atrás Búsqueda adelante Parar Reproducir Pausa Dispositivo con sintonizador incorporado Después de cambiar al dispositivo mientras se ve un programa de TV Botone CH Dispositivo de audio Cuando Receptor está activado Botones VOL VOL Botón MUTE Anyview2 Cuando se ve l...

Страница 157: ...ancia del televisor está en modo TV Compruebe si es un mando a distancia exclusivo para Anynet Anynet no funciona en algunas situaciones búsqueda de canales Cuando se conecta o se desconecta el cable HDMI se han de buscar de nuevo los dispositivos o reiniciar el televisor Compruebe si la función Anynet del dispositivo Anynet está activada Deseo iniciar Anynet Compruebe si el dispositivo Anynet est...

Страница 158: ... contraste Realice un ajuste preciso La imagen es demasiado grande o demasiado pequeña Ajuste los parámetros de tamaño La calidad visual de los canales digitales puede variar La calidad visual de los canales digitales puede variar según el método original de producción analógico o digital Si el método de producción original es digital calidad visual alta Si el método de producción original es anal...

Страница 159: ...anual de instalación detallado y todas las piezas necesarias para el montaje No use tornillos con un tamaño superior al estándar ya que pueden causar daños en el interior del televisor Para montajes murales que no cumplen las especificaciones de tornillos estándar VESA la longitud de éstos puede variar dependiendo de las especificaciones No use tornillos que no cumplan las especificaciones de torn...

Страница 160: ... 1231 x 849 x 316 mm Peso Cuerpo principal Con soporte 67 5 lbs 30 6 kg 72 8 lbs 33 0 kg 91 7 lbs 41 6 kg 97 0 lbs 44 0 kg Consideraciones medioambientales Temperatura de funcionamiento Humedad de funcionamiento Temperatura de almacenamiento Humedad en almacenamiento Entre 10 C y 40 C 50 F a 104 F Del 10 al 80 sin condensación Entre 20 C y 45 C 4 F a 113 F Del 5 al 95 sin condensación Este disposi...

Страница 161: ... 7 VISTA SUPERIOR VISTA FRONTAL VISTA LATERAL VISTA POSTERIOR NOTA No todos los dibujos están necesariamente a escala Algunas dimensiones están sujetas a cambio sin previo aviso Consulte las dimensiones de cada unidad antes adaptar el mueble para el televisor La empresa no se responsabiliza de cualquier error tipográfico o de impresión 2007 Samsung Electronics America Inc ...

Страница 162: ... 7 VISTA SUPERIOR VISTA FRONTAL VISTA LATERAL VISTA POSTERIOR NOTA No todos los dibujos están necesariamente a escala Algunas dimensiones están sujetas a cambio sin previo aviso Consulte las dimensiones de cada unidad antes adaptar el mueble para el televisor La empresa no se responsabiliza de cualquier error tipográfico o de impresión 2007 Samsung Electronics America Inc ...

Страница 163: ...Esta página se ha dejado en blanco expresamente ...

Страница 164: ...te con nuestro Servicio de Atención al Cliente Country Customer Care Center Web Site Address CANADA 1 800 SAMSUNG 7267864 www samsung com ca Samsung Electronics Canada Inc Customer Service 55 Standish Court Mississauga Ontario L5R 4B2 Canada Samsung Electronique Canada Inc Service à la Clientèle 55 Standish Court Mississauga Ontario L5R 4B2 Canada U S A 1 800 SAMSUNG 7267864 www samsung com Samsun...

Отзывы: