background image

92

How to Set up Restrictions using the “TV Parental Guidelines”

First, set up a personal identification number (PIN), and enable the V-Chip. (See previous section.)
Parental restrictions can be set up using either of two methods: The TV guidelines or the MPAA rating.

1

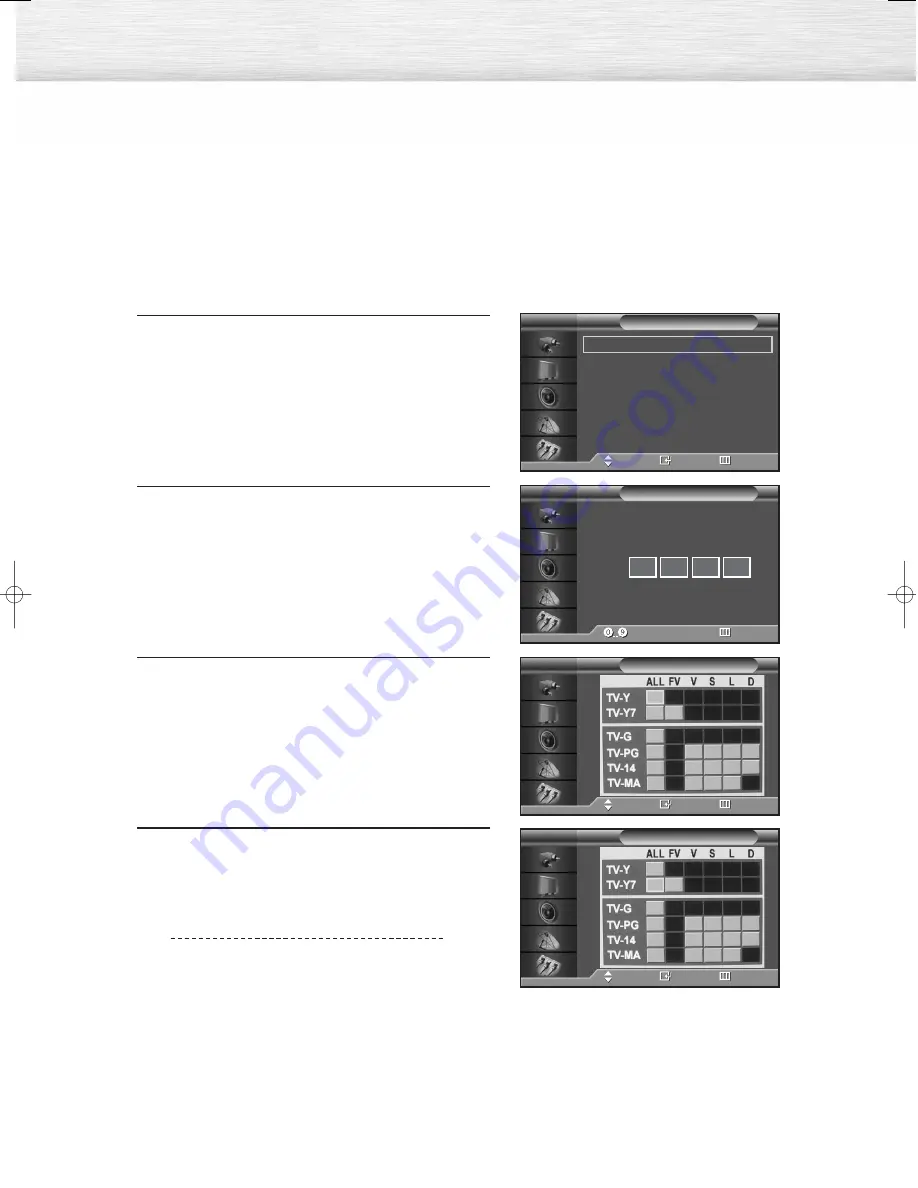
Press the MENU button. Press the 

or 

button to

select “Setup”, then press the ENTER button.

Press the 

or 

button to select “V-Chip”, then 

press the ENTER button.

The message “Enter PIN” will appear. Enter your 4- 
digit PIN number. 

3

The “V-Chip” screen will appear. Press the 

or 

button to select “TV Parental Guidelines”, then press
the ENTER button.

The “TV Parental Guidelines” screen will appear.
Press the 

or 

button to select one of the six ages

based categories:

TV-Y

Young children

TV-Y7

Children 7 and over

TV-G

General audience

TV-PG

Parental guidance

TV-14

Viewers 14 and over

TV-MA

Mature audience

Language

: English

Time

Caption

Digital NR

: On

V-Chip

Miscellaneous

PC

Setup

TV

Move

Enter

Return

TV Parental Guidelines

TV

Move

Enter

Return

Enter PIN

V-Chip

TV

Enter PIN

Return

*

*

*

*

TV Parental Guidelines

TV

Move

Enter

Return

BN68-00733A-00_076-103Eng  9/2/04  10:00 AM  Page 92

Содержание PL-42D4S

Страница 1: ...Owner s Instructions PL 42D4S This device is a Class B digital apparatus ...

Страница 2: ...ned in images are not covered by your Samsung limited warranty 2 Important Warranty Information Regarding Television Format Viewing User Instructions Screen Image retention Do not display a still image such as on a video game or when hooking up a PC to this PDP on the plasma display panel for more than several minutes as it can cause screen image retention This image retention is also known as scr...

Страница 3: ... Sound Control Customizing the Sound 56 Using Automatic Sound Settings 57 Choosing a Multi Channel Sound MTS Soundtrack 58 Using the Auto Volume 59 Setting the TruSurround XT 60 Selecting the Internal Mute 61 Channel Control Fine Tuning Channels 64 Connecting a PC and Operation Connection a PC 66 Adjusting the PC Screen 70 Changing the Position of the Image 71 Picture Quality Adjustment 72 Informa...

Страница 4: ......

Страница 5: ... L A S M A D I S P L A Y P A N E L General Information Your New Plasma Display Panel 6 Remote Control Buttons 8 Wall Installation Instructions 10 How to assemble the Stand Base 14 Connecting Speakers 15 ...

Страница 6: ... Press to turn the PDP on and off Power Indicator Power Off Red Power On Off Timer On Green Remote Control Signal Receiver Aim the remote control towards this spot on the PDP Checking Accessories Owner s Instructions Once you have unpacked your PDP check to make sure that you have all the parts shown here If any piece is missing or broken call your dealer Remote Control BN59 00376B AAA Batteries 4...

Страница 7: ...ERVICE Connector for service only ˆS VIDEO Video and audio inputs for external devices with an S Video output such as a camcorder or VCR ØAV VIDEO L AUDIO R Video and audio inputs for external devices such as a camcorder or VCR COMPONENT Video Y Pb Pr and audio L AUDIO R inputs for Component ANT IN VHF UHF 75Ω 75Ω Coaxial connector for Antenna Cable Network EXT SPEAKER 8Ω Connectors for external s...

Страница 8: ...Remote Control Buttons 8 Remote Control ...

Страница 9: ...us channel ÚTV VIDEO button Press to display all of the available video sources ie Video S Video Component PC DVI ÆCH Channel buttons Use it to switch channels ıINFO button Press to display information on the PDP screen EXIT button Press to exit the menu Up Down Left Right buttons Control the cursor in the menu P SIZE button Setect Picture size STILL button Press to pause the current screen CAPTIO...

Страница 10: ...id the following locations Do not install next to smoke and fire detectors Do not install in an area subjected to vibration or high voltage Do not install near or around any heating apparatus 3 Use only recommended parts and components Installation Notes Insulation Holder 4 EA SCREW 4 EA SCREW 12 EA 1EA 2EA LEFT 1EA RIGHT 1EA Parts Wall attachment panel is sold separately Check with your dealer Wa...

Страница 11: ...le the support bars and hinges as illustrated using screws provided 12 screws are provided For safety reasons make sure all 12 screws are firmly attached How to assemble the Wall Mount Bracket ASSY HINGE LEFT Separate ASSY HINGE into Left and Right Wall Mount Bracket Wall Mount Bracket Support Bars Support Bars Captive Screws ASSY HINGE RIGHT ASSY HINGE LEFT ASSY HINGE RIGHT 3 After securing the s...

Страница 12: ...tion Make sure the wall attachment panels are tightened Otherwise the PDP may fall Note A 5 inch 12 7 cm gap is needed between the back of the Plasma TV and the wall Wall Installation Instructions 12 Fixing the PDP panel to the wall attachment panel bracket 3 Tighten the screws of the insulation holders to the back of the PDP 4 Put the 4 insulation holders on the PDP in the grooves of the wall mou...

Страница 13: ...es of the PDP 1 Secure the SET to the wall mount bracket Please refer to the following instructions 2 Set the angle by pulling the upper end of the SET attached to bracket in the direction of the arrow 3 The angle can be adjusted from 0 to 15 by 2 Change Angle 1 Be sure to remove the safety pins underneath the PDP Caution If the safety pins are not removed the angle cannot be adjusted Any attempt ...

Страница 14: ... secure both sides of the support pins using 8 screws provided 2 Assemble the PDP with the stand and firmly secure the PDP using 4 screws provided Two or more people should carry the PDP Never lay the PDP on the floor because of possible damage to the screen Always store the PDP upright 14 ...

Страница 15: ...les on the rear of the PDP 3 Tighten the PDP and the speaker bracket using the screws removed from the PDP When moving your PDP do NOT hold the speaker connected to your PDP It may damage the bracket clamping the speaker and your PDP together and result in a drop of your PDP and a risk of personal damage and injury ...

Страница 16: ...minimum impedance 8Ω When you connect the speaker wire to the external speaker out connector first bind the speaker wire round the ferrite core to secure it Ferrite Cores The ferrite cores are used to attenuate undesired signals When connecting cables attach one of these ferrite cores to the cable near the connector When you connect POWER Cord to the POWER IN first bind POWER Cord round the ferrit...

Страница 17: ... A S M A D I S P L A Y P A N E L Connections Connecting VHF and UHF Antennas 18 Connecting Cable TV 19 Connecting a VCR 21 Connecting a Camcorder 22 Connecting a DVD Player 23 Connecting a DTV Receiver 24 ...

Страница 18: ...ennas 18 Antennas with 75 ohm Round Leads If your antenna looks like this it has 75 ohm round leads 1 Plug the antenna lead into the VHF UHF terminal on the PDP Use the Antenna Cable an accessory included in the product package ...

Страница 19: ...ng cable into the VHF UHF terminal on the PDP Use the Antenna Cable an accessory included in the product package Cable with a Cable Box that Descrambles All Channels 1 Find the cable connected to the ANTENNA OUT terminal on your cable box This terminal might be labeled ANT OUT VHF OUT or simply OUT 2 Connect the cable to the VHF UHF terminal on the PDP Use the Antenna Cable an accessory included i...

Страница 20: ...the splitter and the IN termi nal of the cable box 3 Connect a coaxial cable between the ANTENNA OUT terminal of the cable box and the B IN terminal of the RF A B switch 4 Connect a coaxial cable between the other OUT terminal of the cable box and the A IN terminal of the RF A B switch 5 Connect the last coaxial cable between the OUT terminal of the RF A B switch and the VHF UHF terminal on the PD...

Страница 21: ...UDIO R jacks on the PDP and VIDEO or S VIDEO L AUDIO R output jacks on the VCR Note For better video you can use an S Video cable Note Please be sure to match the color coded input terminals and cable jacks Videotape Playback 1 Turn on your PDP 2 Press the TV VIDEO button to select VIDEO or S VIDEO 3 Turn on your VCR insert a videotape and press the play button How to Connect PDP VCR ...

Страница 22: ...IDEO cable Note Please be sure to match the color coded input terminals and cable jacks Viewing Tapes 1 Turn on your PDP 2 Press the TV VIDEO button to select VIDEO or S VIDEO 3 Turn on your camcorder and set it to Video Mode For details refer to your camcorder Owner s instructions 4 Set the IN OUT switch on your camcorder to OUT 5 Insert the tape into the camcorder and press the Play button How t...

Страница 23: ... Connect a Audio Cable between the AUDIO L R COMPONENT input jacks on the PDP and the AUDIO output jacks on the DVD player Note Please be sure to match the color coded input terminals and cable jacks To Play DVD 1 Turn on your PDP 2 Press the TV VIDEO button to select COMPONENT 3 Turn on your DVD player insert a DVD disc and press the Play button For an explanation of Component video see your DVD ...

Страница 24: ...DVI output jacks on the DTV receiver Connect an Audio cable between the COMPONENT L R AUDIO or DVI L R AUDIO jacks on the PDP and the AUDIO output jacks on the DTV receiver Note Please be sure to match the color coded input terminals and cable jacks To Watch DTV 1 Turn on your PDP 2 Press the TV VIDEO button to select COMPONENT or DVI 3 Turn on your DTV receiver For an explanation of Component vid...

Страница 25: ...P L A S M A D I S P L A Y P A N E L Operation Turning the PDP On and Off 26 Plug Play Feature 28 Memorizing the Channels 31 Viewing an External Signal Source 36 ...

Страница 26: ...DP Your PDP also lets you display the status of many of your PDP s features Viewing the Menus 1 With the power on press the MENU button on the remote control The main menu appears on the screen The Input menu is selected 2 Press the or buttons to move items in the menu Press the œ ENTER buttons to display change or use the selected items Press the ENTER button to enter items in the menu On screen ...

Страница 27: ...ing Status Information Press the INFO button on the remote control The PDP will display the Picture mode Sound mode MTS Caption and Clock Air 4 Mono V Chip Picture Custom Sound Custom MTS Stereo Clock 12 00 am CC ...

Страница 28: ...ton on the remote control 2 Select the appropriate language by pressing the or button 3 Press the ENTER button to confirm your choice 4 Press the ENTER button The message Start Plug Play is displayed and then the Language menu is automatically displayed The message Antenna input check is displayed Start Plug Play Start Plug Play Exit Language Move Enter Enter Skip English Français Español Plug Pla...

Страница 29: ...r Watching is displayed and then the channels which have been stored can be viewed 29 The search will end automatically Channels are sorted and stored in an order which reflects their position in the frequency range with lowest first and highest last When it has finished the Clock Set menu is displayed To stop the search before it has finished or return to normal viewing press the MENU button Air ...

Страница 30: ... the ENTER button 3 Press the or button to select Plug Play Press the ENTER button 4 For further details on how to set refer to the previous page Note Plug and Play can only be accessed in the TV mode Language English Time Caption Digital NR On V Chip Miscellaneous PC Setup TV Move Enter Return Melody On Plug Play Blue Screen On Miscellaneous TV Move Enter Return Start Plug Play Start Plug Play En...

Страница 31: ...e TV systems Contact your local cable company to identify the type of cable system that exists in your particular area At this point the signal source has been selected Proceed to Storing Channels in Memory Next page Memorizing the Channels Your PDP can memorize and store all of the available channels for both off air antenna and cable channels After the available channels are memorized use the CH...

Страница 32: ...nnels After all the available channels are stored the Auto program menu reappears Press the ENTER button to stop 4 Press the MENU button to exit Note The PDP automatically cycles through all of the available channels and stores them in memory This takes about one to two minutes Air CATV Air Auto Program Add Delete Fine Tune Scan Channel TV Move Enter Return Air CATV Air Auto Program Add Delete Fin...

Страница 33: ...nate between Add and Delete Press the CH or CH button to change channels you want to add or delete 3 Press the MENU button to exit Note You can view any channel including an erased channel by using the number buttons on the remote control Air CATV Air Auto Program Add Delete Fine Tune Scan Channel TV Move Enter Return Air CATV Air Auto Program Add Delete Fine Tune Scan Channel TV Move Enter Return...

Страница 34: ...then press the ENTER button 2 Press the or button to select Scan then press the ENTER button Only the memorized channels are chosen 3 Press the MENU button to stop Press the MENU button to exit Air CATV Air Auto Program Add Delete Fine Tune Scan Channel TV Move Enter Return Scan Return Air 4 ...

Страница 35: ... channel 112 press the 100 button then 1 then 2 To change to single digit channels 0 9 faster press 0 before the single digit For channel 4 press 0 then 4 Using the PRE CH button to select the previous channel Press the PRE CH button The TV will switch to the last channel viewed To quickly switch between two channels that are far apart tune to one channel then use the number button to select the s...

Страница 36: ...mponent Monitor OUT PC or DVI on the PDP s rear panel Viewing an External Signal Source Use the remote control to switch between viewing signals from connected equipment such as VCRs DVD Set Top box and the TV source broadcast or cable Source List TV Edit Name Input TV Move Enter Return TV AV S Video Component PC DVI Source List TV Move Enter Return TV AV S Video Component PC DVI Source List TV Mo...

Страница 37: ... the VCR DVD Cable STB HD STB Satellite STB AV Receiver DVD Receiver Game Camcorder DVD Combo DHR or PC Set other signal sources AV S Video Component PC or DVI using the same method as listed above 4 Press the MENU button to exit Note DHR DVD HDD Recorder 37 Edit Name Source List TV Edit Name Input TV Move Enter Return Edit Name AV S Video Component PC DVI Edit Name TV Move Enter Return AV S Video...

Страница 38: ......

Страница 39: ...zing the Picture 40 Using Automatic Picture Settings 41 Selecting the Color Tone 42 DNIe Digital Natural Image engine 43 Changing the Screen Size 44 Freezing the Picture 46 Viewing the Picture in Picture 47 Selecting a Signal Source Antenna or Cable for PIP 52 ...

Страница 40: ...tton to select the item you wish to change then press the ENTER button Press the œ or button to change the value of the item 4 Press the MENU button to exit Notes In the PC DVI mode you can t adjust the Color and Tint If you make any changes to these settings the picture standard is automatically switched to the custom Mode Custom Custom Color Tone Normal Color Control Film Mode Off Size 16 9 DNIe...

Страница 41: ... if you want to adjust the settings according to personal preference see Customizing the Picture page 40 Using Automatic Picture Settings Your PDP has automatic picture settings that allow you to adjust the video display easily Quick way to access the picture setting Just press the P MODE button on the remote control Mode Custom Custom Color Tone Normal Color Control Film Mode Off Size 16 9 DNIe O...

Страница 42: ...in PC mode You can select Cool Normal or Warm in DVI mode 4 Press the MENU button to exit Mode Custom Custom Color Tone Normal Color Control Film Mode Off Size 16 9 DNIe On PIP Picture TV Move Enter Return Mode Custom Custom Color Tone Normal Color Control Film Mode Off Size 16 9 DNIe On PIP Picture TV Move Enter Return Cool2 Cool1 Normal Warm1 Warm2 Mode Custom Custom Color Tone Normal Color Cont...

Страница 43: ...n Switches on the DNIe mode Off Switches off the DNIe mode Demo The screen before applying DNIe appears on the right and the screen after applying DNIe appears on the left 4 Press the MENU button to exit 43 Mode Custom Custom Color Tone Normal Color Control Film Mode Off Size 16 9 DNIe On PIP Picture TV Move Enter Return Mode Custom Custom Color Tone Normal Color Control Film Mode Off Size 16 9 DN...

Страница 44: ...xit Note If you watch a still image or the 4 3 Normal mode for a long time over 2 hours an image may be burned onto the screen View the monitor in 16 9 Wide or Panorama mode as much as possible Mode Custom Custom Color Tone Normal Color Control Film Mode Off Size 16 9 DNIe On PIP Picture TV Move Enter Return Mode Custom Custom Color Tone Normal Color Control Film Mode Off Size 16 9 DNIe On PIP Pic...

Страница 45: ... mode will cause the PIP window to disappear 16 9 W 16 9 Wide ide 16 9 Aspect Ratio that fits DVD and Wide Screen applications Panorama Panorama Fits a 16 9 picture onto a 4 3 screen and displays it without clipping the image Zoom Zoom Magnifies the 16 9 wide picture in a vertical direction to fit the screen size Select by pressing the œ or button Use the or button to move the picture up and down ...

Страница 46: ...46 Still Press the STILL button on the remote control to freeze a moving picture Press again to cancel Freezing the Picture ...

Страница 47: ...Chip Lock is set to On Change the setting to Off and try it again 4 Press the MENU button to exit PIP Settings Viewing the Picture in Picture O PIP and Swap Operate X PIP doesn t Operate 47 Mode Custom Custom Color Tone Custom Color Control Film Mode Off Size 16 9 DNIe On PIP Picture TV Move Enter Return PIP Off Source TV Swap Size Position Air CATV Air Channel 4 PIP TV Move Enter Return PIP Off S...

Страница 48: ...nected any equipment to the PDP s respective input jacks 5 Press the MENU button to exit Notes The PIP function operates in Wide screen 16 9 and Panorama Using Multi Screen in the Normal 4 3 or Zoom screen will change the size of the main screen to Wide screen 48 Mode Custom Custom Color Tone Normal Color Control Film Mode Off Size 16 9 DNIe On PIP Picture TV Move Enter Return PIP On Source TV Swa...

Страница 49: ... to select Swap then press the ENTER button The image in the PIP window will appear on the main screen and vice versa 4 Press the MENU button to exit Mode Custom Custom Color Tone Normal Color Control Film Mode Off Size 16 9 DNIe On PIP Picture TV Move Enter Return PIP On Source TV Swap Size Position Air CATV Air Channel 4 PIP TV Move Enter Return PIP On Source TV Swap Size Position Air CATV Air C...

Страница 50: ...then press the ENTER button 5 Press the MENU button to exit Mode Custom Custom Color Tone Normal Color Control Film Mode Off Size 16 9 DNIe On PIP Picture TV Move Enter Return PIP On Source TV Swap Size Position Air CATV Air Channel 4 PIP TV Move Enter Return PIP On Source TV Swap Size Position Air CATV Air Channel 4 PIP TV Move Enter Return PIP On Source TV Swap Size Position Air CATV Air Channel...

Страница 51: ...tion you want then press the ENTER button 5 Press the MENU button to exit Note The Double1 or Double2 mode can not be selected in position Mode Custom Custom Color Tone Normal Color Control Film Mode Off Size 16 9 DNIe On PIP Picture TV Move Enter Return PIP On Source TV Swap Size Position Air CATV Air Channel 4 PIP TV Move Enter Return PIP On Source TV Swap Size Position Air CATV Air Channel 4 PI...

Страница 52: ...ntenna is connected the setting is Air If a Cable TV system is providing the signal press the or button until the appropriate type of cable system is selected STD HRC or IRC 5 Press the MENU button to exit the menu Mode Custom Custom Color Tone Normal Color Control Film Mode Off Size 16 9 DNIe On PIP Picture TV Move Enter Return PIP On Source TV Swap Size Position Air CATV Air Channel 4 PIP TV Mov...

Страница 53: ...or button to change the channel that appears in the PIP window 5 Press the MENU button to exit Mode Custom Custom Color Tone Normal Color Control Film Mode Off Size 16 9 DNIe On PIP Picture TV Move Enter Return PIP On Source TV Swap Size Position Air CATV Air Channel 4 PIP TV Move Enter Return PIP On Source TV Swap Size Position Air CATV Air Channel 4 PIP TV Move Enter Return 4 PIP On Source TV Sw...

Страница 54: ......

Страница 55: ... A Y P A N E L Sound Control Customizing the Sound 56 Using Automatic Sound Settings 57 Choosing a Multi Channel Sound MTS Soundtrack 58 Using the Auto Volume 59 Setting the TruSurround XT 60 Selecting the Internal Mute 61 ...

Страница 56: ...lance equalizer to be adjusted by pressing the œ or button Press the or button to reach the required setting 4 Press the MENU button to exit Mode Custom Custom MTS Stereo Auto Volume Off SRS TSXT Stereo Internal Mute Off Sound TV Move Enter Return Custom TV Adjust Move Return 100 300 1K 3K 10K 0 R L If you make any changes to the equalizer settings the sound Mode is automatically switched to the c...

Страница 57: ...hen watching movie Choose Speech when watching a show that is mostly dialogue i e news Choose Custom to recall your personalized settings see Customizing the Sound page 56 Using Automatic Sound Settings Mode Custom Custom MTS Stereo Auto Volume Off SRS TSXT Stereo Internal Mute Off Sound TV Move Enter Return Mode Custom Custom MTS Stereo Auto Volume Off SRS TSXT Stereo Internal Mute Off Sound TV M...

Страница 58: ...on Note The MTS function operates in TV mode only Quick way to access the MTS menu Just press the MTS button on the remote control Choosing a Multi Channel Sound MTS Soundtrack Depending on the particular program being broadcast you can listen to stereo mono or a Separate Audio Program SAP audio is usually a foreign language translation Sometimes SAP has unrelated information like news or weather ...

Страница 59: ... it necessary to adjust the volume every time the channel is changed Auto volume lets you automatically adjust the volume of the desired channel by lowering the sound output when the modula tion signal is high or by raising the sound output when the modulation signal is low Mode Custom Custom MTS Stereo Auto Volume Off SRS TSXT Stereo Internal Mute Off Sound TV Move Enter Return Mode Custom Custom...

Страница 60: ...en press the ENTER button 3 Press the or button to change the setting Off 3D Mono or Stereo then press the ENTER button 4 Press the MENU button to exit TruSurround XT SRS and Symbol are trademarks of SRS Labs Inc TruSurround XT technology is incorporated under license from SRS Labs Inc Mode Custom Custom MTS Stereo Auto Volume Off SRS TSXT Stereo Internal Mute Off Sound TV Move Enter Return Mode C...

Страница 61: ...on 3 Press the or button to select On then press the ENTER button Pressing the or button will alternate between On and Off 4 Press the MENU button to exit Mode Custom Custom MTS Stereo Auto Volume Off SRS TSXT Stereo Internal Mute Off Sound TV Move Enter Return Mode Custom Custom MTS Stereo Auto Volume Off SRS TSXT Stereo Internal Mute Off Sound TV Move Enter Return Mode Custom Custom MTS Stereo A...

Страница 62: ......

Страница 63: ...P L A S M A D I S P L A Y P A N E L Channel Control Fine Tuning Channels 64 ...

Страница 64: ...ton to adjust the fine tuning 4 To store the fine tuning setting in the TV s memory press the ENTER button A star icon will appear To reset the fine tuning to 0 press the button to select Reset then press the ENTER button 5 Press the MENU button to exit Air CATV Air Auto Program Add Delete Fine Tune Scan Channel TV Move Enter Return Fine Tune Move Adjust Store Air 4 0 Reset Return Fine Tune Move A...

Страница 65: ...P L A S M A D I S P L A Y P A N E L Connecting a PC and Operation Connecting a PC 66 Adjusting the PC Screen 70 Changing the Position of the Image 71 Picture Quality Adjustment 72 Information 75 ...

Страница 66: ...C and the Audio input jacks PC INPUT on the PDP 1 2 Connecting a PC DVI to the PDP Connect a DVI cable between the PC DVI jack on the PC and the DVI D input jack on the PDP Connect a Audio cable between the Audio jack on the PC and the Audio L R input DVI INPUT jacks on the PDP 1 2 Note Please be sure to match the color coded input terminals and cable jacks To watch the PC screen 1 Turn on your PD...

Страница 67: ...lution eliminates complicated and time consuming setup It allows you to install your monitor in a Plug and Play compatible system without the usual setup hassles and confusion Your PC system can easily identify and configure itself for use with your display This monitor automatically tells the PC system its Extended Display Identification data EDID using Display Data Channel DDC protocols ...

Страница 68: ...ick on Properties The Display Dialog Box will be displayed 2 Click on Settings then set the Display Mode with reference to the Display Modes Table You do not need to change the Colours settings 3 Click on Advanced A new settings dialog box will be displayed 4 Click on the Monitor tab then set the Screen Refresh Rate with reference to the Display Modes Table Set the Vertical Frequency and Horizonta...

Страница 69: ...zontal In some cases abnormal signals such as stripes might appear on the screen when the PC power is turned off or if the PC is disconnected If so press the TV VIDEO button on the remote control or SOURCE button on the front panel to enter the VIDEO mode Also make sure that the PC is connected Connect only a PC monitor to the monitor output port while viewing the PC screen Otherwise random signal...

Страница 70: ...Control is available only when the Color Tone is set to Custom and a PC is connected 3 Press the or button to select the item you want to change then press the ENTER button Press the œ or button to change the value of the item using the on screen gauge as your guide 4 Press the MENU button to exit Mode Custom Custom Color Tone Custom Color Control Film Mode Off Size 16 9 DNIe On PIP Picture TV Mov...

Страница 71: ...NTER button 2 Press the or button to select PC then press the ENTER button 3 Press the or button to select Position then press the ENTER button 4 Adjust the position of screen by pressing the œ button 5 Press the MENU button to exit Language English Time Caption Digital NR On V Chip Miscellaneous PC Setup TV Move Enter Return Image Lock Position Information Auto Adjustment PC TV Move Enter Return ...

Страница 72: ...utton 3 Press the or button to select Auto Adjustment then press the ENTER button The message Auto Adjustment in progress appears on the screen and the picture adjustments are automatically activated 4 Press the MENU button to exit Air 11 Language English Time Caption Digital NR On V Chip Miscellaneous PC Setup TV Move Enter Return Image Lock Position Information Auto Adjustment PC TV Move Enter R...

Страница 73: ...s the ENTER button 4 Press the ENTER button to select Coarse Remove picture noise vertical stripes on the screen by pressing the œ or button If Coarse is not set properly vertical stripes will appear on the screen 5 Press the MENU button to exit Language English Time Caption Digital NR On V Chip Miscellaneous PC Setup TV Move Enter Return Image Lock Position Information Auto Adjustment PC TV Move ...

Страница 74: ... press the ENTER button 4 Press the or button to select Fine then press the ENTER button Remove picture noise on the screen by pressing the œ or button If Fine is not set properly noise will appear on the screen 5 Press the MENU button to exit Language English Time Caption Digital NR On V Chip Miscellaneous PC Setup TV Move Enter Return Image Lock Position Information Auto Adjustment PC TV Move En...

Страница 75: ...n 3 Press the or button to select Information then press the ENTER button The vertical horizontal frequencies and resolution appear 4 Press the MENU button to exit Language English Time Caption Digital NR On V Chip Miscellaneous PC Setup TV Move Enter Return Image Lock Position Information Auto Adjustment PC TV Move Enter Return Resolution 1280 720 H Frequency 38 0KHz V Frequency 60 5 Hz Informati...

Страница 76: ......

Страница 77: ...P L A S M A D I S P L A Y P A N E L Time Setting Setting the Clock 78 Setting the Sleep Timer 79 Setting the Timers 80 ...

Страница 78: ... select correct minute 5 Press the button to select am pm then press the or button to select the proper time of day am or pm Press the MENU button 6 Press the MENU button to exit 78 Language English Time Caption Digital NR On V Chip Miscellaneous PC Setup TV Move Enter Return Clock am Sleep Timer Off On Timer Off Off Timer Off Time TV Move Enter Return Clock TV Adjust Move Return Hour Minute am pm...

Страница 79: ...0 to 180 minutes 5 Press the button to select Activation then press the or button to select On or Off 6 Press the MENU button to exit Setting the Sleep Timer Quick way to access the sleep timer setting Just press the SLEEP button on the remote control 79 Language English Time Caption Digital NR On V Chip Miscellaneous PC Setup TV Move Enter Return Clock am Sleep Timer Off On Timer Off Off Timer Of...

Страница 80: ...ct hour 4 Press the button to select Minute then press the or button to select correct minute 5 Press the button to select am pm then press the or button to select the proper time of day am or pm Language English Time Caption Digital NR On V Chip Miscellaneous PC Setup TV Move Enter Return Clock am Sleep Timer Off On Timer Off Off Timer Off Time TV Move Enter Return On Timer TV Adjust Move Return ...

Страница 81: ...utton to select On or Off 9 If you want to set Off Time press the MENU button Press the or button to select Off Timer Set the Off Timer just as you set On Timer 10 Press the MENU button to exit 81 On Timer TV Adjust Move Return Hour Minute am pm 12 00 am Channel Volume Activation Air 3 10 Off On Timer TV Adjust Move Return Hour Minute am pm 12 00 am Channel Volume Activation Air 3 10 Off On Timer ...

Страница 82: ......

Страница 83: ...guage 84 Digital Noise Reduction 85 Selecting the Film Mode 86 Setting the Melody Sound 87 Setting the Blue Screen 88 Viewing Closed Captions 89 Using the V Chip 90 P L A S M A D I S P L A Y P A N E L Function Description ...

Страница 84: ...uage English Français or Español 4 Press the MENU button to exit Language English Time Caption Digital NR On V Chip Miscellaneous PC Setup TV Move Enter Return Language English Time Caption Digital NR On V Chip Miscellaneous PC Setup TV Move Enter Return English Français Español Langue Français Heure Sous titres Réduct bruit num Marche puce V Divers PC Configuration TV Dépl Entrée Retour English F...

Страница 85: ...ER button 2 Press the or button to select Digital NR then press the ENTER button 3 Press the or button to select On or Off then press the ENTER button 4 Press the MENU button to exit Language English Time Caption Digital NR On V Chip Miscellaneous PC Setup TV Move Enter Return Language English Time Caption Digital NR On V Chip Miscellaneous PC Setup TV Move Enter Return Language English Time Capti...

Страница 86: ...ress the or button to select On or Off then press the ENTER button 4 Press the MENU button to exit Note Film mode is supported in TV Video S Video and Component 480i Mode Custom Custom Color Tone Normal Color Control Film Mode Off Size 16 9 DNIe On PIP Picture TV Move Enter Return Mode Custom Custom Color Tone Normal Color Control Film Mode Off Size 16 9 DNIe On PIP Picture TV Move Enter Return Of...

Страница 87: ...ing On or Off 5 Press the MENU button to exit 87 Setting the Melody Sound You can hear clear melody sound when the television is powered on or off Language English Time Caption Digital NR On V Chip Miscellaneous PC Setup TV Move Enter Return Melody On Plug Play Blue Screen On Miscellaneous TV Move Enter Return Melody On Plug Play Blue Screen On Miscellaneous TV Move Enter Return Melody On Plug Pla...

Страница 88: ... the or button to select Blue Screen Press the ENTER button 4 Press the or button to select On or Off then press the ENTER button 5 Press the MENU button to exit Language English Time Caption Digital NR On V Chip Miscellaneous PC Setup TV Move Enter Return Blue Screen is displayed when there is no signal from an external device in the External Mode regardless of the Blue Screen Setting Melody On P...

Страница 89: ...r example Channel 1 may have subtitles in English while Channel 2 has subtitles in Spanish Viewing Closed Captions Your TV decodes and displays the closed captions that are broadcast with certain TV shows These captions are usually subtitles for the hearing impaired or foreign language translations All VCRs record the closed caption signal from television programs so home recorded video tapes also...

Страница 90: ...ult PIN number of a new TV set is 0 0 0 0 3 The V Chip screen will appear Press the or button to select Change PIN then press the ENTER button 4 The Change pin screen will appear Choose any 4 digits for your PIN and enter them As soon as the 4 digits are entered the Confirm New PIN screen appears Re enter the same 4 dig its When the Confirm screen disappears your PIN has been memorized 5 Press the...

Страница 91: ... The V Chip screen will appear To enable the V Chip feature press the ENTER button so that the V Chip Lock field is On Pressing the or button will alternate between On and Off Press the MENU button 4 Press the MENU button to exit Language English Time Caption Digital NR On V Chip Miscellaneous PC Setup TV Move Enter Return Enter PIN V Chip TV Enter PIN Return V Chip Lock Off TV Parental Guidelines...

Страница 92: ...IN will appear Enter your 4 digit PIN number 3 The V Chip screen will appear Press the or button to select TV Parental Guidelines then press the ENTER button 4 The TV Parental Guidelines screen will appear Press the or button to select one of the six ages based categories TV Y Young children TV Y7 Children 7 and over TV G General audience TV PG Parental guidance TV 14 Viewers 14 and over TV MA Mat...

Страница 93: ...ion 6 How to set the FV D L S and V sub ratings First select one of these TV Ratings TV Y TV Y7 TV G TV PG TV 14 or TV MA See Step 4 on previous page and press button A symbol will be displayed for each sub rating While is selected press the ENTER button to go to a sub rating Press ENTER to block the sub rating To select a different TV Rating press the or button and then repeat the process Note Th...

Страница 94: ...atedly press the or button to select a particular MPAA category Pressing the or button will cycle through the MPAA categories While a particular category is selected press the ENTER button to activate it A selected symbol will be displayed Press the ENTER button to block or unblock the category Note The V Chip will automatically block any category that is more restrictive For example if you block ...

Страница 95: ...s depending on the rating of the local TV programs the V Chip might lock out all the channels In this case use the V Chip function for an emergency escape 1 Press the MENU button Press the or button to select Setup then press the ENTER button 2 Press the or button to select V Chip then press the ENTER button 3 Enter your PIN number and press the or button to temporarily disable the V Chip Lock Thi...

Страница 96: ......

Страница 97: ...P L A S M A D I S P L A Y P A N E L Appendix Troubleshooting 98 Care and Maintenance 99 Specifications 100 ...

Страница 98: ...blem first try this list of possible problems and solutions If none of these troubleshooting tips apply then call your nearest service center Possible Solution Check all wire connections Press the TV VIDEO button to put your remote control in the TV mode Check if the power plug is connected Check to see that both the PDP and the source are plugged in and turned on Adjust the Brightness or Contrast...

Страница 99: ...ar Do not place the PDP on a rough and slanted surface such as cloth or paper Liquids Do not place liquids near or on the PDP Cabinet Never open the cabinet or touch the parts inside Wipe your PDP with a clean dry cloth Never use water cleaning fluids wax or chemicals Do not put heavy objects on top of the cabinet Temperature If your PDP is suddenly moved from a cold to a warm place unplug the pow...

Страница 100: ...028 W X 86 4 D X 685 H mm with stand 33 24 kg with stand 100 240 V 50 60 Hz 852 H X 480 V 107 Cm 42 inches VHF UHF 75Ω unbalanced AV S VIDEO COMPONENT 480i 480p 720p 1080i RGB PC DSUB 15P DVI AV S VIDEO COMPONENT PC DVI 15W 15W 8 Ω Model Dimensions Display Weight Display Voltage Number of Pixels Screen Size ANTENNA input VIDEO input AUDIO input AUDIO output ...

Страница 101: ...101 Memo ...

Страница 102: ...Memo 102 ...

Страница 103: ...103 Memo ...

Страница 104: ...BN68 00733A 00 ...

Отзывы: