20 English
Ins
tallation ins
truc
tions
Installation instructions
3.
Install male 0.5-in (1.3-mm) or 0.75-in (1.9-mm) flare union adapter to the NPT
internal thread of the manual shut-off valve, taking care to back up the shut-off
valve to keep it from turning.
4.
Connect flexible metal appliance connector to the adapter on the range. Position
range to permit connection at the shut-off valve.
5.
When all connections have been made, make sure all range controls are in the
off position and turn on the main gas supply valve. Use a liquid leak detector at
all joints and connections to check for leaks in the system.
WARNING
To prevent death, personal injury, explosion, and/or fire hazard,
DO NOT
use a
flame to check for gas leaks.
When using test pressures greater than ½ psig to pressure-test the gas supply
system of the residence, disconnect the range and individual shut-off valve from
the gas supply piping. When using test pressures of ½ psig or less to test the gas
supply system, simply isolate the range from the gas supply system by closing the
individual shut-off valve.
WARNING
Do not exceed 25 ft-lbs of torque when making gas line connections.
Overtightening may crack the pressure regulator resulting in a gas leak.
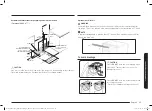
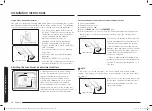
Flexible connector hookup
Installer: Inform the consumer of the location of the gas shut-off valve.
Adapter
Flex
Connector
(6-ft max.)
Adapter
Gas Shut-Off Valve
0.5-in or 0.75-in
Gas Pipe
Tubing Line to
Oven Burner
Control Valve
Gas Flo
w int
o R
ange
Pressure
Regulator
Tubing Line
to Cooktop
Control
Manifold
NOTE
If your area requires a rigid pipe hookup,
contact a qualified installer, service agency,
or gas supplier.
NOTE
The gas shut-off valve should be installed
in an accessible location in the gas piping,
external to the appliance, for the purpose
of turning on or shutting off the gas to the
appliance.
Step 3. Convert to lp gas (optional)
All new gas ranges are shipped from the factory set up to use natural gas. Any
Samsung gas range can be converted to use LP gas. Refer to page 55 in the User
Manual to contact a qualified service technician.
The conversion process should only be performed by a qualified LP gas installer.
Conversion instructions and LP orifices will be supplied with the LP conversion kit.
The conversion to LP requires all burner orifices to be changed (5 surface burners
and 2 oven burners).
In addition, the nozzle on the gas pressure regulator needs to be reversed. All
replaced orifices must be left with the consumer, including the instructions and
retrofit sizes and orifice indication.
Checking the flame quality all burner after converting to lp gas.
Install_NX60T8751_BEST_BETTER_AA_DG68-01243A-03_EN+MES+CFR_210119.indb 20
Install_NX60T8751_BEST_BETTER_AA_DG68-01243A-03_EN+MES+CFR_210119.indb 20
2021-01-19 오후 3:23:41
2021-01-19 오후 3:23:41


