


English - 15
initial cleaning
Before the oven is used for the first time, initial cleaning of the oven is required to remove the new oven smell.
1.
Remove all accessories from the oven.
2.
Run oven with convection 200 °C or conventional 200 °C for an hour. This procedure will burn
any remaining production substances in the oven.
3.
Switch off the oven by turnning mode selector to “off” after an hour.
For the first time use of the accessories, clean the accessories thoroughly with warm water,
detergent and soft clean cloth.
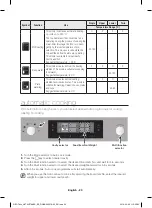
using the oven
Your new oven has below basic steps for cooking.
STEP 1
SELECT THE
CAVITY FIRST
STEP 2
SET COOKING
FUNCTION
STEP 3
SET
TEMPERATURE
Mode selector
Multi function
selector
Temperature
Cavity selector
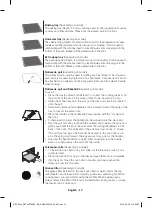
USE OF CAVITY
Upper mode
The uppper cavity is used for cooking.
Divider is required to use this mode.
Twin mode
The twin mode allows you to cook
two meals at different functions
and different temperature settings.
Divider is required to use this mode.
Single Mode
The total cavity is used for cooking.
Remove the divider.
Lower mode
The lower cavity is used for cooking.
Divider is required to use this mode.
SINGLE MODE
In single mode, the oven operates like a traditional oven.
Use this mode for large amounts of food or if you need special
accessories such as the spit.
Remove divider from the oven to use this mode.
UPPER MODE
Only upper cavity or lower cavity used for cooking.
These modes save time for pre-heating and energy while cooking
smaller amount of food. Insert divider into shelf level 3 to use this mode.
When you choose to cook in half cavity mode (upper or lower
mode), the door glass of unused cavity might show signs of
condensation.
LOWER MODE
TWIN MODE
In twin mode, the upper cavity and lower cavity operate with
different functions and temperature for each other. The cook timer
and end timer settings are also available for each. Insert divider into
shelf level 3 to use this mode.
04
INITIAL CLEANING & USING THE O
VEN
NEO Twin_NV70H7786ES_EE_DG68-00537A-00_EN.indd 15
2014-04-05 �� 2:22:58
Содержание NV70 77 Series
Страница 33: ...pm 08 reng ring och sk tsel NEO Twin_NV70H7786ES_EE_DG68 00537A 00_SE indd 33 2014 03 25 5 29 04...
Страница 34: ...pm NEO Twin_NV70H7786ES_EE_DG68 00537A 00_SE indd 34 2014 03 25 5 29 04...
Страница 35: ...pm NEO Twin_NV70H7786ES_EE_DG68 00537A 00_SE indd 35 2014 03 25 5 29 04...
Страница 69: ...huskeliste 08 rengj ring og stell NEO Twin_NV70H7786ES_EE_DG68 00537A 00_NO indd 33 2014 03 25 5 29 44...
Страница 70: ...huskeliste NEO Twin_NV70H7786ES_EE_DG68 00537A 00_NO indd 34 2014 03 25 5 29 44...
Страница 71: ...huskeliste NEO Twin_NV70H7786ES_EE_DG68 00537A 00_NO indd 35 2014 03 25 5 29 44...
Страница 105: ...muistiinpanoja 08 Puhdistaminen ja huolto NEO Twin_NV70H7786ES_EE_DG68 00537A 00_FI indd 33 2014 03 25 5 26 24...
Страница 106: ...muistiinpanoja NEO Twin_NV70H7786ES_EE_DG68 00537A 00_FI indd 34 2014 03 25 5 26 24...
Страница 107: ...muistiinpanoja NEO Twin_NV70H7786ES_EE_DG68 00537A 00_FI indd 35 2014 03 25 5 26 24...
Страница 141: ...memo 08 reng ring og vedligeholdelse NEO Twin_NV70H7786ES_EE_DG68 00537A 00_DA indd 33 2014 03 25 5 24 19...
Страница 142: ...memo NEO Twin_NV70H7786ES_EE_DG68 00537A 00_DA indd 34 2014 03 25 5 24 19...
Страница 143: ...memo NEO Twin_NV70H7786ES_EE_DG68 00537A 00_DA indd 35 2014 03 25 5 24 19...
Страница 177: ...memo 08 CLEANING AND CARES NEO Twin_NV70H7786ES_EE_DG68 00537A 00_EN indd 33 2014 04 05 2 23 06...
Страница 178: ...memo NEO Twin_NV70H7786ES_EE_DG68 00537A 00_EN indd 34 2014 04 05 2 23 06...
Страница 179: ...memo NEO Twin_NV70H7786ES_EE_DG68 00537A 00_EN indd 35 2014 04 05 2 23 06...


