background image

20

Things to watch out for when taking pictures

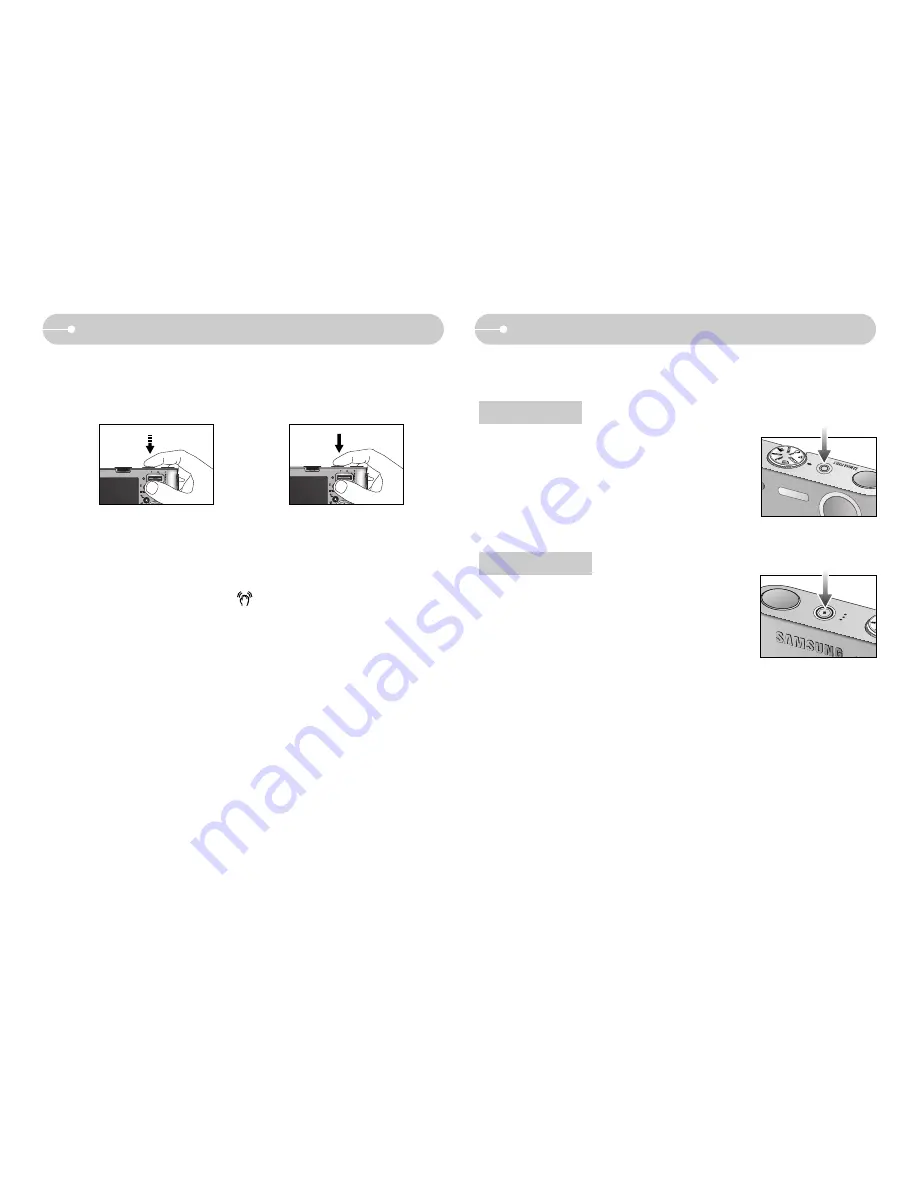
Pressing the shutter button down half way.

Lightly press the shutter button to confirm focus and flash battery charge. 
Press the shutter button all way down to take the picture.

The available recording time may vary depending on shooting conditions and
camera settings.

When the Flash Off or Slow synchro mode is selected in a low lighting condition,
the camera shake warning indicator (        ) may appear on the LCD monitor. In
this case, use a tripod, support the camera on a solid surface or change to flash
shot mode.

Shooting against the light : 
Do not take pictures into the sun. Taking a picture against the sun may make the
picture dark. To take a picture against the sun, please use the [Backlight] in the
scene shooting mode (see page 18), fill-in flash (see page 25), spot metering
(see page 37), or exposure compensation (see page 30).

Avoid obstructing the lens or the flash when you capture an image.

Compose the image by using the LCD monitor.

Under certain conditions the auto focus system may not perform as expected.

- When photographing a subject that has little contrast.
- If the subject is highly reflective or shiny.
- If the subject is moving at high speed.
- When there is strong reflected light, or when the background is very bright.
- When the subject matter has only horizontal lines or the subject is very narrow 

(such as a stick or flagpole).

- When the surroundings are dark.

Using the camera buttons to set the camera

The recording mode function can be set up by using the camera buttons.

Used for turning the camera’s power on/ off.

If there is no operation during the specified time, the
camera's power will be turned off automatically to
save battery life. 
Refer to page 58 for more information about the auto
power off function.

Used for taking an image or recording voice in the
RECORDING mode.

In MOVIE CLIP mode : 
Pressing the shutter button down fully starts the
process for recording a movie clip. Press the shutter
button once and the movie clip is recorded for as long as
the available recording time in the memory allows. If you wish to stop recording,
press the shutter button again.

In STILL IMAGE mode

Pressing the shutter button down halfway activates the autofocus and checks
the condition of the flash. Pressing the shutter button down fully takes and stores
the image. If you select voice memo recording, the recording will start after the
camera has finished storing the image data.

[Lightly press the shutter button]

[Press the shutter button]

POWER button

SHUTTER button

Содержание NV3S

Страница 1: ...ung Camera This manual will guide you through using the camera including capturing images downloading images and using the application software Please read this manual carefully before using your new camera User s Manual ENGLISH ...

Страница 2: ...ader Thank you for buying a Samsung Digital Camera Prior to using this camera please read this user manual thoroughly When you require After Sales service please bring the camera and the cause of the camera malfunction such as battery Memory card etc to the A S centre Please check that the camera is operating properly long before you intend to use it e g for a trip or an important event to avoid d...

Страница 3: ... do not cover the camera or AC Charger This may cause heat to build up and distort the camera body or cause a fire Always use the camera and its accessories in a well ventilated area DANGER indicates an imminently hazardous situation which if not avoided will result in death or serious injury Do not attempt to modify this camera in any way This may result in fire injury electric shock or severe da...

Страница 4: ...res and are perfectly normal The time of power on can be delayed and the colour of LCD monitor can be changed slightly Fast movement when pointing the camera at the subject can make an after image appear on the LCD monitor Credit cards may be demagnetized if left near case Avoid leaving magnetic strip cards near the case CAUTION Contents READY System chart 5 Identification of features 6 Front Top ...

Страница 5: ...r for Windows 98SE 85 Digimax Converter 86 Digimax Master 87 FAQ 90 SOFTWARE MP3 PMP TEXT VIEWER MODE Metering 37 Continuous shot 37 Sharpness 38 Auto Focus type 38 OSD On Screen Display information 39 Starting play mode 40 Playing back a still image 40 Playing back a movie clip 40 Movie clip capture function 40 On camera movie trimming 41 Playing back a recorded voice 41 LCD monitor indicator 42 ...

Страница 6: ... nearest Samsung dealer or Samsung service centre Software CD see p 79 Camera strap User manual Product warranty Camera case SD memory card MMC see p 12 DPOF compatible printer see p 51 Rechargeable battery SLB 0837 Cradle AC adapter SAC 45 USB cable SUC C2 PictBridge compatible printer see p 54 Computer External monitor see p 61 Included items Earphones AV Earphones gender AV cable ...

Страница 7: ... 6 Identification of features Front Top Power button Shutter button Camera strap Mode dial Self timer lamp Auto Focus lamp Speaker Optical 3X zoom lens Lens cover Flash Microphone Speaker ...

Страница 8: ...ay mode button Print button E Effect button Earphones Jack Camera status lamp Zoom Thumbnail Volume button 5 function button button DELETE button Back Bottom USB AV connection terminal Cradle connector Identification of features ...

Страница 9: ...USB port Voice memo Voice Recording UP button FLASH LEFT button MENU OK button SELF TIMER RIGHT button Macro DOWN button Play Pause button Battery holder Battery chamber Memory card slot Battery chamber cover You can recharge your rechargeable battery transfer a captured image to print and download images with the cradle Refer to pages 11 54 83 ...

Страница 10: ... connected to a PC After taking a picture Power on The lamp turns on when the camera is ready to take a picture the lamp turns off The lamp blinks while saving the image data and then turns off when the camera is ready to take another picture The lamp lights up LCD monitor turns off after initializing the device The lamp blinks LCD monitor turns off The lamp lights up The lamp blinks Approx 150 MI...

Страница 11: ...ended use of the camera the camera body may become warm This is perfectly normal When you use earphones do not remove the battery while the camera is turning on It may generate a loud noise INFORMATION Still image Using the fully charged battery 640X480 image size 30fps frame rate Approx 90 MIN Approx 100 MIN About 200 shots Battery life Number of images Based on the following shooting conditions ...

Страница 12: ...er is inserted the camera power may be turned off because the rechargeable battery is discharged again When you charge the battery with the cradle you only can use Lithium Ion battery pack SLB 0837 Charging LED Being Charged Red LED is on Charging is complete Green LED is on Charging error Red LED is off or blinking Before inserting any cables or AC adapter check the directions and do not insert b...

Страница 13: ...that is used in another digital camera To use the memory card in this camera format the memory card using this camera Do not use a memory card formatted by another digital camera or memory card reader If the memory card is subjected to any of the following the recorded data may become corrupted When the memory card is used incorrectly If the power is switched off or the memory card is removed whil...

Страница 14: ...of the SD memory card the data protection will be cancelled Slide the switch towards the top of the SD memory card before taking a picture Don t remove the memory card when the camera status lamp is blinking as this may cause damage to data in the memory card INFORMATION When using a 256MB MMC Multi Media Card the specified shooting capacity will be as follows These figures are approximate as imag...

Страница 15: ...is at the first item of the date and time setup In all other instances the cursor will be shifted to the left of its current position UP DOWN button changes the value of each item Setting up the language 1 Select the Language menu by pressing the UP DOWN button and press the RIGHT button 2 Select the desired sub menu by pressing the UP DOWN button and press the OK button You can select one of the ...

Страница 16: ... 13 p 29 14 ISO p 28 15 RGB RGB p 28 16 p 38 17 p 36 18 P 36 P 13 00 01 30 00 30 00 P 13 20 p 22 19 21 P 21 Number of available shots remaining Remaining time Movie clip Voice recording 19 Recording mode Image size Optical Digital Zoom bar Digital Zoom rate Imagequality Framerate Sharpness White Balance Exposure compensation Date Time Camera shake warning Auto focus frame Card inserted indicator V...

Страница 17: ... will be stored on the memory card 3 Close the battery chamber cover 4 Press the power button to turn on the camera If the date time that is displayed on the LCD monitor is incorrect reset the date time before taking a picture 5 Select the AUTO mode by rotating the mode dial 6 Point the camera towards the subject and compose the image by using the LCD monitor 7 Press the shutter button to capture ...

Страница 18: ...s digital processor images taken using the ASR may take a little longer for the camera to process Wise Shot 2 images are taken at a time One is taken in the Fill In Flash mode and the other is taken in the ASR mode You can select and save only one of the images How to use the Wise Shot 1 Select the ASR mode by rotating the mode dial 2 Press the E button and the Wise Shot function is activated 3 Pr...

Страница 19: ...acklight Portrait without shadows caused by backlight Firework Firework scenes Beach Snow For ocean lake beach and snow scape scenes How to use the MOVIE CLIP mode A movie clip can be recorded for as long as the available recording time of the memory capacity allows 1 Select the MOVIE CLIP mode by rotating the mode dial Available recording time will display on the LCD monitor 2 The MOVIE CLIP mode...

Страница 20: ...lips 1 Press the Pause button while recording a movie clip and the recording will be paused 2 Press the Pause button again to resume the recording 3 If you wish to stop recording press the shutter button again MOVIE CLIP mode Voice recording mode Successive recording of a movie clip How to use the VOICE RECORDING mode A voice recording can be recorded for as long as the memory capacity allows Max ...

Страница 21: ... the subject is moving at high speed When there is strong reflected light or when the background is very bright When the subject matter has only horizontal lines or the subject is very narrow such as a stick or flagpole When the surroundings are dark Using the camera buttons to set the camera The recording mode function can be set up by using the camera buttons Used for turning the camera s power ...

Страница 22: ... camera has a 3X optical zoom and a 5X digital zoom function Using both will offer a total zoom ratio of 15X TELE Zoom Optical zoom TELE Pressing the ZOOM T button This will zoom into the subject i e the subject will appear nearer Digital zoom TELE When the maximum 3X optical zoom is selected pressing the ZOOM T button activates the digital zoom software Releasing ZOOM T button stops the digital z...

Страница 23: ...from the moment the picture is stored In the middle of the sound recording pressing the shutter button will stop the voice memo Images taken using the digital zoom may take a little longer for the camera to process Allow time for this to take place You may notice a decrease in image quality when using the digital zoom To view a clearer digital zoom image press the shutter button halfway at the max...

Страница 24: ... 5 Wide only W 5 Infinity T 50 Infinity W 5 Infinity T 50 Infinity W 5 50 T 25 50 Program ASR mode Auto Types of focus modes and focus ranges W Wide T Tele Unit cm X O X O X O O X O X O X O O O O SCENE Mode Auto macro Super macro Macro Normal Auto macro Super macro Macro Normal Mode X X X X X O X X X X X X X X X X X X X X X X X X X X O X X X X X X O O O X X O O Available focusing method by recordi...

Страница 25: ...the menu is displayed on the LCD monitor pressing the LEFT button makes the cursor shift to the left tab When the menu is not displayed on the LCD monitor the LEFT button operates as the FLASH button Selecting the flash mode 1 Rotate the MODE DIAL to select a RECORDING mode with the exception of Movie clip and Motion capture modes 2 Press the Flash button until the desired flash mode indicator dis...

Страница 26: ... caused by the the flash light reflecting off atmospheric dust INFORMATION Flash mode indicator The flash operates with a slow shutter speed to obtain a balanced correct exposure In poor lighting conditions the camera shake warning indicator will display on the LCD monitor When a shot with red eye is detected this mode will reduce the red eye effect automatically Slow synchro Red eye reduction Fla...

Страница 27: ...erates as the Self timer This function is used when the photographer would also like to be in the image Selecting the self timer 1 Press the SELF TIMER button until the desired mode indicator displays on the LCD monitor 2 When you press the SHUTTER button the picture will be taken after the specified time has elapsed In Movie Clip mode only the 10SEC self timer will work When you select 2SEC self ...

Страница 28: ...he cursor to the sub menu or for confirming data Size 3072 x 2304 2816 x 2112 2592 x 1944 3072 x 1728 2272 x 1704 2048 x 1536 Youcanusethe buttontoadjustthevaluesfortheRGB ISO whitebalance exposurecompensationandLongTimeshutterspeed When the ASR mode is selected ISO value is fixed as AUTO and Exposure value is fixedas0 0EV Main menu Sub menu RGB ISO button Pressing the MENU button Menu off Menu on...

Страница 29: ...era s sensitivity to light and therefore the greater its capacity to take pictures in darker conditions However the noise level in the image will increase as the ISO value increases making the image appear coarser 3 When you press the button again the value you set will be saved and ISO setup mode will end button When special effect colour from the icon other than is selected it will not be able t...

Страница 30: ...e white balance menu bar will appear as shown 2 Use the LEFT and RIGHT buttons to set the white balance to the desired value The value you set wil be displayed on the LCD monitor AUTO The camera automatically selects the appropriate white balance settings depending on the prevailing lighting conditions DAYLIGHT For taking images outside CLOUDY For taking images under a cloudy and overcast sky Fluo...

Страница 31: ...Adjusting the shutter speed and aperture values 1 Select the Night scene mode 2 Press button and Long Time shutter menu LT For selecting shutter speed and aperture value will be displayed 3 Configure the Long Time shutter value with the up down left right button 4 Press the button again The value you set will be saved and the mode will switch to NIGHT SCENE mode Aperture Value Shutter Speed AUTO 1...

Страница 32: ...rned off the special effect setting will be preserved To cancel the special effect select the sub menu Color or sub menu HighLight Composite Photo Frame When an effect is selected the preview image on the LCD may be slow to appear INFORMATION Still image mode By using the camera s digital processor it is possible to add special effects to your images 1 Press the E button in the available camera mo...

Страница 33: ...g the frame position Capture SH Edit E Effect button HighLight HighLight HighLight HighLight You can make the subject stand out from its surroundings The subject will be sharp and in focus while making the rest out of focus 1 Press the E button in the available camera modes with the exception of Movie clip and Auto mode and select the menu 2 Select a desired sub menu by pressing the Up Down button...

Страница 34: ...ton and Play mode button during the composite shots each mode of the camera buttons is executed The images captured before will be deleted After taking the last composite shooting press the OK button And then the voice memo will start INFORMATION Composite Composite Composite Composite Composite E Effect button Changing a part of composite Before taking the last composite shot you can change a par...

Страница 35: ...during movie recording You can select this menu only in the MOVIE CLIP mode If the memory card is not inserted this function will not operate Stabilizer E Effect button Photo Frame You can add 9 types of frame like borders to a still image you want to capture 1 Press the E button in the available camera modes with the exception of Movie clip and Auto mode and select the menu 2 Select a desired sub...

Страница 36: ...Voice Recording mode 2 Use the LEFT and RIGHT buttons to navigate through the menus Pressthe LEFTor RIGHTbutton Press the UPorDOWN button Press the UPorDOWN button Pressthe LEFTor RIGHTbutton 3 Use the UP and DOWN buttons to select a sub menu 4 Select a sub menu and then the value you set will be saved Press the MENU button and the menu will disappear METERING SIZE 3072 x 2304 2816 x 2112 2592 x 1...

Страница 37: ...use more memory than lower resolution shots Therefore the higher the resolution selected the fewer will be the number of shots available INFORMATION You can select the image size appropriate for your application STILL IMAGE mode MOVIE CLIP mode SIZE 3072 x 2304 2816 x 2112 2592 x 1944 3072 x 1728 2272 x 1704 2048 x 1536 3072X 2816X 2592X 3072X 2272X 2048X 1600X 1024X 640X 720x 640x 320x 2304 2112 ...

Страница 38: ...xposed correctly regardless of the back lighting Continuous shot SHOOTING Single Continuous AEB AEB You can select continuous shot and AEB Auto Exposure Bracketing Single Take one picture only Continuous Images will be taken continuously until the shutter button is released The shooting capacity depends on the memory AEB Take three pictures in a series in different exposures standard exposure 0 0E...

Страница 39: ... sharp This is suitable for printing Vivid The edges of the image are emphasized The edges will appear sharp but noise may occur in the recorded image Auto Focus type You can select your preferred Auto Focus type according to the shooting condition Center AF The rectangular area in the center of the LCD monitor will be focused Multi AF This camera selects a AF point from the 5 AF points When the c...

Страница 40: ...ave and the camera isn t operated during the specified time about 30 SEC the camera power will become idle automatically LCD monitor OFF Camera status lamp Blinking To use the camera again press any of the camera buttons except the power button If there is no operation during the specified time the camera power will be turned off automatically to save battery life Refer to page 58 for more informa...

Страница 41: ...FORMATION Playing back a movie clip 1 Select the recorded movie clip that you want to play back by using the LEFT RIGHT button 2 Press the play pause button to play back a movie clip file To pause a movie clip file while playing it back press the play pause button again Pressing the play pause button again will cause the movie clip file will restart To rewind the movie clip while it is playing pre...

Страница 42: ... the earphones If you want to extract the movie clip at the beginning of the frame press the Zoom T button before starting the movie clip If the time line bar passes by the start point by pressing the REW Left button the first frame of the movie clip will display If you don t specify the ending point of the movie clip the trimming confirmation window will display at the point of the last frame INF...

Страница 43: ... on the camera to conveniently set up the Play mode functions Play mode button If you have turned on the camera by pressing the POWER button you can press the PLAY MODE button once to switch to Play mode and press it again to switch to Recording mode You can turn the power on with the play mode button The camera is turned on in play mode Press the play mode button Under 1 Sec again to turn off the...

Страница 44: ...roportion to the image size Normal display mode Thumbnail display mode Pressing the Thumbnail button Pressing the enlargement button Image enlargement 1 Select an image that you want to enlarge and press the enlargement button 2 Different parts of the image can be viewed by pressing the 5 function button 3 Pressing the thumbnail button will zoom back to the original full sized image You can tell w...

Страница 45: ... Playing back Movie Clip Stop When the menu is displayed on the LCD monitor the UP button operates as a direction button When the menu is not displayed on the LCD monitor the UP button operates as the voice memo button You can add your voice to a stored still image Adding a Voice Memo to a Still Image 1 Press the LEFT RIGHT button to select an image that you wish to add sound to 2 Press the voice ...

Страница 46: ...FF REW EXIT OK STOP OK Left Right Menu OK button LEFT RIGHT MENU OK buttons activate the following LEFT button While the menu is showing the LEFT button operates as a direction button While the menu is not showing press the LEFT button to select the previous image RIGHT button While the menu is showing the RIGHT button operates as a direction button While the menu is not showing press the RIGHT bu...

Страница 47: ...d images will be stored in a green tone Captured images will be stored in a blue tone Save the image in negative mode Colour Red eye reduction 1 Select a still image and press the E button 2 Select menu by pressing the Left Right button 3 Press the Down button and the red eye will be edited 4 Press the OK button and the the changed image will save as a new file name Exit E Exit E Red Eye Fix Save ...

Страница 48: ... 49 p 50 p 50 p 51 p 51 PROTECT Unlock Lock DELETE RESIZE SLIDE Effect Menu tab Main menu Sub menu Secondary menu Page No Yes COPY TO CARD OSD INFORMATION Menu tab Main menu Sub menu Secondary menu Page One Pic All Pics Auto PostCard Card 4X6 L 2L Letter A4 A3 Auto Full 1 2 4 8 9 16 Index IMAGES Layout Size This menu is available while the camera is connected to a PictBridge supporting printer dir...

Страница 49: ...how Interval Effect Back Set OK Play Repeat Play SLIDE Show Interval Effect Back Set OK 1 sec 3 sec 5 sec 10 sec Setting up the play back function using the LCD monitor Menu tab Main menu Sub menu Secondary menu Page Auto Plain Photo FastPhoto Auto Draft Normal Fine Auto Off On Auto Off On No Yes RESET Quality Type Menus are subject to change without prior notice Repeat setting Setting the slide s...

Страница 50: ...This is used to protect specific shots from being accidentally erased Lock It also unprotects images that have been previously protected Unlock Protecting Images 1 Select a desired sub menu by pressing the UP DOWN button and press the OK button Select Selection window for an image to be protected released is displayed Up Down Left Right Select an image Zoom W T Button Protect release the image OK ...

Страница 51: ...delete all unprotected images If there aren t protected images all the images are deleted and a No Image message will display 2 After deletion the screen will be changed to the play mode screen Resize Change the resolution size of pictures taken Select Start image MP3 Skin to save an image to be the start up image MP3 Skin 1 Select a desired sub menu by pressing the UP DOWN button and press the OK...

Страница 52: ...nu by pressing the UP DOWN button Horizontal Vertical Right 90 Left 90 180 Before rotating the image DPOF DPOF Digital Print Order Format allows you to embed printing information on your memory card s MISC folder Select the pictures to be printed and how many prints to make The DPOF indicator will display on the LCD monitor when an image that has DPOF information plays back Images can then be prin...

Страница 53: ...rint Zoom W T Button Select the number of prints All Pics Configure number of prints for all pictures except movie and voice files W T button Select a number of prints Cancel Cancel the print setup 3 Press the OK button to confirm the setting If an image carries DPOF instructions the DPOF indicator will show DPOF Index Images except for movie clips and voice file are printed as index type 1 Select...

Страница 54: ...u by pressing the UP DOWN button and press the OK button Select Selection window to change the print size of an image is displayed Up Down Left Right Select an image Zoom W T Button Change the print size OK button Your changes will be saved and the menu will disappear All Pics Change print size of all saved images W T button Select a print size OK button Confirm the changed setting Cancel Cancel a...

Страница 55: ...lt in internal memory to the camera s removable SD memory card Copying to the Memory Card 1 Select a desired sub menu by pressing the UP DOWN button and press the OK button No Cancels Copy to Card Yes All images movie clips and voice recording files saved in the internal memory are copied to the memory card after the Processing message is displayed After copying has been completed the screen will ...

Страница 56: ... to save Press the Shutter button to return to the menu without setting the number of prints 4 Press the Print button and images will be printed When One Pic is selected When All Pics is selected Back Set OK IMAGES Size Layout Type Quality One Pic All Pics Pictbridge If the USB menu is set to the Computer you cannot connect a Pictbridge compatible printer to the camera through USB cable with Conne...

Страница 57: ...ton and the PictBridge menu will display 2 Use the UP and DOWN buttons to select the desired menu and then press the RIGHT button 3 Use the UP and DOWN buttons to select the desired submenu value and then press the OK button The menus you can set up are as follows Menu Size Set the size of the printing paper Auto PostCard Card 4X6 L 2L Letter A4 A3 Set the number of pictures to be printed on a she...

Страница 58: ...camera modes except Voice Recording and MP3 PMP TEXT VIEWER modes press the MENU button Press the LEFT RIGHT button and select the SETUP menu tab The items indicated by are default settings ENGLISH FRANÇAIS DEUTSCH ESPAÑOL ITALIANO PORTUGUÊS DUTCH DANSK SVENSKA SUOMI BAHASA POLSKI Magyar File Power Off Language Format Date Time Imprint Sound p 58 p 58 p 58 p 59 p 60 p 59 p 59 Menus are subject to ...

Страница 59: ... a set amount of time in order to prevent unnecessary battery drainage 1 3 5 10min The power will turn off automatically if not used for the period of time specified LANGUAGE sub menu English Korean French German Spanish Italian S Chinese T Chinese Japanese Russian Portuguese Dutch Danish Swedish Finnish Thai BAHASA MALAY INDONESIAN Arabic Polish Hungarian Czech and Turkish Language There is a cho...

Страница 60: ...ile The Date Time are imprinted at the bottom right side of the still image The imprint function is applied only to still images except for the images taken in the Text scene mode and photo frame effect mode Depending on the manufacturer and print mode the date printed on an image may not be printed correctly Setting up the Date Time Date type You can change the date and time that will be displaye...

Страница 61: ...n select an external device to which you want to connect the camera using the USB cable AF Sound SETUP Format Date Time Imprint Sound USB Back Set OK Computer Printer If you set the operation sound to ON various sounds will be activated for camera startup so that you can be aware of the camera operation status If Off is selected The AF lamp will not light up If On is selected The AF lamp will ligh...

Страница 62: ...put signal from the camera can be NTSC or PAL Your choice of output will be governed by the type of device monitor or TV etc to which the camera is connected PAL mode can support only BDGHI Connecting to an external monitor Yellow Video White sound SETUP USB AF Sound AF Lamp LCD Video Out Back Set OK NTSC PAL Using the AV cable with Cradle Using the AV cable with Camera ...

Страница 63: ...T VIEWER modes has the MyCAM menu The items indicated by are default settings Menu tab Main menu Sub menu Page Off LOGO User Image 1 User Image 2 Off Sound 1 Sound 2 Sound 3 Off Sound 1 Sound 2 Sound 3 Start Image Start Sound Shutter Sound p 63 p 63 p 63 Menus are subject to change without prior notice SETUP AF Sound AF Lamp LCD Video Out Quick View Back Set OK Off 0 5 sec 1 sec 3 sec SETUP AF Lam...

Страница 64: ...rtable Media Player program You can take a picture listen to the MP3 files and watch the movie clip Movie and Video clip whenever you want To use the PMP mode you must convert the multimedia file with the Digimax Converter In the TEXT VIEWER mode you can see the text on the LCD monitor with listening MP3 music If the file name is over 128 2 Byte language like Korean Chinese etc or 256 1 Byte langu...

Страница 65: ... from the latest stopped frame Open The browsing menu will display to select a desired file 3 Select a desired file and press the OK button And then the file will play back Take care of the illegal duplication of MP3 multimedia files It violates various copyright laws This camera can only play back MP3 files in the MP3 mode and SDC files modified XviD MPEG4 video MPEG Layer2 audio type in the PMP ...

Страница 66: ...uage is displayed as The automatic power off function will not operate if the a file is playing back If there over 100 files in the memory it takes a little longer for the camera to process to the MP3 PMP mode If there is no operation during the specified time About 30 sec in the MP3 TEXT VIEWER mode B G M Off Auto scroll Off the LCD monitor is turned off automatically and the camera status lamp b...

Страница 67: ...n Encoding Type ANSI Uni TEXT VIEWER mode Battery p 12 TEXT Contents Indication of present TEXT Current page Whole page LCD monitor indicator for MP3 PMP TEXT VIEWER mode When you playback a movie converted with the Digimax Converter there may be a white spot under the LCD monitor of the camera It s not the camera malfunction and there are no problems to use the camera Encoding Type ANSI American ...

Страница 68: ... back by pressing the Left Right button This deletes files stored on the memory 1 Select a desired file to delete on the browsing menu and press the Delete button 2 A message will display as shown Yes deletes the selected file No cancels Delete files and the browsing menu will display Volume button Play Pause Control button Deletebutton Delete Confirm OK Yes No Before deleting files from the camer...

Страница 69: ...imedia file is playing back press the Playlist button 2 A playlist that is currently playing will be highlighted 3 Move the cursor to a desired list by pressing the Control button Pressing the OK button the selected file is played back Pressing the Playlist button the selection will be cancelled MP3 Mode PMP Mode TEXT VIEWER Mode Using the camera buttons to adjust the camera J Heart Misty mp3 wait...

Страница 70: ... change without prior notice Menu tab Main menu Sub menu Page p 70 p 70 MP3 Menu tab Main menu Sub menu Page TEXT Auto Scroll MP3 BGM Play mode MP3 Skin Show Interval p 70 p 70 p 71 p 72 p 71 p 70 p 72 p 72 p 71 p 71 Delete All Show Play Resume Resume Resume Language Delete All Seeking Player Display Delete All PMP p 71 p 72 p 71 ENG KOR FRA DEU ESP ITA CHN TWN JPN RUS PRT NLD DNK SWE FIN MYS POL ...

Страница 71: ...d frame TEXT VIEWER mode plays back from the lastest stopped frame The browsing menu will display to select a desired file Resume You can set various repeat and shuffle options This function is adopted only in the selected folder plays a single track once plays a single track repeatedly plays all tracks in the folder repeatedly randomly plays all tracks in the folder once randomly plays all tracks...

Страница 72: ...This will skip a set frame whenever you press the Left Right button Frame search All files stored on the memory card will be deleted In the MP3 mode only MP3 files are deleted In the PMP mode only multimedia files are deleted In the TEXT VIEWER mode TEXT files are deleted Delete all cancels Delete files A confirmation window will display Select Yes and press the OK button All files will be deleted...

Страница 73: ...ton even though a memory card is inserted If the memory card is not inserted the Auto mode will be selected when you press the Shutter button To cancel the recording mode of the MP3 mode press the E button or do not operate any buttons for about 10 seconds INFORMATION AutoScroll MP3 BGM Setting Languagesetting The playing text is scrolled automatically and displays on the LCD monitor The text will...

Страница 74: ...et inside the camera Doing so may result in failure or may permanently damage the unit Extremes in temperature may cause problems If the camera is transferred from a cold to a warm and humid environment condensation can form on the delicate electronic circuitry If this occurs turn the camera off and wait for at least 1 hour until all moisture is dispersed Moisture build up can also occur in the me...

Страница 75: ...Hearing experts advise against continuously loud and extended play If you experience a ringing in your ears reduce volume or discontinue use Warning indicator There are several warnings that may appear on the LCD display Card Error ㆍMemory card error Turn off the camera power and turn it on again Insert the memory card again Insert the memory card and format the memory card p 59 Card Locked ㆍThe m...

Страница 76: ...al scene ㆍWhite balance or effect setting is incorrect Select appropriate White balance and effect Before contacting a service centre Please check the following The camera doesn t switch on ㆍThere is low battery capacity Insert charged battery p 12 ㆍBattery is inserted incorrectly with the polarities reversed Insert the battery according to the polarity marks ㆍThe rechargeable battery is not inser...

Страница 77: ...ts USB ㆍThe camera driver is not installed Install a USB Storage Driver Specification Image Sensor Type 1 2 5 CCD Effective Pixel Approx 7 2 Mega pixel Total Pixel Approx 7 4 Mega pixel Lens Focal Length NV Lens f 6 3 18 9mm 35mm film equivalent 38 114mm F No F 3 5 F 4 5 Digital Zoom ㆍStill Image mode 1 0X 5 0X ㆍPlay mode 1 0X 12 0X depends on image size LCD Monitor 2 5 Color TFT LCD Focusing Type...

Страница 78: ...71 195 223 223 274 318 422 600 1736 Sharpness Soft Normal Vivid Effect Normal B W Sepia Negative Red Green Blue RGB Composite Highlight Frame White Balance Auto Daylight Cloudy Fluorescent_H Fluorescent_L Tungsten Custom Voice Recording Voice Recording max 1 hour Voice Memo in Still Image max 10 sec Date Imprinting Date Date Time Off user selectable Shooting Still Image Modes Auto Program Scene AS...

Страница 79: ...g Capturing Mode is Auto Default 3M Auto reload function Remember last played file Background skin of MP3 playback using user images PMP Specification PMP Decoder Movie Xvid MPEG4 Using Digimax Converter S W Audio MPEG1 Layer 2 Using Digimax Converter S W Play Mode Seeking in Play Max 32X Skipping in Play Auto skipping after one file played Auto reload function Remember last played frame Support F...

Страница 80: ...rd disk space 1024x768 pixels 16 bit colour display compatible monitor 24 bit colour display recommended DirectX 9 0 or late DigimaxConverter PCwithprocessorbetterthanPentiumIII500MHz PentiumⅣrecommended Windows98SE 2000 ME XP Windows2000 XPrecommended For playing back a movie clip Mac OS 10 1 10 4 MPlayer VLC Media Player Power Mac G3 or later Mac OS 9 0 10 4 Minimum 64MB RAM 110MB of available h...

Страница 81: ...http www samsungcamera com English http www samsungcamera co kr Korean 2 Install the camera driver and DirectX by selecting a button shown on the monitor Be sure to check the system requirements before installing the driver You should allow 5 10 seconds for running the automatic setup program If the frame does not show run the Windows Explorer and select Samsung exe in the CD ROM Drive root direct...

Страница 82: ... and conditions of the GNU General Public License and everyone can copy modifiy and distribute this codec freely but WITHOUT ANY WARRANTY IMPLIED OR EXPRESSED OF MERCHANTABILITY OR FITNESS FOR A PARTICULAR PURPOSE provided however that you have to follow the GNU General Public License whenever you are distributing this codec or modification thereof For more information see the GNU General Publice ...

Страница 83: ...specify USB Driver in the CD supplied INFORMATION Starting PC mode If you connect the USB cable to a USB port on your PC and then turn on the power the camera will automatically switch to computer connection mode In this mode you can download stored images to your PC through the USB cable The LCD monitor is always turned off in PC mode 1 In any mode with the exception of Voice Recording mode press...

Страница 84: ... inserting any cables or AC adapter check the directions and do not insert by force It may cause breakage of cable or camera INFORMATION Downloading stored images You can download the still images stored on the camera to your PC s hard disk and print them or use a photo editing software to edit them 1 Connect the camera to your PC with the USB cable 2 On your computer s desktop display select My c...

Страница 85: ...e camera and PC are transferring a file If the camera status lamp blinks please wait until the lamp has finished blinking and is constantly on 2 Unplug the USB cable Windows 2000 ME XP The illustrations may differ from those shown depending on the Windows O S 1 Check whether the camera and PC are transferring a file If the camera status lamp blinks please wait until the lamp has finished blinking ...

Страница 86: ...emovable disk Setting up the USB Driver for MAC Using the USB Driver for MAC For Mac OS 10 0 or later First complete uploading from computer to camera and then remove the removable disk with the Extract command If a movie clip can t play back on the Mac OS please visit the following site http www divx com divx mac and download the codec Or use a media player that supports the Xvid codec Mplayer VL...

Страница 87: ...d of codecs If a multimedia file can t play back on the Windows Media Player install a multicodec We recommend Full version of latest K Lite Codec Install the Digimax Converter again after installing the multi codec You can select destination folder of each converted file When the folder is not selected the converted files are saved on a folder where the source file is If you convert several files...

Страница 88: ...FORMATION Digimax Master You can download view edit and save your images and movies with this software This software is only compatible with Windows but not Windows 98 To run the Digimax Master double click the Digimax Master icon on the desktop Downloading images 1 Connect the camera to your PC 2 A window for downloading images will display after connecting the camera to your PC To download the c...

Страница 89: ...s will be displayed Image viewer You can view the stored images Image viewer functions are listed below Menu bar You can select menus File Edit View Tools Change functions Auto download help etc Image selection window You can select the desired images in this window Media type selection menu You can select image viewer image edit and movie edit functions in this menu Preview window You can preview...

Страница 90: ...ie edit You can get the still image movie clip narration music files together in a movie clip Movie clip edit functions are listed below Edit menu You can select the following menus Add Media You can add other media elements to a movie Edit Clip You can change the brightness contrast colour and saturation Effects You can insert an effect Set Text You can insert texts Narrate You can insert a narra...

Страница 91: ... that only the camera s USB cable is connected to the computer Case 6 When I open the Device Manager by clicking Start Settings Control Panel Performance and Maintenance System Hardware Device Manager there are Unknown Devices Other Devices entries with a yellow question mark beside them or devices with an exclamation mark beside them Double click on the entry with the question or exclamation mark...

Страница 92: ...use a media player that supports XviD codec Mplayer VideoLanClient When the DirectX 9 0 or later is not installed Install the DirectX 9 0 or later 1 Insert the CD provided with the camera 2 Run the windows explorer and select the CD ROM drive USB Driver DirectX 9 0 folder and click the DXESETUP exe file The DirectX will be installed Visit the following site for downloading the DirectX http www mic...

Страница 93: ...ment Declaration of Conformity Trade Name SAMSUNG TECHWIN Model No Samsung NV3 Responsible Party Samsung Opto Electronics America INC Address 40 Seaview Dr Secaucus NJ 07094 Telephone No 201 902 0347 This device complies with Part 15 of the FCC Rules Operation is subject to the following two conditions 1 This device may not cause harmful interference and 2 this device must accept any interference ...

Страница 94: ...1 4320 4510 www samsungphoto fr SAMSUNGOPTO ELECTRONICSGMBH AMKRONBERGERHANG6 D 65824SCHWALBACH TS GERMANY TEL 49 0 6196665303 FAX 49 0 6196665366 www samsungcamera de TIANJINSAMSUNGOPTO ELECTRONICSCO LTD 7PINGCHANGROADNANKAIDIST TIANJIN P RCHINA POSTCODE 300190 TEL 86 22 2761 4599 FAX 86 22 2769 7558 www samsungcamera com cn SAMSUNGOPTO ELECTRONICSUKLIMITED SAMSUNGHOUSE1000HILLSWOODDRIVE HILLSWOO...

Отзывы: