background image

1

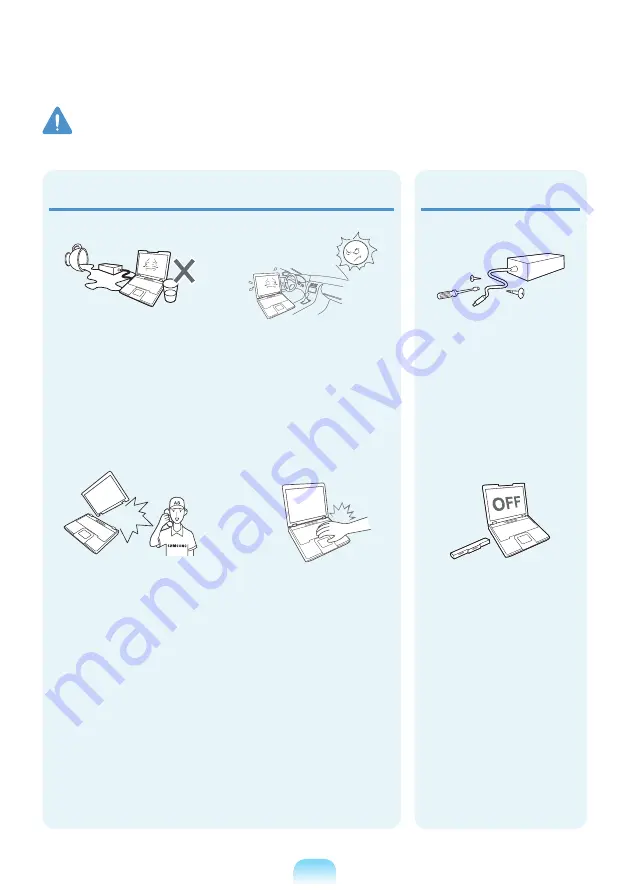
Avoid direct sunlight when 

the computer is in an air-

tight location such as inside 

a vehicle.

There is a danger of a fire 

hazard. The computer may 

overheat and also present 

opportunity to thieves.

Do not use your notebook 

PC for long periods of time 

while a part of your body is 

making direct contact with 

it. The temperature of the 

product may increase during 

normal operation.

This may result in harming or 

burning your skin.

Never disassemble the 

power supply or AC adapter.

There is a danger of electric 

shock.

When removing the RTC 

(Real Time Clock) battery, 

keep it out of the reach of 

children as they could touch 

and/or swallow it.

There is a danger of choking. 

If a child has swallowed it, 

contact a doctor immediately. 

Upgrade Related

Do not place any container 

filled with water or chemicals 

over or near the computer.

If water or chemicals enter 

the computer, this may cause 

fire or electric shock.

If the computer is broken 

or dropped, disconnect the 

power cord and contact a 

service center for a safety 

check.

Using a broken computer may 

cause electric shock or fire 

hazard.


  Warning

Failing to follow instructions marked with this symbol may cause personal injury and even fatality.

Содержание NP-R439E

Страница 1: ...User Guide SAMSUNG P428 R428 R429 R439 R478 ...

Страница 2: ......

Страница 3: ...ter 47 Turn on the computer 48 Using Sleep Mode 49 Chapter 2 Using the computer Keyboard 52 Touchpad 56 CD Drive ODD Optional 57 Inserting and Ejecting a CD 57 Multi Card Slot Optional 59 ExpressCard Slot Optional 61 Adjusting the Volume 62 Chapter 3 Settings and Upgrade LCD Brightness Control 64 BIOS Setup 65 Entering the BIOS Setup 65 The BIOS Setup Screen 66 Setting a Boot Password 68 Changing ...

Страница 4: ... ...

Страница 5: ...ty Information 23 Replacement Parts and Accessories 25 Regulatory Compliance Statements 27 WEEE SYMBOL INFORMATION 40 Basic Items 41 Overview 42 Front View 42 Status Indicators 43 Right View 44 Left View 45 Back View 46 Bottom View 46 Turn on the computer 47 Attaching the Battery 47 Connect the AC adapter 47 Turn on the computer 48 Using Sleep Mode 49 ...

Страница 6: ...y that has already been installed on another PC c For the installation procedures and any issues with the operating systems or applications not supplied by Samsung Computer contact the corresponding software company v The company will not provide a replacement or refund due to the reason x c and if our service engineer visits you due to this problem a service charge will be applied Charge the batt...

Страница 7: ...aution Content included in this section includes information required about the function Note Content included in this section includes helpful information to use the function Copyright Samsung Electronics Co Ltd 2009 Samsung Electronics Co Ltd owns the copyright of this manual No part of this manual may be reproduced or transmitted in any form or by any means electronic or mechanical without the ...

Страница 8: ...ifference in capacity calculation E g For a 80GB HDD Windows represents the capacity as 74 5GB 80x1 000x1 000x1 000 byte 1 024x1 024x1 024 byte 74 505GB In addition the capacity representation in Windows may be even smaller because some programs such as Recovery Solution may reside in a hidden area of the HDD About Memory Capacity Representation The memory capacity reported in Windows is less than...

Страница 9: ...es the risk that a malfunction or damage to the product will occur Avoid exposing any part of your body to the heat from the computer vent or AC adapter for a long time when the computer is on Exposing a part of your body close to the heat from the vent or AC adapter for long periods of time may cause a burn Avoid blocking the vent at the bottom or side of the computer when using it on a bed or cu...

Страница 10: ...r loose main plug or power cord or power outlet There is a danger of electric shock or fire hazard Plug the power cord firmly into the power outlet and AC adapter Failing to do so may cause fire hazard Do not unplug the power cord out by pulling the cable only If the cord is damaged it may cause electric shock Do not bend the power cord excessively or do not place a heavy object over the power cor...

Страница 11: ...h the product Using another adapter may cause the screen to flicker AC Adapter Usage Precautions If water or another substance enters the power input jack AC adapter or the computer disconnect the power cord and contact the service center Damage to the device within the computer may cause electric shock or fire hazard Keep the power cord or outlet clean so that they are not covered with dust Faili...

Страница 12: ...floor heating as it may cause the computer to overheat Take care that the computer vents on the side or the bottom are not blocked especially in these environments If the vents are blocked the computer may overheat and it may cause a computer problem or even an explosion Do not use the computer in a humid location such as a bathroom or sauna Please use the computer within the recommended temperatu...

Страница 13: ...plosion or fire To use the computer safely replace a dead battery with a new authorized battery Please charge the battery fully before using the computer for the first time Never heat the battery or put the battery into a fire Do not put or use the battery in a hot location such as a sauna inside a vehicle exposed to the heat and so on There is a danger of an explosion or fire Take care not to all...

Страница 14: ...ger of electric shock When removing the RTC Real Time Clock battery keep it out of the reach of children as they could touch and or swallow it There is a danger of choking If a child has swallowed it contact a doctor immediately Upgrade Related Do not place any container filled with water or chemicals over or near the computer If water or chemicals enter the computer this may cause fire or electri...

Страница 15: ...mputer and disconnect all cables before disassembling the computer If there is a modem disconnect the phone line If you are disassembling notebook computer make sure to remove the battery Failing to do so may cause electric shock Custody and Movement Related Follow the instructions for the relevant location e g airplane hospital etc when using a wireless communication device wireless LAN Bluetooth...

Страница 16: ...ve current and a high temperature and may damage the battery or cause a fire Charge the battery according to the instructions in the manual Failing to do so may cause an explosion or fire from damage to the product Do not heat the battery or expose it to heat e g inside a vehicle during the summer There is a danger of explosion or fire Do not block the ports holes vents etc of the product and do n...

Страница 17: ... the notebook computer is turned off The temperature may rise and it may cause overheating and deformation of the product Do not press the Eject Button while the Floppy Disk CD ROM drive is in operation You might lose data and the disk might be suddenly ejected and could cause an injury Take care not to drop the product while using it This may cause personal injury or loss of data Do not touch the...

Страница 18: ...Emergency disk eject method using paperclip should not be used while the disk is in motion Make sure to use the emergency disk eject method only when the Optical Disk Drive is stopped There is a danger of injury Do not place your face close to the Optical Disk Drive tray when it is operating There is a danger of injury due to an abrupt ejection Check CDs for cracks and damage prior to use It may d...

Страница 19: ...hard disk drive is operating The data may be lost and irrecoverable due to a computer virus infection The data may be lost if the power is turned off while running a program Moving or causing an impact to the computer while the hard disk drive is operating may cause files to be corrupted or bad sectors on the hard disk To prevent data loss due to damage to the hard disk drive please backup your da...

Страница 20: ...just the heights of desks and chairs appropriate to your height The heights are to be adjusted so that your arm forms a right angle when you place your hand over the keyboard while sitting down on a chair Adjust the height of chair so that your heel is comfortably placed on the floor Do not use the computer while you are lying down but only while you are sitting down Do not use the computer on you...

Страница 21: ...en entering contents printed on a paper into the computer use a static paper holder so that the height of the paper is almost equal to that of the monitor Hand Position Keep your arm at a right angle as shown by the figure Keep the line from your elbow to your hand straight Do not place your palm over the keyboard while typing Do not hold the mouse with excessive force Do not press the keyboard to...

Страница 22: ...ur intervention Please check the equalizer default setting before first usage Use Time Break Time Take a break for 10 minutes or more after a 50 minute period when working for more than one hour Illumination Do not use the computer in dark locations The illumination level for computer use must be as bright so for reading a book Indirect illumination is recommended Use a curtain to prevent reflecti...

Страница 23: ...erated only with the type of power source indicated on the rating label Ensure that the electrical outlet you are using to power your equipment is easily accessible in case of fire or short circuit If your computer has a voltage selector switch make sure that the switch is in the proper position for your area Openings in the computer case are provided for ventilation Do not block or cover these op...

Страница 24: ...ified personnel if The power cord or plug is damaged Liquid has been spilled into the system The system does not operate properly when the operating instructions are followed The system was dropped or the casing is damaged The system performance changes The Instruction On Safety Operation of NotePC z When installing and operating devices please refer to safety requirements in the user guide x Devi...

Страница 25: ...HS Radiation Performance Standard Should the unit ever need servicing contact an authorized service location Laser Safety Note Use of controls or adjustments or performance of procedures other than those specified in this manual may result in hazardous radiation exposure To prevent exposure to laser beams do not try to open the enclosure of a CD or DVD drive Class 1M laser radiation when operating...

Страница 26: ...puter For more information on power cord set requirements contact your authorized dealer reseller or service provider General Requirements The requirements listed below are applicable to all countries All power cord sets must be approved by an acceptable accredited agency responsible for evaluation in the country where the power cord set will be used The power cord set must have a minimum current ...

Страница 27: ...ents Wireless devices are closely regulated and use may not be allowed The RF field strength of the wireless device or devices that may be embedded in your notebook are well below all international RF exposure limits as known at this time Because the wireless devices which may be embedded into your notebook emit less energy than is allowed in radio frequency safety standards and recommendations ma...

Страница 28: ...plicable authority for authorization prior to use or turning on the wireless device Every country has different restrictions on the use of wireless devices Since your system is equipped with a wireless device when traveling between countries with your system check with the local Radio Approval authorities prior to any move or trip for any restrictions on the use of a wireless device in the destina...

Страница 29: ... in hospitals is restricted to the limits set forth by each hospital Explosive Device Proximity Warning Do not operate a portable transmitter such as a wireless network device near unshielded blasting caps or in an explosive environment unless the device has been modified to be qualified for such use Use On Aircraft Caution Regulations of the FCC and FAA prohibit airborne operation of radio freque...

Страница 30: ...h can be determined by turning the equipment off and on the user is encouraged to try to correct the interference by one or more of the following measures Reorient or relocate the receiving antenna Increase the separation between the equipment and receiver Connect the equipment into an outlet on a circuit different from that to which the receiver is connected Consult the dealer or an experienced r...

Страница 31: ... use of a wireless device near the body this does not include extremities This device should be used more than 20 cm 8 inches from the body when wireless devices are on The power output of the wireless device or devices which may be embedded in your notebook is well below the RF exposure limits as set by the FCC This transmitter must not be collocated or operate in conjunction with any other anten...

Страница 32: ...u believe it is necessary The telephone company may make changes in its facilities equipment operations or procedures that could affect the operation of the equipment If this happens the telephone company will provide advanced notice in order for you to make necessary modifications to maintain uninterrupted service If trouble is experienced with this equipment Modem for repair or warranty informat...

Страница 33: ... GHz and 5 65 to 5 85 GHz bands These radar stations can cause interference with and or damage to this device The maximum allowed antenna gain for use with this device is 6dBi in order to comply with the E I R P limit for the 5 25 to 5 35 and 5 725 to 5 85 GHz frequency range in point to point operation As a general guideline a separation of 20 cm 8 inches between the wireless device and the body ...

Страница 34: ...tions made by the user to this equipment or equipment malfunctions may give the telecommunications company cause to request the user to disconnect the equipment Users should make sure for their own protection that the electrical ground connections of the power utility telephone lines and internal metallic water pipe system if present are connected together This precaution may be particularly impor...

Страница 35: ... the Warranty or contact the retailer where you purchased your product European Radio Approval Information for products fitted with EU approved radio devices This Product is a Notebook computer low power Radio LAN type devices radio frequency RF wireless communication devices operating in the 2 4GHz 5GHz band may be present embedded in your notebook system which is intended for home or office use ...

Страница 36: ...declara que el Notebook PC cumple con los requisitos esenciales y cualesquiera otras disposiciones aplicables o exigibles de la Directiva 1999 5 CE Ελληνική Greek ΜΕ ΤΗΝ ΠΑΡΟΥΣΑ Samsung ΔΗΛΩΝΕΙ ΟΤΙ Notebook PC ΣΥΜΜΟΡΦΩΝΕΤΑΙ ΠΡΟΣ ΤΙΣ ΟΥΣΙΩΔΕΙΣ ΑΠΑΙΤΗΣΕΙΣ ΚΑΙ ΤΙΣ ΛΟΙΠΕΣ ΣΧΕΤΙΚΕΣ ΔΙΑΤΑΞΕΙΣ ΤΗΣ ΟΔΗΓΙΑΣ 1999 5 ΕΚ Français French Par la présente Samsung déclare que l appareil Notebook PC est conforme au...

Страница 37: ...nish Samsung vakuuttaa täten että Notebook PC tyyppinen laite on direktiivin 1999 5 EY oleellisten vaatimusten ja sitä koskevien direktiivin muiden ehtojen mukainen Svenska Swedish Härmed intygar Samsung att denna Notebook PC står I överensstämmelse med de väsentliga egenskapskrav och övriga relevanta bestämmelser som framgår av direktiv 1999 5 EG Íslenska Icelandic Hér með lýsir Samsung yfir því ...

Страница 38: ...wever authorization for use is further restricted in particular countries or regions within countries as follows General European standards dictate maximum radiated transmit power of 100 mW effective isotropic radiated power EIRP and the frequency range 2400 2483 5 MHz The low band 5 15 5 35 GHz is for indoor use only Belgium The product may be used outdoors but for outdoor transmissions over a di...

Страница 39: ...is equipment can use either loop disconnect pulse or DTMF tone signaling only the performance of the DTMF signaling is subject to regulatory requirements for correct operation It is therefore strongly recommended that the equipment is set to use DTMF signaling for access to public or private emergency services DTMF signaling also provides faster call setup This equipment has been approved to Counc...

Страница 40: ...s should not be mixed with other commercial wastes for disposal Correct disposal of batteries in this product Applicable in the European Union and other European countries with separate battery return systems This marking on the battery manual or packaging indicates that the batteries in this product should not be disposed of with other household waste at the end of their working life Where marked...

Страница 41: ... of the optional items Some items may be replaced with similar products and the color of some items may differ from that in this document Power Cable User Guide Charge the battery fully when using the computer for the first time Warranty Information Computer AC Adapter Standard Battery ...

Страница 42: ... enter data by pressing the keys 4 Touchpad Touchpad Buttons The touchpad and touchpad buttons provide functions similar to the mouse ball and buttons 5 Multi Card Slot Optional A card slot that supports SD Card SDHC MMC cards and SDXC cards SDXC cards may not be supported depending on the product specifications 6 Status Indicators Shows the operating status of the computer The corresponding opera...

Страница 43: ... on when the wireless LAN is operating 4 Charge Status This shows the power source and the battery charge status Green When the battery is fully charged or the battery is not installed Amber When the battery is being charged Off When the computer is running on battery power without being connected to AC adapter 5 Power This shows the computer operating status On When the computer is operating Blin...

Страница 44: ...t to prevent the computer from being stolen Either type A or B is provided depending on the model Model A 1 Modem Port Optional A port to which a telephone cable is connected to in order to dial up to the Internet 2 CD Drive ODD Optional Plays CD or DVD titles Since an ODD Optical Disk Drive is optional the installed drive depends on the computer model 3 USB Port You can connect USB devices to the...

Страница 45: ...chargeable USB port is provided You can distinguish the ports using the figure or printed on the port of the product eSATA USB Common Port This port can be used to connect a USB or eSATA device Windows XP does not support eSata Chargeable USB You can charge USB devices through the USB port even when the computer is turned off Charging a device through a Chargeable USB takes longer than using a reg...

Страница 46: ...ted through these holes If the vents are blocked the computer may overheat Avoid blocking the vents as this may be dangerous 1 2 1 2 3 1 Battery Latches A latch used to remove or install the battery 2 Memory Compartment Cover Hard Disk Drive Compartment Cover The main memory and hard disk drive is installed inside the cover 3 Speaker A device used to generate sound ...

Страница 47: ...apter 2 Connect the power cable Charge the battery fully when using the computer for the first time When using the power cable insert the power cable completely into the AC adapter Some items may be replaced with similar products and the color of some items may differ from that in this document x AC Adapter Power Cable z DC in Jack ...

Страница 48: ... the Power button to turn the computer on 3 Power button LED is lit while the computer is turned on LED Press the Fn key to increase the LCD brightness You can only use this function after installing Windows XP Windows Vista Windows 7 and installing the Easy Display Manager program with the system software media disk z x ...

Страница 49: ...de enables switching the computer to Standby mode in order to minimize power consumption and enables users to use the computer instantly by pressing any key on the mouse or keyboard Using Sleep Mode in Windows Vista 7 Click Start Sleep Using Stand by Mode in Windows XP Click Start Turn Off Computer Stand By ...

Страница 50: ...50 ...

Страница 51: ...51 Chapter 2 Using the computer Keyboard 52 Touchpad 56 CD Drive ODD Optional 57 Inserting and Ejecting a CD 57 Multi Card Slot Optional 59 ExpressCard Slot Optional 61 Adjusting the Volume 62 ...

Страница 52: ...ftware Media depending on your computer model Shortcut Keys You can use the following functions by pressing the keys below with the Fn key Fn Name Function REST Sleep Mode Pressing the key switches the computer to power saving Standby mode To use the computer in this state press the Power button You can use this button after installing Windows XP Windows Vista Windows 7 Gauge Shows the remaining b...

Страница 53: ...ng Magic Doctor is launched Easy SpeedUp Manager You can select operation mode when you need maximum system performance or low noise low power consumption with one click You can only use this function after installing Windows XP Windows Vista Windows 7 and installing the Magic Keyboard program with the system software media disk Only for XP Silent Low noise and low power consumption mode Normal No...

Страница 54: ...ia disk Touchpad You can turn the Touchpad function on or off by pressing this button after installing Windows XP Windows Vista Windows 7 When using an external mouse only you can turn the Touchpad off Num Lock You can use some of the character keys as numeric keys by turning the Num Lock on after installing Windows XP Windows Vista Windows 7 Scroll Lock You can scroll up or down the screen while ...

Страница 55: ...rol To control the volume press the Fn key combination or the Fn key combination You can mute the sound or cancel the mute function by clicking the Fn key combination You can use the volume and numeric keys after installingWindows XP Windows Vista Windows 7 Numeric Key The numbers are printed in blue on the numeric keys If Num Lock is turned on by pressing the Fn key combination you can use the nu...

Страница 56: ...in the BIOS Setup Optional Model A Model B Touchpad Used to move the cursor Scroll Area Plays the role of the mouse wheel You can scroll up and down using the Scroll Area Touchpad Left Button You can select or run a program using this button Touchpad Right Button Plays the role of the right mouse button Touchpad LED Optional Touchpad LED is lit while you touch the Touchpad The power is automatical...

Страница 57: ... high speed When you clean a CD or DVD title wipe with a soft cloth from inside to outside Insert a Mini CD into the center of the CD drive The images used for the illustration are of a representative model therefore the images may differ from the the actual product Using a CD that is not in the shape of a circle is not recommended Inserting and Ejecting a CD 1 Click the Eject button of the optica...

Страница 58: ... clicks The CD drive status indicator is turned on A CD drive s reading and writing speed may differ depending on the condition and type of the media To eject a CD when the CD drive does not work or the computer is off place the end of a paper clip into the Emergency Hole until the CD tray is ejected ...

Страница 59: ...You can use a multi card just like any data storage device A copyright protection function is not supported Since you can lose a card when moving the computer keep the card separately Before using the slot remove the dummy card from the slot Only models supplied with a dummy card Supported Cards SD Card SDHC card MMC card and SDXC cards SDXC cards may not be supported depending on the product spec...

Страница 60: ...he first time you must format the card before using it Formatting a card deletes all data saved on the card If the card includes data backup the data before formatting it 1 Click Start My computer 2 Right click over a card drive with the touchpad and select Format 3 Click Start to the formatting To use a card to exchange data with a digital device such as a digital camera formatting the data using...

Страница 61: ...d supports LAN TV Tuner and Sound cards This computer s slot supports the Express Card 34 specifications Before You Start Remove the dummy card installed to protect the slot first Optional Lightly push the dummy card of the slot The dummy card pops up Eject the dummy card This slot is a ExpressCard slot You cannot connect a PCMCIA card here To insert a card Insert a card into the slot on the side ...

Страница 62: ...ndows XP Windows Vista Windows 7 Adjusting the Volume using the Volume Adjustment Program You can only use it after installing Windows XP Windows Vista Windows 7 The following are the procedures to control the volume in Windows 7 Vista For the Windows XP procedures refer to the following as the procedures are similar Click the Volume icon on the taskbar and slide the volume control bar to adjust t...

Страница 63: ...Setup 65 The BIOS Setup Screen 66 Setting a Boot Password 68 Changing the Boot Priority 70 Upgrading Memory 71 Battery 73 Installing Removing the Battery 73 Charging the Battery 74 Measuring the Remaining Battery Charge 74 Extending the Battery Usage Time 75 Using the Security Lock Port 77 ...

Страница 64: ...w 1 Turn the computer on and press the F2 key when the SAMSUNG logo appears on the screen to enter the BIOS Setup 2 Select the Boot menu and set the Brightness Mode Control item to User Control 3 Press the F10 key to save the settings and exit Setup LCD bad pixels principle of laptop computer Samsung observes the specifications regarding strict quality and reliability of LCD But in spite of that i...

Страница 65: ... functions of the BIOS setup are subject to change for product function enhancement purposes The BIOS Setup menus and items may differ depending on your computer model Entering the BIOS Setup 1 Turn the computer on 2 When the booting screen SAMSUNG logo appears press the F2 key to enter the BIOS Setup Press the F12 key while the booting screen SAMSUNG logo appears the system will try to boot from ...

Страница 66: ... Main Used to change the basic system and environment settings Advanced Used to configure advanced functions on your computer for devices and chipsets Security Used to configure security functions including passwords Boot Used to set the boot priority and other boot options Exit Used to exit the Setup either saving the changes or not ...

Страница 67: ...ress to change the item value F9 Press to load the default Setup settings ESC Press to return to a higher level menu or to move to the Exit menu Left Right Keys Press to move to another menu Enter Press to select an item or to enter a sub menu F10 Press to save the changes and exit Setup The keyboard image may differ from the actual keyboard ...

Страница 68: ...in the Setup Notice window press Enter The supervisor password has been set The supervisor password is required to turn the computer on or to enter the BIOS Setup Setting a User Password Users can start the system with a user password but cannot enter the System Setup By doing this you can prevent other users from entering Setup Setting a Boot Password When setting a password you have to enter a p...

Страница 69: ...rd after restarting the computer by pressing the computer Power button If you cannot change the hard disk drive password or the HDD Password Frozen message appears when entering the BIOS Setup and then selecting Security HDD Password press the Power button to turn the computer on again Setting Up a Boot Password To setup a boot password the administrator password Set Supervisor Password should be ...

Страница 70: ...Device Priority item 3 Press the down key to move to the AHCI HDD item and press the F6 key to move up to the top item 4 Press the F10 key to save the settings and exit Setup The highest boot priority device is now set to the Hard Drive XXXXXXXX Type A Model Type B Model Boot Device Priority Set Boot Priority 1 IDE CD xxx 2 IDE HDD xxx 3 USB KEY N A 4 USB HDD N A 5 USB FDD N A 6 USB CD N A 7 NETWO...

Страница 71: ...e manufacturer is recommended Only use the same type of memory as specified in the Product Specification The images used for the illustration are of a representative model therefore the images may differ from the the actual product You must use only memory modules with the specifications DDR2 or DDR3 printed on the memory slot that appears when you open the memory compartment cover Adding a Memory...

Страница 72: ...t easily push the memory module down while pulling the memory module latches outward 4 Close the memory compartment cover and fasten the screw Removing a memory module Pull the memory module latches outward The memory module will pop up Remove the memory module out at an angle of 30 degrees ...

Страница 73: ...er heat the battery pack put it near or in a fire or use at a temperature higher than 60 C as this may cause fire Never cause a short circuit between the battery pack terminals or disassemble the battery pack Carefully read and follow the precautions printed on the battery and the safety instructions in the User Manual before using the battery Please refer to the system operation environment of th...

Страница 74: ... status by completing the following procedures To use the shortcut key to view You can only use this function after installing Windows XP Windows Vista Windows 7 and installing the Easy Display Manager program with the system software media disk Only for Windows XP Windows Vista Windows 7 Press the Fn keys on the keyboard The remaining battery charge will displayed for a moment Battery Usage Time ...

Страница 75: ...e keyboard to decrease the LCD brightness to extend the battery usage time You can only use this function after installing Windows XP Windows Vista Windows 7 Vista and installing the Easy Display Manager program with the system software media disk Only for Windows XP Windows Vista Windows 7 ...

Страница 76: ...ion and then recharging it again 1 Disconnect the AC power adapter after turning off the computer 2 Restart your computer and press the F2 button when the Samsung logo appears to start the BIOS Setup 3 Move to the Boot Smart Battery Calibration item using the direction keys and press Enter 4 Highlight Yes in the Battery Calibration Confirmation window and press Enter The Battery Calibration functi...

Страница 77: ...ter from being stolen when you have to use the computer in a public place To use this feature you have to purchase the Kensington lock additionally To use the Kensington lock refer to the product manual Tie the Kensington lock cable to a fixed object and install the other end of the cable to the Security Lock port ...

Страница 78: ...78 ...

Страница 79: ...Chapter 4 Appendix Product Specifications 80 ...

Страница 80: ...rce 310M External nVidia GeForce GT 320M External nVidia GeForce GT 330M External ATI Radeon HD 545V External ATI Radeon HD 5470 External Operating Environment Temperature 5 40 C for storage 10 32 C when operating Humidity 5 90 for storage 20 80 when operating Operating Voltage 100 240VAC Frequency 50 60Hz Output Power Optional 60W or 90W Output Voltage Optional 19V 3 16A 60W or 19V 4 74A 90W Opti...

Страница 81: ...poration Microsoft MS DOS and Windows are registered trademarks of the Microsoft Corporation All other product or company names mentioned herein are registered trademarks of their respective companies ENERGY STAR Partner As an ENERGY STAR Partner SAMSUNG has determined that this product meets the ENERGY STAR guidelines for energy efficiency ...

Страница 82: ...82 ...

Страница 83: ......

Страница 84: ...BA81 08985A23 100831 BA81 08985A23 ...

Отзывы: