background image

10


English

English


10

English


11

Checking or Editing the 
Programmed Tracks

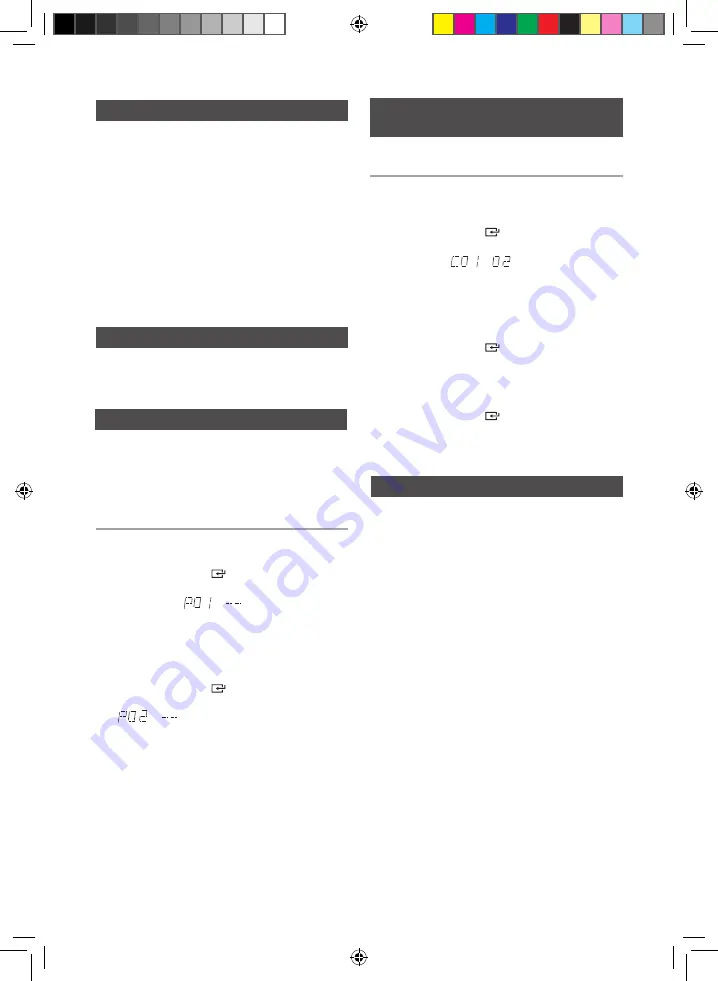
You can check a list of programmed tracks and 
edit them as you want.

1. 

If a programmed track is being played, press the 
STOP (

@

) button once.

2. 

Press the 

ENTER


button twice to display 

the message below: 


    (C=Check, 01= program number)


If a total of 24 tracks are already pro-
grammed, “

C

” will be displayed rather 

than “

P

” in the display.

3. 

Press the 

ENTER


button repeatedly until 

the desired track is displayed.

4. 

Press the 

[

 or 

]

 button to select a different 

track.

5. 

Press the 

ENTER


button to confirm your 

selection.

6. 

To play the programmed tracks, press the  

PLAY

 (

+

) button.

You can repeatedly play back a designated section 

of a CD.

1. 

Press the 

REPEAT A-B

 button at the beginning 

of desired part.

•  'RPT A'

 will be displayed.

2. 

Press the 

REPEAT A-B

 button at the ending of 

desired part.

•  'RPT AB'

 will be displayed.

3. 

 To cancel 

REPEAT A-B

 function, press the 

REPEAT A-B

 button again.

•  'OFF'

 will be displayed.


REPEAT A-B function is available only within a     


track.

You can play a disc followed by a USB continuously.  

1. 

Press the 

AUTO CHANGE

 button.

Each time you press this button, the mode will 
switch as follows:

       AUTO CHANGE ON 

;

 AUTO CHANGE OFF

• 

When the auto change mode is "ON", the unit will play 

the Disc


;


USB 1


;


USB 2 continuously.

• 

When the auto change mode is "ON", if you press 

the 

POWER

 button, FUNCTION button, or the 

OPEN/CLOSE

 button, the auto change function 

automatically switches to "OFF" mode. 

• 

When the USB is playing, if you disconnected the 

USB, the auto change function automatically switches 

to "OFF" mode. 

• 

When the auto change mode is "ON", the unit cannot 

record.

• 

When the auto change mode is "ON", the REPEAT 

and SLEEP functions automatically change to OFF.

• 

When t

he auto change mode is "ON", the CD REC 

SPEED, USB 2 REC, REPEAT, PROGRAM, DELETE 
and SLEEP functions do not work, and the unit 
displays "AUTO CHANGE ON".

• 

When the DISC play ends, if there's no USB 1, the 

unit will continue to play music from the USB 2.

• 

When the DISC play ends, if there's no USB 1 and 

USB 2, the unit will continue to play the disc.

• 

When the USB 2 play ends, if there's no DISC, the 

unit will continue to play music from the USB 1.

A-B Repeat Playback

Auto Change Function

10 Skip Function

Press the 

+10

 or 

-10

 button while in playback mode.

The unit will skip as many as 10 tracks forward or 
10 tracks back from the current track.

This function is not available during playback of an 

MP3/WMA-CD.

• 

 You can program the playback order of up to 24 

tracks of your choice.

• 

However, you must stop playing the CD before 

selecting tracks.

1. 

 While in CD playback mode, press the 

STOP

(

@

button to stop playing the CD.

2. 

Press the 

ENTER 


button to display the 

message below:
 

(01= program number, --= track number)

3. 

Use the 

[

 or 

]

 button to move to a desired 

track.

• 

Press 

[

 to move to the previous track.

• 

Press 

]

 to move to the next track.

4. 

Press the 

ENTER


button to confirm your 

selection, the selection is stored and 

  is displayed.

5. 

To select additional tracks, follow Steps 3  

to 4 above.

6. 

Press the 

PLAY 

(

+

) button to play the 

programmed tracks.

7. 

Press the 

STOP

(

@

) button to stop playing the 

programmed tracks, Press the 

STOP

 (

@

) button 

again to cancel playing the programmed tracks.

• 

 If you open the disc tray or turn off the 

product, your programming will be canceled.


In CD Program mode, if you press the USB REC 

or the AUTO CHANGE buttons, these functions 

will not work, and the unit will display "PROG".

CD Programming

MX-F870-ZP-ENG-0304.indd   10

2013-3-13   16:11:01

Содержание MX-F870

Страница 1: ... RW Playback user manual Imagine the possibilities Thank you for purchasing this Samsung product To receive more complete service please register your product at www samsung com register MX F870 MX F870 ZP ENG 0304 indd 1 2013 3 13 16 10 45 ...

Страница 2: ...de blade of the plug to the wide slot in the wall outlet Fully insert the plug into the wall outlet This product satisfies FCC regulations when shielded cables and connectors are used to connect the unit to other equipment To prevent electromagnetic interference with electric appliances such as radios and televisions use shielded cables and connectors for connections FCC NOTE for U S A This equipm...

Страница 3: ...ld with the apparatus When a cart is used use caution when moving the cart apparatus combination to avoid injury from tip over 13 Unplug this apparatus during lightning storms or when unused for long periods of time 14 Refer all servicing to qualified service personnel Servicing is required when the apparatus has been damaged in any way such as when the power supply cord or plug is damaged liquid h...

Страница 4: ... Do not use CD R discs over 700MB 80 minutes as they may not be played back Some CD RW Rewritable media may not be playable Only CD Rs that are properly closed can be fully played If the session is closed but the disc is left open you may not be able to fully play the disc CD R MP3 Discs Only CD R discs with MP3 files in ISO 9660 or Joliet format can be played MP3 file names should contain no blan...

Страница 5: ...eat One or All Tracks on a Compact Disc 9 A B Repeat Playback 10 10 Skip Function 10 CD Programming 10 Checking or Editing the Programmed Tracks 10 Auto Change function 10 Playing a USB Device 11 To Select a Track from a USB Device 11 To Search a Folder Quickly 11 To repeat 11 To Use High Speed Search 11 To delete a file 11 To skip 10 tracks 11 Setting the Clock 12 Timer Function 12 Cancelling the...

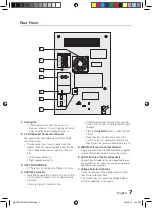
Страница 6: ...necting an External Component such as an MP3 player Connect AUX IN 1 on the front panel of the MINI COMPACT to the Audio Out of the external component MP3 player Press the TUNER AUX button to select the AUX 1 input 18 USB 2 REC jack 19 USB 2 REC button 20 OPEN CLOSE button 21 USB 2 button 22 ENTER button 23 PLAY PAUSE button 24 Search Skip button 25 USER EQ button 26 Window display 27 LOCAL EQ but...

Страница 7: ... sure to match connector colors If the external analog component has only one Audio Out jack connect to either the left or right terminal Press the TUNER AUX button to select the AUX 2 input When the unit is in AUX mode if none of the buttons on the front panel are pushed for more than 8 hours the power will automatically turn off 5 FM AM Antenna Connector Terminal Plug the connector on the FM AM ...

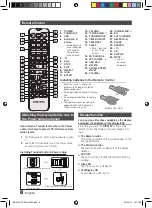
Страница 8: ...EC SPEED MO ST 23 VOLUME 24 TUNING ALBUM 25 EQ 26 AUTO CHANGE 27 REPEAT A B 28 PAUSE 29 SEARCH 30 10 31 CD 32 DISPLAY 33 MUTE Turn off the sound temporarily 1 2 3 4 5 6 7 8 9 10 11 12 13 14 15 16 17 18 19 20 22 21 23 24 25 26 27 28 29 30 31 32 33 Installing batteries in the Remote Control Match the and ends of the batteries with the diagram inside the battery compartment Always replace both batter...

Страница 9: ...entering You can load or unload a compact disc when the radio USB or auxiliary source function is selected Also when you press the OPEN CLOSE button the product will automatically change to the MP3 CD mode If no buttons are pressed on the product or remote control for more than 3 minutes when the product is in Pause mode the product will change to Stop mode If no buttons are pressed on the product...

Страница 10: ...ge mode is ON the REPEAT and SLEEP functions automatically change to OFF When the auto change mode is ON the CD REC SPEED USB 2 REC REPEAT PROGRAM DELETE and SLEEP functions do not work and the unit displays AUTO CHANGE ON When the DISC play ends if there s no USB 1 the unit will continue to play music from the USB 2 When the DISC play ends if there s no USB 1 and USB 2 the unit will continue to p...

Страница 11: ... on the product or remote control for more than 25 minutes when the product is in Stop mode or no USB mode the power will automatically turn off Connect an external storage device such as a USB flash memory or external HDD Hard Disk Drive to the product You can play files in MP3 WMA format Before you begin Connect the external USB storage device to your product Select the USB mode by pressing the ...

Страница 12: ...ess the ENTER button Result The minutes flash c Press the TUNING ALBUM or button to set the minutes d Press the ENTER button Result OFF is displayed for a few seconds You can now set the timer switch off time 5 Set the timer switch off time a Press the TUNING ALBUM or button to set the hours Timer Function After you have set the timer the unit will start auto matically at the time shown by the TIM...

Страница 13: ...P button The unit automatically creates and saves recorded files in MP3 format SAM XXXX MP3 5 To remove the USB device safely press the STOP button once again After recording a directory named RECORDING DISCxxxx FULL CD RECORDING RECORDING TRACK RECORDING CD COPY MP3 CD USB MP3 RECORDING MP3 CD TUNER RECORDING or AUX RECORDING is created on your USB device You can store up to 15 FM stations 15 AM ...

Страница 14: ...from an external device through the AUX or USB channel may cause noise in the recording If this occurs lower the external device s volume level The maximum TUNER AUX recording time is 5 hours Your mini compact system provides predefined equalizer settings that are optimized for particular music genre You can also adjust the bass middle and treble levels manually 1 Press the EQ button Each time you...

Страница 15: ...hoose a desired party mode 1 Press the PARTY button Each time press this button the party mode will switch as following PARTY 1 PARTY 2 PARTY 3 OFF Party function You can stack and install the speakers as described in the figure 1 Insert 2 spacers into the holes of the Subwoofer L and fix them 2 Stack the Front Speaker L horizontally on the Subwoofer L 3 Insert 2 spacers into the holes of the Fron...

Страница 16: ...slow playback Are the speakers connected properly Is the speaker setup correctly customized Is the disc severely damaged The remote control does not work Is the remote control being operated within its operational angle and distance range Are the batteries drained The product is not working Example The power goes out or the front panel key doesn t work or or you hear a strange noise The product is...

Страница 17: ...e 74 min Amplifier MX F870 1650 Watts MAX Front speaker output 330 W CH 6 Ω 100 Hz Rear speaker output 165 W CH 12 Ω 100 Hz Subwoofer 330 W CH 6 Ω 100 Hz Frequency range 20 Hz 20 KHz S N Ratio 75 dB Channel separation 50 dB Input sensitivity AUX 800 mV Nominal specification Samsung Electronics Co Ltd reserves the right to change the specifications without notice Weight and dimensions are approxima...

Страница 18: ...NG 72678 doar din reţeaua Romtelecom tarif local 2 021 206 01 10 din orice reţea tarif normal www samsung com Serbia 0700 Samsung 0700 726 7864 www samsung com Area Contact Centre Web Site Slovakia 0800 SAMSUNG 726 7864 www samsung com Spain 902 1 SAMSUNG 902 172 678 www samsung com Sweden 0771 726 7864 SAMSUNG www samsung com Switzerland 0848 SAMSUNG 7267864 CHF 0 08 min www samsung com ch www sa...

Страница 19: ...Code No AH68 02606J Rev 0 0 MX F870 ZP ENG 0304 indd 19 2013 3 13 16 11 11 ...

Отзывы: