background image

Service Manual

Alignment & Troubleshooting

4-15

Samsung Electronics

4.1.7  Paper Jam

4.1.7.1  In the paper feed area

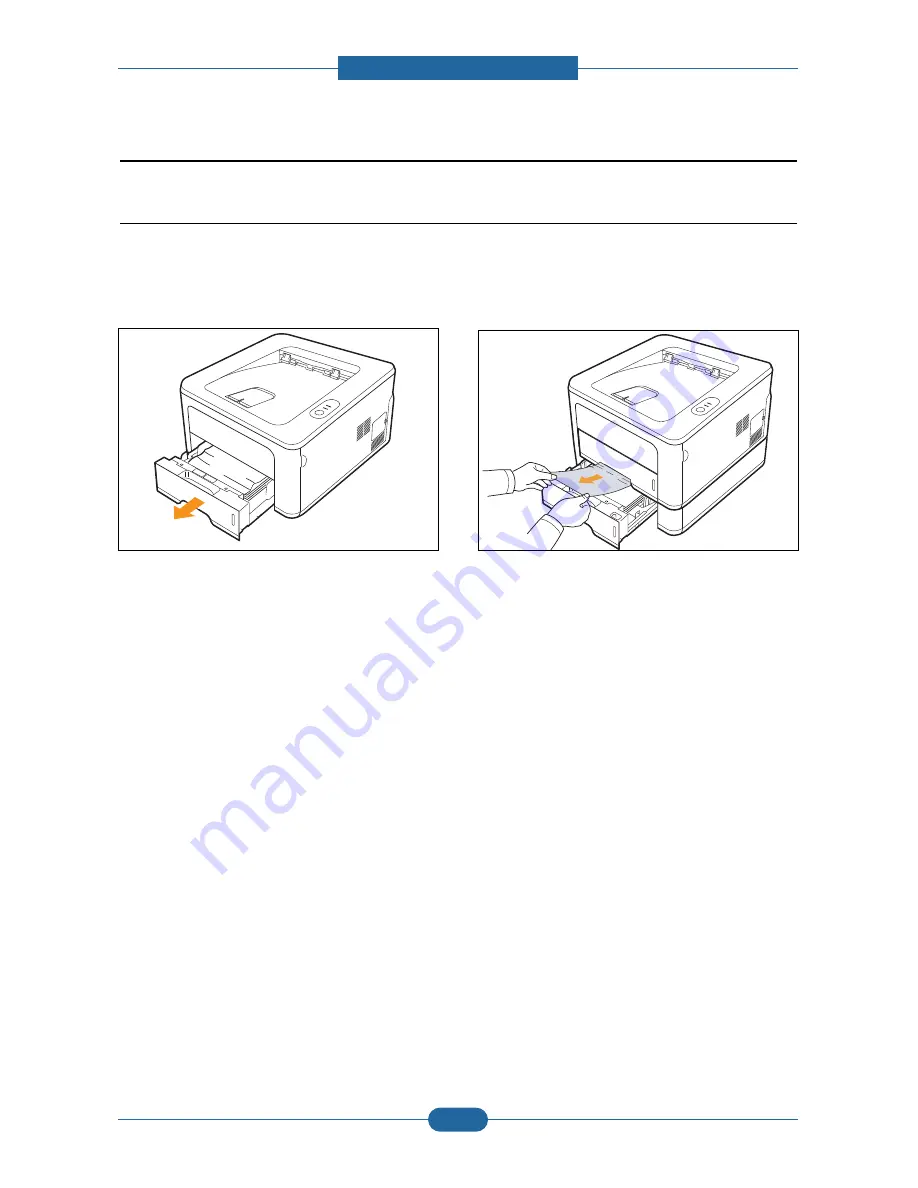
In the tray 1

1. Pull the tray 1 open.

2. Remove the jammed paper by gently pulling it

straight out. Make sure that all of the paper is
properly aligned in the tray 1.

If the paper does not move when you pull, or if you
do not see the paper in this area, check the fuser
area around the toner cartridge. 

3. Insert the tray 1 into the printer until it snaps into

place. Printing automatically resumes.

Содержание ML-2851ND

Страница 1: ...tr PCL6 PS3 1 200x1 200dpi 400MHz processor USB 2 0 N W ML 2851ND only 32MB Max 160MB factory option 2K Standard 5K High Yield Paper Input 250 sh CST 1 sh MP Standard Duplex Printing Options 250 sh SCF ML 2850D Manual SERVICE DIGITAL LASER PRINTER ML 2850 Series ML 2850D ML 2851ND Basic Model ML 2851ND ML 2851ND XAZ ...

Страница 2: ...ter Components 2 9 2 2 2 System Layout 2 12 2 2 3 Engine H W Specifications 2 17 2 2 4 S W Descriptions 2 27 3 Disassembly and Reassembly 3 1 General Precautions on Disassembly 3 1 3 2 Used Screw List 3 2 3 3 Cover Unit 3 3 3 3 1 CASSETTE Front Cover 3 3 3 3 2 DUPLEX UNIT COVER TOP COVER REAR 3 4 3 3 3 Cover Side LEFT RIGHT 3 5 3 4 Fuser Ass y 3 6 3 5 LSU Laser Scanning Unit 3 7 3 6 Drive Ass y 3 ...

Страница 3: ...d Reset F W 4 20 4 2 Troubleshooting 4 21 4 2 1 Procedure of Checking the Symptoms 4 21 4 2 2 The cause and solution of Bad image 4 22 4 2 3 The cause and solution of the bad discharge 4 38 4 2 4 The cause and solution of the malfunction 4 46 4 2 5 Toner Cartridge Service 4 56 4 2 6 The cause and solutions of bad environment of the software4 58 5 Exploded Views Parts List 5 1 Main 5 2 5 2 Top Cove...

Страница 4: ...ms and Abbreviations 7 2 7 3 Select a location for the printer 7 4 7 4 Sample Tests Patterns 7 5 7 5 LAN Optional Function 7 6 7 6 Information of model s code 7 6 7 7 Parts Life Cycle Maintenance Table 7 7 7 7 1 Parts Life Cycle Maintenance Table 7 7 7 7 2 Toner Cartridge Criterion 7 7 7 8 Model Information 7 8 7 8 1 Understanding for Model Code 7 8 7 8 2 Understanding Material Code Name 7 9 Conti...

Страница 5: ...n access to laser radiation above a Class I level during normal operation user maintenance or prescribed service condition Warning Never operate or service the printer with the protective cover removed from Laser Scanner assembly The reflected beam although invisible can damage your eyes When using this product these basic safety pre cautions should always be followed to reduce risk of fire electr...

Страница 6: ... or removing the power connector The power connector must be inserted com pletely otherwise a poor contact could cause overheating possibly leading to a fire When removing the power connector grip it firmly and pull 7 Take care of the power cable Do not allow it to become twisted bent sharply round corners or other wise damaged Do not place objects on top of the power cable If the power cable is d...

Страница 7: ... to the printer in such areas 5 Do not place candles burning cigarettes etc on the printer These could cause a fire 1 2 4 Assembly Disassembly Precautions Replace parts carefully always use Samsung parts Take care to note the exact location of parts and also cable routing before dismantling any part of the machine Ensure all parts and cables are replaced correctly Please carry out the following pr...

Страница 8: ...n etc If do you can get harm 3 When you move the printer This printer weighs 7 87kg Use safe lifting and handling techniques Use the lifting handles located on each side of the machine Back injury could be caused if you do not lift carefully 4 Ensure the printer is installed safely The printer weighs 7 87Kg ensure the printer is installed on a level surface capable of supporting its weight Failure...

Страница 9: ...m to prevent electrostatic charge buildup in the vicinity of the assem bly 3 Use only a grounded tip soldering iron to solder or desolder ESDs 4 Use only an anti static solder removal device Some solder removal devices not classified as anti static can generate electrical charges sufficient to damage ESDs 5 Do not use Freon propelled chemicals When sprayed these can generate electrical charges suf...

Страница 10: ...p to 14 ipm in A4 14 5 ipm in Letter Warmup time From Sleep 15 sec 15 sec FPOT From Ready 8 5 sec 8 5 sec From Sleep less than 23 5 sec less than 23 5 sec Resolution Up to 1 200 x 1 200 dpi effective output Up to 1 200 x 1 200 dpi effective output 2 Product specification and feature 2 1 Product Specifications 2 1 1 Product Overview 28ppm A4 30ppm Ltr PCL6 PS3 1 200x1 200dpi 400MHz processor USB 2 ...

Страница 11: ...32 64bits Compatibility SPL PCL6 Win 2000 XP 32 64bits SPL PCL6 Win 2000 XP 32 64bits 2003 server Vista 32 64bits 2003 server Vista 32 64bits PS3 Win 2000 XP 32 64bits PS3 Win 2000 XP 32 64bits Vista 32 64bits Vista 32 64bits 2003 PPD Mac PPD Linux PPD 2003 PPD Mac PPD Linux PPD Wired Network Protocol N A SPX IPX TCP IP Ethertalk SNMP HTTP 1 1 Supporting OS N A Windows NT4 0 2000 XP 32 64bits 2003...

Страница 12: ...0 sheets 80g 250 sheets 80g Media sizes A4 A5 Letter Legal Executive Folio A4 A5 Letter Legal Executive Folio Oficio ISO B5 JIS B5 Oficio ISO B5 JIS B5 Media types Plain paper Plain paper Media weight 16 28lb 60 to 105g 16 28lb 60 to 105g Sensing Paper empty sensor Paper empty sensor Optional Cassette Tray Capacity 250 sheets 80g 250 sheets 80g Media sizes A4 A5 Letter Legal Executive Folio A4 A5 ...

Страница 13: ...y 30 000 sheets 30 000 sheets MPBF 35 000 sheets 35 000 sheets MTTR 30 min 30 min SET Life Cycle 100 000 sheets or 5 years 100 000 sheets or 5 years whichever comes first whichever comes first RDS Comm Mode Yes Yes Operation Yes Yes 2 1 2 6 Environment ITEM ML 2850D ML 2851ND Operating Temperature 10C to 32C 10C to 32C Environment Humidity 20 to 80 20 to 80 Acoustic Noise Printing Less than 50dBA ...

Страница 14: ...nit Standard Standard 2 1 2 9 Others ITEM ML 2850D ML 2851ND Memory Upgradable Mem Slot N A N A Upgradable Mem Type N A N A Upgradable Mem Unit 128MB factory option 128MB factory option Sensor Paper Empty YES YES Paper Size NO NO Media Type NO NO Paper Full NO NO Service Service Item Period 1 Transfer Roller 50K pages 1 Transfer Roller 50K pages 2 Fuser Unit 50K pages 2 Fuser Unit 50K pages 3 Pick...

Страница 15: ... Electronics 2 1 2 10 Reliability Service Periodic Replacing Parts JC96 04717A 220V JC96 04718A 110V JC97 03062A JC66 01218A Code Fig 50 000 Fuser Unit 3 50 000 Pick up Roller 2 50 000 Transfer Roller 1 Yield pages Parts No Code Fig Yield pages Parts No ...

Страница 16: ...pm A4 Resolution 1 200 dpi class 600 dpi class Processor 400 MHz 166 MHz Memory Max 32 MB 160 MB 16 MB 144 MB Emulation PCL6 PS3 PCL6 Interface USB 2 0 N W USB 2 0 N W IEEE1284 Paper Input 150 CST 150 CST FPOT C M 30 sec 8 5 sec 50 sec 10 sec Noise 50 dBA 51 dBA Toner 2K 5K 3K 5K Dim WDH 364 x 369 x 209 6mm 358 x 452 x 278mm Options 250 SCF Memory factory option 250 SCF Memory ...

Страница 17: ...s 600 x 600 dpi Processor 400 MHz 264 MHz 300 MHz Memory Max 32 MB 160 MB 16 MB 16 MB 64 MB 576 MB Emulation PCL6 PS3 PCL6 PS3 PCL6 PS3 Interface USB 2 0 N W USB 2 0 N W USB 2 0 N W Paper Input 250 CST 250 OT 250 CST FPOT C M 30 sec 8 5 sec 20 sec N A Noise 50 dBA 47 dBA N A Toner 2K 5K 2K 2 5K 1K 2K Dim WDH 364 x 369 x 209 6mm 407 x 453 x 370mm 420 x 424 x 432mm Options 250 SCF 250 SCF 250 500 SC...

Страница 18: ...unctions and operating principal of the main component 2 2 1 Printer Components 2 2 1 1 Front View The figure above shows an ML 2851ND 1 output tray 6 tray 1 2 control panel 7 optional tray 2 3 control board cover 8 paper level indicator 4 front cover 9 output support 5 manual tray 10 manual tray paper width guides ...

Страница 19: ...t spec and feature 2 10 Samsung Electronics 2 2 1 2 Rear View The figure above shows an ML 2851ND 1 network porta 4 duplex unit 2 USB port 5 power receptacle 3 optional tray 2 cable connector 6 power switch a ML 2851ND only ...

Страница 20: ...Samsung Electronics 2 2 1 3 Control Panel 1 Error Indicates the status of your printer 2 Online Indicates the status of your printer 3 Cancel Prints a demo page or configuration page Cancels the print job Makes the printer pick up the print media ...

Страница 21: ...Service Manual Product spec and feature 2 12 Samsung Electronics 2 2 2 System Layout LSU DEVE CASSETTE DUPLEX FUSER ...

Страница 22: ...r pickup function driving control function paper feeding function and removing electronic static function 4 Registration roller It has a paper arranging function paper transferring function paper detecting function jam remov ing function and so on 5 MP tray It has a paper arranging function paper transferring function jam removing function and so on It uses rubbing pad method to feed 1 sheets of g...

Страница 23: ...hermostat 2 Heat roller The heat roller transfers the heat from the lamp to apply a heat on the paper The surface of a heat roller is coated with Teflon so toner does not stick to the surface 3 Pressure roller A pressure roller mounted under a heat roller is made of a silicon resin and the surface also is coated with Teflon When a paper passes between a heat roller and a pressure roller toner adhe...

Страница 24: ...rning principle of polygon mirror The OPC drum is turned with the paper feeding speed The HSYNC signal is created when the laser beam from LSU reaches the end of the polygon mirror and the signal is sent to the con troller The controller detects the HSYNC signal to adjust the vertical line of the image on paper In other words after the HSYNC signal is detected the image data is sent to the LSU to ...

Страница 25: ...blade Developing Method Non contacting method Toner Non magnetic 1 component pulverized type toner The life span of toner 2 000 or 5 000 pages LSA Pattern A4 standard Toner remaining amount detecting sensor Yes OPC Cleaning Cleaning blade type Management of disusable toner Collect the toner by using Cleaning Blade OPC Drum protecting Shutter No Classifying device for toner cartridge ID is classifi...

Страница 26: ... is consisted of the circuits of the motor paper feed pass driving clutch driving pre transfer lamp driving current driving and fan driving The signals from the paper feed jam sensor and paper empty sensor are directly inputted to the main board SDRA M U6 U7 SDRA M U6 U7 ASIC U8 ASIC U8 USB Port IC USB Port IC Network Interface IC Network Interface IC DC to DC Converter 3 3V U15 DC to DC Converter...

Страница 27: ...PVC Dual Single Beam LVDS Pad VDO HSYNC UART 5 Channels 1 Channels Supports DMA Operation PCI Controller 32Bits 33 66MHz PCI Local Bus Specification rev2 2 Complaint Host Agent Mode Support 4 Devices in Host Mode NAND Flash Controller 8 16Bits H W EEC Generation Auto Boot Mode Using Internal SRAM 4KB MAC 10M 100Mbps Full IEEE 802 3 Compatibility Engine Controller LSU Interface Unit Step Motor 2 Ch...

Страница 28: ...veloper is inserted or not is detected by CRUM After the developer is mounted the sub CRUM can read the information of toner cartridge from contact with CRUM involved in toner cartridge If the information of toner cartridge is invalid it will show invalid sign on LED Paper Exit Sensing It detects paper state whether paper gets out from the set with operation of exit sensor on the HVPS and actuator...

Страница 29: ...e for sensing and voltage value for the V reference can be changed by motor driving volt age value The motor driving voltage is calculated with the following formula The motor driving circuit is formed when the Driver IC is selected The A3977 Motor Driver IC is used in this case The resistance Rs value for sensing and voltage value for the V reference can be changed by motor driving voltage value ...

Страница 30: ...ontrol Method The THV PWM ACTIVE is transfer active signal It detects the resistance by recognizing the voltage value F B while permits the environmental recognition voltage Output Voltage Control Method Transfer Output Voltage is outputted and controlled by changing Duty of THVPWM Signal 10 Duty 650V 90 Duty 5KV 5 Charge Voltage MHV Input Voltage 24 V DC 15 Output Voltage 1 3KV 1 8KV DC 50V Outpu...

Страница 31: ...mmon use It is mounted at the side of the set It is consisted of the SMPS part which supplies the DC power for driving the system and the AC heater control part which supplies the power to fuser SMPS has two output channels Which are 5V and 24V AC Input Input Rated Voltage AC 220V 240V AC 110V 127V Input Voltage fluctuating range AC 198V 264V AC 99V 135V Rated Frequency 50 60 Hz Frequency Fluctuat...

Страница 32: ...Maximum output 15W 105 6W 8 Peak output 18W 127 2W 1ms 9 Protection for loading Shut down or Fuse Shut down or Output shortage and Protection Voltage Drop overflowing current NO ITEM System 1 Stand By Less than 60W 2 PRINTING Less than 400W 3 Sleep Mode Less than 8W SW2 SW2 CON1 Heat Lamp CON CON1 Heat Lamp CON F02 250V 3 15A F02 250V 3 15A F01 220V 250V 8A 110V 250V 10A F01 220V 250V 8A 110V 250V...

Страница 33: ...Fuser e coil gets heat from AC power The AV power controls the switch with the Triac a semiconductor switch The ON OFF control is operated when the gate of the Triac is turned on off by Phototriac insulting part In other words the AC control part is passive circuit so it turns the heater on off with taking signal from engine control part When the HEATER ON signal is turned on at engine the LED of ...

Страница 34: ...ough AD converter The voltage value for impressing to the transfer roller is decided by the changed value Each voltage value is controlled according to 3 3 4 2 Timing Chart ITEM Description JAM 0 JAM 1 JAM 2 DUPLEX JAM 1 DUPLEX JAM 0 After picking up paper cannot be entered due to paper is not fed After picking up paper entered but it cannot reach to the feed sensor in certain time due to slip etc...

Страница 35: ... and drives the polygon motor When the detector detects the beam Hsync occurs When the polygon motor speed becomes strady Lready occurs If two conditions are satisfied the status are not satisfied the error shown in below occurs Error Description OPEN HEAT ERROR When warming up it has been lower than 90 over 20 seconds LOW HEAT ERROR Standby has been lower than the Standby Reference Temperature 20...

Страница 36: ...anguage which printer can understand and transfers data to spooler 3 Stand alone Application that offers the various printing application PSU Printer Settings Utility Printer Status Monitor Network Management in Window system 4 Web based Application that offers the same functions as Stand alone Application and RDC Remote Diagnosis Control in Web environment Firmware is made up of 1 Application Emu...

Страница 37: ...onal functions management of printing job printer administra tion Status monitor to monitoring the printer status by real time in Web independent environment on OS 3 Stand alone Application that is a similar Window software as same as above 2 4 Port Monitor that manages the network communication between spooler and Network Interface Card or various addi tional application and Network Interface Car...

Страница 38: ... Kernel receives this data from Host and then select emulation fit to data and start selected one After emulation job end Kernel sends the output bit map data to Engine using Printer Video Controller by clock type for LSU Engine print the received data to required paper with the sequential developing process 2 Case of using Network Interface Card After user start to print the wanted document to PC...

Страница 39: ...hine note the cable routing that will be affected Whenever servicing the machine you must perform as follows 1 Check to verify that documents are not stored in memory 2 Be sure to remove the toner cartridge before you disassemble parts 3 Unplug the power cord 4 Use a flat and clean surface 5 Replace only with authorized components 6 Do not force plastic material components 7 Make sure all componen...

Страница 40: ...WRCH18A CASSETTE SCREW TAPTITE PWH B M3 L6 ZPC WHT SWRCH18A 1 4 6003 000269 DRIVE SCREW TAPTITE BH S M3 L6 ZPC WHT SWRCH18A 11 5 6003 000282 DUPLEX UNIT SCREW TAPTITE BH B M3 L8 ZPC BLK SWRCH18A FRAME SCREW TAPTITE BH B M3 L8 ZPC BLK SWRCH18A FUSER SCREW TAPTITE BH B M3 L8 ZPC BLK SWRCH18A 4 FRONT COVER SCREW TAPTITE BH B M3 L8 ZPC BLK SWRCH18A 1 LSU SCREW TAPTITE BH B M3 L8 ZPC BLK SWRCH18A 10 SC...

Страница 41: ...ice Manual Disassembly and Reassembly 3 3 Samsung Electronics 3 3 Cover Unit 3 3 1 CASSETTE Front Cover 1 Remove the CASSETTE 2 Remove the FRONT COVER carefully especially hooks 3 Remove the TONER CARTRIGE ...

Страница 42: ...amsung Electronics 3 3 2 DUPLEX UNIT COVER TOP COVER REAR 1 Remove two SCREW in front view 2 Turning back of SET remove DUPLEX UNIT like below figure 3 After open the COVER REAR remove two SCREWs then disassemble the Cover Top up 4 Remove COVER REAR ...

Страница 43: ...Service Manual Disassembly and Reassembly 3 5 Samsung Electronics 3 3 3 Cover Side LEFT RIGHT 1 Remove their first hook from frame base 2 After removing the hook of backside remove Cover Side LEFT RIGHT ...

Страница 44: ... 4 Fuser Ass y 1 Before fuser ass y removal Remove COVER TOP DUPLEX COVER REAR 2 After remove guide rear assy like below figure remove four screws of fuser assy 3 In upper view remove the three harness connected to fuser 4 Remove fuser carefully not to damage HARNESSes ...

Страница 45: ...anual Disassembly and Reassembly 3 7 Samsung Electronics 3 5 LSU Laser Scanning Unit 1 Before LSU ass y removal Remove the COVER TOP COVER RIGHT 2 Remover four Screw M4 L10 of LSU and one connector from Main B D ...

Страница 46: ...eassembly 3 8 Samsung Electronics 3 6 Drive Ass y 1 Before Drive ass y removal Remove the CASSETTE Cover FRONT COVER TOP COVER LEFT Assy 2 Remove the seven Screws and remove Drive Ass y carefully 3 Remove the Connector of Drive Ass y ...

Страница 47: ... Samsung Electronics 3 7 Main PBA SMPS HVPS 1 Before Main PBA SMPS HVPS removal Remove CASSETTE COVER FRONT COVER TOP COVER RIGHT 2 HVPS Remove 6 screws and 1 HARNESS SMPS Remove 4 screws and 3 HARNESSes Main PBA Remove 4 screws and all HARNESSes ...

Страница 48: ...Service Manual Disassembly and Reassembly 3 10 Samsung Electronics 3 8 HOLDER PAD Disassembly 1 Remove the CASSETTE from SET 2 Disassemble HOLER PAD after putting out three HOOKs ...

Страница 49: ...y and Reassembly 3 11 Samsung Electronics 3 9 Transfer Roller 1 Open the COVER FRONT 2 Push HOLDER TRANSFER which holds the transfer roller and remove the roller from set 3 Be carefull not to touch the sponge of Transfer Roller ...

Страница 50: ... the several sample patterns for maintenance With the sample patterns check the existence of the abnormality The patterns help to regularly maintain the product 4 1 1 1 Printing a Demo Page After setting up your printer print a demo page to make sure that the printer is operating correctly Press and hold the Cancel button for about 2 seconds A demo page prints out ...

Страница 51: ...nual Alignment Troubleshooting 4 2 Samsung Electronics 4 1 1 2 Printing a configuration Page Press and hold the Cancel button for about 4 seconds A configuration page prints out print out with the menu map sheet ...

Страница 52: ...Service Manual Alignment Troubleshooting 4 3 Samsung Electronics ...

Страница 53: ...ectronics 4 1 2 Control Panel 4 1 2 1 Control Panel 1 Error Indicates the status of your printer 2 Online Indicates the status of your printer 3 Cancel Prints a demo page or configuration page Cancels the print job Makes the printer pick up the print media ...

Страница 54: ...with corporate intranet access You can download this program from http solution samsungprinter com SyncThruTM Web Service A web server embedded to your network print server which allows you to configure the network parameters necessary for the printer to connect to various network environments SetIP A utility program allowing you to select a network interface and manually configure the addresses f...

Страница 55: ...he instruction in the installation window This program does not support Linux 1 Insert the driver CD provided along with your machine 2 Start Windows Explorer and open the X drive X represents your CD ROM drive 3 Double click Application SetIP 4 Open the language folder you want to use 5 Double click Setup exe to install this program 6 From the Windows Start menu select Programs Samsung Network Pr...

Страница 56: ...The printer has stopped printing due to a major error The toner cartridge is not installed Install the toner cartridge Your system has some problems If this problem occurs contact your service representative The toner is totally exhausted Remove the old toner cartridge and install a new one Blinking A minor error is occurring and the printer is waiting for the error to be cleared When the problem ...

Страница 57: ...al image 1 OPC Drum 75 5mm White spot Block Spots 2 Charge Roller 26 7mm Block Spot and Periodic Band 3 Supply Roller 47 1mm Periodic Band by little difference of density 4 Developing Roller 35 2mm White Spot Horizontal black band 5 Transfer Roller 47mm Ghost Damaged Image by abnormal transfer 6 Heat Roller 77 6mm Black Spots or Vertical Black Band 7 1 Pressure Roller _1st 62 8mm Blackground 7 2 P...

Страница 58: ...2 03 04 20 30 40 50 69 60 62 68 64 70 71 72 73 95 MAIN MOTOR OPERATING SYSTEM MAIN HIGH VOLTAGE ON TRNSFER HIGH VOLTAGE ON THV REFERANCE VOLTAGE DEV SUPPLY HIGH VOLTAGE ON PTL ON LSU OPERATING SYSTEM PICKUP CLUTCH ON PEEMPTY PWITH NEW CRU TEST FEED EXIT SENSOR TEST COVER OPEN SENSOR TEST FUSER TEST HOT BURN TEST CLEAN MODE PRINT THV TRIGGER ALL HV FAN ON THV REFERENCE ON ERROR STATUS CODE STATUS C...

Страница 59: ...per is passing out of the Feed Sensor 40 Feed Sensor off The paper has passed out of the Feed Sensor 50 Paper Out The paper has passed out of Exit Sensor 69 Sleep Mode The fuser power turned off to minimize the power consumption Code State Description 60 62 68 Fuser Error The error in the fuser occurred There is a short circuit in the thermistor and the thermostat while printing Low Temperature Er...

Страница 60: ...on High voltage probe should be used 02 Transfer High Voltage On THV 1000 voltage output by MHV terminal Caution High voltage probe should be used 03 Transfer High Voltage Reference on THV 1300 voltage output by MHV terminal Caution High voltage probe should be used 04 DEV supply High Voltage DEV Supply High Voltage Test The left one of the three LEDs in the self test panel is on when DEV high vol...

Страница 61: ...ressed the middle LED is on and temperature of the fuser is up to Printing Mode If you press the button once more the left LED is on and temperature of the fuser is up to overheat Mode 11 Hot Burn Test If the enter button pressed the printer is continuously printing without detection Turn the power off to stop operation 12 Cleaning Mode Print Mode Print the paper to clean the OPC Drum in the Cartr...

Страница 62: ... Burn On 12 Clean Print Clean Printing 13 Thv Reference low adequate high 14 PTL PTL On PTL Off PTL No 15 FAN Fan On Fan Off 16 PickUp Manual Pickup On Manual Pickup Off 17 Manual Manual Sensor Manual Sensor Function 4 1 6 4 Self Test Button If the Self Test button pressed vertical lines are printed Turn the power on while pressing this button 89 shows in the DCU and the printer is warming up Afte...

Страница 63: ...Service Manual Alignment Troubleshooting 4 14 Samsung Electronics 4 1 6 5 Paper Path LSU DEVE CASSETTE DUPLEX FUSER ...

Страница 64: ...2 Remove the jammed paper by gently pulling it straight out Make sure that all of the paper is properly aligned in the tray 1 If the paper does not move when you pull or if you do not see the paper in this area check the fuser area around the toner cartridge 3 Insert the tray 1 into the printer until it snaps into place Printing automatically resumes ...

Страница 65: ...es not move when you pull or if you do not see the paper in this area stop and go to step 3 3 Pull the tray 1 half 4 Pull the paper straight up and out 5 Insert the trays back into the printer Printing automatically resumes In the manual tray 1 Remove the jammed paper from the printer 2 Open and close the front cover 3 Load a paper into the manual feeder then the printer resumes ...

Страница 66: ...oner cartridge 1 Open and close the front cover The jammed paper is automatically ejected from the printer 2 Gently pull the paper out of the output tray If you do not see the jammed paper or if there is any resistance when you pull stop and go to the next step 3 Open the rear cover 4 Pull the guide rear on each side down and remove the paper Return the guide rear to its original position 5 Close ...

Страница 67: ...move the paper from the bottom of the printer Duplex jam 1 1 Open the rear cover 2 Pull the guide rear on each side down and remove the paper Return the guide rear to its original position 3 Close the rear cover Printing automatically resumes 1 duplex unit 1 4 1 7 4 In the duplex unit area If the duplex unit is not inserted correctly paper jam may occur Make sure that the duplex unit is inserted c...

Страница 68: ...y Do not remove paper from the tray while your printer is printing Flex fan and straighten paper before loading Do not use creased damp or highly curled paper Do not mix paper types in a tray Use only recommended print media Ensure that the recommended print side of print media is facing down in the tray or facing up in the multi purpose tray If paper jams occur frequently when you print on A5 siz...

Страница 69: ...p key Power O n the Printer 2 In Dos Prompt type Usblist2 Rom file name and Press Enter 3 Status LED Slow bli nk 4 Status LED Ton er Save LED are both blink 5 When download complete set will be automatically power On Off and it ll Warming Up LED Panel Boot Download method 1 In Dos Prompt type Usblist2 Rom file name and Press Enter 2 Status LED Slow blink 3 Status LED Ton er Save LED are both blink...

Страница 70: ...e attempting to repair the printer first obtain a detailed description of the problem from the customer Power On No Power Power Module error Main PBA error Panel PBA error Refer to Solution of Image Problem Green LED on Ready or Power save Error Lamp ON Refer to 4 1 4 LED Status Error Message Test Print END printing Quality is Nomal ...

Страница 71: ...nting 3 Partly depression or deformation on the surface of the transfer roller 2 Scratched surface of the charge roller in the toner cartridge 1 Damaged develop roller in the Toner cartridge Deformed Doctor blade or cleaning blade If causes 1 and 2 occur in the toner cartridge replace the toner cartridge and try to print out Replace the transfer roller if occurred as No 3 Digital Printer Digital P...

Страница 72: ...d blade In case the life of the toner cartridge has been expired white lines or light image occur in front of the image 1 Foreign matter stuck onto the window of internal lenses of LSU mirror Foreign matter stuck onto the window Clean the LSU window with recommended cleaner IPA Clean the window with a clean cotton swab Replace the toner cartridge No 3 Remove the foreign matter and burr of the expo...

Страница 73: ...6 7mm Supply roller 47 1mm Develop roller 35 2mm Transfer roller 47mm 1 Bad contacts of the voltage terminals to toner cartridge Clean each voltage terminal of the Charge Supply Develop and Transfer roller remove the toner particles and paper particles 1 Clean the right Gear that has relatively small gap of the teeth in the OPC 2 If the malfunction persists replace the toner cartridge Digital Prin...

Страница 74: ...7 7 mm interval OPC drum 75 5 mm interval OPC drum 75 5 mm interval 1 If dark or blurry black spots occur periodically the rollers in the Toner cartridge may be contaminated with foreign matter or paper particles Charge roller 26 7 mm interval OPC drum 75 5 mm interval Run OPC cleaning Mode Print and run the Self test 2 or 3 times In case of 75 5 mm interval unremovable in 1 cleanly remove foreign...

Страница 75: ...VPS Run self test and check 1 4 1 Develop roller is stained when the toner of toner cartridge is almost consumed Check if the Toner Save mode is off Check if the density is light No 1 Replace the toner cartridge and try to print out No 2 Wait 30 minutes after printer is powered on before you start printing No3 Clean up the contaminated area by the toner Replace the HVPS if the problems are not sol...

Страница 76: ... of the Toner cartridge and charge terminal of HVPS 3 VD0 signal of the Main PBA is Low state 1 No charge voltage in the engine board Check the state of the connector which connects the engine board and HVPS 1 Clean the high voltage charge terminal 2 Replace the HVPS if not solved by the above direction 1 and 2 Replace the LSU Unit or Main PBA Digital Printer Digital Printer Digital Printer Digita...

Страница 77: ...d blade 2 The life of the Toner cartridge has expired 1 The pressure force on the left and right springs of the transfer roller is not even the springs are damaged the transfer roller is improperly installed or the transfer roller bushing or holder is damaged Replace both the left and right Spring Holder Occur in the toner cartridge gently shake the toner cartridge Replace the toner cartridge and ...

Страница 78: ...n 2 per a page and hasn t it been used long time The toner cartridge is basically designed to print 5K sheets with 5 image If it prints more than 6K sheets with 2 coverage a background can occur Replace the toner cartridge when the life span of it has been ended The A S is not guaranteed if using a recyled the toner cartridger 1 If the problem is still not solved replace the toner cartridge 2 Gent...

Страница 79: ... one in the HVPS board 1 Bad contacts caused by contamination from toner particles between high voltage terminal in the main body and the electrode of the Toner cartridge Clean the terminals when contaminated by toner particles Replace the engine board if not solved by the above directions 1 2 Occur in the toner cartridge replace the toner cartridge and try to print out Continue If not solved by t...

Страница 80: ... Samsung Electronics 5 Abnormal low temperature below 10 C 6 Damaged cleaning blade in the toner cartridge Wait about 1 hour after power on before using printer Continue Occur in the toner cartridge replace the toner cartridge and try to print out ...

Страница 81: ... or transparencies using manual feeder When printing on card stock thicker than normal paper or transparencies such as OHP higher transfer voltage is required Select Thick Mode on paper type menu from the software application and after using returning to the original mode is recommended Digital Printer Digital Printer Digital Printer Digital Printer Digital Printer Digital Printer 75 5mm ...

Страница 82: ...intervals The temperature of the fuser is maintained high Disassemble the fuser and remove the contaminated toner particles on the roller and clean the foreign matter between Thermistor and Heat roller Caution can be deformed DigitalPrinter DigitalPrinter DigitalPrinter DigitalPrinter DigitalPrinter DigitalPrinter 62 8 or 77 6mm ...

Страница 83: ...e transfer roller is contaminated stains on the face of page will occur 1 Toner leakage due to improperly sealed toner cartridge Replace the toner cartridge If the transfer roller is contaminated run PC Cleaning Mode Print 2 or 3 times And perform Self Test 2 or 3 times to remove contamination Digital Printer Digital Printer Digital Printer Digital Printer Digital Printer ...

Страница 84: ... Perform the OPC Cleaning Mode Print 2 or 3 times Run Self Test to remove the contamination of the transfer roller 1 Replace the transfer roller if contaminated severely 2 Disassemble the fuser and clean the H R Heat Roller and P R Pressure roller And check the area between H R and Thermistor If contaminated clean the area not to be deformed DigitalPrinter DigitalPrinter DigitalPrinter DigitalPrin...

Страница 85: ...cription Blank page is printed Bad ground contacts in OPC and or toner cartridge 1 Check if the Ground OPC is defective set inside right side 2 Remove contamination of the terminals of the toner cartridge and the unit Digital Printer Digital Printer Digital Printer Digital Printer Digital Printer ...

Страница 86: ...inter turns on several blank pages print 1 Bad ground contacts in OPC and or toner cartridge Remove contamination of the terminals of the toner cartridge 2 Abnormal solenoid 1 Perform the engine self test using DCU to check if the Solenoid is normal 2 If not solved by the above directions 1 2 Replace the engine board 3 Turn the power off delete the data of PC and try printing again ...

Страница 87: ... 38 Samsung Electronics 4 2 3 The cause and solution of the bad discharge 1 Wrong Print Position Description Printing begins at wrong position on the paper Wrong sense time caused by defective feed sensor actuator Replace the defective actuator ...

Страница 88: ...heck whether the assembly slot between shaft pickup and housing pickup opens or is broken away 5 If the paper feeds into the printer and Jam 0 occurs perform DCU to check feed sensor of the engine board 1 Check the Solenoid by using DCU 2 Check if the pad is loose due to bad sealing of the side pad Replace the solenoid Clean with soft cloth dampened with IPA Isopropyl Alcohol or water Replace the ...

Страница 89: ... in the fuser just after passing through the Actuator Feed 1 If the recording paper is jammed in front of or inside the fuser 2 If the recording paper is stuck in the discharge roller and the fuser just after passing through the Actuator Feed Feed Actuator may be defective Replace the SMPS or Exit Sensor 1 Replace the Main PBA 2 Reassemble the Actuator Feed and Spring Actuator if the movement is b...

Страница 90: ... away or transformed It occurs when the Spring of a Guide claw is broken away or transformed It occurs when the Heat Roller or Pressure Roller is seriously contaminated with the toner Check if the exit sensor actuator is defective Check if the actuator exit is deformed Check if the lever part is deformed in shape Check whether burrs occur in the assembly part of the actuator exit or not and if the...

Страница 91: ...nment Troubleshooting 4 42 Samsung Electronics 5 JAM Duplex Description Recording paper is Jamned in front or inside a duplex module It is a case that a paper cannot reach to a registration sensor Replace a duplex roller ...

Страница 92: ...r Guide Rear in the Cassette if the position is correct Replace the solenoid if necessary 2 Solenoid malfunction the solenoid does not work properly Perform DCU Replace the Main PBA 3 Pad Friction is contaminated with foreign matter oil Clean the pad friction with soft cloth dampened with IPA Isopropyl Alcohol 4 The face of paper is blended Use the smooth paper ...

Страница 93: ...off set After disassembling the fuser clean contamination between the heat roller and the thermostor and remove the contamination of the pressure roller 2 Check the claw of the fuser whether it is deformed 1 If there is heavy background repair it by the background troubleshooting method 2 Clean the surface of the heat roller with IPA or water 3 Check the warp or separation of the print claw and th...

Страница 94: ...ption Paper is rolled up in the OPC How to remove the rolled paper in the OPC Remove the paper while turning the OPC against the ongoing direction Clean fingerprints on the OPC softly with soft cloth dampened with tissue 1 Paper is too much thin Recommend to use normal paper 2 The face of paper is curled ...

Страница 95: ... thermostat AC wire and heat lamp are open or not Replace the fuser if a thermostat is open Replace the fuser if a thermistor sensor is located deep inside of a sponge Check whether the overheat mode circuit operates normally or not Replace the fuser 2 Check whether a thermistor is open or not 3 Heat lamp ON OFF test 4 It could not operate due to a gear of a fuser is melted ...

Страница 96: ...2 LSU Error Description PMOTOR ERROR HSYNC ERROR 1 Check whether the LSU connector is disconnected or not Replace a LSU Replace a main board if the same error occurs again after replacing a LSU 2 Check whether the LSU motor is rotating or not 3 Check the HSYNC signal ...

Страница 97: ...4 48 Samsung Electronics 3 Not function of the gear of the fuser due to melting away Description The motor breaks away from its place due to gear melting away 1 Check the Heat Lamp 1 Replace the Fuser 2 Replace the Main PBA 3 Replace the SMPS ...

Страница 98: ...1 Bending or deformation of the actuator of the paper sensor Replace the defective actuator Replace the Sensor PBA 2 The function of the engine board is defective 3 Check the Connector Description The paper lamp on the operator panel is on even when paper is loaded in the cassette ...

Страница 99: ...without indication 1 Bending or deformation of the actuator of the paper sensor Replace the defective actuator Replace the engine board 2 The function of the engine board is defective Description The paper lamp on the operator panel does not come on when the paper cassette is empty ...

Страница 100: ...de rear may be defective Replace the hook lever if defective 1 Check the insertion of the Cover Open S W Connect 2 Replace the Main Control board or Cover Open S W 2 Check the connector and circuit of the cover switch department in the Main Control board Description The ERROR lamp is on even when the print cover is closed ...

Страница 101: ...is open 1 Check the connector and circuit of the cover switch department in the Main Control board Perform DCU test 1 Check the insertion of the Cover Open S W Connect 2 Replace the Main Control board or Cover Open S W Description The Error LED does not come on even when the printer cover is open ...

Страница 102: ...hermostor and remove the contamination of the pressure roller 2 Check the claw of the fuser whether it is deformed 1 If there is heavy background repair it by the background troubleshooting method 2 Clean the surface of the heat roller with IPA or water 3 Check the warp or separation of the print claw and the holder plate claw and then manage it Description Main motor is not driving when printing ...

Страница 103: ...ut are normal Replace the power supply cord or SMPS 1 Replace the control board 2 Replace the OP panel 2 Check the inferiority of LED Panel or LCD window on the front cover if the OP panel does not appear after normal warming up Description When system power is turned on all lamps on the operator panel do not come on ...

Страница 104: ...Getting Curved 1 If the supply of 24v is unstable in the Main Control board linking with LSU check drive by DCU test LSU Check Replace LSU 1 Replace theToner Joint PBA 2 Replace the MainPBA 2 Chect the Deve PBA in the Toner Cartridge Description When printing vertical line gets curved ...

Страница 105: ...oblem thoroughly 4 2 5 3 Distinguish function for choice cartridge Distinguish function for choice cartridge An EEP ROM is mounted to a cartridge for distinguishing a choice toner cartridge Items written in below are detected by checking up memory information If the data of the EEP ROM is broken it cannot be detected 1 Detecting existence of a toner cartridge It detects whether a toner cartridge i...

Страница 106: ...set A unique key has been applied 4 2 5 4 b Low Toner Contents When a toner in the toner cartridge almost ended the red LED is blinking Solution It means that a toner in the toner cartridge has been almost ended Repare the new toner cartridge 4 2 5 4 c Replace Cartridge Contents Turning the red LED on means the life span of a toner cartridge except a toner part has been ended Solution If an Toner ...

Страница 107: ...PC and printer port is proper If you use windows check if the printer driver in the controller is set up If the printer driver is properly set up check in which program the printing is not working The best way to find out is to open the memo pad to check the function of printing If it is not working in a certain program adjust the setup the program requires Sometimes the printout is normal within ...

Страница 108: ...s increase printing speed SPP normal mode support 8 bit data transfer while ECP Mode transfer the 12 bit data If the regular font is not printing the cable or the printer driver may be defective Turn the PC and printer off and reboot the system to print again If not solved double click the printer in my computer If the regular fonts are not printed this time again the cable must be defective so re...

Страница 109: ...new driver Delete the unnecessary files to secure enough space of the hard disk and start printing job again 2 Printer Driver Error 3 Error message from insufficient memory The printing job sometimes stops or due to insufficient virtual memory but it actually comes from the insufficient space of the hard disk Description The printing is not working properly even when the cable has no problem even ...

Страница 110: ...ated to OS are damaged or virus infected Add up enough memory to the PC 6 Memory is less than suggested one Description To spool which stands for simultaneous peripheral operations online a computer document or task list or job is to read it in and store it usually on a hard disk or larger storage medium so that it can be printed or otherwise processed at a more convenient time for example when a ...

Страница 111: ... 21 5 10 Duplex Unit 5 23 5 11 Cassette 5 25 5 12 SCF 5 27 Contents Contents 5 Exploded Views and Parts List DIGITAL LASER PRINTER The keynote of Product Smallest Duplex Built in Mono Laser Printer Low Noise 28ppm A4 30ppm Ltr PCL6 PS3 1 200x1 200dpi 400MHz processor USB 2 0 N W ML 2851ND only 32MB Max 160MB factory option 2K Standard 5K High Yield Paper Input 250 sh CST 1 sh MP Standard Duplex Pr...

Страница 112: ...Service Manual ExplodedView and Parts list 5 2 Samsung Electronics 5 1 Main 0 1 2 3 4 5 6 7 8 9 10 11 12 13 14 14 1 14 2 15 16 17 18 19 20 ...

Страница 113: ...SA 5 1 11 JC66 01218A ROLLER TRANSFER 1 SA 5 1 12 JC96 04733A ELA UNIT LSU 1 SA 5 1 13 JC96 04736A MEA UNIT DUPLEX 1 SA 5 1 14 1 JC63 01650A COVER DUPLEX 1 SA 5 1 14 2 JC63 01651A COVER REAR DUPLEX 1 SA 5 1 15 JC97 03012A MEA COVER TOP 1 SA 5 1 16 1 JC97 03013A MEA UNIT COVER_LEFT 1 SA 5 1 16 2 JC97 03014A MEA UNIT COVER_RIGHT 1 SA 5 1 16 3 JC97 03015A MEA UNIT COVER_REAR 1 SA 5 1 16 4 JC97 03016A...

Страница 114: ...Service Manual ExplodedView and Parts list 5 4 Samsung Electronics 5 2 Top Cover 0 1 2 3 3 5 7 8 9 10 ...

Страница 115: ...OP 1 SNA 5 2 2 JC61 02230A STACKER RX 1 SA 5 2 3 JC72 01343A PMO SUB_M_STACKER 2 SA 5 2 5 JC63 01528A COVER DUMMY KEY 1 SNA 5 2 7 JC67 00274A LENS LED 1 SA 5 2 8 6107 001169 SPRING CS 1 SA 5 2 9 JC64 00359A KEY ON_LINE 1 SA 5 2 10 6003 000196 SCREW TAPTITE 1 SNA Drawer SEC_Code Description QT y Service Remark SA SERVICE AVAILABLE SNA SERVICE not AVAILABLE ...

Страница 116: ...Service Manual ExplodedView and Parts list 5 6 Samsung Electronics 5 3 Cover Ass y 0 1 2 3 3 1 3 2 4 ...

Страница 117: ... 03016A MEA UNIT COVER_FRONT 1 SA 5 3 2 JC97 03013A MEA UNIT COVER_LEFT 1 SA 5 3 3 JC97 03014A MEA UNIT COVER_RIGHT 1 SA 5 3 3 1 JC63 01525A COVER RIGHT 1 SNA 5 3 3 2 JC63 01570A COVER RIGHT_DIMM 1 SNA 5 3 4 JC97 03015A MEA UNIT COVER_REAR 1 SA Drawer SEC_Code Description QT y Service Remark SA SERVICE AVAILABLE SNA SERVICE not AVAILABLE ...

Страница 118: ...Service Manual ExplodedView and Parts list 5 8 Samsung Electronics 5 4 Front Cover 0 1 2 3 4 5 ...

Страница 119: ...MEA UNIT COVER_FRONT 1 SA 5 4 1 JC63 01527A COVER FRONT 1 SA 5 4 2 JB64 00007A LOCKER LATCH PUSH 1 SA 5 4 3 JC63 01569A COVER MANUAL 1 SNA 5 4 4 JC61 02267A BRACKET MANUAL 1 SNA 5 4 5 6003 000282 SCREW TAPTITE 1 SNA Drawer SEC_Code Description QT y Service Remark SA SERVICE AVAILABLE SNA SERVICE not AVAILABLE ...

Страница 120: ...Service Manual ExplodedView and Parts list 5 10 Samsung Electronics 5 5 Rear Cover 0 2 1 ...

Страница 121: ...sung Electronics Rear Cover Parts List 5 5 0 JC97 03015A MEA UNIT COVER_REAR 1 SA 5 5 1 JC63 01526A COVER REAR 1 SNA 5 5 2 JC61 02399A GUIDE CHANGE_DUP 1 SNA Drawer SEC_Code Description QT y Service Remark SA SERVICE AVAILABLE SNA SERVICE not AVAILABLE ...

Страница 122: ...ronics 5 6 Frame1 0 1 2 3 4 4 5 6 6 1 6 2 7 8 9 10 11 12 13 14 15 16 17 18 19 20 21 21 1 21 2 21 3 22 23 23 24 25 25 26 26 1 26 2 26 3 27 28 29 30 31 32 33 34 35 36 37 38 39 40 41 42 43 44 45 46 47 49 48 50 51 52 53 54 54 1 54 2 54 3 54 4 55 56 57 115 58 59 60 60 ...

Страница 123: ...d Parts list 5 13 Samsung Electronics Frame2 0 1 63 64 65 66 67 68 69 70 71 72 73 74 75 76 77 78 79 75 80 81 82 83 84 85 86 87 87 88 89 90 91 92 93 94 95 96 97 98 99 100 101 102 102 103 104 105 106 107 108 109 110 111 112 113 114 75 ...

Страница 124: ... 1 SA 5 6 19 JC72 00382B PMO BUSHING FEED 5 SA 5 6 20 JC66 01656A ROLLER FEED REGI 1 SA 5 6 21 JC97 03141A MEA UNIT GEAR PICK UP 1 SA 5 6 21 1 JC72 00979A GEAR PICK UP A 1 SA 5 6 21 2 6107 001167 SPRING CS 1 SA 5 6 21 3 JC72 00980A GEAR PICKUP B 1 SA 5 6 22 JC66 01889A CAM PICK UP 1 SA 5 6 23 JC72 00982A PMO IDLE PICK_UP 2 SA 5 6 24 JC66 01692A SHAFT P PICK_UP 1 SA 5 6 25 JC61 00915A STOPPER M PIC...

Страница 125: ...3 JC66 00830A ROLLER EXIT FR 2 SNA 5 6 54 4 6107 001163 SPRING CS 2 SNA 5 6 55 JC66 40209A GEAR M EXIT 1 SA 5 6 56 JC72 41191B PMO BEARING SHAFT 2 SA 5 6 57 JC61 02308A SUPPORT ROLLER 1 SA 5 6 59 JC66 01662A ROLLER EXIT F DOWN 1 SA 5 6 63 JC63 01572A SHIELD CONTROLLER 1 SA 5 6 64 JC63 01573A SHIELD SMPS 1 SA 5 6 65 JC62 00461A INSULATION SMPS 1 SA 5 6 66 JC61 40001A FOOT ML80 2 SA 5 6 67 JC70 0054...

Страница 126: ...RANSFER 1 SA 5 6 97 JC66 01654A SHAFT FEED IDLE 1 SA 5 6 98 JC61 00585A BUSH M FEED IDLE 2 SA 5 6 99 JC61 70958A SPRING ETC TR 2 SA 5 6 100 JC61 00914A PLATE P PUSH BUSHING 2 SA 5 6 101 JC72 00984A PMO PLATE GUIDE DEVE_L 1 SA 5 6 102 JC61 70932A SPRING ETC GUIDE DEVE 2 SA 5 6 103 JC72 00985A PMO PLATE GUIDE DEVE_R 1 SA 5 6 104 6107 001370 SPRING TR 1 SA 5 6 105 JC61 02468A BUSH TR_L 1 SA 5 6 106 J...

Страница 127: ...Service Manual ExplodedView and Parts list 5 17 Samsung Electronics 5 7 Main Drive 0 1 15 15 15 15 2 12 4 19 11 12 3 13 14 5 12 7 8 9 6 20 10 18 ...

Страница 128: ...SA 5 7 7 JC66 01625A GEAR FEED RDCN 56 25 1 SA 5 7 8 JC66 01640A GEAR PICKUP IDLE 31 1 SA 5 7 9 JC66 01650A GEAR RDCN 52 18 1 SA 5 7 10 JC66 01798A GEAR OPC CLUTCH 29 1 SA 5 7 11 JC66 01637A GEAR FUSER DR OUT 37 1 SA 5 7 12 6031 000023 WASHER PLAIN 5 SNA 5 7 13 JC61 02227A BRACKET MOTOR 1 SNA 5 7 14 JC31 00090A MOTOR BLDC 1 SNA 5 7 15 6003 000269 SCREW TAPTITE 11 SA 5 7 18 6044 001130 RING C 1 SNA...

Страница 129: ...Service Manual ExplodedView and Parts list 5 19 Samsung Electronics 5 8 Rear Guide 0 1 2 3 4 5 6 ...

Страница 130: ...ot AVAILABLE 5 8 0 JC97 03067A MEA UNIT GUIDE REAR 1 SA 5 8 1 JC61 02198A GUIDE REAR 1 SNA 5 8 2 JC66 01661A ROLLER IDLE_EXIT 4 SNA 5 8 3 JC61 02158A BUSH TX 3 SNA 5 8 4 JC66 01584A SHAFT EXIT_F UP 1 SNA 5 8 5 JC66 01583A GEAR EXIT 1 SA 5 8 6 JC73 00259A RUBBER EXIT_F UP 2 SNA Drawer SEC_Code Description QT y Service Remark ...

Страница 131: ...Service Manual ExplodedView and Parts list 5 21 Samsung Electronics 5 9 Fuser 0 21 22 22 23 24 27 24 27 20 26 28 28 25 11 12 10 30 13 4 3 17 16 29 32 1 37 9 29 6 5 31 36 35 34 33 3 14 15 2 18 19 7 8 ...

Страница 132: ...GUIDE CLAW 4 SNA 5 9 17 JC61 01950A SPRING ETC CLAW 4 SA 5 9 18 6107 001165 SPRING TS 1 SA 5 9 19 JC66 01595A ACTUATOR EXIT 1 SNA 5 9 20 JC61 02197A FRAME FUSER 1 SNA 5 9 21 JC66 01663A ROLLER PRESSURE 1 SNA 5 9 22 JC61 02336A BUSH PR 1ST 2 SNA 5 9 23 JC66 01664A ROLLER PRESSURE_2ND 1 SNA 5 9 24 JC61 02337A BUSH PR 2ND 2 SNA 5 9 25 JC66 01598A LEVER LINK JAM_R 1 SNA 5 9 26 JC66 01597A LEVER LINK J...

Страница 133: ...Service Manual ExplodedView and Parts list 5 23 Samsung Electronics 5 10 Duplex Unit 0 17 18 16 16 18 17 19 15 13 14 20 2 3 1 4 4 12 12 1 12 2 12 12 1 12 2 5 6 10 11 7 8 9 ...

Страница 134: ... 00038A GEAR EXIT F DOWN 1 SA 5 10 10 6602 001589 BELT TIMING GEAR 1 SA 5 10 11 6602 001588 BELT TIMING GEAR 1 SA 5 10 12 JC96 03662A ELA UNIT ROLLER_DUP 2 SNA 5 10 12 1 JC66 00901A ROLLER FEED_DUP 1 SA 5 10 12 2 6044 000107 RING C 1 SNA 5 10 13 JC61 02235A BRACKET DUPLEX_ALIGN 1 SNA 5 10 14 6003 000440 SCREW TAPPING 1 SNA 5 10 15 JC61 02314A GUIDE DUPLEX_UPPER 1 SNA 5 10 16 JC66 00896A ROLLER M I...

Страница 135: ...Service Manual 5 25 Samsung Electronics 5 11 Cassette 0 5 4 9 10 3 2 8 11 11 1 22 21 22 21 14 15 12 13 7 6 18 17 19 19 16 20 ExplodedView and Parts list ...

Страница 136: ..._UP 1 SA 5 11 9 JC66 00719A CAM M KNOCK UP 1 SA 5 11 10 6003 000261 SCREW TAPTITE 1 SA 5 11 11 6107 001166 SPRING CS 2 SA 5 11 12 JC72 00972A PMO PLATE_LOCKER 1 SA 5 11 13 JG61 70531A SPRING ETC LOCKER PLATE 1 SA 5 11 14 JC96 04743A ELA HOU HOLDER_PAD 1 SA 5 11 15 JC61 01978A HOUSING HOLDER PAD 1 SA 5 11 16 JC63 01531A COVER HANDLE_CASSETTE 1 SA 5 11 17 6107 001047 SPRING ES 2 SA 5 11 18 JC66 0052...

Страница 137: ...1 4 8 1 2 8 11 22 11 24 11 23 11 31 11 30 11 29 11 21 11 18 11 20 11 19 11 19 11 18 11 17 10 10 1 10 2 10 3 9 9 11 9 12 9 1 9 3 9 4 9 2 9 5 9 6 9 7 9 8 9 9 9 10 11 28 11 27 11 25 11 26 11 5 11 16 11 4 11 3 11 2 11 9 11 1 11 10 11 5 11 13 11 15 11 14 11 12 11 10 11 9 11 8 11 7 11 8 11 11 11 6 ...

Страница 138: ...R STEP 1 SA 5 12 9 10 JC72 00825A PMO IMPELLER_DRV 1 SA 5 12 9 11 6003 000269 SCREW TAPTITE 5 SA 5 12 9 12 6031 000023 WASHER PLAIN 3 SNA 5 12 10 JC97 03062A MEA UNIT PICK UP 1 SNA 5 12 10 1 JC61 00909A HOUSING M PICK UP_R2 1 SA 5 12 10 2 JC73 00265A RUBBER PICK_UP 1 SA 5 12 10 3 JC61 00910A HOUSING M PICK UP2_R2 1 SA 5 12 11 JC96 04771A ELA HOU FRAME_SCF 1 SNA 5 12 11 1 JC61 02189A FRAME SCF 1 SN...

Страница 139: ...MO IDLE PICK_UP 2 SA 5 12 11 27 JC66 00394A GEAR FEED 2 1 SA 5 12 11 29 JC72 00980A PMO GEAR PICK_UP B 1 SA 5 12 11 31 6107 001170 SPRING TS 1 SA 5 12 21 JC61 00586A BUSH M PICK_UP L 1 SA 5 12 22 JC66 01653A SHAFT FEED_SCF 1 SNA 5 12 23 JC66 00598A ROLLER FEED 1 SA 5 12 24 JC72 00382B PMO BUSHING FEED 2 SA Drawer SEC_Code Description QT y Service Remark SA SERVICE AVAILABLE SNA SERVICE not AVAILAB...

Страница 140: ... Sensor OPE KEY LED1 LED2 PickUp Clutch Regist Clutch Front Cover Micro Switch Rear Cover Micro Switch 5V 24V FUSER ON 5V 24V 24VS 24VS 24V DEVELOPER Unit FAN MAIN FAN LSU OPC MHV DEV Supply THV Varistor T D S DRUM M Main Motor MTBLDC NOR Flash S29GL320M 4MB X 2EA SDRAM K4S281632 16MB X 2EA MCLK 12MHz VCLK 12MHz EEPROM M24C32W X 2EA ...

Страница 141: ...CN13 SENSOR 1 2 3 1 2 3 1 2 3 1 2 3 3 3V GND P AP ER_E XI T 3 4 5 24VS 3 3V 3 3V SCF _RXD nSCF _DET SCF _TXD GND GND GND 1 2 3 4 5 6 7 8 9 CN14 SCF_IF VBUS DM DP GND 1 2 3 4 CN11 USB_IF GND NC RD 3 3V RD TD 3 3V TD 3 3V P U LED2 3 3V P U LED1 1 2 3 4 5 6 7 8 9 10 11 12 CN9 NETWORK_IF CN3 LSU S W FA N 24V S G ND P_M OT_EN LSU_RDY P_M OT_CLK LD_EN LD_P OWER1 G ND HSY NC1 LSU_SH1 G ND VDO1_m inus V D...

Страница 142: ...ded safe and easy troubleshooting as described in this service manual DCU Diagnostic Control Unit Standard Test equipment to diagnose the Laser printer supplied by Samsung Electronics DVM Digital Volt Meter Standard Indicates more than 3 digits Driver Standard type type M3 long M3 short M2 long M2 short Tweezers Standard For general home use small type Cotton Swab Standard For general home use for...

Страница 143: ...tor CPU Central Processing Unit dB decibel dBA decibel A dBM decibel milliwatt DC direct current DCU Diagnostic Control Unit DPI Dot Per Inch DRAM Dynamic Random Access Memory DVM Digital Voltmeter ECP Enhanced Capability Port EDC Embedded Diagnostic control EEPROM Electronically Erasable Programmable Read Only Memory EMI Electro Magnetic Interference EP electrophotographic EPP Enhanced Parallel P...

Страница 144: ...hy place NVRAM nonvolatile random access memory OPC Organic Photo Conductor OP Operation Panel Equipment PBA Printed Board Assembly PCL Printer Command Language Printer Control Language PDL Page Discription Language PPM Page Per Minute PPS Pulse Per Second PS Post Script PTL Pre Transfer Lamp PWM Pulse Width Modulation Q PID Quick Printer Initiating Device Q ty quantity RAM Random Access Memory RO...

Страница 145: ...ough room to open the printer trays covers and allow for proper ventilation see diagram below Provide the proper environment A firm level surface Away from the direct airflow of air conditioners heaters or ventilators Free of extreme fluctuations of temperature sunlight or humidity Clean dry and free of dust ...

Страница 146: ...he sample patterns shown below are the standard test patterns used in the factory The life of the toner cartridge developer cartridge and printing speed are measured with the pattern shown below 5 The A4 ISO 19752 standard pattern samples are reproduced reduced to 70 of the actual A4 size ...

Страница 147: ...ve LED regular blink Normal NPC No Packet Active LED Off On maintenance NPC Initial inferiority Link LED On The link LED On Normally linked Link LED Off Link LED off Link Inferiority RJ 45 Jack Link LED Green Active LED Orange LED STATUS 1 ML 2850D Mono Laser printer 28ppm Duplex Basic model 2 ML S2850A ELA UNIT SCF Option model 3 ML 2851ND Mono Laser printer 28ppm Network Duplex Basic model 4 ML ...

Страница 148: ... or conteminated reverse side Toner leakage Clean up OPC 10 times and inside of machine with cloth if disappeared no failure Image Fainted After shake cartridge right and left 5 6 times if printing image is not fainted no failure Toner Exhausted Vertical Black Line Vertical thin line emerge if cartridge is scratched Customer fault Supplies Life Cycle Condition Engine Codition LCD Indication Custmo...

Страница 149: ...al Engine E Division between code 1 Speed of Engine If same speed models are released simultaneously higher model is added 1 at speed code If over 10 models with same speed are brought into tenth model is added 1 2 Domestic Entry Model Distribution C C Engine speed Information The first number deleted 1 New model series model division Over 3rd grade project 2 Valuablet model divi sion in market de...

Страница 150: ...parts are under type 2 2 A S Only material Only for A S not related to product manufacturing 3 Ass y material More than two materials are assembled If the material order is out of service the order can be processed by Ass y material order Picture and numbers are also described on Service manual Ass y Material and A S Only material Code are recognizable by product name Those are under type 2 and kn...

Страница 151: ...851 D0XAZ GSPN Global Service Partner Network North America service samsungportal com Latin America latin samsungportal com CIS cis samsungportal com Europe europe samsungportal com China china samsungportal com Asia asia samsungportal com Mideast Africa mea samsungportal com ...

Отзывы: