background image

ENGLISH

41

41

Setting the Miniket Photo : Adjusting the LCD Monitor

Adjusting the LCD Brightness

You can adjust the brightness of the LCD monitor to compensate for ambient lighting conditions.

1 Turn the Mode Dial to the 

Settings

mode.

2. Press the [POWER] button to turn on the Miniket Photo.

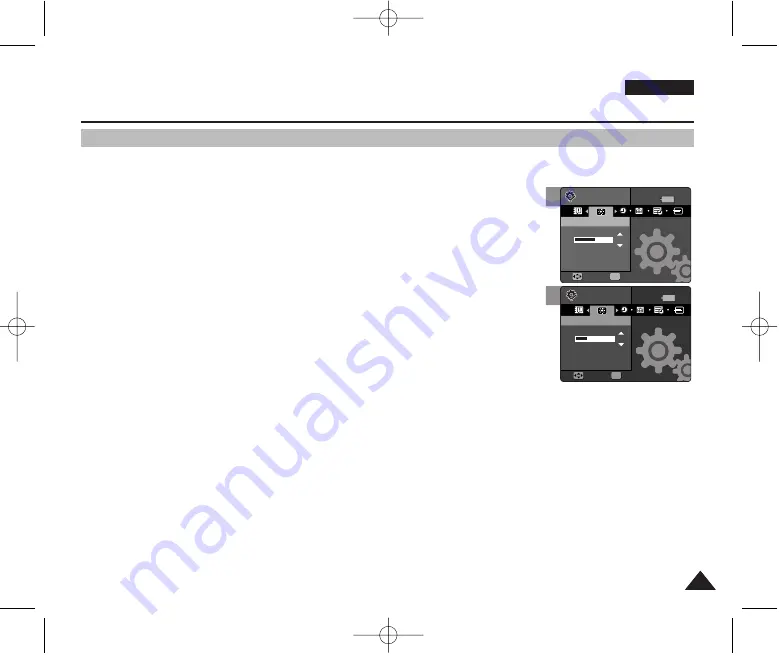
3. Select <LCD Brightness> by moving the joystick left / right.

4. Adjust the brightness by moving the joystick up / down then press the

joystick(OK).

Moving the joystick up will brighten the screen whereas moving it down will darken the
screen.

Brightness range: You can adjust the brightness between 00 ~ 31 steps.

5. After you finish adjusting, turn the Mode Dial to the desired mode.

[ Notes ]

A Brighter LCD screen setting consumes more battery power.

Adjust the LCD brightness when the ambient lighting is too bright and the monitor is hard to see.

LCD Brightness does not affect the brightness of images to be stored.

3

4

14

Move

Move

Select

Select

Settings

Settings

LCD Brightness

LCD Brightness

Move

Select

Settings

LCD Brightness

OK

10

Move

Select

Settings

LCD Brightness

Move

Move

Select

Select

Settings

Settings

LCD Brightness

LCD Brightness

OK

00934J VP-MS10 UK~053  6/17/06 6:22 PM  Page 41

Содержание Miniket Photo VP-MS10BL

Страница 1: ...ctive 89 336 CEE 73 23 CEE 93 68 CEE AF Auto Focus CCD Charge Coupled Device LCD Liquid Crystal Display VP MS10 S BL R MS11 S BL R MS12 S BL R MS15 S BL R ENGLISH Use only approved battery packs Otherwise there is a danger of overheating fire or explosion Samsung is not responsible for problems occurring due to using unapproved batteries 00934J VP MS10 UK 007 6 17 06 6 03 PM Page C ...

Страница 2: ...with the Miniket Photo 13 Rear Left View 14 Front Bottom View 15 LCD Display 16 OSD On Screen Display in Photo Capture Mode Photo View Mode 16 OSD On Screen Display in Movie Record Mode Movie Play Mode 17 OSD On Screen Display in Music Mode 18 OSD On Screen Display in Voice Record Voice Play Settings Mode 19 Battery Pack Installation Ejection 20 Maintaining the Battery Pack 21 Charging the Battery...

Страница 3: ...ry 33 Selecting the Memory Type 34 Before You Start Operating the Miniket Photo 35 Setting Memory 37 Selecting the Memory Type 37 Setting the File No Function 38 Formatting the Memory 39 Viewing Memory Space 40 Adjusting the LCD Monitor 41 Adjusting the LCD Brightness 41 Setting Date Time 42 Setting Date Time 42 Setting Date Format 43 Setting Date Time Display 44 Setting the System 45 Setting the ...

Страница 4: ...ene Modes 60 Setting the Photo Size 61 Setting the Photo Quality 62 Setting the Metering Method 63 Setting the Self Timer 64 Setting the Multi Shot 65 Setting Digital Effects 66 Adjusting the Exposure Exposure Compensation 67 Setting the ISO Speed Sensitivity 68 Setting the White Balance 69 Setting the Macro Mode 70 Setting the Flash 71 Setting the Sharpness 73 Setting the Focus Method 74 Setting ...

Страница 5: ...Movie on the LCD Monitor 92 Setting the Recording Options 93 Using the Shortcut Buttons 93 Setting the Program AE 95 Setting the White Balance 96 Setting the Digital Effects 97 Setting the Macro Mode 98 Setting the Movie Quality 99 Setting the Movie Size 100 Setting the Self Timer 101 Setting the Wind Cut 102 Setting the Viewing Options 103 Using the Shortcut Buttons 103 Deleting Movie Files 107 P...

Страница 6: ... Playing Voice Files 122 Setting the Voice Play Options 123 Using the Shortcut Buttons 123 Setting the Repeated Play 125 Deleting Voice Files 126 Protecting Voice Files 127 Copying Voice Files 128 Using the PC Cam Function 130 Using the PC Cam Function 130 Printing with PictBridge 132 Printing with PictBridge 132 Using as a Mass Storage Device 134 Using as a Mass Storage Device 134 ENGLISH 6 6 Voi...

Страница 7: ...ecting to a TV Monitor 140 Connecting to a VCR 141 Printing Photos 142 Printing with DPOF 142 Cleaning and Maintenance 143 After using the Miniket photo 143 Cleaning the Body 144 Regarding the Battery 145 Using Abroad 146 Self Diagnosis Display 147 Self Diagnosis Display 147 Checklist 147 ENGLISH 7 7 Specifications 151 Index 153 Power Sources United Kingdom Only 155 Using the Menu 149 Troubleshoot...

Страница 8: ...on for removing stains Do not use any type of solvent especially benzene as it may seriously damage the finish Keep your Miniket Photo away from rain and saltwater After using clean the Miniket Photo Saltwater may cause the parts to corrode Using the earphone or headphone for an extended time can cause a serious damage to your hearing If you are exposed to a sound in higher than 85db for an extend...

Страница 9: ...copyright owners and is contrary to copyright laws All the trade names and registered trademarks mentioned in this manual or other documentation provided with your Samsung product are trademarks or registered trademarks of their respective holders Notes Regarding the Miniket Photo Notes Regarding COPYRIGHT Notes Regarding Moisture Condensation 1 Do not leave the Miniket Photo exposed to high tempe...

Страница 10: ... the Battery Pack is inserted firmly in place The new Battery Pack provided with the product is not charged Before using the Battery Pack you need to fully charge it Do not drop the Battery Pack Dropping the Battery Pack may damage it Fully discharging a Lithium lon battery damages the internal cells The Battery Pack may be prone to leakage when fully discharged To avoid damage to the Battery Pack...

Страница 11: ... used replacement parts specified by the manufacturer and with the same characteristics as the original part Unauthorised substitutions may result in fire electric shock or other hazards Correct Disposal of This Product Waste Electrical Electronic Equipment Applicable in the European Union and other European countries with separate collection systems This marking shown on the product or its litera...

Страница 12: ...terface for Data Transfer You can transfer still images and movie files or any other files to a PC using the USB interface PC Cam for multi entertaining You can use the Miniket Photo as a PC Cam for video chatting and other PC Cam applications Voice Record Playback with vast memory You can record voices and store it in the internal memory or mini SD card optional accessory and play back recorded v...

Страница 13: ...your local Samsung dealer and service centre You can download programmes the latest driver software and CODECs from the Samsung Electronics webpage ENGLISH 13 13 Getting to know your Miniket Photo Accessories Supplied with the Miniket Photo 3 Audio Video Cable 2 AC Power Adapter 1 Lithium Ion Battery Pack 5 Software CD 4 USB Cable 8 Soft Case 9 Earphones 7 Instruction Book Quick Guide 6 Hand Strap...

Страница 14: ...jack 5 USB port 6 DC IN jack 7 Connector Cover 8 Recording charging Indicator 9 Built in Speaker 10 Display Button 11 LCD Monitor ENGLISH 14 14 Name of Each Part MENU 5 25 MEGA PIXEL POWER W T USB DC IN 1 Fastening Hand strap 2 11 10 9 8 7 6 5 3 4 00934J VP MS10 UK 037 6 17 06 7 17 PM 페이지14 001 hp2420 ...

Страница 15: ...11 Battery Slot 12 Mini SD card slot 13 Battery Lock Switch Usable mini SD card mini SD card 9 11 12 13 10 Notes There is a protecting film on the lens when the product is purchased Please remove the protecting film before using it A shock to the set may open the lens cover even when the power is turned off Turn the power on and the lens cover will operate normally 1 2 3 4 5 7 6 8 00934J VP MS10 U...

Страница 16: ... Metering Mode Indicator 24 Scene Mode Indicator 1 Mode Indicator 2 Image Size Indicator 3 DPOF Indicator 4 Image Number 5 Delete Shortcut Button 6 Protection Shortcut Button 7 Slide Shortcut Button 8 Record Play Shortcut Button 9 Battery Life Indicator 10 Memory Type Indicator 11 Image Counter Current Total 12 Current Selection 13 Move Help Key 14 Full View Help Key Photo View Mode Move Full View...

Страница 17: ...Indicator 17 Remaining Time Indicator 1 Mode Indicator 2 Image Size Indicator 3 Image Number 4 Playback Progress Bar 5 Counter Elapsed Time 6 Volume Indicator 7 Delete Shortcut Button 8 Protection Shortcut Button 9 All Play Shortcut Button 10 Record Play Shortcut Button 11 Battery Life Indicator 12 Memory Type Indicator 13 Image Counter Current Total 14 Stop Play Pause Indicator Movie Record Mode ...

Страница 18: ...20 Battery Life Indicator 21 Memory Type Indicator 22 File Number Current Total 1 File Property 2 Progress Bar 3 Counter Elapsed Time File Length 4 Search Help Key 5 Play Pause Help Key 6 Volume Control Help Key 7 Equalizer Shortcut Button 8 Volume Indicator Music Mode Move Move Search Pause Folder Folder Play Play Volume MUSIC1 9 10 11 12 Music Mode 00 50 03 00 Move Search Search Pause Pause Fold...

Страница 19: ... Button 9 Repeat Shortcut Button 10 File List Display Shortcut Button 11 Record Play Shortcut Button 12 Protection Indicator Voice Record Mode SW SWAV0001 W V0001 WAV SWAV0001 WAV 00 00 00 02 10 00 00 00 00 02 10 00 8KHz Mono 64Kbps 1 2 3 4 Voice Play Mode SWAV0004 WAV SWAV0002 WAV 8KHz Mono 64Kbps 00 00 16 00 00 20 00 00 16 00 00 20 Search Search Volume Pause Pause Volume 7 8 11 10 9 8 7 6 6 5 5 ...

Страница 20: ...diagram to pop the Battery Pack out 2 Pull the ejected Battery Pack out in the direction as shown in the diagram To eject the Battery Pack Notes Clean the terminals to remove any foreign substances before inserting the Battery Pack If the Miniket Photo will not be in use for a while remove the Battery Pack from the Miniket Photo It is recommended to prepare fully charged additional Battery Packs f...

Страница 21: ...not put the Battery Pack near any heat sources fire or flames for example Do not disassemble process press or heat the Battery Pack Do not allow the and terminals of the Battery Pack to be short circuited It may cause leakage heat generation fire or overheating If Miniket Photo fails to work when you turn on the power or the battery life indicator flickers replace the Battery Pack It is recommende...

Страница 22: ...perature 5M image size Super Fine Pictures captured at 20 sec interval zoom in or out after each capturing Power off and on after each 8 captures Default LCD brightness 14 3 non flash use 1 flash use capturing Fully charged battery Room temperature Normal 320x240 Image Size No zooming Conditions Fully charged battery Room temperature LCD display turned off 44 1 KHz 128 Kbps 4MB Default equaliser U...

Страница 23: ...r State Fully charged 25 50 is used 50 70 is used 75 95 is used Over 95 is used The Miniket Photo will soon turn off Change the Battery Pack as soon as possible flickers The Miniket Photo will be forced to turn off soon Message Low battery SB LH82 820 mAh Approx 1 hr 40 min Approx 3 hr Battery Using AC Adapter Using USB Charging It is recommended to fully charge the Battery Pack before use You may...

Страница 24: ...y Pack before use You should only charge the battery in an environment between 32 F 0 C and 104 F 40 C If ambient temperature is too low when charging it may take long to fully charge or may not fully charge the battery which results the green indicator will not turn on Before connecting the cable make sure that you don t have any foreign substances between connectors Connecting the AC Power Adapt...

Страница 25: ...the LED indicates the state of power or charging LED Colour Blue Power On NU Recording Charging Indicator Power Indicator LED Colour Red Orange Green During Recording Recording Movie and Voice Mode During Charging Charging Fully Charged 00934J VP MS10 UK 037 6 17 06 7 17 PM 페이지25 001 hp2420 ...

Страница 26: ...ecord play back voice clips PC Cam Mode You can use the Miniket Photo as a PC Cam for video chatting and other PC Cam applications PictBridge Mode When you connect the Miniket Photo to a PictBridge supported printer with a USB cable you can print your stored pictures without a PC Storage Mode Connecting the Miniket Photo to a PC with a USB cable allows you to store various files in the Miniket Pho...

Страница 27: ...o the Photo and Movie mode In Music and Voice modes the DISPLAY button will not operate The LCD screen goes off automatically after 30 seconds if there was no button operation In that case press any button to turn on the LCD monitor 1 Change the desired mode by setting the Mode Dial 2 Press the MENU button 3 Move the cursor by moving the joystick up down left right to select desired menu item and ...

Страница 28: ...ou may directly access the functions 1 Turn the Mode Dial to set the desired mode 2 Press the POWER button to turn on the Miniket Photo 3 On the LCD monitor the function icon of shortcut button is displayed Press the shortcut button to access the function directly In Photo Capture Mode the icons of 4 shortcut buttons will be MENU PIXEL POWER W T Icons of Shortcut button functions Mode Dial Power B...

Страница 29: ...y pressing the joystick You can adjust the volume by moving the joystick up down in Movie Music Voice playback modes 3 Confirm your selection by pressing the joystick OK Menu Selection Move Upwards Move Downwards Move Left Move Right Confirm Selection While Playing Back Increase Volume Decrease Volume Move left Move right Move down Move Up Confirm selection MENU Joystick 00934J VP MS10 UK 037 6 17...

Страница 30: ... files are recognised under the system folder MP3 Folders created under the system folder MP3 other than MUSIC1 4 cannot be recognised Figure 1 User folders can be created under MUSIC1 4 folders MP3 files under a user created folder will be recognised and played back but the folder name will not be displayed on the LCD screen Figure 2 Folders and files created by a user under a user folder will no...

Страница 31: ...23 Approx 47 Approx 95 Approx 190 Approx 30 Approx 61 Approx 122 Approx 244 Approx 37 Approx 75 Approx 151 Approx 303 Approx 60 Approx 120 Approx 240 Approx 481 Approx 136 Approx 273 Approx 546 Approx 1092 Approx 292 Approx 585 Approx 1170 Approx 2340 Approx 51 Approx 102 Approx 204 Approx 409 Approx 66 Approx 132 Approx 264 Approx 528 Approx 81 Approx 163 Approx 327 Approx 655 Approx 128 Approx 2...

Страница 32: ...p it or cause it to suffer a strong impact Do not use or store in a place that has high temperature and humidity or dusty environment Do not allow foreign substances on the mini SD card terminals Use a soft dry cloth to clean the terminals if required It is recommended to use a mini SD card case to avoid losing data from moving and static electricity After a period of use the mini SD card may get ...

Страница 33: ...ction of 1 as shown in the diagram until it stops Then open the lid 2 2 Insert a mini SD card into the slot until it softly clicks in the direction of the arrow shown in the diagram The mini SD card terminals will face down while the LCD monitor faces up Ejecting a mini SD card 1 Slightly push the mini SD card inwards to pop it out 2 Pull the mini SD card out of the slot and close the Cover Note M...

Страница 34: ...y moving the joystick left right and press the joystick OK Yes Photo movie music and voice files will be stored in the inserted mini SD card No Photo movie music and voice files will be stored in the internal memory Selecting the Memory Type Getting Started Notes If there is no mini SD card inserted only the Int Memory option will be available When you insert the mini SD card in Setting Mode the p...

Страница 35: ...ard slot Refer to page 33 2 Charge the Battery Pack by directly connecting the AC Power Adapter to the Miniket Photo Refer to page 24 3 Press the POWER button to turn on the Miniket Photo 4 Select the desired mode by turning the Mode Dial 5 Press the Record Stop button to take a picture start recording movie voice To set focus press the Record Stop button halfway down 6 When finished press the POW...

Страница 36: ... Format 43 Setting Date Time Display 44 Setting the System 45 Setting the NTSC PAL 45 Setting the Beep Sound 46 Setting the Shutter Sound 47 Selecting Language 48 Setting the Mode Display 49 Setting the Auto Shut Off 50 Resetting the Miniket Photo 51 1 1 POWER W T Power Button How to set to Settings mode How to set to Settings mode 1 Turn the Mode Dial to the Settings mode 2 Press the POWER button...

Страница 37: ...ll prompt you automatically to select the storage type except when in the Settings mode If there is no mini SD card inserted only the Int Memory option will be available System requires a small portion of memory space actual storage capacity may differ from the printed memory capacity The maximum recording time and image capacity is subject to change depending on the media used refer to page 31 Yo...

Страница 38: ... default value 100 0001 Series Numbering is continuous between the mini SD cards so that the first file number assigned on a new mini SD card is 1 more than the last file number assigned on the previous mini SD card 5 After you finish setting turn the Mode Dial to the desired mode Note When you set File No to Series each file is assigned with a different number so as to avoid duplicating file name...

Страница 39: ... Mode Dial to the desired mode Warning Previous information can not be restored after formatting Notes There is no guarantee on the operation of a mini SD card which has not been formatted on the Miniket Photo Make sure to format any mini SD card on the Miniket Photo If there is no mini SD card inserted only the Int Memory option will be available 4 Format Format Format Int Memory Memory Card Move...

Страница 40: ...ode Dial to the Settings mode 2 Press the POWER button to turn on the Miniket Photo 3 Select Memory Space by moving the joystick left right 4 The used memory space and total memory space are displayed 5 After you finish viewing memory space turn the Mode Dial to the desired mode Note System requires a small portion of memory space actual storage capacity may differ from the printed memory capacity...

Страница 41: ...s moving it down will darken the screen Brightness range You can adjust the brightness between 00 31 steps 5 After you finish adjusting turn the Mode Dial to the desired mode Notes A Brighter LCD screen setting consumes more battery power Adjust the LCD brightness when the ambient lighting is too bright and the monitor is hard to see LCD Brightness does not affect the brightness of images to be st...

Страница 42: ...oystick up down Items are displayed in the order of the date format By default it appears in the order of Year Month Date Hour and Minute 6 After setting the last item press the Joystick OK to finish the setting 7 After you finish setting turn the Mode Dial to the desired mode Notes You can display Date Time Set on the LCD monitor by setting the Date Time option other than to Off Refer to page 44 ...

Страница 43: ... The date is displayed in the order of Year Month Date DD MM YYYY The date is displayed in the order of Date Month Year MM DD YYYY The date is displayed in the order of Month Date Year 5 After you finish setting turn the Mode Dial to the desired mode 3 4 Settings Settings Date Format Date Format YYYY MM DD DD MM YYYY MM DD YYYY Move Move Select Select Settings Date Format Move Select Settings Date...

Страница 44: ...d in Movie Record or Photo Capture mode Note Date and time information is displayed on the LCD screen in Photo capturing and Movie recording modes In movie photo playback modes date and time information is not displayed on the LCD screen Setting the Miniket Photo Setting Date Time Setting Date Time Display 3 4 Settings Settings Date Time Date Time Off Date Time Date Time Move Move Select Select Se...

Страница 45: ...e desired mode Warning Recording and playback settings should be identical NTSC recordings are properly played back in NTSC mode If recording and playback settings are different displayed video may not be perfect When using a TV be sure to set the same output setting Playback on a TV is not available if the video format is different than that of Miniket Photo For example Miniket Photo is set to PA...

Страница 46: ... by moving the joystick up down and then press the joystick OK Off Turn the beep sound off On Turn the beep sound on 5 After you finish setting turn the Mode Dial to the desired mode Note When the earphones or Audio Video cable is connected to the Miniket Photo the Beep Sound function will not operate Settings Settings Beep Sound Beep Sound Off On Move Move Select Select Settings Beep Sound Move S...

Страница 47: ...elect the desired option by moving the joystick up down and then press the joystick OK Off Turn the shutter sound off On Turn the shutter sound on 5 After you finish setting turn the Mode Dial to the desired mode Settings Settings Off On Shutter Sound Shutter Sound Move Move Select Select Settings Shutter Sound Move Select 3 Settings Shutter Sound Move Select Settings Settings Off On Shutter Sound...

Страница 48: ...ER button to turn on the Miniket Photo 3 Select Language by moving the joystick left right 4 Select the desired Language by moving the joystick up down and then press the joystick OK English Español Français Português Deutsch Italiano Nederlands Polski PÛÒÒÍËÈ Magyar ì Í ªÌÒ Í Svenska 5 After you finish setting turn the Mode Dial to the desired mode 00934J VP MS10 UK 053 6 17 06 6 22 PM Page 48 ...

Страница 49: ... Display off On Turns the Mode Display on 5 After you finish setting turn the Mode Dial to the desired mode Note Turning on the Miniket Photo when the Mode Dial is not set to the proper mode position only the Samsung logo will appear Turn the Mode Dial to a exact mode position 3 4 Settings Mode Display Move Select TYPE Settings Settings Mode Display Mode Display Off On Move Move Select Select OK T...

Страница 50: ...e Mode Dial to the desired mode Notes The Auto Shut Off will not function when you connect the AC Power Adapter to the Miniket Photo The Auto Shut Off functions when the Battery Pack is the only power source Auto Shut Off will only function when you set this function in Settings mode Press the POWER button to revive the Miniket Photo Power Save LCD will reduce the brightness of the LCD screen to s...

Страница 51: ...joystick left right and then press the joystick OK Yes Starts the reset function No Cancel the reset function Warning If you reset the Miniket Photo all functions you set are initialized to the default factory settings Notes User settings and date time information are initialized when you reset After resetting the Miniket Photo set date time refer to page 42 Settings Reset Move Select Move Move Se...

Страница 52: ...Mode 70 Setting the Flash 71 Setting the Sharpness 73 Setting the Focus Method 74 Setting the Anti Shake Function Image Stabilisation 75 Setting the Digital Zoom 76 Setting the Imprint Option 77 Setting the Viewing Options 78 Using the Shortcut Buttons 78 Deleting Photo Files 82 Protecting Photo Files 83 Rotating a Photo File 84 Resizing Photos 85 Setting the Slideshow 86 Setting the DPOF Digital ...

Страница 53: ...try to set the focus again 4 Fully press the Record Stop button to take a picture 5 After capturing press the POWER button to turn off the Miniket Photo to prevent battery power consumption Note Shaking warning indicator will appear and blink when you press the Record Stop button for a long time to set the focus in a dark place Pressing the button halfway down will set the focus and fully pressing...

Страница 54: ... the image quality IN 23 23 2592 T 23 T 23 2592 IN 23 23 Zoom In Zoom Out Move the W T zoom switch to W WIDE The shot subject s size is reduced and you can take a picture as if you were far away from the subject On the zoom indicator in the LCD screen the arrow moves to W The smallest rate of zoom out is the default rate original resolution of the subject Move the W T zoom switch to T TELE The sub...

Страница 55: ...e the joystick left right to find the photo you want to view Each movement of the joystick goes to the previous next photo Notes If there is no file stored to view the message No stored Photo appears Moving the joystick right at the last photo will move to the first photo Moving the joystick left at the first photo will move to the last photo Moving the joystick left right for more than 1 seconds ...

Страница 56: ...W T W T Move the W T zoom switch to W WIDE The screen switches to multi view The photo you were viewing in the single view previously is selected Zooming out will not display multi view if there was no stored photo Move the W T zoom switch to T TELE From the multi view screen it switches back to the single view screen Move the W T Zoom switch to T TELE again to enlarge the selected photo Move Move...

Страница 57: ... and saves it as a new file No Cancels cropping 8 If Yes is selected cropped image is saved and displayed on the screen Notes You cannot crop an image smaller than 640 x 480 pixels VGA size The original photo is not overwritten by the cropped image The cropped image is saved separately The maximum magnification ratio differs depending on the image resolution 5M up to 3 86x 4M up to 3 09x 3M up to ...

Страница 58: ...Shortcut 1 button toggles between the Photo capture view modes 1 Turn the Mode Dial to Photo mode 2 Press the POWER button to turn on the Miniket Photo 3 Press the Shortcut 2 button Each press of the Shortcut 2 button cycles through the flash modes Note Regarding the flash use with the Scene modes refer to page 72 By default the scene mode is set to Manual IN 2592 17 17 IN 17 2592 IN 23 23 2592 23...

Страница 59: ...h press of the Shortcut 3 button cycles through Notes Regarding the Macro use with Scene modes refer to page 72 By default the scene mode is set to Manual 1 Turn the Mode Dial to Photo mode 2 Press the POWER button to turn on the Miniket Photo 3 Press the Shortcut 4 button Each press of the Shortcut 4 button cycles through refer to page 64 IN 23 23 2592 23 23 2592 IN 23 23 IN 23 23 2592 2 23 2592 ...

Страница 60: ...rtrait Scene Scene Move Move Select Select Exit Exit Photo Scene Move Select Exit OK 23 23 Photo Scene Move Select Exit MENU TYPE Photo Photo Auto Manual Night Portrait Scene Scene Move Move Select Select Exit Exit OK 23 23 IN 2592 Photo Scene Move Select Exit Photo Scene Move Select Exit 23 23 23 Auto Manual Night Portrait Children Landscape For automatic balancing exposure and shutter speed for ...

Страница 61: ... can set the image resolution to meet your needs 1 Turn the Mode Dial to Photo mode 2 Press the POWER button to turn on the Miniket Photo 3 Press the MENU button Menu screen appears 4 Move the joystick left right to select Photo Size 5 Select an option by moving the joystick up down and then press the joystick OK 5M 4M 3M 2M 1M VGA 6 Press the MENU button to exit the menu An icon indicating the se...

Страница 62: ...to capacity is an approximation and subject to recording conditions While the menu screen is displayed pressing the Record Stop button will exit the menu ENGLISH 62 62 4 5 6 Photo Mode Setting the Capturing Options Setting the Photo Quality 51 Photo Photo Photo Quality Photo Quality Super Fine Fine Normal Move Move Select Select Exit Exit Photo Photo Quality Move Select Exit OK 23 51 Photo Photo Q...

Страница 63: ...oving the joystick up down and then press the joystick OK 6 Press the MENU button to exit the menu An icon indicating the selected Metering mode appears on the screen Notes Regarding metering with Scene modes refer to page 72 While the menu screen is displayed pressing the Record Stop button will exit the menu 3 IN 2592 Photo Metering Move Select Exit Photo Metering Move Select Exit 23 23 23 Multi...

Страница 64: ...ars 4 Move the joystick left right to select Self Timer 5 Select an option by moving the joystick up down and then press the joystick OK 6 Press the MENU button to exit the menu Notes You can easily access this function by using the shortcut button refer to page 59 It is recommended to use a tripod for best results on Self Timer pictures Restarting the Miniket Photo will cancel the Self Timer sett...

Страница 65: ...Select an option by moving the joystick up down and then press the joystick OK 6 Press the MENU button to exit the menu An icon indicating the selected Multi Shot mode appears on the screen If Off is selected no icon will be displayed Notes When you set the Multi Shot enabled you cannot use the flash Anti Shake is not available when you set the Multi Shot enabled Restarting the Miniket Photo will ...

Страница 66: ...to Photo mode 2 Press the POWER button to turn on the Miniket Photo 3 Press the MENU button Menu screen appears 4 Move the joystick left right to select Digital Effect 5 Select an option by moving the joystick up down and then press the joystick OK 6 Press the MENU button to exit the menu The selected Digital Effect and icon appear on the screen If Off is selected no icon will be displayed Note Wh...

Страница 67: ...tton Menu screen appears 4 Move the joystick left right to select EV 5 Select an option by moving the joystick up down and then press the joystick OK 2 0 1 6 1 3 1 0 0 6 0 3 0 0 3 0 6 1 0 1 3 1 6 2 0 The screen brightness gets darker when the EV settings goes to a negative setting and gets brighter when it goes to a positive setting 6 Press the MENU button to exit the menu An icon indicating the s...

Страница 68: ... joystick up down and then press the joystick OK 6 Press the MENU button to exit the menu An icon indicating the selected ISO Speed appears on the screen If Auto is selected no icon will be displayed Notes The higher the ISO Speed number the higher sensitivity to light It results in brighter imaging under darker lighting High ISO Speed setting may result in picture noise Regarding ISO setting in S...

Страница 69: ...s captured after the Custom WB set will be affected by the setting 6 Press the MENU button to exit the menu An icon indicating the selected white balance appears on the screen If Auto is selected no icon will be displayed Notes In general outdoors picture taking Auto setting will allow users to have best results As the lighting condition changes set the appropriate white balance before taking a pi...

Страница 70: ...e your subject As the distance gets closer the focused area gets narrower If the focus will not set try to put more distance between you and the subject It is recommended to use a tripod to avoid unstable picture taking and have best results Regarding Macro setting in Scene modes refer to page 72 While the menu screen is displayed pressing the Record Stop button will exit the menu 4 5 6 Photo Mode...

Страница 71: ... the joystick OK 6 Press the MENU button to exit the menu Notes You can easily access this function by using the shortcut button refer to page 58 Regarding Flash setting in Scene modes refer to page 72 While the menu screen is displayed pressing the Record Stop button will exit the menu When the flash is set it fires twice once for metering and once for capturing to make the best result 3 2592 Pho...

Страница 72: ... X X X O X O X X O X X X O X O X X X O X X X X X X O X X O X X O X Pan X X O X O X X O X X X O X O X X X O X X X X X X O X X O X X X X Pan X X O X O X X O O O X O X O X X X O X X X X X X O X X O O X X X Pan X X O X O X X O X X X O X O X X X O X X X X X X X O X O X X X X O X X O X Supported Functions According to the Capturing Modes ISO ISO AUTO ISO 100 ISO 200 ISO 400 A c Off OFF 0 3 2 0EV 0 EV 0 ...

Страница 73: ...s displayed pressing the Record Stop button will exit the menu MENU Photo Photo Sharpness Sharpness Soft Normal Sharp Move Move Select Select Exit Exit OK Photo Sharpness Move Select Exit 23 23 Photo Sharpness Move Select Exit MENU Photo Photo Sharpness Sharpness Soft Normal Sharp Move Move Select Select Exit Exit OK 23 23 2592 Photo Sharpness Move Select Exit Photo Sharpness Move Select Exit IN 2...

Страница 74: ...ile the menu screen is displayed pressing the Record Stop button will exit the menu MENU TYPE Photo Photo Focus Focus Multi AF Center AF Spot AF Move Move Select Select Exit Exit OK Photo Focus Move Select Exit 23 23 Photo Focus Move Select Exit MENU TYPE Photo Photo Focus Focus Multi AF Center AF Spot AF Move Move Select Select Exit Exit OK 23 23 2592 Photo Focus Move Select Exit Photo Focus Move...

Страница 75: ...es to produce one stabilised picture The stabilisation range is up to 2 in all 4 directions up down left right For example a rectangle subject of 100mm width and height can be stabilised up to 2mm movement in vertical horizontal direction The Method When the Miniket Photo has shaking movement specific subject s outlines from 3 contiguous captured images will be recognised and processed to concur a...

Страница 76: ...eriorate when using the digital zoom 1 Turn the Mode Dial to Photo mode 2 Press the POWER button to turn on the Miniket Photo 3 Press the MENU button Menu screen appears 4 Move the joystick left right to select Digital Zoom 5 Select an option by moving the joystick up down and then press the joystick OK Off Disables digital zoom Only optical zoom 3x will be supported for zooming On Enables digital...

Страница 77: ... Press the MENU button Menu screen appears 4 Move the joystick left right to select Imprint 5 Select an option by moving the joystick up down and then press the joystick OK Off Cancels imprinting Date Imprints Date only Date Time Imprints Date and Time 6 Press the MENU button to exit the menu After taking a picture you can check the imprinted date time information in Photo View mode Notes Before s...

Страница 78: ...de Switches to Photo view mode 4 Press the Shortcut 1 button again Moves to the Photo Capture mode 1 Turn the Mode Dial to Photo mode 2 Press the POWER button to turn on the Miniket Photo 3 Press the Shortcut 1 button in Photo Capture mode Switches to Photo view mode 4 Press the Shortcut 2 button 5 The Slideshow begins Refer to page 86 for further details on Slideshow 6 Press the joystick OK to st...

Страница 79: ...3 button Each press of the Shortcut 3 button will toggle between Locked and Unlocked 5 Selected photo will be Protected 1 Turn the Mode Dial to Photo mode 2 Press the POWER button to turn on the Miniket Photo 3 Press the Shortcut 1 button in Photo Capture mode Switches to Photo view mode 4 Press the Shortcut 4 button 5 Select an option by moving the joystick up down and then press the joystick OK ...

Страница 80: ...ears Select an option by moving the joystick left right Cancel Cancels protection 6 If Select was selected select photo files to protect by moving the joystick left right up down and press the joystick OK Multiple photo files can be selected using the joystick OK indicator appears on the protected photos 7 Press the Shortcut 3 button again The message Confirm appears Select Yes or No by moving the...

Страница 81: ...elete by moving the joystick left right up down and press the joystick OK Multiple photo files can be selected using the joystick OK icon appears on the selected files 7 Press the Shortcut 4 button The message Delete appears Select Yes or No by moving the joystick left right and then press the joystick OK to confirm 8 Selected photo file are deleted Refer to page 82 for further details Note Protec...

Страница 82: ...rm 7 If Select is selected Multi view screen appears Select photo files to delete by moving the joystick left right up down and press the joystick OK Multiple photo files can be selected using the joystick OK An icon indicating the selected file to be deleted appears 8 Press the Shortcut 4 button The message Delete appears Select Yes or No by moving the joystick left right and then press the joyst...

Страница 83: ...ft right and then press the joystick OK to confirm 7 If Select is selected Multi view screen appears Select photo files to protect by moving the joystick left right up down and press the joystick OK Multiple photo files can be selected using the joystick OK An icon indicating selected file is to be protected appears 8 Press the Shortcut 3 button The message Confirm appears Select Yes or No by movi...

Страница 84: ...he joystick up down and then press the joystick OK Right 90 Rotates the photo clockwise by 90 Left 90 Rotates the photo counterclockwise by 90 Updown 180 Flips the image up and down Rotates 180 8 Press the MENU button to exit the menu Notes Rotated images having a portrait ratio will have black margins on both the left right corners of the LCD when it is displayed Rotating will not affect the imag...

Страница 85: ... by moving the joystick up down and then press the joystick OK 4M 3M 2M 1M VGA You can only resize a saved photo to be smaller than the original 8 Press the MENU button to exit the menu Notes Only JPEG files can be resized Photos of VGA size cannot be resized Resized photos are saved separately The original photo will not be deleted Rotated photos cannot be resized If there is not enough space to ...

Страница 86: ...oystick up down and then press the joystick OK Off Sets not to repeat the slideshow On Sets to repeat the slideshow 10 Select Start by moving the joystick up down and then press the joystick OK Slideshow starts To stop the slideshow press the joystick OK Notes You can easily access this function by using the shortcut button refer to page 78 The interval between photos may vary depending on the siz...

Страница 87: ...onfirm 7 If Select is selected Multi view screen appears Select the photo files to set by moving the joystick left right up down 8 Set the number of prints by using the Shortcut 3 and Shortcut 4 buttons Move to another photo by moving the joystick left right and repeat the steps to set DPOF 9 The message Confirm appears when you press the joystick OK Select Yes or No by moving the joystick left ri...

Страница 88: ... If Select is selected Multi view screen appears Select photo files to copy by moving the joystick left right up down and press the joystick OK Multiple photo files can be selected using the joystick OK An icon indicating the selected file to be copied appears 8 Press the Shortcut 4 button The message Copy appears Select Yes or No by moving the joystick left right and then press the joystick OK to...

Страница 89: ... Size 100 Setting the Self Timer 101 Setting the Wind Cut 102 Setting the Viewing Options 103 Using the Shortcut Buttons 103 Deleting Movie Files 107 Protecting Movie Files 108 Setting the All Play 109 Copying Movie Files 110 Save important data recordings separately on other media to avoid accidental loss due to a system failure or other reasons POWER W T Power Button 1 Turn the Mode Dial to Movi...

Страница 90: ...nt battery power consumption The timestamp will be recorded along with the movie to support users with a faster search 00 00 16 Elapsed Recording Time REM 4 Min Remaining Recording Time Notes To adjust the brightness of LCD screen set the LCD Brightness in Settings mode refer to page 41 After recording turn off the Miniket Photo to conserve battery power The brightness of the LCD monitor will not ...

Страница 91: ...A OFF OFF 640 REM AE AUTO IN STBY STBY T OFF STBY 4 Min 4 Min 4 Min F F F OFF STBY A OFF OFF 640 REM IN AE AUTO T STBY STBY 4 Min 4 Min 4 Min F F F W T W T Zoom In Zoom Out Move the W T zoom switch to W WIDE The shot subject s size is reduced and you can record movies as if you were far away from the subject On the zoom indicator in the LCD screen the arrow moves to W The smallest rate of zoom out...

Страница 92: ...ppears and disappears after a few seconds Notes If there is no file stored to view the message No stored Movie appears When the earphones or Audio Video cable is connected to the Miniket Photo the built in speaker will automatically turn off As for photo viewing you can also select and play the movie file in a multi view display 00 00 16 100 0001 1 1 100 0001 00 00 00 00 00 16 100 0001 00 00 16 00...

Страница 93: ... Turn the Mode Dial to Movie mode 2 Press the POWER button to turn on the Miniket Photo 3 Press the Shortcut 2 button Each press of the Shortcut 2 button cycles through Program AE modes 00 00 16 00 00 16 100 0001 100 0001 100 0001 IN 1 1 1 1 OFF STBY 4 Min 640 F A OFF OFF 640 REM IN AE AUTO STBY STBY STBY 4 Min 4 Min 4 Min F F F OFF STBY A OFF OFF 640 REM IN STBY STBY 4 Min 4 Min 4 Min F F F 3 00 ...

Страница 94: ... Movie mode 2 Press the POWER button to turn on the Miniket Photo 3 Press the Shortcut 4 button Each press of the Shortcut 4 button cycles through the Digital Effects S N BW BW S N N BW S S N BW S N BW A OFF STBY OFF OFF 640 REM IN AE AUTO STBY STBY 4 Min 4 Min 4 Min F F F A OFF OFF 640 REM IN AE AUTO STBY STBY STBY 4 Min 4 Min 4 Min F F F OFF STBY A 640 REM IN AE AUTO STBY STBY BW BW 4 Min 4 Min ...

Страница 95: ... Movie Program AE Move Select Exit Movie Program AE Auto Move Select Exit OFF STBY 4 Min 4 Min 4 Min F F F MENU TYPE AE AE AUTO OFF STBY Movie Movie Program AE Program AE Auto Sports Spotlight Beach Snow Move Move Select Select Exit Exit OK Movie Program AE Auto Move Select Exit OFF STBY 4 Min 4 Min F F OFF STBY Movie Program AE Move Select Exit MENU TYPE AE Movie Movie Program AE Program AE Auto ...

Страница 96: ...ill exit the menu MENU AE A OFF STBY Movie Movie White Balance White Balance Auto Daylight Cloudy Fluorescent H Move Move Select Select Exit Exit OK Movie White Balance Move Select Exit OFF STBY 4 Min 4 Min F F OFF STBY Movie White Balance Move Select Exit MENU AE Movie Movie White Balance White Balance Auto Daylight Cloudy Fluorescent H Move Move Select Select Exit Exit OK OFF STBY 4 Min 4 Min F ...

Страница 97: ...BY Movie Digital Effect Move Select Exit S N BW Movie Digital Effect Move Select Exit S 4 Min 4 Min 4 Min F F F MENU S S N N BW BW OFF STBY STBY Movie Movie OK Digital Effect Digital Effect Off Sepia Nega BLK WHT Move Move Select Select Exit Exit S N BW Movie Digital Effect Move Select Exit S 4 Min 4 Min F F S N BW OFF STBY STBY Movie Digital Effect Move Select Exit MENU S S N N BW BW Movie Movie ...

Страница 98: ...et try to put more distance between you and the subject It is recommended to use a tripod to avoid unstable movie recording and have best results Regarding Macro use with Program AE refer to page 102 While the menu screen is displayed pressing the Record Stop button will exit the menu MENU OFF STBY OFF STBY Movie Movie OK Macro Macro Off Macro Move Move Select Select Exit Exit Movie Macro Move Sel...

Страница 99: ... and Fine quality will record at 30fps while Normal at 15fps In PAL setting Super Fine and Fine will record at 25fps while Normal at 12 5fps MENU TYPE SF SF N N F F OFF SF STBY OFF STBY 2 Min Movie Movie OK Movie Quality Movie Quality Super Fine Fine Normal N F Movie Movie Quality SF SF Move Move Select Select Exit Exit Move Select Exit 4 Min F SF N F OFF SF STBY OFF STBY 2 Min Movie Movie Quality...

Страница 100: ... more memory space which results in shorter maximum recording time While the menu screen is displayed pressing the Record Stop button will exit the menu A OFF OFF 640 REM IN AE AUTO STBY STBY OFF STBY 8 Min Movie Movie Size Move Select Exit Movie Movie Size Move Select Exit 4 Min 4 Min F F F MENU TYPE AE 320 OFF STBY OFF STBY 8 Min Movie Movie Movie Size Movie Size OK Move Move Select Select Exit ...

Страница 101: ...enu Restarting the Miniket Photo will cancel the Self Timer setting MENU TYPE AE OFF STBY OFF STBY Movie Movie Self Timer Self Timer Off 2 sec 10 sec OK Move Move Select Select Exit Exit Movie Self Timer Move Select Exit 4 Min 4 Min F F OFF STBY OFF STBY Movie Self Timer Move Select Exit MENU TYPE AE Movie Movie Self Timer Self Timer Off 2 sec 10 sec OK Move Move Select Select Exit Exit 4 Min 4 Mi...

Страница 102: ...een has focused Focuses on the deepest DOF Depth of Field position which makes the both near and distant view are in focus Notes When Wind Cut is enabled a bit of low frequency band bass sound will be reduced along with the wind noise It is a normal result not a malfunction Regarding Wind Cut use with Program AE refer to the availability table While the menu screen is displayed pressing the Record...

Страница 103: ...e 2 Press the POWER button to turn on the Miniket Photo 3 Press the Shortcut 1 button It switches to Movie play mode 4 Press the Shortcut 2 button 5 The All Play begins Refer to page 109 To stop playback press the joystick OK 00 00 16 00 00 16 100 0001 100 0001 100 0001 100 0001 All Play 00 IN 1 6 1 6 640 00 00 16 00 00 16 00 00 16 100 0001 100 0001 100 0001 100 0001 All Play All Play IN 00 00 00 ...

Страница 104: ...he POWER button to turn on the Miniket Photo 3 Press the Shortcut 1 button It switches to Movie play mode 4 Press the Shortcut 4 button 5 Select an option by moving the joystick up down button and then press the joystick OK Delete Deletes the selected movie file Cancel Cancels the deletion 6 Deletes the selected movie file Refer to page 107 00 00 16 100 0001 00 00 16 00 00 16 100 0001 100 0001 100...

Страница 105: ...t was selected select movie files to protect by moving the joystick left right up down and press the joystick OK Multiple movie files can be selected using the joystick OK indicator appears on the protected files Pressing the joystick OK again will make the Lock indicator disappear 7 Press the Shortcut 3 button The message Confirm appears Select the desired item by moving the joystick left right a...

Страница 106: ...cels deletion 6 If Select was selected select movie files to delete by moving the joystick left right up down and press the joystick OK Multiple movie files can be selected using the joystick OK indicator appears on the selected files 7 Press the Shortcut 4 button The message Delete appears Select the desired option by moving the joystick left right and then press the joystick OK to confirm 8 Sele...

Страница 107: ...he joystick OK Multiple movie files can be selected using the joystick OK indicator appears on the selected files 8 Press the Shortcut 4 button The message Delete appears Select the desired item by moving the joystick left right and then press the joystick OK to confirm 9 Press the MENU button to exit the menu Notes You can easily access this function by using the shortcut button refer to page 104...

Страница 108: ...es will be protected If All is selected the message Protect All appears Select the desired item by moving the joystick left right and then press the joystick OK to confirm 7 If Select is selected Multi view screen appears Select files to protect by moving the joystick left right up down and press the joystick OK Multiple movie files can be selected using the joystick OK indicator appears on the se...

Страница 109: ...e shortcut button refer to page 103 All Play starts from the current movie selected All play cannot start from a damaged file All Play will skip the damaged file during the All Play While the menu screen is displayed pressing the Record Stop button will exit the menu 00 01 36 100 0001 00 00 36 Movie All Play All Play On Move Select Exit MENU TYPE Movie Movie All Play All Play Start Repeat Move Mov...

Страница 110: ...ck OK Multiple movie files can be selected using the joystick OK indicator appears on the selected files 8 Press the Shortcut 4 button The message Copy appears Select the desired item by moving the joystick left right and then press the joystick OK to confirm 9 Press the MENU button to exit the menu Notes It copies from the currently used memory to another When File No is set file numbering will s...

Страница 111: ...ting the Equaliser 117 Deleting Music Files 118 Protecting Music Files 119 Save important data recordings separately on other media to avoid accidental loss due to a system failure or other reasons ENGLISH POWER W T Power Button 1 Turn the Mode Dial to Music mode 2 Press the POWER button to turn on the Miniket Photo How to set to Music mode How to set to Music mode 00934J VP MS10 UK 111 6 17 06 6 ...

Страница 112: ... mini SD Card and E is the internal memory 5 Paste copied music files into the desired folder among MUSIC1 MUSIC2 MUSIC3 and MUSIC4 under the MP3 Up to 500 files can be stored in each folder Warning Copying and redistributing of MP3 files may violate the copyright law You cannot create a new folder on your Miniket Photo set MUSIC1 MUSIC4 are system folders When the folders are renamed it may not b...

Страница 113: ...usic files 1 Turn the Mode Dial to Music mode 2 Press the POWER button to turn on the Miniket Photo 3 The last file played back is displayed If there is no music file stored the message No stored Music appears 4 Select a music file to play by moving the joystick left right and then press the joystick OK 5 The selected music file is played back To pause playback press the joystick OK To stop playba...

Страница 114: ...rs MUSIC1 MUSIC2 MUSIC3 MUSIC4 Setting the Repeat Option 1 Turn the Mode Dial to Music mode 2 Press the POWER button to turn on the Miniket Photo 3 Press the Shortcut 2 button Each press of the Shortcut 2 button cycles through repeat modes 1 6 1 6 00 00 03 00 00 00 03 00 OK Search Search Play Play KHz Volume Volume Move Folder Play 128Kbps 1 6 1 6 00 00 03 00 Search Play Volume Move Move Folder Fo...

Страница 115: ...ket Photo 3 Press the Shortcut 4 button Each press of the Shortcut 4 button cycles through Equaliser modes 1 6 00 00 03 00 00 00 03 00 1 6 00 00 03 00 OK Search Search Play Play Search Play KHz Volume Volume Volume 128Kbps 1 6 00 00 03 00 00 00 03 00 OK Search Search Play Play Music Equalizer Move Select Exit Music Equalizer 44 1KHz Volume Volume 128Kbps 1 6 00 00 03 00 Search Play 1 6 00 00 03 00...

Страница 116: ...unction by using the shortcut button refer to page 114 When the earphones or Audio Video cable is connected to the Miniket Photo the built in speaker will not operate MENU button is not operable when music playback is paused TYPE MENU 1 6 00 00 03 00 Search Play 1 6 00 00 03 00 Search Play Music Music Repeat Repeat Off One Group All Move Move Select Select Exit Exit OK Music Repeat Move Select Exi...

Страница 117: ...03 00 Search Play Music Music Equalizer Equalizer Normal Pop Jazz Classic OK Move Move Select Select Exit Exit Music Equalizer Move Select Exit Jazz Volume Volume 1 6 00 00 03 00 Search Play 1 6 00 00 03 00 Search Play Music Equalizer Move Select Exit TYPE MENU Music Music Equalizer Equalizer Normal Pop Jazz Classic OK Move Move Select Select Exit Exit Jazz Volume Volume 1 6 00 00 03 00 Search Pla...

Страница 118: ...ars Select Yes or No by moving the joystick left right and then press the joystick OK to confirm 8 Selected music files are deleted Press the MENU button to exit the menu Notes Deleting MP3 files in a user folder on the Miniket Photo will not delete the user folder Delete the user folder on a PC MENU button is not operable when music playback is paused Protected files will not be deleted Music Mod...

Страница 119: ...he POWER button to turn on the Miniket Photo 3 Press the MENU button on the stop mode 4 Move the joystick left right to select Protect 5 Select an option by moving the joystick up down and then press the joystick OK Select The Playlist appears and you can select files to protect All All files will be protected If All is selected the message Protect All appears Select the desired option by moving t...

Страница 120: ...d Play 125 Deleting Voice Files 126 Protecting Voice Files 127 Copying Voice Files 128 Save important data recordings separately on other media to avoid accidental loss due to a system failure or other reasons POWER W T Power Button 1 Turn the Mode Dial to Voice mode 2 Press the POWER button to turn on the Miniket Photo How to set to Voice mode How to set to Voice mode 00934J VP MS10 UK 120 6 17 0...

Страница 121: ...recording or in the voice recording mode the menu is not accessed Optimal distance for sound recording is 40cm During voice recording if the Mode Dial is changed and the recording will stop SWAV0001 WAV 00 00 00 02 15 40 SWAV0001 WAV 00 00 00 02 16 00 SW SWAV0001 W V0001 WAV SWAV0001 WAV 8KHz Mono 64Kbps 00 00 20 02 15 40 00 00 20 02 15 40 SWAV0001 WAV SWAV0002 WAV 8KHz Mono 64Kbps 00 00 00 02 15 ...

Страница 122: ...0 20 SWAV0001 WAV SWAV0001 WAV 00 00 00 00 00 10 SWAV0001 WAV SWAV0002 WAV Mono 64Kbps 00 00 00 00 00 20 00 00 00 00 00 20 1 6 2 6 2 6 2 6 2 6 OK Search Play Search Search Play Play Search Pause Search Pause 8KHz Volume Volume Volume Volume Volume SWAV0001 WAV SWAV0002 WAV Mono 64Kbps 00 00 16 0000 20 00 00 16 00 00 20 00 00 16 0000 20 SWAV0001 WAV SWAV0001 WAV 00 00 00 00 00 10 SWAV0001 WAV 00 00...

Страница 123: ... 00 00 00 20 SWAV0001 WAV 00 00 00 02 15 40 1 6 1 6 OK Search Search Play Play Volume Volume Shortcut buttons are provided to allow users easy access to frequently used functions Switching to Voice Record Mode 1 Turn the Mode Dial to Voice mode 2 Press the POWER button to turn on the Miniket Photo 3 Press the Shortcut 1 button The Voice Play screen appears 4 Press the Shortcut 1 button again Each ...

Страница 124: ... SWAV0001 WAV SWAV0001 WAV 8KHz Mono 64Kbps 00 00 00 00 00 10 00 00 00 00 00 10 1 6 1 6 OK Search Search Play Play SWAV0001 WAV 00 00 00 00 00 10 1 6 Search Play Volume Volume Volume SWAV0001 WAV 00 00 00 00 00 10 1 6 Search Play SWAV0001 WAV SWAV0001 WAV 8KHz Mono 64Kbps 00 00 00 00 00 10 00 00 00 00 00 10 1 6 1 6 OK Search Search Play Play Delete Cancel Volume Volume Volume 00 00 00 00 00 10 Sea...

Страница 125: ...t in speaker will not operate You can access the menu only when the recorded voice file playback is stopped TYPE MENU SWAV0001 WAV 00 00 00 00 00 10 1 6 Search Play SWAV0001 WAV 00 00 00 00 00 10 1 6 Search Play Voice Voice Repeat Repeat Off One All Shuffle Move Move Select Select Exit Exit OK Voice Repeat Move Select Exit Volume Volume SWAV0001 WAV 00 00 00 00 00 10 1 6 Search Play SWAV0001 WAV 0...

Страница 126: ...tick OK to confirm 9 Press the MENU button to exit the menu Notes You can easily access this function by using the shortcut button refer to page 124 After deleting a file the last file of the current folder is selected You can access the menu only when the recorded voice file playback is stopped TYPE MENU SWAV0002 WAV SWAV0003 WAV SWAV0004 WAV SWAV0005 WAV SWAV0001 WAV 00 00 00 00 00 10 1 6 Search...

Страница 127: ...t 3 button The message Confirm appears Select Yes or No by moving the joystick left right and then press the joystick OK to confirm 9 Press the MENU button to exit the menu An icon indicating the protected file appears on the screen Note You can access the menu only when the recorded voice file playback is stopped TYPE SWAV0002 WAV SWAV0003 WAV SWAV0004 WAV SWAV0005 WAV SWAV0001 WAV 00 00 00 00 00...

Страница 128: ...tton to exit the menu Notes It copies from the currently used memory to another When File No is set file numbering will start from the next to the last file 6 Voice Mode Setting the Voice Play Options Copying Voice Files TYPE SWAV0001 WAV 00 00 00 00 30 00 1 6 Search Play Voice Voice Copy to Copy to Select All MENU OK Move Move Select Select Exit Exit Volume SWAV0002 WAV SWAV0003 WAV SWAV0004 WAV ...

Страница 129: ...Cam Function 130 PC Cam mode 6 6 POWER W T Power Button 1 Turn the Mode Dial to PC Cam mode 2 Press the POWER button to turn on the Miniket Photo How to set to PC Cam mode How to set to PC Cam mode ENGLISH 00934J VP MS10 UK 155 6 17 06 7 14 PM Page 129 ...

Страница 130: ...tion Refer to respective product documentation for further details 5 When finished disconnect the cable Warning The product does not support audio transfer Please use separate microphone for audio transfer Notes You must install the DV Driver refer to page 137 When the USB Port connection changed it may require DV Driver re installation It is recommended to use an AC Power Adapter during data tran...

Страница 131: ...dge 132 PictBridge mode 7 7 POWER W T Power Button 1 Turn the Mode Dial to PictBridge mode 2 Press the POWER button to turn on the Miniket Photo How to set to PictBridge mode How to set to PictBridge mode ENGLISH 00934J VP MS10 UK 155 6 17 06 7 14 PM Page 131 ...

Страница 132: ...umber of copies Range of possibilities 1 99 Pressing the Shortcut 3 button on 99 will set to 1 Pressing the Shortcut 4 button on 1 will set to 99 7 Press the Shortcut 1 button to begin printing To cancel printing press the Shortcut 1 button again 8 When finished disconnect the USB cable Warning This function works only with printers that support PictBridge Notes Number of copies and imprint option...

Страница 133: ... on other media to avoid accidental loss due to a system failure or other reasons Storage Mode 8 8 POWER W T Power Button 1 Turn the Mode Dial to Storage mode 2 Press the POWER button to turn on the Miniket Photo How to set to Storage mode How to set to Storage mode ENGLISH 00934J VP MS10 UK 155 6 17 06 7 14 PM Page 133 ...

Страница 134: ...and E is the internal memory 6 After copying to desired files on PC you can copy to memory Internal memory or mini SD card In Windows XP Internal Memory Miniket MISC External Memory mini SD card Removable Disk MISC 7 When finished disconnect the USB cable Warning You cannot create a new folder on your Miniket Photo set If you create a new folder using a PC it will not appear on the set Notes Disco...

Страница 135: ...1 0 Video Studio 138 Connecting To Other Devices 139 Connecting to a PC Using USB Cable 139 Connecting to a TV Monitor 140 Connecting to a VCR 141 Printing Photos 142 Printing with DPOF 142 Cleaning and Maintenance 143 After using the Miniket photo 143 Cleaning the Body 144 Regarding the Battery 145 Using Abroad 146 Miscellaneous Information 9 9 ENGLISH 00934J VP MS10 UK 155 6 17 06 7 14 PM Page 1...

Страница 136: ...nnected to a PC or using USB hubs may cause communication installation errors with the Miniket Photo Disconnecting the USB cable during the data transfer will stop the communication and may damage data stored in the memory Pentium III 800MHz Windows 98SE ME 256MB 1 2 GB or above 1024 x 768 dots 24bit colour USB 1 1 CPU OS Memory Free space on the hard disk Display Resolution USB Pentium IV 2GHz Wi...

Страница 137: ...X 9 0 DV Driver is a software driver that is required to support establishing connection to a PC If it is not installed some functions will not be supported 1 Click on DV Driver on the Setup screen Driver software required is installed automatically Following drivers will be installed USB Removable disk driver Windows 98 SE only USB PC CAMERA driver 2 Click on Confirm to finish driver installation...

Страница 138: ...ter inserting the CD the setup screen displays automatically Follow the instruction to start installation It is a video editing tool that allows users to edit movie files Notes For photo editing use Photo Express For movie playback on a PC it is required to install software in this order DV Driver DirectX 9 0 Video Codec For movie editing use the Video Studio For PC Cam use it is required to insta...

Страница 139: ...n the message saying that it is safe to remove the hardware appears unplug the cable from the PC Warning When data communication is disrupted due to static electricity magnetic field or other reason restart the programme or try to disconnect connect the communication cable USB Cable again In Windows XP be informed that dialog windows may pop up overlapped Notes Multiple USB devices connected to a ...

Страница 140: ...e Dial to Movie mode Movie Record mode is displayed on the TV screen 5 Press the Shortcut 1 button to switch to Movie Play mode Select a movie file to play 6 Move the joystick left right to select a movie and then press the joystick OK It begins playback To pause playback press the joystick OK To stop playback hold down the joystick OK Notes You can play back photo files as well as movie files Whe...

Страница 141: ...lours of the terminals 3 Connect the Audio Video Cable from TV Input to Video Output 4 Turn on the TV and set the Source to the external input source 5 Turn on the VCR and set the Source to the external input source where you connected the Miniket Photo Notes You can play back photo files as well as the movie files When connected to other devices with the Audio Video cable no screen is displayed o...

Страница 142: ...s Printing DPOF files in the mini SD card 1 Set the DPOF information for the photo you want to print Refer to page 87 2 Insert a mini SD card into the DPOF supporting printer 3 Follow the steps of the printer to print out photos Notes For further details about printing photos refer to the user s manual of the printer Printing may not be performed depending on types of printers In this case downloa...

Страница 143: ...et Photo when not in use Battery consumption may vary depending on the condition of use Recording with many starts and stops frequent zooming and recording in low temperatures will shorten actual recording times Dispose of used battery packs promptly Do not dispose of Battery Packs by burning them The battery pack will become warm during charging and use This is not a malfunction The battery pack ...

Страница 144: ... clean the surface To clean the lens use an optional air blower to blow out dirt and other small objects Do not wipe the lens with a cloth or your fingers If necessary use lens cleaning paper Do not use thinner alcohol or benzene for cleaning Otherwise the finish may be damaged Cleaning should be done only after the battery pack has been removed and other power sources have been disconnected Note ...

Страница 145: ...The battery pack is not water resistant Keep the battery out of reach of children If it is swallowed seek medical assistance immediately Wipe the battery with a clean dry cloth to ensure proper contact Do not pick up the battery using metal tools as this may cause a short circuit Do not short the battery or dispose of the battery in fire Do not disassemble the battery The battery could explode or ...

Страница 146: ...ings on a television set or to copy it to a video cassette recorder VCR the television set or the VCR must comply with the TV standard and have the appropriate Audio Video ports You can set the TV standard of the Miniket Photo for its video output TV Standards PAL Compatible Countries Regions Australia Austria Belgium Bulgaria China CIS Czech Republic Denmark Egypt Finland France Germany Greece Gr...

Страница 147: ...ted one Check the memory space or format of the mini SD card Delete the damaged corrupted file To delete a protected file unlock the protection prior to deletion Informs that Action Display No Power is supplied Date Time is wrong Focus does not adjust automatically The mini SD card will not load properly Colour balance of the picture is not natural Digital zoom does not work Files stored in the mi...

Страница 148: ...a file does not comply with a supported file format Cable connection was done improperly The Source of the TV is set improperly Mode is set to Recording mode TV set may not support on screen text display depending on manufacturer Focus is not set properly and the image looks blurry Adjust the LCD brightness page 41 Low temperature may produce a dark LCD screen It is normal not a malfunction Select...

Страница 149: ...ti Center Spot Self Timer Off 2 sec 10 sec Multi Shot Off Normal AEB Digital Effect Off Sepia Nega BLK WHT 1 Memory Memory Type Int Memory Memory Card File No Reset Series 3 Date Time Date Time Set Date Format YYYY MM DD DD MM YYYY MM DD YYYY Date Time Off Date Time Date Time Auto Shut off Reset Off 3 min 5 min Start Mode Display Off On Format Int Memory Memory Card Memory Space 000MB 000MB 4 Syst...

Страница 150: ...te Select All White Balance Auto Daylight Cloudy Fluorescent H Fluorescent L Tungsten 2 Play 1 Record Delete Select All Protect Select All Copy to Select All All Play Start Repeat Movie Size 640x480 320x240 Macro Off Macro Movie Quality Super Fine Fine Normal Self Timer Off 2 sec 10 sec Wind Cut Off On Memory Type Int Memory Memory Card Memory Type Int Memory Memory Card Memory Type Int Memory Mem...

Страница 151: ... flash memory mini SD card 2 5 Trans reflective 150K pixels VP MS10 64MB MS11 128MB MS12 256MB MS15 512MB 1 2 5 inch CCD 5 25 Mega pixel Total Pixel X3 Optical X5 Digital f 6 3 18 9mm F3 5 W 4 3 T 8 1 2000 sec Multi Center Spot 2 0 V 0 3EV Step Auto 100 200 400 Auto Daylight Cloudy Fluorescent H Fluorescent L Tungsten Custom WB 2 seconds 10 seconds 3 continuous pictures AEB Automatic Exposure Brac...

Страница 152: ...gh Speed Proprietary 3 pins connector ø3 5 Stereo Video 1 0Vp_p 75Ω Audio 7 5dBm 47KΩ 0 C 32 F 40 104 F 10 80 3 7V Li Ion Battery Pack 4 8V AC Power Adapter 95mm x 56 mm x 19 mm excluding extrusions 143g Including Battery Pack Omni directional Stereo condenser microphone AC 100 240V 50 60 Hz DC 4 8V 1 0 A 0 C 32 F 40 104 F 10 80 70 mm x 30 mm x 42 mm 89 5g The product design and specifications are...

Страница 153: ... 143 146 D Date Time Set 42 44 Digital Effect 66 97 Digital Zoom 76 DPOF 87 142 DV Media Pro 1 0 137 138 E Earphones 13 EV 67 Exposure 67 F File No 38 Formatting 39 Focus 74 H Hand Strap 13 I ISO Sensitivity 68 Internal Memory 37 J Joystick 29 L Language 48 Lithium Ion Battery Pack 13 M Mini SD card 32 Metering 63 Macro 70 Mode Dial 26 Movie 89 00934J VP MS10 UK 155 6 17 06 7 14 PM Page 153 ...

Страница 154: ...lity 62 99 R Resetting 51 Record 121 S Shutter Sound 47 Sepia 66 97 Self Timer 64 101 Slideshow 86 Shortcut Button 28 Safety Instructions 8 11 Self Diagnosis Display 147 148 T Troubleshooting 147 148 U USB 139 V Voice Record 121 W Wind Cut 102 Z Zooming In and Out 54 91 00934J VP MS10 UK 155 6 17 06 7 14 PM Page 154 ...

Страница 155: ... Kingdom Only The plug used on this product is a unitary transformer plug and is designed specifically for this Miniket Photo it must never be replaced or removed with any other type of plug 00934J VP MS10 UK 155 6 17 06 7 14 PM Page 155 ...

Страница 156: ... considered to be defective in materials nor workmanship by reason that it requires adaptation in order to conform to national or local technical or safety standards in force in any Country other than the one for which the product was originally designed and manufactured This warranty will not cover and no re imbursement will be made for such adaptation nor any damage which may result 5 This warra...

Страница 157: ... timolovgio hv h apovdeixh lianikhvı pwvlhshı pavnw sthn opoiva o seiriakovı ariqmovı tou proiovntoı prevpei na eivnai eukrinhvı 2 H upocrevwsh thı SAMSUNG aforav movno thn episkeuhv tou proiovntoı 3 H episkeuhv tou proiovntoı prevpei na anativqetai movno se exousiodothmevna kevntra service hv exousiodothmevnouı antiproswvpouı thı SAMSUNG Kamiva apozhmivwsh den qa givnei apodekthv gia episkeuhv po...

Страница 158: ...ovpouı pou antivkeintai stiı tecnikevı prodiagrafevı asfaleivaı pou iscuvoun katav thn crhvsh tou proiovntoı B Episkeuhv pou evgine apov mh exousiodothmevna sunergeiva service G Atuchvmata qeomhniveı hv opoiadhvpote aitiva pevra tou elevgcou thı SAMSUNG sumperilambanomevnwn allav mh periorismevnwn twn keraunwvn tou nerouv thı fwtiavı twn dhmosivwn anataracwvn tou kakouv aerismouv klp D H egguvhsh ...

Страница 159: ...8 65 65 0 15 Min www samsung com fr GERMANY 01805 121213 0 12 Min www samsung de HUNGARY 06 40 985 985 www samsung com hu ITALIA 199 153 153 www samsung com it LUXEMBURG 02 261 03 710 www samsung lu NETHERLANDS 0900 20 200 88 0 10 Min www samsung com nl NORWAY 231 627 22 www samsung com no POLAND 0 801 801 881 www samsung com pl PORTUGAL 80 8 200 128 www samsung com pt SLOVAKIA 0850 123 989 www sa...

Страница 160: ...on Of the use of certain Hazardous Substances in electrical and electronic equipment and we do not use the 6 hazardous materials Cadmium Cd Lead Pb Mercury Hg Hexavalent Chromium Cr 6 Poly Brominated Biphenyls PBBs Poly Brominated Diphenyl Ethers PBDEs in our products 00934J VP MS10 UK 007 6 17 06 6 03 PM Page B ...

Отзывы: