background image

69

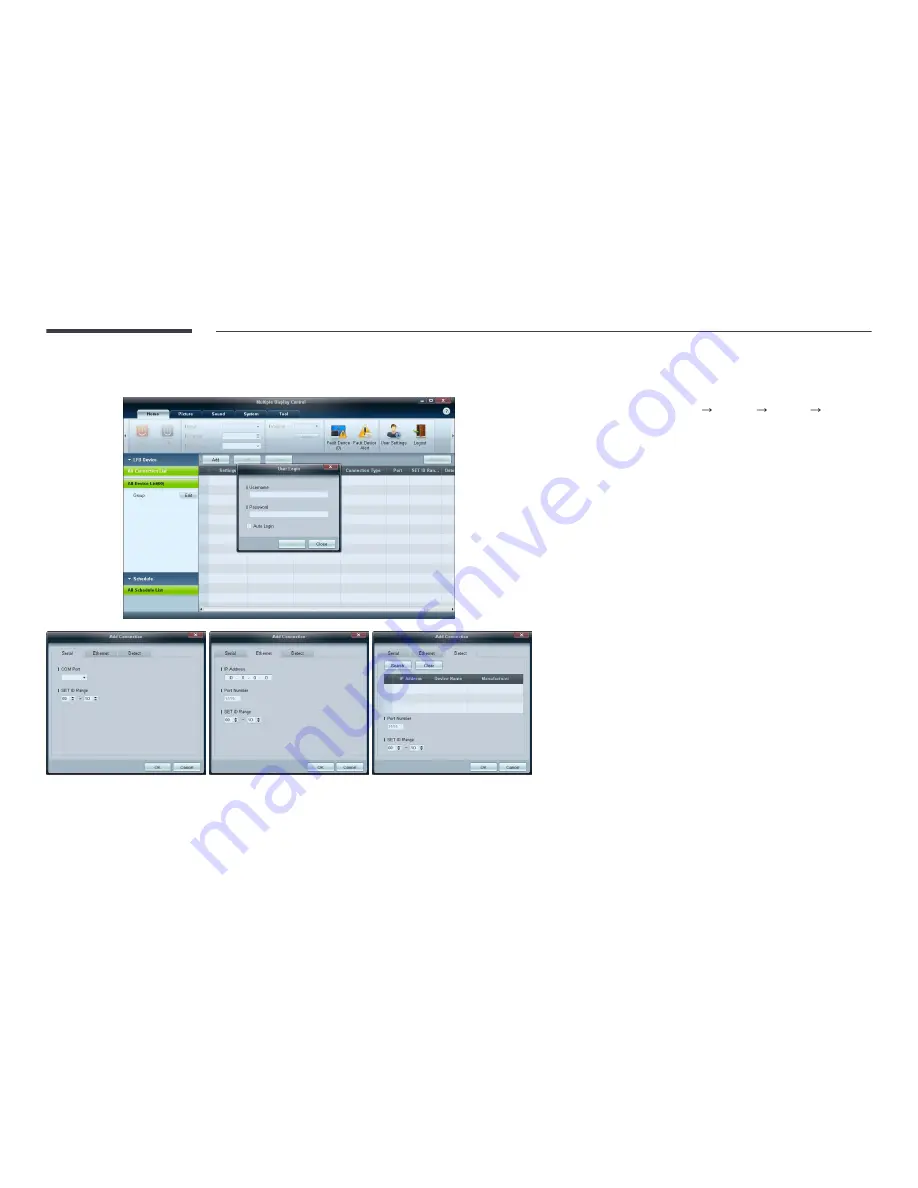
Getting Started with MDC

To start the program, click 

Start


Programs


Samsung


MDC Unified

.

The login window appears after the MDC program is launched.
Enter the user ID and password.


The default user ID and password are 

admin

.


Make sure to change the password after the first login.

Click 

Add

 to add a display device.

SET ID Range

: Select a range of the unique ID assigned to a monitor.


-

Serial

: If the connection is established via RS232C, go to 

Serial

 and 

specify the 

COM Port

.


-

Ethernet

: If the connection is established via 

Ethernet

, enter the IP that 

was entered for the display device.


-

Detect

: Search for display devices connected via Ethernet.

Содержание ME95C

Страница 1: ...LFD DISPLAY User Manual The color and the appearance may differ depending on the product and the specifications are subject to change without prior notice to improve the performance ME95C BN46 00354A 01 ...

Страница 2: ...ble Digital type 46 Connection Using an HDMI DVI Cable 46 Connection Using an HDMI Cable 47 Connection Using an DP Cable 47 Changing the Resolution 48 Changing the Resolution on Windows XP 48 Changing the Resolution on Windows Vista 48 Changing the Resolution on Windows 7 49 Changing the Resolution on Windows 8 49 Connecting an External Monitor 50 Connecting to a Video Device 51 Connection Using t...

Страница 3: ... RGB Only Mode 105 Color Space 105 White Balance 106 10p White Balance 106 Gamma 106 Motion Lighting 107 Picture Options 108 Color Tone 109 Color Temp 109 Digital Noise Filter 109 MPEG Noise Filter 109 HDMI Black Level 110 Film Mode 110 Auto Motion Plus 110 Dynamic Backlight 111 Reset Picture 111 Sound Adjustment Sound Mode 112 Sound Effect 113 Broadcast Audio Options 114 Sound on Video Call 115 S...

Страница 4: ...3 Auto Protection Time 154 Screen Burn Protection 155 Pixel Shift 155 Timer 156 Immediate Display 157 Side Gray 157 Ticker 158 Video Wall 159 Video Wall 159 Format 159 Horizontal 159 Vertical 160 Screen Position 160 Source AutoSwitch Settings 161 Source AutoSwitch 161 Primary Source Recovery 161 Primary Source 161 Secondary Source 161 General 162 Max Power Saving 162 Game Mode 162 BD Wise 162 Menu...

Страница 5: ...ying Files 190 Creating a Playlist 190 My List 191 My List options 191 Videos 192 Playing a Video 192 Photos 193 Viewing a Photo or Slide Show 193 Music 194 Playing Music 194 Videos Photos Music Play Option menu 195 Supported Subtitle and AllShare Play file formats 197 Subtitle 197 Supported image resolutions 197 Supported music file formats 198 Supported Video Formats 198 MagicInfo Lite File Form...

Страница 6: ...oduct 255 Checking the Resolution and Frequency 255 Check the followings 256 Q A 266 Specifications General 268 PowerSaver 271 Preset Timing Modes 272 Appendix Contact SAMSUNG WORLD WIDE 274 Responsibility for the Pay Service Cost to Customers 276 Not a product defect 276 A Product damage caused by customer s fault 276 Others 276 Optimum Picture Quality and Afterimage Burn in Prevention 277 Optimu...

Страница 7: ...owns the copyright for this manual Use or reproduction of this manual in parts or entirety without the authorization of Samsung Electronics is prohibited Microsoft Windows are registered trademarks of Microsoft Corporation VESA DPM and DDC are registered trademarks of the Video Electronics Standards Association Ownership of all other trademarks is attributed to their due owner ...

Страница 8: ...bol are prohibited Instructions marked by this symbol must be followed Cleaning Exercise care when cleaning as the panel and exterior of advanced LCDs are easily scratched Take the following steps when cleaning The following images are for reference only Real life situations may differ from what is shown in the images 1 Power off the product and computer 2 Disconnect the power cord from the produc...

Страница 9: ...single power socket Overheated power sockets may cause a fire Do not touch the power plug with wet hands Otherwise an electric shock may result Insert the power plug all the way in so it is not loose An unsecure connection may cause a fire Connect the power plug to a grounded power socket type 1 insulated devices only An electric shock or injury may result Do not bend or pull the power cord with f...

Страница 10: ...he plug when disconnecting the power cord from the power socket An electric shock or fire may result Installation Warning DO NOT PLACE CANDLES INSECT REPELLANTS OR CIGARETTES ON TOP OF THE PRODUCT DO NOT INSTALL THE PRODUCT NEAR HEAT SOURCES A fire may result Have a technician install the wall mount hanger Installation by an unqualified person can result in an injury Only use approved cabinets Do ...

Страница 11: ...duct may fall and become damaged and or cause an injury Using the product in an area with excess vibration may damage the product or cause a fire Do not install the product in a vehicle or a place exposed to dust moisture water drips etc oil or smoke A fire or electric shock may result Do not expose the product to direct sunlight heat or a hot object such as a stove The product lifespan may be red...

Страница 12: ...o consult Samsung Customer Service Center if you want to install the product at such a place Operation Warning There is a high voltage inside the product Never disassemble repair or modify the product yourself A fire or electric shock may result Contact Samsung Customer Service Center for repairs Before moving the product turn off the power switch and disconnect the power cord antenna cable and al...

Страница 13: ...electric shock or fire may result from a damaged cable Do not use or keep combustible spray or an inflammable substance near the product An explosion or fire may result Ensure the vents are not blocked by tablecloths or curtains An increased internal temperature may cause a fire 100 Do not insert metallic objects chopsticks coins hairpins etc or objects that burn easily paper matches etc into the ...

Страница 14: ...aged or cause an injury Looking at the screen too close for an extended period of time can deteriorate your eyesight Do not use humidifiers or stoves around the product A fire or electric shock may result Rest your eyes for more than 5 minutes for every 1 hour of product use Eye fatigue will be relieved Do not touch the screen when the product has been turned on for an extended period of time as i...

Страница 15: ...e of the internal liquid Use only the specified standardized batteries and do not use a new battery and a used battery at the same time Otherwise the batteries may be damaged or cause fire personal injury or damage due to a leakage of the internal liquid The batteries and rechargeable batteries are not ordinary refuse and must be returned for recycling purposes The customer is responsible for retu...

Страница 16: ...1 Remove the black locking device at the bottom of the box 3 2 1 2 Hold the grooves to disassemble the packaging box 3 Check to make sure that no components are missing in the package Remove the protective foams and plywood The appearance of actual components may differ from the image shown 4 Store the box in a dry area so that it can be used when moving the product in the future ...

Страница 17: ...arately may differ from the image shown Checking the Components Components Components may differ in different locations Quick setup guide Warranty card Not available in some locations User manual Batteries P 24 Not available in some locations Remote Control P 23 AA59 00714A Power cord D SUB cable P 45 RS232C IN adapter BRACKET PIM 2EA ...

Страница 18: ...ailer Wall mount Kit RS232C Stereo cable P 61 DVI cable P 46 HDMI DVI cable P 46 DP cable P 47 HDMI cable P 47 Video cable P 51 Stereo cable P 26 Component cable P 52 RCA stereo cable P 54 RCA cable P 51 AV Component adapter P 51 AUDIO adapter P 51 External sensor Kit P 26 LAN cable ...

Страница 19: ...C OUT adapter PIM The RS232C adapter can be used to connect to another monitor using the D SUB 9 pin type RS232C cable Ensure you connect each of the adapters to the correct RS232C IN or OUT port on the product ...

Страница 20: ...ve to the left or right menu You can adjust the volume by moving the panel key left or right when the control menu is not displayed Remote sensor Press a button on the remote control pointing at the sensor on the front of the product to perform the corresponding function Using other display devices in the same space as the remote control of this product can cause the other display devices to be in...

Страница 21: ...el key MENU Display the OSD menu Move the panel key left to select menu in the control menu The OSD control screen will appear Move the panel key right to select the desired menu You can select a sub menu item by moving the panel key up down left or right To change settings select the desired menu and press the panel key CONTENT Contents Home Enter Contents Home mode Move the panel key up to selec...

Страница 22: ...e DVI IN DVI IN Connects to a source device using a DVI cable or HDMI DVI cable DP IN Connects to a PC using a DP cable DP OUT Connects to another product using a DP cable USB Connect to a USB memory device AUDIO OUT Connects to the audio of a source device RGB DVI HDMI AV COMPONENT AUDIO IN Receives sound from a PC via an audio cable RS232C IN Connects to MDC using an RS232C stereo adapter RS232C...

Страница 23: ...enu Mute the sound Unmuting the sound Press MUTE again or press the volume control VOL button Contents Home Launch Button Change the channel in TV mode Temporarily turn off the video and mute the audio Disabling the BLANK function Press BLANK one more time Press SOURCE Turn the product off and then on again Display or hide the onscreen display menu or return to the previous menu Power on the produ...

Страница 24: ...guide for digital channels In other modes manually select a connected source device In media and HDMI CEC modes configure settings for the functions assigned to the color buttons on the remote control Enable or disable lock mode Use these buttons in Videos Photos Music and Anynet modes Quickly select frequently used functions Return to the previous menu It sets safe lock function Remote control bu...

Страница 25: ...sired 4 Finish setting 5 Close the onscreen display OSD menu Remote Control Reception Range 7m 10m 30 30 Use the remote control within 7m to 10m from the sensor on the product at an angle of 30 from the left and right Store used batteries out of reach of children and recycle Do not use a new and used battery together Replace both batteries at the same time Remove batteries when the remote control ...

Страница 26: ...able A command sent from the remote control pointed at product 1 will be received by both display products 1 and 2 The appearance may differ depending on the product 1 2 IR OUT IR AMBIENT SENSOR IN Controlling more than one display product using an external sensor kit sold separately A command sent from the remote control pointed at product 1 to which the external sensor kit is connected will be r...

Страница 27: ...d Rotation Contact Samsung Customer Service Center for further details The product can be tilted at a maximum angle of 15 from a perpendicular wall surface To use the product vertically portrait turn it clockwise so that the LED is pointing down A B Figure 1 1 Side view Ventilation Installation on a Perpendicular Wall A Minimum 40 mm B Ambient temperature Under 35 C When installing the product on ...

Страница 28: ...ll allow at least the space specified above between the product and wall for ventilation and ensure that the ambient temperature is kept below 35 C Dimensions 1 2 3 4 5 Unit mm inches Model name 1 1 2 2 3 4 3 4 5 ME95C 2127 2 83 74 2102 6 82 77 1185 4 46 66 1210 0 47 63 45 8 1 8 All drawings are not necessarily to scale Some dimensions are subject to change without prior notice Refer to the dimens...

Страница 29: ...detailed information on installing the wall mount see the instructions provided with the wall mount We recommend you contact a technician for assistance when installing the wall mount bracket Samsung Electronics is not responsible for any damage to the product or injury to yourself or others if you elect to install the wall mount on your own ...

Страница 30: ...ith the VESA standard screw specifications the length of the screws may differ depending on the wall mount specifications Do not fasten the screws too firmly This may damage the product or cause the product to fall leading to personal injury Samsung is not liable for these kinds of accidents Samsung is not liable for product damage or personal injury when non specified wall mount is used or the co...

Страница 31: ...e 9600 bps Data bits 8 bit Parity None Stop bit 1 bit Flow control None Maximum length 15 m only shielded type Pin assignment 1 2 3 4 5 6 7 8 9 Pin Signal 1 Detect data carrier 2 Received data 3 Transmitted data 4 Prepare data terminal 5 Signal ground 6 Prepare data set 7 Send request 8 Clear to send 9 Ring indicator ...

Страница 32: ...3 P1 P1 P1 P2 P2 Female Rx Tx Gnd 2 3 5 3 2 5 Tx Rx Gnd STEREO PLUG 3 5ø LAN Cable Pin assignment 1 2 3 4 5 6 7 8 Pin No Standard Color Signal 1 White and orange TX 2 Orange TX 3 White and green RX 4 Blue NC 5 White and blue NC 6 Green RX 7 White and brown NC 8 Brown NC ...

Страница 33: ...J45 Direct LAN cable PC to HUB RJ45 RJ45 MDC HUB P1 P1 P2 P2 Signal P1 P2 Signal TX 1 1 TX TX 2 2 TX RX 3 3 RX RX 6 6 RX Cross LAN cable PC to PC RJ45 P1 P2 Signal P1 P2 Signal TX 1 3 RX TX 2 6 RX RX 3 1 TX RX 6 2 TX ...

Страница 34: ...34 Connection Connection 1 RS232C IN OUT RS232C IN OUT RS232C IN OUT RS232C IN OUT Connection 2 RJ45 RJ45 Connection 3 RS232C OUT RJ45 RS232C IN OUT RS232C IN OUT RS232C IN OUT ...

Страница 35: ... wall mode control 0x5C 0 1 9 Safety Lock 0x5D 0 1 No Command type Command Value range 10 Video Wall On 0x84 0 1 11 Video Wall User Control 0x89 All communications take place in hexadecimals The checksum is calculated by adding up all values except the header If a checksum adds up to be more than 2 digits as shown below 11 FF 01 01 112 the first digit is removed E g Power On ID 0 Header Command ID...

Страница 36: ...a length Ack Nak r CMD Val1 Checksum 0xAA 0xFF 3 N 0x11 ERR ERR A code showing what error has occurred Volume control Function The volume of a product can be adjusted using a PC Viewing volume state Get Volume Status Header Command ID Data length Checksum 0xAA 0x12 0 Setting the volume Set Volume Header Command ID Data length Data Checksum 0xAA 0x12 1 Volume Volume Volume value code to be set on a...

Страница 37: ...V 0x40 DTV 0x21 HDMI1 0x22 HDMI1_PC 0x23 HDMI2 0x24 HDMI2_PC 0x31 HDMI3 0x32 HDMI3_PC 0x25 DisplayPort DVI_video HDMI1_PC HDMI2_PC and HDMI3_PC cannot be used with the Set command They only respond to Get commands This model does not support HDMI1 HDMI1_PC HDMI2 HDMI2_PC HDMI3 and HDMI3_PC ports RF TV DTV are only available with models that include a TV Ack Header Command ID Data length Ack Nak r ...

Страница 38: ...Header Command ID Data length Ack Nak r CMD Val1 Checksum 0xAA 0xFF 3 A 0x18 Screen Mode Screen Mode A code that sets the product status Nak Header Command ID Data length Ack Nak r CMD Val1 Checksum 0xAA 0xFF 3 N 0x18 ERR ERR A code showing what error has occurred Screen size control Function The screen size of a product can be changed using a PC Viewing the screen size Get Screen Size Status Head...

Страница 39: ...A 0xFF 3 A 0x3C PIP PIP A code used to turn the PIP mode of a product on or off Nak Header Command ID Data length Ack Nak r CMD Val1 Checksum 0xAA 0xFF 3 A 0x3C PIP ERR A code showing what error has occurred Auto adjustment control PC and BNC only Function Automatically adjust the PC system screen using a PC Viewing auto adjustment state Get Auto Adjustment Status None Setting auto adjustment Set ...

Страница 40: ... Data length Ack Nak r CMD Val1 Checksum 0xAA 0xFF 3 A 0x5C ERR ERR A code showing what error has occurred Safety Lock Function PC can be used to turn the Safety Lock function on or off on a product This control is available regardless of whether or not the power is turned on Viewing the safety lock state Get Safety Lock Status Header Command ID Data length Checksum 0xAA 0x5D 0 Enabling or disabli...

Страница 41: ...mand ID Data length Ack Nak r CMD Val1 Checksum 0xAA 0xFF 3 A 0x84 V Wall_ On V Wall_On Same as above Nak Header Command ID Data length Ack Nak r CMD Val1 Checksum 0xAA 0xFF 3 N 0x84 ERR ERR A code showing what error has occurred Video Wall User Control Function Turn the Video Wall function on or off on the product from your computer Get Video Wall Status Header Command ID Data length Checksum 0xA...

Страница 42: ... 6 0x61 0x62 0x63 0x64 0x65 0x66 0x67 0x68 0x69 0x6A 0x6B 0x6C 0x6D 0x6E 0x6F 7 0x71 0x72 0x73 0x74 0x75 0x76 0x77 0x78 0x79 0x7A 0x7B 0x7C 0x7D 0x7E N A 8 0x81 0x82 0x83 0x84 0x85 0x86 0x87 0x88 0x89 0x8A 0x8B 0x8C N A N A N A 9 0x91 0x92 0x93 0x94 0x95 0x96 0x97 0x98 0x99 0x9A 0x9B N A N A N A N A 10 0xA1 0xA2 0xA3 0xA4 0xA5 0xA6 0xA7 0xA8 0xA9 0xAA N A N A N A N A N A 11 0xB1 0xB2 0xB3 0xB4 0xB...

Страница 43: ...00 Set Number Data 1 0x01 2 0x02 99 0x63 100 0x64 Ack Header Command ID Data length Ack Nak r CMD Val1 Val2 Checksum 0xAA 0xFF 4 A 0x89 Wall_Div Wall_SNo Nak Header Command ID Data length Ack Nak r CMD Val1 Checksum 0xAA 0xFF 3 N 0x89 ERR ERR A code showing what error has occurred ...

Страница 44: ...layers Pre connection Checkpoints Before connecting a source device read the user manual provided with it The number and locations of ports on source devices may differ from device to device Do not connect the power cable until all connections are completed Connecting the power cable during connection may damage the product Connect the sound ports correctly left white and right red Check the types...

Страница 45: ...nect a source device first before connecting the power cable A PC can be connected to the product in a variety of ways Select a connection method suitable for your PC Connecting parts may differ in different products Connection using the D SUB cable Analog type RGB IN RGB DVI HDMI AV COMPONENT AUDIO IN ...

Страница 46: ...HDMI AV COMPONENT AUDIO IN Connection Using an HDMI DVI Cable When you connect a PC to the product using an HDMI DVI cable set Edit Name to DVI PC to access video and audio content stored on the PC HDMI IN 1 HDMI IN 2 HDMI IN 3 RGB DVI HDMI AV COMPONENT AUDIO IN ...

Страница 47: ...ed off or goes into power saving mode monitor setting changes may not be updated As a result screen output may not be displayed properly In the occurrence of this issue set Max Power Saving to Off before using the product Some graphics cards that are not compliant with the DP standard may prevent the Windows Booting Bios screen from being displayed when the product is in power saving mode If this ...

Страница 48: ...re quality The picture quality of TFT LCDs may degrade if the optimum resolution is not selected Changing the Resolution on Windows XP Go to Control Panel Display Settings and change the resolution Changing the Resolution on Windows Vista Go to Control Panel Personal Settings Display Settings and change the resolution ...

Страница 49: ...e Resolution on Windows 7 Go to Control Panel Display Screen Resolution and change the resolution Changing the Resolution on Windows 8 Go to Settings Control Panel Display Screen Resolution and change the resolution ...

Страница 50: ...50 Connecting an External Monitor Connecting parts may differ in different products DP OUT ...

Страница 51: ... a source device first before connecting the power cable You can connect a video device to the product using a cable Connecting parts may differ in different products Press the SOURCE button on the remote control to change the source Connection Using the AV Cable AV IN COMPONENT IN RGB DVI HDMI AV COMPONENT AUDIO IN ...

Страница 52: ...DMI DVI cable To resolve this additionally connect an audio cable to the audio ports on the product and video device When you connect a video device to the product using an HDMI DVI cable set Edit Name to DVI Devices to access video and audio content stored on the video device Supported resolutions include 1080p 50 60Hz 720p 50 60Hz 480p and 576p HDMI IN 1 HDMI IN 2 HDMI IN 3 RGB DVI HDMI AV COMPO...

Страница 53: ...ay normally if at all or the audio may not work if an external device that uses an older version of HDMI mode is connected to the product If such a problem occurs ask the manufacturer of the external device about the HDMI version and if out of date request an upgrade Be sure to use an HDMI cable with a thickness of 14 mm or less Be sure to purchase a certified HDMI cable Otherwise the picture may ...

Страница 54: ...rent products AUDIO OUT Connecting the antenna Connecting parts may differ in different products When the product is powered on for the first time basic settings are configured automatically Take extra care to ensure the wires inside the antenna cable are not bent ANT IN ...

Страница 55: ...o settings using the Windows Control Panel on the OPS device For products made by other manufacturers this only applies to HDMI compatible devices To enable sound output from the product with an OPS device that does not support HDMI configure the analog audio settings using the Windows Control Panel go to Plug In Module Edit Name and set the input source to PC DVI PC or DVI Attaching the BRACKET P...

Страница 56: ...th your laptop computer wirelessly This technology is based on the wireless LAN N series that is designed to transfer a high quality signal of 720p or 1080p between wireless devices This is useful especially if you want to connect your desktop or laptop computer to a bigger screen such as a product To implement the WiDi feature your laptop computer must meet the requirements below For compatibilit...

Страница 57: ...i program on your laptop computer Note that the security code will only be displayed on the screen when first run 5 A connection has been established with your laptop computer Now you can use the WiDi feature to transfer data wirelessly Usage Conditions Frequency 2 4G 5G Effective Range 0 5m 3m max 10m required to minimize the electric interference Operation Since the WiDi technology uses a compre...

Страница 58: ... receive the MDC signal RS232C MDC Communicates with the MDC via a RS232C MDC cable RJ45 MDC Communicates with the MDC via an RJ45 MDC cable If MDC Connection is set to RJ45 MDC and the product is powered off only the WOL function will be enabled MDC communication will not be available The WOL function is enabled only when MDC Connection is set to RJ45 MDC Wake On LAN WOL This feature allows you t...

Страница 59: ...lected the PC recognizes the two displays as a single monitor Clone mode is enabled if the input source is a digital input other than DisplayPort such as DVI HDMI1 HDMI2 or HDMI3 Expand In this Multi Stream Transport MST mode a different screen output is displayed on two display devices connected If Expand is selected the PC recognizes the two displays as separate monitors The mode functions only ...

Страница 60: ... and click Install 9 Installation progress will be displayed 10 Click Finish in the displayed InstallShield Wizard Complete window 11 The MDC Unified shortcut icon will be created on the desktop after installation Uninstallation 1 Select Settings Control Panel on the Start menu and double click Add Delete Program 2 Select MDC Unified from the list and click Change Remove MDC installation can be af...

Страница 61: ...you to easily control multiple display devices simultaneously using a PC Connecting to MDC Using MDC via RS 232C serial data communications standards An RS 232C serial cable must be connected to the serial ports on the PC and monitor RS232C IN OUT Monitor 1 Monitor 2 Computer ...

Страница 62: ... connect the device to the PC One display device can connect to another using an RS 232C serial cable Connection using a direct LAN cable Multiple products can be connected using the RJ45 port on the product and the LAN ports on the HUB RJ45 HUB Monitor 1 Monitor 2 Computer ...

Страница 63: ...63 Connection using a cross LAN cable Multiple products can be connected using the RS232C IN OUT port on the product RS232C OUT RJ45 Monitor 1 Monitor 2 Computer ...

Страница 64: ...Port No MAC and Connection Type connection status Set ID Range and detected devices Each connection can contain a maximum of 100 devices connected in serial daisy chain fashion All the LFDs detected in a connection are displayed in the Device list where the user can make groups and send commands to detected devices Connection list modification options Connection modification options includes Add E...

Страница 65: ...et to admin After logging in for the first time make sure to change the password to ensure security To change the password go to Home User Settings After you are logged in User Login admin appears at the right bottom of the program To log in automatically when the program restarts select the Auto Login checkbox in the User Login window ...

Страница 66: ... all the LFDs connected in daisy chain of a selected connection There can be a maximum of 100 LFDs in a connection The Set ID is assigned sequentially in the daisychain running from 1 to 99 and then finally to Set ID 0 ID for the last 100th LFD is set to 0 ...

Страница 67: ...py the setting of one LFD and apply it to multiple selected LFDs You can select specific tab categories or all tab categories for cloning using the copy setting option window To delete the settings you have configured click the Paste Settings button ...

Страница 68: ...he maximum number of times the MDC command will be retried in case of there being no reply or a corrupted reply from an LFD The retry count value can be set using the MDC options window The retry count value must be between 1 10 The default value is 1 ...

Страница 69: ...e admin Make sure to change the password after the first login 2 Click Add to add a display device SET ID Range Select a range of the unique ID assigned to a monitor Serial If the connection is established via RS232C go to Serial and specify the COM Port Ethernet If the connection is established via Ethernet enter the IP that was entered for the display device Detect Search for display devices con...

Страница 70: ...d device or change the input source or volume of the device Choose display devices from the list of sets and select the Home tab Select an item and change the corresponding setting Power On Power on a selected display Off Power off a selected display Input Input Source Change the input source Input sources available can vary depending on the Display Device Models The input source can be changed on...

Страница 71: ...s menu shows a list of display devices which have following errors fan error temperature error brightness sensor error or lamp error Select a display device from the list The Repair button will be enabled Click the Refresh button to refresh the error status of the display device The recovered display device will disappear from the Fault Device List Fault Device Alert Display device in which error ...

Страница 72: ...out the login window will appear prompting you to enter user information even if the Auto Login checkbox is selected Screen Adjustment Custom The screen settings contrast brightness etc can be adjusted Choose display devices from the list of sets and select the Picture tab Select an item and change the corresponding screen setting Picture Mode Adjust the picture mode for the selected display devic...

Страница 73: ... Plus function Clear Set the level of Auto Motion Plus to clear This mode is suitable to display vivid images Standard Set the level of Auto Motion Plus to standard Smooth Set the level of Auto Motion Plus to smooth This mode is suitable to display smooth images Custom Customize the level of screen burn in or flickering Demo This function demonstrates the technology of Auto Motion Plus The result ...

Страница 74: ...ding to the video Size Picture Size Adjust the screen size for the selected display device The Detail item will be disabled if Picture Size is set to a mode that does not support detailed configuration The buttons can be used to adjust Zoom The screen can be relocated using the up down left right buttons Detail You can view details of the selected screen size PC Screen Adjustment Frequency adjustm...

Страница 75: ...ce a pop up message window appears when the product receives a 3D signal 3D Optimization The overall adjustment of 3D effect 3D Expert Pattern View a 3D pattern 3D Effect Adjust 3D effects like perspective and depth for your preferred 3D viewing experience Auto Automatically adjust the perspective and depth settings in accordance with the 3D input source Manual Manually adjust the perspective and ...

Страница 76: ... motion LED Motion Plus Removes blur and judder from scenes with larger amounts of rapid movement to provide a clearer picture Color Space Adjusts the range and variety of color the color space available to create images Auto Native Custom To adjust Color Red Green Blue and Reset set Color Space to Custom White Balance Adjust the color temperature for a more natural picture R Offset G Offset B Off...

Страница 77: ...y Balance L R Adjust the volume of the left and right speakers of the selected display device SRS TS XT Enable or disable the SRS TS XT effect for the selected display device System Setup Video Wall Choose display devices from the list of sets and select the System tab The Video Wall function can be used to display part of a whole picture or repeat the same picture on each of connected multiple di...

Страница 78: ...Preview are enabled when Video Wall is set to on Note that if multiple sets are selected Preview is enabled only if the settings for H and V match the layout of the selected sets To change the Position select a set and drag it to a new position The range of screen divider settings may differ depending on the model PIP Basic information required to adjust PIP will appear in the menu screen PIP will...

Страница 79: ...he standby mode to activate if an input source is not detected Fan Temperature Configure the settings required to detect the fan speed and internal temperature for the product s protection Fan Control Select a method to configure the fan speed Fan Speed Setting Configure the fan speed Temperature Detect the internal temperature by specifying the range of temperature ...

Страница 80: ... set Button Lock to Off OSD Display Source OSD Select whether to display a message when the Source is changed Not Optimum Mode OSD Select whether to display a message when a non compatible mode is selected No Signal OSD Select whether to display a message when there is no input signal MDC OSD Select whether to display a message when settings are changed by the MDC ...

Страница 81: ...r On Time Set the time to power on the selected display device Volume Specify the volume of the display device when it is powered on by On Time Source Specify the input source of the display device when it is powered on by On Time Off Timer Repeat Specify the period for which you want to repeat the selected Timer Once EveryDay Mon Fri Mon Sat Sat Sun Manual Holiday Apply The Holiday Management set...

Страница 82: ...an be enabled or disabled in the Timer settings menu Add You can specify holidays Click the Add button in the Holiday Management window Delete Delete holidays check the corresponding checkboxes and click this button List of holidays View a list of holidays you have added Screen Burn Protection Pixel Shift Move the screen slightly at specified time intervals to prevent screen burn in ...

Страница 83: ...al Display the image retention preventive pattern set in Mode for a specified period of time from Start Time to End Time Mode Select a screen protective pattern to display Period Hour Specify the time interval to activate the Screen Saver function The option is enabled when Repeat is selected for Timer Time Sec Specify the duration to keep the Screen Saver function on The option is enabled when Re...

Страница 84: ...on Automatically adjust the backlight of the selected display device at a specified time If Manual Lamp Control is adjusted Auto Lamp Control will automatically switch to Off Manually adjust the backlight for the selected display If Auto Lamp Control is adjusted Manual Lamp Control will automatically switch to Off Ambient Light Ambient Light detects ambient light intensity and automatically adjust...

Страница 85: ...display on the screen Timer Set the Start Time and End Time to display a message Message Position Select an orientation to display a message Message from Horizontal and Vertical Motion Specify the Direction and Speed to display a message Message Font Options Specify the message Size Foreground Color Foreground Opacity Background Color and Background Opacity ...

Страница 86: ...le or disable the remote control Virtual Romete Control Control a device from a PC using the virtual remote control Reset Reset Picture Reset the screen settings Reset Sound Reset the sound settings Reset System Reset the system settings Reset All Reset the screen sound and system settings at the same time ...

Страница 87: ...am to use the selected language Command Retry Count Specify the number of retry attempts when a command fails Error Status Interval Specify the time interval to query the display device in order to check if Fault Device has occurred Mail Alert Interval Specify the time interval for email notifications in the event when Fault Device occurs Edit Column Select the items you want to display in the lis...

Страница 88: ...88 Monitor Window A window appears showing details for data transfer between the computer and display devices Filter View the program information Information ...

Страница 89: ...89 Other Functions Resizing a Window Place the mouse pointer on a corner of the program window An arrow will appear Move the arrow to customize the size of the program window ...

Страница 90: ...k and select Group Edit in the display device list section on the left side of the program window The Add on the same level button is enabled only if at least one group is created 2 In the Edit Group window displayed click Add on the same level or Add on the sub level Add on the same level Create a group on the same level as the selected group ...

Страница 91: ...ub level Create a sub group under the selected group 3 Enter the group name Deleting Groups 1 Select a group name and click Edit 2 In the Edit Group window displayed click Delete 3 Click Yes The group will be deleted ...

Страница 92: ... click Rename 3 If a cursor appears in the old group name enter a new group name Schedule Management Creating Schedules Create and register a schedule on a group basis 1 Click All Schedule List in the schedule section on the left side of the program window The Add button will be enabled in the middle ...

Страница 93: ...ist of schedules will appear in the set list window Device Group Select a group Date Time Instant Execution Run the schedule immediately Timer Set the date time and interval to run the schedule Action Select a function that will activate at the specified time and interval Schedule Modification To modify a schedule select the schedule and click Edit Deleting a Schedule To delete a schedule select t...

Страница 94: ...menu For a display that supports the ID in a range of 0 to 99 the ID should be set between 0 and 99 The display you want to control does not appear on the other Control Info Grids Check that the display is powered on See the power status in the system information chart Ensure you select the input source the display is connected to The following message appears repeatedly Check that the display you...

Страница 95: ...played 2 When one display is selected Settings for the selected display are displayed 3 When two displays are selected e g in sequence of ID 1 and ID 3 The settings for ID 1 are displayed before the settings for ID 3 4 When the All Select checkbox is checked and all displays are selected The default settings are displayed ...

Страница 96: ...Brightness Sharpness Color Tint G R Information 60 70 45 50 50 G 50 R 50 The displayed image may differ depending on the model If the input source is PC DVI or DisplayPort Information This mode reduces eye fatigue and is suitable for displaying information to the public Advertisement This mode is suitable for displaying video content and indoor outdoor advertisements If the input source is AV Comp...

Страница 97: ... a PC is connected HDMI2 when a PC is connected HDMI3 when a PC is connected Information Backlight Contrast Brightness Sharpness Advertisement Backlight Contrast Brightness Sharpness Color AV Component HDMI1 HDMI2 HDMI3 TV Dynamic Standard Natural Movie Backlight Contrast Brightness Sharpness Color Tint G R When you make changes to Backlight Contrast Brightness Sharpness Color or Tint G R the OSD ...

Страница 98: ...educes the 16 9 picture by 25 Smart View 2 is enabled only in HDMI1 HDMI2 HDMI3 mode Wide Fit Enlarges the aspect ratio of the picture to fit the entire screen 4 3 Sets the picture to basic 4 3 mode Do not set your product to 4 3 format for a long time The borders displayed on the left and right or top and bottom of the screen may cause image retention screen burn which is not covered by the warra...

Страница 99: ... 4 3 Screen Fit Component 1080i 1080p 16 9 Wide Fit 4 3 Screen Fit Custom HDMI1 HDMI2 HDMI3 720p 1080i 1080p 16 9 Smart View 1 Smart View 2 Wide Fit 4 3 Screen Fit Custom HDMI1 HDMI2 HDMI3 480i 480p 16 9 Zoom1 Zoom2 Smart View 1 Smart View 2 4 3 Custom PC DVI DisplayPort HDMI1 when a PC is connected HDMI2 when a PC is connected HDMI3 when a PC is connected 16 9 4 3 Original Ratio ...

Страница 100: ...e picture up or down 3 Press the E button Zoom Position Screen Adjustment Picture Size Zoom Position PC Screen Adjustment Resolution Select Custom Off The displayed image may differ depending on the model To use the Zoom Position function after selecting Screen Fit in HDMI1 HDMI2 HDMI3 1080i 1080p or Component 1080i 1080p or Custom follow these steps 1 Press the button to select Zoom Position Pres...

Страница 101: ...st the PC s screen position if it is not centered or does not fit the product screen Press the or button to adjust the Vertical Position Press the or button to adjust the Horizontal Position Image Reset Resets the image to the default settings Resolution Select Screen Adjustment Picture Size Zoom Position PC Screen Adjustment Resolution Select Custom Off Available in PC mode only The displayed ima...

Страница 102: ...quency values positions and fine tune the settings automatically Rotation MENU m Picture Rotation ENTER E Picture Rotation Aspect Ratio Portrait Full Screen Available in PC mode only The displayed image may differ depending on the model Rotate the product screen orientation Landscape Display the screen in landscape mode default Portrait Display the screen in portrait mode ...

Страница 103: ...Available in PC mode only The displayed image may differ depending on the model Set the rotated screen to be either full screen or original Full Screen Display the rotated screen in full screen Original Display the rotated screen in the original aspect ratio Available only when Rotation is set to Portrait ...

Страница 104: ... HDMI1 when a PC is connected HDMI2 when a PC is connected HDMI3 when a PC is connected Information White Balance Gamma Advertisement Dynamic Contrast Black Tone Flesh Tone Color Space White Balance Gamma AV TV Component HDMI1 HDMI2 HDMI3 Natural Dynamic Not available AV TV Component HDMI1 HDMI2 HDMI3 Standard Dynamic Contrast Black Tone Flesh Tone RGB Only Mode Color Space White Balance Gamma Mot...

Страница 105: ...f Low Medium High Black Tone Select the black level to adjust the screen depth Off Dark Darker Darkest Flesh Tone Emphasize pink Flesh Tone RGB Only Mode Displays the Red Green and Blue color for making fine adjustments to the hue and saturation Off Red Green Blue Color Space Adjusts the range and variety of colors the color space available to create images Auto Native Custom To adjust Color Red G...

Страница 106: ...ness Reset Resets the White Balance to its default settings 10p White Balance Controls the white balance in 10 point interval by adjusting the red green and blue brightness Off On Interval Select interval to adjust Red Adjust the red level Green Adjust the green level Blue Adjust the blue level Reset Resets the 10p White Balance to its default settings Available when the Picture Mode is set to Mov...

Страница 107: ...lance 10pWhite Balance Gamma Motion Lighting Off 0 Off The displayed image may differ depending on the model Motion Lighting Reduces power consumption by reducing screen brightness when the picture on the screen is in motion Off On ...

Страница 108: ...igital Noise Filter MPEG Noise Filter Auto Motion Plus Dynamic Backlight DVI DisplayPort HDMI1 when a PC is connected HDMI2 when a PC is connected HDMI3 when a PC is connected Information Color Tone Color Temp HDMI Black Level Dynamic Backlight Advertisement Color Tone Color Temp Digital Noise Filter MPEG Noise Filter HDMI Black Level Auto Motion Plus Dynamic Backlight HDMI1 HDMI2 HDMI3 Dynamic St...

Страница 109: ... for each external device connected to an input on the product Color Temp Adjust the color temperature Red Green Blue Range 3000K 15000K This option is available when Color Tone is set to Off Digital Noise Filter If the broadcast signal received by your product is weak you can activate the Digital Noise Filter feature to reduce any static and ghosting that may appear on the screen Off Low Medium H...

Страница 110: ...cture The menu names may vary depending on the country Off Switches Auto Motion Plus off Clear Sets Auto Motion Plus to Clear suitable for viewing moving images clearly mode Standard Sets Auto Motion Plus to Standard mode Smooth Sets Auto Motion Plus to Smooth suitable for viewing moving images naturally mode Custom Use to reduce the afterimage and judder as much as you want Demo Demonstrates Auto...

Страница 111: ... the backlight to provide the best possible screen contrast under the current conditions Off On The Dynamic Backlight is not available when the input source is set to PC AV Component or TV while Video Wall is On Reset Picture MENU m Picture Reset Picture ENTER E Picture Reset Picture The displayed image may differ depending on the model Resets your current picture mode to its default settings ...

Страница 112: ...The displayed image may differ depending on the model You can select a sound mode to suit your personal preferences Standard Selects the normal sound mode Music Emphasizes music over voices Movie Provides the best sound for movies Clear Voice Emphasizes voices over other sounds Amplify Increase the intensity of high frequency sound to allow a better listening experience for the hearing impaired If...

Страница 113: ...und Off On This function provides a virtual 5 1 channel surround sound experience through a pair of speakers using HRTF Head Related Transfer Function technology Dialog Clarity Off On This function allows you to increase the intensity of a voice over background music or sound effects so that dialog can be heard more clearly Equalizer Use Equalizer to customize sound setting for each speaker Balanc...

Страница 114: ...keys and the press E Mono Choose for channels that are broadcasting in mono or if you are having difficulty receiving a stereo signal Stereo Choose for channels that are broadcasting in stereo SAP Choose to listen to the Separate Audio Program which is usually a foreign language translation Depending on the program being broadcast you can listen to Mono Stereo or SAP Broadcast Audio Options MENU m...

Страница 115: ...Sound Sound Mode Sound Effect Broadcast Audio Options Sound onVideo Call Speaker Settings Reset Sound Standard Current Source The displayed image may differ depending on the model Select the audio source you want to hear during a video call Current Source Video Call ...

Страница 116: ...external speakers only When the Speaker Select is set to Internal both the product speakers and the external speakers are on You will hear sound through both If there is no video signal both the products speakers and the external speakers will be mute Auto Volume Off Normal Night The volume can vary depending on the channel Automatically equalize the volume level when switching to another channel ...

Страница 117: ...nd ENTER E Sound Sound Mode Sound Effect Broadcast Audio Options Sound onVideo Call Speaker Settings Reset Sound Standard Current Source The displayed image may differ depending on the model Reset all sound settings to the factory defaults ...

Страница 118: ...tenna Auto Program Clear Scrambled Channel FineTune Crosstalk Noise Reduction Cable On The displayed image may differ depending on the model Available in TV mode only Before your television can begin memorizing the available channels you must specify the type of signal source that is connected to the LED display Air Cable ...

Страница 119: ...ur product is connected to an antenna choose Air and then press ENTER E The product will automatically start memorizing channels Cable If your product is connected to a cable outlet choose Cable and then press ENTER E Go to Step 3 3 On the cable type screen use the buttons to select the type of digital and analog cable systems you have STD HRC or IRC Most systems are STD Standard When done select ...

Страница 120: ...age may differ depending on the model Available in TV mode only digital channels only This function filters out scrambled channels after Auto Program is completed This process may take up to 20 30 minutes How to Stop the Clear Scrambled Channel function 1 Press the E button to select Stop 2 Press the button to select Yes 3 Press the E button This function is only available in Cable mode ...

Страница 121: ...fine tune the channel as this is done automatically during the search and store operation If the signal is weak or distorted fine tune the channel manually Scroll to the left or right until the image is clear This function is only available in Cable mode Settings are applied to the channel you re currently watching Fine tuned channels that have been saved are marked with an asterisk on the right h...

Страница 122: ...crambled Channel FineTune Crosstalk Noise Reduction Cable On The displayed image may differ depending on the model Available in TV mode only analog channels only This function reduce diagonal noise in picture caused by the crosstalk of signals If your TV displays with a noise while watching TV turns on this function ...

Страница 123: ...ct to your LAN by connecting the LAN port on the back of your product to an IP Sharer which is connected to an external modem Use LAN cable for the connection See the diagram below The Modem Port on the Wall External Modem ADSL VDSL IP Sharer having DHCP server LAN Modem Cable LAN Cable LAN Cable RJ45 Network Settings MENUm Network Network Settings ENTERE Network Settings The next step is to set u...

Страница 124: ...he IP address subnet mask gateway and DNS values your product needs to access the Internet so you do not have to enter them manually Most home networks are Dynamic Networks Some networks require a Static IP address If your network requires a Static IP address you must enter the IP address subnet mask gateway and DNS values manually on your product Cable Setup Screen when you set up the network con...

Страница 125: ...the Network Settings screen Select Start press E and then press E again 2 The network test screen appears and verifies the network connection When the connection has been verified the Wired network and Internet connection completed message appears If the connection process fails check the LAN port connection If the automatic process cannot find the network connection values or if you want to set t...

Страница 126: ...splayed How to set up manually 1 Go to the Network Settings screen Select Start press E and then press E again 2 The network test screen appears and the verification process starts Press Stop The verification process stops 3 Select IP Settings on network connection screen The IP Settings screen appears 4 Select the field at the top press E and then set IP Setting to Enter manually Repeat the entry...

Страница 127: ...the following wireless network security protocols If you select the Pure High throughput Greenfield 802 11n mode and the Encryption type is set to WEP TKIP or TKIP AES WPS2Mixed on your AP or wireless router Samsung products will not support a connection in compliance with new Wi Fi certification specifications If your wireless router supports WPS Wi Fi Protected Setup you can connect to the netwo...

Страница 128: ...searches for available wireless networks When done it displays a list of the available networks 3 In the list of networks press the or button to select a network and then press the E button twice If the wireless router is set to Hidden Invisible you have to select Add Network and enter the correct Network Name and Security key to establish the connection 4 If the Enter security key screen appears ...

Страница 129: ...alues manually Getting the Network Connection Values To view the Network connection values on most Windows computers follow these steps 1 Right click the Network icon on the bottom right of the screen 2 In the pop up menu that appears click Status 3 On the dialog that appears click the Support tab 4 On the Support Tab click the Details button The Network connection values are displayed ...

Страница 130: ...y Security key or PIN 6 When done use the right arrow button to move the cursor to Next and then press E The network connection screen appears and the verification process starts 7 Select Stop while network connections are being attempted This will stop the connection 8 Select IP Settings on network connection screen The IP Settings screen appears 9 Select the field at the top press E and then set...

Страница 131: ...o Network Settings screen 2 Select WPS PBC press E and then press E again 3 Press the WPS PBC button on your router within 2 minutes Your product automatically acquires all the network setting values it needs and connects to your network 4 The network connection screen appears and network setup is done ...

Страница 132: ...e setup and ready to use MAC Address IP Address Subnet Mask Gateway DNS Server You are connected to the Internet If you have any problems using online services please contact your Internet Service Provider IP Settings Retry Close The displayed image may differ depending on the model You can check the current network and Internet status ...

Страница 133: ...uct starts to search devices 2 Turn on the Wi Fi Direct function on your device Select the desired Wi Fi device PBC Push Button Configuration Press the WPS PBC button on your Wi Fi device within 2 minutes Your product automatically acquires all the network setting values it needs and connects to your network PIN Input the displayed PIN on your device If you want to disconnect the device select the...

Страница 134: ...ly using the remote control B Show security key Shows the security key Whether to show the security key is represented by a checkbox at the top A Del Deletes the entered security key one digit at a time C Space Inserts a blank space between characters when entering the security key R Return Returns to the screen before entering the security key The Security key should consist of more than 8 digits...

Страница 135: ...fter the alarm window appears If you press the RETURN or EXIT button when the alarm window appears the media contents are not played The first time a device accesses your product through the media function a warning popup window appears Press the E button to select Allow This permits the phone to access the product freely and use the AllShare Play function to play content To turn off media content...

Страница 136: ...work connection Press the E button to start If you do not know your network set up information or want to set to it later select Skip You can set up the network connection later using the Network menu 3 Selecting search options for Auto Program Press the or button then press the E button Select the channel source to memorize When setting the antenna source to Cable a step appears allowing you to a...

Страница 137: ...the RJ45 cable DisplayPort Daisy Chain To display the DP IN video input through the DP OUT output port select a device connection method from Single Stream Transport SST and Multi Stream Transport MST Clone In this Single Stream Transport SST output mode the same screen output is displayed on two display devices connected If Clone is selected the PC recognizes the two displays as a single monitor ...

Страница 138: ...ble or an antenna connected to the product to set the time automatically Manual Set the current time manually Clock Set Set the clock to use the various various timer features of the product Set the Date and Time Select Clock Set Select Date or Time and then press E Use the number buttons to enter numbers or press the up and down arrow buttons Use the left and right arrow buttons to move from one ...

Страница 139: ...n is only available when the Clock Mode is set to Auto Sleep Timer Automatically shuts off the product after a preset period of time Off 30 min 60 min 90 min 120 min 150 min 180 min Use the up and down arrows to select a period of time and then press E To cancel Sleep Timer select Off ...

Страница 140: ... level Source Select the input source of your choice Antenna when the Source is set to TV Select Air or Cable Channel when the Source is set to TV Select the desired channel Music Photo when the Source is set to USB Select a folder in the USB device containing music or photo files you want played when the product turns on automatically This function is available only when a USB device is connected...

Страница 141: ...left and right arrow buttons to change entry fields Holiday Management Timer will be disabled during a period specified as a holiday Add Specify the period you want to add as a holiday Select the start and end dates of the holiday you want to add using the buttons and click the Save button The period will be added to the list of holidays Start Set the start date of the holiday End Set the end date...

Страница 142: ...uage Rotate Menu Device Manager Eco Solution Off English Landscape The displayed image may differ depending on the model Adjust the brightness of the SAMSUNG logo board which is found at the bottom front of the product Off Dim Darken the Samsung logo board Bright Brighten the Samsung logo board ...

Страница 143: ... Language Rotate Menu Device Manager Eco Solution Off English Landscape The displayed image may differ depending on the model Set the menu language A change to the language setting will only be applied to the onscreen menu display It will not be applied to other functions on your PC ...

Страница 144: ...figure the menu screen Auto Automatically adjust the menu screen depending on the rotation of the screen orientation Default Landscape Display the menu in landscape mode Portrait Display the menu in portrait mode on the right side of the product screen If Rotate Menu is set to Portrait only the menu window will switch to portrait mode Functions will be performed based on the orientation of the ful...

Страница 145: ...onfigure keyboard connection settings or options for a connected keyboard Select Keyboard Select a keyboard you want to use from the available connected keyboards It is possible to use only one connected keyboard Keyboard Options Depending on the country Keyboard Language Specify the keyboard input language Keyboard Type Specify the keyboard type Switch Input Language Configure the key combination...

Страница 146: ...ble the Off Min Backlight When Eco Sensor is On you can manually adjust the minimum screen brightness Min Backlight is the darkest backlight mode Make sure the Min Backlight setting is lower than the Backlight setting If Eco Sensor is On the display brightness may change become slightly darker or brighter depending on the surrounding light intensity No Signal Power Off Save power by turning the de...

Страница 147: ...PC input jacks Caption Mode You can select the desired caption mode The availability of captions depends on the program being Broadcasted Default CC1 CC4 Text1 Text4 analog channels only The analog Caption function operates in either analog product channel mode or when a signal is supplied from an external device to the product Depending on the broadcasting signal the analog Caption function may o...

Страница 148: ...a and Cyan The default is Black Font Opacity This adjusts the opacity of text Options include Default Transparent Translucent Solid and Flashing Background Opacity This adjusts the opacity of the caption background Options include Default Transparent Translucent Solid and Flashing Return to Default This option sets each Size Font Color Background Color Font Opacity and Background Opacity to their ...

Страница 149: ...o lock the buttons on the product Only the remote control can control the product if Button Lock is set to On Off On Program Rating Lock When turned on the Program Rating Lock feature can automatically block programs that you deem inappropriate for your children You must enter a PIN personal identification number before you can set or change any of the Program Rating Lock restrictions Off On This ...

Страница 150: ...amming suitable for all audiences PG Parental Guidance 14 Programming contains themes or content which may not be suitable for viewers under the age of 14 18 Adult programming To block certain content you select a lock and press E That is you click it For example click the 18 lock and you block all TV programs rated 18 The rating categories are also grouped so that clicking one category blocks all...

Страница 151: ...on levels differ depending on the broadcasting station The default menu name and Downloadable U S Rating change depending on the downloaded information Even if you set the on screen display to another language the Downloadable U S Rating menu will appear in English only Blocking one rating level will automatically block other categories that deal with more sensitive material The rating titles For ...

Страница 152: ...the PIP sub picture screen Main picture Sub picture PC AV TV AV PC DVI HDMI1 HDMI2 HDMI3 DisplayPort Component TV TV PC DVI Component HDMI1 HDMI2 HDMI3 DisplayPort DVI HDMI1 HDMI2 HDMI3 DisplayPort AV TV PIP Off On Activate or deactivate the PIP function Source You can select a source of the sub picture Air Cable Air Cable Select either Air or Cable as the input source for the sub screen This opti...

Страница 153: ...n source to display in three screen mode HDMI1 HDMI2 HDMI3 DVI DisplayPort Plug In Module This option is available only when Triple Screen is set to On Select Sound Select the screen you want to enable sound for This option is available only when Triple Screen is set to On Screen Size Select sizes for the main screen sub screen 1 and sub screen 2 This option is available only when Triple Screen is...

Страница 154: ...cker VideoWall Source AutoSwitch Settings Off Off The displayed image may differ depending on the model If the screen displays a still image for a certain period of time you define the product activates the screen saver to prevent the formation of burnt in ghost images on the screen Off 2 hours 4 hours 8 hours 10 hours ...

Страница 155: ...lly or vertically Pixel Shift Off On Horizontal Vertical and Time are enabled only when Pixel Shift is set to On Horizontal Sets how many pixels the screen moves horizontally Vertical Sets how many pixels the screen moves vertically Time Set the time interval for performing the horizontal or vertical movement respectively Available Pixel Shift Settings and Optimum Settings Available Settings Optim...

Страница 156: ... Interval Mode Select a screen protective pattern to display Pixel Pixels on the screen alternate black continuously Rolling Bar A vertical bar moves left to right Fading Screen The entire screen becomes brighter then darker The Rolling Bar and Fading Screen patterns appear only once regardless of the specified repeat period or time Period Specify the time interval to activate the Screen Burn Prot...

Страница 157: ...isplayed image may differ depending on the model Immediate Display Select the screen saver you want to display immediately Off Pixel Rolling Bar Fading Screen Side Gray When the screen is set to 4 3 aspect ratio adjust the brightness of white margins on sides to protect the screen Off Right Dark ...

Страница 158: ...re enabled only when Ticker is set to On Message Enter a message to display on the screen Time Set the Start Time and End Time to display a Message Position Select an orientation to display a Message from Horizontal and Vertical Horizontal Left Center Right Vertical Top Middle Bottom Motion Specify the Direction and Speed to display a Message Motion Off On Direction Left Right Top Bottom Speed Slo...

Страница 159: ...activate Video Wall To organize a video wall select On Format Select a format to display images on multiple displays Full Display images in full screen Natural Display images at the original resolution without enlarging or reducing The Format option is only enabled when Video Wall is set to On Horizontal This function automatically divides the screen according to the specified number of horizontal...

Страница 160: ...o the vertical arrangement Conversely if the vertical arrangement is set to 13 a maximum of 7 displays can be assigned to the horizontal arrangement The Vertical option is only enabled when Video Wall is set to On Screen Position You can customize the arrangement of split screens by moving displays identified with a number using the Screen Position function Select Screen Position to display the ar...

Страница 161: ... video source is available If both the primary and secondary input sources are not recognized the display will perform two searches for an active source each search checking the primary and then secondary source If both searches fail the display will return to the first video source and display a message indicating that there is no signal When the Primary Source selection is set to All the display...

Страница 162: ...onsole and connect another external device set Game Mode to Off in the setup menu Game Mode is not available when the input source is set to TV PC DVI or DisplayPort l After connecting the game console set Game Mode to On Unfortunately you may notice reduced picture quality If Game Mode is On Picture Mode is set to Standard and Sound Mode is set to Movie BD Wise Provides the optimal picture qualit...

Страница 163: ...ally power on the product if the power cable is connected Off On Standby Control You can set the screen standby mode to be applied when an input signal is received Auto Power saving mode will activate if no input signals are detected even though a source device is connected to the display The message No Signal will appear if no source device is connected On Power saving mode will activate if no in...

Страница 164: ...he warm up time for the screen to turn on after the power button is pressed Range 0 50 seconds A warm up time that is too short may damage the product due to overvoltage Temperature Control This function detects the internal temperature of the product You can specify the temperature range that is acceptable The default temperature is set to 77 C The recommended operating temperature for this produ...

Страница 165: ...evice supporting Anynet is in the standby or on status While in PIP mode Anynet functions only when an AV device is connected as the primary display It does not work if the AV device is connected as a secondary display Anynet supports up to 12 AV devices in total Note that you can connect up to 3 devices of the same type Anynet Menu The Anynet menu changes depending on the type and status of the A...

Страница 166: ... HDMI CEC and then press E 2 Select Device List and then press the E button If you cannot find a device you want select Refresh to refresh the list 3 Select a device and then press the E button You can switch to the selected device The Device List menu appears only when you set Anynet HDMI CEC to On in the System menu Switching to the selected device may take up to 2 minutes You cannot cancel the ...

Страница 167: ...heck if the Anynet function of the Anynet device is set on I want to start Anynet Check if the Anynet device is properly connected to the product and check if the Anynet HDMI CEC is set to On in the Anynet Setup menu Press the TOOLS button to display the Anynet menu and select a menu you want I want to exit Anynet Select View PC in the Anynet menu Press the SOURCE button on the product remote cont...

Страница 168: ...eck whether Anynet HDMI CEC is set to On in the Anynet Setup menu Search Anynet devices again Anynet requires an HDMI connection Make sure the device is connected to your product with an HDMI cable Some HDMI cables may not support Anynet functions If the connection is terminated because there has been a power failure or the HDMI cable has been disconnected please repeat the device scan ...

Страница 169: ...tion file For more information about DivXⓇ VOD visit http vod divx com Player Mode MENU m System Player Mode ENTER E System Player Mode MagicInfo Lite The displayed image may differ depending on the model Select Player Mode Changing Player Mode will change the functions in Contents Home MagicInfo Lite MagicInfo Premium S MagicInfo Videowall S Changing Player Mode will automatically reboot the prod...

Страница 170: ...e product After configuration is complete the product is rebooted automatically The option may not work properly if the USB device contains a file other than a settings file Confirm that the USB device functions properly before running the option The option is available for products with the same Model Code and Software Version Go to Support Contact Samsung and find the product Model Code and Soft...

Страница 171: ...s PC Module Power MENU m System PC Module Power ENTER E System PC Module Power The displayed image may differ depending on the model PC module Refers to network boxes or PIM The PC module can be turned on off separately from the LFD Synced Power On To turn on the PC module without turning on the LFD select Off Off On Synced Power Off To turn off the LFD without turning off the PC module select Off...

Страница 172: ...write down your settings so that you can easily reset them after the upgrade By USB To perform a software update from a USB device contact the customer service center Contact Samsung MENU m Support Contact Samsung ENTER E View this information when your product does not work properly or when you want to upgrade the software You can find information regarding our call centers and how to download pr...

Страница 173: ...Switches the mode and display between Air and Cable C Program View Channel View digital channels only For digital channels switches the display between C Program View and Channel View When you select a digital channel in Channel List select once to display a list of programs on that channel select again to re display the Channel View CH Mode Channel On Channel View screen Toggles between the Favor...

Страница 174: ...w channels added in the TV Favorites 1 Favorites 5 A maximum of five lists of favorite channels are supported Recently Viewed View the most recently viewed channels Mostly Viewed View the most frequently viewed channels Icons in Channel ICON Function A Cable Switch the antenna signal to Air or Cable B Delete Delete channels that are selected using the cursor or the Select function Information Disp...

Страница 175: ...ry Deleting a channel in Channel 1 If you want to delete a channel select a category of the channel 2 Move to the right from the selected channel list to select a channel c appears to the left of the selected channel More than one channel can be selected To deselect a channel select the channel again c disappears 3 Press TOOLS on the remote control to open Tools 4 Select Delete A message Deleted t...

Страница 176: ...Air Air Air Air Air Air Air The displayed image may differ depending on the model Available in TV mode only Use the following functions from Edit Favorites on the left of the Added Ch screen ICON Function A Add Add selected channels to Favorites D Change Fav Go to another list of favorite channels The list of favorite channels switches to another list each time D is selected with the remote contro...

Страница 177: ...ite channels on the right of the Edit Favorites screen ICON Function A Delete Delete the selected channel More than one channel can be deleted simultaneously c appears next to the selected channel B Change order Complete the Change order process C Copy Copy a channel from a list of favorite channels to another list D Change Fav Go to another list of favorite channels The list of favorite channels ...

Страница 178: ...me Channel Manager TOOLS Add Delete ENTER E Add selected channels to Favorites Delete selected channels from Favorites Select All Deselect All MENU m Support Contents Home Channel Manager TOOLS Select All Deselect All ENTER E Select all channels in the current list of channels Deselect all channels The deselect function is available when a channel is selected Using the TOOLS button with Channel ...

Страница 179: ...he selected channel to the list of favorite channels A channel can also be added from the Edit Favorites screen Channels can be added to any of the five lists of favorite channels as desired To move from a list of favorite channels to another list select D using the remote control The list of favorite channels switches to another list each time D is selected 6 Select OK If the selected channel has...

Страница 180: ...gain c disappears 3 Press TOOLS on the remote control to open Tools 4 Select Delete A message Do you want to delete the selected item s appears 5 Select OK A message Deleted the selected item s appears To delete a channel directly from a list of favorite channels without using the Tools menu select B using the remote control Channel Channel status icons ICON Operations A Analog channel c A channel...

Страница 181: ...ils about the MagicInfo Lite menu MagicInfo Premium S MENU m Support Contents Home MagicInfo Premium S ENTER E MagicInfo Premium S can also be accessed by pressing MagicInfo Lite S on the remote control To launch MagicInfo Premium S select MagicInfo Premium S for the Player Mode on the System A license needs to be purchased to use MagicInfo Premium S MagicInfo Premium S Player can be used to edit ...

Страница 182: ...cInfo Videowall S Player allows you to play content at a desired time Content that can be played includes VideoWall content created in MagicInfo VideoWall Author in addition to other image and video files Content can be played only through VideoWall Console over a network Refer to page 250 for details about the MagicInfo Videowall S menu AllShare Play MENU m Support Contents Home AllShare Play ENT...

Страница 183: ...depending on the selected source VCR DVD Cable STB Satellite STB PVR STB AV Receiver Game Camcorder PC DVI PC DVI Devices TV IPTV Blu ray HD DVD DMA Available settings in the Picture menu depend on the current source and settings made in Edit Name When connecting a PC to the HDMI terminal set Edit Name to PC In other cases set Edit Name to AV devices When connecting a PC to the HDMI IN 1 HDMI IN 2...

Страница 184: ...e to the product back up files to ensure your data is not damaged or lost Samsung Electronics is not liable for any damage or loss of data Do not remove a USB device while it is loading If a USB device is connected using a USB extension cable the USB device may not be recognized or files saved on the device may not be able to be read If the product does not recognize a connected USB device the fil...

Страница 185: ...rotection Time Power saving mode on some external hard disk drives may automatically deactivate after connecting to the product File system and formats AllShare Play may not function properly with unLicensed multimedia files Media Transfer Protocol MTP is not supported Supported file systems include FAT16 FAT32 and NTFS read only AllShare Play supports the sequential JPEG format It does not suppor...

Страница 186: ...remote control Alternatively go to Source using the OSD menu MENUm Support Contents Home Source ENTERE 2 Select a USB device and press TOOLS on the remote control Tools option appears 3 Select Safely Remove USB and wait until the USB device is disconnected The USB device is disconnected Deleting AllShare Play from the screen 1 Go to the AllShare Play page MENUm Support Contents Home AllShare Play ...

Страница 187: ...nected to a PC over a network AllShare Play does not support the following features Background Music On and Background Music Setting features Feature that sorts files in the Videos Photos or Music folder according to the default setting π or µ feature during video playback DivXⓇ DRM is not supported Make sure you set the Windows firewall program to permit the AllShare PC software When using AllSha...

Страница 188: ...s Connect your Samsung display product to a network through AllShare Play and use the special features provided by Samsung as follows Playback of various video formats DivX MP4 3GPP AVI ASF MKV etc Video thumbnail feature Bookmark feature to resume video playback Auto chaptering scene search Digital Content Management Compatibility with various subtitle formats SRT SMI SUB TXT TTXT Search with fil...

Страница 189: ... sort files press D on the remote control to specify the sorting criteria Sort Criteria Operation Videos Photos Music Folder view Displays the whole folder You can view the file name and thumbnail by selecting the folder c c c Title Sorts and displays the file title in Symbol Number Alphabet Special order c c c Latest Date Sorts and shows files by the latest date c c Earliest Date Sorts and shows ...

Страница 190: ...es not appear if a folder is highlighted by the cursor 4 Select files and press Send cappears for selected files To select all the files in the current folder press Select All To deselect all the files press Deselect All Creating a Playlist 1 Select files from the list of Videos Photos or Music files 2 Press TOOLS on the remote control and select Add to Playlist The option does not appear if a fol...

Страница 191: ...w video photo or music files that were uploaded to a PC or USB device This mode is suitable when playing new files that were recently uploaded Playlist Display Playlist files saved on a PC or USB device To play a Playlist select the desired Playlist My List options Option Name Operations Recently Played What s New Playlist Play Play a selected file or Playlist c c c Remove Delete a selected file c...

Страница 192: ...Stop and Play buttons on the bottom of your remote during playback π 3 π 2 π 1 µ 1 µ 2 µ 3 Press the RETURN button to exit the movie Using the Play Continuously Function Resume Play If you exit a movie when it is playing you can play the movie later from the point where you stopped it 1 Select a file from the list of files 2 Press the Play or E button 3 The Movie will begin to play from where you ...

Страница 193: ...in order starting from the file you selected If you select the wrong background music you cannot change the music until the BGM Background Music has finished loading During a slide show press the TOOLS button to access additional functions such as Go to Photos List Stop Slide Show Slide Show Speed Slide Show Effect Background Music On Background Music Off Background Music Setting Picture Mode Soun...

Страница 194: ...ory or a USB device Select files from the list of files 2 Press the E button or Play button When the music is playing you can search using the π REW and µ FF button If the sound is abnormal when you play MP3 files adjust the Equalizer in the Sound menu An over modulated MP3 file may cause a sound problem ...

Страница 195: ... the currently playing video from the beginning c Scene Search You can use the Scene Search function during playback to view or start a movie from the scene of your choice c Title Search You can move directly to another Title c Time Search You can search the movie using l and r buttons at intervals of 1 minute c Repeat Mode You can play movie and music files repeatedly c Picture Size You can adjus...

Страница 196: ... up a subtitle option c Start Slide Show Stop Slide Show You can start or stop a slide show Alternatively use the or button on the remote c Slide Show Speed You can select the slide show speed during the slide show Alternatively use the π or µ button on the remote c Slide Show Effect You can set various slide show effects c Background Music On Background Music Off You can start or stop background ...

Страница 197: ...xt SubStation Alpha ssa Advanced SubStation Alpha ass Powerdivx psb Xsub Container AVI SubStation Alpha Container MKV Advanced SubStation Alpha Container MKV SubRip Container MKV MPEG 4 timed text Container MP4 Supported image resolutions File Extension Type Resolution jpg jpeg JPEG 15360 x 8640 png PNG 1920 x 1080 bmp BMP 1920 x 1080 mpo MPO 15360 x 8640 ...

Страница 198: ...k Jump function is not supported You may experience file stuttering while playing a video through a network connection The menu may take longer to appear if the video s bit rate exceeds 10Mbps Some USB digital camera devices may not be compatible with the player Video Decoder Audio Decoder Supports up to H 264 Level 4 1 H 264 FMO ASO RS VC1 SP MP AP L4 and AVCHD are not supported For all Video cod...

Страница 199: ...s tp trp mov flv vob svi m2ts mts divx AVI MKV ASF MP4 3GP VRO VOB PS TS DIVX 3 11 4 x 5 x 6 x 1920 x 1080 6 30 30 AC3 LPCM ADMPCM IMA MS AAC HE AAC WMA DD MPEG MP3 DTS Core G 711 ALaw μ Law MPEG4 SP ASP H 264 BP MP HP Motion JPEG Window Media Video v9 MPEG2 MPEG1 VP6 640 x 480 4 MVC 1920 x 1080 24 25 30 40 webm WebM VP8 6 30 8 Vorbis ...

Страница 200: ...er than the maximum resolution cannot be played Check the vertical and horizontal resolution of the file Check the supported video and audio Codec types and Versions Check the supported file versions Flash version up to 10 1 is supported PowerPoint version up to 97 2007 is supported Only the last USB device that was connected is recognized To launch MagicInfo Lite select MagicInfo Lite for the Pla...

Страница 201: ...avi mkv asf wmv mp4 mov 3gp vro mpg mpeg ts tp trp flv vob svi m2ts mts divx AVI MKV ASF MP4 3GP VRO VOB PS TS DIVX 3 11 4 x 5 x 6 x 1920 x 1080 6 30 30 AC3 LPCM AAC HE AAC WMA DD MPEG MP3 DTS Core G 711 ALaw μ Law MPEG4 SP ASP H 264 BP MP HP Motion JPEG Window Media Video v9 MPEG2 MPEG1 VP6 640 x 480 4 ...

Страница 202: ...x 720 60 frame max Above 1280 x 720 30 frame max GMC 2 or higher is not supported Supports only BD MVC Spec Some codecs may not be supported in portrait playback mode Audio content with a Bit rate or Frame rate larger than the rate specified in the table above can cause choppy audio during playback Video content will not play or not play correctly if there is an error in the content or the contain...

Страница 203: ...80 Audio Codec H 264 BP Caution F4V file format is not supported Screen Video is not supported Compatible document file formats Extension ppt pptx Version Office 97 Office 2007 Functions not supported Animation effect 3D shapes which will be displayed in 2D Header and footer some subitems are not supported Word Art Align A group alignment error may occur Office 2007 SmartArt is not fully supported...

Страница 204: ...dow Effects not supported Compatible document file formats Extension doc docx Version Office 97 Office 2007 Functions not supported Page background effect Some paragraph styles Word Art Align A group alignment error may occur 3D shapes which will be displayed in 2D Office 2007 SmartArt is not fully supported 97 out of 115 subitems are supported Charts Half width characters Letter spacing Vertical ...

Страница 205: ...al page 219 1 Access the server you have assigned to your device 2 Enter your ID and password to log in 3 Select Device from the top menu bar 4 Select Lite from the menus on the left 5 Select Unapproved from the sub menus of Lite 6 Select the Approve button for your device from the list of unapproved Lite devices ...

Страница 206: ...le refer to the MagicInfo Lite Server user s manual If a device is deleted from the list of devices approved by the server the device will reboot to reset its settings Setting the current time A schedule may not run if the time set on the device is different from the server s current time 1 Go to the tabs Device Time 2 Select your device 3 Select Clock Set and sync the time with the server When co...

Страница 207: ...nu screen To view whether the server is connected when a Network Schedule is running press INFO on the remote 1 Select MagicInfo Lite Player in the MagicInfo Lite menu MagicInfo Lite MagicInfo Lite Player Local Schedule Manager Content Manager Settings Mode Local Schedule Server Connected USB Connected Return Close 2 Select Network Schedule in the MagicInfo Lite Player menu MagicInfo Lite Player N...

Страница 208: ...Schedule Manager This menu is disabled if there was no schedule run previously in Local Schedule Manager Internal AutoPlay MagicInfo Lite Player Network Schedule Local Schedule Internal AutoPlay USB AutoPlay Mode Local Schedule Server Connected USB Connected Return Close To enable and use the option ensure at least one content file is saved in Internal Memory The content file must be a file other ...

Страница 209: ...he content file must be a file other than a music or text file Ensure a USB device is inserted Be sure to create a folder named MagicInfoSlide in the USB device and put content in the folder 1 Select USB AutoPlay in the MagicInfo Lite Player menu screen The content contained in the MagicInfoSlide folder on the USB device will play in alphabetical order USB AutoPlay will automatically run if USB me...

Страница 210: ...nected Return Close 2 Select Create in the Local Schedule Manager screen Local Schedule Manager Storage Internal Memory No Playing Schedule Create Edit Delete Run Info Copy Close Return 3 Select Time to set the time you want to play content am pm No Item 12 pm 00 12 am 00 Create T C Time Content am pm No Item Save Cancel Return A maximum of 24 schedules can be created If more than one schedule is ...

Страница 211: ...elect Duration Menu1 jpg 00 00 05 00 00 05 Menu2 jpg Direction Content Duration Up Down Save Cancel Return Specify the sequence and time duration to play content files Changing the playing sequence Select a content file and change the sequence using the Up or Down button Duration Set the duration to play content Duration cannot be specified for videos Duration must be at least 5 seconds Press Save...

Страница 212: ...Return Local Schedule Manager Storage Internal Memory No Playing Schedule All Schedules Modifying a Local Schedule Ensure at least one Local Schedule is registered 1 Select Local Schedule Manager in the MagicInfo Lite menu screen MagicInfo Lite MagicInfo Lite Player Local Schedule Manager Content Manager Settings Mode Local Schedule Server Connected USB Connected Return Close 2 Select the local sc...

Страница 213: ...dule is deleted content files in the schedule will also be deleted 1 Select Local Schedule Manager in the MagicInfo Lite menu screen MagicInfo Lite MagicInfo Lite Player Local Schedule Manager Content Manager Settings Mode Local Schedule Server Connected USB Connected Return Close 2 Select the local schedule you want to delete and select Delete 2012 01 01_1834 lsch Create Edit Delete Run Info Copy...

Страница 214: ...dule Manager Storage Internal Memory No Playing Schedule All Schedules Stopping a Local Schedule This option is available only when a schedule is running Selecting Stop will change the running mode from Local Schedule to Network Schedule 1 Select Local Schedule Manager in the MagicInfo Lite menu screen MagicInfo Lite MagicInfo Lite Player Local Schedule Manager Content Manager Settings Mode Local ...

Страница 215: ...chedule Server Connected USB Connected Return Close 2 Select the local schedule you want to view details and select Info 2012 01 01_1834 lsch Create Edit Delete Run Info Copy Close Return Local Schedule Manager Storage Internal Memory No Playing Schedule All Schedules 3 The details of the schedule will be displayed 2012 01 01_1834 lsch 12 00 am 12 00 pm 2 File s Menu1 jpg Menu2 jpg Information Ret...

Страница 216: ...B Internal Memory Content files in a copied schedule are saved to a subfolder under the local schedules folder in Internal Memory The subfolder is assigned the schedule name Internal Memory USB Content files in a copied schedule are saved to a subfolder under the local schedules folder on the USB memory device The subfolder is assigned the schedule name 3 Select local schedule files and press Copy...

Страница 217: ...g 5549 2MB 0 0MB 0 6227 2MB 0 2MB 2 Menu1 jpg Content Manager Internal Memory USB Localschedule Folder1 Copy Delete Close Return Select Free Space Selected File s Selected File s Free Space If content is selected from Internal Memory You can copy the content under Internal Memory to USB memory If content is selected from USB You can copy the content under USB memory to Internal Memory Selecting co...

Страница 218: ...rver Connected USB Connected Return Close 2 Select the content you want to delete Next select Delete Content under Internal Memory and USB memory can be deleted at the same time Menu1 jpg Menu2 jpg Menu3 jpg Menu4 jpg 5549 2MB 0 0MB 0 6227 2MB 0 2MB 2 Content Manager Internal Memory USB Folder1 Copy Delete Close Return Select Free Space Selected File s Selected File s Free Space Localschedule ...

Страница 219: ... server is configured to use https and data transfer is encrypted Enter the server IP address and port number Use 7001 as the port number If unable to connect to the server using port number 7001 check with your server administrator to find the correct port number and then change the port number FTP Mode Specify the FTP operating mode Active Passive Default Storage Specify the location you want to...

Страница 220: ... Wipe Ripple Wash Drop Wave Pin Wheel Random Growth 4 Spin Random None Default Content Specify the content to play by default when launching MagicInfo Lite Content of up to 20MB is supported for Default Content Content Layout Switch the orientation of playing content to Landscape or Portrait mode Landscape Portrait If Content Layout is Portrait view it does not support VP8 video codec Schedule Nam...

Страница 221: ...control Software Version Displays the software version of a device Device Name Displays the name of a device recognized by the server Device ID Displays the original identification number of a device Mode Displays the current operating mode Network Schedule Local Schedule Internal AutoPlay or USB AutoPlay of MagicInfo Lite Player Server Displays the connection status Connected Disconnected or Non ...

Страница 222: ...on on the remote control Picture Mode Dynamic Standard Natural Movie Customizes the screen settings for the content currently playing Sound Mode Standard Music Movie Clear Voice Amplify Customizes the audio settings for the content currently playing PIP Off On Activate or deactivate the PIP function Background Music Off On Activate or deactivate the Background Music function Background Music Setti...

Страница 223: ...ude FAT32 and NTFS A file with a vertical and horizontal resolution larger than the maximum resolution cannot be played Check the vertical and horizontal resolution of the file Check the supported video and audio Codec types and Versions Check the supported file versions Flash version up to 10 1 is supported PowerPoint version up to 97 2007 is supported Only the last USB device that was connected ...

Страница 224: ...60 frame max Above 1280 x 720 30 frame max GMC 2 or higher is not supported Supports only BD MVC Spec Some codecs may not be supported in dual playback mode where two video files play simultaneously and portrait playback mode Audio content with a Bit rate or Frame rate larger than the rate specified in the table above can cause choppy audio during playback Video content will not play or not play c...

Страница 225: ...7 Functions not supported Animation effect 3D shapes which will be displayed in 2D Header and footer some subitems are not supported Word Art Align A group alignment error may occur Office 2007 SmartArt is not fully supported 97 out of 115 subitems are supported Object insertion Half width characters Letter spacing Charts Vertical text some subitems are not supported Slide notes and handout Compat...

Страница 226: ...s which will be displayed in 2D Office 2007 SmartArt is not fully supported 97 out of 115 subitems are supported Charts Half width characters Letter spacing Vertical text some subitems are not supported Slide notes and handout Creation editing playback are only available in Template Manager Supported in USB AutoPlay and Network Schedule Authored in a PC authoring tool for Premium S Player Compatib...

Страница 227: ...re than one sound output cannot be used Playback priority Flash file network BGM local BGM video file in the main frame selected by the user Network BGM Settings can be configured in step 1 when creating a server schedule Local BGM BGM settings can be configured using the tools displayed after the TOOLS button is pressed during MagicInfo Premium S playback User selected main frame Main frame setti...

Страница 228: ...BGM video file in the main frame selected by the user User selected main frame Sound output can be selected in step 3 while authoring in Template Manager Others Flash performance can be slower on a PC H W performance restrictions PIP function restrictions PIP function is not available during Flash playback Not supported if the content layout is Portrait Note that PIP is supported when configured i...

Страница 229: ...age 246 1 Access the server you have assigned to your device 2 Enter your ID and password to log in 3 Select Device from the top menu bar 4 Select Premium from the menus on the left 5 Select Unapproved from the sub menus of Premium 6 Select the Approve button for your device from the list of unapproved Premium devices ...

Страница 230: ...refer to the MagicInfo Premium Server user s manual If a device is deleted from the list of devices approved by the server the device will reboot to reset its settings Setting the current time A schedule may not run if the time set on the device is different from the server s current time 1 Go to the tabs Device Time 2 Select your device 3 Select Clock Set and sync the time with the server When co...

Страница 231: ...ew whether the server is connected when a Network Schedule is running press INFO on the remote 1 Select MagicInfo Premium S Player in the MagicInfo Premium S menu MagicInfo Premium S MagicInfo Premium S Player Local Schedule Manager Template Manager Content Manager Settings Mode Local Schedule Server Connected USB Connected Return Close 2 Select Network Schedule in the MagicInfo Premium S Player m...

Страница 232: ...te Manager Click Create to create a template Select the template you want to run Run 1 Select Template Player in the MagicInfo Premium S Player menu screen Run templates created in Template Manager This menu is disabled if there was no template run previously in Template Manager Go to Local Schedule Manager Click Create to create a schedule Select the schedule you want to run Run 1 Select Local Sc...

Страница 233: ...edule Template Player Internal AutoPlay USB AutoPlay Mode Local Schedule Server Connected USB Connected Return Close To enable and use the option ensure at least one content file is saved in the MagicInfoSlide folder on the USB device The content file must be a file other than a music or text file Ensure a USB device is inserted Be sure to create a folder named MagicInfoSlide in the USB device and...

Страница 234: ...onnected USB Connected Return Close 2 Select Create in the Local Schedule Manager screen Local Schedule Manager Storage Internal Memory No Playing Schedule Create Edit Delete Run Info Copy Close Return 3 Select Time to set the time you want to play content am pm No Item 12 pm 00 12 am 00 Create T C Time Content am pm No Item Save Cancel Return A maximum of 24 schedules can be created If more than ...

Страница 235: ... 5 Select Duration Menu1 jpg 00 00 05 00 00 05 Menu2 jpg Direction Content Duration Up Down Save Cancel Return Specify the sequence and time duration to play content files Changing the playing sequence Select a content file and change the sequence using the Up or Down button Duration Set the duration to play content Duration cannot be specified for videos Duration must be at least 5 seconds Press ...

Страница 236: ...hedule Manager Storage Internal Memory No Playing Schedule All Schedules Modifying a Local Schedule Ensure at least one Local Schedule is registered 1 Select Local Schedule Manager in the MagicInfo Premium S menu screen MagicInfo Premium S MagicInfo Premium S Player Local Schedule Manager Template Player Content Manager Settings Mode Local Schedule Server Connected USB Connected Return Close 2 Sel...

Страница 237: ...s except for template files in the schedule will also be deleted 1 Select Local Schedule Manager in the MagicInfo Premium S menu screen MagicInfo Premium S MagicInfo Premium S Player Local Schedule Manager Template Player Content Manager Settings Mode Local Schedule Server Connected USB Connected Return Close 2 Select the local schedule you want to delete and select Delete 2012 01 01_1834 lsch Cre...

Страница 238: ...dule Manager Storage Internal Memory No Playing Schedule All Schedules Stopping a Local Schedule This option is available only when a schedule is running Selecting Stop will change the running mode from Local Schedule to Network Schedule 1 Select Local Schedule Manager in the MagicInfo Premium S menu screen MagicInfo Premium S MagicInfo Premium S Player Local Schedule Manager Template Player Conte...

Страница 239: ...gs Mode Local Schedule Server Connected USB Connected Return Close 2 Select the local schedule you want to view details and select Info 2012 01 01_1834 lsch Create Edit Delete Run Info Copy Close Return Local Schedule Manager Storage Internal Memory No Playing Schedule All Schedules 3 The details of the schedule will be displayed 2012 01 01_1834 lsch 12 00 am 12 00 pm 2 File s Menu1 jpg Menu2 jpg ...

Страница 240: ...ent file in a copied schedule contains a template file the content file is saved to a subfolder under the templates folder in Internal Memory The subfolder is assigned the template name Internal Memory USB Content files except for templates in a copied schedule are saved to a subfolder under the local schedules folder on the USB memory device The subfolder is assigned the schedule name If a conten...

Страница 241: ...nager Template Manager Content Manager Settings Mode Local Schedule Server Connected USB Connected Return Close 2 Select Create in the Template Manager screen Template Manager Storage Internal Memory No Playing Schedule Create Edit Copy Delete Play Preview Close Return 3 Select a template in Landscape or Portrait mode Create Select a template Landscape Portrait Next Cancel ...

Страница 242: ...a message input mode None Select this mode if you do not want to input a message From File Select a txt file User Input Input a message using the virtual keyboard A message can be up to 27 characters long Scroll Select a message scroll direction None Left to Right Right to Left Up to Bottom Bottom to Up Alignment Select a message alignment mode Left Center Right Color Select a message text color W...

Страница 243: ...tain only one PIP file If a PIP file is selected only one Videos file can be selected An Office file and a PDF file cannot be contained in the same template A template cannot contain more than one Flash file 5 Select Sound Background music Create Select Sound Background music Background Music Preview Previous Next Cancel If two Videos files are assigned select the file with the sound you want to u...

Страница 244: ...te Manager 20130101_2222 stmp Template Manager Storage Internal Memory No Playing Schedule All Schedules Create Edit Delete Run Copy Close Return Preview Content Manager Copying content 1 Select Content Manager in the MagicInfo Premium S menu screen MagicInfo Premium S MagicInfo Premium S Player Local Schedule Manager Template Manager Content Manager Settings Mode Local Schedule Server Connected U...

Страница 245: ...ers appears above Internal Memory USB memory If a distributed folder is copied to USB memory that already contains a distributed folder content and schedule folders in the existing distributed folder will be deleted first before the new folder is copied 3 Next select Copy Deleting content 1 Select Content Manager in the MagicInfo Premium S menu screen MagicInfo Premium S MagicInfo Premium S Player...

Страница 246: ...is configured to use https and data transfer is encrypted Enter the server IP address and port number Use 7001 as the port number If unable to connect to the server using port number 7001 check with your server administrator to find the correct port number and then change the port number FTP Mode Specify the FTP operating mode Active Passive Default Storage Specify the location you want to save co...

Страница 247: ...ted from MagicInfo Author Schedule to the USB memory device Manual Auto Image Effect Configures the image transition effects Fade1 Fade2 Blind Spiral Checker Linear Stairs Wipe Random None Default Content Specify the content to play by default when launching MagicInfo Premium S Content of up to 20MB is supported for Default Content Content Layout Switch the orientation of playing content to Landsc...

Страница 248: ...ftware Version Displays the software version of a device Device Name Displays the name of a device recognized by the server Device ID Displays the original identification number of a device Mode Displays the current operating mode Network Schedule Local Schedule Template Player Internal AutoPlay or USB AutoPlay of MagicInfo Premium S Player Server Displays the connection status Connected Disconnec...

Страница 249: ...on on the remote control Picture Mode Dynamic Standard Natural Movie Customizes the screen settings for the content currently playing Sound Mode Standard Music Movie Clear Voice Amplify Customizes the audio settings for the content currently playing PIP Off On Activate or deactivate the PIP function Background Music Off On Activate or deactivate the Background Music function Background Music Setti...

Страница 250: ...le with MagicInfoVideowall S Player Read before using MagicInfo Videowall S Player MagicInfo Videowall S can only configure and control content files via VideoWall Console Refer to the VideoWall Console user manual for further details To display the menu selection window press RETURN on the remote control See page 201 for further details on supported codecs To launch MagicInfo Videowall S select M...

Страница 251: ...digital camera devices may not be compatible with the player Supports up to H 264 Level 4 1 H 264 FMO ASO RS VC1 SP MP AP L4 and AVCHD are not supported For all Video codecs except MVC VP8 VP6 Below 1280 x 720 60 frame max Above 1280 x 720 30 frame max GMC 2 or higher is not supported Supports only BD MVC Spec Some codecs may not be supported in dual playback mode where two video files play simult...

Страница 252: ...ne video Videos file can be played per client Different content files can be played on the displays of a video wall Two video Videos files cannot be played on a single display of a video wall Available Available Not available ...

Страница 253: ... Internal Memory Save the content to the internal memory of the product External Save the content to USB memory Default Content Configure the settings for the content that will play by default Content Layout Switch the orientation of playing content to Landscape or Portrait mode Landscape Portrait If Content Layout is Portrait view it does not support VP8 video codec Port View the port number of t...

Страница 254: ...ed The displayed image may differ depending on the model Press the INFO button on the remote control Software Version Displays the software version of a device Device Name Displays the name of a device recognized by the server Device ID Displays the original identification number of a device USB Displays the connection status of a USB device ...

Страница 255: ...f the screen remains blank while the power LED blinks even when the product is correctly connected to a PC perform product testing 1 Power off both the PC and product 2 Disconnect all the cables from the product 3 Power on the product 4 If No Signal is displayed the product is operating normally Checking the Resolution and Frequency Not Optimum Mode will briefly be displayed if a mode that exceeds...

Страница 256: ...ontact the graphics card or computer manufacturer for further details about how to adjust the screen settings PC is shown in Source when a PC is not connected PC is always shown in Source irrespective of whether or not a PC is connected Screen issue The power LED is off The screen will not switch on Make sure that the power cord is connected No Signal is displayed on the screen refer to Connecting...

Страница 257: ...is inconsistent Go to Picture and adjust the Color Space settings White does not really look white Go to Picture and adjust the White Balance settings There is no image on the screen and the power LED blinks every 0 5 to 1 second The product is in power saving mode Press any key on the keyboard or move the mouse to return to the previous screen The product will turn off automatically Go to System ...

Страница 258: ...the default settings Refer to page 111 for details about the Reset Picture menu Broken lines are displayed on the edges of the screen If Picture Size is set to Screen Fit change the setting to 16 9 Lines red green or blue are displayed on the screen These lines are displayed when there is a defect in DATA SOURCE DRIVER IC on the monitor Contact a Samsung Service Center to resolve the issue The dis...

Страница 259: ...he audio cable is properly connected to the audio input port on the product Check the audio output settings for the source device For example if an HDMI cable is connected to the monitor the audio setting for the cable box may need to be changed to HDMI If a DVI HDMI cable is used a separate audio cable is required If the product has a headphone port make sure nothing is connected to it Reconnect ...

Страница 260: ...s on the product Audio settings on a source device do not affect the internal speaker settings on the product There is an echo sound coming from the speakers Different decoding speeds between the product speakers and external speakers can cause an echo In this case set Speaker Select to External Remote control issue The remote control does not work Make sure that the batteries are correctly in pla...

Страница 261: ...egular intervals The product may be affected by the surrounding radio signals Do not place objects that can cause electric interference between the product and the PC laptop computer If the product is too close to the laptop computer the WiDi performance may be deteriorated It is recommended maintaining the recommended distance between them A microwave oven and vacuum cleaner can cause electric in...

Страница 262: ...e to Extended Desktop mode 2 Change the screen resolution to 1920 x 1080 for the extended desktop mode 3 Move the video player to the extended desktop screen 4 Maximize the video player screen before playing the 1080p video source InWiDi mode the mouse pointer seems to move slowly Since WiDi will have a 0 3 second delay in processing the signal you may encounter a slower reaction of the keyboard a...

Страница 263: ...D 1920 X 1080 video displays blurry characters WiDi by its nature displays the video in a downsized resolution To improve the sharpness contact the manufacturer of your laptop computer for the latest software driver Other issue Caption is grayed out and not selectable If the selected input source is not TV Caption cannot be selected from the System menu Caption can be enabled from a source device ...

Страница 264: ...I HDMI cable is connected DVI cables do not transmit sound data Make sure to connect the audio cable to the correct input jack to enable audio HDMI Black Level is not functioning properly on an HDMI device withYCbCr output This function is available only when a source device such as a DVD player and STB is connected to the product via an HDMI RGB signal cable There is no sound in HDMI mode Display...

Страница 265: ...s pressed on the remote control the IR sensor may be defective Contact your nearest service center to have the product serviced If there is no change on the screen when a button is pressed on the remote control although the sensor light flashes red the mainboard may be defective Contact your nearest service center to have the product serviced In power saving mode when the input source is DisplayPo...

Страница 266: ...cy in Monitor Settings Windows 8 Go to Settings Control Panel Appearance and Personalization Display Adjust resolution Advanced Settings Monitor and adjust the frequency in Monitor Settings How can I change the resolution Windows XP Go to Control Panel Appearance and Themes Display Settings and adjust the resolution Windows ME 2000 Go to Control Panel Display Settings and adjust the resolution Win...

Страница 267: ...tings or BIOS SETUP on the PC Windows Vista Set power saving mode in Control Panel Appearance and Personalization Personalize Screen Saver Settings or BIOS SETUP on the PC Windows 7 Set power saving mode in Control Panel Appearance and Personalization Personalize Screen Saver Settings or BIOS SETUP on the PC Windows 8 Set power saving mode in Settings Control Panel Appearance and Personalization P...

Страница 268: ...play area 2096 64 mm H x 1179 36 mm V 82 54 inches H x 46 43 inches V Dimensions W x H x D 2127 2 x 1210 0 x 45 8 mm 83 74 x 47 63 x 1 8 inches Weight without stand 60 8 kg 134 0 Ibs Wall Mounting Hole 900 mm 600 mm 35 43 inches 23 62 inches Display Color 1 07 B 10Bits Dithering Synchronization Horizontal Frequency 30 81 kHz Vertical Frequency 56 75 Hz ...

Страница 269: ...he product as the standard voltage can vary in different countries USB 2 DOWN Signal connectors Input Optional Tuner ATV DTV An America Product Only Composite Component common PC D Sub DVI HDMI 3ea Audio In RJ45 RS232C In USB 2ea Media Player DP In Output Audio Out RS232C Out DP Out Environmental considerations Operating Temperature 32 F 104 F 0 C 40 C Humidity 10 80 non condensing Storage Tempera...

Страница 270: ...an customize the installation settings if desired Due to the nature of the manufacturing of this product approximately 1 pixel per million 1ppm may appear brighter or darker on the panel This does not affect product performance This device is a Class A digital apparatus USA only Dispose unwanted electronics through an approved recycler To find the nearest recycling location go to our website www s...

Страница 271: ...th a power saving function PowerSaver Normal Operation Power saving mode Power off Power off Power Button off Typical Rating Rating with PIM Max Power Indicator On Blinking Amber OFF Power Consumption 290 W 400 W 450 W 495 W under 0 5 W under 0 5 W 0 W The displayed power consumption level can vary in different operating conditions or when settings are changed SOG Sync On Green is not supported To...

Страница 272: ...ble by referring to the graphics card user manual Resolution Horizontal Frequency kHz Vertical Frequency Hz Pixel Clock MHz Sync Polarity H V IBM 720 x 400 31 469 70 087 28 322 MAC 640 x 480 35 000 66 667 30 240 MAC 832 x 624 49 726 74 551 57 284 MAC 1152 x 870 68 681 75 062 100 000 VESA 640 x 480 31 469 59 940 25 175 VESA 640 x 480 37 861 72 809 31 500 VESA 640 x 480 37 500 75 000 31 500 VESA 800...

Страница 273: ... 1152 x 864 67 500 75 000 108 000 VESA 1280 x 720 45 000 60 000 74 250 VESA 1280 x 800 49 702 59 810 83 500 VESA 1280 x 1024 63 981 60 020 108 000 VESA 1280 x 1024 79 976 75 025 135 000 VESA 1366 x 768 47 712 59 790 85 500 VESA 1440 x 900 55 935 59 887 106 500 VESA 1600 x 900 60 000 60 000 108 000 VESA 1680 x 1050 65 290 59 954 146 250 VESA 1920 x 1080 67 500 60 000 148 500 ...

Страница 274: ...ng com ca English http www samsung com ca_fr French LATIN AMERICA ARGENTINE 0800 333 3733 http www samsung com ar BOLIVIA 800 10 7260 http www samsung com BRAZIL 0800 124 421 Demais cidades e regiões 4004 0000 Capitais e grandes centros http www samsung com br CHILE 800 SAMSUNG 726 7864 http www samsung com cl COLOMBIA 01 8000 112 112 Bogotá 600 12 72 http www samsung com co COSTA RICA 0 800 507 7...

Страница 275: ...sung com latin Spanish http www samsung com latin_en English JAMAICA 1 800 234 7267 http www samsung com NICARAGUA 001 800 5077267 http www samsung com latin Spanish http www samsung com latin_en English MEXICO 01 800 SAMSUNG 726 7864 http www samsung com PANAMA 800 7267 http www samsung com latin Spanish http www samsung com latin_en English PARAGUAY 009 800 542 0001 http www samsung com py PERU ...

Страница 276: ...omer requests software installation and setup for the product If a service technician removes cleans dusts or foreign materials inside of the product If customer requests an installation additionally after purchasing a product through home shopping or online A Product damage caused by customer s fault Product damage caused by customer s mishandling or wrong repair If a product damage is caused by ...

Страница 277: ...r of sub pixels by panel type 6 220 800 Run Auto Adjustment to improve the picture quality If noise is still found even after auto adjustment adjust Coarse or Fine Leaving the screen fixed on a stationary image for an extended period of time may cause afterimage burn in or defective pixels Activate power saving mode or a dynamic screen saver if you will not be using the product for an extended per...

Страница 278: ...ge burn in should not occur when an LCD panel is operating in proper conditions BlackMatrix Source Drain DataBus Line TFT Gate PixelElectrode ITO Storage Capaccitor Cs Color Filter Common Electrode ITO Preventing afterimage burn in The best way to protect the product from afterimage burn in is switching the power off or setting the PC or system to run a screen saver when not in use Also Warranty s...

Страница 279: ...erval Change text color and background color every 30 minutes FLIGHT TIME OZ348 20 30 FLIGHT TIME OZ348 20 30 FLIGHT TIME OZ348 20 30 FLIGHT TIME OZ348 20 30 Move and change text every 30 minutes as shown below FLIGHT TIME OZ348 FLIGHT TIME OZ348 20 30 Step 1 Step 2 Step 3 20 30 Regularly display a moving image along with a logo Interval Display a moving image along with a logo for 60 seconds afte...

Страница 280: ...X CertifiedⓇ and associated logos are trademarks of DivX Inc and are used under license ABOUT DIVX VIDEO DivXⓇ is a digital video format created by DivX Inc This is an official DivX CertifiedⓇ device that plays DivX video Visit www divx com for more information and software tools to convert your files into DivX video ABOUT DIVX VIDEO ON DEMAND This DivX CertifiedⓇ device must be registered in orde...

Страница 281: ...ed 60 times in one second Horizontal Frequency____ The time required to scan a single line from the left to the right side of the screen is called a horizontal cycle The reciprocal number of a horizontal cycle is called horizontal frequency Horizontal frequency is measured in kHz Source____ Input source refers to a video source device connected to the product such as a camcorder or video or DVD pl...

Отзывы: