background image

P.SCAN 

(Progressive Scan) 

Function

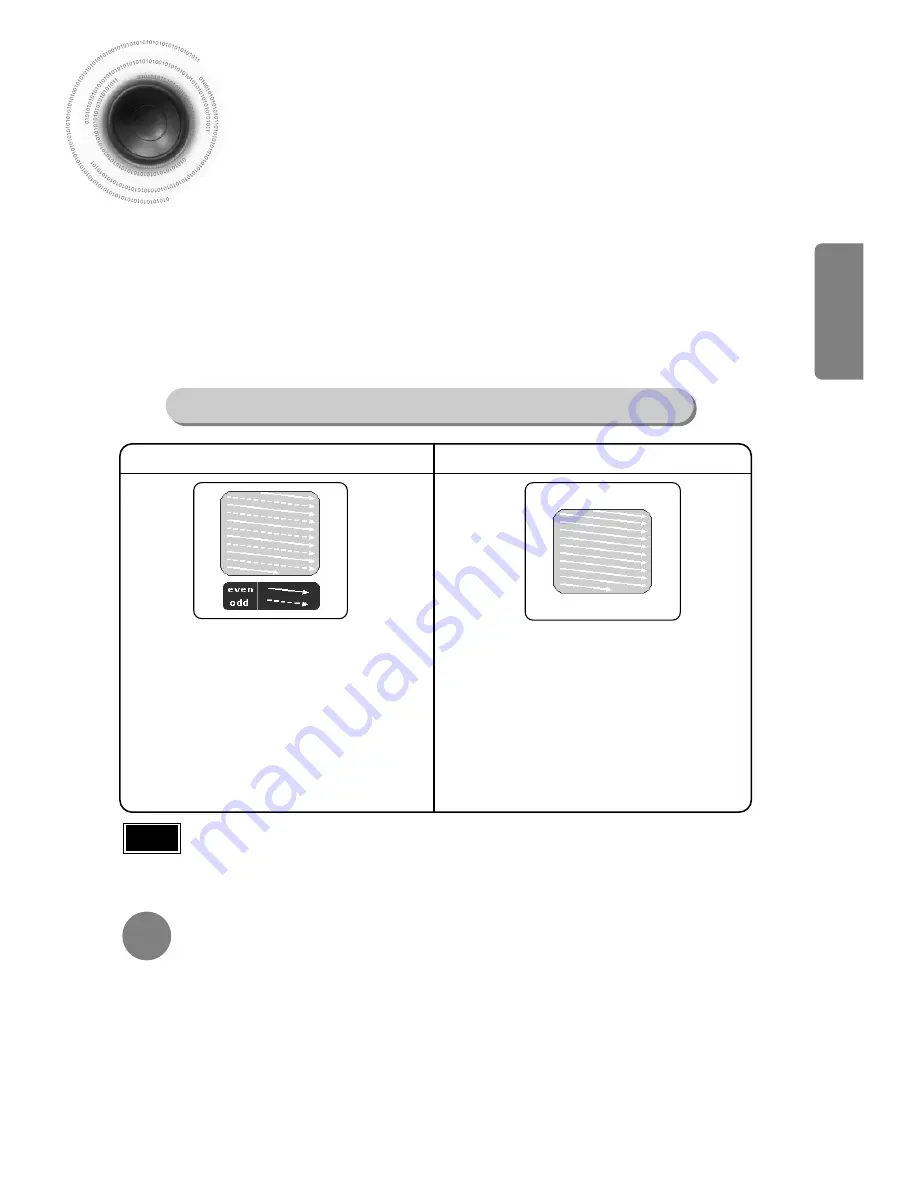
Unlike regular Interlace Scan, in which two fields of picture information alternate to create the
entire picture (odd scan lines, then even scan lines), Progressive Scan uses one field of
information (all lines displayed in one pass) to create a clear and detailed picture without visible
scan lines. 

Press and hold P.SCAN button on the remote controller for over 5 seconds in stop
mode.

Pressing and holding the button for over 5 seconds will select "

Progressive Scan

" and "

Interlace Scan

"

repetitively.

In interlaced-scan video, a frame consists of two
interlaced fields (odd and even), where each field
contains every other horizontal line in the frame. 
The odd field of alternating lines is displayed first, and
then the even field is displayed to fill in the alternating
gaps left by the odd field to form a single frame. 
One frame, displayed every 1/25th of a second, contains
two interfaced fields, thus a total of 50 fields are
displayed every 1/50th of a second.
The interlaced scanning method is intended for capturing
a still object. 

Interlaced Scan (1 FRAME = 2 FIELDS)

The progressive scanning method scans one full frame of
video consecutively down the screen, line by line.
An entire image is drawn at one time, as opposed to the
interlaced scanning process by which a video image is
drawn in a series of passes.
The progressive scanning method is desirable for dealing
with moving objects.   

Progressive Scan (FULL FRAME)

What is Progressive (or Non-Interlaced) Scanning?

This function works only on TVs equipped with component video inputs (Y, Pr, Pb) that support
Progressive Video. (It does not work on TVs with conventional component inputs, i.e., non-progressive
scan TVs.)

Depending on the brand and model of your TV, this function may not work.

Note

By default, the video format is set to "

PAL

".

Each time the button is pressed, the video format switches between "

NTSC

" and "

PAL

".

Each country has a different video format standard. 

For normal playback, the video format of the disc must be the same as the video format of your TV. 

Turn off the power and then press 

REC/PAUSE 

on the Main Unit.

Selecting the Video Format

CONNECTIONS

12

Содержание MAX-KT65

Страница 1: ...AH68 0187C Rev 0 0 THIS APPLIANCE IS MANUFACTURED BY ...

Страница 2: ...GITAL VIDEO Instruction Manual FAVORITE SONG SEARCH SONG INFO MU TE RE TU RN MENU VOLME SOUND MODE TUNER MEMORY P SCAN TUNING OPEN CLOSE CANCEL DVD OK DVD TAPE TUNER RESERVE TUNER TAPE AUX SLEEP BAND TAPE 1 2 DISC SKIP ZOOM SLOW SUBTITLE STEP TEMPO KEY CONTROL FEMALE MALE MELODY AUDIO EZ VIEW SLIDE MODE REPEAT LOGO REMAIN ...

Страница 3: ...UCE THE RISK OF ELECTRIC SHOCK DO NOT REMOVE REAR COVER NO USER SERVICEABLE PARTS INSIDE REFER SERVICING TO QUALIFIED SERVICE PERSONNEL CLASS 1 LASER PRODUCT This Compact Disc player is classified as a CLASS 1 LASER product CAUTION This marking shown on the product or its literature indicates that it should not be disposed with other household wastes at the end of its working life To prevent possi...

Страница 4: ... a long period of time PREPARATION Protect the player from moisture i e vases and excess heat e g fireplace or equipment creating strong magnetic or electric fields i e speakers Disconnect the power cable from the AC supply if the player malfunctions Your player is not intended for industrial use Use of this product is for personal use only Condensation may occur if your player or disc have been s...

Страница 5: ... Power Saving Function The MAX KT65 automatically shuts itself off after 20 minutes in the stop mode Customized TV Screen Display The MAX KT65 allows you to select your favorite image during JPEG DVD playback and set it as your background wallpaper DVD Digital Versatile Disc offers fantastic audio and video thanks to Dolby Digital surround sound and MPEG 2 video compression technology Now you can ...

Страница 6: ...Dynamic Range Compression 39 AV SYNC Setup 40 Playing DVD OK Discs 41 Connecting Microphone 42 Reserving Accompaniment Music 43 Priority Playing Accompaniment Music 44 Favorite Song Function 45 Search Song Function 47 Key Control Tempo Control 52 Male Female Key Control 53 Setting the Chorus 54 Setting the Fanfare 55 Setting the Average Score 56 Setting the Shadow 57 RADIO OPERATION Listening to R...

Страница 7: ...ONS 21 CASSETTE DECK 2 22 SLEEP 23 TIME ON OFF 24 TIMER CLOCK 25 MULTI JOG 26 ENTER 27 VOLUME 28 POWER SOUND SURROUND 29 CD Open Close 30 DISC CHANGE 31 DISC SELECTION BUTTONS 32 WINDOW DISPLAY 33 REC PAUSE 34 TAPE 1 2 1 FM MODE STEREO 2 POWER SURROUND 3 Volume 4 TITLE 5 POWER SOUND 6 SUPER BASS 7 TAPE 1 2 8 TAPE RUNNING DIRECTOR 9 TAPE REVERSE MODE 10 PLAYING DISC NUMBER 11 MAIN DISPLAY FUNCTION ...

Страница 8: ...io Cable AM Antenna FM Antenna 6 Accessories PREPARATION 1 AM Antenna Connectors 2 FM Antenna Connector 3 Video Output Connector Connect the TV s video input jacks VIDEO IN to the VIDEO OUT connector 4 Component Video Output Connectors Connect a TV with component vide input jacks to these jacks 5 S Video Output Connector If the TV is equipped with an S Video input connector S VIDEO IN connect it t...

Страница 9: ...tton KEY CONTROL button TEMPO button TUNER BAND button SLEEP button TAPE 1 2 button Number 0 9 buttons RESERVE button AUX button INFO button MUTE button Direction Enter button TUNER MEMORY P SCAN button TUNING button FAVORITE SONG button STEP button SLOW button EZ VIEW button REMAIN button ZOOM button SUBTITLE button LOGO COPY button Play Pause button Tuning Preset CD Skip button Stop button OPEN ...

Страница 10: ...ressing down and sliding the cover in the direction of the arrow 1 Insert two 1 5V AAA batteries paying attention to the correct polarities and 2 Replace the battery cover 3 Follow these precautions to avoid leaking or cracking cells Place batteries in the remote control so they match the polarity to and to Use the correct type of batteries Batteries that look similar may differ in voltage Always ...

Страница 11: ...falling of the speaker Do not take the speaker near from TV or computer monitor The speaker near the TV or computer monitor may influence the quality of the screen display Directions in Installing Speaker Speakers Place these speakers in front of your listening position facing inwards about 45 toward you Place the speakers so that their tweeters will be at the same height as your ear Align the fro...

Страница 12: ...ntrol of TV to set the TV to S VIDEO 2 Method 2 Using S Video Out Better Quality Composite Video A single video signal that is a composite of the black and white information Y and the color information C S Video A video transmission standard that provides a sharper brighter picture than ordinary composite video by separating brightness and color signals Note Please be sure to turn off the power an...

Страница 13: ...onnect a component video cable not supplied from the Pr Pb and Y jacks on the back panel of the system to the corresponding jacks on your television COMPONENT IN Connecting to a TV Con t Please be sure to turn off the power and unplug the power cord before moving or installing this unit Please choose one of two video connection methods not supplied ...

Страница 14: ... 1 50th of a second The interlaced scanning method is intended for capturing a still object Interlaced Scan 1 FRAME 2 FIELDS The progressive scanning method scans one full frame of video consecutively down the screen line by line An entire image is drawn at one time as opposed to the interlaced scanning process by which a video image is drawn in a series of passes The progressive scanning method i...

Страница 15: ...connector colors 1 Example Analog signal components such as a VCR Camcorder and TV Connecting an External Analog Component Connecting External Components Audio Cable If the external analog component has only one Audio Out connect either left or right Press AUX to select AUX AUX appears in the display 2 ...

Страница 16: ...unit could rise and may damage it Do not obstruct the cooling fan or ventilation holes If the cooling fan or ventilation holes are covered with a newspaper or cloth heat may build up inside the unit and fire may result Cooling Fan FM antenna connection AM antenna connection 1 Connect the FM antenna supplied to the FM 75Ω COAXIAL terminal as a temporary measure 2 Slowly move the antenna wire around...

Страница 17: ...play The current time is now set 5 When the correct time is displayed press ENTER Increase the minutes Decrease the minutes 4 When the correct hour is displayed press ENTER The minutes flash Increase the hours Decrease the hours 3 Press ENTER The hour flashes You can display the time even when you are using another function by pressing TIMER CLOCK once You can also use Multi Jog or button on the R...

Страница 18: ...n will be stored in memory If PLAY PAUSE button or ENTER button is pressed playback resumes from the stop position This function works only with DVDs If pressed twice STOP is displayed and if PLAY PAUSE button is pressed playback starts from the beginning To stop playback press STOP during playback DivX The CD DVD or DVD OK function is automatically selected when Disc Skip is pushed To select a sp...

Страница 19: ... you press button if there are over 2 files in the disk Press and hold button Each time the button is held down during playback the playback speed changes as follows DivX files can be played in Zoom X2 mode only Note Zoom Function 2 Press Cursor buttons to move to the area you want to enlarge 1 Press ZOOM button Each time you press the button your selection will toggle between ZOOM X2 and ZOOM OFF...

Страница 20: ...d on CD in the ISO 9660 format MPEGs containing DivX can be divided into Video and Audio Video compatibility All versions of DivX later than 3 11 including the latest 5 1 are supported In addition XviD is supported For WMV V1 V2 V3 and V7 formats are possible Audio compatibility MP3s encoded at bitrates from 80kbps to 320kbps AC3s from 128kbps to 448kbps and WMAs from 56kbps to 160kbps are support...

Страница 21: ...ently being played Screen Display CD display VCD display DVD display CHAPTER display TITLE display MP3 CD display REPEAT PLAYBACK display ELAPSED TIME display TRACK FILE display STEREO L R display SUBTITLE display AUDIO LANGUAGE display ANGLE display DOLBYDIGITALdisplay Depending on the disc the disc information display may appear different Note DivX DivX display Checking the Remaining Time CHAPTE...

Страница 22: ...W button Each time the button is pressed during playback the playback speed changes as follows Slow Playback DVD VCD DivX 20 Reverse slow playback does not work with VCDs and DivX Note During fast playback of a CD or MP3 CD sound is heard only at 2x speed and not at 4x 8x and 32x speeds No sound is heard during slow playback and step motion playback OPERATION ...

Страница 23: ...ss STEP button When watching a VCD with a track longer than 15 minutes each time is pressed playback will skip back or forward 5 minutes TITLE 01 05 CHAPTER 002 040 TITLE 01 05 CHAPTER 004 040 Something like you Back for good Love of my life More than words I need you My love Uptown girl DVDRECEIVER SMARTNAVI Something like you Back for good Love of my life More than words I need you My love Uptow...

Страница 24: ...button to move to ANGLE display 1Press INFO button 1 3 Each time the button is pressed the angle changes as follows 3 Press Cursor buttons or numeric buttons to select the desired angle 2 3 3 3 1 3 1 3 The Angle function works only with discs on which multiple angles have been recorded Note 22 OPERATION ...

Страница 25: ...r TITLE Repeatedly plays the selected title RANDOM Plays tracks in random order A track that has already been played may be played again TRACK Repeatedly plays the selected track DIR Repeatedly plays all tracks in the selected folder DISC Repeatedly plays the entire disc OFF Cancels Repeat Playback To Select a Repeat Playback Mode in the Disc Information Screen Press INFO button twice 1 Press Curs...

Страница 26: ... as follows 3 Press ENTER button Press EZ VIEW button Each time the button is pressed the zoom function will switch between On and Off When a movie is played in Wide screen format black bars at the top and bottom of the TV screen can be removed by pressing the EZ VIEW button This function will not work if the DVD is recorded with multi camera angle format Black bars may not disappear because some ...

Страница 27: ...ss INFO button twice SP 2 3 FR 3 3 You can use the SUBTITLE button on the remote control to select a subtitle language Depending on the disc the Subtitle and Audio Language functions may not work Audio Language Selection Function DVD Subtitle Language Selection Function DVD Note 2 Press Cursor button to move to SUBTITLE display 1Press INFO button twice 3 Press Cursor button or numeric buttons to s...

Страница 28: ...red chapter and then press ENTER button 01 05 025 040 0 00 01 1 1 Moving to a Chapter 6 Press the numeric buttons to select the desired time and then press ENTER button 01 05 028 040 1 30 00 1 1 Moving to a Specific Time 3 Press Cursor buttons to move to Chapter display Moving to a Chapter 01 05 025 040 1 17 30 1 1 5 Press Cursor buttons to move to time display Moving to a Specific Time Press the ...

Страница 29: ...p to the next slide 1 Playback starts automatically Each image is shown for 5 seconds before another image is displayed Press the OPEN CLOSE button 2 Playback starts automatically Each time the button is pressed the image makes the transition as follows Press SLIDE MODE button 3 From top to bottom From bottom to top Rectangular shape in the center Vertical curtain shape Each time a new image is di...

Страница 30: ... A B Repeat Playback A B Repeat Playback does not work on MP3 and JPEG discs To select A B Repeat Playback from the information display screen or press REP A B button 2 Press REP A B at the end of the section 1 Press REP A B at the beginning of the section you want to repeat To cancel AB Repeat Playback press REP A B to select REPEAT PLAYBACK OFF DVD VCD CD Note REPEAT A REPEAT OFF REPEAT A B ...

Страница 31: ... Press Cursor buttons to move to DISC MENU and then press ENTER button 4 Press ENTER button 3 Press Cursor buttons to select the desired item PBC Playback Control Function When playing a VCD version 2 0 you can select and view various scenes according to the menu screen PBC ON This VCD disc is version 2 0 The disc is played back according to the menu screen Some functions may be disabled When some...

Страница 32: ... title of each movie Depending on the disc this function may either not work at all or may work differently 2 Press Cursor button to move to Title Menu DVD 1 Press MENU button 3 Press ENTER button The title menu appears Press MENU button to exit the setup screen 30 OPERATION ...

Страница 33: ...e was set to English OSD will be displayed in English 3 Selecting the Subtitle Language recorded on the disc Selecting the Disc Menu Language recorded on the disc Press ENTER button 5 Press Cursor button to select the desired item and then press ENTER button Press Cursor button to select the desired language and then press ENTER button Press RETURN button to return to the previous level Press MENU...

Страница 34: ...6 Bengali Bangla 1245 Inupiak 1376 Dutch 1527 Tajik 1067 Tibetan 1248 Indonesian 1379 Norwegian 1528 Thai 1070 Breton 1253 Icelandic 1393 Occitan 1529 Tigrinya 1079 Catalan 1254 Italian 1403 Afan Oromo 1531 Turkmen 1093 Corsican 1257 Hebrew 1408 Oriya 1532 Tagalog 1097 Czech 1261 Japanese 1417 Punjabi 1534 Setswana 1103 Welsh 1269 Yiddish 1428 Polish 1535 Tonga 1105 Danish 1283 Javanese 1435 Pasht...

Страница 35: ...utton Once the setup is complete you will be taken to the previous screen Press Cursor button to move to TV DISPLAY and then press ENTER button Press Cursor button to select the desired item and then press ENTER button Press RETURN button to return to the previous level Press MENU button to exit the setup screen ...

Страница 36: ...our wide screen TV You can enjoy the wide screen aspect Select this to play a 16 9 picture in the letter box mode on a conventional TV Black bars will appear at the top and bottom of the screen Select this to play a 16 9 picture in the pan scan mode on a conventional TV You can see the central portion of the screen only with the sides of the 16 9 picture cut off 4 3LB 4 3 Letter box WIDE 4 3PS 4 3...

Страница 37: ...ess Cursor button to move to Setup and then press ENTER button 4 The password is set to 7890 by default Once the setup is complete you will be taken to the previous screen If you have selected Level 6 you cannot view DVDs with Level 7 or higher The higher the level the closer the content is to violent or adult material 3 5 Press Cursor button to move to PARENTAL and then press ENTER button Press C...

Страница 38: ...nter the old password a new password and confirm new password The setting is complete 3 5 Press Cursor button to move to PASSWORD and then press ENTER button Press ENTER button Enter the password and then press ENTER button Setting the Password You can set the password for the Parental rating level setting SETUP Press CANCEL button to cancel the error numeric when you inputting password ...

Страница 39: ... button PAUSE COPY LOGO DATA Setting the Wallpaper Select this to set the Samsung Logo image as your wallpaper Select this to set the desired image as your wallpaper 37 COPY LOGO DATA will be displayed on the TV screen The selected wallpaper will be displayed You can repeat Steps 1 and 2 to set up to 3 wallpapers The power will turn off and turn on automatically and back on the display mode Note V...

Страница 40: ...tton Press Cursor button to move to LOGO and then press ENTER button To Change the Wallpaper 5 4 Press MENU button to exit the setup screen Press to select the desired USER and then press ENTER Press RETURN button to return to the previous level Press MENU button to exit the setup screen 38 ...

Страница 41: ...ress MENU button Press Cursor button to move to Audio and then press ENTER button 3 4 If DRC is selected press ENTER Press Cursor to adjust the DRC Press RETURN button to return to the previous level Press MENU button to exit the setup screen The Cursor button is pressed the greater the effect and the Cursor button is pressed the smaller the effect ...

Страница 42: ...ress ENTER button Press Cursor buttons to move to AV SYNC and then press ENTER button Press the MENU button 4 You can set the audio delay time between 0 ms and 300 ms Set it for the best sync up with audio Press Cursor buttons to select the Delay Time of AV SYNC and then press the ENTER button Video may lag behind the audio if the unit is connected to a digital TV If this occurs adjust the audio d...

Страница 43: ... 1 Use the NUMERIC 0 9 buttons to select the song you want to play back Press the PLAY PAUSE button or the ENTER button The numeric and title of the song will be displayed and the accompaniment starts 41 Press the STOP button To Clear Incorrectly Entered Song Numeric Press the STOP button To Stop During Accompaniment When playing DVD OK Discs only DVD Ok verison 6 disk is available Note ...

Страница 44: ... the volume of the micro phone Connect the microphone to the MIC jack on the front panel 3 Press the ECHO button Note To record your voice with microphone press the REC PAUSE button If you hear strange noises squealing or howling while using the Karaoke feature move the microphone away from the speakers Turning down the microphone volume or the speaker volume is also effective SETUP ...

Страница 45: ... 2 1 Press the NUMERIC 0 9 buttons to select the song you want to reserve Press the RESERVE button The song is reserved 43 To Cancel the Reservation 2 1 Enter the numeric of the song you have reserved Press the CANCEL button Note RESERVE function will not operate if REPEAT function is set while DVD OK is played ...

Страница 46: ...PLAY PAUSE button 44 Priority Playing Accompaniment Music SETUP Each time the button is pressed the selection changes as follows REPEAT OFF REPEAT ONE REPEAT ALL RANDOM Press the REPEAT button DVD OK Repeat Play Note REPEAT function will not operate if RESERVE function is set while DVD OK is played ...

Страница 47: ... the stop mode press the FAVORITE SONG button Press button to select the location to save among FAVORITE1 2 3 Press the number 0 9 button to enter the song you want Press the RESERVE button to save it Deleting FAVORITE SONG Saving FAVORITE SONG 45 1 During the stop mode press the FAVORITE SONG button 2 Press button to select the song to delete 3 Press the CANCEL button ...

Страница 48: ...ONG button Press button to select the location of song among FAVORITE 1 2 3 Press button to select the song you want Press the ENTER button to play back selected song Singing FAVORITE SONG To Exit FAVORITE SONG Screen Press STOP button or FAVORITE SONG button ...

Страница 49: ...n without viewing the song list book 47 RUSSIA ENGLISH UKRAINE DUET SONG GENRE HITS SONGS Items Detailed Items Alphabet NAME SINGER NAME SINGER NAME SINGER ROCK CHANSON FOLK BARD ROMANCES MODERN 30 60S 70S 80S CHILDREN ARMY A A Z A Structure of Song Search R R ...

Страница 50: ...move to the detailed items and then press button to select the NAME or SINGER 4 5 Press button to move to the song list on the bottom and then press button to select the song you want Press the ENTER button to play back selected song To Exit Search Song Screen Press STOP button or SEARCH SONG button SETUP 48 Search by Language Press button if you want to move to the previous stage 3 Press button i...

Страница 51: ...ONG button and then press button to select the DUET SONG Press button to move to the song list on the bottom Press button to select the song you want Press the ENTER button to play back selected song Searching DUET SONG 49 Press button if you want to move to the previous stage To Exit Search Song Screen Press STOP button or SEARCH SONG button ...

Страница 52: ...st on the bottom and then press button to select the song you want Press the ENTER button to play back selected song Searching by Genre To Exit Search Song Screen Press STOP button or SEARCH SONG button Press button if you want to move to the previous stage At this time press button to move to the song list on the bottom You can select the genre among ROCK CHANSON FOLK BARD ROMANCES Press button i...

Страница 53: ...ng Press button to move to the song list on the bottom and then press button to select the song you want Press the ENTER button to play back selected song Searching by HITS SONGS Press button if you want to move to the previous stage To Exit Search Song Screen Press STOP button or SEARCH SONG button At this time press button to move to the song list on the bottom You can select the song among MODE...

Страница 54: ...s decreased During the playback press the KEY CONTROL buttons Key Control Each time button is pressed the tempo gets faster and each time button is pressed the tempo gets slower During the playback press the TEMPO buttons Tempo Control You can easily do song search on screen without viewing the song list book 52 SETUP ...

Страница 55: ...ime the button is pressed this selection alternates between Male and Female Select Male when singing in male voice and select Female when singing in female voice During the playback press the FEMALE MALE button Male Female Key Control ...

Страница 56: ...Each time the button is pressed the selection changes as follows ON OFF 4 Press Cursor button to move to Chorus Press ENTER button to select the desired item Note Chorus function may not work depending on information recorded in the disk You can set the chorus to ON or OFF ...

Страница 57: ...K discs Press MENU button 3 Each time the button is pressed the selection changes as follows ON OFF 4 Press Cursor button to move to Fanfare Press ENTER button to select the desired item You can set Fanfare to come out after singing a song ...

Страница 58: ... MENU button 3 Each time the button is pressed the selection changes as follows LOW MIDDLE HIGH RADDON OFF 4 Press Cursor button to move to Average Score Press ENTER button to select the desired item You can set the grade of scores displayed in the screen in advance ...

Страница 59: ...discs Press MENU button 3 Each time the button is pressed the selection changes as follows ON OFF 4 Press Cursor button to move to Shadow Press ENTER button to select the desired item You can set the lyrics to be displayed in the black strips ...

Страница 60: ...AUTO and then press and hold button or turn Multi Jog Knob to automatically search the band AutomaticTuning2 Press STOP to select MANUAL and then briefly press or turn Multi Jog Knob to tune in to a lower or higher frequency Manual Tuning Each time the button is pressed the sound switches between STEREO and MONO In a poor reception area select MONO for a clear interference free broadcast Press MON...

Страница 61: ... select the FM band Press the TUNER MEMORY button before PROGRAM disappears from the display PROGRAM disappears from the display and the station is stored in memory 5 4 You can select between 1 and 15 Press the TUNER MEMORY button Press the TUNER MEMORY button 6 To preset another station repeat steps 2 to 5 Press to select preset number You can store up to 15 FM stations 15 AM stations FM Frequenc...

Страница 62: ...e Tape function Switch the system on by pressing STANDBY ON Rewind the cassette DOWN button Fast forward the cassette UP button 5 4 Side A Tape button once Side B Tape button twice Press TAPE 1 2 button to select the cassette to be played Press the PUSH EJECT of the cassette deck to open the cassette door and insert a cassette Press the button if necessary 6 When you have finished playback press S...

Страница 63: ...ng of each track reset the counter by pressing COUNTER RESET Each cassette deck has a separate counter Your mini component system has three cassette playback modes which enable you to listen to both sides of a cassette automatically When playing a cassette in one of the cassette decks a counter is displayed to enable you to take note of the counter value at the start of each track to start playbac...

Страница 64: ... recording Take care not to insert the tape to be copied in TAPE 2 as it will be erased when you start recording 2 1 3 Insert a blank cassette in TAPE 2 Switch the system on by pressing STANDBY ON 5 4 Insert the tape to be copied in TAPE 1 Press STOP button Press DUBBING button to copy a cassette The appropriate indications are displayed and the cassette in TAPE 1 is copied to the cassette in TAPE...

Страница 65: ... then close the cassette door Insert the cassette with the safety tabs 2 1 3 Insert a blank cassette in TAPE Switch the system on by pressing STANDBY ON When stopped press the button to start the recording from the first piece of music Press and CD SYNCHRO button during the playback of CD to start the recording from the first part of the music being played 5 4 Use the CD selection buttons to selec...

Страница 66: ...safety tabs 2 1 3 Insert a blank cassette in TAPE 2 Switch the system on by pressing STANDBY ON Recording will begin To stop recording press button 5 4 Use the CD selection buttons to select the desired song Load a compact disc Press REC PAUSE button Press the DVD OK button Direct recording The cassette tape you want to record on must have the safety tabs intact Note The direct recording mode enab...

Страница 67: ...on the recording 2 1 3 Insert a blank cassette in TAPE 2 Switch the system on by pressing STANDBY ON REC is displayed in red and recording starts 5 4 Select the TUNER function by pressing TUNER BAND Press REC PAUSE button 6 To stop recording press button Select the radio station that you wish to record by pressing DOWN or UP button ...

Страница 68: ...l TIMER is displayed Press the ENTER button 7 Press or button to select the source to be played when the system switches on 5 4 a Set the hour by pressing or button b Press ENTER The minutes flash c Set the minutes by pressing or button d Press ENTER OFF TIME is displayed instead of the equalizer symbols for a few seconds followed by any switch off time already set you can now set the timer switch...

Страница 69: ...n standby After having set the timer it will start automatically as shown by the TIMER indication on the display If you no longer wish to use the timer you must cancel it is no longer displayed To cancel the timer press TIMER ON OFF once is displayed again To resume the timer press TIMER ON OFF again ...

Страница 70: ...ND MODE Your mini compact system is equipped with a preset equalizer that allows you to choose the most appropriate balance between treble and bass frequencies according to the type of music you are listening to Your mini compact system is equipped with the function of Power Sound Power Surround The function of Power Sound Power Surround amplifies bass and improves high key or bass twice as much f...

Страница 71: ... selection changes as follows 90 MIN 60 MIN 45 MIN 30 MIN 15 MIN OFF Press SLEEP button Sleep Timer Function You can set the time that the DVD player will shut itself off To cancel the sleep timer press SLEEP button until OFF appears on the display MUTE appears in the display To turn off mute press the button again Mute Function This is useful when answering a doorbell or telephone call Press MUTE...

Страница 72: ... DEMO Function You can view the various functions available on your system To cancel this function press DEMO DIMMER again Press DEMO DIMMER button DEMO DIMMER Function Each time the button is press the brightness changes as follows DIMMER ON Dim DIMMER OFF Bright DIMMER Function You can adjust the brightness of the display on the main unit so it won t interfere with your movie viewing Press DEMO ...

Страница 73: ... the front panel to select from BASS 08 to BASS 08 total 9 steps 1 You can select the level of low tones you desire 2 TREBLE Level Treble function stresses low tones providing thudding sound effects Turn Treble knob on the front panel to select from TRE 08 to TRE 08 total 9 steps 1 You can select the level of high tones you desire 2 ...

Страница 74: ...nt panel Prolonged use of headphones at a high volume may damage your hearing Note Connecting Headphones You can connect a set of headphones to your mini compact system so that you can listen to music or radio programmers without disturbing other people in the room The earphones must have a 3 5ø jack or an appropriate adapter ...

Страница 75: ...f warm air comes into contact with cold parts inside the player When condensation forms inside the player the player may not operate correctly If this occurs remove the disc and let the player stand for 1 or 2 hours with the power on Note Check that the tape in the cassette is sufficiently taut To prevent erasing a cassette that you wish to keep remove the safety tab on the upper edge of the casse...

Страница 76: ...mediately when the Play Pause button is pressed No sound is heard during fast playback slow playback and step motion playback Are the speakers connected properly Is the speaker setup correctly customized Is the disc severely damaged Sound is not produced Was the DVD player suddenly moved from a cold place to a warm one When condensation forms inside the player remove the disc and let the player st...

Страница 77: ...e display and all settings will return to the default values Press the POWER button Using the RESET function will erase all stored settings Do not use this unless necessary Turn off the power and hold the STOP button on the main unit for longer than 5 seconds Using the RESET function will erase all stored settings Do not use this unless necessary The product cann t play illegal copied DVD disc The...

Страница 78: ... may not play at all Disc Recording Format CD R MP3 Discs Only CD R discs with MP3 files in ISO 9660 or Joliet format can be played MP3 file names should be 8 characters or less in length and contain no blank spaces or special characters If the name of a file is in Korean the name will be displayed on the TV screen in Korean and will be shown in the display of the main unit Use discs recorded with...

Страница 79: ...e menu displayed on the TV monitor Both the DVD player and DVD discs are encoded with a region number If the region number on the DVD disc does not correspond to the region number of the DVD player the player cannot play the disc Translated appearing at the bottom of the screen A DVD disc can contain up to 32 subtitle languages These numbers are recorded on DVD discs When a disc contains two or mo...

Страница 80: ...gnal noise ratio 85 dB at 1 KHz with filter Distortion 0 05 at 1 KHz Channel separation 75 dB Disc sizes Diameter 120 or 80 mm Thickness 1 2 mm TAPE DECK Frequency range 125 Hz 10 KHz Signal noise ratio 40 dB Channel separation 30 dB Erasing effect 50 dB without filter AMPLIFIER Output power Main Speaker 6 Ω 75 Watts CH RMS IEC total harmonic distortion 10 Channel separation 40 dB Signal noise rat...

Страница 81: ...0 15 Min www samsung com fr GERMANY 01805 121213 0 14 Min www samsung de HUNGARY 06 40 985 985 www samsung com hu ITALIA 199 153 153 www samsung com it LUXEMBURG 02 261 03 710 www samsung lu NETHERLANDS 0900 20 200 88 0 10 Min www samsung com nl NORWAY 231 627 22 www samsung com no POLAND 0 801 801 881 www samsung com pl PORTUGAL 80 8 200 128 www samsung com pt SLOVAKIA 0850 123 989 www samsung co...

Отзывы: