background image

11

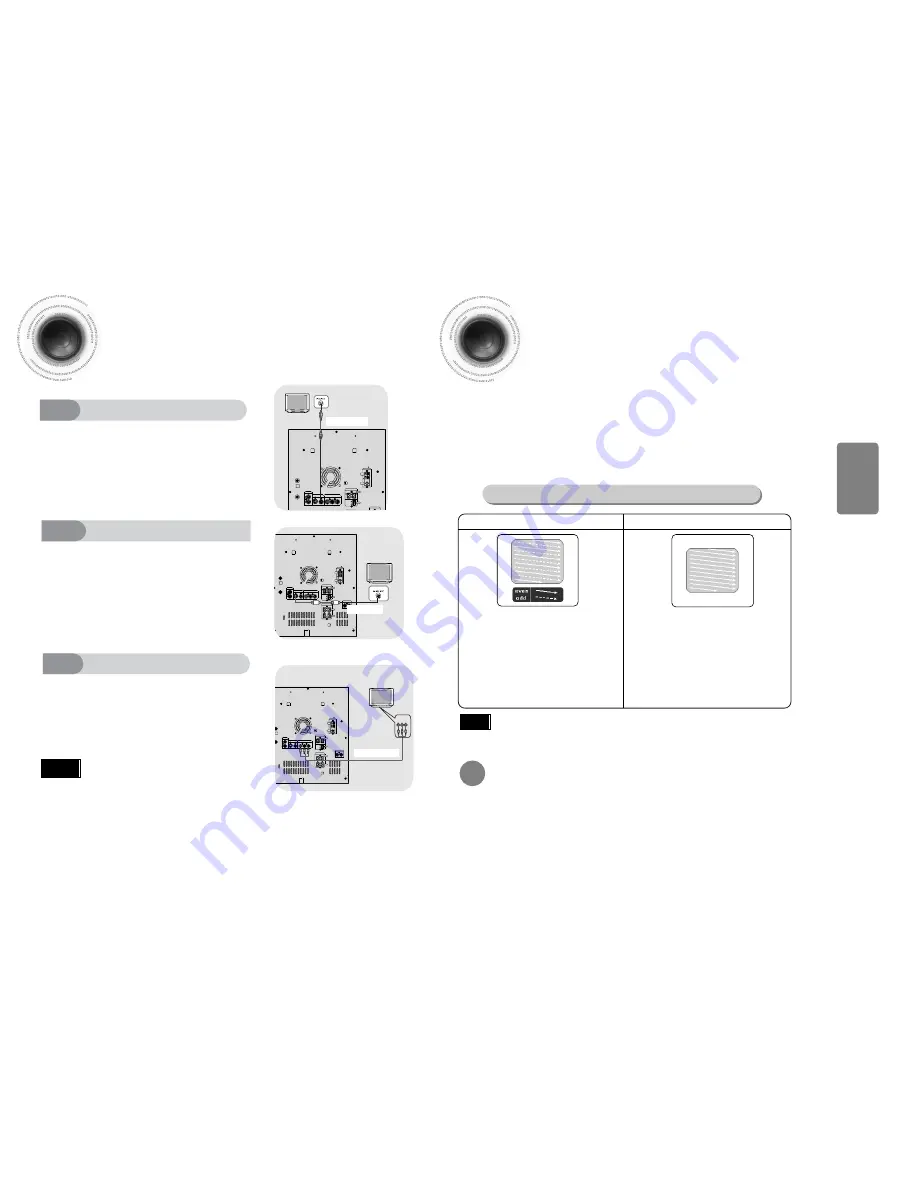
Use this method if your TV have Pr,Pb andY jacks.

Method 3 

Component Video (Best Quality) 

If you television is equipped with Component Video inputs,connect a

component video cable from the Pr,Pb and Y jacks on 

the back panel of the system to the corresponding jacks on your television.

COMPONENT

IN

AUX IN

L

R

R

ANTENNA

AM 

FM
(75)

S.VIDEO

VIDEO OUT

COMPONENT VIDEO OUT

P R

Y

FRONT

SPEAKERS(6)

REAR

R

+

-

L

+

-

SPEAKERS(6)

LINE OUT

CENTER

WOOFER

+

-

+

-

L

L

R

R

R

+

-

L

+

-

+

-

+

-

L

P B

Connecting to a TV

Please be sure to turn off the power and unplug the power cord before moving or installing this unit.
Please choose one of three video connection methods.

P.SCAN 

(Progressive Scan) 

Function

Unlike regular Interlace Scan, in which two fields of picture information alternate to create the
entire picture (odd scan lines, then even scan lines), Progressive Scan uses one field of
information (all lines displayed in one pass) to create a clear and detailed picture without
visible scan lines. 

Press and hold P.SCAN button on the remote controller for over 5 seconds in
STOP  mode.

Pressing and holding the button for over 5 seconds will select "

Progressive Scan

" and "

Interlace Scan

"

repetitively.

In interlaced-scan video, a frame consists of two
interlaced fields (odd and even), where each field
contains every other horizontal line in the frame. 
The odd field of alternating lines is displayed first, and
then the even field is displayed to fill in the alternating
gaps left by the odd field to form a single frame. 
One frame, displayed every 1/30th of a second, contains
two interfaced fields, thus a total of 60 fields are
displayed every 1/60th of a second.
The interlaced scanning method is intended for capturing
a still object. 

Interlaced Scan (1 FRAME = 2 FIELDS)

The progressive scanning method scans one full frame of
video consecutively down the screen, line by line.
An entire image is drawn at one time, as opposed to the
interlaced scanning process by which a video image is
drawn in a series of passes.
The progressive scanning method is desirable for dealing
with moving objects.   

Progressive Scan (FULL FRAME)

What is Progressive (or Non-Interlaced) Scanning?

This function works only on TVs equipped with component video inputs (Y, Pr, Pb) that support
Progressive Video. (It does not work on TVs with conventional component inputs, i.e., non-progressive
scan TVs.)

Depending on the brand and model of your TV, this function may not work.

Note

By default, the video format is set to "PAL".

Each time the button is pressed, the video format switches between "NTSC" and "PAL".

Each country has a different video format standard. 

For normal playback, the video format of the disc must be the same as the video format of your TV. 

Turn off the main unit and then press 

NTSC/PAL 

on the Remote Control or 

REC/PAUSE 

on the Main Unit.

Selecting the Video Format

CONNECTIONS

12

Use this method if your TV has an S-Video In jack.

AUX IN

L

R

R

ANTENNA

AM 

FM
(75)

S.VIDEO

VIDEO OUT

COMPONENT VIDEO OUT

P R

Y

R

+

-

L

+

-

SPEAKERS(6)

LINE OUT

CENTER

WOOFER

+

-

+

-

L

P B

L

R

R

R

+

-

L

+

-

+

-

+

-

L

AUX IN

L

R

R

ANTENNA

AM 

FM
(75)

S.VIDEO

VIDEO OUT

COMPONENT VIDEO OUT

P R

Y

FRONT

SPEAKERS(6)

REAR

R

+

-

L

+

-

SPEAKERS(6)

LINE OUT

CENTER

WOOFER

+

-

+

-

L

P B

Method 1

Using Video Out  (Good Quality)

Connect Video Out on the player to Video In on your TV.

1

Connect S-Video Out to S-Video In on your TV.

1

Press the TV/VIDEO button on the remote of TV control to
set the TV to "VIDEO".

2

Press the TV/VIDEO button on the remote control of TV to set
the TV to "S-VIDEO".

2

Method 2

Using S-Video Out  (Better Quality )

• Composite Video: A single video signal that is a composite of 
the black-and-white information (Y) and the color information (C).
• S-Video: A video transmission standard that provides a sharper,

brighter picture than ordinary composite video by separating 

brightness and color signals.

Note

Supplied

Not Supplied

Not Supplied

Содержание MAX-DJ14500

Страница 1: ...IDEO Instruction Manual AH68 01592E THIS APPLIANCE IS MANUFACTURED BY SOUND OPEN CLOSE DISC SKIP ZOOM SLOW REPEAT REMAIN SUB TITLE TUNER VOLUME MU TE MENU INFO RET URN ENTER TESTTONE TIMER CLOCK TIMERON OFF LOGO SLIDEMODE EZ VIEW NTSC PAL CANCEL DIGEST TUNING TAPE AUX BAND SLEEP DIMMER SOUNDEDIT P SCAN AH59 01379B ...

Страница 2: ...the unit has reached room temperature before using Phones During thunderstorms disconnect AC main plug from the wall outlet Voltage peaks due to lightning could damage the unit Do not expose the unit to direct sunlight or other heat sources This could lead to overheating and malfunction of the unit The battery used with this product contain chemicals that are harmful to the environment Do not disp...

Страница 3: ...I I Mode 53 Dolby Pro Logic I I Effect 54 RADIO OPERATION Listening to Radio 55 Presetting Stations 56 TAPE DECK Listening to a Cassette 57 MISCELLANEOUS Recording a Compact Disc 60 Recording a Radio Program 62 Timer Function 63 Canceling the Timer 64 P SOUND SOUND MODE Function 65 Sleep Timer Function Mute Function 66 DEMO Function DIMMER Function 67 Bass Treble level USER EQ Function 68 Connecti...

Страница 4: ... OPEN CLOSE 32 DISC CHANGE 33 DISC SELECTION BUTTONS 34 WINDOW DISPLAY 35 BASS LEVEL Display Window AUX IN L R R S VIDEO VIDEO OUT COMPONENT VIDEO OUT P R Y FRONT SPEAKERS 6 REAR R L SPEAKERS 6 LINE OUT CENTER WOOFER L ANTENNA AM FM 75 1 SW Antenna Connector Option 2 AM Antenna Connectors 3 FM Antenna Connector 4 5 1 Channel Speaker Output Terminals 5 LINE OUT 6 Component Video Output Connectors C...

Страница 5: ...e polarity to and to Use the correct type of batteries Batteries that look similar may differ in voltage Always replace both batteries at the same time Do not expose batteries to heat or flame Remote Control 7 Description Caution TESTTONE VOLUME button MENU button POWER STANDBY ON button OPEN CLOSE button TUNER button TAPE PLAY button REPEAT button MUTE button Number 0 9 buttons EZ VIEW NTSC PAL b...

Страница 6: ...ind your listening position If there isn t enough room place these speakers to face each other Place them about 60 to 90cm 2 to 3feet above your ear facing slightly downward Unlike the front and center speakers the rear speakers are used to handle mainly sound effects and sound will not come from them all the time The position of the subwoofer is not so critical Place it anywhere you like Usually ...

Страница 7: ...ly down the screen line by line An entire image is drawn at one time as opposed to the interlaced scanning process by which a video image is drawn in a series of passes The progressive scanning method is desirable for dealing with moving objects Progressive Scan FULL FRAME What is Progressive or Non Interlaced Scanning This function works only on TVs equipped with component video inputs Y Pr Pb th...

Страница 8: ...smitter too great walls blocking the radio waves etc install an outdoor aerial The cooling fan dissipates the heat generated inside the unit so that the unit can be operated normally The cooling fan is activated automatically to supply cool air to the unit Please observe the following cautions for your safety Make sure the unit is well ventilated If the unit has poor ventilation the temperature in...

Страница 9: ...e required options If you exceed this time you must start again You can display the time even when you are using another function by pressing TIMER CLOCK once CLOCK is displayed 2 Press TIMER CLOCK twice 1 Switch the system on by pressing POWER button TIMER appears in the display The current time is now set 5 When the correct time is displayed press ENTER Increase the minutes Decrease the minutes ...

Страница 10: ...racks Numbers are allotted to these sections These numbers are called track numbers TRACK 1 TRACK 2 TRACK 4 TRACK 5 TRACK 3 Disc terminology 18 Bonus Group Navigating Pages Some DVD Audio discs have an extra bonus group that requires a 4 digit key number to access See the disc packaging for details and the key number Bonus Group When you play a DVD Audio disc that has a bonus group the key number ...

Страница 11: ...om 80kbps to 384kbps AC3s from 128kbps to 384kbps and WMAs from 56kbps to 128kbps are supported In addition for subtitles this unit will support Text format SMI SPEC VIDEO Compatibility DivX3 11 Up to the latest VERSION WMV WMV V1 V2 V3 V7 AUDIO Compatibility MP3 CBR 80kbps 384kbps AC3 CBR 128kbps 384kbps WMA CBR 56kbps 128kbps Each time you press the button your selection will toggle between SUBT...

Страница 12: ...PEG What is a Title A movie contained in a DVD disc What is a Chapter Each title on a DVD disc is divided into several smaller sections called chapters appears on the TV screen If this symbol appears on the TV screen while buttons are being operated that operation is not possible with the disc currently being played What is a Track File A section of video or a music file recorded on a VCD CD or MP...

Страница 13: ...1379B TESTTONE PL II EFFECT PL II MODE SOUNDEDIT P SCAN Skipping Scenes Songs DVD VCD MP3 DVD VCD MP3 Briefly press Each time the button is pressed briefly during playback the previous or next chapter track or directory file will be played But you cannot skip chapters consecutively When watching a VCD with a track longer than 15 minutes each time is pressed playback will skip back or forward 5 min...

Страница 14: ...s INFO button once Repeat Playback Repeat playback allows you to repeatedly play a chapter title track song or directory MP3 file Press REPEAT button Each time the button is pressed during playback the repeat playback mode changes as follows DVD VCD CD MP3 JPEG Repeat playback operation is not possible with version 2 0 VCD discs if PBC is turned on To use Repeat Playback on a VCD with PBC you shou...

Страница 15: ... ratio Note SELECT ZOOM POSITION A B Repeat Playback OPEN CLOSE DISC SKIP ZOOM SLOW REPEAT REMAIN SUB TITLE TUNER VOLUME M U T E MENU INFO R E T U R N TIMER CLOCK TIMERON OFF LOGO SLIDEMODE NTSC PAL CANCEL DIGEST TUNING TAPE AUX BAND SLEEP DIMMER MONO ST AH59 01379B AH59 01379B TESTTONE PL II EFFECT PL II MODE P SCAN SOUNDEDIT 28 OPERATION The A B Repeat function will not work on an MP3 or JPEG di...

Страница 16: ... Depending on the disc you may not be able to move to the selected title or time Something like you Back for good Love of my life More than words I need you My love Uptown girl DVDRECEIVER SMARTNAVI SELECT 03 Move Select Stop Note Selecting Audio Subtitle Language Depending on the number of languages on a DVD disc a different audio language ENGLISH SPAIN JAPANESE etc is selected each time the butt...

Страница 17: ...de JPEG DISC SKIP ZOOM SLOW REPEAT REMAIN SUB TITLE TUNER VOLUME M U T E MENU INFO R E T U R N TIMER CLOCK TIMERON OFF LOGO SLIDEMODE NTSC PAL CANCEL DIGEST TUNING TAPE AUX BAND SLEEP DIMMER MONO ST AH59 01379B AH59 01379B TESTTONE PL II EFFECT PL II MODE P SCAN SOUNDEDIT Place the JPEG disc on the disc tray Each time the button is pressed the slide moves backward or forward Press to skip to the n...

Страница 18: ...ER MONO ST AH59 01379B AH59 01379B TESTTONE PL II EFFECT PL II MODE P SCAN SOUNDEDIT 2 When playing a VCD version 2 0 this toggles between PBC ON and OFF When you select the disc menu that is not supported by the disc the This menu is not supported message appears on the screen 1In stop mode Press MENU button Press Cursor buttons to move to DISC MENU and then press ENTER button 4 Press ENTER butto...

Страница 19: ...T AH59 01379B AH59 01379B TESTTONE PL II EFFECT PL II MODE P SCAN SOUNDEDIT 2 1In stop mode Press MENU button Press Cursor button to move to Setup and then press ENTER button 4 Once the setup is complete if the language was set to English OSD will be displayed in English 3 Selecting the Subtitle Language recorded on the disc Selecting the Disc Menu Language recorded on the disc Press ENTER button ...

Страница 20: ... is 16 9 This ratio is called the aspect ratio When playing DVDs recorded in different screen size you should adjust the aspect ratio to fit your TV or monitor For a standard TV select either 4 3LB or 4 3PS option according to personal preference Select 16 9 if you have a wide screen TV Select this to view a 16 9 picture in the full screen mode on your wide screen TV You can enjoy the wide screen ...

Страница 21: ...selected Level 6 you cannot view DVDs with Level 7 or higher The higher the level the closer the content is to violent or adult material 3 5 Press Cursor button to move to PARENTAL and then press ENTER button Press Cursor button to select the desired rating level and then press ENTER button Enter the password and then press ENTER button Note 2 1 Press MENU button Press Cursor button to move to Set...

Страница 22: ...1 3 Press MENU button Press Cursor button to move to Setup and then press ENTER button Press Cursor button to move to LOGO and then press ENTER button To Change the Wallpaper 5 4 Press MENU button to exit the setup screen Press to select the desired USER and then press ENTER Select this to set the Samsung Logo image as your wallpaper Select this to set the desired image as your wallpaper Press RET...

Страница 23: ...een appears 3 Press Cursor buttons to move to Audio and then press ENTER button 4 You can set the audio delay time between 0 ms and 300 ms Set it to the optimal status Press Cursor buttons to select the Delay Time of AV SYNC and then press the ENTER button Video may look slower than the audio if it is connected with digital TV In this case adjust the delay time of audio to optimal status to fit th...

Страница 24: ...ired speaker and then press ENTER button For C LS and RS each time the button is pressed the mode switches alternately as follows SMALL NONE For L and R the mode is set to SMALL Press RETURN button to return to the previous level Press MENU button to exit the setup screen 45 46 SETUP SMALL Select this when using the speakers NONE Select this when no speakers are installed 2 1 In Stop mode press ME...

Страница 25: ...cement It is desirable to place all speakers within this circle Ideal SPEAKER placement SETUP 2 1 In Stop mode press MENU button Press Cursor button to move to Audio and then press ENTER button You can set the delay time for C between 00 and 05mSEC and for LS and RS between 00 and 15mSEC 4 3 5 Press Cursor button to move to DELAY TIME and then press ENTER button Press Cursor buttons to move to the...

Страница 26: ... Speaker Level The volume level can be adjusted in steps from 6dB to 6dB The sound gets louder as you move closer to 6dB and quieter as you get closer to 6dB Method 1 Whenadjustingtheaudioqualityusingthesetupscreen Method 2 When manually adjusting with the SOUND EDIT button 2 1 Adjusting Front Speaker Balance Adjusting Rear Speaker Balance Press SOUND EDIT button and then press Cursor 3 Adjusting ...

Страница 27: ...or to adjust the DRC Press RETURN button to return to the previous level Press MENU button to exit the setup screen DISC SKIP ZOOM SLOW REPEAT REMAIN SUB TITLE TUNER VOLUME M U T E MENU INFO R E T U R N TIMER CLOCK TIMERON OFF LOGO SLIDEMODE NTSC PAL CANCEL DIGEST TUNING TAPE AUX BAND SLEEP DIMMER MONO ST AH59 01379B AH59 01379B TESTTONE PL II EFFECT PL II MODE P SCAN SOUNDEDIT SETUP The Cursor bu...

Страница 28: ...ANORAMA This mode extends the front stereo image to include the surround speakers for an exciting wraparound effect with side wall imaging CENTER WIDTH Sound is output to the center speaker only The front left and right speakers produce phantom sound DIMENSION Incrementally adjusts the sound field DSP from the front or rear When playing a DVD disc encoded with two or more channels multi channel mo...

Страница 29: ...s between STEREO and MONO In a poor reception area select MONO for a clear interference free broadcast Press MONO ST button to listen in Mono Stereo This applies only when listening to an FM station To tune in to a preset station press on the remote control to select a channel Refer to Step 2 on page 41 to automatically or manually tune in to a station 2 1 Each time the button is pressed the band ...

Страница 30: ...ton Press the button The cassette starts playing SOUND 58 Press REVERSE MODE until the appropriate symbol is displayed One side of the selected cassette and then stops One side of the cassette The other side of the cassette and then stops Both sides of the cassette indefinitely until you press stop Before starting to record a cassette for which you wish to take note of the counter values at the be...

Страница 31: ...recording with the start of the disc or track of your choice only on Audio CD Press the OPEN CLOSE button to open the CD door Insert a CD and press the OPEN CLOSE button to close the CD door Press the PUSH EJECT button to open the cassette door insert a cassette and then close the cassette door Insert the cassette with the safety tabs 2 1 3 Insert a blank cassette in Tape 2 Switch the system on by...

Страница 32: ... SOUND Direct recording The cassette tape you want to record on must have the safety tabs intact Note 61 The direct recording mode enables you to start recording with any track on the compact disc Recording a Radio Program You can record a radio program of your choice You do not need to adjust the volume as it has no effect on the recording 2 1 3 Insert a blank cassette in Deck 2 Switch the system...

Страница 33: ...sh c Set the minutes by pressing or button d Press ENTER OFF TIME is displayed instead of the equalizer symbols for a few seconds followed by any switch off time already set you can now set the timer switch off time TAPE cassette Insert a cassette tape TUNER radio a Press ENTER b Select a preset station by pressing or CD compact disc Load on or more compact disc a Set the hour by pressing or butto...

Страница 34: ...answering a doorbell or telephone call Press MUTE button kHz MHz kHz MHz P SOUND AND SOUND MODE Function P SOUND Function To obtain a Select Normal balance linear PASS Balance suitable for pop music POP Balance suitable for rock music ROCK Balance suitable for classic music CLASSIC Balance suitable for voice USE EQ Turn SOUND MODE on the front panel or Press SOUND MODE on the remote control until ...

Страница 35: ...l of high tones you desire 2 The various functions available are listed in turn on the display All these functions are described in detail in this booklet For instructions on how to use them refer to the appropriate sections DEMO Function You can view the various functions available on your system To cancel this function press DEMO DIMMER again Press DEMO DIMMER button DEMO Function DIMMER Functio...

Страница 36: ...r edge of the cassette To record a cassette where the tab has been broken simply cover the opening with adhesive tape When you have finished playing a cassette always put it back in its case Store your cassettes in a clean place out of direct sunlight where they will not be exposed to high temperatures Avoid using 120 minute cassettes as they place unnecessary strain on the tape mechanism Precauti...

Страница 37: ...c jacket and then select the appropriate function Aspect ratio cannot be changed Before Calling for Service Refer to the chart below when this unit does not function properly If the problem you are experiencing is not listed below or if the instruction below does not help turn off the unit disconnect the power cord and contact the nearest authorized dealer or Samsung Electronics Service Center Is ...

Страница 38: ...e playable If possible do not use CD RW Rewritable media as they may not be playable Only the CD Rs that are properly closed can be fully played If the session is closed but the disc is left open you may not be able to fully play the disc CD R JPEG Discs Only files with the jpeg and JPEG extensions can be played If the disc is not closed it will take longer to start playing and not all of the reco...

Страница 39: ... N Ratio Distortion Usable Sensitivity S N Ratio Distortion Composite Video S Video Component Video Front speaker output Center speaker output Rear speaker output Subwoofer speaker output Frequency range S N Ratio Channel separation Input sensitivity G E N E R A L T U N E R F M T U N E R A M O U T P U T V I D E O A M P L I F I E R 11Kg 370 x 332 x 270 mm 5 C 35 C 10 75 12dB 55dB 0 8 60dB 35dB 2 1 ...

Отзывы: