background image

ENG

47

Don’t disconnected USB and AC Cord  during CD-Ripping.This may cause 


the file damage.If you want to stop CD-Ripping during CD-Ripping,you must 

press stop Key first and after the CD Stopped,then you can remove the USB 

device.

If you disconnected USB device when CD Ripping, the main unit will be 


power off and you may not delete the ripped file, In this case, please connect 

the USB on the PC and backup the USB data on the PC first and then 

formate the USB device .

When the USB memory is not enough, it will be displayed “RIPPING 


ERROR”.

DTS-CD can’t for CD Ripping.


With external HDD,FAT format the USB can be CD Ripping,but not NTFS.


The CD Ripping function of this product does not support all USB devices. 

When you use CD high speed search function or in the Pause or Stop mode, 


the CD Ripping can’t work.

During CD Ripping, do not deal impact.If is shocked while CD Ripping, CD 


Ripping maybe disengage. 

Sometimes, some of USB devices, CD Ripping time is long.


In program mode, you can't use CD RIPPING function.


When CD Ripping completes or Stops, the CD will reload.


TAPE DECK

48

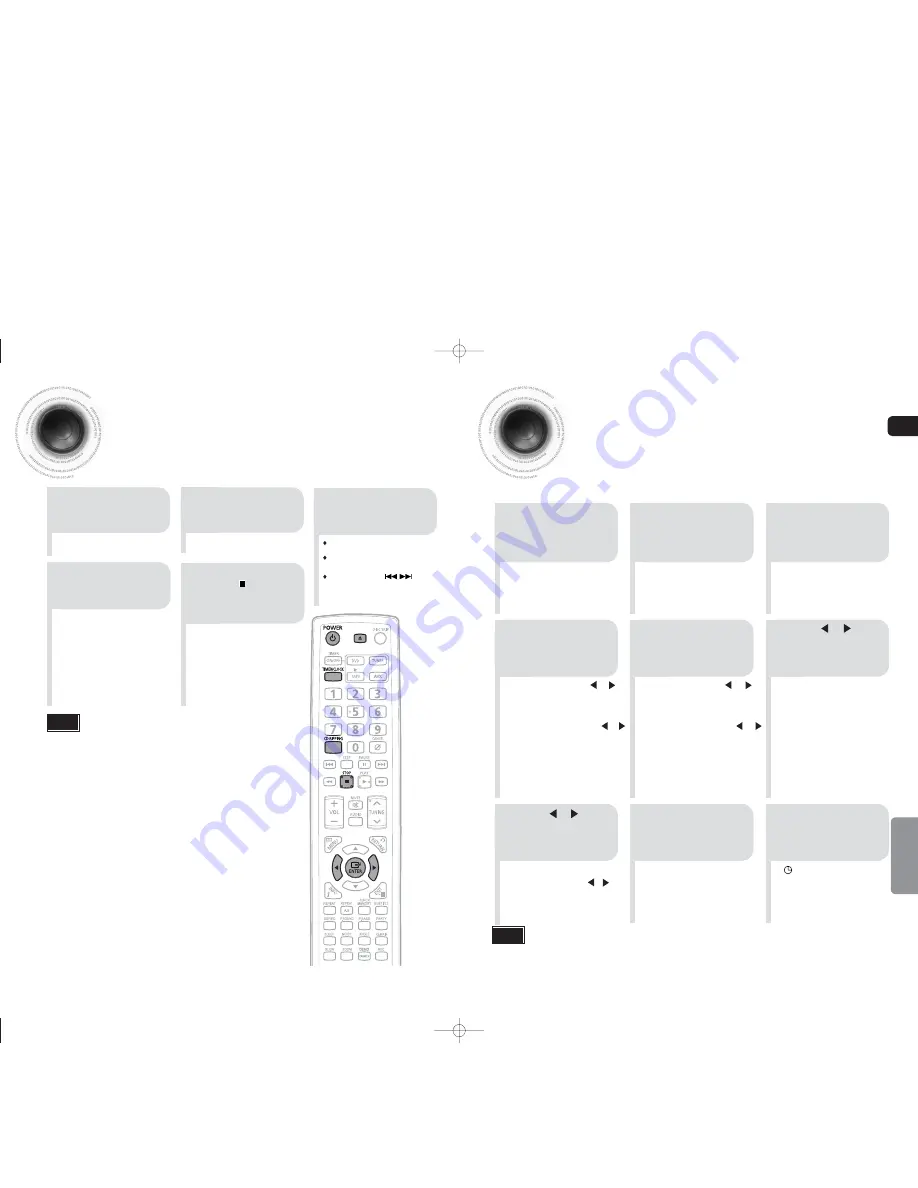
CD RIPPING Function

You can rip a compact disc as a MP3 file on the USB 
This feature enables you to ripping with the start of the disc or track of your choice.

2

1

3

Connect the 
USB. 

Switch the system 

on by pressing 

POWER

.

Load a compact 
disc(Digital 
Audio).

4

Press CD 

RIPPING button 

on remote control 

to starting ripping.

 Press the 

OPEN/CLOSE

 button to open 

the CD door.

 Insert a CD and press the 

OPEN/CLOSE


button to close the CD door.

Use the CD selection (

 ) buttons 

to select the desired song.

If the system is playing state, turn the CD 


¡

RIPPING dial down or press CD RIPPING button 

on the remote control to start the ripping for the 

current track.

Turn CD RIPPING dial up or press and hold CD 


¡

RIPPING button on the remote control to start 

ripping the all tracks of Disc.

Press this button, “TRACK RIPPING” is 


¡

displayed and CD RIPPING starts.
Press and hold this button, “FULL CD RIPPING” 


¡

is displayed and CD RIPPING starts.
During CD ripping, do not disconnect USB 


¡

device.

5

To stop ripping, press 

STOP( )button.and
then automatically 

create and save as 

the MP3 file.

After CD-Ripping,a directory named 
“RIPPING FOLDER” will be created in your 
device.The file name is same with the disc.

Note

Timer Function

• 


The timer enables you to switch the system on or off at specific times.

• 


If you no longer want the system to be switched on or off automatically, you must cancel the timer.

• 


Before setting the timer, check that the current time is correct.

• 


For each step, you have a few seconds to set the required options. 

If you exceed this time, you must start again.

Example:

 You wish to wake up to music every morning.

• 


ON TIME

 is displayed for a few 

seconds, followed by any switch-
on time already set; you can set 
the timer switch-on time.

•  

The source to be selected is 
displayed.

2

1

3

Switch the system 

on by pressing 

POWER

.

Press 

TIMER/

CLOCK

 until 

TIMER

 is 

displayed.

Press the 

ENTER 

button.

• 


      is displayed to the top right of 
the time, indicating that the timer 
has been set. 

•  

The system will switch on and off 
automatically at the required 
times.

8

7

9

Press     or     button 

to select the source to 

be played when the 

system switches on.

Press 

ENTER

 to 

confirm the timer.

Press 

POWER 

to 

set the system to 
standby mode.

5

4

a

.  Set the hour by pressing      or  

button.

b.

  Press 

ENTER 

.

• 

The minutes flash.

c.

  Set the minutes by pressing      or  

button.

d.

  Press 

ENTER

.

•  

OFF TIME

 is displayed for a few 

seconds, followed by any switch-
off time already set; you can now 
set the timer switch-off time.

•  TUNER (radio) :  

a

 Press 

ENTER

.

b

  Select a preset station 

by pressing      or      .

•  DVD/CD (compact disc) :  

   Load on or more compact disc.
•  USB :Insert a USB.

•  TAPE (cassette) : Insert a cassettetape.

a

.  Set the hour by pressing      or  

button.

b.

  Press 

ENTER

.

• 

The minutes flash.

c.

  Set the minutes by pressing      or  

button.

d.

  Press 

ENTER

.

•  

VOL 10

 is displayed, where 10 

corresponds to the volume 
already set.

Set the timer 
switch-off time.

6

Press     or     button 

to adjust the volume 

level and press 

ENTER

.

Set the timer 
switch-on time.

Note

•  

If the timer switch on and off times are identical, the word 

ERROR

 is displayed.

•  

If there is no disc or usb, when you select the “DVD/CD, TAPE, USB, it will automatically change to 

“TUNER”.

35-58p-MAX-DG53-DG54-NO ENG.indd   46-47

35-58p-MAX-DG53-DG54-NO ENG.indd   46-47

2009-3-24   11:18:54

2009-3-24   11:18:54

Содержание MAX-DG53

Страница 1: ... MAX DG53 MAX DG54 imagine the possibilities Thank you for purchasing a Samsung product To receive a more complete service please register your product at www samsung com global register 1 34p MAX DG53 DG54 NO ENG indd 2 3 1 34p MAX DG53 DG54 NO ENG indd 2 3 2009 3 24 11 02 56 2009 3 24 11 02 56 ...

Страница 2: ...al household trash PREPARATION RISK OF ELECTRIC SHOCK DO NOT OPEN TO REDUCE THE RISK OF ELECTRIC SHOCK DO NOT REMOVE REAR COVER or BACK NO USER SERVICEABLE PARTS INSIDE REFER SERVICING TO QUALIFIED SERVICE PERSONNEL CAUTION This symbol indicates dangerous voltage inside the product that presents a risk of electric shock or personal injury This symbol indicates important instructions accompanying t...

Страница 3: ...HOST all in a single player Power Saving Function The MAX DG53 DG54 automatically shuts itself off after 20 minutes in the stop mode only for USB DVD TV Screen Saver Function The MAX DG53 DG54 automatically brightens and darkens the brightness of the TV screen after 3 minutes in the stop mode The MAX DG53 DG54 automatically switches itself into the power saving mode after 20 minutes in the screen ...

Страница 4: ...GE 1 2 3 4 5 6 7 8 9 1 Speaker Connector Terminals 2 Video Output Connector Connect the TV s video input jacks VIDEO IN to the VIDEO OUT connector 3 LINE OUT connector 4 Component Output Connectors Connect a TV with component video input jacks to these jacks 5 FM Antenna Connector 1 Speaker Connector Terminals 2 Video Output Connector Connect the TV s video input jacks VIDEO IN to the VIDEO OUT co...

Страница 5: ...replace both batteries at the same time Do not expose batteries to heat or flame Insert Remote Batteries DSP EQ button VOLUME button MENU button TIMER CLOCK button POWER button TIMER ON OFF button CANCEL button PAUSE button Number 0 9 buttons TAPE button AUX USB button TUNER button DVD button DISC SKIP button OPEN CLOSE button REMAIN button ANGLE button POWER BASS button DEMO DIMMER button TUNER M...

Страница 6: ...left speaker marked L right speaker marked R To achieve the correct sound quality insert those speaker connector cables to the speaker connector terminals of the system Connecting the Speakers Before moving or installing the product be sure to turn off the power and disconnect the power cord Front Speakers Place these speakers in front of your listening position facing inwards about 45 toward you ...

Страница 7: ...ve scanning method scans one full frame of video consecutively down the screen line by line An entire image is drawn at one time as opposed to the interlaced scanning process by which a video image is drawn in a series of passes The progressive scanning method is desirable for dealing with moving objects Progressive Scan FULL FRAME What is Progressive or Non Interlaced Scanning This function works...

Страница 8: ...urface This unit does not receive AM broadcasts Note AUX Connecting an External Component MP3 player AUX Front Panel Audio Cable not supplied Components such as an MP3 Player 1 Connect PORTABLE AUDIO IN Audio on the MINI COMPACT front panel to the Audio Out of the external component MP3 player 2 Press the AUX USB button to select AUX input The mode switches as follows AUX USB 1 34p MAX DG53 DG54 N...

Страница 9: ... next disc is played automatically You can also use on the panel front instead of buttons in step 3 4 Note To resume playback press PLAY button again To temporarily pause playback press PAUSE button during playback If pressed once the stop position will be stored in memory If PLAY button is pressed playback resumes from the stop position This function works only with DVDs If pressed twice STOP is ...

Страница 10: ... or JPEG files on a PC can be stored on a CD and then played back with this DVD player JPEG 17 18 OPERATION Rotate Flip Function Zoom Auto play Function Press Cursor buttons during playback Press INFO button during playback TV displays as below 1 Use to select icon and then press ENTER button each time you press the button your selection will rotate as clockwise 2 Use to select icon and then press...

Страница 11: ...eo and Audio Video compatibility All versions of DivX later than 3 11 including the latest 5 1 are supported In addition XviD is supported Audio compatibility MP3s encoded at bit rates from 8kbps to 320kbps AC3s from 32kbps to 640kbps and WMAs from 48kbps to 384kbps are supported In addition for subtitles this unit will support Text format SMI SPEC VIDEO Compatibility DivX3 11 Up to the latest VER...

Страница 12: ...ected A device supporting USB 1 1 alone may cause a difference in the picture quality depending on the device USB Devices that can be used with the MINI COMPONENT SYSTEM USB Storage Device 1 MP3 Player 2 Digital Camera 3 Removable HDD 4 Removable HDDs equipped with less than 160 Gbytes are supported Removable HDDs equipped with 160Gbytes or more may not be recognized depending on the device If the...

Страница 13: ...ed into several smaller sections called chapters appears on the TV screen If this symbol appears on the TV screen while buttons are being operated that operation is not possible with the disc currently being played What is a Track File A section of video or a music file recorded on a CD or MP3 CD Depending on the disc the disc information display may appear different Note OPERATION During fast pla...

Страница 14: ... track or directory file will be played But you cannot skip chapters consecutively The picture moves forward one frame each time the button is pressed during playback Playing Frame by Frame Press STEP button Skip Skip Step 26 OPERATION 2 Press Cursor buttons or numeric buttons to select the desired angle DivX CD CD Track01 Track01 Track02 Track03 Track04 Track05 Track06 Track07 Track02 Track01 Tra...

Страница 15: ...utton is pressed during playback the repeat playback mode changes as follow Press the REPEAT button or cursor button to select one mode then press ENTER button Select Cancel Repeat playback Select Repeat playback one Chapter Select Repeat playback one Title Select Repeat playback A B DVD DVD CD MP3 DIVX CD MP3 DIVX Repeat Playback Options Track Off Folder Track Folder Disc Shuffle Off Track Disc S...

Страница 16: ... desiredAudiolanguageandthen pressENTERbutton PressCursor ornumericbuttonstoselectthe desiredSubtitlelanguageand thenpressENTERbutton Each time the button is pressed the zoom level changes as follow 2 x 4 x OFF 2 x 4 x 2 x OFF Zoom Screen Enlarge Function DVD DVD 2 Press Cursor buttons to move to the area you want to enlarge 1Press ZOOM button 3 Press ENTER button DivX DivX JPEG JPEG You can use t...

Страница 17: ...ay not be able to move to the selected title or time Note 32 OPERATION Using Disc Menu You can use the menus for the audio language subtitle language profile etc DVD menu contents differ from disc to disc DVD 2 1 In stop mode press MENU button Press Cursor buttons to move to DISC MENU and then press ENTER button 4 3 Press Cursor buttons to select the desired item and then press ENTER button Press ...

Страница 18: ...1 In stop mode press MENU button Press Cursor button to move to Setup and then press ENTER button 3 Once the setup is complete if the language was set to English OSD will be displayed in English Selecting the Audio Language recorded on the disc Selecting the Subtitle Language recorded on the disc Selecting the DivX Subtitle Language recorded on the disc 4 Press Cursor button to select the desired ...

Страница 19: ...Ds recorded in different screen size you should adjust the aspect ratio to fit your TV or monitor For a standard TV select either 4 3LB or 4 3PS option according to personal preference Select 16 9 if you have a wide screen TV Select this to view a 16 9 picture in the full screen mode on your wide screen TV You can enjoy the wide screen aspect Select this to play a 16 9 picture in the letter box mo...

Страница 20: ...ial 3 5 Press Cursor button to move to Parental Setup and then press ENTER button Press Cursor button to select the Rating Level and then press ENTER button Press Cursor button to select the Change Password and then press ENTER button Enter the password and then press ENTER button Note 2 1 In stop mode press MENU button Press Cursor button to move to Setup and then press ENTER button Enter the old...

Страница 21: ...ve to AV SYNC and then press ENTER button In stop mode press MENU button Setting the DRC Dynamic Range Compression You can use this function to enjoy Dolby Digital sound when watching movies at low volume at night 1 2 In stop mode press MENU button Press Cursor button to move to Audio and then press ENTER button 3 4 Press Cursor to adjust the DRC Press RETURN button to return to the previous level...

Страница 22: ...n Refer to Step 2 on page 41 to automatically or manually tune in to a station 2 1 3 Example Presetting FM 89 1 in the memory Press TUNING or to select 89 10 Press the TUNER button and select the FM band 5 4 You can select between 1 and 15 Press the TUNER MEMORY button Press the TUNER MEMORY button 6 To preset another station repeat steps 2 to 5 Press TUNING or to select preset number Remote Contr...

Страница 23: ...ing button 44 Insert a cassette with the recording playback side facing the cassette holder and then push the cassette door shut 2 4 1 3 Press TAPE button on the remote control to select the Tape function Switch the system on by pressing POWER Rewind the cassette button Fast forward the cassette button You can use the button of the front panel instead of the button 5 Press the PUSH EJECT of the ca...

Страница 24: ...es you to start recording with any track on the compact disc Press the OPEN CLOSE button to open the CD door Insert a CD and press the OPEN CLOSE button to close the CD door Press the PUSH EJECT button to open the cassette door insert a cassette and then close the cassette door Insert the cassette with the safety tabs 2 1 3 Insert a blank cassette in Deck Switch the system on by pressing POWER Rec...

Страница 25: ...top ripping press STOP button and then automatically create and save as the MP3 file After CD Ripping a directory named RIPPING FOLDER will be created in your device The file name is same with the disc Note Timer Function The timer enables you to switch the system on or off at specific times If you no longer want the system to be switched on or off automatically you must cancel the timer Before se...

Страница 26: ...UND automatically covert to OFF mode When CD Ripping the P BASS function can t work and the P BASS automatically covert to OFF mode POWER SOUND Function Your mini compact system is equipped with the function of POWER SOUND mode The function of POWER SOUND mode amplifies bass and improves high key or bass twice as much for you to appreciate powerful real sound POWER BASS Function Your mini compact ...

Страница 27: ...c you are listening to 52 MISCELLANEOUS Sleep Timer Function Mute Function The remaining time before the DVD player will shut itself off is displayed Pressing the button again changes the sleep time from what you have set earlier To confirm the sleep timer setting press SLEEP button Each time the button is pressed the selection changes as follows 90 MIN 60 MIN 45 MIN 30 MIN 15 MIN OFF Press SLEEP ...

Страница 28: ...he loudspeakers are no longer used to output the sound Connect the headphones to the PHONES jack on the front panel Prolonged use of headphones at a high volume may damage your hearing Note Plug a microphone with a 6 3ø MIC jack into the Mic terminal Connecting Headphones Microphone Connect one Microphone Turn the MIC VOL knob to adjust the MIC Volume You can connect a set of headphones to your mi...

Страница 29: ...o 5 seconds later Symptom Check Remedy Is the TV power on Are the video cables connected properly Is the disc dirty or damaged A poorly manufactured disc may not be playable Disc is rotating but no picture is produced Picture quality is poor and picture is shaking Is the remote control being operated within its operation range of angle and distance Are the batteries exhausted The remote control do...

Страница 30: ...ayed per CD A maximum of 300 folders can be played per CD DVD R RW CD R RW DivX Discs Software updates for incompatible formats are not supported Example QPEL GMC resolution higher than 720 x 480 pixels etc Sections with a high frame rate might not be played while playing a DivX file DivX is a digital video format created by DivX Inc This is an official DivX Certified or DivX Ultra Certified devic...

Страница 31: ...2 etc These numbers are assigned to the tracks which are recorded on video and audio CDs They enable specific tracks to be located quickly Contains recordings of pictures and sound whose quality is roughly comparable to that of video tape This player also supports video CDs with playback control version 2 0 5 1 or 6 Channel Digital Surround sound reproduced from DVDs and LDs recorded as a digital ...

Страница 32: ...stions or comments relating to Samsung products please contact the SAMSUNG customer care centre Region Country Customer Care Center Web Site 35 58p MAX DG53 DG54 NO ENG indd 60 35 58p MAX DG53 DG54 NO ENG indd 60 2009 3 24 11 19 10 2009 3 24 11 19 10 ...

Отзывы: