background image

Samsung Electronics

5-4 High Voltage Capacitor

5-5 High Voltage Diode

5-6 Adjustment of Primary Switch, Secondary Switch and Monitor Switch

5-2

1. Check continuity of the capacitor with the meter set at the highest resistance scale.
2. Once the capacitor is charged, a normal capacitor shows continuity for a short time, and then indicates 9M

W.

3. A shorted capacitor will show continuous continuity.
4. An open capacitor will show constant 9M

W.

5. Resistance between each terminal and chassis should read infinite.

1. Isolate the diode from the circuit by disconnecting its leads.
2. With the ohm-meter set at the highest resistance scale, measure across the diode terminals. Reverse the

meter leads and read the resistance. A meter with 6V, 9V or higher voltage batteries should be used to
check the front-to back resistance of the diode (otherwise an infinite resistance may be read in both
directions). The resistance of a normal diode will be infinite in one direction and several hundred K

W

in

the other direction.

1. When mounting Primary switch and Interlock

Monitor switch to Latch Body, consult the
figure.

2. No specific adjustment during installation of

Primary switch and Monitor switch to the latch
body is necessary.

3. When mounting the Latch Body to the oven

assembly, adjust the Latch Body by moving it so
that the oven door will not have any play in it.
Check for play in the door by pulling the door
assembly. Make sure that the latch keys move
smoothly after adjustment is completed.
Completely tighten the screws holding the Latch
Body to  the oven assembly.

4. Reconnect to Monitor switch and check the

continuity of the monitor circuit and all latch
switches again by following the components test
procedures.

5. Confirm that the gap between the switch

housing and the switch actuator is no more than
0.5mm when door is closed.

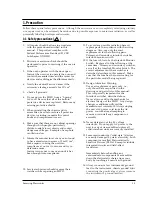
Precaution

For continued protection against radiation hazard, replace parts in accordance with the wiring diagram and be sure to use the
correct part number for the following switches: Primary and secondary interlock switches, and the interlock monitor switch
(replace all together). Then follow the adjustment procedures below. After repair and adjustment, be sure to check the continuity
of all interlock switches and the interlock monitor switch.

Alignment and Adjustments

Door Open

Door Closed

Primary switch

¥

0

Monitor switch (COM-NC)

0

¥

Monitor switch (COM-NO)

¥

0

Secondary S/W

¥

0

Primary Interlock Switch

Lever Door(B)

Body Latch

Interlock 
Monitor
Switch

Interlock
Secondary
Switch

Содержание M530

Страница 1: ...CKEN PIECES FISH GROUND BEEF 1 2 3 3 FOOD AMT MIN ENDSOFPKG TURNEDUNDER 2 4 1 2 3 4 1 2 8 10 1 2 6 7 8 4 5 1 2 11 15 5 9 11 2 1 2 1 2 100g 1cup 1 2cup 170 230g 250 300g 250 300g 450 700g 450 g 450 g 4 POEN DOOR M530 1 Precaution 2 Specifications 3 Operating Instructions 4 Disassembly and Reassembly 5 Alignment and Adjustments 6 Troubleshooting 7 Exploded Views and Parts List 8 Schematic Diagrams S...

Страница 2: ...nterlock monitor switch 12 If the fuse is blown by the Interlock Monitor Switch Replace all of the following at the same time Primary and secondary switches as well as the Interlock Monitor Switch The correct adjustment of these switches is described elsewhere in this manual Make sure that the fuse has the correct rating for the particular model being repaired 13 Design Alteration Warning Use exac...

Страница 3: ...es this includes the filament voltage of the magnetron High voltage is present during any cook cycle Before touching any components or wiring always unplug the oven and discharge the high voltage capacitor See Figure 1 1 2 The high voltage capacitor remains charged about 30 seconds after disconnection Short the negative terminal of the high voltage capacitor to to the oven chassis Use a screwdrive...

Страница 4: ...cs 2 1 MODEL M530 ITEM TIMER 15 MINUTE POWER SOURCE 240V 50Hz AC POWER CONSUMPTION MICROWAVE 1000W OUTPUT POWER 600W IEC 705 TEST PROCEDURE OPERATING FREQUENCY 2 450MHz MAGNETRON OM52SHM 31 COOLING METHOD COOLING FAN MOTOR OUTSIDE DIMENSIONS 461 W x 244 H x 310 D ...

Страница 5: ...ler GlassPlate DoorLatches OFF 1 2 3 4 5 6 7 8 9 11 12 14 10 13 15 POPCORN SOUP SAUCE BEVERAGE FROZEN VEGETABLES POTATOES BACON SLICES TV DINNER ENTREE MELTED BUTTER CHICKEN PIECES FISH GROUND BEEF 1 2 3 3 FOOD AMT MIN ENDSOFPKG TURNEDUNDER 2 4 1 2 3 4 1 2 8 10 1 2 6 7 8 4 5 1 2 11 15 5 9 11 2 1 2 1 2 100g 1cup 1 2cup 170 230g 250 300g 250 300g 450 700g 450 g 450 g 4 POEN DOOR M530 461mm 355mm 244...

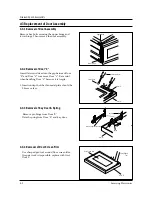
Страница 6: ...ry carefully 7 Remove screws from the back panel 8 Take out the fan motor 9 Remove the oven lamp by rotating to pull out from hole of air cover NOTE1 When removing the magnetron make sure that its antenna does not hit any adjacent parts or it may be damaged NOTE2 When replacing the magnetron be sure to remount the magnetron gasket in the correct position and make sure the gasket is in good conditi...

Страница 7: ...1 Insertion depth of the thin metal plate should be 0 5mm or less 4 3 3 Removal of Key Door Spring Remove pin hinge from Door E Detach spring from Door E and key door 4 3 4 Removal of Door Screen Film Use sharp edged tool around Door screen film If repair work is impossible replace with Ass y Door E Upper Hinge Lower Hinge Protect Tape Flat Screw Driver Door C Door E Key Door Door A Spring Hook to...

Страница 8: ...hen replacing the drive motor be sure to remount it in the correct position 8 Connect all the leads to the drive motor 9 Screw the deive motor cover to the base plate with a screw driver 10 Remount the coupler in the correct position 4 4 Replacement of Fuse 4 5 Replacement of Drive Motor Disassembly and Reassembly Screw Drive Motor Cover Base Plate Drive Motor After replacement of the defective co...

Страница 9: ...e push button from control panel At this time button spring is also removed together 2 When assembling first insert button spring and push button to match with hooks 4 6 2 Removal of Push Button Disassembly and Reassembly OFF 1 2 3 4 5 6 7 8 9 11 12 14 10 13 15 FOOD AMT MIN ENDSOFPKG TURNEDUNDER POPCORN 1 35 oz pkg 3 3 1 2 SOIP SAUCE BEVERAGE 2 1 2 4 FROZENVEGETABLES 10 oz 6 7 1 2 POTATOES 2 6 8 o...

Страница 10: ...rminal and magnetron case should read open 1 The low voltage transformer is located on the control circuit board 2 Remove the low voltage transformer from the PCB Ass y and check continuity 3 Normal resistor reading is shown in the table PRECAUTION 1 High voltage is present at the high voltage terminals during any cook cycle 2 It is neither necessary nor advisable to attempt measurement of the hig...

Страница 11: ...imary switch and Monitor switch to the latch body is necessary 3 When mounting the Latch Body to the oven assembly adjust the Latch Body by moving it so that the oven door will not have any play in it Check for play in the door by pulling the door assembly Make sure that the latch keys move smoothly after adjustment is completed Completely tighten the screws holding the Latch Body to the oven asse...

Страница 12: ...ional power test should be made if temperature rise is marginal NOTE 2 Output power in watts is computed by multiplying the temperature rise step E by a factor of 91 times the of centigrade temperature The microwave heat distribution can be checked indirectly by measuring the water temperature rise at certain positions in the oven 1 Prepare five beakers made of Pyrex having 100 milliliters capacit...

Страница 13: ...ocedure for Measurement of Microwave Energy Leakage 5 11 Note on Measurement 5 10 Check for Microwave Leakage 5 13 1 Record keeping and notification after measurement 1 After adjustment and repair of a radiarion preventing device make a repair record for the measured values and keep the data 2 If the radiation leakage is more than 4 mW after determining that all parts are in good condition functio...

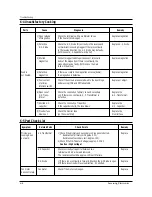
Страница 14: ...fuse 2 Poor contact of Check continuity of power supply cord Also check Adjust or replace the power cord whether the power cord is securely wired power supply cord 3 Defective lamp The fan motor rotates but lamp does not light Replace the lamp Oven lamp 4 Defective timer Check the terminals of timer for continuity Replace the timer does not contacts turning the timer knob ON and OFF repeatedly lig...

Страница 15: ...ghten screws of fan motor 2 Loose screws on H V Transformer Tighten screws of H V Transformer 3 Shorted H V Diode Replace H V Diode Turntable motor does not rotate 1 Open or loose wiring of turntable motor Replace turntable motor 2 Defective turntable motor Oven stops operation during cooking 1 Open or loose wiring of primary Adjust door and latch switches interlock switch 2 Operation of thermal c...

Страница 16: ...he timer does not operate with 220 230V applied to the Replace timer Timer does timer motor terminals the timer motor amy be faulty not operate 2 Defective The lamp does not light Replace timer contacts of timer S W Cooking tray 1 Defective Check to see if 21V exists at the motor terminals Replace drive motor does not drive motor If so motor will be defective rotate 1 Blocking of Check if the air ...

Страница 17: ...primary coil and secondary Replace the H V Trans coil If there is no continuity H V Transformer is H V Transformer former defective 7 Shorted H V Check the continuity of capacitor Replace the capacitor If the capacitor shorts the fuse blows H V Capacitor 8 Monitor fuse Check the monitor fuse Replace the blown out on the noise filter Monitor fuse 6 4 Unsatisfactory Cooking Symptom Related Parts Che...

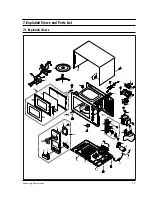
Страница 18: ...cs 7 Exploded Views and Parts List 7 1 Exploded Views 7 1 NC NO COM 2 3 4 5 9 10 31 39 29 28 30 37 36 33 32 34 35 34 27 26 25 24 23 15 14 22 21 20 19 13 12 17 16 38 40 1 11 46 48 47 41 42 43 44 45 18 8 OFF FOOD MIN 6 7 ...

Страница 19: ... 3 BL 1 17 DE64 40088C DOOR KEY NYLON 66 2021SW M530 M540 SEAU 1 18 DE45 10079A TIMER ASSY TMFE15MTK1 230V 50HZ NO DEFRO 1 19 DE72 70124D CONTROL PANEL ABS 130G GE WHT M530 XSA 1 20 DE64 10082A KNOB TIMER ABS VH0800 RA WH 02 B 15G MU 1 21 DE61 70076A SPRING BUTTON HSWR PI0 6 1 22 DE66 20052B BUTTON PUSH ABS VH 0800 RA BK 01 A 21G 1 23 DE66 90055B LEVER DOOR NYLON 66 2021SW M530 M540 SE 1 24 DE61 4...

Страница 20: ...3 M4 L10 SWR10 ZPC2 1 P CORD DE60 10012A SCREW TAP TITE TH 3 M4 L10 SWR10 ZPC2 1 B PLTE DE60 10069A SCREW TAP TH TH M4 L10 FRFZY 1 B H U DE02 00081A TAPE OPP OPP T0 07 W50 TRP OSCA 1 P CASE DE60 10080A SCREW WASHER M5 L12 2S 4 HVT DE60 10082J SCREW TAPPING TH 2S 4X8 MSWR3 ZPC YEL WS 1 B HVC DE60 10082J SCREW TAPPING TH 2S 4X8 MSWR3 ZPC YEL WS 1 NO FIL DE60 10098A SCREW ASSY TAPTITE PH TC M4X8 SWRC...

Страница 21: ...ITY PRIMARY S W BLU RESISTOR 2200pF 2200pF 0 1uF F1 NOISE FILTER F H V FUSE H V CAPACITOR FA MAGNETRON H V T H V D 1ND L FM DM TM WHT WHT WHT TIMER S W SECONDARY S W MONITOR S W RED RED BRN BLU FA F HIGH VOLTAGE TRANSFORMER H V FUSE HIGH VOLTAGE CAPACITOR HIGH VOLTAGE DIODE TO CHASSIS MAGNETRON SYMBOL COLOR ORG ORANGE BRN BROWN RED RED BLU BLUE RED RED ...

Отзывы: