background image

English-

5

Y

O U R

N

E W

T V

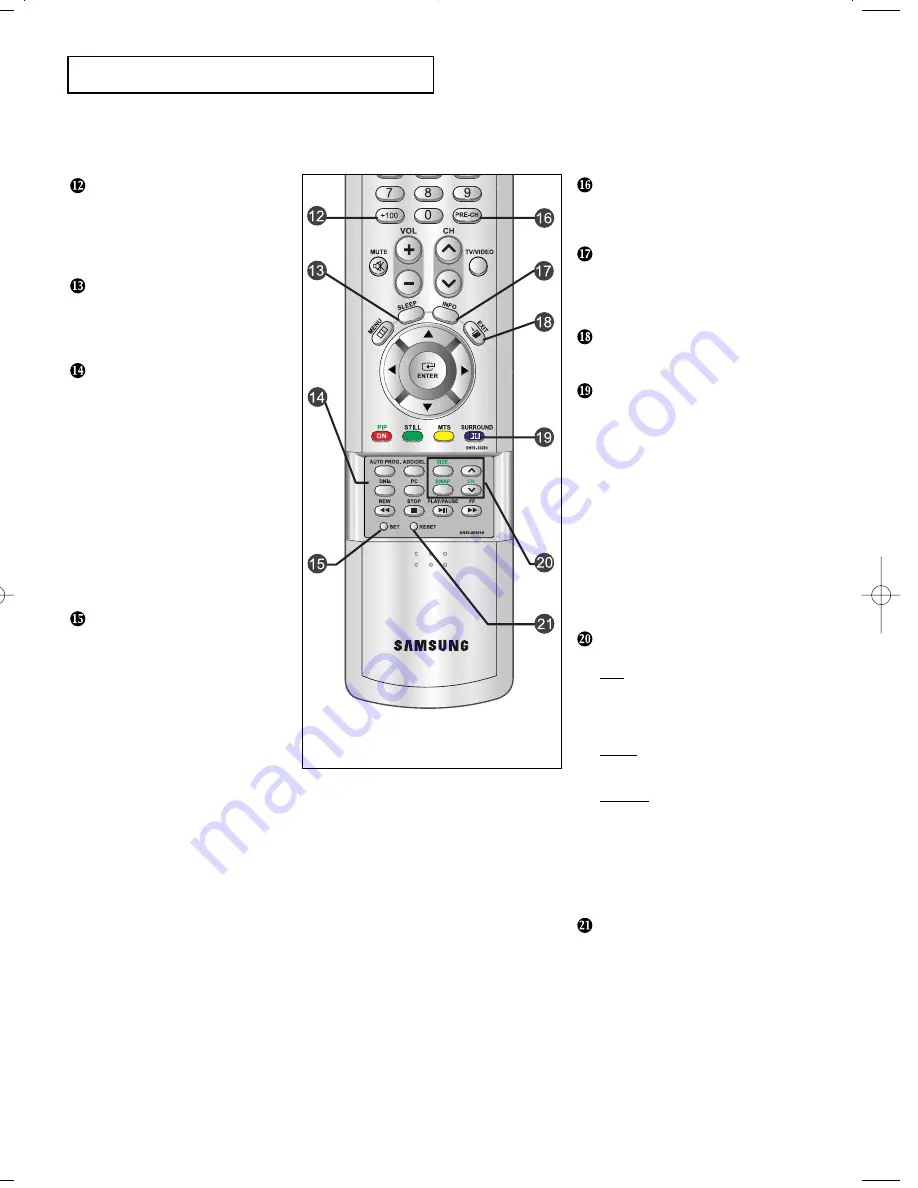
PRE-CH

Tunes to the previous channel.
(See Page 16)

INFO

Press to display the current channel   
and audio/video settings.
(See Page 17)

EXIT

Press to exit the menu.

PIP

See the PIP screen section of this    
manual. (See Page 36)

STILL

Press to stop the action during
a particular scene. Press again to
resume normal video.
(See Page 38)

MTS BUTTON

Press to select MONO or STEREO   
mode. (See Page 47)

DOLBY DIGITAL BUTTON

Press to enjoy theater-quality 3-D   
sound. (See Page 41-45)

PIP CONTROLS

(See Page 37)

CH

Displays the available channels
in sequence.
(These buttons change channels
in the PIP window only.)

SIZE

Press to make the PIP window
double, large or small.

SWAP

Exchanges the video signal that is
currently displayed on the main
screen with the signal in the PIP
window.
(While the main screen is in
PC mode, it does not work.)

RESET

When your remote does not work,  
change the batteries and press the   
“Reset” button for 2-3 seconds    
before use.

+100

Press to select channels over 100.
For example, to select channel 121,
press “+100”, then press “2” and “1”.
(See Page 24)

SLEEP TIMER

Press to select a time for the TV to   

turn off automatically.

(See Page 54)

AUTOMATIC CHANNEL

BUTTON

Press to automatically store       
selected TV/cable channels.
(See Page 24)

ADD/ERASE

Press to add or erase channels
in the TV’s memory.
(See Page 25)

DNIe BUTTON

Press to improve the digital video   
quality. (See Page 40)

PC

Press to switch to the PC mode.

SET BUTTON

 venus-02-en  6/28/03 8:14 AM  Page 5

Содержание LTN-325W

Страница 1: ...ORTADO POR SAMSUNG ELECTRONICS MEXICO S A DE C V Via Lopez Portillo No 6 Col San Francisco Chilpan Tultitlan Estado de Mexico C P 54940 Mexico D F Mexico Tel 01 55 5317 2551 3410 3409 Fax 01 55 5317 3377 EXPORTADO POR Samsung Electronics Co Ltd 416 Maetan 3dong Yeongtong Gu Suwon City Kyungki Do Korea 448R 05_cover qxd 11 8 04 11 07 AM Page 1 ...

Страница 2: ...ixed for an extended period of time the amount of light transmission will also remain varied and as a result the borders may leave traces Digital Ready TV When you select the wide screen 16 9 mode to watch an SD grade digital broadcast and the set top box output is 1080i Digital Ready TV When the TV receives HD grade signals and the set top box output is 1080i When you watch a digital HD grade bro...

Страница 3: ...borders at the left right and the center of the screen remain fixed for an extended period of time the amount of light transmission will also remain varied and as a result the borders may leave traces When you watch a DVD CD or a video in wide screen 21 9 format on a wide screen 16 9 TV When you connect a computer or a game console to the TV and select the 4 3 screen mode If you connect a DVD play...

Страница 4: ... into your outlet consult an electrician for replacement of the obsolete outlet 10 Protect the power cord from being walked on or pinched particu larly at plugs convenience receptacles and the point where they exit from the apparatus 11 Only use attachments accessories specified by the manufacturer 12 Use only with cart stand tripod bracket or table specified by the manufacturer or sold with the a...

Страница 5: ...d Important One Federal Court has held that unauthorized recording of copyrighted TV programs is an infringement of U S copyright laws Certain Canadian programs may also be copyrighted and any unauthorized recording in whole or in part may be in violation of these rights WARNING To prevent damage which may result in fire or electric shock hazard do not expose this appliance to rain or moisture As ...

Страница 6: ...ser must use shielded signal interface cables to maintain FCC compliance for the product Provided with this monitor is a detachable power supply cord with IEC320 style terminations It may be suitable for connection to any UL Listed personal computer with similar configuration Before making the connection make sure the volt age rating of the computer convenience outlet is the same as the monitor an...

Страница 7: ...ages and text such as stock market reports video game displays station logos web sites or computer graphics and patterns should be limited as described above for all televisions Displaying any stationary images that exceed the above guidelines can cause uneven aging of picture tubes LCDs that leave subtle but permanent burned in ghost images in the television picture To avoid this vary the program...

Страница 8: ...MEMO ...

Страница 9: ...l TV Set Top Box 13 Connecting the Speakers 14 Connecting a PC 15 Chapter 3 Special Features 16 Turning the TV On and Off 16 Changing Channels 16 Using the Channel Buttons 16 Using the Pre CH Button to select the Previous Channel 16 Adjusting the Volume 16 Using Mute 17 Viewing the Display 17 Viewing the Menus 17 Setting Up Your Remote Control 18 Chapter 4 Operation 22 Plug Play Feature 22 Memoriz...

Страница 10: ...Sound 50 Setting the Clock 51 Setting the On Off Timer 52 Setting the Sleep Timer 54 Using the V Chip 55 Setting Up Your Personal ID Number PIN 55 How to Enable Disable the V Chip 56 How to Set up Restrictions Using the TV guidelines 56 How to Set up Restrictions using the MPAA Ratings G PG PG 13 R NC 17 X 58 How to Reset the TV after the V Chip Blocks a Channel Emergency Escape 59 Chapter 5 PC Di...

Страница 11: ...e or eliminate reception problems Fine tuning control for the sharpest picture possible A built in multi channel sound decoder for stereo and bilingual listening Equiped dual channel speakers Headphone jack for private listening 16 9 letter box format available depending upon source List of Parts Please make sure the following items are included with your LCD TV If any items are missing contact yo...

Страница 12: ...ower off REMOTE CONTROL SENSOR Aim the remote control towards this spot on the TV TV VIDEO See Page 17 Displays a menu of all of the available input sources TV VIDEO1 VIDEO2 S VIDEO Component 1 Component 2 PC DVI MENU Press to see an on screen menu of your TV s features VOL Press to increase or decrease the volume Also used to select items on the on screen menu CH Press to change channels Also pre...

Страница 13: ...ed continuously such as a VCR or a DVD player For more information on connecting equipment see pages 7 15 VIDEO AUDIO OUTPUT VIDEO AUDIO INPUT SUPER VIDEO INPUT HEADPHONE JACK COMPONENT DIGITAL AUDIO IN JACK PC AUDIO INPUT PC VIDEO DVI D INPUT SPEAKER OUT JACK WOOFER OUTPUT TV ANTENNA KENSINGTON LOCK POWER INPUT ...

Страница 14: ...e to select on screen menu items and change menu values The remote control will only function with VCR or DVD units that are compatible with the LCD TV VIDEO DVD CONTROL BUTTON Use this button to control the video or DVD functions Works only with compatible VCR or DVD players POWER Turns the TV on and off See Page 16 P SIZE Press to change the screen size See Page 38 P MODE Adjusts the TV picture ...

Страница 15: ...ZE Press to make the PIP window double large or small SWAP Exchanges the video signal that is currently displayed on the main screen with the signal in the PIP window While the main screen is in PC mode it does not work RESET When your remote does not work change the batteries and press the Reset button for 2 3 seconds before use 100 Press to select channels over 100 For example to select channel ...

Страница 16: ...tall two AAA size batteries Make sure to match the and ends of the batteries with the diagram inside the compartment Installing Batteries in the Remote Control 1 Slide the cover out completely YOUR NEW TV The remote control doesn t work Check the following 1 Is the TV power switch on 2 Are the plus and minus ends of the batteries reversed 3 Did the battery run out 4 Is the power out or is the powe...

Страница 17: ...ntennas see Separate VHF and UHF Antennas on page 8 Antennas with 300 ohm Flat Twin Leads If you are using an off air antenna such as a roof antenna or rabbit ears that has 300 ohm twin flat leads follow the directions below Chapter Two INSTALLATION 1 Place the wires from the twin leads under the screws on a 300 75 ohm adaptor not supplied Use a screwdriver to tighten the screws 2 Plug the adaptor...

Страница 18: ... into the TV ANTENNA terminal on the bottom of the rear panel INSTALLATION Antennas with 75 ohm Round Leads 1 Plug the antenna lead into the TV ANTENNA terminal on the bottom of the back panel Separate VHF and UHF Antennas If you have two separate antennas for your TV one VHF and one UHF you must combine the two antenna signals before connecting the antennas to the TV This procedure requires a an ...

Страница 19: ...me Channels If your cable box descrambles only some channels such as premium channels follow the instructions below You will need a two way splitter an RF A B switch and four lengths of coaxial cable These items are available at most electronics stores 1 Find and disconnect the cable that is connected to the ANTENNA IN terminal on your cable box This terminal might be labeled ANT IN VHF IN or simp...

Страница 20: ...A B switch 6 Connect the last coaxial cable between the OUT terminal on the RF A B switch and the VHF UHF terminal on the rear of the TV INSTALLATION After you ve made this connection set the A B switch to the A position for normal viewing Set the A B switch to the B position to view scrambled channels When you set the A B switch to B you will need to tune your TV to the cable box s output channel...

Страница 21: ... panel configuration A coaxial cable is usually included with a VCR If not check your local electronics store If you have a mono non stereo VCR use the Y connector not supplied to hook up to the left and right audio input jacks of the TV If your VCR is stereo you must connect two cables Connecting a VCR These instructions assume that you have already connected your TV to an antenna or a cable TV s...

Страница 22: ...na or cable to your VCR and your TV Connecting an S VHS VCR Your Samsung TV can be connected to an S Video signal from an S VHS VCR This connection delivers a better picture as compared to a standard VHS VCR 2 Connect a set of audio cables between the AUDIO OUT jacks on the VCR and the AUDIO INPUT jacks on the TV 1 Connect a set of audio cables between the AUDIO IN jacks on the VCR and the AUDIO j...

Страница 23: ...le between the COMPONENT1 or COMPONENT2 Y Pb Pr jacks on the TV and the Y Pb Pr jacks on the DVD player Note For an explanation of Component video see your Set Top Box owner s manual Each external input source device has a different back panel configuration Connecting a Digital TV Set Top Box The connections for a typical set top box are shown below 1 Connect a set of audio cables between the L R ...

Страница 24: ...e nearest electronics store to purchase them 1 Connect the speaker cables to the Speaker OUT jacks on the TV and the IN jacks on the speakers 2 Connect the Subwoofer OUT jack on the TV to the Subwoofer How to Connect 1 Turn the TV on and press the TV Input button to select TV 2 Press the Volume button to adjust the volume level How to Turn the Sound On Wind the speaker cable on the core twice or m...

Страница 25: ...nding on the model PC VIDEO CABLE DVI D DVI D PC AUDIO CABLE PC AUDIO INPUT Connect these to the audio output jacks on your PC PC VIDEO INPUT Connect to the video output port on your PC Each external input source device has a different back panel configuration TV rear panel PC rear PC VIDEO CABLE DVI D SUB PC AUDIO CABLE TV rear panel PC rear DVI D D SUB ...

Страница 26: ...he Volume 1 Press the VOL buttons to increase or decrease the volume Turning the TV On and Off Press the POWER button You can also use the Power button on the front panel Note 1 Use of the Power button on the remote is possible only when the TV is in Power Saving stand by mode If the TV is powered off the remote cannot be used to turn the TV on 2 To retain the time and or automatic alarm settings ...

Страница 27: ...y Allows the user to adjust the settings according to his her prefer ence and shows the current settings Viewing the Menus 1 With the power on press the MENU button The main menu appears on the screen It s left side has five icons Input Picture Sound Channel Setup The on screen menus disappear from the screen after about thirty seconds You can also use the MENU CHANNEL VOLUME and TV Video buttons ...

Страница 28: ...ote to Operate Your VCR 1Turn off your VCR 2 Press the MODE button and make sure that the VCR LED is illuminated 3 Press the Set button on your TV s remote control 4 Using the number buttons on your remote control enter three digits of the VCR code listed on page 21 of this manual for your brand of VCR Make sure you enter three digits of the code even if the first digit is a 0 If more than one cod...

Страница 29: ...ttons on your remote control enter three digits of the cable box code listed on page 21 of this manual for your brand of cable box Make sure you enter three digits of the code even if the first digit is a 0 If there is more than one code listed try the first one 5 Press the Power button on the remote control Your cable box should turn on if your remote is set up correctly If your cable box does no...

Страница 30: ... control enter three digits of the DVD code listed on page 21 of this manual for your brand of DVD Make sure you enter three digits of the code even if the first digit is a 0 If there is more than one code listed try the first one 5 Press the Power button on the remote control Your DVD should turn on if your remote is set up correctly If your DVD does not turn on after set up repeat steps 2 3 and ...

Страница 31: ...22 050 065 069 082 001 002 007 024 040 024 017 038 062 065 011 017 023 025 038 039 055 070 016 024 016 024 040 041 011 023 025 039 055 070 073 015 017 062 084 086 014 044 055 017 038 062 065 017 038 014 025 042 059 053 054 061 009 011 017 053 011 015 017 018 021 024 028 036 052 062 KLH LG Lloyd Logik LXI Magnavox Marantz Marta MEI Memorex MGA Midland Minota Mitsubishi Montgomery ward MTC Multitech...

Страница 32: ...Press the POWER button on the remote control The message Plug Play is displayed 2 Press the ENTER button The TV will begin memorizing all of the available channels 3 Press the LEFT RIGHT buttons to move to the hour or minute Set the hour or minute by pressing the UP DOWN buttons refer to Setting and Displaying the Current Time on page 51 4 The message Enjoy your watching is displayed ...

Страница 33: ...hannels you must specify the type of signal source that is connected to the TV i e an antenna or a cable system 1 Press the MENU button to display the menu Press the UP DOWN buttons to select Channel then press the ENTER button 2 Press the UP DOWN buttons to select Air CATV then press the ENTER button Repeatedly press the UP DOWN buttons to cycle through these choices Air antenna STD HRC or IRC al...

Страница 34: ... Press ENTER at any time to interrupt the memorization process and return to the CHANNEL menu 2 Press the UP DOWN buttons to select Auto program Press the ENTER button 1 First select the correct signal source Air STD HRC IRC See steps 1 2 on previous page Press the MENU button Press the UP DOWN buttons to select Channel then press the ENTER button 4 After all the available channels are stored the ...

Страница 35: ... number buttons to directly select the channel that will be Add or Delete Press the MENU button to display the menu Press the UP DOWN buttons to select Channel then press the ENTER button Press the UP DOWN buttons to select Add Delete Press the ENTER button Press the ENTER to select Add and Delete Press the MENU button to exit You can view any channel including an erased channel by using the numbe...

Страница 36: ...reen menu Press the UP DOWN buttons to select Input then press the ENTER button Press the UP DOWN buttons to select Edit Name then press the ENTER button 2 Press the UP DOWN buttons to select Video1 Video2 S Video Component1 Component2 or PC DVI then press the ENTER button 3 Press the UP DOWN buttons repeatedly until the correct VCR appears After the VCR is entered press the ENTER button ...

Страница 37: ...ss of the picture Choose Standard for the standard factory settings Choose Movie when viewing the movies Choose Custom if you want to adjust the settings according to personal preference see Customizing the Picture page 28 1 Press the MENU button to display the menu Press the UP DOWN buttons to select Picture then press the ENTER button Press the ENTER button 2 Press the UP DOWN buttons to select ...

Страница 38: ...tings See the previous page 3 Press the ENTER button to select a particular item 4 Press the LEFT RIGHT buttons to decrease or increase the value of a particular item For example if you select Contrast pressing ENTER increases it Press the MENU button to exit Press the UP DOWN buttons to select Contrast Brightness Sharpness Color or Tint 2 Press the UP DOWN buttons to select Custom Picture then pr...

Страница 39: ...tching music videos or concerts Choose Movie when watching movies Choose Speech when watching a show that is mostly dialogue i e news Choose Custom to recall your personalized settings 2 Press the UP DOWN buttons repeatedly to select the Standard Music Movie Speech or Custom sound settings Press the ENTER button 1 Press the MENU button to display the menu Press the UP DOWN buttons to select Sound ...

Страница 40: ...und then press the ENTER button Customizing the Sound The sound settings can be adjusted to suit your personal preference Alternatively you can use one of the automatic settings See the previous page 3 Press the UP DOWN buttons to select a particular item to be changed Press the LEFT RIGHT buttons to increase or decrease the value of a particular item Press the MENU button to exit ...

Страница 41: ...buttons to select Language Press the ENTER button 1 Press the MENU button to display the menu Press the UP DOWN buttons to select Setup then press the ENTER button 3 Press the UP DOWN buttons to select English Français Español or Português Press the MENU button to exit ...

Страница 42: ...viewing the poor picture you must set the Blue screen mode to Off 1 Press the MENU button to display the menu Press the UP DOWN buttons to select Setup then press the ENTER button 2 Press the UP DOWN buttons to select Blue Screen then press the ENTER button 3 Press the UP DOWN buttons to set Blue Screen On Press the MENU button to exit Pressing the UP DOWN buttons will alternate between On and Off...

Страница 43: ...the MENU button to display the menu Press the UP DOWN buttons to select Setup then press the ENTER button 3 Press the UP DOWN buttons to select the signal source Press the MENU button to exit If a VCR is connected to the output jacks you can record the signals coming from the source of your choice If the output is set to TV and the PIP window function is on you can select the audio from the PIP wi...

Страница 44: ...ise preamplifier boosts the incoming signal 2 Press the UP DOWN buttons to select LNA then press the ENTER button 3 Press the UP DOWN buttons to set LNA On Press the MENU button to exit 1 Press the MENU button to display the menu Press the UP DOWN buttons to select Channel then press the ENTER button Pressing UP DOWN will alternate between On and Off ...

Страница 45: ...lect Fine Tune then press the ENTER button 4 Press the LEFT RIGHT buttons to adjust the Fine Tuning and Press the ENTER button Press the NENU button to exit OPERATION If you do not store the channel in memory adjustments to the settings are applied before you change the channel but are not saved Therefore they return to the original settings once you move to another channel User adjusted channels ...

Страница 46: ... UP DOWN buttons to select PIP then press the ENTER button 2 Press the ENTER button to select PIP On If you turn the TV off while watching and turn it on again the PIP window will disappear Quick way to access the PIP menu Simply press the PIP button on the remote control Sub Picture PC Analog PC DVI TV Tuner1 TV Tuner2 AV1 AV2 S VHS COMP1 COMP2 Main Picture PC Analog PC DVI TV Tuner1 TV Tuner2 AV...

Страница 47: ...rnate between a smaller and larger PIP window Changing the Size of the PIP Window You cannot select the PIP window function when the TV set is in energy saving mode You will see the Check the cable connection or Out of input range message on the screen in PC mode Press the button once more to deselect PIPmode You may notice that the picture in the PIPwindow becomes slightly unnatural when you set ...

Страница 48: ... OPERATION Changing the Screen Size 1 Press the P SIZE button to change the screen size Wide Sets the picture to 16 9 wide mode Panorama Use this mode for the wide aspect ratio of a panoramic picture However it does not work in 720p and 1080i modes Zoom 1 2 Magnifies the size of the picture on screen 4 3 Sets the picture to 4 3 normal mode This is the standard TV screen size ...

Страница 49: ...to select Color Tone then press the ENTER button 1 Press the MENU button to display the menu Press the UP DOWN buttons to select Picture then press the ENTER button 3 Press the UP DOWN buttons to select Color Tone Press the MENU button to exit Choose from the following Color Tone settings Cool 2 Cool 1 Normal Warm 1 Warm 2 according to personal preference ...

Страница 50: ... buttons to select DNIe items Press the MENU button to exit 1 Press the MENU button to display the menu Press the UP DOWN buttons to select Picture then press the ENTER button DNIe Demo The screen shows the improved image on the left hand side and the original image on the right hand side DNIe On Improved picture mode demonstrated by DNIe Demo is activated DNIe Off The mode is deactivated and the ...

Страница 51: ...r channel that has the 20 100Hz bass effect Turning the Dolby Pro Logic II On 2 Press the UP DOWN buttons to select Dolby Digital then press the ENTER button 1 Press the MENU button to display the menu Press the UP DOWN buttons to select Sound then press the ENTER button 3 Press the UP DOWN buttons to select Dolby Pro Logic II then press the ENTER button 4 Press the UP DOWN buttons to select ON th...

Страница 52: ...s to select Sound then press the ENTER button 3 Press the UP DOWN buttons to select Dynamic Range then press the ENTER button 4 Press the UP DOWN buttons to select ON then press the ENTER button Press the MENU button to exit Turning the Dynamic Range On Reduces the difference between the high and low volume Suitable for nighttime listening To Enjoy Dolby Digital Sound ...

Страница 53: ...en press the ENTER button 4 Press the UP DOWN buttons to select Front Left then press the ENTER button Press the MENU button to exit Speaker Choose your left and right front speakers among the small and large speakers and select On Off for the center the left and right rear speakers and the subwoofer When the Dolby ProLogic II is on Turn the subwoofer on and choose the small speakers as your left ...

Страница 54: ...elect Level Control then press the ENTER button 4 Press the UP DOWN buttons to select Test Tone then press the ENTER button Press the MENU button to exit Level You can choose On Off for a test The output levels of the left and right front speakers the center speaker and the left and right rear speakers are adjustable within the range of 10 10dB Use to adjust the connection settings and output leve...

Страница 55: ...r Left or Rear Right then press the ENTER button Press the LEFT RIGHT buttons to adjust Time Delay Press the MENU button to exit Time Delay For the best quality 5 1 channel surround sound reproduction place the speakers so that the distance between the speakers and the distance between you and the speakers are the same The sound coming out of the speakers does not reach the listener at the same ti...

Страница 56: ...factured under license from Dolby Laboratories Dolby Pro Logic and the double D symbol are trademarks of Dolby Laboratories Front Speakers Although ideally it should be at the same height as the front speakers you can also place it on or below the TV set Center Speaker Place the speakers behind the listener at a certain distance away so that they are placed 23 6 inch 35 4 inch higher than the list...

Страница 57: ...the bilingual function while you are watching a program in mono If you set the stereo setting to Off and change the channel the setting remains Mono regardless of the properties of the signals sent from the broadcaster Press the MTS button to switch between Mono and Stereo Please note that it works only when the broadcast is done in stereo 2 Press the UP DOWN buttons to select MTS Setting then pre...

Страница 58: ...r Sub when PIP is On 1 Press the MENU button to display the menu Press the UP DOWN buttons to select Sound then press the ENTER button 2 Press the UP DOWN buttons to select Sound Select Press the ENTER button 3 Press the ENTER button to select Main or Sub Select Main to hear the main TV sound and select Sub to hear the PIP window sound Press the MENU button to exit ...

Страница 59: ...P DOWN buttons to select Optical or Coaxial then press the ENTER button 4 Press the UP DOWN buttons to select then press the ENTER button Press the MENU button to exit Optical cable Changes electric pulses into optical signals for transmission This transmission system transmits the digital audio signals in the S PDIF format in which the glass conductor transmits the signals in the form of light Co...

Страница 60: ...und then press the ENTER button 2 Press the UP DOWN buttons to select Headphone and press the ENTER button Note Headphones must be purchased separately 3 Press the UP DOWN buttons to select the particular item to be changed Press the LEFT RIGHT buttons to decrease or increase the value of a particular item Press the MENU button to exit Note When TV is connected with Digital Audio In refer to page ...

Страница 61: ...en press the ENTER button 3 Press the UP DOWN buttons repeatedly until the correct time appears After the hour is entered press the LEFT RIGHT buttons to select Minute Press the UP DOWN buttons until the correct Minute appears Press the LEFT RIGHT buttons to select am pm and adjust with the UP DOWN buttons Press the MENU button to exit 2 Press the ENTER button to select Time then press the ENTER b...

Страница 62: ...on page 51 2 Press the ENTER button to select Time then press the ENTER button to select Clock 3 Press the UP DOWN buttons to select On Time then press the ENTER button Press the UP DOWN buttons repeatedly to select the appropriate hour Press the LEFT RIGHT buttons repeatedly to select the appropriate time i e the time when the TV will turn on When you set the hours make sure the correct time of d...

Страница 63: ...the hours and minutes Follow the same procedure as in steps 1 4 above 6 When finished setting the timer press the MENU button to exit What is Absent Power Off When you set the timer on your television will be turned off if you do not operate any controls during 3 hours after you turn on the TV This Absent power off function is available in only Timer on situation This function will prevent the lea...

Страница 64: ... 3 Press the UP DOWN buttons repeatedly until the correct time appears Press the MENU button to exit 2 Press the ENTER button to select Time then press the UP DOWN buttons to select Sleep Press the ENTER button Setting the On Off Timer Using the Menu Easy Way to Set the Sleep Timer Press the button on the remote The number on the screen changes from Off 30 60 90 120 150 180 This time must be set b...

Страница 65: ...ppear Press the UP DOWN buttons to select Change Pin 4 Press the LEFT RIGHT buttons The Change Pin screen will appear Choose any 4 digits for your Pin and enter them Note If you forget the Pin press the remote control buttons in the following sequence which resets the pin to 0 0 0 0 POWER OFF MUTE 8 2 4 POWER ON OPERATION As soon as the 4 digits are entered the Confirm new Pin screen appears Re en...

Страница 66: ...isplay the menu Press the UP DOWN buttons to select Setup then press the ENTER button 2 Press the UP DOWN buttons to select V Chip then press the ENTER button The Enter pin screen will appear Enter your 4 digit Pin number 3 The V Chip screen will appear and V Chip lock will be selected To enable the V Chip feature press the UP DOWN buttons so that the V Chip Lock is set to Yes Pressing the UP DOWN...

Страница 67: ...MENU again To select a different TV Rating press the UP DOWN buttons and then repeat the process Note 1 The TV Y7 TV PG TV 14 and TV MA have additional options See the next step to change any of the following sub ratings FV Fantasy Violence D Sexual suggestive Dialog L Adult Language S Sexual situation V Violence Note 2 The V Chip will automatically block certain categories that are more restricti...

Страница 68: ... While the U or B is highlight press the ENTER buttons to change the sub rating Press MENU once to save the TV guidelines A TV Rating will be selected and no letters U or B will be changed to yellow To exit this screen press the MENU button again To select a different TV Rating press the UP DOWN buttons and then repeat the process Note The V chip will automatically block certain categories that ar...

Страница 69: ...buttons to select a particular MPAA category When a category is selected its color changes to blue Pressing the UP DOWN buttons will cycle through the MPAA categories G General audience no restrictions PG Parental guidance suggested PG 13 PG 13 Parents strongly cautioned R R Restricted Children under 17 should be accompanied by an adult NC 17 No children under age 17 X X Adults only NR Not rated 3...

Страница 70: ...ufacturer or Samsung Dealer First click on Settings on the Windows start menu While Settings is highlighted move the cursor so that Control Panel is highlighted When the control panel screen appears click on Display and a display dialog box will appear Navigate to the settings tab on the display dialog box The two key variables that apply the TV PC interface are resolution and colors The correct s...

Страница 71: ... control to select the PC mode 1 Press the MENU button to display the menu Press the UP DOWN buttons to select Setup then press the ENTER button 3 Press the UP DOWN buttons to select Coarse or Fine 4 Press the LEFT RIGHT buttons to adjust the screen quality vertical stripes appear or the picture may be blurry 5 When you are satisfied with the settings press the MENU button repeatedly to return to ...

Страница 72: ...he menu Press the UP DOWN buttons to select Setup then press the ENTER button 2 Press the UP DOWN buttons to select PC Setup then press the ENTER button Press the ENTER button to select Position 3 Press the UP DOWN buttons to adjust the V Position Press the LEFT RIGHT buttons to adjust the H Position Press the MENU button to exit PC DISPLAY ...

Страница 73: ...Press the MENU button to display the menu Press the UP DOWN button to select Setup then press the ENTER button 2 Press the UP DOWN buttons to select PC Setup then press the ENTER button Press the UP DOWN buttons to select Image Reset then press the ENTER button 3 Press the MENU button to exit PC DISPLAY ...

Страница 74: ... ENTER button Press the UP DOWN buttons to select DVI Select then press the ENTER button 3 Press the UP DOWN button to select DVI Select then press the ENTER button Press the MENU button to exit Even if the cables are connected properly you may have selected the wrong DVI signal if you do not see the banner on the screen Choose the right DVI signal for your computer PC DISPLAY Image Lock Position ...

Страница 75: ...matically fine tunes the settings and adjusts the frequency values and positions 1 Press the MENU button to display the menu Press the UP DOWN button to select Setup then press the ENTER button 2 Press the UP DOWN buttons to select PC Setup then press the ENTER button 3 Press the UP DOWN buttons to select Auto Adjustment then press the ENTER button PC DISPLAY ...

Страница 76: ... Press the TV VIDEO button Make sure the TV is plugged in Check the antenna connections First check the volume of units connected to your TV digital broadcasting receiver DTV DVD cable broadcasting receiver VCR etc Then adjust the TV volume accordingly Make sure the program is broadcast in color Adjust the picture settings If the set is moved or turned in a different direction the power should be ...

Страница 77: ...anagement system Move the computer s mouse or press a key on the keyboard Check that the display resolution and frequency from your PC or video board is an available mode for your TV On your computer check Control Panel Display Settings If the setting is not correct use your computer utility program to change the display settings NOTE Your TV supports multiscan display functions within the followi...

Страница 78: ...bed on Chapter 2 Users cannot service the TV User maintenance is restricted to cleaning as explained below Unplug the LCD TV from the power outlet before cleaning To clean your flat panel display screen lightly dampen a soft clean cloth with water or mild detergent If possible use a special screen cleaning tissue or solution suitable for the antistatic coating To clean the LCD TV cabinet use a clo...

Страница 79: ...d separately The appearance and locking method may differ from the illustration depending on the manufacturer Please refer to the manual provided with the Kensington lock for proper use 1 Insert the locking device into the Kensington slot on the LCD TV Figure 1 and turn it in the locking direction Figure 2 2 Connect the Kensington lock cable 3 Fix the Kensington lock to a desk or a heavy stationar...

Страница 80: ... put the right hinge to the right side of the bracket and vice versa Be aware of the correct installation direction of the bracket when you set the angle to 30 and 32 degrees The direction for 30 and 32 degrees is indicated on the bracket surface When you first open the box the bracket is not assembled Put the left and right brackets in the direction of the arrow and tighten the captive screws 1 A...

Страница 81: ... as below and put the plastic screw anchors in 2 LCD TV Wall bracket Wall 1 Attach the plastic screw anchors to each of the left right brackets as in 1 2 Assemble the bracket bars to the left right brackets as in the picture on the left They are left right and upper lower symmetrical and the assembly direction does not matter Warning 1 Installing a wall bracket must be done by a qualified professi...

Страница 82: ...o not handle liquids near or on the TV Liquids that spill into it can cause serious damage Cabinet Never open the cabinet or touch the parts inside Wipe your TV with a clean dry cloth Never use water cleaning fluids wax or chemicals Do not put heavy objects on top of the cabinet Temperature If your TV is suddenly moved from a cold to a warm place unplug the power cord and allow at least two hours ...

Страница 83: ...CVBS S VHS RGB Component Video In Audio In 1 0 Vp p 75 ohm 500mVrms Power Supply Input AC 100 240V 50 60Hz Power Consumption Audio Characteristics Maximum Power Saving Unit WxDxH body With Speaker With Stand 180 W 1 0 W 260 W 1 0 W 31 53 X 8 58 X 24 60 inch 801 0 x 218 0 x 625 0mm 39 88 X 8 58 X 24 60 inch 1013 0 x 218 0 x 625 0mm 22 kg 38 89 X 12 48 X 29 13 inch 988 0 x 317 0 x 740 0mm 48 42 X 12...

Страница 84: ...n optimized during manufacture Mode Resolution Horizontal Frequency kHz Vertical Frequency Hz Pixel Clock Frequency MHz Sync Polarity H V MAC 640X480 832X624 640X480 720X400 640X480 640X480 800X600 800X600 800X600 1024X768 1024X768 1024X768 1280X768 35 000 49 726 31 469 31 469 37 861 37 500 37 879 48 077 46 875 48 364 56 476 60 023 47 700 66 667 74 551 59 940 70 087 72 809 75 000 60 317 72 188 75 ...

Отзывы: