background image

Español-25

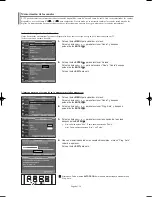
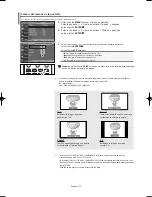
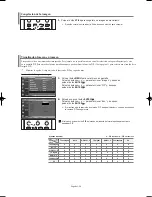
Cambio del tamaño de la pantalla

La selección del tamaño de la pantalla depende del tipo de entrada de vídeo.

1.

Pulse el botón 

MENU 

para ver el menú en pantalla.

Pulse los botones 

para seleccionar “Imagen” y, después, 

pulse el botón 

ENTER

.

2.

Pulse los botones 

para seleccionar “Tamaño” y, después, 

pulse el botón 

ENTER

.

3.

Pulse los botones 

para seleccionar el formato de pantalla que desee.

Pulse el botón 

ENTER

Pulse el botón 

EXIT 

para salir.

• 

16:9

: Establece la imagen en modo panorámico 16:9.

• 

Zoom1

: Aumenta el tamaño de la imagen en la pantalla.

• 

Zoom2

: Amplía el formato de la imagen Zoom1.

• 

4:3

: Establece la imagen en modo normal 4:3.

• En los modos TV, VIDEO, S-VIDEO, y COMPONENTE (480i, 480p), pueden seleccionarse todos los 

modos de pantalla.  (16:9 • Zoom1 • Zoom2 • 4:3).

• En los modos TV(DTV), DVI, PC, HDMI, y COMPONENTE (720P, 1080i), sólo pueden seleccionar los modos 16:9 y 4:3.

• En Zoom1 y Zoom2, se puede ajustar el tamaño por medio de los botones arriba o abajo después de pulsar 

el botón P.SIZE.

• El tamaño de la imagen no se cambiará cuando PIP sea Doble.

• Si observa una imagen fija o el modo 4:3 durante largo tiempo (más de 2 horas), puede que la imagen se

"queme" en pantalla. Vea siempre que pueda la televisión en modo 16:9.

• HD (alta definición)

16:9 - 1080i (1920x1080), 720P (1280x720)

Alternativo, pulse el boton 

P.SIZE 

del mando a distancia de forma repetida para seleccionar 

uno de los ajustes de tamaño de imagen.

16:9

Establece la imagen en modo 

panorámico 16:9.

Zoom1

Tamaño de pantalla cuando se amplía

verticalmente el formato amplio.

Zoom2

Tamaño de pantalla cuando se amplía 

verticalmente el formato Zoom1.

4:3

Establece la imagen en modo

normal 4:3.

BN68-00998A-03Spa.qxd  6/28/06 7:22 PM  Page 25

Содержание LNS4051DX

Страница 1: ...ez contacter le Service Consommateurs Samsung Contacte con SAMSUNG WORLD WIDE Si tiene alguna pregunta o comentario referente a nuestros productos por favor contacte con nuestro Servicio de Atención al Cliente Country CANADA U S A Customer Care Center 1 800 SAMSUNG 7267864 1 800 SAMSUNG 7267864 Address Samsung Electronics Canada Inc Customer Service 55 Standish Court Mississauga Ontario L5R 4B2 Ca...

Страница 2: ... gauche à droite et au centre de l écran à cause de la différence d émission de lumière sur l écran La lecture d un DVD ou l utilisation d une console de jeu peut avoir un effet similaire sur l écran Les dommages provoqués par les effets qui précèdent ne sont pas couverts par la garantie L affichage d images fixes de jeux vidéo et d ordinateurs pendant plus longtemps qu une période spécifique peut...

Страница 3: ... 28 Setting the TruSurround XT 28 Choosing a Multi Channel Sound MTS track Digital 29 Choosing a Multi Channel Sound MTS track Analog 29 Selecting the Internal Mute 30 Automatic Volume Control 30 Setting the On Off Melody 31 Listening to the Sound of the Sub PIP Picture 31 CHANNEL CONTROL Selecting the Antenna 32 Setting the Channel Manager 32 To set up Your Favorite Channels 33 Using the Channel ...

Страница 4: ... surround system Accessories Please make sure the following items are included with your LCD TV If any items are missing contact your dealer M4 X L16 The items color and shape may vary depending on the model General Information Remote Control Batteries AAA x 2 LN S2651D LN S3251D LN S4051D BN59 00511A LN S2652D LN S3252D LN S4052D BN59 00512A Power Cord 3903 000144 Cleaning Cloth BN63 01798A Cover...

Страница 5: ...s you would use the and buttons on the remote control Press to change channels In the on screen menu use the buttons as you would use the and buttons on the remote control SPEAKERS POWER Press to turn the TV on and off POWER INDICATOR Blinks and turns off when the power is on and lights up in stand by mode REMOTE CONTROL SENSOR Aim the remote control towards this spot on the TV Buttons on the Lowe...

Страница 6: ...ection is needed for an HDMI to HDMI connection HEADPHONE LN S2651D LN S2652D Connect a set of external headphones for private listening ANT 1 IN ANT 2 IN Connect to an antenna or cable TV system PC IN Connect to the video and audio output jacks on your PC COMPONENT IN Connect Component video audio POWER INPUT Connect the supplied power cord KENSINGTON LOCK The Kensington lock optional is a device...

Страница 7: ...xternal devices with an S Video output HEADPHONE Connect a set of external headphones for private listening Side Panel Jacks LN S3251D LN S3252D LN S4051D LN S4052D Use the left side panel jacks to connect a component that is used only occasionally such as a camcorder or video game See page 10 ...

Страница 8: ...Cable channels ADD DEL Use to store and delete channels to from memory SET Sets the remote to control your TV VCR Cable DVD or Set Top Box TV DVD STB CABLE VCR Press to operate your TV DVD STB CABLE box or VCR SOURCE Press to display all of the available video sources PRE CH Tunes to the previous channel FAV CH Press to switch to your favorite channels E SAVING Adjusts screen brightness to save en...

Страница 9: ...HF and UHF Antennas If you have two separate antennas for your TV one VHF and one UHF you must combine the two antenna signals before connecting the antennas to the TV This procedure requires an optional combiner adaptor available at most electronics shops UHF VHF ANT 1 IN AIR ANT 2 IN CALBE ANT 1 IN AIR 1 Lift the cover at the back of the remote control upward as shown in the figure 2 Install two...

Страница 10: ...er Cable Box Incoming cable Connecting to a Cable Box that Descrambles Some Channels If your cable box descrambles only some channels such as premium channels follow the instructions below You will need a two way splitter an RF A B switch and four lengths of RF cable These items are available at most electronics stores 1 Find and disconnect the cable that is connected to the ANT IN terminal on you...

Страница 11: ...fferent back panel configuration When connecting an external device match the color of the connection terminal to the cable For 40 inch model use the cables with the ferrite core VCR Rear Panel TV Rear Panel RF Cable Not supplied Video Cable Not supplied Audio Cable Not supplied 2 3 4 5 Connecting an S VHS VCR Your Samsung TV can be connected to an S Video signal from an S VHS VCR This connection ...

Страница 12: ...bles between the AV IN2 R AUDIO L jacks on the TV and the AUDIO OUT jacks on the camcorder Audio Cable Not supplied Video Cable Not supplied or S Video Cable Not supplied Connecting a DVD Player The rear panel jacks on your TV make it easy to connect a DVD player to your TV 1 Connect a Component Cable between the COMPONENT IN PR PB Y jacks on the TV and the COMPONENT Y PB PR jacks on the DVD playe...

Страница 13: ...e core Connecting a Digital Audio System The rear panel jacks on your TV make it easy to connect a Digital Audio System to your TV 1 Connect an Optical Cable between the DIGITAL AUDIO OUT OPTICAL jacks on the TV and the Digital Audio Input jacks on the Digital Audio System When a Digital Audio System is connected to the DIGITAL AUDIO OUT OPTICAL terminal Decrease the gain volume of the TV and adju...

Страница 14: ...Mute Component PC HDMI Speaker Output Mute Mute RF Sound Output Sound Output Mute AV S Video Sound Output Sound Output Mute Component PC HDMI Sound Output Sound Output Mute When Internal mute is set to On Sound menus except Multi Track Options and Digital Output cannot be adjusted Audio Out Optical L R Out Connecting the iPod 1 Turn on the TV 2 Connect the MP3 Link RS232 and AV IN1 cable to the TV...

Страница 15: ...ENTER button to select Start If the antenna is connected to ANT 1 AIR select Air and if it is connected to ANT 2 CABLE select Cable If both ANT 1 AIR and ANT 2 CABLE are connected select the Air Cable In Cable mode you can select the correct signal source among STD HRC and IRC by pressing the or button then press the ENTER button Contact your local cable company to identify the type of cable syste...

Страница 16: ...t Plug Play Press the ENTER button For further details on setting up options refer to the previous page Plug Play can only be accessed in the TV mode If you want to reset this feature Changing Channels 1 Press the CH or CH button to change channels When you press the CH or CH button the TV changes channels in sequence You will see all the channels that the TV has memorized The TV must have memoriz...

Страница 17: ...lay the channel the type of sound and the status of certain picture and sound settings The screen displays disappear after about ten seconds The display identifies the current channel and the status of certain audio video settings Press the INFO button once more or wait approximately 10 seconds and it disappears automatically Adjusting the Volume 1 Press the VOL or VOL buttons to increase or decre...

Страница 18: ...tton to display the menu Press the or buttons to select Channel then press the ENTER button 2 Press the ENTER button select Antenna Press the or buttons to select Air or Cable then press the ENTER button Press the EXIT button to exit Storing Channels in Memory Automatic Method 1 Press the MENU button to display the menu Press the or buttons to select Channel then press the ENTER button 2 Press the...

Страница 19: ...des TV VCR Cable DVD or Set Top Box Pressing the corresponding button on the remote control allows you to switch between these modes and control whichever piece of equipment you choose The remote control might not be compatible with all DVD Players VCRs Cable boxes and Set Top Boxes Setting Up the Remote to Operate Your Cable Box 1 Turn off your cable box 2 Press the CABLE button on your TV s remo...

Страница 20: ...rol Modes DVD When your remote control is in DVD mode the volume buttons still control your TV s volume Setting Up the Remote to Operate Your Set Top Box 1 Turn off your STB 2 Press the STB button on your TV s remote control 3 Press the SET button on your TV s remote control 4 Using the number buttons on your remote control enter three digits of the STB code listed on page 21 of this manual for yo...

Страница 21: ...37 070 036 006 007 008 009 010 025 038 025 021 056 059 007 008 018 021 026 037 062 006 021 006 021 024 025 034 005 019 041 075 019 034 041 046 VCR Brand MONTGOMERY WARD MTC MULTITECH NEC OPTIMUS ORION PANASONIC PENTAX PENTEX RESEARCH PHILCO PHILIPS PIONEER PORTLAND PROSCAN QUARTZ QUASAR RADIO SHACK REALISTIC RCA SANSUI SANYO SCOTT SEARS SHARP SHIMTOM SIGNATURE SONY SYLVANIA SYMPHONIC TANDY TASHIKA...

Страница 22: ...073 051 108 109 073 059 100 106 107 074 075 025 031 057 058 054 055 056 076 093 074 094 073 048 049 050 052 053 144 074 105 072 076 092 119 044 045 046 047 023 Brand SAMSUNG GI HAMLIN HITACHI JERROLD MACOM MAGNAVOX OAK PANASONIC PHILIPS PIONEER RCA REGAL Code 000 001 002 003 004 005 006 007 041 003 024 031 025 030 038 039 025 030 019 023 028 026 003 022 027 037 044 019 021 023 028 004 018 020 044 ...

Страница 23: ...46 049 050 063 058 059 061 062 016 065 066 051 052 053 065 066 064 057 026 020 027 031 005 006 007 064 064 054 060 015 017 028 029 030 072 060 066 016 021 037 055 056 057 024 031 068 Brand PANASONIC PHILIPS ROTEL RIO RCA RAITE ROWA SAMPO SONY SHERWOOD SVA SYLVANIA SHARP SANSUI SANYO SHINSONIC Code 024 034 124 134 136 137 138 036 076 117 118 120 023 035 074 075 131 132 073 038 104 026 029 126 127 1...

Страница 24: ...V Receiver DVD Receiver GAME Camcorder DVD Combo PC VOD STB or TV input source then press the ENTER button Press the EXIT button to exit Use to select TV or other external input sources connected to the TV Use to select the input source of your choice 1 Press the MENU button to display the menu Press the ENTER button to select Input 2 Press the ENTER button to select Source List Press the or butto...

Страница 25: ...ss and Color are not available Picture mode needs to be adjusted separately for each input 3 Press the or buttons to select Contrast Brightness Sharpness Color or Tint then press the ENTER button 4 Press the or buttons to decrease or increase the value of a particular item For example if you select Contrast pressing the button increases it Press the ENTER button Press the EXIT button to exit Tint ...

Страница 26: ...eset DNIe Demo Digital Natural Image engine Samsung s new technology brings you more detailed images with contrast white enhancement and 3D noise reduction You can see how DNIe improves the picture by setting DNIe demo mode to On 1 Press the MENU button to display the menu Press the or buttons to select Picture then press the ENTER button 2 Press the or buttons to select DNIe Demo then press the E...

Страница 27: ... be selected 16 9 Zoom1 Zoom2 4 3 In TV DTV DVI PC HDMI COMPONENT 720p 1080i modes only 16 9 4 3 modes can be selected You must select Zoom with P Size button on the remote not in the OSD menu if you want to move the Zoom 1 or 2 picture up or down You can not change the picture size when PIP is set to Double If you watch a still image or the 4 3 mode for a long time over 2 hours an image may be bu...

Страница 28: ...cture in Picture 1 Press the MENU button to display the menu Press the or buttons to select Picture then press the ENTER button Press the or buttons to select PIP then press the ENTER button 2 Press the ENTER button again Press the or buttons to select On then press the ENTER button If you turn the TV off while watching in PIP mode and turn it on again the PIP window will disappear Alternately you...

Страница 29: ...sired channel in the PIP window Press the ENTER buttons MAIN AV 1 2 S Video 1 2 Component PIP TV Digital MAIN PC HDMI 1 2 PIP TV Analog The channel can be active when the sub picture is set to TV Changing the Position of the PIP Window 6 Press the or buttons to select Position then press the ENTER button Press the or buttons to select the desired PIP window position Press the ENTER buttons The Dou...

Страница 30: ...ENTER button to select Mode Press the or buttons to select Standard Music Movie Speech or Custom sound setting then press the ENTER button Press the EXIT button to exit Choose Standard for the standard factory settings Choose Music when watching music videos or concerts Choose Movie when watching movies Choose Speech when watching a show that is mostly dialog i e news Choose Custom to recall your ...

Страница 31: ...uttons to select Sound then press the ENTER button Quick way to access the MTS menu Just press the MTS button on the remote control You can listen in a language other than your chosen language by pressing the MTS button 2 Press the or buttons to select Multi Track Options then press the ENTER button 3 Press the ENTER button to select Preferred Language Press the or buttons to choose the language E...

Страница 32: ... press the ENTER button Press the EXIT button to exit Sound output from the TV speakers is muted Automatic Volume Control 1 Press the MENU button to display the menu Press the or buttons to select Sound then press the ENTER button 2 Press the or buttons to select Auto Volume then press the ENTER button 3 Press the or buttons to set Auto Volume On then press the ENTER button Press the EXIT button t...

Страница 33: ...R button Press the EXIT button to exit When the PIP feature is activated you can listen to the sound of the sub PIP picture English 31 Setting the On Off Melody 1 Press the MENU button to display the menu Press the or buttons to select Sound then press the ENTER button 2 Press the or buttons to select Melody then press the ENTER button 3 Press the or buttons to select On or Off then press the ENTE...

Страница 34: ...n to delete the channel You can add or delete a channel so only channels you want are displayed Selecting the Antenna 1 Press the MENU button to display the menu Press the or buttons to select Channel then press the ENTER button 2 Press the ENTER button to select Antenna Press the or buttons to select Air or Cable then press the ENTER button Press the EXIT button to exit If the antenna is connecte...

Страница 35: ...your Favorite channel selection press the ENTER button until the symbol is no longer highlighted Press the EXIT button to exit Only memorized channels can be set as favorite channels All favorite channels will be shown in the Favorite menu You can set channels you watch frequently as favorites 5 Press the or buttons to select a channel to add then press the ENTER button Press the or buttons to sel...

Страница 36: ...press CH MGR button on the remote Choose All Added or Favorite Viewing the Channel Lists 1 Press the MENU button to display the menu Press the or buttons to select Channel then press the ENTER button 2 Press the or buttons to select Channel Manager then press the ENTER button 3 Press the or buttons to select All Added or Favorite then press the ENTER button 4 Press the or buttons to select Channel...

Страница 37: ...r optimal reception Labeling Channels 1 Press the MENU button to display the menu Press the or buttons to select Channel then press the ENTER button Press the or buttons to select Name then press the ENTER button 2 Press the or buttons to select the channel to be assigned a new name then press the ENTER button Press the or buttons to select a letter a number or a blank Results in this sequence A Z...

Страница 38: ...lifier boosts the incoming signal 1 Press the MENU button to display the menu Press the or buttons to select Channel then press the ENTER button 2 Press the or buttons to select Signal Strength then press the ENTER button If the signal strength meter indicates that the signal is weak physically adjust your antenna to increase the signal strength Continue to adjust the antenna until you find the be...

Страница 39: ...ion exists on your display settings dialog box the correct value is 60 or 60 Hz Otherwise just click OK and exit the dialog box Display Modes If the signal from the system equals the standard signal mode the screen is adjusted automatically If the signal from the system doesn t equal the standard signal mode adjust the mode by referring to your videocard user guide otherwise there may be no video ...

Страница 40: ...our PC 1 Press the MENU button to display the menu Press the or buttons to select Setup then press the ENTER button Press the or buttons to select PC then press the ENTER button Change to the PC mode first 2 Press the ENTER button to select Image Lock 3 Press the or buttons to select Coarse or Fine then press the ENTER button Press the or buttons to adjust the screen quality Vertical stripes may a...

Страница 41: ...utton 3 Press the or buttons to adjust the V Position Press the or buttons to adjust the H Position Press the ENTER button Press the EXIT button to exit Initializing the Screen Position or Color Settings 1 Press the MENU button to display the menu Press the or buttons to select Setup then press the ENTER button Press the or buttons to select PC then press the ENTER button Change to the PC mode fir...

Страница 42: ...n 2 Press the ENTER button to select Clock 3 Press the ENTER button to select Clock Mode Press the or buttons to select Manual then press the ENTER button 4 Press the or buttons to select Clock Set then press the ENTER button 5 Press the or buttons to move to Month Day Year Hour Minute or am pm Set the date and time you want by pressing the or buttons then press the ENTER button Press the EXIT but...

Страница 43: ...ect Time Zone then press the ENTER button 5 Press the or buttons to highlight the time zone for your local area and to move the highlight to the appropriate time zone on the map of the United States then press the ENTER button 6 Press the or buttons to select DST Daylight Saving Time then press the ENTER button Press the or buttons to select On or Off then press the ENTER button Press the EXIT but...

Страница 44: ...ress the MENU button to display the menu Press the or buttons to select Setup then press the ENTER button Press the or buttons to select Time then press the ENTER button 2 Press the or buttons to select On Timer then press the ENTER button 3 Press the or buttons to adjust Hour then press the button to move to the next step Set other items using the same method as above When finished press the MENU...

Страница 45: ...de If no signal is being received or the signal is very weak a blue screen automatically replaces the noisy picture background If you wish to continue viewing the poor picture you must set the Blue Screen mode to Off 1 Press the MENU button to display the menu Press the or buttons to select Picture then press the ENTER button 2 Press the or buttons to select Blue Screen then press the ENTER button...

Страница 46: ...tup then press the ENTER button 2 Press the or buttons to select Game Mode then press the ENTER button 3 Select On or Off by pressing the or buttons then press the ENTER button 4 Press the EXIT button to exit To disconnect the game console and connect another external device cancel game mode in the picture menu If you display the TV menu in Game mode the screen shakes slightly Game Mode is not ava...

Страница 47: ... to exit The default is CC1 CC1 The Primary Synchronous Caption Service These are captions in the primary language that must be in sync with the sound preferably matched to a specific frame CC2 The Special Non Synchronous Use Captions This channel carries data that is intended to augment information carried in the program CC3 Secondary Synchronous Caption Service Alternate program related caption ...

Страница 48: ...the desired sub menu options see options below then press ENTER Press the EXIT button to exit The availability of captions depends on the program being broadcast Default means to follow the standard set by the broadcaster Size This option consists of Default Small Standard and Large The default is Standard Font Style This option consists of Default Style0 Style 7 You can change the font you want T...

Страница 49: ... then press the ENTER button Select the required option Off Low Medium High by pressing or button Press the ENTER button Press the EXIT button to exit Menu Transparency Level Adjusts the transparency of the menu screen 1 Press the MENU button to display the menu Press the or buttons to select Setup then press the ENTER button 2 Press the or buttons to select Menu Transparency then press the ENTER ...

Страница 50: ...he or buttons to select Change PIN then press the ENTER button The Change PIN screen will appear Choose any 4 digits for your PIN and enter them As soon as the 4 digits are entered the Confirm new PIN screen appears Re enter the same 4 digits When the Confirm screen disappears your PIN has been memorized Press the EXIT button to exit If you forget the PIN press the remote control buttons in the fo...

Страница 51: ... Pressing the or buttons will alternate between On and Off Press the ENTER button Press the EXIT button to exit How to Set up Restrictions Using the TV Parental Guidelines First set up a personal identification number PIN and enable the V Chip See previous section Parental restrictions can be set up using either of two methods The TV guidelines or the MPAA rating 1 Press the MENU button to display...

Страница 52: ...ll be blocked TV G TV PG TV 14 and TV MA The sub ratings D L S V work together similarly See next section 6 How to set the FV D L S and V sub ratings First select one of these TV Ratings TV Y TV Y7 TV G TV PG TV 14 or TV MA See Step 4 on previous page and press the button The symbol will be displayed for each sub rating While is selected press the ENTER button to go to a sub rating Press ENTER to ...

Страница 53: ...then press the ENTER button 4 The MPAA Rating screen will appear Repeatedly press the or buttons to select a particular MPAA category Pressing the or buttons will cycle through the MPAA categories Press the EXIT button to exit Allow all Press to unlock all TV ratings Block all Press to lock all TV ratings While a particular category is selected press the ENTER button to activate it The symbol will...

Страница 54: ...on Press the ENTER button to activate the restriction selected The symbol is indicated Press the EXIT button to exit Allow all Press to unlock all TV ratings Block all Press to lock all TV ratings E Exempt programming includes news sports documentaries and other information programming talk shows music videos and variety programming C Programming intended for children under age 8 C8 Programming ge...

Страница 55: ...ess the or buttons to select a appropriate restriction Press the ENTER button to activate the restriction selected The symbol is indicated Press the EXIT button to exit Allow all Press to unlock all TV ratings Block all Press to lock all TV ratings E Exempt programming includes news sports documentaries and other information programming talk shows music videos and variety programming G General 8 a...

Страница 56: ...downloaded from the broadcasting station However depending on the information from the broadcasting station it may not be available for use 4 Press the or buttons to select a appropriate restriction Press the ENTER button to activate the restriction selected The symbol is indicated Press the EXIT button to exit Allow all Press to unlock all TV ratings Block all Press to lock all TV ratings Parenta...

Страница 57: ...ected to the TV you can navigate the iPod using the buttons on the remote using the On Screen Display OSD When connected to the TV the controls on the front of the iPod are disabled If the TV and the iPod are disconnected during the operation there can be a loss of com munication if this should happen disconnect and reconnect the 30 pin connector to the iPod Note that the display loading time can ...

Страница 58: ...s working Replace the remote control batteries Clean the upper edge of the remote control transmission window Check the battery terminals Ensure that the signal cable is firmly connected to the PC source Check the maximum resolution and the frequency of the Video Adapter Compare these values with the data in the Display Modes Please check the digital signal strength and input antenna Adjust the Br...

Страница 59: ...on on a table 2 Remove four screws from the back of the TV 3 Separate the stand from the TV 4 Cover the bottom hole with a cap 2 3 4 Stand Swivel Function LN S3251D LN S3252D LN S4051D LN S4052D Place the TV more than 7 87 inches 200 mm away from the wall There should be enough space between the wall and the TV Place the TV on a flat and stable space to easily swivel the TV 20 20 The TV can be swi...

Страница 60: ...able Attach the set bracket onto the rear side of the TV set and secure the screws 3 Insert three Hangers of the set bracket into the grooves of the wall bracket Fix set bracket and wall bracket with screws Note Before installing the TV on the wall first connect the cables Wall Bracket Set Bracket Screw 8 EA WoodScrew 4EA Anchor 4 EA Installation Guide M4 X L20 M4 X L15 Installing the Wall Mount K...

Страница 61: ... set bracket onto the rear side of the TV set and secure the screws 3 Insert three Hangers of the set bracket into the grooves of the wall bracket Fix set bracket and wall bracket with screws Note Before installing the TV on the wall first connect the cables Wall Bracket Set Bracket Screw 8 EA WoodScrew 7EA Anchor 7 EA Screw 3 EA Installation Guide M4 X L20 M6 X L14 Installing the Wall Mount Kit L...

Страница 62: ... S2652D 26 inch AC110V 120V 60Hz 133 W 1360 x 768 60 Hz 5W X 2 26 57 X 2 95 X 18 72 inches 675 X 75 X 475 5 mm 26 57 X 8 48 X 20 87 inches 675 X 215 5 X 530 mm 22 67 lbs 10 1 kg 50 F to 104 F 10 C to 40 C 10 to 80 non condensing 4 F to 113 F 20 C to 45 C 5 to 95 non condensing Design and specifications are subject to change without prior notice 20 20 LN S2651D LN S2652D LN S3251D LN S3252D LN S405...

Страница 63: ...This page is intentionally left blank ...

Страница 64: ...This page is intentionally left blank ...

Страница 65: ...XT 28 Sélection d une bande son à canaux multiples MTS Numérique 29 Sélection d une bande son à canaux multiples MTS Analogique 29 Sélection du mode Internal Mute Silence Int 30 Contrôle automatique du volume 30 Configuration de la mélodie de marche d arrêt 31 Activation du son de l image SIS secondaire 31 CONTRÔLE DES CHAÎNES Sélection de l antenne 32 Réglage de Gestionnaire de canaux 32 Configur...

Страница 66: ...round XT offre un système surround Dolby virtuel Accessoires Vérifiez que les éléments suivants sont inclus avec votre télévision LCD S il manque des éléments contactez votre revendeur M4 X L16 La couleur et la forme des éléments peuvent varier en fonction du modèle Informations générales Télécommande et piles AAA x 2 LN S2651D LN S3251D LN S4051D BN59 00511A LN S2652D LN S3252D LN S4052D BN59 005...

Страница 67: ...ons et de la télécommande Appuyez sur ce bouton pour changer de canal Dans le menu à l écran utilisez les boutons de la même manière que les boutons et de la télécommande HAUT PARLEURS ALIMENTATION Appuyez sur ce bouton pour allumer et teindre la télévision VOYANT D ALIMENTATION Clignote puis s arrête lorsque le téléviseur est allumé S allume en mode Veille CAPTEUR DE LA TÉLÉCOMMANDE Dirigez la té...

Страница 68: ... requise entre deux appareils HDMI PRISE CASQUE LN S2651D LN S2652D Pour connecter un ensemble d écouteurs externes pour une écoute individuelle ANT 1 IN ANT 2 IN Pour connecter une antenne ou un système de télévision par câble PC IN A connecter à la prise de sortie audio et vidéo de votre PC COMPONENT IN Connectez le composant vidéo audio ENTREE D ALIMENTATION Connectez le câble d alimentation fo...

Страница 69: ...sortie S Vidéo PRISE CASQUE Pour connecter un ensemble d écouteurs externes pour une écoute individuelle Prises du panneau latéral LN S3251D LN S3252D LN S4051D LN S4052D Les prises du panneau latéral permettent de connecter un composant utilisé seulement occasionnellement par exemple un caméscope ou une console de jeu Voir page10 ...

Страница 70: ...ET Règle la télécommande pour qu elle contrôle votre téléviseur votre magnétoscope votre lecteur DVD ou votre décodeur TV DVD STB CABLE VCR Permet de contrôler votre téléviseur votre lecteur DVD le STB votre décodeur ou votre magnétoscope SOURCE Appuyez sur ce bouton pour afficher toutes les sources vidéo disponibles PRE CH Syntonise sur la canal précédente FAV CH Appuyez sur ce bouton pour navigu...

Страница 71: ...e en bas du panneau arrière Antennes VHF et UHF séparées Si vous disposez de deux antennes séparées pour votre télévision une VHF et une UHF vous devez combiner les deux signaux des antennes avant de les brancher à la télévision Cette procédure exige un multiplexeur adaptateur disponible dans la plupart des magasins d électronique UHF VHF ANT 1 IN AIR ANT 2 IN CABLE ANT 1 IN AIR 1 Soulevez le pann...

Страница 72: ...ion servant à décrypter certaines canal Si votre boîte de jonction ne décrypte que certaines canal comme les canal dites premium suivez les instructions ci dessous Pour ce faire vous avez besoin d un séparateur bidirectionnel d un interrupteur RF A B et de quatre longueurs de câble coaxial Ces articles sont disponibles dans la plupart des magasins d électronique 1 Localisez et débranchez le câble ...

Страница 73: ...ource externe est différente suivant les appareils Lorsque vous connectez un périphérique externe faites correspondre les couleurs de la borne et du câble Pour le modèle 40 pouces utilisez les câbles avec noyau ferrite Panneau arriére du magnétoscope Pannear arrière de la télévision Câble RF non fourni Câble Vidéo non fourni Câble Audio non fourni 2 3 4 5 Branchement d un magnétoscope S VHS Votre ...

Страница 74: ... prises AV IN 2 R AUDIO L du téléviseur et les prises AUDIO OUT du caméscope Câble Audio non fourni Câble Vidéo non fourni ou Câble S Vidéo non fourni Branchement d un lecteur DVD Les prises du panneau arrière de votre télévision ont été spécialement conçues pour faciliter le branchement d un lecteur DVD 1 Connectez un Câble composante entre les prises COMPONENT IN PR PB Y du téléviseur et les pri...

Страница 75: ...ec noyau ferrite Branchement d un système audio numérique Les prises du panneau arrière de votre téléviseur permettent de brancher facilement un système audio numérique 1 Branchez un câble optique entre les prises DIGITAL AUDIO OUT OPTICAL Sortie audio numérique Optique du téléviseur et les prises d entrée numérique du système audio numérique Lorsqu un système audio numérique est connecté à la bor...

Страница 76: ...V S Vidéo Composant PC HDMI HF AV S Vidéo Composant PC HDMI Sortie de haut parleur Sortie de haut parleur Sortie de haut parleur Sortie audio Sortie audio Sortie audio Mute Mute Mute Sortie audio Sortie audio Sortie audio Mute Mute Mute Mute Mute Mute Mode Internal Mute Desactive Mode Internal Mute Active Aucun signal vidéo Connexion de l iPod 1 Allumez le téléviseur 2 Connectez la liaison MP3 RS2...

Страница 77: ...le bouton ENTER pour sélectionner Démarrer Si l antenne est branchée dans la prise ANT 1 AIR sélectionnez Air et si elle est branchée sur la prise ANT 2 CABLE sélectionnez Câble Si les prises ANT 1 AIR et ANT 2 CABLE sont toutes deux utilisées sélectionnez Air Câble En mode Câble vous pouvez sélectionner la source de signal qui vous convient parmi STD HRC et IRC en appuyant sur le bouton ou puis s...

Страница 78: ...n ENTER Pour en savoir plus sur la configuration des options reportez vous à la page précédente La fonction Prêt à l emploi est accessible uniquement en mode TV Si vous souhaitez réinitialiser ce paramètre Changement des canal 1 Appuyez sur le bouton CH ou CH pour changer de canal Quand vous appuyez sur le bouton CH ou CH la télévision change de canal de façon séquentielle Vous pourrez voir toutes...

Страница 79: ...fiche la canal le type de son et l état de certains paramètres de son et d image Les affichages à l écran disparais sent après environ dix secondes L affichage identifie la canal en cours et l état de certains paramètres audio et vidéo Appuyez de nouveau sur la touche INFO ou attendez environ 10 secondes avant qu il disparaisse automatiquement Réglage du volume 1 Appuyez sur les boutons VOL ou VOL...

Страница 80: ...uyez sur le bouton ENTER 2 Appuyez sur le bouton ENTER pour sélectionner Antenne Appuyez plusieurs fois sur les boutons ou pour naviguer entre les options Air ou Câble puis appuyez sur le bouton ENTER Appuyez sur le bouton EXIT pour quitter Enregistrement des canal dans la mémoire méthode automatique 1 Appuyez sur le bouton MENU pour afficher le menu Appuyez sur les boutons ou pour sélectionner Ch...

Страница 81: ... Téléviseur Magnétoscope Câble Lecteur DVD ou Décodeur Une pression sur le bouton correspondant de la télécommande vous permet de basculer entre ces différents modes et de contrôler l appareil de votre choix La télécommande peut ne pas être compatible avec tous les lecteurs DVD magnétoscopes boîtes de jonction et décodeurs Configuration de la télécommande pour faire fonctionner votre câblosélecteu...

Страница 82: ... télécommande Lecteur DVD Quand la télécommande est dans le mode DVD les touches de volume commandent toujours le volume du téléviseur Paramétrage de la télécommande pour contrôler votre décodeur 1 Éteignez votre lecteur STB 2 Appuyez sur le bouton STB de la télécommande du téléviseur 3 Appuyez sur le bouton SET de la télécommande du téléviseur 4 En utilisant les boutons numériques de votre téléco...

Страница 83: ...036 006 007 008 009 010 025 038 025 021 056 059 007 008 018 021 026 037 062 006 021 006 021 024 025 034 005 019 041 075 019 034 041 046 Codes de magnétoscope Marque MONTGOMERY WARD MTC MULTITECH NEC OPTIMUS ORION PANASONIC PENTAX PENTEX RESEARCH PHILCO PHILIPS PIONEER PORTLAND PROSCAN QUARTZ QUASAR RADIO SHACK REALISTIC RCA SANSUI SANYO SCOTT SEARS SHARP SHIMTOM SIGNATURE SONY SYLVANIA SYMPHONIC T...

Страница 84: ...8 109 073 059 100 106 107 074 075 025 031 057 058 054 055 056 076 093 074 094 073 048 049 050 052 053 144 074 105 072 076 092 119 044 045 046 047 023 Marque SAMSUNG GI HAMLIN HITACHI JERROLD MACOM MAGNAVOX OAK PANASONIC PHILIPS PIONEER RCA REGAL Code 000 001 002 003 004 005 006 007 041 003 024 031 025 030 038 039 025 030 019 023 028 026 003 022 027 037 044 019 021 023 028 004 018 020 044 014 022 0...

Страница 85: ...50 063 058 059 061 062 016 065 066 051 052 053 065 066 064 057 026 020 027 031 005 006 007 064 064 054 060 015 017 028 029 030 072 060 066 016 021 037 055 056 057 024 031 068 Marque PANASONIC PHILIPS ROTEL RIO RCA RAITE ROWA SAMPO SONY SHERWOOD SVA SYLVANIA SHARP SANSUI SANYO SHINSONIC Code 024 034 124 134 136 137 138 036 076 117 118 120 023 035 074 075 131 132 073 038 104 026 029 126 127 128 129 ...

Страница 86: ...VD Jeu Caméscope Combo DVD PC Décodeur VOD ou TV puis appuyez sur la touche ENTER Appuyez sur le bouton EXIT pour quitter A utiliser pour sélectionner le téléviseur ou une autre source d entrée externe connectée au téléviseur Permet de sélectionner l écran de votre choix 1 Appuyez sur le bouton MENU pour afficher le menu Appuyez sur le bouton ENTER pour sélectionner Entrée 2 Appuyez sur le bouton ...

Страница 87: ... Couleur ne sont pas disponibles Le mode Image doit être réglé séparément pour chaque entrée 3 Appuyez sur les boutons ou pour sélectionner Contraste Luminosité Netteté Couleur ou Teinte puis appuyez sur le bouton ENTER 4 Appuyez sur les boutons ou pour augmenter ou baisser la valeur d un élément spécifique Par exemple si vous choisissez Contraste et si vous appuyez sur le bouton le contraste augm...

Страница 88: ...isés DNIe démo Image naturelle numérique La nouvelle technologie de Samsung vous garantit des images plus précises grâce à un meilleur contraste à l amélioration des blancs et à la réduction du bruit 3D Vous pouvez apprécier l amélioration de l image par la technologie DNIe en activant le mode DNIe Demo Démo DNle 1 Appuyez sur le bouton MENU pour afficher le menu Appuyez sur les boutons ou pour sé...

Страница 89: ...onibles 16 9 Zoom1 Zoom2 4 3 Dans les modes TV DTV DVI PC et HDMI COMPOSANT 720P 1080I seuls les modes 16 9 et 4 3 peuvent être sélectionnés Vous devez sélectionner la fonction Zoom à l aide du bouton P Size de la télécommande pas dans le menu OSD pour déplacer l image Zoom 1 ou 2 vers le haut ou le bas Vous ne pouvez pas modifier la taille de l image lorsque la fonction SIS est définie sur Double...

Страница 90: ...puyez sur le bouton MENU pour afficher le menu Appuyez sur les boutons ou pour sélectionner Image puis appuyez sur le bouton ENTER Appuyez sur les boutons ou pour sélectionner ISI puis appuyez sur le bouton ENTER 2 Appuyez à nouveau sur le bouton ENTER Appuyez sur les boutons ou pour sélectionner On puis appuyez sur le bouton ENTER Si vous mettez le moniteur hors tension alors qu il est en mode IS...

Страница 91: ... Appuyez sur le bouton ENTER PRINCIPALE AV 1 2 S Vidéo 1 2 Composant PIP TV numérique PRINCIPALE PC HDMI 1 2 PIP TV analogique La chaîne peut être active lorsque l image secondaire est définie sur TV Pour changer la position de la fenêtre ISI 6 Appuyez sur les boutons ou pour sélectionner Position puis appuyez sur le bouton ENTER Appuyez sur les boutons ou pour sélectionner la position de la fenêt...

Страница 92: ... réglage du son Standard Musique Cinéma Parole ou Personn puis appuyez sur ENTER Appuyez sur le bouton EXIT Choisissez Standard pour les paramètres usine standard Choisissez Musique quand vous regardez une vidéo musicale ou un concert Choisissez Cinéma quand vous regardez des films Choisissez Parole quand vous regardez une émission comprenant essentiellement des dialogues par exemple le journal té...

Страница 93: ...ou pour sélectionner Son puis appuyez sur le bouton ENTER Raccourci vers le menu MTS Appuyez simplement sur le bouton MTS de la télécommande Vous pouvez écouter le programme dans une langue autre que la langue sélectionnée en appuyant sur le bouton MTS 2 Appuyez sur les boutons ou pour sélectionner Options multi pistes puis appuyez sur le bouton ENTER 3 Appuyez sur les boutons ENTER pour sélection...

Страница 94: ... bouton ENTER Appuyez sur le bouton EXIT pour quitter La sortie audio des haut parleurs du téléviseur est désactivée Contrôle automatique du volume 1 Appuyez sur le bouton MENU pour afficher le menu Appuyez sur les boutons ou pour sélectionner Son puis appuyez sur le bouton ENTER 2 Appuyez sur les boutons ou pour sélectionner Volume auto puis appuyez sur le bouton ENTER 3 Appuyez sur les boutons o...

Страница 95: ...uton EXIT pour quitter Lorsque la fonction SIS est activée vous pouvez écouter le son de l image SIS secondaire Français 31 Configuration de la mélodie de marche d arrêt 1 Appuyez sur le bouton MENU pour afficher le menu Appuyez sur les boutons ou pour sélectionner Son puis appuyez sur le bouton ENTER 2 Appuyez sur les boutons ou pour sélectionner Mélodie puis appuyez sur le bouton ENTER 3 Appuyez...

Страница 96: ...r la chaîne Vous pouvez ajouter ou supprimer une chaîne afin d afficher uniquement les chaînes de votre choix Sélection de l antenne 1 Appuyez sur le bouton MENU pour afficher le menu Appuyez sur les boutons ou pour sélectionner Chaîne puis appuyez sur le bouton ENTER 2 Appuyez sur les boutons ENTER pour sélectionner Antenne Appuyez sur les boutons ou pour sélectionner Air ou Câble puis appuyez su...

Страница 97: ...r votre sélection de chaînes préférées appuyez sur le bouton ENTER jusqu à ce que le symbole ne soit plus en surbrillance Appuyez sur le bouton EXIT pour quitter Seules les chaînes déjà en mémoire peuvent faire partie de vos chaînes favorites Toutes vos chaînes préférées apparaissent comme Favorite Vous pouvez définir en favoris les chaînes que vous regardez fréquemment 5 Appuyez sur les boutons o...

Страница 98: ...de la télécommande Ajoute Affiche les chaînes ajoutées lorsque vous appuyez sur le bouton CH MGR de la télécommande Favorite Affiche vos chaînes préférées lorsque vous appuyez sur le bouton CH MGR de la télécommande Affichage de la liste des chaînes 1 Appuyez sur le bouton MENU pour afficher le menu Appuyez sur les boutons ou pour sélectionner Chaîne puis appuyez sur le bouton ENTER 2 Appuyez sur ...

Страница 99: ...puyez sur les boutons ou pour sélectionner Chaîne puis appuyez sur le bouton ENTER Appuyez sur les boutons ou pour sélectionner Nom puis appuyez sur le bouton ENTER 2 Utilisez les boutons ou pour sélec tionner la chaîne à renom mer puis appuyez sur le bouton ENTER Utilisez les boutons ou pour sélec tionner une lettre un chiffre ou un espace séquence de résultat A Z 0 9 espace Appuyez sur le bouton...

Страница 100: ... peut amplifier le signal et ainsi améliorer la réception 1 Appuyez sur le bouton MENU pour afficher le menu Appuyez sur les boutons ou pour sélectionner Chaîne puis appuyez sur le bouton ENTER 2 Appuyez sur les boutons ou pour sélectionner Puissance signal puis appuyez sur le bouton ENTER Si l indicateur de puissance indique que le signal numérique est faible déplacez votre antenne de manière à a...

Страница 101: ...l Affichage Réglage correct de la taille résolution Optimum 1360 x 768 pixels Si votre boîte de dialogue des paramètres d affichage comporte une option de fréquence verticale la valeur correcte est 60 ou 60Hz Sinon cliquez sur OK et quittez la boîte de dialogue Modes d affichage Si le signal du système équivaut au mode de signal standard l écran se règle automatiquement Si le signal du système ne ...

Страница 102: ... 1 Appuyez sur le bouton MENU pour afficher le menu Appuyez sur les boutons ou pour sélectionner Configuration puis appuyez sur le bouton ENTER Appuyez sur les boutons ou pour sélectionner PC puis appuyez sur le bouton ENTER Passez d abord en mode PC 2 Appuyez sur les boutons ENTER pour sélectionner Verrouiller l image 3 Appuyez sur les boutons ou pour sélectionner Grain ou Affiné puis appuyez sur...

Страница 103: ...outons ou pour régler Position vert Appuyez sur les boutons ou pour régler Position hor Appuyez sur le bouton ENTER Appuyez sur le bouton EXIT pour quitter Initialiser la position de l écran et les paramètres des couleurs 1 Appuyez sur le bouton MENU pour afficher le menu Appuyez sur les boutons ou pour sélectionner Configuration puis appuyez sur le bouton ENTER Appuyez sur les boutons ou pour sél...

Страница 104: ...r les boutons ENTER pour sélectionner Horloge 3 Appuyez sur les boutons ENTER pour sélectionner Mode horloge Appuyez sur les boutons ou pour sélectionner Manuel puis appuyez sur le bouton ENTER 4 Appuyez sur les boutons ou pour sélectionner Rég horloge puis appuyezsur le bouton ENTER 5 Appuyez sur les boutons ou pour nav iguer entre les paramètres Mois Jour Année Heure Minute ou am pm Définissez l...

Страница 105: ...au hor puis appuyez sur le bouton ENTER 5 Appuyez sur les boutons ou pour sélectionner le fuseau horaire de votre région et pour déplacer la sélection vers la zone appropriée sur la carte des États Unis puis appuyez sur le bouton ENTER 6 Appuyez sur les boutons ou pour sélectionner H d été puis appuyez sur le bouton ENTER Appuyez sur les boutons ou pour sélectionner On ou Off puis appuyez sur le b...

Страница 106: ...nu Appuyez sur les boutons ou pour sélectionner Configuration puis appuyez sur le bouton ENTER Appuyez sur les boutons ou pour sélectionner Heure puis appuyez sur le bouton ENTER 2 Appuyez sur les boutons ou pour sélectionner Minuteur ON puis appuyez sur le bouton ENTER 3 Utilisez les boutons ou pour régler le paramètre Heure puis appuyez sur le bouton pour passer à l étape suivante Définissez les...

Страница 107: ... signal n est reçu ou si le signal est très faible un écran bleu remplace automatiquement l arrière plan de l image parasité Pour continuer malgré tout à afficher l image de mauvaise qualité vous devez définir l option Écran bleu sur Off 1 Appuyez sur le bouton MENU pour afficher le menu Appuyez sur les boutons ou pour sélectionner Image puis appuyez sur le bouton ENTER 2 Appuyez sur les boutons o...

Страница 108: ...ur le bouton ENTER 2 Appuyez sur les boutons ou pour sélectionner Mode Jeu puis appuyez sur le bouton ENTER 3 Appuyez sur les boutons ou pour sélectionner On ou Off puis appuyez sur le bouton ENTER 4 Appuyez sur le bouton EXIT pour quitter Pour déconnecter la console de jeu et connecter un autre périphérique externe sortez du mode Jeu dans le menu Image Si vous affichez le menu TV en mode Jeu l éc...

Страница 109: ...ppuyez sur ENTER Appuyez sur le bouton EXIT pour quitter La valeur par défaut est CC1 CC1 Sous titres principaux synchronisés Il s agit des sous titres fournis dans la langue principale qui doivent être synchronisés avec le son et de préférence avec une image spécifique CC2 Sous titres spéciaux non synchronisés Ce canal contient les données destinées à augmenter les fournies par le programme CC3 S...

Страница 110: ... sélectionnez les options de sous menu souhaitées voir options ci dessous puis appuyez sur ENTER Appuyez sur le bouton EXIT pour quitter La disponibilité des sous titres dépend du programme diffusé La valeur Par défaut correspond à la configuration standard choisie par le fournisseur Format Cette option peut prendre les valeurs suivantes Par défaut Petit Standard et Grand La valeur par défaut est ...

Страница 111: ...ENTER Sélectionnez l option souhaitée à l aide du bouton ou Off Bas Moyen Haute Appuyez sur le bouton ENTER Appuyez sur le bouton EXIT pour quitter Niveau de transparence du menu Cette fonction permet de régler la transparence de l écran de menu 1 Appuyez sur le bouton MENU pour afficher le menu Appuyez sur les boutons ou pour sélectionner Configuration puis appuyez sur le bouton ENTER 2 Appuyez s...

Страница 112: ...outons ou pour sélectionner Changer NIP puis appuyez sur le bouton ENTER L écran Changer NIP s affiche Choisissez un code NIP à 4 chiffres et saisissez le Lorsque vous avez entré le code NIP l écran Confirmer NIP apparaît Saisissez de nouveau le code Lorsque l écran de confirmation disparaît votre code NIP est mémorisé Appuyez sur le bouton EXIT pour quitter Si vous oubliez votre code NIP appuyez ...

Страница 113: ...tons ou alterne entre les modes On et Off Appuyez sur le bouton ENTER Appuyez sur le bouton EXIT pour quitter Comment configurer les restrictions à l aide des Contrôle parental TV Réglez d abord le numéro d identification personnel NIP et activez la fonction puce V Voir section précédente Les restrictions parentales peuvent être réglées à l aide de l une de ces deux méthodes Les guides TV ou la Cl...

Страница 114: ...alors bloquées TV G TV PG TV 14 et TV MA Les évaluations secondaires D L S V fonctionnent de la même façon voir section suivante 6 Comment régler les évaluations secondaires FV D L S et V Pour commencer sélectionnez l une des catégories TV Y TV Y7 TV G TV PG TV 14 ou TV MA voir Étape 4 page précédente et appuyez sur le bouton Un symbole apparaît pour chaque sous catégorie Lorsque le symbole est sé...

Страница 115: ...ran V Chip apparaît Appuyez sur les boutons ou pour sélectionner Classif MPAA puis appuyez sur le bouton ENTER 4 L écran Classif MPAA s affiche Appuyez plusieurs fois sur les boutons ou pour sélectionner une catégorie MPAA spécifique Utilisez de nouveau les boutons ou pour parcourir les catégories MPAA Appuyez sur le bouton EXIT pour quitter Perm Tout déverrouille tous les réglages du téléviseur B...

Страница 116: ...ée Appuyez sur la touche ENTER pour activer la restriction sélectionnée Le s affiche Appuyez sur le bouton EXIT pour quitter Perm Tout Dévéverrouille tous les réglages du téléviseur Bloq Tout Verrouille tous les réglages du téléviseur E Les émissions exemptes de restrictions incluent nouvelles sports documentaires et autres émissions d information interview variétés vidéo clips et émissions de var...

Страница 117: ...ur la touche ou pour entrer une restriction appropriée Appuyez sur la touche ENTER pour activer la restriction sélectionnée Le s affiche Appuyez sur le bouton EXIT pour quitter Perm Tout Dévéverrouille tous les réglages du téléviseur Bloq Tout Verrouille tous les réglages du téléviseur E Les émissions exemptes de restrictions incluent nouvelles sports documentaires et autres émissions d informatio...

Страница 118: ...isse pas l utiliser 4 Appuyez sur la touche ou pour entrer une restriction appropriée Appuyez sur la touche ENTER pour activer la restriction sélectionnée Le s affiche Appuyez sur le bouton EXIT pour quitter Perm tout Appuyez sur cette touche pour déverrouiller toutes les catégories Bloq tout Appuyez sur cette touche pour verrouiller toutes les catégories Les niveaux de contrôle parental diffèrent...

Страница 119: ...vez parcourir les données de l iPod à l aide des boutons de la télécommande en utilisant l affichage à l écran OSD Lorsque l iPod est connecté au téléviseur les commandes sur sa face avant sont désactivées Si le téléviseur et l iPod sont déconnectés pendant l opération une perte de communication peut survenir dans ce cas débranchez puis rebranchez le connecteur 30 broches à l iPod Notez que le cha...

Страница 120: ...es puis essayez de nouveau Vérifiez que la prise électrique fonctionne correctement Remplacez les piles de la télécommande Nettoyez la partie supérieure de la télécommande fenêtre de transmission Vérifiez les bornes de la batterie Assurez vous que le câble d interface est solidement branché aux sources PC Vérifiez la résolution maximale et la fréquence de l adaptateur vidéo Comparez ces valeurs au...

Страница 121: ...s à l arrière de la télévision 3 Vous pouvez ensuite séparer la base du télévision 4 Fermez l ouverture en utilisant un cache 2 3 4 Fonction d orientation du socle LN S3251D LN S3252D LN S4051D LN S4052D Placez le téléviseur à plus de 7 87 inch 200 mm du mur Il doit y avoir assez d espace entre le mur et le téléviseur Posez le téléviseur sur une surface plane et stable afin de pouvoir faire pivote...

Страница 122: ...z le support de la télévision à l arrière de la télévision puis vissez les vis 3 Placez les 3 crochets du support dans les ouvertures du support mural Assemblez le support de la télévision avec le support mural avec les vis Remarque Connecter les câbles avant d installer le téléviseur au mur M4 X L20 M4 X L15 Installer un kit de fixation mural LN S2651D LN S2652D Cette installation peut être utili...

Страница 123: ... la télévision à l arrière de la télévision puis vissez les vis 3 Placez les 3 crochets du support dans les ouvertures du support mural Assemblez le support de la télévision avec le support mural avec les vis Remarque Connecter les câbles avant d installer le téléviseur au mur M4 X L20 M6 X L14 Installer un kit de fixation mural LN S3251D LN S3252D LN S4051D LN S4052D Cette installation peut être ...

Страница 124: ...idité au cours du fonctionnement Température de stockage Humidité du stockage LN S2651D LN S2652D 26 inches AC110V 120V 60Hz 133 W 1360 x 768 60 Hz 5W X 2 675 X 75 X 475 5 mm 26 57 X 2 95 X 18 72 inches 675 X 215 5 X 530 mm 26 57 X 8 48 X 20 87 inches 10 1 kg 22 67 lbs 10 C à 40 C 50 F à 104 F 10 à 80 sans condensation 20 C à 45 C 4 F à 113 F 5 à 95 sans condensation Le design et les spécification...

Страница 125: ...Cette page est laissée intentionnellement en blanc ...

Страница 126: ...elección de una pista de sonido multicanal MTS Digital 29 Selección de una pista de sonido multicanal MTS Analogo 29 Selección del silencio interno 30 Control automático de volumen 30 Ajuste de la melodía de encendido apagado 31 Escuchar el sonido de la sub imagen del PIP 31 CONTROL DE LOS CANALES Selección de la antena 32 Configuración del Gestor de Canales 32 Para configurar los canales favorito...

Страница 127: ...amente reales SRS TruSurround XT SRS TruSurround XT proporciona un sistema surround Dolby virtual Accesorios Compruebe que las opciones siguientes se incluyen con su TV LCD Si falta alguna opción póngase en contacto con el proveedor M4 X L16 El color y la forma de los artículos pueden variar según el modelo Información General Mando A Distancia y Pilas AAA x 2 LN S2651D LN S3251D LN S4051D BN59 00...

Страница 128: ... modo que los botones y del mando a distancia Pulse para cambiar de canal En el menú de la pantalla utilice estos botones del mismo modo que los botones y del mando a distancia ALTAVOCES POWER Pulse para encender o apagar el TV INDICADOR DE ALIMENTACIÓN Parpadea y se apaga cuando se enciende el aparato y se ilumina en el modo en espera SENSOR DEL MANDO A DISTANCIA Dirija el mando a distancia hacia...

Страница 129: ...A DE AURICULARES LN S2651D LN S2652D Efectuar una conexión de un conjunto de auriculares exteriores para la audición individual ANT 1 IN ANT 2 IN Efectuar una conexión con una antena o con un sistema de televisión por cable PC IN Se conecta a la toma de salida de audio y vídeo del PC COMPONENT IN Permite conectar el componente de vídeo audio ENTRADA DE ALIMENTACIÓN Conecte el cable de alimentación...

Страница 130: ... Video TOMA DE AURICULARES Efectuar una conexión de un conjunto de auriculares exteriores para la audición individual Tomas del panel lateral LN S3251D LN S3252D LN S4051D LN S4052D Use las tomas del panel lateral izquierdo para conectar los componentes que se utilizan ocasionalmente como una videocámara o un videojuego Consulte la página 10 ...

Страница 131: ...rar el mando a distancia para controlar el televisor el aparato de vídeo el reproductor de DVD y el receptor de televisión digital o de cable TV DVD STB CABLE VCR Púlselo para controlar el televisor el reproductor de DVD el receptor de televisión digital o de cable o el aparato de vídeo SOURCE Pulse para visualizar todos las fuentes de vídeo PRE CH Sintoniza el canal anterior FAV CH Pulse este bot...

Страница 132: ... Antenas de VHF y UHF independientes Si dispone de dos antenas independientes para el TV una de VHF y otra de UHF debe combinar ambas señales de la antena antes de conectarlas al TV Este procedimiento precisa un adaptador combinador especial disponible en la mayoría de tiendas de electrónica UHF VHF ANT 1 IN AIR ANT 2 IN CABLE ANT 1 IN AIR 1 Levante la tapa de la parte posterior del mando a distan...

Страница 133: ...odificador que decodifica algunos canales Si su decodificador sólo decodifica algunos canales como los canales de pago siga las instrucciones siguientes Necesitará un divisor de dos vías un conmutador de RF A B y cuatro largos de cable RF Estas opciones se encuentran en la mayoría de tiendas de electrónica 1 Busque y desconecte el cable que está conectado al terminal ANT IN entrada de antena del d...

Страница 134: ...dispositivo externo debe hacer coincidir los colores del terminal de conexión y del cable Para el modelo de 40 pulgadas utilice los cables con el núcleo de ferrita Panel posterior del VCR Panel posterior del TV Cable RF No incluido Cable de vídeo No incluido Cable de Audio No incluido 2 3 4 5 Conexión de un reproductor de vídeo S VHS Este televisor Samsung se puede conectar a una señal S Video pro...

Страница 135: ...s tomas AV IN 2 R AUDIO L del televisor y las tomas AUDIO OUT Salida de audio de la videocámara Cable de Audio No incluido Cable de Video No incluido o Cable de S Video No incluido Conexión de un reproductor de DVD Los conectores del panel posterior del TV facilitan la conexión de un reproductor de DVD al TV 1 Conecte un cable de componente entre las tomas COMPONENT IN PR PB Y del televisor y las ...

Страница 136: ...dio digital Las tomas del panel posterior del televisor facilitan la conexión de un sistema de audio digital al televisor 1 Conecte un cable óptico entre las tomas DIGITAL AUDIO OUT OPTICAL Salida de audio digital óptica del televisor y las tomas Digital Audio Input Entrada de audio digital del sistema de audio digital Cuado un sistema de audio digital se conecta a la terminal DIGITAL AUDIO OUT OP...

Страница 137: ...el sonido Salida del sonido Silencio Silencio Silencio Salida del sonido Salida del sonido Salida del sonido Silencio Silencio Silencio Silencio Silencio Silencio Silencio interno desactivado Silencio interno activado Sin señal del vídeo Cuando Silenc Int se ajusta en Enc los únicos menús de sonido que se pueden ajustar son Opc Multi track y Salida Digital Conexión del iPod 1 Encienda el televisor...

Страница 138: ...iar Si la antena está conectada a ANT 2 CABLE seleccione Cable si está conectada a ANT 1 AIR seleccione Aire Si ANT 1 AIR y ANT 2 CABLE están conectadas seleccione Aire Cable En el modo de cable puede seleccionar el origen de señal correcto entre STD HRC e IRC pulsando los botones o a continuación pulse el botón ENTER Póngase en contacto con su proveedor de cable para saber el tipo de sistema de c...

Страница 139: ... Play después pulse el botón ENTER Si desea más detalles sobre las opciones de configuración consulte la página anterior Sólo se puede acceder a Plug Play en el modo TV Si desea reiniciar esta función Cambio de canales 1 Pulse los botones CH o CH para cambiar los canales Cuando pulse los botones CH o CH el TV cambiará los canales por orden Verá todos los canales que ha memorizado el TV El TV deber...

Страница 140: ... El TV visualizará el canal el tipo de sonido y el estado de determinados ajustes de sonido e imagen La información en pantalla desaparece pasados unos diez segundos La pantalla identifica el canal actual y el estado de algunos ajustes de audio vídeo Pulse el botón INFO otra vez o espere unos 10 segundos y desaparecerá automáticamente Ajuste del volumen 1 Pulse los botones VOL o VOL para subir o b...

Страница 141: ...ra seleccionar Canal y después pulse el botón ENTER 2 Pulse el botón ENTER para seleccionar Antena Pulse los botones o para seleccionar Aire o Cable después pulse el botón ENTER Pulse el botón EXIT para salir Almacenamiento de los canales en la memoria método automático 1 Pulse el botón MENU para visualizar el menú Pulse los botones o para seleccionar Canal y después pulse el botón ENTER 2 Pulse l...

Страница 142: ...Top Box receptor TV digital Pulsando el botón correspondiente del mando a distancia podrá cambiar de un modo a otro y controlar cualquiera de estos equipos El mando a distancia quizá no sea compatible con todos los reproductores de DVD vídeos decodificadores y receptores de TV digital Configuración del mando a distancia para controlar el decodificador de cable 1 Apague el decodificador del cable 2...

Страница 143: ... mando a distancia esté en el modo DVD los botones de volumen seguirán controlando el volumen del televisor Configuración del mando a distancia para controlar el STB 1 Apague el STB 2 Pulse el botón STB del mando a distancia del televisor 3 Pulse el botón SET del mando a distancia del televisor 4 Mediante los botones de número del mando a distancia introduzca los tres dígitos del código del STB co...

Страница 144: ... 070 036 006 007 008 009 010 025 038 025 021 056 059 007 008 018 021 026 037 062 006 021 006 021 024 025 034 005 019 041 075 019 034 041 046 Códigos de vídeo Marca MONTGOMERY WARD MTC MULTITECH NEC OPTIMUS ORION PANASONIC PENTAX PENTEX RESEARCH PHILCO PHILIPS PIONEER PORTLAND PROSCAN QUARTZ QUASAR RADIO SHACK REALISTIC RCA SANSUI SANYO SCOTT SEARS SHARP SHIMTOM SIGNATURE SONY SYLVANIA SYMPHONIC TA...

Страница 145: ...08 109 073 059 100 106 107 074 075 025 031 057 058 054 055 056 076 093 074 094 073 048 049 050 052 053 144 074 105 072 076 092 119 044 045 046 047 023 Marca SAMSUNG GI HAMLIN HITACHI JERROLD MACOM MAGNAVOX OAK PANASONIC PHILIPS PIONEER RCA REGAL Codigo 000 001 002 003 004 005 006 007 041 003 024 031 025 030 038 039 025 030 019 023 028 026 003 022 027 037 044 019 021 023 028 004 018 020 044 014 022...

Страница 146: ...0 063 058 059 061 062 016 065 066 051 052 053 065 066 064 057 026 020 027 031 005 006 007 064 064 054 060 015 017 028 029 030 072 060 066 016 021 037 055 056 057 024 031 068 Marca PANASONIC PHILIPS ROTEL RIO RCA RAITE ROWA SAMPO SONY SHERWOOD SVA SYLVANIA SHARP SANSUI SANYO SHINSONIC Codigo 024 034 124 134 136 137 138 036 076 117 118 120 023 035 074 075 131 132 073 038 104 026 029 126 127 128 129 ...

Страница 147: ...TB Receptor AV Receptor DVD Juego Filmadora DVD Combo PC STB VOD o TV y a continuación pulse el botón ENTER Pulse el botón EXIT para salir Siga este procedimiento para seleccionar el televisor u otra fuente externa de entrada conectada al televisor Se usa para seleccionar la pantalla deseada 1 Pulse el botón MENU para ver el menú en pantalla Pulse el botón ENTER para seleccionar Entrada 2 Pulse el...

Страница 148: ...or no están disponibles Cada valor ajustado del modo Imagen se almacenará por separado según su modo de entrada 3 Pulse los botones o para seleccionar Contraste Luminos Definición Color y Tinte después pulse el botón ENTER 4 Pulse los botones o para aumentar o reducir el valor de una opción concreta Por ejemplo si selecciona Contraste pulse para incrementarlo Pulse el botón ENTER Pulse el botón EX...

Страница 149: ...tor de imagen natural digital La nueva tecnología de Samsung brinda imágenes con más detalles más contraste mejora de los blancos y una reducción de ruidos 3D Puede ver cómo DNIe mejora la imagen activando el modo Demo DNIe 1 Pulse el botón MENU para ver el menú en pantalla Pulse los botones o para seleccionar Imagen y después pulse el botón ENTER 2 Pulse los botones o para seleccionar Demo DNIe y...

Страница 150: ...os los modos de pantalla 16 9 Zoom1 Zoom2 4 3 En los modos TV DTV DVI PC HDMI y COMPONENTE 720P 1080i sólo pueden seleccionar los modos 16 9 y 4 3 En Zoom1 y Zoom2 se puede ajustar el tamaño por medio de los botones arriba o abajo después de pulsar el botón P SIZE El tamaño de la imagen no se cambiará cuando PIP sea Doble Si observa una imagen fija o el modo 4 3 durante largo tiempo más de 2 horas...

Страница 151: ...ara ver el menú en pantalla Pulse los botones o para seleccionar Imagen y después pulse el botón ENTER Pulse los botones o para seleccionar PIP y después pulse el botón ENTER 2 Pulse de nuevo el botón ENTER Pulse los botones o para seleccionar Enc y después pulse el botón ENTER Si mientras mira la televisión en el modo PIP apaga el televisor y vuelve a encenderlo la ventana PIP desaparecerá Altern...

Страница 152: ...V 1 2 S Video 1 2 Componente PIP TV Digital IMAGEN PRINCIPAL PC HDMI 1 2 PIP TV Analógica El canal puede estar activo cuando la imagen secundaria esté configurada como TV Cambio de la posición de la ventana PIP 6 Pulse los botones o para seleccionar Posición y después pulse el botón ENTER Pulse los botones o para seleccionar la posición de la ventana PIP deseada Pulse el botón ENTER Los modos Dobl...

Страница 153: ... botón ENTER para seleccionar Modo Pulse los botones o para seleccionar el ajuste de sonido Normal Música Cine Diálogo o Favorito y pulse el botón ENTER Pulse el botón EXIT para salir Elija Normal si desea usar los ajustes de fábrica Elija Música cuando mire vídeos musicales o conciertos Elija Cine cuando mire películas Elija Diálogo cuando esté visualizando contenidos de alto contenido en diálogo...

Страница 154: ... pantalla Pulse los botones o para seleccionar Sonido y después pulse el botón ENTER Forma rápida de acceder al menú MTS Pulse el botón MTS del mando a distancia Puede escuchar en un idioma distinto del elegido pulsando el botón MTS 2 Pulse los botones o para seleccionar Opc Multi track y después pulse el botón ENTER 3 Pulse los botones ENTER para seleccionar Idioma preferido Pulse los botones o p...

Страница 155: ...botón ENTER Pulse el botón EXIT para salir Se silencia la salida de sonido desde los altavoces del televisor Control automático de volumen 1 Pulse el botón MENU para ver el menú en pantalla Pulse los botones o para seleccionar Sonido y después pulse el botón ENTER 2 Pulse los botones o para seleccionar Vol Auto y después pulse el botón ENTER 3 Pulse los botones o para seleccionar Enc y después pul...

Страница 156: ...e el botón EXIT para salir Cuando la opción PIP esta activada usted puede escuchar el sonido de la sub imagen del PIP Español 31 Ajuste de la melodía de encendido apagado 1 Pulse el botón MENU para ver el menú en pantalla Pulse los botones o para seleccionar Sonido y después pulse el botón ENTER 2 Pulse los botones o para seleccionar Melodía y después pulse el botón ENTER 3 Pulse los botones o par...

Страница 157: ...para suprimir el canal Puede agregar o suprimir un canal para que se muestren sólo los canales que desee Selección de la antena 1 Pulse el botón MENU para ver el menú en pantalla Pulse los botones o para seleccionar Canal y después pulse el botón ENTER 2 Pulse el botón ENTER para seleccionar Antena Pulse los botones o para seleccionar Aire o Cable y después pulse el botón ENTER Pulse el botón EXIT...

Страница 158: ...orito Para cancelar su selección de canales Favoritos presione el botón ENTER hasta que el simbolo no este mas sobreindicado Pulse el botón EXIT para salir Sólo pueden seleccionarse como favoritos los canales memorizados Todos los canales seleccionados se mostrarán en Favoritos Puede seleccionar los canales que ve frecuentemente como favoritos 5 Pulse los botones o para seleccionar el canal que de...

Страница 159: ...a distancia se muestran todos los canales Agregado Cuando se pulsa el botón CH MGR del mando a distancia se muestran los canales agregados Favoritos Cuando se pulsa el botón CH MGR del mando a distancia se muestran los canales favoritos Visualización de la lista de canales 1 Pulse el botón MENU para ver el menú en pantalla Pulse los botones o para seleccionar Canal y después pulse el botón ENTER 2...

Страница 160: ...ajustar manualmente un determinado canal a fin de que la recepción sea óptima Etiquetado de canales 1 Pulse el botón MENU para ver el menú en pantalla Pulse los botones o para seleccionar Canal y después pulse el botón ENTER Pulse los botones o para seleccionar Nombre y después pulse el botón ENTER 2 Pulse los botones o para seleccionar el canal al que se va a asignar un nuevo nombre y pulse el bo...

Страница 161: ...r previo de bajo ruido refuerza la señal entrante 1 Pulse el botón MENU para ver el menú en pantalla Pulse los botones o para seleccionar Canal y después pulse el botón ENTER 2 Pulse los botones o para seleccionar Intensidad señal y después pulse el botón ENTER Si el medidor de potencia de señal indica que la señal es débil ajuste físicamente su antena para incrementar la potencia de la señal Cont...

Страница 162: ...ste una opción de frecuencia vertical en el cuadro de diálogo de configuración de la pantalla el valor correcto es 60 o 60 Hz Si no haga clic en Aceptar y salga del cuadro de diálogo Modos de visualización Si la señal desde el sistema es igual al modo de señal estándar la pantalla se ajustará automáticamente Si la señal desde el sistema no es igual que el modo de señal estándar deberá ajustar el m...

Страница 163: ...tón MENU para ver el menú en pantalla Pulse los botones o para seleccionar Configuración y después pulse el botón ENTER Pulse los botones o para seleccionar PC y después pulse el botón ENTER En primer lugar cambie al modo PC 2 Pulse los botones o para seleccionar Fijar la Imagen y después pulse el botón ENTER 3 Pulse los botones o para seleccionar Grueso o Fino y después pulse el botón ENTER Pulse...

Страница 164: ...R 3 Pulse los botones o para ajustar Posición V Pulse los botones o para ajustar Posición H Pulse el botón ENTER Pulse el botón EXIT para salir Inicio de la configuración de Posición de la pantalla o del Color 1 Pulse el botón MENU para ver el menú en pantalla Pulse los botones o para seleccionar Configuración y después pulse el botón ENTER Pulse los botones o para seleccionar PC y después pulse e...

Страница 165: ...ER 2 Pulse el botón ENTER para seleccionar Reloj 3 Pulse el botón ENTER para seleccionar Modo Reloj Pulse los botones o para seleccionar Manual y después pulse el botón ENTER 4 Pulse los botones o para seleccionar Config Reloj y después pulse el botón ENTER 5 Pulse los botones o para desplazarse a Mes Día Año Hora Minuto o am pm Seleccione la fecha y la hora que desee pulsando los botones o pulse ...

Страница 166: ...eleccionar Zona Tiempo y después pulse el botón ENTER 5 Pulse los botones o para resaltar la zona horaria del área local y para mover la selección a la zona horaria apropiada en el mapa de Estados Unidos después pulse el botón ENTER 6 Pulse los botones o para seleccionar Tiempo Verano después pulse el botón ENTER Pulse los botones o para seleccionar Enc o Apag y después pulse el botón ENTER Pulse ...

Страница 167: ...otón MENU para ver el menú en pantalla Pulse los botones o para seleccionar Configuración y después pulse el botón ENTER Pulse los botones o para seleccionar Tiempo y después pulse el botón ENTER 2 Pulse los botones o para seleccionar T de encendido y después pulse el botón ENTER 3 Pulse los botones o para ajustar Hora y pulse el botón para ir al paso siguiente Ajuste otras opciones utilizando el ...

Страница 168: ...no se recibe ninguna señal o ésta es muy débil una pantalla azul sustituye de forma automática la imagen con interferencias Si desea continuar viendo la imagen deficiente debe definir el modo Pantalla Azul en Apag 1 Pulse el botón MENU para ver el menú en pantalla Pulse los botones o para seleccionar Imagen y después pulse el botón ENTER 2 Pulse los botones o para seleccionar Pantalla Azul y despu...

Страница 169: ...e el botón ENTER 2 Pulse los botones o para seleccionar Modo Juego y después pulse el botón ENTER 3 Pulse los botones o para seleccionar Enc o Apag y después pulse el botón ENTER 4 Pulse el botón EXIT para salir Si desea desconectarse de la consola de videojuegos y conectar otro dispositivo externo cancele Modo juego en el menú de la imagen Si ve la televisión en Modo juego la pantalla tiembla lig...

Страница 170: ...subtítulos sincronizados Son subtítulos en el idioma principal que debe estar sincronizado con el sonido preferiblemente que coincida con la secuencia específica CC2 Subtítulos especiales de uso no sincronizado Este canal transporta datos que están destinados a ampliar la información del programa CC3 Servicio de subtítulos secundarios sincronizados Datos alternativos de subtítulos relacionados con...

Страница 171: ...ubmenú que desee vea las opciones en la pagina siguiente y pulse el botón ENTER Pulse el botón EXIT para salir La disponibilidad de los subtítulos depende del programa que se esté emitiendo La opción Programado significa que se sigue el estándar establecido por el emisor Tamaño Esta opción consta de Programado Pequeño Normal y Grande El valor predeterminado es Normal Tipo de letra Esta opción cons...

Страница 172: ... y después pulse el botón ENTER Seleccione la opción deseada Apag Bajo Medio Alto pulsando los botones o Pulse el botón ENTER Pulse el botón EXIT para salir Nivel Transparencia del menú Ajusta la transparencia de la pantalla del menú 1 Pulse el botón MENU para ver el menú en pantalla Pulse los botones o para seleccionar Configuración y después pulse el botón ENTER 2 Pulse los botones o para selecc...

Страница 173: ...botones o para seleccionar Cambiar Código y después pulse el botón ENTER Aparecerá la pantalla Cambiar Código Escriba un nuevo código PIN de 4 dígitos En cuanto introduzca los 4 dígitos aparece la pantalla Confirmar Nuevo Código Vuelva a escribir los 4 dígitos Cuando desaparezca la pantalla de confirmación el código quedará memorizado Pulse el botón EXIT para salir Si olvida su código pulse los bo...

Страница 174: ... los botones o se alterna entre Enc y Apag Pulse el botón ENTER Pulse el botón EXIT para salir Configuración de Restricciones usando la sección Guías pater TV Primero establezca un número de identificación personal PIN y active V Chip Consulte la sección anterior Las restricciones del bloqueo de programas se pueden establecer mediante dos métodos Las guía de programas o la clasificación MPAA 1 Pul...

Страница 175: ...das TV G TV PG TV 14 y TV MA Las subclasificaciones D L S V funcionan de manera similar Consulte la sección siguiente 6 Cómo establecer las subclasificaciones FV D L S y V Primero seleccione una de las clasificaciones de TV TV Y TV Y7 TV G TV PG TV 14 o TV MA consulte el paso 4 en la página anterior y pulse el botón Por cada subclasificación aparecerá un símbolo Con el seleccionado pulse el botón ...

Страница 176: ...MPAA y después pulse el botón ENTER 4 Aparecerá la pantalla Clas MPAA Pulse varias veces los botones o para seleccionar una categoría concreta de MPAA Pulsando los botones o pasará secuencialmente por todas las categorías MPAA Perm todo Se pulsa para desbloquear todos los programas de televisión Bloq todo Se pulsa para bloquear todos los programas de televisión Con una determinada categoría selecc...

Страница 177: ... ENTER para activar la restricción seleccionada Está resaltada la Pulse el botón EXIT para salir Perm todo Se pulsa para desbloquear todos los programas de televisión Bloq todo Se pulsa para bloquear todos los programas de televisión E La programación de exención incluye noticias deportes documentales y la programación de otra información programas de entrevistas y programas de variedades C Progra...

Страница 178: ... seleccionar la restricción apropiada Pulse el botón ENTER para activar la restricción seleccionada Está resaltada la Pulse el botón EXIT para salir Perm todo Se pulsa para desbloquear todos los programas de televisión Bloq todo Se pulsa para bloquear todos los programas de televisión E La programación de exención incluye noticias deportes documentales y la programación otra información programas ...

Страница 179: ...a su uso 4 Pulse los botones o para seleccionar la restricción apropiada Pulse el botón ENTER para activar la restricción seleccionada Está resaltada la Pulse el botón EXIT para salir Allow All Perm Todo Se pulsa para desbloquear todos los programas de televisión Block All Bloq Todo Se pulsa para bloquear todos los programas de televisión Los niveles de restricción de bloqueo difieren según la emi...

Страница 180: ...ncipal Sólo puede activar el iPod mediante el menú en pantalla del televisor Si el televisor y el conector de patillas del iPod no están conectados durante el funcionamiento y se han terminado bruscamente puede haber un problema de comunicación cuando vuelva a insertar el conector En este caso reinicie el iPod principal y actívelo Tenga en cuenta que el tiempo de carga de la pantalla puede retrasa...

Страница 181: ...tra vez Compruebe que la toma de la pared funciona Remplace las pilas del mando a distancia Limpie el borde superior del mando a distancia ventana de transmisión Compruebe los terminales de la pila Compruebe que el cable de señal esté conectado firmemente con las fuentes del PC Compruebe la resolución máxima y la frecuencia del adaptador de vídeo Compare estos valores con los datos de los modos de...

Страница 182: ...bre una mesa 2 Desmonte los 4 tornillos de la parte posterior del TV 3 Separe el soporte del TV 4 Cubra con una tapa el orificio inferior 2 3 4 Función de base giratoria LN S3251D LN S3252D LN S4051D LN S4052D Coloque el televisor a una distancia mínima de 7 87 pulg 200 mm de la pared Debe dejar un espacio suficiente entre el TV y la pared Coloque el TV sobre una superficie plana y estable así pod...

Страница 183: ...una mesa Acople el soporte del aparato sobre la parte posterior del televisor y apriete los tornillos 3 Inserte los 3 Colgadores del soporte del aparato en los surcos del soporte de pared Fije el soporte del aparato y el soporte de pared con los tornillos Nota Antes de montar el televisor en la pared debe conectar los cables Soporte de pared Soporte de aparato Tornillo 8EA Tornillodemadera 4EA Anc...

Страница 184: ...l soporte del aparato sobre la parte posterior del televisor y apriete los tornillos 3 Inserte los 3 Colgadores del soporte del aparato en los surcos del soporte de pared Fije el soporte del aparato y el soporte de pared con los tornillos Nota Antes de montar el televisor en la pared debe conectar los cables Soporte de pared Soporte de aparato Tornillo 8EA Tornillo de madera 7EA Anclaje 7EA Tornil...

Страница 185: ...Humedad de almacenamiento LN S2651D LN S2652D 26 pulg AC110V 120V 60Hz 133 W 1360 x 768 60 Hz 5W X 2 675 X 75 X 475 5 mm 26 57 X 2 95 X 18 72 pulg 675 X 215 5 X 530 mm 26 57 X 8 48 X 20 87 pulg 10 1 kg 22 67 lbs Entre 10 C y 40 C 50 F a 104 F Del 10 al 80 sin condensación Entre 20 C y 45 C 4 F a 113 F Del 5 al 95 sin condensación El diseño y las especificaciones están sujetos a cambios sin previo ...

Страница 186: ...Esta pagina se ha dejado en blanco expresamente ...

Отзывы: