background image

English-34

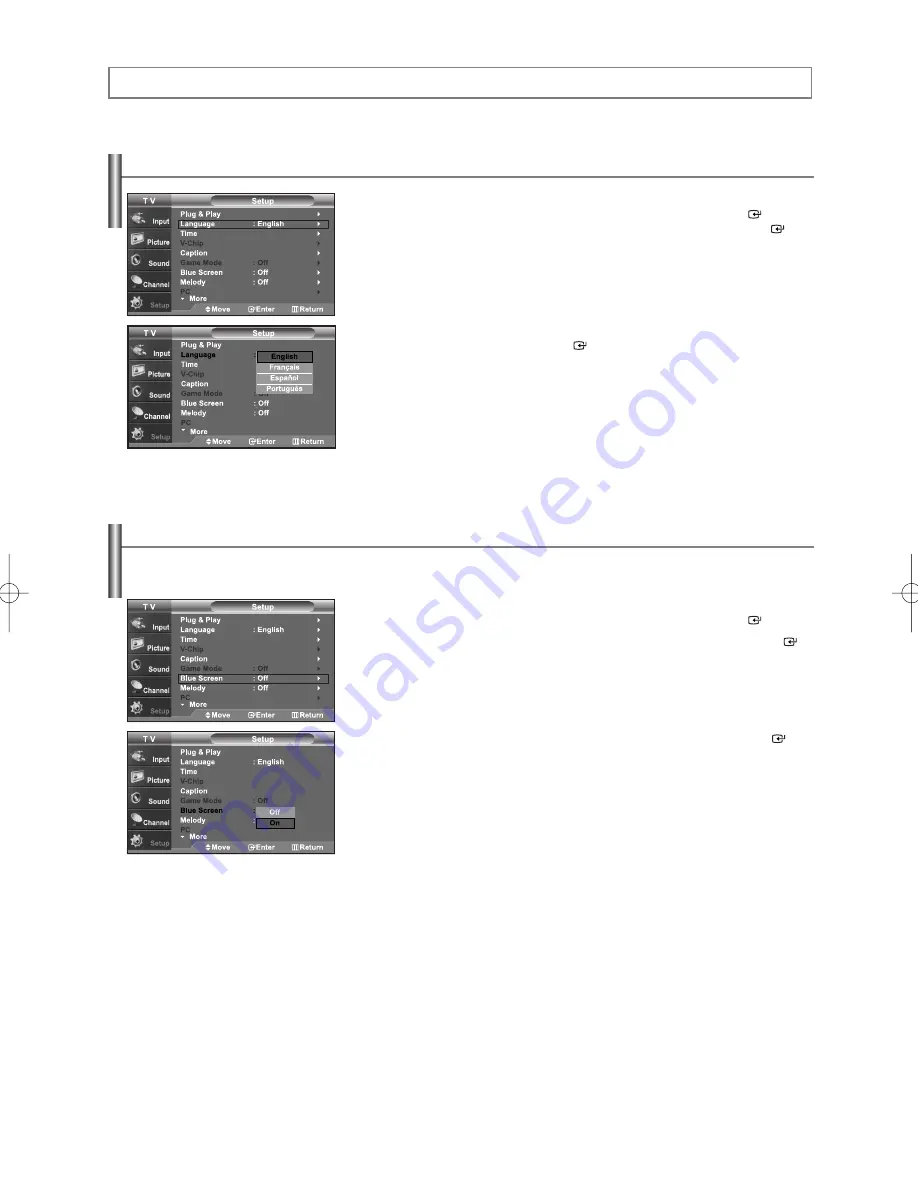
Selecting a Menu Language

1.

Press the 

MENU 

button to display the menu.

Press the 

or 

buttons to select “Setup”, then press the 

ENTER

button.

Press the 

or 

buttons to select “Language”, then press the 

ENTER

button.

2.

Press the 

or 

buttons to select “English”, “Français”, “Español”, or

“Português”, then press the 

ENTER

button.

Press the 

EXIT 

button to exit.

Setting the Blue Screen Mode

If no signal is being received or the signal is very weak, a blue screen automatically replaces the noisy picture background.
If you wish to continue viewing the poor picture, you must set the “Blue Screen” mode to “Off”

1.

Press the 

MENU 

button to display the menu.

Press the 

or 

buttons to select “Setup”, then press the 

ENTER

button.

2.

Press the 

or 

buttons to select “Blue Screen”, then press the 

ENTER

button.

3.

Press the 

or 

buttons to select “On” or “Off” then press the 

ENTER

button.

Press the 

EXIT 

button to exit.

Function Description

BN68-01001W-00Eng.qxd  7/24/06 8:05 PM  Page 34

Содержание LN26T71B

Страница 1: ... 3733 0800 124 421 800 726 7864 SAMSUNG 0 800 507 7267 1 800 10 7267 800 6225 1 800 299 0013 1 800 234 7267 01 800 SAMSUNG 7267864 800 7267 1 800 682 3180 1 800 751 2676 1 800 7267 864 1 800 100 5303 Web Site www samsung com ar www samsung com br www samsung com cl www samsung com latin www samsung com latin www samsung com latin www samsung com latin www samsung com latin www samsung com mx www s...

Страница 2: ... rights reserved Precauciones al mostrar en la pantalla una imagen fija La imagen fija puede causar daños permanentes en la pantalla del televisor No deje una imagen fija en la pantalla LCD durante más de dos horas ya que se podría producir una retención de la imagen en la pantalla Este fenómeno de retención de imágenes también se denomina quemadura de pantalla Para evitar que se produzca esa pers...

Страница 3: ... Changing the Screen Size 20 Freezing the Picture 21 Viewing Picture in Picture 21 SOUND CONTROL Customizing the Sound 23 Using Automatic Sound Settings 23 Setting the TruSurround XT 23 Choosing a Multi Channel Sound MTS track 24 Automatic Volume Control 24 Selecting the Internal Mute 24 Listening to the Sound of the Sub PIP Picture 25 Resetting the Sound Settings to the Factory Defaults 25 Connec...

Страница 4: ...d XT provides a virtual Dolby surround system Accessories Please make sure the following items are included with your LCD TV If any items are missing contact your dealer M4 X L16 The items color and shape may vary depending on the model General Information Remote Control Batteries AAA x 2 Power Cord Cover Bottom Stand LN26T71B LN32T71B Screw LN26T71B LN32T71B Owner s Instructions Warranty Card Reg...

Страница 5: ... inch model supports TV AV S Video Component1 Component2 PC and HDMI MENU Press to see an on screen menu of your TV s features Press to increase or decrease the volume In the on screen menu use the buttons as you would use the and buttons on the remote control Press to change channels In the on screen menu use the buttons as you would use the and buttons on the remote control SPEAKERS REMOTE CONTR...

Страница 6: ...ble TV system SERVICE Connector for service only AUDIO OUT R L Connect to the audio input jacks on your Amplifier Home theater PC IN Connect to the video and audio output jacks on your PC HEADPHONE LN26T71B Connect a set of external headphones for private listening POWER INPUT Connect the supplied power cord KENSINGTON LOCK The Kensington lock optional is a device used to physically fix the system...

Страница 7: ...nputs for external devices with an S Video output HEADPHONE Connect a set of external headphones for private listening Side Panel Jacks LN32T71B LN40T71B Use the left side panel jacks to connect a component that is used only occasionally such as a camcorder or video game See page 10 ...

Страница 8: ...or Separate Audio Program SAP broadcast SRS Selects SRS TruSurround XT mode SOURCE Press to display all of the available video sources PRE CH Tunes to the previous channel SLEEP Press to select a preset time interval for automatic shut off PC Selects the PC mode directly CH CH Press to change channels EXIT Press to exit the menu UP DOWN LEFT RIGHT ENTER Use to select on screen menu items and chang...

Страница 9: ... and UHF Antennas If you have two separate antennas for your TV one VHF and one UHF you must combine the two antenna signals before connecting the antennas to the TV This procedure requires an optional combiner adaptor available at most electronics shops UHF VHF ANT IN ANT IN ANT IN 1 Lift the cover at the back of the remote control upward as shown in the figure 2 Install two AAA size batteries Ma...

Страница 10: ...of the TV Splitter Cable Box Incoming cable Connecting to a Cable Box that Descrambles Some Channels If your cable box descrambles only some channels such as premium channels follow the instructions below You will need a two way splitter an RF A B switch and four lengths of RF cable These items are available at most electronics stores 1 Find and disconnect the cable that is connected to the ANT IN...

Страница 11: ...el configuration When connecting an external device match the color of the connection terminal to the cable VCR Rear Panel TV Rear Panel Antenna Cable Not supplied Video Cable Not supplied Audio Cable Not supplied 2 3 4 5 Connecting an S VHS VCR LN26T71B Your Samsung TV can be connected to an S Video signal from an S VHS VCR This connection delivers a better picture as compared to a standard VHS V...

Страница 12: ...bles between the AV IN2 R AUDIO L jacks on the TV and the AUDIO OUT jacks on the camcorder Audio Cable Not supplied Video Cable Not supplied or S Video Cable Not supplied Connecting a DVD Player The rear panel jacks on your TV make it easy to connect a DVD player to your TV 1 Connect a Component Cable between the COMPONENT IN 1 or 2 Y PB PR jacks on the TV and the COMPONENT Y PB PR jacks on the DV...

Страница 13: ...that the HDMI device is smaller in size has the HDCP High Bandwidth Digital Copy Protection coding feature installed and supports multi channel digital audio Each external input source device has a different back panel configuration When connecting an external device match the color of the connection terminal to the cable Connecting an Amplifier DVD Home Theater 1 Connect Audio Cables between the ...

Страница 14: ...ferent back panel configuration When connecting an external device match the color of the connection terminal to the cable The HDMI DVI jacks do not support PC connection 1 2 Internal Mute Off Internal Mute On Video No Signal RF Speaker Output Mute Mute Internal Speakers AV S Video Speaker Output Mute Mute Component PC HDMI Speaker Output Mute Mute RF Sound Output Sound Output Mute AV S Video Soun...

Страница 15: ...isplayed with OK selected Press the ENTER button 4 Press the or buttons to select Air STD HRC or IRC then press the ENTER button 5 Press the ENTER button to select Start The TV will begin memorizing all of the available channels To stop the search before it has finished press the ENTER button with Stop selected 6 Press the ENTER button Press the or buttons to move to the Hour Minute or am pm Set t...

Страница 16: ...re details on the options of the setup refer to the previous page Plug Play can only be accessed in the TV mode Using the Channel Buttons 1 Press the PRE CH button The TV will switch to the last channel viewed To quickly switch between two channels that are far apart tune to one channel then use the number button to select the second channel Then use the PRE CH button to quickly alternate between ...

Страница 17: ...sub menu 3 Press the EXIT button to exit The on screen menus disappear from the screen after about two minutes Viewing the Display 1 Press the INFO button on the remote control The TV will display the channel the type of sound and the status of certain picture and sound settings CAPTION The display identifies the current channel and the status of certain audio video settings Press the INFO button ...

Страница 18: ...cle through these choices Air STD HRC or IRC all cable TV Press the EXIT button to exit STD HRC and IRC identify various types of cable TV systems Contact your local cable company to identify the type of cable system that exists in your particular area At this point the signal source has been selected Proceed to Storing Channels Automatically Storing Channels in Memory Automatic Method 1 First sel...

Страница 19: ...ns to select VCR DVD D VHS Cable STB HD STB Satellite STB AV Receiver DVD Receiver Game Camcorder DVD Combo DHR or PC input source then press the ENTER button Press the EXIT button to exit Use to select TV or other external input sources connected to the TV Use to select the input source of your choice 1 Press the MENU button to display the menu Press the ENTER button to select Input 2 Press the E...

Страница 20: ... PC mode Tint Sharpness are not available 3 Press the or buttons to select Contrast Brightness Sharpness Color or Tint then press the ENTER button 4 Press the or buttons to decrease or increase the value of a particular item For example if you select Contrast pressing the button increases it Press the ENTER button Press the EXIT button to exit Tint doesn t operate in HDMI PC or any Component mode ...

Страница 21: ...d images with contrast white enhancement and 3D noise reduction You can see how DNIe improves the picture by setting DNIe demo mode to On 1 Press the MENU button to display the menu Press the or buttons to select Picture then press the ENTER button 2 Press the or buttons to select DNIe Demo then press the ENTER button This function doesn t work when the Input Source is PC 3 Press the or buttons to...

Страница 22: ...480p modes all screen modes can be selected 16 9 Zoom 4 3 2 In PC HDMI 720p 1080i COMPONENT 720p 1080i modes only 16 9 4 3 modes can be selected 3 You must select Zoom with P Size button on the remote control not in the OSD menu if you want to move the Zoom picture up or down 4 If you change the picture size when PIP is On PIP will automatically be turned Off If you watch a still image or the 4 3 ...

Страница 23: ...ct Picture then press the ENTER button Press the or buttons to select PIP then press the ENTER button 2 Press the ENTER button again Press the or buttons to select On then press the ENTER button If you turn the TV off while watching in PIP mode and turn it on again the PIP window will disappear Alternately you can press the PIP button on the remote control repeatedly to activate or deactivate the ...

Страница 24: ...w 6 Press the or buttons to select Position then press the ENTER button Press the or buttons to select the desired PIP window position Press the ENTER buttons The Double Double Wide mode cannot be selected in Position mode Changing the Size of the PIP Window 7 Press the or buttons to select Size then press the ENTER button Press the or buttons to select the desired size of the PIP window Press the...

Страница 25: ...ons to select Standard Music Movie Speech or Custom sound setting then press the ENTER button Press the EXIT button to exit Choose Standard for the standard factory settings Choose Music when watching music videos or concerts Choose Movie when watching movies Choose Speech when watching a show that is mostly dialog i e news Choose Custom to recall your personalized settings see Customizing the Sou...

Страница 26: ...ing difficulty receiving a stereo signal Choose Stereo for channels that are broadcasting in stereo Choose SAP to listen to the Separate Audio Program which is usually a foreign language translation Choosing a Multi Channel Sound MTS track Press the MTS buttons on the remote control repeatedly to select Mono Stereo or SAP Selecting the Internal Mute 1 Press the MENU button to display the menu Pres...

Страница 27: ...to the corresponding port you can operate only Internal Mute and Sound Select in PIP mode in Sound menu Prolonged use of headphones at a high volume may damage your hearing You will not receive sound from the speakers when you connect headphones to the system You can select this option when PIP is set to On Main Used to listen to the sound of the main picture Sub Used to listen to the sound of the...

Страница 28: ...to select Channel Manager 4 Press the button to select line 5 Press the or button to select the undesired channel then press the ENTER button to cancel 6 Repeat steps 5 for each channel to be selected or canceled 7 Press the EXIT button to exit is active when Child Lock is selected to On You can add or delete a channel so only channels you want are displayed G G G G G G G G Press the CH MGR button...

Страница 29: ...Press the button to select line 7 Press the or button to select the channels you want to lock then press the ENTER button 8 Repeat steps 7 for each channel to be locked or unlocked 9 Press the EXIT button to exit Select On or Off in Child Lock to easily turn the channels which selected on to be active or inactive G G G G G G G G This feature allows you to prevent unauthorized users such as childre...

Страница 30: ...ne tuning To store the fine tuning setting in the TV s memory press the ENTER button If you do not store the fine tuned channel in memory adjustments are not saved 4 To reset the fine tuning setting press the button to select Reset then press the ENTER button Press the EXIT button to exit Only analog TV channels can be fine tuned will appear next to the name of fine tuned channels Use fine tuning ...

Страница 31: ...ion exists on your display settings dialog box the correct value is 60 or 60 Hz Otherwise just click OK and exit the dialog box Display Modes If the signal from the system equals the standard signal mode the screen is adjusted automatically If the signal from the system doesn t equal the standard signal mode adjust the mode by referring to your videocard user guide otherwise there may be no video ...

Страница 32: ...l mode Change to the PC mode first Setting up the TV with your PC 1 Press the MENU button to display the menu Press the or buttons to select Setup then press the ENTER button Press the or buttons to select PC then press the ENTER button 2 Press the ENTER button to select Image Lock 3 Press the or buttons to select Coarse or Fine then press the ENTER button Press the or buttons to adjust the screen...

Страница 33: ...tion Press the or buttons to adjust the H Position Press the ENTER button Press the EXIT button to exit Initializing the Screen Position Change to the PC mode first 1 Press the MENU button to display the menu Press the or buttons to select Setup then press the ENTER button Press the or buttons to select PC then press the ENTER button 2 Press the or buttons to select Image Reset then press the ENTE...

Страница 34: ...ss the ENTER button Press the or buttons to select Time then press the ENTER button 2 Press the ENTER button to select Clock Set 3 Press the or buttons repeatedly until the correct Hour appears After the hour is entered press the or buttons to select Minute Press the or buttons until the correct Minute appears Press the or buttons to select am pm and adjust with the or buttons Press the EXIT butto...

Страница 35: ...with the setting entered set Activation to Yes by pressing or buttons When finished press the ENTER button The current time will appear every time you press the INFO button You can set the Hour and Minute directly by pressing the number buttons on the remote control 3 Press the or buttons to select Off Timer then press the ENTER button Press the or buttons to adjust Hour then press the button to m...

Страница 36: ...etting the Blue Screen Mode If no signal is being received or the signal is very weak a blue screen automatically replaces the noisy picture background If you wish to continue viewing the poor picture you must set the Blue Screen mode to Off 1 Press the MENU button to display the menu Press the or buttons to select Setup then press the ENTER button 2 Press the or buttons to select Blue Screen then...

Страница 37: ... MENU button to display the menu Press the or buttons to select Setup then press the ENTER button 2 Press the or buttons to select Game Mode then press the ENTER button 3 Select On or Off by pressing the or buttons then press the ENTER button 4 Press the EXIT button to exit To disconnect the game console and connect another external device cancel game mode in the picture menu If you display the TV...

Страница 38: ... to select Caption Press the or buttons to set the Caption On then press the ENTER button 3 Press the or buttons to select Mode then press the ENTER button Press the or buttons to set Caption or Text then press the ENTER button Depending on the particular broadcast it might be necessary to alter the settings to Channel and Field Different channels and fields display different information Field 2 c...

Страница 39: ...tton Press the EXIT button to exit 1 Press the MENU button to display the menu Press the or buttons to select Setup then press the ENTER button 2 Press the or buttons to select Color System then press the ENTER button Select the required option Auto PAL M PAL N NTSC by pressing or button Press the ENTER button Press the EXIT button to exit Using the Color System Feature Normally the TV can receive...

Страница 40: ...rking Replace the remote control batteries Clean the upper edge of the remote control transmission window Check the battery terminals Ensure that the signal cable is firmly connected to the PC source Check the maximum resolution and the frequency of the Video Adapter Compare these values with the data in the Display Modes Adjust the Brightness and Contrast Adjust the Fine tuning Adjust the Coarse ...

Страница 41: ...the TV 3 Insert screw into the hole indicated and tighten The stand is installed for models with the screen sizes of 40 inch and above 2 3 Disconnecting the Stand 1 Place the TV faced down on a soft cloth or cushion on a table 2 Remove four screws from the back of the TV 3 Separate the stand from the TV 4 Cover the bottom hole with a cap 2 3 4 ...

Страница 42: ...on a table Attach the set bracket onto the rear side of the TV set and secure the screws 3 Insert three Hangers of the set bracket into the grooves of the wall bracket Fix set bracket and wall bracket with screws Note Before installing the TV on the wall first connect the cables Wall Bracket Set Bracket Screw 8 EA WoodScrew 4EA Anchor 4 EA Installation Guide M4 X L20 M4 X L15 Installing the Wall M...

Страница 43: ... Attach the set bracket onto the rear side of the TV set and secure the screws 3 Insert three Hangers of the set bracket into the grooves of the wall bracket Fix set bracket and wall bracket with screws Note Before installing the TV on the wall first connect the cables Wall Bracket Set Bracket Screw 8 EA WoodScrew 7EA Anchor 7 EA Screw 3 EA Installation Guide M4 X L20 M6 X L14 Installing the Wall ...

Страница 44: ...h stand Weight With stand Environmental Considerations Operating Temperature Operating Humidity Storage Temperature Storage Humidity LN26T71B 26 inch AC100 240V 10 60 50Hz 133 W 1360 x 768 60 Hz 5W X 2 29 69 X 3 11 X 18 31 inches 754 X 79 X 465 mm 29 69 X 8 90 X 20 43 inches 754 X 226 X 519 mm 23 59 lbs 10 7 kg 50 F to 104 F 10 C to 40 C 10 to 80 non condensing 4 F to 113 F 20 C to 45 C 5 to 95 no...

Страница 45: ...1 Visualización Imagen en imagen 21 CONTROL DE SONIDO Personalización del sonido 23 Uso de los parámetros de sonido automáticos 23 Configuración del TruSurround XT SRS TSXT 23 Selección de una pista de sonido multicanal MTS 24 Control automático de volumen 24 Selección del silencio interno 24 Escuchar el sonido de la sub imagen del PIP 25 Reajuste de valores de sonido a los valores predefinidos de...

Страница 46: ...urround XT proporciona un sistema surround Dolby virtual Accesorios Compruebe que las opciones siguientes se incluyen con su TV LCD Si falta alguna opción póngase en contacto con el proveedor Información General M4 X L16 Mando A Distancia y Pilas AAA x 2 Cable de alimentación Cubierta inferior Base LN26T71B LN32T71B Tornillo LN26T71B LN32T71B Manual de Instrucciones Tarjeta de garantía Tarjetas de...

Страница 47: ... modo que los botones y del mando a distancia Pulse para cambiar de canal En el menú de la pantalla utilice estos botones del mismo modo que los botones y del mando a distancia ALTAVOCES SENSOR DEL MANDO A DISTANCIA Dirija el mando a distancia hacia este punto del TV POWER Pulse para encender o apagar el TV INDICADOR DE ALIMENTACIÓN Parpadea y se apaga cuando se enciende el aparato y se ilumina en...

Страница 48: ...r solamente para servicio AUDIO OUT R L Conéctelo a la toma de la entrada de audio del amplificador sistema de Cine en casa PC IN Se conecta a la toma de salida de audio y vídeo del PC TOMA DE AURICULARES LN26T71B Efectuar una conexión de un conjunto de auriculares exteriores para la audición individual ENTRADA DE ALIMENTACIÓN Conecte el cable de alimentación suministrado KENSINGTON LOCK El bloque...

Страница 49: ...on salida S Video TOMA DE AURICULARES Efectuar una conexión de un conjunto de auriculares exteriores para la audición individual Tomas del panel lateral LN32T71B LN40T71B Use las tomas del panel lateral izquierdo para conectar los componentes que se utilizan ocasionalmente como una videocámara o un videojuego Consulte la página 10 ...

Страница 50: ...ependiente emisión SAP SRS Selecciona el modo SRS TruSurround XT SOURCE Pulse para visualizar todos las fuentes de vídeo PRE CH Sintoniza el canal anterior SLEEP Pulse este botón para seleccionar un intervalo prefijado para la desconexión automática PC Seleccione el modo PC directamente CH CH Permiten cambiar de canal EXIT Pulse el botón para salir ARRIBA ABAJO IZQUIERDA DERECHA ENTER Sirve para s...

Страница 51: ...tenas de VHF y UHF independientes Si dispone de dos antenas independientes para el TV una de VHF y otra de UHF debe combinar ambas señales de la antena antes de conectarlas al TV Este procedimiento precisa un adaptador combinador especial disponible en la mayoría de tiendas de electrónica UHF VHF ANT IN ANT IN ANT IN 1 Levante la tapa de la parte posterior del mando a distancia como se muestra en ...

Страница 52: ...onexión a un decodificador que decodifica algunos canales Si su decodificador sólo decodifica algunos canales como los canales de pago siga las instrucciones siguientes Necesitará un divisor de dos vías un conmutador de RF A B y cuatro largos de cable RF Estas opciones se encuentran en la mayoría de tiendas de electrónica 1 Busque y desconecte el cable que está conectado al terminal ANT IN entrada...

Страница 53: ...ivo externo debe hacer coincidir los colores del terminal de conexión y del cable Panel posterior del VCR Panel posterior del TV Cable RF No incluido Cable de vídeo No incluido Cable de Audio No incluido 2 3 4 5 Conexión de un reproductor de vídeo S VHS LN26T71B Este televisor Samsung se puede conectar a una señal S Video procedente de un reproductor de vídeo S VHS Esta conexión ofrece mejor calid...

Страница 54: ...o entre las tomas AV IN 2 R AUDIO L del televisor y las tomas AUDIO OUT Salida de audio de la videocámara Cable de Audio No incluido Cable de Video No incluido o Cable de S Video No incluido Conexión de un reproductor de DVD Los conectores del panel posterior del TV facilitan la conexión de un reproductor de DVD al TV 1 Conecte un cable de componente entre las tomas COMPONENT IN 1 or 2 Y PB PR del...

Страница 55: ... función de codificación HDCP protección alta de la copia digital del ancho de banda y es compatible con el sonido digital de varios canales Cada dispositivo de fuente de entrada externa requiere una configuración distinta en el panel posterior Cuando conecte un dispositivo externo debe hacer coincidir los colores del terminal de conexión y del cable Conexión de un amplificador DVD para cine en ca...

Страница 56: ...cte un dispositivo externo debe hacer coincidir los colores del terminal de conexión y del cable Las tomas HDMI DVI no admiten la conexión del PC 1 2 Altavoz interno Salida de audio Optical R L Out RF AV S Vídeo Componente PC y HDMI RF AV S Vídeo Componente PC y HDMI Salida de altavoces Salida de altavoces Salida de altavoces Salida del sonido Salida del sonido Salida del sonido Silencio Silencio ...

Страница 57: ...r seleccionado Pulse el botón ENTER 4 Pulse los botones o para seleccionar Aire STD HRC o IRC después pulse el botón ENTER 5 Pulse el botón ENTER para seleccionar Iniciar El televisor empezará a memorizar todos los canales disponibles Para detener la búsqueda antes de que finalice pulse el botón ENTER con Detener seleccionado 6 Pulse el botón ENTER Pulse los botones o para desplazarse a la Hora Mi...

Страница 58: ...tre ellos Utilización del botón PRE CH para seleccionar el canal anterior Ajuste del volumen 1 Pulse los botones VOL y VOL para subir o bajar el volumen 1 Pulse el botón MUTE y el sonido se desconectará En la esquina inferior izquierda de la pantalla aparecerá la palabra 2 Para recuperar el sonido vuelva a pulsar MUTE o simplemente pulse los botones VOL y VOL Mediante Silencio Puede anular el soni...

Страница 59: ...R para acceder al submenú del icono 3 Pulse el botón EXIT para salir Los menús en pantalla desaparecen transcurridos alrededor de dos minutos Visualización de la pantalla 1 Pulse el botón INFO del mando a distancia El TV visualizará el canal el tipo de sonido y el estado de determinados ajustes de sonido e imagen CAPTION La pantalla identifica el canal actual y el estado de algunos ajustes de audi...

Страница 60: ...botón EXIT para salir STD HRC e IRC identifican los distintos tipos de sistemas de TV por cable Póngase en contacto con su proveedor de cable para averiguar el tipo de sistema de cable existente en su zona En este momento ya se ha seleccionado el origen de la señal Siga con Almacenamiento de los canales en la memoria Almacenamiento de los canales en la memoria método automático 1 En primer lugar s...

Страница 61: ...fuente de entrada Vídeo DVD D VHS Cable STB HD STB Satélite STB Receptor AV Receptor DVD Juego Filmadora DVD Combo DHR o PC y a continuación pulse el botón ENTER Pulse el botón EXIT para salir Siga este procedimiento para seleccionar el televisor u otra fuente externa de entrada conectada al televisor Se usa para seleccionar la pantalla deseada 1 Pulse el botón MENU para ver el menú en pantalla Pu...

Страница 62: ...finición y Color no están disponibles 3 Pulse los botones o para seleccionar Contraste Luminos Definición Color y Tinte después pulse el botón ENTER 4 Pulse los botones o para aumentar o reducir el valor de una opción concreta Por ejemplo si selecciona Contraste pulse para incrementarlo Pulse el botón ENTER Pulse el botón EXIT para salir Tinte no funciona en los modos Componente PC o HDMI Cada val...

Страница 63: ...aste mejora de los blancos y una reducción de ruidos 3D Puede ver cómo DNIe mejora la imagen activando el modo Demo DNIe 1 Pulse el botón MENU para ver el menú en pantalla Pulse los botones o para seleccionar Imagen y después pulse el botón ENTER 2 Pulse los botones o para seleccionar Demo DNIe y después pulse el botón ENTER Esta función no se activa cuando la fuente está en el modo PC 3 Pulse los...

Страница 64: ...seleccionarse todos los modos de pantalla 16 9 Zoom 4 3 2 En los modos PC HDMI 720P 1080i y COMPONENTE 720P 1080i sólo pueden seleccionar los modos 16 9 y 4 3 3 Debe seleccionar Zoom con el botón P Size del mando a distancia no en el menú OSD si desea mover arriba o abajo la imagen ampliada 4 Si cambia el tamaño de la imagen cuando PIP está activado esta función se apagará automaticamente Si obser...

Страница 65: ...Pulse los botones o para seleccionar PIP y después pulse el botón ENTER 2 Pulse de nuevo el botón ENTER Pulse los botones o para seleccionar Enc y después pulse el botón ENTER Si mientras mira la televisión en el modo PIP apaga el televisor y vuelve a encenderlo la ventana PIP desaparecerá Alternativo pulse el botón PIP del mando a distancia de forma repetida para activar o desactivar PIP Este tel...

Страница 66: ...ar activo cuando la imagen secundaria esté configurada como TV Pulse el botón POSITION del mando a distancia para cambiar la posición de la pantalla PIP Cambio de la posición de la ventana PIP 6 Pulse los botones o para seleccionar Posición y después pulse el botón ENTER Pulse los botones o para seleccionar la posición de la ventana PIP deseada Pulse el botón ENTER Los modos Doble y Doble ancho no...

Страница 67: ...os botones o para seleccionar el ajuste de sonido Normal Música Cine Diálogo o Favorito y pulse el botón ENTER Pulse el botón EXIT para salir Elija Normal si desea usar los ajustes de fábrica Elija Música cuando mire vídeos musicales o conciertos Elija Cine cuando mire películas Elija Diálogo cuando esté visualizando contenidos de alto contenido en diálogos p ej noticieros Elija Favorito para recu...

Страница 68: ...ol Auto y después pulse el botón ENTER 3 Pulse los botones o para seleccionar Enc o Apag y después pulse el botón ENTER Pulse el botón EXIT para salir Reduce las diferencias en el nivel de volumen entre las emisoras Español 24 1 Pulse el botón MENU para ver el menú en pantalla Pulse los botones o para seleccionar Sonido y después pulse el botón ENTER 2 Pulse los botones o para seleccionar MTS y de...

Страница 69: ...tón MENU para visualizar el menú Pulse los botones o para seleccionar Sonido y a continuación pulse el botón ENTER 2 Pulse los botones o para seleccionar Reiniciar y pulse el botón ENTER 3 Pulse el botón EXIT para salir Si Modo Juego está activado la función Reiniciar sonido se activa Si tras configurar el ecualizador selecciona la función Reiniciar se restauran los parámetros de fábrica de la con...

Страница 70: ... 3 Pulse de nuevo el botón ENTER para seleccionar Gestor de canales 4 Pulse el botón para seleccionar la línea 5 Pulse los botones o para seleccionar el canal no deseado y a continuación pulse el botón ENTER 6 Repita el paso 5 con cada canal que desee seleccionar o cancelar 7 Pulse el botón EXIT para salir está activo cuando Bloqueo está seleccionado en Enc Puede agregar o suprimir un canal de man...

Страница 71: ...Pulse el botón para seleccionar la línea 7 Pulse los botones o para seleccionar los canales que desea bloquear y a continuación pulse el botón ENTER 8 Repita el paso 7 con cada canal que desee bloquear o desbloquear 9 Pulse el botón EXIT para salir Seleccione Enc o Apag en Bloqueo para activar o desactivar fácilmente los canales que estén marcados con Esta función permite bloquear el vídeo y el au...

Страница 72: ...R Si no guarda en la memoria el canal ajustado con precisión los ajustes se perderán 4 Para reiniciar la sintonización fina pulse el botón para seleccionar Reiniciar y pulse el botón ENTER Para reiniciar la sintonización fina pulse el boton para seleccionar Reiniciar pulse el botón ENTER Pulse el botón EXIT para salir Solo puede ajustarse la sintonizacion de los canales de television analogicos El...

Страница 73: ...ste una opción de frecuencia vertical en el cuadro de diálogo de configuración de la pantalla el valor correcto es 60 o 60 Hz Si no haga clic en Aceptar y salga del cuadro de diálogo Modos de visualización Si la señal desde el sistema es igual al modo de señal estándar la pantalla se ajustará automáticamente Si la señal desde el sistema no es igual que el modo de señal estándar deberá ajustar el m...

Страница 74: ...modo PC en primer lugar Ajuste del televisor con el ordenador 1 Pulse el botón MENU para ver el menú en pantalla Pulse los botones o para seleccionar Configuración y después pulse el botón ENTER Pulse los botones o para seleccionar PC y después pulse el botón ENTER 2 Pulse el boton ENTER para seleccionar Fijar la Imagen 3 Pulse los botones o para seleccionar Grueso o Fino y después pulse el botón ...

Страница 75: ...e los botones o para ajustar Posición H Pulse el botón ENTER Pulse el botón EXIT para salir Inicio de la configuración de Posición de la pantalla Debe cambiar al modo PC en primer lugar 1 Pulse el botón MENU para ver el menú en pantalla Pulse los botones o para seleccionar Configuración y después pulse el botón ENTER Pulse los botones o para seleccionar PC y después pulse el botón ENTER 2 Pulse lo...

Страница 76: ...spués pulse el botón ENTER Pulse los botones o para seleccionar Tiempo y después pulse el botón ENTER 2 Pulse el botón ENTER para seleccionar Config Reloj 3 Pulse repetidamente los botones o hasta que aparezca la hora correcta Hora Pulse los botones o para seleccionar Minuto Pulse repetidamente los botones o hasta que aparezca el minuto correcto Minuto Pulse los botones o para seleccionar am pm y ...

Страница 77: ...ido con el valor introducido establezca Activación en Sí pulsando los botones o Cuando haya terminado pulse el botón ENTER La hora actual aparecerá siempre que se pulse el botón INFO Puede ajustar la hora y los minutos directamente pulsando los botones numéricos de mando a distancia 3 Pulse los botones o para seleccionar Hora de Apagado y a continuación pulse el botón ENTER Pulse los botones o par...

Страница 78: ...te del modo Pantalla Azul Si no se recibe ninguna señal o ésta es muy débil una pantalla azul sustituye de forma automática la imagen con interferencias Si desea continuar viendo la imagen deficiente debe definir el modo Pantalla Azul en Apag 1 Pulse el botón MENU para ver el menú en pantalla Pulse los botones o para seleccionar Configuración y después pulse el botón ENTER 2 Pulse los botones o pa...

Страница 79: ...enú en pantalla Pulse los botones o para seleccionar Configuración y después pulse el botón ENTER 2 Pulse los botones o para seleccionar Modo Juego y después pulse el botón ENTER 3 Pulse los botones o para seleccionar Enc o Apag y después pulse el botón ENTER 4 Pulse el botón EXIT para salir Si desea desconectarse de la consola de videojuegos y conectar otro dispositivo externo cancele Modo juego ...

Страница 80: ... para seleccionar Enc y después pulse el botón ENTER 3 Pulse los botones o para seleccionar Modo y a continuación pulse el botón ENTER Pulse los botones o para establecer Subtítulo o Texto y a continuación pulse el botón ENTER Según la emisión puede ser necesario realizar cambios en Canal y Campo Los distintos canales y campos muestran información diferente El campo 2 lleva infor mación adicional ...

Страница 81: ...R Pulse el botón EXIT para salir Para seleccionar el modo de ahorro de energía que ha configurado pulse el botón E SAVING del mando a distancia Uso de la función Sistema de color Normalmente el televisor puede recibir imagen y sonido de buena calidad en el modo AUTO Este modo detecta automáticamente el sistema de color de la señal Si recibe un sistema de señal con un color insatisfactorio seleccio...

Страница 82: ...be que la toma de la pared funciona Remplace las pilas del mando a distancia Limpie el borde superior del mando a distancia ventana de transmisión Compruebe los terminales de la pila Compruebe que el cable de señal esté conectado firmemente con las fuentes del PC Compruebe la resolución máxima y la frecuencia del adaptador de vídeo Compare estos valores con los datos de los modos de Pantalla Ajust...

Страница 83: ... del televisor 3 Inserte el tornillo en el orificio indicado y apriételo El soporte solo esta instalado para modelos sobre 40 pulgadas 2 3 Desconexión del soporte 1 Coloque hacia abajo el TV sobre un paño suave o un almohadón sobre una mesa 2 Desmonte los 4 tornillos de la parte posterior del TV 3 Separe el soporte del TV 4 Cubra con una tapa el orificio inferior 2 3 4 ...

Страница 84: ...sobre una mesa Acople el soporte del aparato sobre la parte posterior del televisor y apriete los tornillos 3 Inserte los 3 Colgadores del soporte del aparato en los surcos del soporte de pared Fije el soporte del aparato y el soporte de pared con los tornillos Nota Antes de montar el televisor en la pared debe conectar los cables Soporte de pared Soporte de aparato Tornillo 8EA Tornillodemadera 4...

Страница 85: ...sa Acople el soporte del aparato sobre la parte posterior del televisor y apriete los tornillos 3 Inserte los 3 Colgadores del soporte del aparato en los surcos del soporte de pared Fije el soporte del aparato y el soporte de pared con los tornillos Nota Antes de montar el televisor en la pared debe conectar los cables Soporte de pared Soporte de aparato Tornillo 8EA Tornillo de madera 7EA Anclaje...

Страница 86: ...Salida Dimensiones An x Pr x Al Cuerpo principal Con soporte Peso Con el soporte Factores medioambientales Temperatura de funcionamiento Humedad de funcionamiento Temperatura de almacenamiento Humedad de almacenamiento LN26T71B 26 pulg CA100 240V 10 60 50Hz 133 W 1360 x 768 60 Hz 5W X 2 754 X 79 X 465 mm 26 69 X 3 11 X 18 31 pulg 754 X 226 X 519 mm 26 69 X 8 90 X 20 43 pulg 10 7 kg 23 59 lbs Entre...

Отзывы: