background image

Содержание LN19B650 - 19" LCD TV

Страница 1: ... Inc Customer Service 55 Standish Court Mississauga Ontario L5R 4B2 Canada CANADA 1 800 SAMSUNG 726 7864 www samsung com ca Samsung Electronique Canada Inc Service la Clientele 55 Standish Court Mississauga Ontario L5R 4B2 Canada Samsung Electronics America Inc U S A 1 800 SAMSUNG 726 7864 www samsung com us 105 Challenger Road Ridgefield Park NJ 07660 0511 imagine the possibilities Thank you for ...

Страница 2: ...mited to private non commercial use by end user consumers for licensed contents No rights are granted for commercial use The license does not cover any product unit other than this product unit and the license does not extend to any unlicensed product unit or process conforming to ISO IEC 11172 3 or ISO IEC 13818 3 used or sold in combination with this product unit The license only covers the use ...

Страница 3: ...lite receiver Set TopBox via Componentcables 8 Connectinga VCR 9 Connectinga DigitalAudio System 9 Connectingan Amplifierl DVD HomeTheater 10 Connectinga Camcorder 11 Connecunga PC 12 Configuringthe Support 1 4enu 26 Troubleshooting 28 WallMount Kit Specifications VESA 29 Using the Anti Theft KensingtonLock 30 Securingthe TV to the Wall 30 Specifications Viewing_nemenus 13 Plug Play Feature 14 Con...

Страница 4: ...igital tuner non subscription HD broadcasts can be viewed with no Cable Box Satellite receiver Set Top Box needed HDMI DVl connection of your PC to this TV Excellent Picture Quality SRS TruSurround HD provides a virtual surround system Accessories Remote Control Power Cord Cleaning Cloth BN59 00857A 3903 000144 BNe3 01798B LNI9B650 BN59 00885A Batteries AAA x 2 Owner s Instructions Warranty Card S...

Страница 5: ...on screen menu use the V CH A buttons as you would use the T and A buttons on the remote control O VOL Press to increase or decrease the volume In the on screen menu use the VOL buttons as you would use the _ iand 1_buttons on the remote control O MENU Press to see an on screen menu of your TV s features O SOURCE C Toggles between all the available input sources In the on screen menu use this butt...

Страница 6: ...able or DVI HDMI adapter DVl to HDMI for video connection and the DVl AUDIO IN R AUDIO L jacks for audio When using an HDMI DVl cable connection you must use the HDMI DVl INjack You can also use the ports to connect to a PC O SERVICE Connector for software upgrades ANT IN Connects to an antenna or cable TV system 0 POWER INPUT Connects the supplied power cord O KENSINGTON LOCK The Kensington Lock ...

Страница 7: ... SOURCE Press to display and select the available video sources FAV CH Press to switch to your favorite channels O MENU Displays the main on screen menu RETURN Returns to the previous menu _ UPAIDOWNYILEFT_I RIGNT_ ENTER L I Use to select on screen menu items and change menu values _ EXIT Press to exit the menu CC Controls the caption decoder MTS Press to choose stereo mono or Separate Audio Progr...

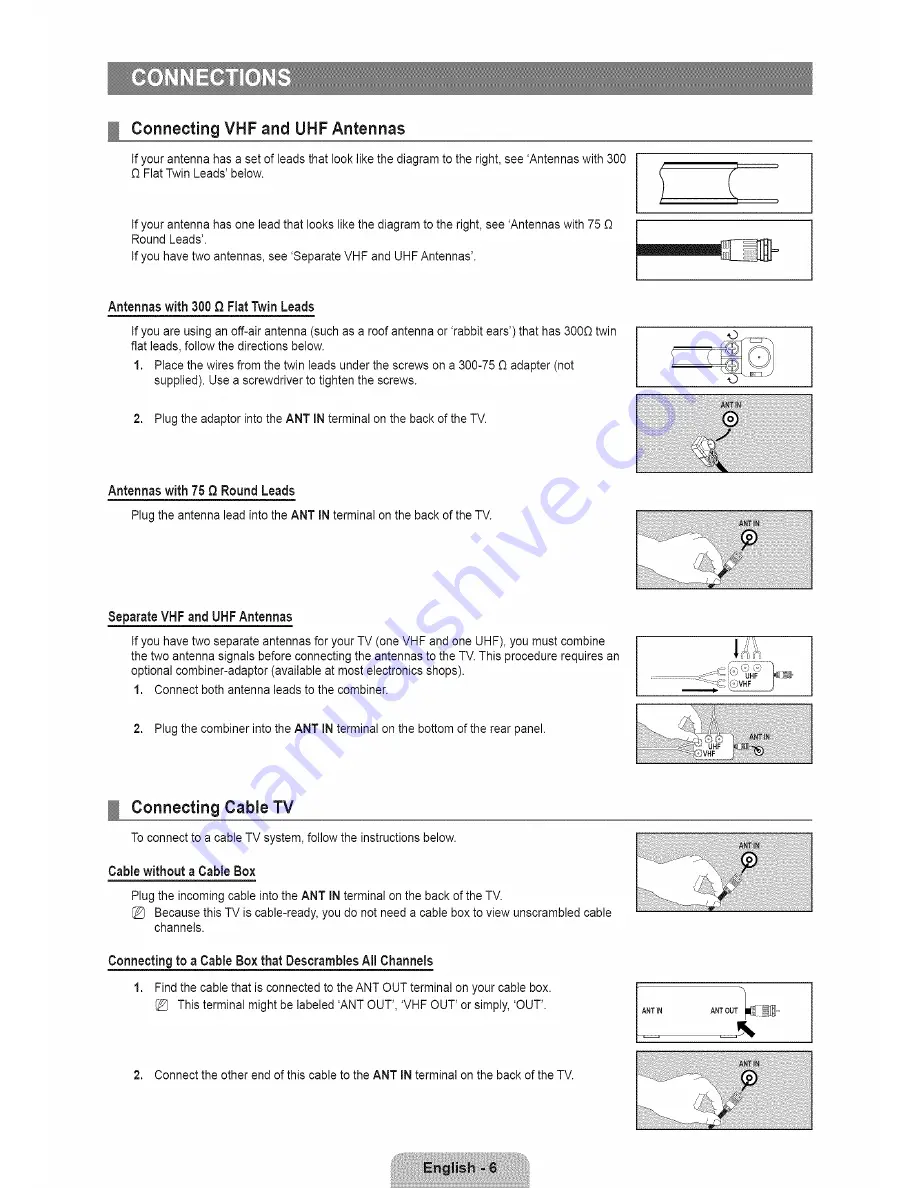
Страница 8: ...ebackof theTV Separate VHF and UFIF Antennas If you have two separate antennas for your TV one VHF and one UHF you must combine the two antenna signals before connecting the antennas to the TV This procedure requires an optional combiner adaptor available at most electronics shops 1 Connect both antenna leads to the combiner 2 Plug the combiner into the ANT INterminal on the bottom of the rear pan...

Страница 9: ... Blu ray player Cable Box Satellite receiver Set Top Box via HDMI This connection can only be made if there is an HDMI Output connector on the external device DVD Blu ray player Cable Box TV Rear Panel Satellite receiver Set Top Box j LL _J O HDMI Cable Not supplied l o o Connect an HDMI Cable between the HDMI DVl IN jack on the TV and the HDMI jack on the DVD Blu ray Player or Cable Box Satellite...

Страница 10: ...aComponentcables The rear panel jacks on your TV make it easy to connect a DVD Blu ray player Cable Box Satellite receiver Set Top Box to ourTV TV Rear Panel DVD Blu ray player Cable Box Satellite receiver Set TopBox Audio Cable Not supplied O Component Cable Not supplied 1 2 Connect a Component Cable between the COMPONENT IN PB PR jacks on the TV and the COMPONENT Y PB PR jacks on the DVD Blu ray...

Страница 11: ...able between the DiGiTAL AUDIO OUT OPTICAL jacks on the TV and the Digital Audio Input jacks on the Digital Audio System When a Digital Audio System is connected to the DiGiTAL AUDIO OUT OPTICAL jack Decrease the volume of the TV and adjust the volume level with the system s volume control 5 1CH audio is possible when the TV is connected to an external device supporting 5 1CH Each Digital Audio Sy...

Страница 12: ...io Input jacks on the Amplifier DVD Home Theater When an audio amplifier is connected to the AUDIO OUT JR AUDIO L jacks Decrease the volume of the TV and adjust the volume level with the Amplifier s volume control Each Amplifier DVD Home Theater has a different back panel configuration When connecting an Amplifier DVD Home Theater match the color of the connection terminal to the cable ...

Страница 13: ...e camcorder Connect Audio Cables between the AV IN JR AUDIO L jacks on the TV and the AUDIO OUT jacks on the camcorder Each Camcorder has a different back panel configuration When connecting a Camcorder match the color of the connection terminal to the cable UsinganHDMICable TV RearPanel HDMI Cable Not supplied 1 Connect a HDMI Cable between the HDMm DVl iN jack on the TV and the HDMI OUT jack on ...

Страница 14: ...ng an HDIVII DVlCable TV RearPanel PC O 3 5 mm Stereo mini piugl2RCA Cable Not supplied HDMIIDVI Cable Not supplied 1 Connect an HDMI DVI cable between the HDIVll DVl INjack on the TV and the PC output jack on your computer 2 Connect a 3 5 mm Stereo miniplug 2RCA Cable between the DVm AUDtO IN JR AUDIO L jack on the TV and the Audio Out jack of the sound card on your computer UsinganHDMICable TV R...

Страница 15: ...s in the menu Press the ENTER C _ button to enter items in the menu 4 Press the A T I _ button to change the selected items Press the RETURN button to return to the previous menu 6 Press the EXIT button to exit from the menu Using the remote control buttons Example Setting the TV s Brightness in the Picture Menu Adjusting the Brightness to 80 1 Press the MENU button to display the menu 2 Press the...

Страница 16: ... B button If you have Digital cable select the cable system signal source for both Analog and Digital Contact your local cable company to identify the type of cable system that exists in your particular area 6 Press the ENTERIZ button to select Start The TV will begin memorizing all of the available channels To stop the search before it has finished press the ENTER B button with Stop selected Afte...

Страница 17: ... _ button Clear Scrambled Channels digital channels only This function is used to filter out scrambled channels after Auto Program is completed This process may take up to 20 30 minutes Tostop searching scrambled channels Press the ENTER _ _ button to select Stop Press the 4 button to select Yes then press the ENTER J button This function is only available in Cable mode Channel List For detailed p...

Страница 18: ...n also delete a channel from the Added Channels or Favorite menu in the same manner Add to Favorite Delete from Favorite You can set channels you watch frequently as Favorite Press the TOOLS button to display the Tools menu You can also set the add to or delete from Favorites by selecting Tools Add to Favorite or Delete from Favorite The v symbol will be displayed and the channel will be set as a ...

Страница 19: ...he picture quality Backlight Adjusts the brightness of LCD back light Contrast Adjusts the contrast level of the picture Brightness Adjusts the brightness level of the picture Sharpness Adjusts the edge definition of the picture Color Adjusts color saturation of the picture Tint G R Adjusts the color tint of the picture When you make changes to Backlight Contrast Brightness Sharpness Color or Tint...

Страница 20: ...cement _ Off On You can emphasize object boundaries in the picture C Picture Options In PC mode you can only make changes to the Color Tone and Size from among the items in Picture Options Color Tone _ Cool Normal 1Warm1 Warm2 Warm1 or Warm2 is only activated when the picture mode is Movie Settings can be adjusted and stored for each external device you have connected to an input of the TV Size Oc...

Страница 21: ...ctive only when an external device is connected to the TV via HDMI The HDMI Black Level function may not be compatible with all external devices Film Mode _ Off Auto The TV can be set to automatically sense and process film signals from all sources and adjust the picture for optimum quality Film Mode is supported in TV Video Component 480i 1080i and HDMI 480i I080i C3 Picture Reset _ Reset Picture...

Страница 22: ...button to select PC mode Auto Adjustment Use the Auto Adjust function to have the TV set automatically adjust the video signals it receives The function also automatically fine tunes the settings and adjusts the frequency values and positions _ _ Press the TOOLS button to display the Tools menu You can also set the Auto Adjustment by selecting Tools _ Auto Adjustment This function does not work in...

Страница 23: ...taneous transmission of many audio tracks for example simultaneous translations of the program into foreign languages You can listen in a language other than the Preferred Language by pressing the MTS button on the remote control Preferred Language is available only in Digital TV mode You can only select the language from among the actual languages being broadcast Multi Track Sound MTS analog chan...

Страница 24: ...ave to set the clock again Clock Mode You can set up the current time manually or automatically Auto Set the current time automatically using the time from a digital broadcast Manual Set the current time to a manually specified time Depending on the broadcast station and signal the auto time may not be set correctly If this occurs set the time manually The Antenna or cable must be connected in ord...

Страница 25: ...0 0 POWER off _ MUTE _ 8 _ 2 4 _ POWER on Allow all Press to unlock all TV ratings Block all Press to lock all TV ratings V Chip Lock _ Off On You can block rated TV Programs TV Parental Guidelines You can block TV programs depending on their rating This function allows you to control what your children are watching TV Y Young children TV YT Children 7 and over TV G General audience TV PG Parental...

Страница 26: ...n the information from the broadcasting station it may not be available for use Parental restriction levels differ depending on the broadcasting station The default menu name and Downloadable US rating changes depending on the downloaded information Even if you set the On screen display to your desired language the Downloadable U 8 Rating menu will appear in English only The rating will automatica...

Страница 27: ...tsdefault The DigitaJ Caption Options are only enabled when the Caption Mode is Service 1 Service 6 If Caption Mode is the default the Digital Caption Options are enabled depending on the broadcast The availability of captions depends on the program being broadcast Default means to follow the standard set by the broadcaster Foreground and Background cannot be set to have the same color Foreground ...

Страница 28: ...ill persists refer to the external device s user manual Sound Test If you think you have a sound problem please perform the sound test You can check the sound by playing a built in melody sound through the TV Does the problem still exist with this sound test appears on the screen If you hear no sound from the TV s speakers before performing the sound test make sure Speaker Select is set to TV spea...

Страница 29: ...urn off and turn on automatically after completing the firmware upgrade Please check the firmware version after the upgrades are complete When software is upgraded video and audio settings you have made will return to their default factory settings We recommend you write down your settings so that you can easily reset them after the upgrade HD Connection Guide This menu presents the connection met...

Страница 30: ...dily Image is not stable and may appear to vibrate when you have a computer connected to the PC input Image is not centered on the screen Clean the upper edge of the remote control transmission window Check the battery terminals Ensure that the signal cable is firmly connected to the PC source Check the maximum resolution and connected device s Video frequency Compare these values with the data in...

Страница 31: ...hasing our wall mount kit a detailed installation manual and all parts necessary for assembly are provided Do not use screws longer than the standard dimension as they may cause damage to the inside of the TV set For wall mounts that do not comply with the VESA standard screw specifications the length of the screws may differ depending on their specifications Do not use screws that do not comply w...

Страница 32: ...d the TV from failing 1 Put the screws into the clamps and firmly fasten them onto the wall Confirm that the screws have been firmly installed onto the wall You may need additional material such as an anchor depending on the type of wall Since the necessary clamps screws and string are not supplied please purchase these additionally 2 Remove the screws from the centre back of the TV put the screws...

Страница 33: ...0 x 63 4 x 351 0 mm 21 3 x 7 5 x 15 9 inches 540 0 x 189 5 x 403 1 ram Weight Without Stand With Stand Environmental Considerations Operating Temperature Operating Humidity Storage Temperature Storage Humidity Stand Swivel Left t Right 9 0 Ibs 4 1 kg 9 7 Ibs 4 4 kg 10 6 Ibs 4 8 kg 11 2 Ibs 5 1 kg 50 F to I04 F I0 C to 40 C 10 to 80 non condensing 4 F to 113 F 20 C to 45 C 5 to 95 non condensing De...

Страница 34: ......

Страница 35: ...a licenciaesta timitadaal uso no comercial privadode consumidoresque sean usuarios finalespara contenido con ticencia No se otorga ningQnderecho parauso comercial La ticencia no cubre ningunaunidad del productoque no seaesta y la licencia no se extiende a ningunaunidad del productoo proceso sin licenciaen conform dad con el ISO IEC 11172 3o ISO IEC 13818 3 utitizadao vendida en combinaci6ncon esta...

Страница 36: ...men_ de ayuda 26 tdecodificador a traves deloscables aecombonentes 8 Conexi6n de un reproductor de video 9 Conexi6n de un sistema de audio digital 9 Conexi6nde un amplificador t DVD para Home Cinema 10 Conexi6n de una videocamara 11 Conex_ona un PC 12 Identificacionde problemas 28 Especificacionesdet equipode montaje en la pared VESA 29 Uso del bloqueo Kensingtonantlrrobos 30 _ Fijaci6n deltelevis...

Страница 37: ... permite ver las emisiones HD que no exigen una suscripci6n sin que sea necesario disponer de un receptor de televisi6n por cable satelite decodificador Conexi6n HDMI DVl del PC con este televisor Calidad excelente de la imagen SRS TruSurround HD proporciona un sistema surround virtual Accesorios Mando a distancia Cable de alimentaci6n PaSode limpieza BN59 00857A 3903 000144 BNe3 01798B LN19B361 B...

Страница 38: ...enOde la pantalla utilice los botones v CN k del mismo modo que los botones T y A del mando a distancia O VOL POlselos para subir o bajar el volumen En el ment_de la pantalla utilice los botones VOL del mismo modo que los botones _ y _ del mando a distancia O MENU Pulse para ver en pantalla un menOcon las caracteristicas del TV O 8OURCEIB Cambia entre todas las fuentes de entrada disponibles En el...

Страница 39: ...del video y los terminales DVI AUDIO IN R AUDIO L para el audio Cuando se usa una conexi6n de cable HDMI DVl se debe conectar en el terminal HDMI DVI IN Tambi_n puede utilizar los puertos para conectarse al PC O SERVICE Conector para la actualizaci6n del software O ANT IN Permite conectar a una antena o un sistema de TV por cable ENTRADA DE ALIMENTACION Permite conectar el cable de alirnentaci6n s...

Страница 40: ...ionar las fuentes de video disponibles FAV CH Permite cambiar a los canales favoritos 0 MENU Muestra el ment_de pantalla principal RETURN Vuelve al ment_ anterior t_ ARRIBA A ABAJO T IZQUtERDA_I DERECHA_ ENTER E Se usan para seleccionar los elementos del menOen pantalla y cambiar los valores del men _ EXIT POlselopara salir del men CO Controla el decodificador de subtitulos _ MTS Pulse para elegir...

Страница 41: ...isor Antenas de VHF y UHF independientes Si dispone de dos antenas independientes para el TV una de VHF y otra de UHF debe combinar ambas set ales de la antena antes de conectarlas al TV Este procedimiento precisa un adaptador combinador especial disponible en la mayoria de tiendas de electr6nica 1 Conecte ambos cables de antena al combinador 2 Conecte el combinador en el terminal ANT IN de la par...

Страница 42: ...av_sde HDIVll Solo es aplicable si hay un conector de salida de HDMI en el dispositivo externo Reproductor DVD Blu rayI receptor por cable Panel posterior dot TV satelite decodificador O Cable HDMI no incluido 1 o o Conecte un cable HDMI entre el terminal HDMI DVI IN del televisor y el terminal HDMI del reproductor DVD Blu ray o receptor por cable sat61ite decodificador _ Qu6es HDMI HDMI o interfa...

Страница 43: ...nales del panel posterior del televisor facilitan la conexi6n de un reproductor de DVD Blu ray receptor por cable sat61ite decodificador al TV Reproductor DVD Blu ray Receptor por cable sat_lite decodificador Panel posterior del iV Cable de audio no incluido Cable de componentes no incluido 1 2 Conecte un cable de componentes entre los terminales COMPONENT IN Y PB PR del televisor y los terminales...

Страница 44: ...l posterior del TV 1 Conecte un cable 6ptico entre los terminales DIGITAL AUDIO OUT OPTICAL del televisor y los terminales de entrada de audio digital del sistema de audio digital Cuando un sistema de audio digital se conecta al terminal DIGITAL AUDIO OUT OPTICAL Reduzca el volumen del TV y ajuste el volumen con el control del sistema El audio de 5 1 canales es posible cuando el televisor esta con...

Страница 45: ...icador DVD para Home Cinema Cuando un amplificador de audio se conecta a los terminales AUDIO OUT R AUDIO L Reduzca la ganancia volumen del TV y ajuste e volumen con e control del amplificador Cada amplificador DVD para Home Cinema tiene una configuraci6n distinta en el panel posterior Cuando conecte un amplificador DVD para Home Cinema debe hacer coincidir los colores de terminal de conexi6n y de...

Страница 46: ...cte los cables de audio entre los terminales AV IN R AUDIO L del televisor y los terminales AUDIO OUT de la videocamara Cada videocamara tiene una configuraci6n distinta en el panel posterior Cuando conecte una videocamara debe hacer coincidir los colores del terminal de conexi6n y del cable Usede uncableHDMI Panel posterior dei TV Cable HDMI no ineluido 1 Conecte un cable HDMI entre el terminal H...

Страница 47: ... coincidir los colores de terminal de conexi6n y de cable Usede uncableHDMI DVI Panel posterior del TV PC 1 Conecte un cable HDMI DVI entre el terminal HDMI DVI IN del televisor y el terminal de salida PC del ordenador 2 Conecte un cable est6reo miniclavija 2 RCA de 3 5 mm entre el terminal DVm AUDIO IN JR AUDIO L del televisor y el terminal de salida de audio de la tarjeta de sonido del ordenador...

Страница 48: ...se el botEn A o T para desplazarse por los elementos del men Pulse el botEn ENTER_ para acceder a los elementos del men Pulse el botEn A V _I _ para cambiar los elementos seleccionados Pulse el botEn RETURN para volver al ment_anterio Pulse el botEn EXiT para salir del men Func i6n _ _ _ 7 _ Seleccione la opciEn marcada Confirme la configuraciEn Ejemplo ConfiguraciEn del brillo del televisor en el...

Страница 49: ...NTER_ Si tiene cable digital seleccione la fuente de la serial del sistema de cable para anal6gica y para digital P6ngase en contacto con su proveedor de cable para saber el tipo de sistema de cable existente en su zona 6 Pulse el bot6n ENTER _ J para seleccionar Iniciar El televisor empezara a memorizar todos los canales disponibles Para detener la b0squeda antes de que termine pulse el bot6n ENT...

Страница 50: ...s canales codificados despu_s de que Prog Auto se haya completado Puede tardar de 20 a 30 minutos Para detener la bOsqueda de canales codificados Pulse el bot6n ENTER _ para seleccionar Detener Pulse el bot6n para seleccionar 8i y a continuaci6n pulse el bot6n ENTER _ Esta funci6n s61oesta disponible en el modo Cable Lista de canales Para conocer el procedimiento detallado sobre c6mo usar la Lista...

Страница 51: ...los canalesborrados Tambi_n puede borrar un canal en los menQsCanales agregados o Favorites de la misma manera Agregar a Favorites Borrar de Favorites Puede configurar come favorites los canales que vea con mas frecuencia _ _ Pulse el bot6n TOOLS para ver el menQHerramientas Tambi_n puede afiadir o borrar canales favorites seleccionando Herramientas _ Agregar a Favorites o Borrar de Favorites Se m...

Страница 52: ...ciones de configuraci6n que permiten controlar la oalidad de la imagen Luz de fondo Ajusta el brillo de la luz de fondo de la pantalla LCD Contraste Ajusta el nivel del contraste de la imagen Brillo Ajusta el nivel del brillo de la imagen Oefinicion Ajusta la definici6n de los bordes de la imagen Color Ajusta la saturaci6n del color de la imagen Tinte V R Ajusta el matiz del color de la imagen Cua...

Страница 53: ...de PC s61ose pueden hacer cambios en los elementos Tone Color y Tamale de Opciones de imagen Tone Color _ Frio Normal Tibiol Tibie2 Tibiol o Tibio2 s61oestan disponibles cuando el mode de imagen esta configurado en Cine La configuraci6n de cada dispositivo externo conectado a la entrada del televisor se puede ajustar y guardar Tamale Es posible que alguna vez desee cambiar el tamale de la imagen e...

Страница 54: ...ctado al televisor a traves de HDMI La funci6n N neg HDMI puede que no sea compatible con dispositivos externos Modo pelicula _ Apagado Auto El televisor se puede configurar para detectar automaticamente y procesar las se_ales de las peliculas procedentes de todas las fuentes y ajustar la imagen para conseguir una calidad 6ptima Modo pelicula es compatible con TV Video Component 480i I080i y HDMI ...

Страница 55: ...utomaticamente de acuerdo con las sefiales de video que reciba La funci6n tambien ajusta automaticamente con mas configuraci6n y ajusta los valores y las posiciones de la frecuencia _ _ Pulse el bot6n TOOLS para ver el menOHerramientas Tambi_n puede establecer el ajuste automatico seleccionando Herramientas _ Ajuste Automatico Esta funci6n no se puede utilizar en modo DVI HDMI C Pantalla El prop6s...

Страница 56: ...mite transmitir simultaneamente muchas pistas de audio por ejemplo traducciones simultaneas del programa en otros idiomas Puede seleccionar un idioma que no sea el Idioma preferido pulsando el bot6n MT del mando a distancia Idioma preferido esta disponible s61oen el modo de televisi6n digital S61ose puede seleccionar uno de los idiomas que ofrece la emisora 8onido Multi track MTS solo canales anal...

Страница 57: ...cable de alimentaci6n debe configurar el reloj de nuevo Mode Reloj Se puede configurar la hera actual manual o automaticamente Auto Configure la hera automaticamente con la hera de la emisora digital Manual Configure la hera actual manualmente SegOn la emisora y la serial la hera automatica no se puede ajustar correctamente En este case ajuste la hera manualmente La antena y el cable se deben cone...

Страница 58: ...uiente que restablece el c6digo a 0 0 0 0 POWER apagar _ MUTE 8 _ 2 4 _ POWER encender Perm todo Se pulsa para desbloquear todos los programas de televisi6n Bloq redo Se pulsa para bloquear todos los programas de televisi6n Bloqueo V Chip _ Apagado Eneendido Puede bloquear los programas de TV clasificados Guias pater TV Puede bloquear los programas de TV segt_nsu clasificaci6n Estafunci6n permite ...

Страница 59: ...cci6n de bloqueo difieren seg0n la emisora El nombre de menO predeterminado y la clasificaci6n US descargable cambian segt_nla informaci6n descargada Aunque configure la visualizaci6n en pantalla en su propio idioma el menO Clasificaci6n U 8 Descargable siempre Io vera en ingles La clasificaci6n bloqueara automaticamente ciertas categorias que son mas restrictivas Los titulos de clasificaci6n por ...

Страница 60: ...cio I Servicio 6 Si el Mode de 8ubtitulo es el predeterminado las opciones Opciones 8ubtitulos Dig se habilitan segOnel emisora La disponibilidad de los subfitulos depende del programa que se este emitiendo Programatic significa que se sigue el estandar establecido per el emisor Las opciones de color de primer piano y color de rondo no se pueden ajustar con el mismo color Opaeidad de primer piano ...

Страница 61: ...a correctamente seleccione No Puede haber un problema en el equipo externo Compruebe las conexiones Si persiste el problem consulte el manual del usuario del dispositivo externo Prueba de sonido Si cree que tiene un problema con el sonido efectOe la prueba de sonido Compruebe el sonido reproduciendo una melodia en el televisor En la pantalla se muestra 2 ContinOael problema con esta prueba del son...

Страница 62: ...y se encendera automaticamente despu_s de completar la actualizaci6n del firmware Despu_s de realizar la actualizaci6n compruebe la versi6n del firmware Cuando se actualiza el software la configuraci6n del video y audio que se haya efectuado vuelve a la configuraci6n predeterminada de fabrica Es aconsejable anotar la configuraci6n para recuperarla facilmente despues de la actualizaci6n _ Guia de c...

Страница 63: ...fectue la prueba de sonido conel menOde autodiagn6stico Desconecteel TV durante30 segundosy despu6s intenteque funcioneotra vez ComDruebeaue la toma de la paredfunciona RemDlacelas pilas del mando a distancia Limpie el borde superiordel mando a distancia ventanade transmisi6n Compruebe tosterminalesde tas pilas Compruebe queet cable de sepal est6conectado firmementecontas fuentesdel PC Compruebe t...

Страница 64: ...rir el equipo de montaje en la pared tambien se distribuye un manual de instalaci6n detallado y todas las piezas necesarias para el montaje No use tornillos con un tama_o superior al estandar ya que pueden causar dar_osen el interior del televisor Para montajes murales que no cumplen las especificaciones de tornillos estandar VESA la Iongitud de _stos puede variar dependiendo de las especificacion...

Страница 65: ...como se exptica a continuaci6n Para impedir que el televisor se eaiga 1 Apriete firmemente las grapas sobre la pared con los tornillos AsegOresede que los tornillos esten bien afirmados en la pared SegOn el tipo de pared quizas necesite algt_nmaterial adicional para el anclaje Las grapas los tornillos y la cadena no se suministran con el producto debera adquirirlos por separado 2 Quite los tomillo...

Страница 66: ... 18 8 X 2 5 X 12 2 pulg 472 0 x 63 4 x 310 7 ram 18 6 X 7 5 X 14 3 pulg 472 0 x 189 5 x 382 8 ram 9 0 Ibs 4 1 kg 9 7 Ibs 4 4 kg 22 pulg 21 9 pulgadas medidas diagonalmente 1360 x 768 a 60Hz 3WX2 21 3 X 2 5 X 13 8 pulg 540 0 x 63 4 x 351 0 ram 21 3 X 7 5 X 15 9 pulg 540 0 x 189 5 x 403 1 ram 10 6 Ibs 4 8 kg 11 2 Ibs 5 1 kg Entre 10 C y 40 C 50 F y I04 F 10 al 80 sin condensaci6n Entre 20 C y 45 C 4...

Страница 67: ... Inc Customer Service 55 Standish Court Mississauga Ontario L5R 4B2 Canada CANADA 1 800 SAMSUNG 726 7864 www samsung com ca Samsung Electronique Canada Inc Service la Clientele 55 Standish Court Mississauga Ontario L5R 4B2 Canada Samsung Electronics America Inc U S A 1 800 SAMSUNG 726 7864 www samsung com us 105 Challenger Road Ridgefield Park NJ 07660 0511 imagine the possibilities Thank you for ...

Страница 68: ...mited to private non commercial use by end user consumers for licensed contents No rights are granted for commercial use The license does not cover any product unit other than this product unit and the license does not extend to any unlicensed product unit or process conforming to ISO IEC 11172 3 or ISO IEC 13818 3 used or sold in combination with this product unit The license only covers the use ...

Страница 69: ...lite receiver Set TopBox via Componentcables 8 Connectinga VCR 9 Connectinga DigitalAudio System 9 Connectingan Amplifierl DVD HomeTheater 10 Connectinga Camcorder 11 Connecunga PC 12 Configuringthe Support 1 4enu 26 Troubleshooting 28 WallMount Kit Specifications VESA 29 Using the Anti Theft KensingtonLock 30 Securingthe TV to the Wall 30 Specifications Viewing_nemenus 13 Plug Play Feature 14 Con...

Страница 70: ...igital tuner non subscription HD broadcasts can be viewed with no Cable Box Satellite receiver Set Top Box needed HDMI DVl connection of your PC to this TV Excellent Picture Quality SRS TruSurround HD provides a virtual surround system Accessories Remote Control Power Cord Cleaning Cloth BN59 00857A 3903 000144 BNe3 01798B LNI9B650 BN59 00885A Batteries AAA x 2 Owner s Instructions Warranty Card S...

Страница 71: ...on screen menu use the V CH A buttons as you would use the T and A buttons on the remote control O VOL Press to increase or decrease the volume In the on screen menu use the VOL buttons as you would use the _ iand 1_buttons on the remote control O MENU Press to see an on screen menu of your TV s features O SOURCE C Toggles between all the available input sources In the on screen menu use this butt...

Страница 72: ...able or DVI HDMI adapter DVl to HDMI for video connection and the DVl AUDIO IN R AUDIO L jacks for audio When using an HDMI DVl cable connection you must use the HDMI DVl INjack You can also use the ports to connect to a PC O SERVICE Connector for software upgrades ANT IN Connects to an antenna or cable TV system 0 POWER INPUT Connects the supplied power cord O KENSINGTON LOCK The Kensington Lock ...

Страница 73: ... SOURCE Press to display and select the available video sources FAV CH Press to switch to your favorite channels O MENU Displays the main on screen menu RETURN Returns to the previous menu _ UPAIDOWNYILEFT_I RIGNT_ ENTER L I Use to select on screen menu items and change menu values _ EXIT Press to exit the menu CC Controls the caption decoder MTS Press to choose stereo mono or Separate Audio Progr...

Страница 74: ...ebackof theTV Separate VHF and UFIF Antennas If you have two separate antennas for your TV one VHF and one UHF you must combine the two antenna signals before connecting the antennas to the TV This procedure requires an optional combiner adaptor available at most electronics shops 1 Connect both antenna leads to the combiner 2 Plug the combiner into the ANT INterminal on the bottom of the rear pan...

Страница 75: ... Blu ray player Cable Box Satellite receiver Set Top Box via HDMI This connection can only be made if there is an HDMI Output connector on the external device DVD Blu ray player Cable Box TV Rear Panel Satellite receiver Set Top Box j LL _J O HDMI Cable Not supplied l o o Connect an HDMI Cable between the HDMI DVl IN jack on the TV and the HDMI jack on the DVD Blu ray Player or Cable Box Satellite...

Страница 76: ...aComponentcables The rear panel jacks on your TV make it easy to connect a DVD Blu ray player Cable Box Satellite receiver Set Top Box to ourTV TV Rear Panel DVD Blu ray player Cable Box Satellite receiver Set TopBox Audio Cable Not supplied O Component Cable Not supplied 1 2 Connect a Component Cable between the COMPONENT IN PB PR jacks on the TV and the COMPONENT Y PB PR jacks on the DVD Blu ray...

Страница 77: ...able between the DiGiTAL AUDIO OUT OPTICAL jacks on the TV and the Digital Audio Input jacks on the Digital Audio System When a Digital Audio System is connected to the DiGiTAL AUDIO OUT OPTICAL jack Decrease the volume of the TV and adjust the volume level with the system s volume control 5 1CH audio is possible when the TV is connected to an external device supporting 5 1CH Each Digital Audio Sy...

Страница 78: ...io Input jacks on the Amplifier DVD Home Theater When an audio amplifier is connected to the AUDIO OUT JR AUDIO L jacks Decrease the volume of the TV and adjust the volume level with the Amplifier s volume control Each Amplifier DVD Home Theater has a different back panel configuration When connecting an Amplifier DVD Home Theater match the color of the connection terminal to the cable ...

Страница 79: ...e camcorder Connect Audio Cables between the AV IN JR AUDIO L jacks on the TV and the AUDIO OUT jacks on the camcorder Each Camcorder has a different back panel configuration When connecting a Camcorder match the color of the connection terminal to the cable UsinganHDMICable TV RearPanel HDMI Cable Not supplied 1 Connect a HDMI Cable between the HDMm DVl iN jack on the TV and the HDMI OUT jack on ...

Страница 80: ...ng an HDIVII DVlCable TV RearPanel PC O 3 5 mm Stereo mini piugl2RCA Cable Not supplied HDMIIDVI Cable Not supplied 1 Connect an HDMI DVI cable between the HDIVll DVl INjack on the TV and the PC output jack on your computer 2 Connect a 3 5 mm Stereo miniplug 2RCA Cable between the DVm AUDtO IN JR AUDIO L jack on the TV and the Audio Out jack of the sound card on your computer UsinganHDMICable TV R...

Страница 81: ...s in the menu Press the ENTER C _ button to enter items in the menu 4 Press the A T I _ button to change the selected items Press the RETURN button to return to the previous menu 6 Press the EXIT button to exit from the menu Using the remote control buttons Example Setting the TV s Brightness in the Picture Menu Adjusting the Brightness to 80 1 Press the MENU button to display the menu 2 Press the...

Страница 82: ... B button If you have Digital cable select the cable system signal source for both Analog and Digital Contact your local cable company to identify the type of cable system that exists in your particular area 6 Press the ENTERIZ button to select Start The TV will begin memorizing all of the available channels To stop the search before it has finished press the ENTER B button with Stop selected Afte...

Страница 83: ... _ button Clear Scrambled Channels digital channels only This function is used to filter out scrambled channels after Auto Program is completed This process may take up to 20 30 minutes Tostop searching scrambled channels Press the ENTER _ _ button to select Stop Press the 4 button to select Yes then press the ENTER J button This function is only available in Cable mode Channel List For detailed p...

Страница 84: ...n also delete a channel from the Added Channels or Favorite menu in the same manner Add to Favorite Delete from Favorite You can set channels you watch frequently as Favorite Press the TOOLS button to display the Tools menu You can also set the add to or delete from Favorites by selecting Tools Add to Favorite or Delete from Favorite The v symbol will be displayed and the channel will be set as a ...

Страница 85: ...he picture quality Backlight Adjusts the brightness of LCD back light Contrast Adjusts the contrast level of the picture Brightness Adjusts the brightness level of the picture Sharpness Adjusts the edge definition of the picture Color Adjusts color saturation of the picture Tint G R Adjusts the color tint of the picture When you make changes to Backlight Contrast Brightness Sharpness Color or Tint...

Страница 86: ...cement _ Off On You can emphasize object boundaries in the picture C Picture Options In PC mode you can only make changes to the Color Tone and Size from among the items in Picture Options Color Tone _ Cool Normal 1Warm1 Warm2 Warm1 or Warm2 is only activated when the picture mode is Movie Settings can be adjusted and stored for each external device you have connected to an input of the TV Size Oc...

Страница 87: ...ctive only when an external device is connected to the TV via HDMI The HDMI Black Level function may not be compatible with all external devices Film Mode _ Off Auto The TV can be set to automatically sense and process film signals from all sources and adjust the picture for optimum quality Film Mode is supported in TV Video Component 480i 1080i and HDMI 480i I080i C3 Picture Reset _ Reset Picture...

Страница 88: ...button to select PC mode Auto Adjustment Use the Auto Adjust function to have the TV set automatically adjust the video signals it receives The function also automatically fine tunes the settings and adjusts the frequency values and positions _ _ Press the TOOLS button to display the Tools menu You can also set the Auto Adjustment by selecting Tools _ Auto Adjustment This function does not work in...

Страница 89: ...taneous transmission of many audio tracks for example simultaneous translations of the program into foreign languages You can listen in a language other than the Preferred Language by pressing the MTS button on the remote control Preferred Language is available only in Digital TV mode You can only select the language from among the actual languages being broadcast Multi Track Sound MTS analog chan...

Страница 90: ...ave to set the clock again Clock Mode You can set up the current time manually or automatically Auto Set the current time automatically using the time from a digital broadcast Manual Set the current time to a manually specified time Depending on the broadcast station and signal the auto time may not be set correctly If this occurs set the time manually The Antenna or cable must be connected in ord...

Страница 91: ...0 0 POWER off _ MUTE _ 8 _ 2 4 _ POWER on Allow all Press to unlock all TV ratings Block all Press to lock all TV ratings V Chip Lock _ Off On You can block rated TV Programs TV Parental Guidelines You can block TV programs depending on their rating This function allows you to control what your children are watching TV Y Young children TV YT Children 7 and over TV G General audience TV PG Parental...

Страница 92: ...n the information from the broadcasting station it may not be available for use Parental restriction levels differ depending on the broadcasting station The default menu name and Downloadable US rating changes depending on the downloaded information Even if you set the On screen display to your desired language the Downloadable U 8 Rating menu will appear in English only The rating will automatica...

Страница 93: ...tsdefault The DigitaJ Caption Options are only enabled when the Caption Mode is Service 1 Service 6 If Caption Mode is the default the Digital Caption Options are enabled depending on the broadcast The availability of captions depends on the program being broadcast Default means to follow the standard set by the broadcaster Foreground and Background cannot be set to have the same color Foreground ...

Страница 94: ...ill persists refer to the external device s user manual Sound Test If you think you have a sound problem please perform the sound test You can check the sound by playing a built in melody sound through the TV Does the problem still exist with this sound test appears on the screen If you hear no sound from the TV s speakers before performing the sound test make sure Speaker Select is set to TV spea...

Страница 95: ...urn off and turn on automatically after completing the firmware upgrade Please check the firmware version after the upgrades are complete When software is upgraded video and audio settings you have made will return to their default factory settings We recommend you write down your settings so that you can easily reset them after the upgrade HD Connection Guide This menu presents the connection met...

Страница 96: ...dily Image is not stable and may appear to vibrate when you have a computer connected to the PC input Image is not centered on the screen Clean the upper edge of the remote control transmission window Check the battery terminals Ensure that the signal cable is firmly connected to the PC source Check the maximum resolution and connected device s Video frequency Compare these values with the data in...

Страница 97: ...hasing our wall mount kit a detailed installation manual and all parts necessary for assembly are provided Do not use screws longer than the standard dimension as they may cause damage to the inside of the TV set For wall mounts that do not comply with the VESA standard screw specifications the length of the screws may differ depending on their specifications Do not use screws that do not comply w...

Страница 98: ...d the TV from failing 1 Put the screws into the clamps and firmly fasten them onto the wall Confirm that the screws have been firmly installed onto the wall You may need additional material such as an anchor depending on the type of wall Since the necessary clamps screws and string are not supplied please purchase these additionally 2 Remove the screws from the centre back of the TV put the screws...

Страница 99: ...0 x 63 4 x 351 0 mm 21 3 x 7 5 x 15 9 inches 540 0 x 189 5 x 403 1 ram Weight Without Stand With Stand Environmental Considerations Operating Temperature Operating Humidity Storage Temperature Storage Humidity Stand Swivel Left t Right 9 0 Ibs 4 1 kg 9 7 Ibs 4 4 kg 10 6 Ibs 4 8 kg 11 2 Ibs 5 1 kg 50 F to I04 F I0 C to 40 C 10 to 80 non condensing 4 F to 113 F 20 C to 45 C 5 to 95 non condensing De...

Страница 100: ......

Страница 101: ...a licenciaesta timitadaal uso no comercial privadode consumidoresque sean usuarios finalespara contenido con ticencia No se otorga ningQnderecho parauso comercial La ticencia no cubre ningunaunidad del productoque no seaesta y la licencia no se extiende a ningunaunidad del productoo proceso sin licenciaen conform dad con el ISO IEC 11172 3o ISO IEC 13818 3 utitizadao vendida en combinaci6ncon esta...

Страница 102: ...men_ de ayuda 26 tdecodificador a traves deloscables aecombonentes 8 Conexi6n de un reproductor de video 9 Conexi6n de un sistema de audio digital 9 Conexi6nde un amplificador t DVD para Home Cinema 10 Conexi6n de una videocamara 11 Conex_ona un PC 12 Identificacionde problemas 28 Especificacionesdet equipode montaje en la pared VESA 29 Uso del bloqueo Kensingtonantlrrobos 30 _ Fijaci6n deltelevis...

Страница 103: ... permite ver las emisiones HD que no exigen una suscripci6n sin que sea necesario disponer de un receptor de televisi6n por cable satelite decodificador Conexi6n HDMI DVl del PC con este televisor Calidad excelente de la imagen SRS TruSurround HD proporciona un sistema surround virtual Accesorios Mando a distancia Cable de alimentaci6n PaSode limpieza BN59 00857A 3903 000144 BNe3 01798B LN19B361 B...

Страница 104: ...enOde la pantalla utilice los botones v CN k del mismo modo que los botones T y A del mando a distancia O VOL POlselos para subir o bajar el volumen En el ment_de la pantalla utilice los botones VOL del mismo modo que los botones _ y _ del mando a distancia O MENU Pulse para ver en pantalla un menOcon las caracteristicas del TV O 8OURCEIB Cambia entre todas las fuentes de entrada disponibles En el...

Страница 105: ...del video y los terminales DVI AUDIO IN R AUDIO L para el audio Cuando se usa una conexi6n de cable HDMI DVl se debe conectar en el terminal HDMI DVI IN Tambi_n puede utilizar los puertos para conectarse al PC O SERVICE Conector para la actualizaci6n del software O ANT IN Permite conectar a una antena o un sistema de TV por cable ENTRADA DE ALIMENTACION Permite conectar el cable de alirnentaci6n s...

Страница 106: ...ionar las fuentes de video disponibles FAV CH Permite cambiar a los canales favoritos 0 MENU Muestra el ment_de pantalla principal RETURN Vuelve al ment_ anterior t_ ARRIBA A ABAJO T IZQUtERDA_I DERECHA_ ENTER E Se usan para seleccionar los elementos del menOen pantalla y cambiar los valores del men _ EXIT POlselopara salir del men CO Controla el decodificador de subtitulos _ MTS Pulse para elegir...

Страница 107: ...isor Antenas de VHF y UHF independientes Si dispone de dos antenas independientes para el TV una de VHF y otra de UHF debe combinar ambas set ales de la antena antes de conectarlas al TV Este procedimiento precisa un adaptador combinador especial disponible en la mayoria de tiendas de electr6nica 1 Conecte ambos cables de antena al combinador 2 Conecte el combinador en el terminal ANT IN de la par...

Страница 108: ...av_sde HDIVll Solo es aplicable si hay un conector de salida de HDMI en el dispositivo externo Reproductor DVD Blu rayI receptor por cable Panel posterior dot TV satelite decodificador O Cable HDMI no incluido 1 o o Conecte un cable HDMI entre el terminal HDMI DVI IN del televisor y el terminal HDMI del reproductor DVD Blu ray o receptor por cable sat61ite decodificador _ Qu6es HDMI HDMI o interfa...

Страница 109: ...nales del panel posterior del televisor facilitan la conexi6n de un reproductor de DVD Blu ray receptor por cable sat61ite decodificador al TV Reproductor DVD Blu ray Receptor por cable sat_lite decodificador Panel posterior del iV Cable de audio no incluido Cable de componentes no incluido 1 2 Conecte un cable de componentes entre los terminales COMPONENT IN Y PB PR del televisor y los terminales...

Страница 110: ...l posterior del TV 1 Conecte un cable 6ptico entre los terminales DIGITAL AUDIO OUT OPTICAL del televisor y los terminales de entrada de audio digital del sistema de audio digital Cuando un sistema de audio digital se conecta al terminal DIGITAL AUDIO OUT OPTICAL Reduzca el volumen del TV y ajuste el volumen con el control del sistema El audio de 5 1 canales es posible cuando el televisor esta con...

Страница 111: ...icador DVD para Home Cinema Cuando un amplificador de audio se conecta a los terminales AUDIO OUT R AUDIO L Reduzca la ganancia volumen del TV y ajuste e volumen con e control del amplificador Cada amplificador DVD para Home Cinema tiene una configuraci6n distinta en el panel posterior Cuando conecte un amplificador DVD para Home Cinema debe hacer coincidir los colores de terminal de conexi6n y de...

Страница 112: ...cte los cables de audio entre los terminales AV IN R AUDIO L del televisor y los terminales AUDIO OUT de la videocamara Cada videocamara tiene una configuraci6n distinta en el panel posterior Cuando conecte una videocamara debe hacer coincidir los colores del terminal de conexi6n y del cable Usede uncableHDMI Panel posterior dei TV Cable HDMI no ineluido 1 Conecte un cable HDMI entre el terminal H...

Страница 113: ... coincidir los colores de terminal de conexi6n y de cable Usede uncableHDMI DVI Panel posterior del TV PC 1 Conecte un cable HDMI DVI entre el terminal HDMI DVI IN del televisor y el terminal de salida PC del ordenador 2 Conecte un cable est6reo miniclavija 2 RCA de 3 5 mm entre el terminal DVm AUDIO IN JR AUDIO L del televisor y el terminal de salida de audio de la tarjeta de sonido del ordenador...

Страница 114: ...se el botEn A o T para desplazarse por los elementos del men Pulse el botEn ENTER_ para acceder a los elementos del men Pulse el botEn A V _I _ para cambiar los elementos seleccionados Pulse el botEn RETURN para volver al ment_anterio Pulse el botEn EXiT para salir del men Func i6n _ _ _ 7 _ Seleccione la opciEn marcada Confirme la configuraciEn Ejemplo ConfiguraciEn del brillo del televisor en el...

Страница 115: ...NTER_ Si tiene cable digital seleccione la fuente de la serial del sistema de cable para anal6gica y para digital P6ngase en contacto con su proveedor de cable para saber el tipo de sistema de cable existente en su zona 6 Pulse el bot6n ENTER _ J para seleccionar Iniciar El televisor empezara a memorizar todos los canales disponibles Para detener la b0squeda antes de que termine pulse el bot6n ENT...

Страница 116: ...s canales codificados despu_s de que Prog Auto se haya completado Puede tardar de 20 a 30 minutos Para detener la bOsqueda de canales codificados Pulse el bot6n ENTER _ para seleccionar Detener Pulse el bot6n para seleccionar 8i y a continuaci6n pulse el bot6n ENTER _ Esta funci6n s61oesta disponible en el modo Cable Lista de canales Para conocer el procedimiento detallado sobre c6mo usar la Lista...

Страница 117: ...los canalesborrados Tambi_n puede borrar un canal en los menQsCanales agregados o Favorites de la misma manera Agregar a Favorites Borrar de Favorites Puede configurar come favorites los canales que vea con mas frecuencia _ _ Pulse el bot6n TOOLS para ver el menQHerramientas Tambi_n puede afiadir o borrar canales favorites seleccionando Herramientas _ Agregar a Favorites o Borrar de Favorites Se m...

Страница 118: ...ciones de configuraci6n que permiten controlar la oalidad de la imagen Luz de fondo Ajusta el brillo de la luz de fondo de la pantalla LCD Contraste Ajusta el nivel del contraste de la imagen Brillo Ajusta el nivel del brillo de la imagen Oefinicion Ajusta la definici6n de los bordes de la imagen Color Ajusta la saturaci6n del color de la imagen Tinte V R Ajusta el matiz del color de la imagen Cua...

Страница 119: ...de PC s61ose pueden hacer cambios en los elementos Tone Color y Tamale de Opciones de imagen Tone Color _ Frio Normal Tibiol Tibie2 Tibiol o Tibio2 s61oestan disponibles cuando el mode de imagen esta configurado en Cine La configuraci6n de cada dispositivo externo conectado a la entrada del televisor se puede ajustar y guardar Tamale Es posible que alguna vez desee cambiar el tamale de la imagen e...

Страница 120: ...ctado al televisor a traves de HDMI La funci6n N neg HDMI puede que no sea compatible con dispositivos externos Modo pelicula _ Apagado Auto El televisor se puede configurar para detectar automaticamente y procesar las se_ales de las peliculas procedentes de todas las fuentes y ajustar la imagen para conseguir una calidad 6ptima Modo pelicula es compatible con TV Video Component 480i I080i y HDMI ...

Страница 121: ...utomaticamente de acuerdo con las sefiales de video que reciba La funci6n tambien ajusta automaticamente con mas configuraci6n y ajusta los valores y las posiciones de la frecuencia _ _ Pulse el bot6n TOOLS para ver el menOHerramientas Tambi_n puede establecer el ajuste automatico seleccionando Herramientas _ Ajuste Automatico Esta funci6n no se puede utilizar en modo DVI HDMI C Pantalla El prop6s...

Страница 122: ...mite transmitir simultaneamente muchas pistas de audio por ejemplo traducciones simultaneas del programa en otros idiomas Puede seleccionar un idioma que no sea el Idioma preferido pulsando el bot6n MT del mando a distancia Idioma preferido esta disponible s61oen el modo de televisi6n digital S61ose puede seleccionar uno de los idiomas que ofrece la emisora 8onido Multi track MTS solo canales anal...

Страница 123: ...cable de alimentaci6n debe configurar el reloj de nuevo Mode Reloj Se puede configurar la hera actual manual o automaticamente Auto Configure la hera automaticamente con la hera de la emisora digital Manual Configure la hera actual manualmente SegOn la emisora y la serial la hera automatica no se puede ajustar correctamente En este case ajuste la hera manualmente La antena y el cable se deben cone...

Страница 124: ...uiente que restablece el c6digo a 0 0 0 0 POWER apagar _ MUTE 8 _ 2 4 _ POWER encender Perm todo Se pulsa para desbloquear todos los programas de televisi6n Bloq redo Se pulsa para bloquear todos los programas de televisi6n Bloqueo V Chip _ Apagado Eneendido Puede bloquear los programas de TV clasificados Guias pater TV Puede bloquear los programas de TV segt_nsu clasificaci6n Estafunci6n permite ...

Страница 125: ...cci6n de bloqueo difieren seg0n la emisora El nombre de menO predeterminado y la clasificaci6n US descargable cambian segt_nla informaci6n descargada Aunque configure la visualizaci6n en pantalla en su propio idioma el menO Clasificaci6n U 8 Descargable siempre Io vera en ingles La clasificaci6n bloqueara automaticamente ciertas categorias que son mas restrictivas Los titulos de clasificaci6n por ...

Страница 126: ...cio I Servicio 6 Si el Mode de 8ubtitulo es el predeterminado las opciones Opciones 8ubtitulos Dig se habilitan segOnel emisora La disponibilidad de los subfitulos depende del programa que se este emitiendo Programatic significa que se sigue el estandar establecido per el emisor Las opciones de color de primer piano y color de rondo no se pueden ajustar con el mismo color Opaeidad de primer piano ...

Страница 127: ...a correctamente seleccione No Puede haber un problema en el equipo externo Compruebe las conexiones Si persiste el problem consulte el manual del usuario del dispositivo externo Prueba de sonido Si cree que tiene un problema con el sonido efectOe la prueba de sonido Compruebe el sonido reproduciendo una melodia en el televisor En la pantalla se muestra 2 ContinOael problema con esta prueba del son...

Страница 128: ...y se encendera automaticamente despu_s de completar la actualizaci6n del firmware Despu_s de realizar la actualizaci6n compruebe la versi6n del firmware Cuando se actualiza el software la configuraci6n del video y audio que se haya efectuado vuelve a la configuraci6n predeterminada de fabrica Es aconsejable anotar la configuraci6n para recuperarla facilmente despues de la actualizaci6n _ Guia de c...

Страница 129: ...fectue la prueba de sonido conel menOde autodiagn6stico Desconecteel TV durante30 segundosy despu6s intenteque funcioneotra vez ComDruebeaue la toma de la paredfunciona RemDlacelas pilas del mando a distancia Limpie el borde superiordel mando a distancia ventanade transmisi6n Compruebe tosterminalesde tas pilas Compruebe queet cable de sepal est6conectado firmementecontas fuentesdel PC Compruebe t...

Страница 130: ...rir el equipo de montaje en la pared tambien se distribuye un manual de instalaci6n detallado y todas las piezas necesarias para el montaje No use tornillos con un tama_o superior al estandar ya que pueden causar dar_osen el interior del televisor Para montajes murales que no cumplen las especificaciones de tornillos estandar VESA la Iongitud de _stos puede variar dependiendo de las especificacion...

Страница 131: ...como se exptica a continuaci6n Para impedir que el televisor se eaiga 1 Apriete firmemente las grapas sobre la pared con los tornillos AsegOresede que los tornillos esten bien afirmados en la pared SegOn el tipo de pared quizas necesite algt_nmaterial adicional para el anclaje Las grapas los tornillos y la cadena no se suministran con el producto debera adquirirlos por separado 2 Quite los tomillo...

Страница 132: ... 18 8 X 2 5 X 12 2 pulg 472 0 x 63 4 x 310 7 ram 18 6 X 7 5 X 14 3 pulg 472 0 x 189 5 x 382 8 ram 9 0 Ibs 4 1 kg 9 7 Ibs 4 4 kg 22 pulg 21 9 pulgadas medidas diagonalmente 1360 x 768 a 60Hz 3WX2 21 3 X 2 5 X 13 8 pulg 540 0 x 63 4 x 351 0 ram 21 3 X 7 5 X 15 9 pulg 540 0 x 189 5 x 403 1 ram 10 6 Ibs 4 8 kg 11 2 Ibs 5 1 kg Entre 10 C y 40 C 50 F y I04 F 10 al 80 sin condensaci6n Entre 20 C y 45 C 4...

Отзывы: