background image

English - 

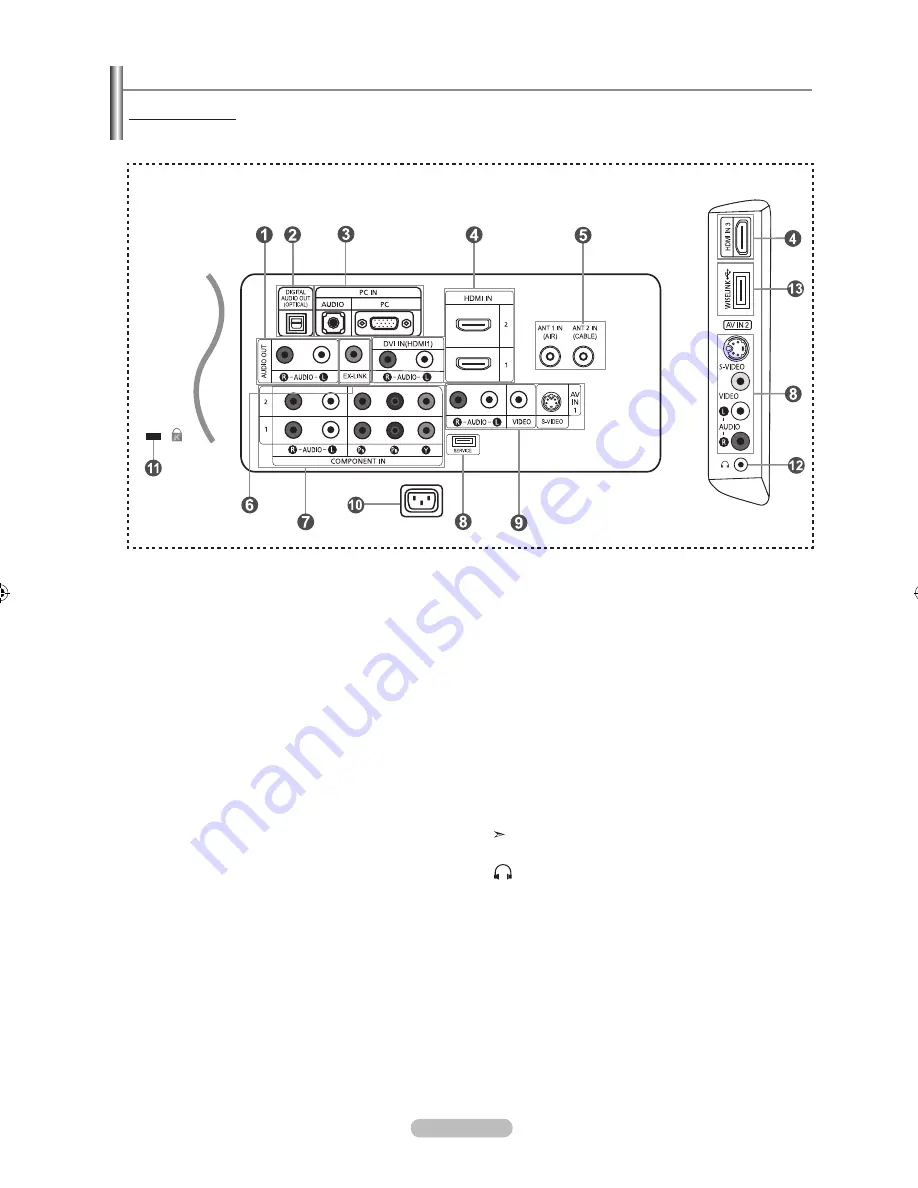
Viewing the Connection panel (depending on the model)

rear panel Jacks

Use the rear panel jacks to connect A/V components that will be connected continuously, such as VCR or DVD players.  

For more information on connecting equipment, see pages 6-12.

audIo out


  Connects to the audio input jacks on your Amplifier/ 

  Home theater.

2


dIGItal audIo out (optICal) 


  Connects to a Digital Audio component.

3


pC In


  Connects to the video and audio output jacks on 

  your PC.

4


hdmI In ,, /dVI In(hdmI) (audIo r/l) 

Connects to the HDMI jack of a device with an HDMI 

output.

   Use the HDMI IN 1 terminal for a DVI connection to an 

external device.  

You should use the DVI to HDMI cable or DVI-HDMI 

adapter (DVI to HDMI) for a video connection, and the 

DVI IN ‘R-AUDIO-L’ terminal for audio.

  -  No sound connection is needed for an HDMI to HDMI 

connection

  -  When using an HDMI/DVI cable connection, you must 

use the HDMI IN 1 terminal. 

  - 23,26 inch model supports HDMI1 and HDMI2 only. 

5


ant  In/ant  In


  Connects to an antenna or cable TV system.

6

 Ex lInK


   Connect this to the jack on the optional wall mount 

bracket. This will allow you to adjust the TV viewing angle 

using your remote control.


7

 ComponEnt In


  Connects Component video/audio.

SErVICE (ln-t5h, ln-t5h, ln-t65h) 


Connector for SERVICE only

aV In  / aV In 


  Video and audio inputs for external devices, such as a 

  camcorder or VCR. 


S-VIdEo


  Connects an S-Video signal from a camcorder or VCR.

poWEr Input


  Connects the supplied power cord

KEnSInGton loCK


  The Kensington lock (optional) is a device used to 

  physically fix the system when used in a public place. 

  If you want to use a locking device, contact the dealer 

  where you purchased the TV. 


The place of the Kensington Lock may be different  

    depending on its model.

      hEadphonE


  Connects a set of external headphones for private  

  listening.

WISElInK (ln-t5h,ln-t05h)


  Connect a USB mass storage device to view photo 

  files(JPEG) and play audio files (MP3).

[Side panel Jacks]

BN68-01156B-02Eng-0329.indd   4

2007-03-29   �� 7:58:21

Содержание LN T4053H - 40" LCD TV

Страница 1: ...monde Si vous avez des suggestions ou des questions concernant les produits Samsung veuillez contacter le Service Consommateurs Samsung Country Customer Care Center Web Site Address CANADA 1 800 SAMSUNG 7267864 www samsung com ca Samsung Electronics Canada Inc Customer Service 55 Standish Court Mississauga Ontario L5R 4B2 Canada Samsung Electronique Canada Inc Service à la Clientèle 55 Standish Co...

Страница 2: ...ctronics Co Ltd All rights reserved Précautions à prendre lors de l affichage d une image fixe Une image fixe peut causer des dommages irrémédiables à l écran du téléviseur N affichez pas une image fixe sur l écran LCD plus de 2 heures Cela pourrait provoquer une rémanence de l image à l écran Cette rémanence de l image est également appelée brûlure de l écran Pour éviter une telle rémanence de l ...

Страница 3: ...36 Automatic Volume Control 36 Selecting the Internal Mute 37 Setting the On Off Melody 37 Listening to the Sound of the Sub PIP Picture 38 Resetting the Sound Settings to the Factory Defaults 38 Connecting Headphones 38 Selecting the Antenna 39 Channel Control Clearing Scrambled Channels Digital 39 Setting the Channel Lists 40 To set up Your Favorite Channels 41 Using the Channel Lists 42 Viewing...

Страница 4: ...001324 Owner s Instructions Warranty Card Registration Card Safety Guide Manual Not available in all locations The items color and shape may vary depending on the model General Information List of Features Adjustable picture settings that can be stored in the TV s memory Automatic timer to turn the TV on and off A special sleep timer V Chip function Excellent Digital Interface Networking With a bu...

Страница 5: ... the and buttons on the remote control 4 CH Press to change channels In the on screen menu use the CH buttons as you would use the and butons on the remote control 5 Power Press to turn the TV on and off POWER INDICATOR Blinks and turns off when the power is on and lights up in stand by mode 6 Remote Control Sensor Aim the remote control towards this spot on the TV 7 SPEAKERS Buttons on the Lower ...

Страница 6: ...ust use the HDMI IN 1 terminal 23 26 inch model supports HDMI1 and HDMI2 only 5 ANT 1 IN ANT 2 IN Connects to an antenna or cable TV system 6 EX LINK Connect this to the jack on the optional wall mount bracket This will allow you to adjust the TV viewing angle using your remote control 7 COMPONENT IN Connects Component video audio 8 Service LN T2353H LN T2354H LN T2653H Connector for SERVICE only ...

Страница 7: ... Box TV DVD STB CABLE VCR Press to operate your TV DVD STB CABLE box or VCR see pages 18 22 When pressing this button a number of buttons on the remote control e g TV DVD STB CABLE VCR VOL and CH buttons light up for a few seconds and then turn off to save power This function is convenient for using the remote at night or when dark LN T2353H LN T2653H SOURCE Press to display all of the available v...

Страница 8: ... pages 18 22 When pressing this button a number of buttons on the remote control e g TV DVD STB CABLE VCR VOL and CH buttons light up for a few seconds and then turn off to save power This function is convenient for using the remote at night or when dark SOURCE Press to display all of the available video sources a PRE CH Tunes to the previous channel b WISELINK This function enables you to view an...

Страница 9: ... Flat Twin Leads below If your antenna has one lead that looks like diagram to the right see Antennas with 75 Ω Round Leads If you have two antennas see Separate VHF and UHF Antennas 1 Place the wires from the twin leads under the screws on a 300 75 Ω adapter not supplied Use a screwdriver to tighten the screws 2 Plug the adaptor into the ANT 2 IN CABLE terminal on the back of the TV ANT 2 IN CALB...

Страница 10: ...box This terminal might be labeled ANT IN VHF IN or simply IN 5 Connect another cable between the other OUT terminal on the splitter and the A IN terminal on the RF A B switch 6 Connect the last RF cable between the OUT terminal on the RF A B switch and the ANT IN terminal on the rear of the TV Splitter Incoming cable Splitter Cable Box Incoming cable Splitter Cable Box RF A B Switch Incoming cabl...

Страница 11: ...ing a VCR or Camcorder Tape to view your VCR tape Each VCR has a different back panel configuration When connecting a VCR match the color of the connection terminal to the cable TV Rear Panel RF Cable Not supplied 3 VCR Rear Panel 2 Video Cable Not supplied 4 Audio Cable Not supplied 5 ANT 1 IN AIR Your Samsung TV can be connected to an S Video signal from an VCR This connection delivers a better ...

Страница 12: ...ONENT IN also Each DVD Player STB has a different back panel configuration When connecting a DVD player STB match the color of the connection terminal to the cable DVD Player Set Top Box TV Rear Panel Component Cable Not supplied 1 Audio Cable Not supplied 2 Connecting a Camcorder The side panel jacks on your TV make it easy to connect a camcorder to your TV They allow you to view the camcorder ta...

Страница 13: ... installed Each DVD player STB has a different back panel configuration 32 40 inch model supports HDMI 3 only Connecting a DVD Player Set Top Box via DVI This connection can only be made if there is a DVI Output connector on the external device 1 Connect a DVI to HDMI Cable or DVI HDMI Adapter between the HDMI IN 1 connector on the TV and the DVI connector on the DVD player Set Top Box 2 Connect A...

Страница 14: ...io System is connected to the DIGITAL AUDIO OUT OPTICAL terminal Decrease the volume of the TV and adjust the volume level with the system s volume control Digital Audio System TV Rear Panel Optical Cable Not supplied 5 1CH audio is possible when the TV is connected to an external device supporting 5 1CH Each Digital Audio System has a different back panel configuration The rear panel jacks on you...

Страница 15: ...e In Cable mode you can select the correct signal source among STD HRC and IRC by pressing the or button then press the ENTER button Contact your local cable company to identify the type of cable system that exists in your particular area 5 The TV will begin memorizing all of the available channels After all the available channels are stored the Auto program menu reappears Press the ENTER button w...

Страница 16: ...eature 1 Press the MENU button to display the menu Press the or buttons to select Setup then press the ENTER button 2 Press the ENTER button again to select Plug Play 3 The message Menu language Shop Mode Channels and Time will be set is displayed Using the Channel Buttons 1 Press the PRE CH button The TV will switch to the last channel viewed To quickly switch between two channels that are far ap...

Страница 17: ...s the MUTE button again or simply press the VOL or VOL buttons Viewing the Display 1 Press the INFO button on the remote control The TV will display the channel the type of sound and the status of certain picture and sound settings Press the INFO button once more or wait approximately 10 seconds and the display disappears automatically The display identifies the current channel and the status of c...

Страница 18: ...e channels by entering the channels digits There are three steps for memorizing channels selecting a broadcast source memoriz ing the channels automatic and adding or deleting channels Channel Lists Selecting the Video Signal source Before your television can begin memorizing the available channels you must specify the type of signal source that is connected to the TV i e an Air or a Cable system ...

Страница 19: ...company to identify the type of cable system that exists in your particular area At this point the signal source has been selected Press the ENTER button to start the auto program To stop the search before it has finished press the ENTER button with stop selected 5 After all the available channels are stored the Auto Program menu reappears Press the EXIT button to exit Move Enter Return Antenna Ai...

Страница 20: ...e of the other codes listed for your brand of VCR If no other codes are listed try each VCR code 000 through 080 Note on Using Remote Control Modes VCR When your remote control is in VCR mode the volume buttons still control your TV s volume Setting Up the Remote to Operate Your Cable Box 1 Turn off your cable box 2 Press the CABLE button on your TV s remote control 3 Press the SET button on your ...

Страница 21: ... Control Modes DVD When your remote control is in DVD mode the volume buttons still control your TV s volume Setting Up the Remote to Operate Your STB 1 Turn off your STB 2 Press the STB button on your TV s remote control 3 Press the SET button on your TV s remote control 4 Using the number buttons on your remote control enter three digits of the STB code listed on page 22 of this manual for your ...

Страница 22: ... 021 026 037 062 MARTA 006 MEI 021 MEMOREX 006 021 024 025 MGA 034 MIDLAND 005 MINOLTA 019 041 075 MITSUBISHI 019 034 041 046 Brand Code MONTGOMERY WARD 020 MTC 002 025 MULTITECH 002 005 025 038 NEC 007 008 018 026 037 062 064 OPTIMUS 020 ORION 073 074 075 076 PANASONIC 021 056 071 072 PENTAX 019 041 075 PENTEX RESEARCH 008 PHILCO 021 056 059 PHILIPS 021 080 PIONEER 019 026 039 053 PORTLAND 015 04...

Страница 23: ... 018 STB DVD COMBO 019 DVD Receiver 020 AV Receiver 021 DVD Brand Code ANAM 030 AUDIOVOX 075 AUDIOLOGIC 085 ANABA 072 APEX DIGITAL 070 071 074 086 083 084 088 111 112 AIWA 114 BROKSONIC 062 BLAUPUNKT 074 B K 122 123 CURTIS MATHES 027 CYBER HOME 077 078 079 082 CLARION 080 125 CIRRUS 081 CYBER HOME 065 CINEVISION 095 DAEWOO 066 DENON 146 FARENHEIT 067 068 FISHER 090 GPX 060 GO VIDEO 061 089 133 135...

Страница 24: ...ite STB HDD COMBO Standard 009 SET TOP BOX Brand Code ALPHASTAR 023 ANAM 043 CHANNEL MASTER 018 034 CROSSDIGITAL 019 CHAPARRAL 035 DIRECT TV 015 016 017 019 022 045 060 061 062 065 066 067 068 DAEWOO 074 DISH NETWORK SYSTEM 069 070 DISHPRO 069 DRAKE 018 024 032 DX ANTENNA 027 ECHOSTAR 025 069 070 071 EXPRESSVU 069 GOI 069 GE 065 GENERALINSTRUMENT 046 047 048 063 064 HTS 069 HOME CABLE 056 HITACHI ...

Страница 25: ... your input source selection easier 1 Press the MENU button to display the menu Press the or buttons to select Input then press the ENTER button Press the or buttons to select Edit Name then press the ENTER button 2 Press the or buttons to select AV1 AV2 S Video1 S Video2 Component1 Component2 PC HDMI1 HDMI2 HDMI3 input jack then press the ENTER button 23 26 inch model supports TV AV1 AV2 S Video1...

Страница 26: ...olor or Tint G R then press the ENTER button 4 Press the or buttons to decrease or increase the value of a particular item For example if you select Contrast pressing the button increases it Press the EXIT button to exit When you make changes to Contrast Brightness Sharpness Color Tint G R OSD will be also adjusted accordingly When in PC mode Tint Sharpness and Color are not available Picture Cont...

Страница 27: ...TV More Color Tone Cool1 Detailed settings Size 16 9 Digital NR Low Active Color On DNle On Reset OK Cool2 Cool1 Normal Warm1 Warm2 Move Enter Return More Color Tone Cool2 Detailed settings Size 16 9 Digital NR Low Active Color On DNle On Reset OK Picture TV 0 Backlight Move Adjust Return Activating Backlight 1 Press the MENU button to display the menu Press the ENTER button to select Picture 2 Pr...

Страница 28: ...n to select Dynamic Contrast then press the ENTER button 7 Press the or button to select Off Low Medium High Press the ENTER button Off Turns off the dynamic contrast adjustment function Low Sets the dynamic contrast to low Medium Sets the dynamic contrast to medium High Sets the dynamic contrast to high Adjusting the Detailed Settings Move Enter Return Black Adjust Off Dynamic Contrast Off Gamma ...

Страница 29: ...pressing the or button then press the ENTER button 14 Press the or button to decrease or increase the value of a particular item Press the ENTER button R offset Adjusts the red color darkness G offset Adjusts the green color darkness B offset Adjusts the blue color darkness R gain Adjusts the red color brightness G gain Adjusts the green color brightness B gain Adjusts the blue color brightness Re...

Страница 30: ...djustment value will refresh the adjusted screen Activating Edge Enhancement You can emphasize object boundaries in the picture 18 Press the or button to select Edge Enhancement then press the ENTER button 19 Press the or button to select Off or On Press the ENTER button Press the EXIT button to exit Move Enter Return Black Adjust Off Dynamic Contrast Off Gamma 0 Color Space Auto White Balance My ...

Страница 31: ...VIDEO and all COMPONENT 480i 480p DTV 480i 480p modes all screen modes can be selected 16 9 Zoom1 Zoom2 4 3 You can select only the 16 9 4 3 and Wide Fit screen sizes in the DTV Component 720p 1080i or HDMI 720p 1080i mode In PC modes only 16 9 4 3 modes can be selected You must select Zoom with the P Size button on the remote if you want to move the Zoom 1or 2 picture up or down When watching a D...

Страница 32: ...nd clearer for a more vivid on screen picture 1 Press the MENU button to display the menu Press the ENTER button to select Picture 2 Press the or buttons to select DNIe then press the ENTER button 3 Press the or buttons to select Off DNle Demo or On then press the ENTER button Off Switches off the DNIe mode Demo The screen before applying DNIe appears on the left screen The screen after applying D...

Страница 33: ... Level Normal Film Mode Off PIP Function Help On SW Upgrade Setup TV Off On More HDMI Black Level Normal Film Mode Off PIP Function Help On SW Upgrade Setup TV Move Enter Return HDMI Black Level More HDMI Black Level Normal Film Mode Off PIP Function Help On SW Upgrade Setup TV Move Enter Return Move Enter Return More HDMI Black Level Normal Film Mode Off PIP Function Help On SW Upgrade Setup TV N...

Страница 34: ...nly You can view Analog TV broadcasts on the PIP screen sub picture when the main picture is from an connected PC to this TV LN T3253H LN T4053H Main picture Sub picture Component 1 2 HDMI 1 2 3 PC Analog TV broadcasts only You can view Analog TV broadcasts on the PIP screen sub picture when the main picture is from an external device connected to HDMI1 2 3 Component1 2 or PC continued Move Enter ...

Страница 35: ... PIP window Press the ENTER buttons The Double Double Wide mode cannot be selected in Position mode 5 Press the or buttons to select Size then press the ENTER button Press the or buttons to select the desired channel in the PIP window Press the ENTER buttons Press the EXIT button to exit If the main picture is in PC mode Size is not available You may notice that the picture in the PIP window becom...

Страница 36: ...ress the or buttons to select Sound then press the ENTER button 2 Press the ENTER button to select Mode Press the or buttons to select Standard Music Movie Speech or Custom sound setting then press the ENTER button Press the EXIT button to exit Choose Standard for the standard factory settings Choose Music when watching music videos or concerts Choose Movie when watching movies Choose Speech when ...

Страница 37: ... French you want then press the ENTER button Press the EXIT button to exit Preferred Language Choosing a Multi Channel Sound MTS track Digital The digital TV transmission system is capable of simultaneous transmission of many audio tracks for example simultaneous translations of the program into foreign languages The availability of these additional multitracks depends upon the program Move Enter ...

Страница 38: ... EXIT button to exit Choose Mono for channels that are broadcasting in mono or if you are having difficulty receiving a stereo signal Choose Stereo for channels that are broadcasting in stereo Choose SAP to listen to the Separate Audio Program which is usually a foreign language translation Multi Track Sound Choosing a Multi Channel Sound MTS track Analog Move Enter Return Preferred Language Engli...

Страница 39: ...tup then press the ENTER button 2 Press the or buttons to select Melody then press the ENTER button 3 Press the or buttons to select Off Low Medium High then press the ENTER button Off Turns off the melody function Low Sets the melody volume to low Medium Sets the melody volume to medium High Sets the melody volume to high Press the EXIT button to exit Setup More Blue Screen On Melody Off PC Home ...

Страница 40: ...m Equalizer SRS TruSurround XT Off Multi Track Options Auto Volume Off Internal Mute Off Sound Select Main Reset Sound TV Move Enter Return Listening to the Sound of the Sub PIP Picture 1 Press the MENU button to display the menu Press the or buttons to select Sound then press the ENTER button 2 Press the or buttons to select Sound Select then press the ENTER button 3 Press the or buttons to selec...

Страница 41: ...TV Cable 3 1 Clearing Scrambled Channels Digital 1 Press the MENU button to display the menu Press the or buttons to select Channel then press the ENTER button 2 Press the or button to select Clear Scrambled Channel then press the ENTER button It searches scrambled channels which are to be removed from the list To stop searching scrambled channels Press the button to select Stop Press the button t...

Страница 42: ...Move Enter Return DTV Air 2 1 Air3 Air4 Air 5 Air 6 Air 7 DTV Air 7 1 Air 8 Air 9 Air 10 DTV Air 10 1 DTV Air 10 2 DTV Air 10 3 DTV Air 10 1 DTV Air 10 2 DTV Air 10 3 DTV Air 10 1 DTV Air 10 2 DTV Air 10 3 Air 12 DTV Air 13 1 DTV Air 13 2 DTV Air 13 3 DTV Air 13 4 Air 5 1 2 Watch Add Delete Favorite List Mode Delete All A d d A l l 1 Press the MENU button to display the menu Press the or buttons t...

Страница 43: ...channels will be shown in the Favorite menu You can set channels you watch frequently as favorites Antenna Air Auto Program Clear Scrambled Channel Channel List Name Fine Tune Signal Strength LNA On Channel Move Enter Return TV All Added Favorite Default List Mode All Channel List Move Enter Return TV CH Channel List All Move Enter Page Return DTV Air 2 1 Air3 Air4 Air 5 Air 6 Air 7 DTV Air 7 1 Ai...

Страница 44: ...press the ENTER button To toggle between your all channels add channels or favorite channels use the red P Mode button on the remote control Red P Mode button Press repeatedly to select All Added or Favorite You can display a list of all channels added channels or your favorite channels Antenna Air Auto Program Clear Scrambled Channel Channel List Name Fine Tune Signal Strength LNA On Channel Move...

Страница 45: ...e Signal Strength LNA On Channel Move Enter Return TV Name Move Enter Return TV Air 2 Air 3 Air 4 Air 5 Air 6 Clear Clear Clear Clear Clear Name Move Adjust Return TV Air 2 Air 3 Air 4 Air 5 Air 6 Clear Clear Clear Clear Clear A LNA Low Noise Amplifier 1 Press the MENU button to display the menu Press the or buttons to select Channel then press the ENTER button 2 Press the or buttons to select LNA...

Страница 46: ...ess the ENTER button If the signal strength meter indicates that the signal is weak physically adjust your antenna to increase the signal strength Continue to adjust the antenna until you find the best position with the strongest signal Press the EXIT button to exit Unlike analog channels which can vary in reception quality from snowy to clear digital HDTV channels have either perfect reception qu...

Страница 47: ...e just click OK and exit the dialog box Display Modes If the signal from the system equals the standard signal mode the screen is adjusted automatically If the signal from the system doesn t equal the standard signal mode adjust the mode by referring to your videocard user guide otherwise there may be no video For the display modes listed below the screen image has been optimized during manufactur...

Страница 48: ...ode first 2 Press the ENTER button to select Image Lock 3 Press the or buttons to select Coarse or Fine then press the ENTER button Press the or buttons to adjust the screen quality Vertical stripes may appear or the picture may be blurry Press the ENTER button Press the EXIT button to exit Adjusting the Screen Quality The purpose of the picture quality adjustment is to remove or reduce picture no...

Страница 49: ...er Return Position PC Image Lock Position Auto Adjustment Image Reset TV Move Enter Return Image Reset is completed Setup More Blue Screen On Melody Off PC Home Theater PC Off Light Effect Watching Mode On Energy Saving Off More TV Move Enter Return Setup More Blue Screen On Melody Off PC Home Theater PC Off Light Effect Watching Mode On Energy Saving Off More TV Move Enter Return Off On 1 Press t...

Страница 50: ...s to move to Month Day Year Hour Minute or am pm Set the date and time you want by pressing the or buttons then press the ENTER button Press the EXIT button to exit The current time will appear every time you press the INFO button You can set the month day year hour and minute directly by pressing the number buttons on the remote control Time Setting Setup Plug Play Language English Time Game Mode...

Страница 51: ...ton Press the EXIT button to exit Depending on the broadcast station and signal the auto time may not be set correctly If this occurs set the time manually The Antenna or cable must be connected in order to set the time automatically Setup Plug Play Language English Time Game Mode Off V Chip Caption Menu Transpatency High More TV Move Enter Return Time Clock Sleep Timer Off Timer 1 Inactivated Tim...

Страница 52: ... ENTER button 3 Press the or buttons to adjust Minute 4 Press the button to select Activation Press the or buttons to select On then press the ENTER button Press the EXIT button to exit Time Clock Sleep Timer Off Timer 1 Inactivated Timer 2 Inactivated Timer 3 Inactivated TV Move Enter Return 1 1 2005 12 30 am Sleep Timer Set Sleep timer TV Move Adjust Return Minute Activation 30 On Sleep Timer Se...

Страница 53: ...s When the On Timer is active you can turn on a specific channel or play back contents such as photo or audio files Make sure that an USB device is connected to your TV Press the or button When finished press the RETURN button to return The current time will appear every time you press the INFO button You can set the hour minute and channel by pressing the number buttons on the remote control Pres...

Страница 54: ...he MENU button to display the menu Press the or buttons to select Setup then press the ENTER button Press the or buttons to select Language then press the ENTER button 2 Press the or buttons to select English Español or Français Press the ENTER button Press the EXIT button to exit Function Description Setup Plug Play Language English Time Game Mode Off V Chip Caption Menu Transpatency High More TV...

Страница 55: ...3 Select On or Off by pressing the or buttons then press the ENTER button 4 Press the EXIT button to exit To disconnect the game console and connect another external device cancel game mode in the setup menu If you display the TV menu in Game mode the screen shakes slightly Game Mode is not available in TV mode Setup Plug Play Language English Time Game Mode Off V Chip Caption Menu Transpatency Hi...

Страница 56: ...he program CC3 Secondary Synchronous Caption Service Alternate program related caption data typically second language captions CC4 Special Non Synchronous Use Captions Similar to CC2 Text1 First Text Service This may be various non program related data Text2 Second Text Service Additional data usually not program related Text3 Text4 Third and Fourth Text Services These data channels should be used...

Страница 57: ... Default Style0 Style 7 You can change the font you want The default is Style 0 Foreground Color This option consists of Default White Black Red Green Blue Yellow Magenta and Cyan You can change the color of the letter The default is White Background Color This option consists of Default White Black Red Green Blue Yellow Magenta and Cyan You can change the background color of the caption The defau...

Страница 58: ...More TV Move Enter Return Setup More Blue Screen On Melody Off PC Home Theater PC Off Light Effect Watching Mode On Energy Saving Off More TV Move Enter Return Off Low Medium High Auto This feature adjusts the brightness of the TV in order to reduce power consumption When watching TV at night set the Energy Saving mode option to High to reduce eye fatigue as well as power consumption 1 Press the M...

Страница 59: ... to display the menu Press the or buttons to select Setup then press the ENTER button 2 Press the or buttons to select Light Effect then press the ENTER button 3 Press the or button to select Off In Standby In Watching TV or Always then press the ENTER button Off LED will not come on In Standby Turns the LED on in standby mode In Watching TV Turns the LED on while watching TV Always LED will come ...

Страница 60: ...o Press the ENTER button Off Turns the screen noise reduction function off Low Reduces screen noise at a low level Medium Reduces screen noise at a medium level High Reduces screen noise at a high level Auto Automatically recognizes and reduces screen noise Press the EXIT button to exit Digital Noise Reduction Move Enter R e t u r n More Color Tone Warm2 Detailed setting Size 16 9 Digital NR Low A...

Страница 61: ...IN press the remote control buttons in the following sequence which resets the pin to 0 0 0 0 Power Off Mute 8 2 4 Power On Using the V Chip The V Chip feature automatically locks out programs that are deemed inappropriate for children The user must enter a PIN personal ID number before any of the V Chip restrictions are set up or changed When the V chip feature is activated the PIP features do no...

Страница 62: ...n English Canadian French Downloadable U S Rating Change PIN V Chip TV Move Enter Return V Chip Lock off TV Parental Guidelines MPAA Rating Canadian English Canadian French Downloadable U S Rating Change PIN V Chip TV Off On 1 Press the MENU button to display the menu Press the or buttons to select Setup then press the ENTER button 2 Press the or buttons to select V Chip then press the ENTER butto...

Страница 63: ...ub ratings D L S V work together similarly See next section 6 How to set the FV D L S and V sub ratings First select one of these TV Ratings TV Y TV Y7 TV G TV PG TV 14 or TV MA See Step 4 on previous page and press the button The symbol will be displayed for each sub rating While is selected press the ENTER button to go to a sub rating Press ENTER to block the sub rating To select a different TV ...

Страница 64: ...PG Parental guidance suggested PG 13 Parents strongly cautioned R Restricted Children under 17 should be accompanied by an adult NC 17 No children under age 17 X Adults only NR Not rated Allow all Press to unlock all TV ratings Block all Press to lock all TV ratings While a particular category is selected press the ENTER button to activate it The symbol will be displayed Press the ENTER button to ...

Страница 65: ...ock all Press to lock all TV ratings C Programming intended for children under age 8 C8 Programming generally considered acceptable for children 8 years and over to watch on their own G General programming suitable for all audiences PG Parental Guidance 14 Programming contains themes or content which may not be suitable for viewers under the age of 14 18 Adult programming Setup Plug Play Language ...

Страница 66: ...ratings Block all Press to lock all TV ratings G General 8 ans Programming generally considered acceptable for children 8 years and over to watch on their own 13 ans Programming may not be suitable for children under the age of 13 16 ans Programming is not suitable for children under the age of 16 18 ans Programming restricted to adults Setup Plug Play Language English Time Game Mode Off V Chip Ca...

Страница 67: ... exit Allow all Press to unlock all TV ratings Block all Press to lock all TV ratings Parental restriction levels differ depending on the broadcasting station The default menu name and Downloadable US rating changes depending on the downloaded information Even if you set the On screen display to your desired language the Downloadable U S Rating menu will appear in English only The rating will auto...

Страница 68: ... USB It may take up to 30 seconds is displayed Please be careful to not disconnect the power or remove the USB drive while upgrades are being applied The TV will shut off and turn on automatically after completing the firmware upgrade Please check the firmware version after the upgrades are complete Upgrading the Software depending on the model Samsung may offer upgrades for TV s firmware in the f...

Страница 69: ...ts are supported We recommend the sequential jpeg format Progressive jpeg uses a lot of memory and decoding may fail Do not disconnect the USB device while it is loading Neither PTP Picture Transfer Protocol nor MTP Media Transfer Protocol is supported The playing duration of an mp3 file may be displayed as 00 00 00 if its playing time information is not found at the start of the file The higher t...

Страница 70: ... depending on the USB Memory Device connected to TV 4 Press the or button to move to an icon then press the ENTER button To exit WISELINK mode press the WISELINK button on the remote control Press the WISELINK button on the remote control to display a WISELINK menu Using the WISELINK Menu Input Source List TV Edit Name WISELINK Anynet HDMI CEC TV Move Enter Return XTICK 861MB 994MB Free Move Enter...

Страница 71: ...mp or tiff will not be displayed The files are displayed on a page 15 thumbnail photos are displayed per page The thumbnails are numbered from left to right and from top to bottom from 1 to 15 Certain types of USB Digital camera and audio devices may not be compatible with this TV Folders are displayed first and they are followed by all JPEG files in the current folder The folders and JPEG files a...

Страница 72: ...he Slide Show if the Default Background Music is set to On To enable this function MP3 files and other photo files must be located in the same folder on the USB Memory Device 5 Press the INFO button during Slide Show to set the option Slide show Speed Background Music Background Music Setting List Press the or button to select the option then press the ENTER button After setting the option press t...

Страница 73: ...s the ENTER button The selected folder will be highlighted Press the MENU button again to return to the SlideShow screen The selected background music is played If you turn Off the Background Music even if the Background Music Settings have been set up the background music will not be played List The saved file information is displayed as a folder or JPEG file To exit WISELINK mode press the WISEL...

Страница 74: ...right direction button on the remote control allows you to move to the next photo Move to Previous Photo Pressing the left direction button on the remote control allows you to move to the previous photo When selecting a photo file the photo file information is displayed on the left side of the TV screen such as the resolution the date modified and the order of the file in the current directory e g...

Страница 75: ...INFO button to open the options window select the Rotate option and press the ENTER button Whenever you do this the photo on the screen is rotated 90 180 270 0 To exit WISELINK mode press the WISELINK button on the remote control The rotated file is not saved The Zoom Slide Show option is disabled when the Rotate option is selected The Rotating function information icon Displayed at the top left o...

Страница 76: ...the Options window select the Zoom option and press the ENTER button Whenever you do this the following zoom options are applied in sequence The INFO button the Rotate option and Enter must be pressed each time you want to Zoom the picture For example from x 2 to x 4 Zoom x 2 Zoom in to the photo x2 Zoom x 4 Zoom in to the photo x4 Zoom x 1 Restore the photo to its original size To pan up down lef...

Страница 77: ...p Pan up to view the upper part of a zoomed in photo Pan Right Pan right to view the right side of a zoomed in photo Pan Left Pan left to view the left side of a zoomed in photo Pan Down END Pan to the bottom of a zoomed in photo Pan Up END Pan to the top of a zoomed in photo Pan Right END Pan to the right most part of a zoomed in photo Pan Left END Pan to the left most part of a zoomed in photo T...

Страница 78: ... adjust the music volume press the VOL or VOL button on the remote control To mute the sound press the MUTE button on the remote control FF REW Key does not function during the play Music function information icon Displayed at the top left of the screen Icon Current OSD Function Music All When all music files are being played Music One When a music file is being played Music Play Pause When pressi...

Страница 79: ... press the WISELINK button on the remote control Upper Folder 00 04 01 00 04 28 00 04 12 00 05 39 00 04 30 00 04 30 00 03 54 00 05 25 Folder 1 001 Swan Song feat TBNY 002 Beatles Yesterday 003 Fall in Love 004 Tom Waits Time 005 Chuk Mangione Feel So good 007 Ryuichi Sakamoto Rain 008 Bon jovi This ain t a love song 006 Nat King Cole Fly me to the moon Nat King Cole Fly me to the moon 00 04 00 Exi...

Страница 80: ...n to select the option then press the ENTER button continued Using the Setup Menu Setup displays the user settings of the WISELINK menu Move Enter Return XTICK 861MB 994MB Free Slide Show Speed Fast Background Music Off Background Music Setting Music Repeat On Screen Saver 5 min Move Enter Return Slide Show Speed Fast Background Music Off Background Music Setting Music Repeat On Screen Saver 5 min...

Страница 81: ...waiting time before the screen saver appears The screensaver will appear when no button is pressed for 1 3 or 5 minutes To exit WISELINK mode press the WISELINK button on the remote control Slide Show Speed Fast Background Music Off Background Music Setting Music Repeat On Screen Saver 5 min Move Enter Return Fast Normal Slow Slide Show Speed Fast Background Music Off Background Music Setting Musi...

Страница 82: ...Out Optical on your TV and Digital Audio Input on the Home Theater Connect only one Home Theater You can listen to 5 1 channel sound through the home theater s speakers Otherwise you can only listen to 2 channel stereo sound in other cases Make sure to connect the Digital Audio IN Optical of the home theater and the TV correctly to listen to TV sound through the home theater However you cannot lis...

Страница 83: ...sted 2 Press the or button to select to a particular device and press the ENTER button It is switched to the selected device 3 If you cannot find a device you want press the or button to select Searching Connections then press the ENTER button The meassage Configuring Anynet connection is displayed When searching devices completes the connected devices are listed in the Anynet menu Switching to th...

Страница 84: ...olor buttons EXIT button After switching to the device while playing a file Backward search Forward search Stop Play Pause Device with built in Tuner After switching to the device when you are watching a TV program CH button Audio Device When Receiver is activated VOL button MUTE button Anyview2 When watching TV Play Pause The Anynet function only works when the remote control is set to TV The REC...

Страница 85: ...arching channels Operating WISELINK I want to start Anynet Check if the Anynet device is properly connected to the TV and check if the Anynet HDMI CEC is set to On in the Anynet Setup menu Press the TV button on the TV remote control to switch to TV Then press the Anynet button to show the Anynet menu and select a menu you want I want to exit Anynet Select Watch TV in Anynet menu Press the SOURCE ...

Страница 86: ...l transmission window Check the battery terminals Check signal cable message Ensure that the signal cable is firmly connected to the PC source Not Supported Mode message Check the maximum resolution and the frequency of the Video Adapter Compare these values with the data in the Display Modes Digital broadcasting screen problem Please check the digital signal strength and input antenna The image i...

Страница 87: ...multiscan display functions within the following frequency domain Horizontal frequency kHz 30 60 Vertical frequency Hz 60 75 PC Maximum refresh rate at 60 Hz 1360 x 768 Image is not centered on the screen Adjust the horizontal and vertical position The screen position must be adjusted on the output source i e STB with a digital signal If a still image is displayed for an extended period of time re...

Страница 88: ... the stand into the hole at the bottom of the TV 3 Insert screw into the hole indicated and tighten Disconnecting the Stand 2 3 4 1 Place the TV face down on a soft cloth or cushion on a table 2 Remove four screws from the back of the TV 3 Separate the stand from the TV 4 Cover the bottom hole with a cap ...

Страница 89: ...to the procedures above 6 You can save 3 respective positions to the red button Select Position 1 green button Select Position 2 and yellow button Select Position 3 If you press a button the set automatically moves to that saved angle 7 If you additionally move the set from a saved position the last position is saved as the final position Wall Mount Adjustment LN T4053H Sold separately Entering th...

Страница 90: ...ll parts necessary for assembly are provided Do not use screws longer than the standard dimension as they may cause damage to the inside of the TV set For wall mounts that do not comply with the VESA standard screw specifications the length of the screws may differ depend ing on their specifications Do not use screws that do not comply with the VESA standard screw specifications Do not use fasten ...

Страница 91: ...Lock may be different depending on its model Specifications Model Name LN T2353H LN T2354H LN T2653H Screen Size Diagonal 23 inches 26 inches Power Consumption 100W 130W PC Resolution 1360 x 768 60 Hz 1360 x 768 60 Hz Sound Output 3W X 2 5W X 2 Dimensions WxDxH Body With stand 586 x 79 x 406 mm 23 0 x 3 1 x 16 0 inches 586 x 216 x 446 mm 23 0 x 8 5 x 17 6 inches 666 x 75 x 461 mm 26 2 x 3 0 x 18 1...

Страница 92: ... Without stand 13 1 kg 28 9 Ibs 10 8 kg 23 8 Ibs 21 1 kg 46 5 Ibs 17 9 kg 39 5 Ibs Environmental Considerations Operating Temperature Operating Humidity Storage Temperature Storage Humidity 50 F to 104 F 10 C to 40 C 10 to 80 non condensing 4 F to 113 F 20 C to 45 C 5 to 95 non condensing 50 F to 104 F 10 C to 40 C 10 to 80 non condensing 4 F to 113 F 20 C to 45 C 5 to 95 non condensing Stand Swiv...

Страница 93: ...pyright holder saying it may be distributed under the terms of this General Public License The Program below refers to any such program or work and a work based on the Program means either the Program or any derivative work under copyright law that is to say a work containing the Program or a portion of it either verbatim or with modifications and or translated into another language Hereinafter tr...

Страница 94: ...se since you have not signed it However nothing else grants you permission to modify or distribute the Program or its derivative works These actions are prohibited by law if you do not accept this License Therefore by modifying or distributing the Program or any work based on the Program you indicate your acceptance of this License to do so and all its terms and conditions for copying distributing...

Страница 95: ...ost effectively convey the exclusion of warranty and each file should have at least the copyright line and a pointer to where the full notice is found One line to give the program s name and a brief idea of what it does Copyright C year name of author This program is free software you can redistribute it and or modify it under the terms of the GNU General Public License as published by the Free So...

Страница 96: ...GNU General Public License This license the GNU Lesser General Public License applies to certain designated libraries and is quite different from the ordinary General Public License We use this license for certain libraries in order to permit linking those libraries into non free programs When a program is linked with a library whether statically or using a shared library the combination of the tw...

Страница 97: ...very part regardless of who wrote it Thus it is not the intent of this section to claim rights or contest your rights to work written entirely by you rather the intent is to exercise the right to control the distribution of derivative or collective works based on the Library In addition mere aggregation of another work not based on the Library with the Library or with a work based on the Library o...

Страница 98: ... in a single library together with other library facilities not covered by this License and distribute such a combined library provided that the separate distribution of the work based on the Library and of the other library facilities is otherwise permitted and provided that you do these two things a Accompany the combined library with a copy of the same work based on the Library uncombined with ...

Страница 99: ...ERVICING REPAIR OR CORRECTION 16 IN NO EVENT UNLESS REQUIRED BY APPLICABLE LAW OR AGREED TO IN WRITING WILL ANY COPYRIGHT HOLDER OR ANY OTHER PARTY WHO MAY MODIFY AND OR REDISTRIBUTE THE LIBRARY AS PERMITTED ABOVE BE LIABLE TO YOU FOR DAMAGES INCLUDING ANY GENERAL SPECIAL INCIDENTAL OR CONSEQUENTIAL DAMAGES ARISING OUT OF THE USE OR INABILITY TO USE THE LIBRARY INCLUDING BUT NOT LIMITED TO LOSS OF...

Страница 100: ...This page is intentionally left blank ...

Страница 101: ...l Mute 37 Configuration de la mélodie de marche d arrêt 37 Activation du son de l image ISI secondaire 38 Connexion du casque 38 Rétablir les paramètres de son par défaut 38 Contrôle des Chaînes Sélection de l antenne 39 Suppression des canaux brouillés canaux numériques 39 Réglage des listes de canaux 40 Configuration de vos chaînes favorites 41 Utilisation de la liste de chaînes 42 Affichage de ...

Страница 102: ...Guide de sécurité N est pas dis ponible dans toutes les agences La forme et la couleur des accessoires peuvent varier selon le modèle Informations générales Liste des fonctions Paramètres d image modifiables pouvant être stockés dans la mémoire du téléviseur Minuterie automatique pour allumer ou éteindre le téléviseur Minuterie de mise en veille spéciale Fonction V Chip Interface numérique et de r...

Страница 103: ...CH Appuyez sur ce bouton pour changer de canal Dans le menu à l écran utilisez les boutons CH de la même manière que les boutons et de la télécommande 5 Alimentation Appuyez sur ce bouton pour allumer et teindre la télévision VOYANT D ALIMENTATION Clignote puis s arrête lorsque le téléviseur est allumé S allume en mode Veille 6 Capteur de la télécommande Dirigez la télécommande vers de point de la...

Страница 104: ...ble HDMI DVI Le modèle 23 26 pouces prend uniquement en charge HDMI1et HDMI2 5 ANT 1 IN ANT 2 IN A connecter à une antenne ou à un téléviseur par câble 6 EX LINK Connecteur pour ajustement fixation murale seulement Voir page 83 7 COMPONENT IN A connecter à la composante vidéo audio 8 SERVICE LN T2353H LN T2354H LN T2653H Connecteur réservé aux opérations de maintenance uniquement 9 AV IN 1 AV IN 2...

Страница 105: ...ou votre décodeur TV DVD STB CABLE VCR Permet de contrôler votre téléviseur votre lecteur DVD le STB votre déco deur ou votre magnétoscope Voir page 18 22 Lorsque vous appuyez sur ce bouton certaines touches de la télécom mande par ex les boutons de sélection d un dispositif cible les boutons numériques et les boutons TV DVD STB CABLE VCR VOL y CH s allument pendant quelques secondes puis s éteign...

Страница 106: ...sque vous appuyez sur ce bouton certaines touches de la télécommande par ex les boutons de sélection d un dispositif cible les boutons numériques et les boutons TV DVD STB CABLE VCR VOL y CH s allument pendant quelques secondes puis s éteignent pour économiser de l énergie Cette fonction permet d utiliser confortablement la télécommande dans l obscurité SOURCE Appuyez sur ce bouton pour afficher t...

Страница 107: ... est dotée d un câble semblable au schéma de droite reportez vous à la section Antenne équipée de câbles ronds 75 Ω Si vous avez deux antennes voir Antennes VHF et UHF séparées 1 Placez les fils de votre câble bipolaire sous les vis de l adaptateur 300 75 Ω non fourni Utilisez un tournevis pour serrer les vis 2 Branchez l adaptateur dans la borne ANT 2 IN CABLE située à l arrière du téléviseur ANT...

Страница 108: ...eut s appeler ANT IN VHF IN ou simplement IN 5 Branchez un autre câble entre l autre prise OUT du séparateur et la prise A IN de l interrupteur RF A B 6 Connectez le dernier câble RF entre la borne OUT du commutateur RF A B et la borne ANT 2 IN CABLE située à l arrière du téléviseur Séparateur Câble d arrivée Séparateur Boîte de jonction Câble d arrivée Séparateur Boîte de jonction Interrupteur RF...

Страница 109: ... l aide de votre magnétoscope La configuration arrière de chaque magnétoscope est différente suivant les appareils Lorsque vous connectez un magnétoscope faites correspondre les couleurs de la borne et du câble Pannear arrière de la télévision Câble RF non fourni 3 Panneau arriére du magnétoscope 2 Câble Vidéo non fourni 4 Câble Audio non fourni 5 ANT 1 IN AIR Votre télévision Samsung peut recevoi...

Страница 110: ... lecteur DVD est différente suivant les appareils Lorsque vous connectez un lecteur DVD faites correspondre les couleurs de la borne et du câble Lecteur DVD boîtier décodeur Pannear arrière de la télévision Câble composante non fourni 1 Câble Audio non fourni 2 Connexion d un caméscope Les prises du panneau latéral assurent la connexion aisée d un caméscope à votre téléviseur Elles vous permettent...

Страница 111: ...age HDCP protection contre la copie numérique à large bande passante La configuration arrière de chaque lecteur de DVD boîtier décodeur est différente suivant les appareils Le modèle 32 40 pouces prend uniquement en charge HDMI3 Connecter un boîtier décodeur lecteur de DVD via DVI Ceci n est réalisable que si le périphérique externe dispose d un connecteur de sortie DVI 1 Connectez un câble DVI ve...

Страница 112: ...rique est connecté à la borne DIGITAL AUDIO OUT OPTICAL Baissez le gain volume du téléviseur et réglez le volume à l aide de la commande de volume du système Système Audio Numérique Pannear arrière de la télévision Câble Optique non fourni L audio 5 1CH n est possible que si le téléviseur est connecté à un périphérique externe prenant en charge le 5 1CH Chaque appareil source externe possède une c...

Страница 113: ... toutes deux utilisées sélectionnez Air Câble En mode Câble vous pouvez sélectionner la source de signal qui vous convient parmi STD HRC et IRC en appuyant sur le bouton ou puis sur ENTER Contactez votre télédistributeur local pour identifier le type de système de câble de votre région 5 La mémorisation des canaux disponibles commence Lorsque la mémorisation est terminée le menu Prog auto s affich...

Страница 114: ...réinitialiser ce paramètre 1 Appuyez sur la touche MENU Appuyez sur les boutons or pour sélectionner Configuration puis appuyez sur le bouton ENTER 2 Appuyez sur ENTER pour choisir Prêt à l emploi 3 Le message La langue des menus le mode Magasin les canaux et l heure sont réglés s affiche Utilisation des boutons de canal 1 Appuyez sur le bouton PRE CH La télévision passe à la dernière canal regard...

Страница 115: ... Mute appuyez de nouveau sur le bouton MUTE ou simplement sur les boutons VOL ou VOL Visualisation de l affichage 1 Appuyez sur le bouton INFO de la télécommande La télévision affiche la canal le type de son et l état de certains paramètres de son et d image Appuyez de nouveau sur la touche INFO ou attendez environ 10 secondes avant qu il disparaisse automatiquement L affichage identifie la canal ...

Страница 116: ... source de radiodiffusion mémorisation des canal automatique Sélection de la source du signal vidéo Avant que votre télévision ne puisse commencer à mémoriser les canal disponibles vous devez spécifier le type de la source de signal reliée à la télévision c est à dire soit une antenne soit le câble 1 Appuyez sur le bouton MENU pour afficher le menu Appuyez sur les boutons ou pour sélectionner Chaî...

Страница 117: ...s systèmes de câblodistribution Pour connaître le système utilisé dans votre région communiquez avec votre câblodistributeur La sélection de la source de diffusion est maintenant terminée Appuyez sur ENTER pour amorcer la mémorisation automatique Pour arrêter la recherche avant la fin appuyez sur le bouton ENTER lorsque Stop est sélectionné 5 Une fois que toutes les canal disponibles sont enregist...

Страница 118: ...éto scope Si aucun autre code n est réper torié essayez tous les codes de magnéto scope de 000 à 080 Remarque sur l utilisation des modes de la télécommande Magnétoscope Quand la télécommande est dans le mode VCR les touches de volume commandent toujours le volume du téléviseur Configuration de la télécommande pour faire fonctionner votre câblosélecteur 1 Éteignez le câblosélecteur 2 Appuyez sur l...

Страница 119: ... télécommande Lecteur DVD Quand la télécommande est dans le mode DVD les touches de volume commandent toujours le volume du téléviseur Paramétrage de la télécommande pour contrôler votre décodeur 1 Éteignez votre lecteur STB 2 Appuyez sur le bouton STB de la télécommande du téléviseur 3 Appuyez sur le bouton SET de la télécommande du téléviseur 4 En utilisant les boutons numériques de votre téléco...

Страница 120: ...008 018 021 026 037 062 MARTA 006 MEI 021 MEMOREX 006 021 024 025 MGA 034 MIDLAND 005 MINOLTA 019 041 075 MITSUBISHI 019 034 041 046 Marque Code MONTGOMERY WARD 020 MTC 002 025 MULTITECH 002 005 025 038 NEC 007 008 018 026 037 062 064 OPTIMUS 020 ORION 073 074 075 076 PANASONIC 021 056 071 072 PENTAX 019 041 075 PENTEX RESEARCH 008 PHILCO 021 056 059 PHILIPS 021 080 PIONEER 019 026 039 053 PORTLAN...

Страница 121: ...RAY COMBO 018 STB DVD COMBO 019 DVD Receiver 020 AV Receiver 021 Codes de lecteur DVD Marque Code ANAM 030 AUDIOVOX 075 AUDIOLOGIC 085 ANABA 072 APEX DIGITAL 070 071 074 086 083 084 088 111 112 AIWA 114 BROKSONIC 062 BLAUPUNKT 074 B K 122 123 CURTIS MATHES 027 CYBER HOME 077 078 079 082 CLARION 080 125 CIRRUS 081 CYBER HOME 065 CINEVISION 095 DAEWOO 066 DENON 146 FARENHEIT 067 068 FISHER 090 GPX 0...

Страница 122: ...08 Satellite STB HDD COMBO Standard 009 STB Marque Code ALPHASTAR 023 ANAM 043 CHANNEL MASTER 018 034 CROSSDIGITAL 019 CHAPARRAL 035 DIRECT TV 015 016 017 019 022 045 060 061 062 065 066 067 068 DAEWOO 074 DISH NETWORK SYSTEM 069 070 DISHPRO 069 DRAKE 018 024 032 DX ANTENNA 027 ECHOSTAR 025 069 070 071 EXPRESSVU 069 GOI 069 GE 065 GENERALINSTRUMENT 046 047 048 063 064 HTS 069 HOME CABLE 056 HITACH...

Страница 123: ...hérique connecté aux entrées pour vous faciliter la sélection 1 Appuyez sur le bouton MENU pour afficher le menu Appuyez sur les boutons ou pour sélectionner Entrée puis appuyez sur le bouton ENTER Appuyez sur les boutons ou pour sélectionner Entrer le nom puis appuyez sur le bouton ENTER 2 Appuyez sur les touches ou pour sélectionner la prise d entrée AV1 AV2 S Vidéo1 S Vidéo2 Composante1 Composa...

Страница 124: ...r ou Teinte puis appuyez sur le bouton ENTER 4 Appuyez sur les boutons ou pour augmenter ou baisser la valeur d un élément spécifique Par exemple si vous choisissez Contraste et si vous appuyez sur le bouton le contraste augmente Appuyez sur le bouton EXIT pour quitter Lorsque vous modifiez les fonctions Contraste Luminosité Netteté Couleur ou Teinte la couleur OSD est modifiée en conséquence En m...

Страница 125: ... Activation de la fonction Contre jour 1 Appuyez sur le bouton MENU pour afficher le menu Appuyez sur le bouton ENTER pour sélectionner Image 2 Appuyez sur les boutons ou pour sélectionner Contre jour puis appuyez sur le bouton ENTER 3 Appuyez sur les boutons ou pour augmenter ou réduire la valeur de l élément souhaité Appuyez sur le bouton ENTER Appuyez sur le bouton EXIT Vous pouvez régler la lu...

Страница 126: ... pour sélectionner Contraste dynam puis appuyez sur le bouton ENTER 7 Appuyez sur le bouton ou pour sélectionner Off Basse Moyen Haute Appuyez sur le bouton ENTER Off Désactive la fonction de réglage du contraste dynamique Basse Utilise un faible contraste dynamique Moyen Utilise un contraste dynamique moyen Haute Utilise un fort contraste dynamique Paramétrage de la fonction Réglages des détails ...

Страница 127: ... appuyez sur le bouton ENTER 14 Appuyez sur les boutons ou pour augmenter ou réduire la valeur de l élément souhaité Appuyez sur le bouton ENTER Décal R Règle la profondeur du rouge Décal V Règle la profondeur du vert Décal B Règle la profondeur du bleu Gain R Règle la luminosité du rouge Gain V Règle la luminosité du vert Gain B Règle la luminosité du bleu Réglage L équilibrage du blanc mis au po...

Страница 128: ...dification de la valeur de réglage actualise l écran modifié Activating Edge Enhancement Vous pouvez accentuer le bord des objets sur l image 18 Appuyez sur les boutons ou pour sélectionner Amélioration des bords puis appuyez sur le bouton ENTER 19 Appuyez sur les boutons ou pour sélectionner Off ou On Appuyez sur le bouton ENTER Appuyez sur le bouton EXIT pour quitter 15 Rose Dépl Régler Retour R...

Страница 129: ...s les modes COMPOSANT 480i 480p tous les modes d affichage sont disponibles 16 9 Zoom1 Zoom2 4 3 Vous ne pouvez sélectionner que les formats 16 9 4 3 et Large en mode DTV ou Component 720p 1080i ou HDMI 720p 1080i Dans les modes PC ne sont disponibles que les formats 16 9 et 4 3 Vous devez sélectionner la fonction Zoom à l aide du bouton P Size de la télécommande pas dans le menu OSD pour déplacer...

Страница 130: ... la touche ou pour sélectionner DNIe puis appuyez sur ENTER 3 Appuyez sur la touche ou pour sélectionner On DNle Demo ou Off puis sur ENTER Off Désactive le mode DNIe Démo L écran de gauche présente l image sans mode DNIe tandis que celui de droite présente l image avec mode DNIe en fonction On Active le mode DNIe Appuyez sur la touche EXIT pour quitter le menu DNIeTM Image naturelle numérique Cet...

Страница 131: ...nu Appuyez sur les boutons ou pour sélectionner Configuration puis appuyez sur le bouton ENTER 2 Appuyez sur les boutons ou pour sélectionner Nv nr HDMI puis appuyez sur le bouton ENTER 3 Appuyez sur la touche ou pour sélectionner Normal ou Basse puis appuyez sur la touche ENTER Normal L image est plus claire Basse L image est plus sombre Cette fonction n est active que lorsqu un périphérique exte...

Страница 132: ...lles analogiques peuvent être visionnées dans la fenêtre ISI image secondaire lorsque l image principale provient d un appareil externe branché à PC LN T3253H LN T4053H Image principale PIP Composant 1 2 HDMI 1 2 3 PC Pour les émissions télévisuelles analogiques seulement Les émissions télévisuelles analogiques peuvent être visionnées dans la fenêtre ISI image secondaire lorsque l image principale...

Страница 133: ...ez sur les boutons ou pour sélectionner la taille de la fenêtre ISI Appuyez sur le bouton ENTER Appuyez sur le bouton EXIT pour quitter If main picture is in PC mode Size is not available Il se peut que l image dans la fenêtre ISI soit un peu moins naturelle lorsque vous utilisez la fenêtre principale pour visualiser un jeu ou un karaoké You can adjust picture position only by using the size menu ...

Страница 134: ...ons ou pour sélectionner Son puis appuyez sur le bouton ENTER 2 Appuyez sur les boutons ENTER pour sélectionner Mode Appuyez sur les boutons ou pour sélectionner le réglage du son Standard Musique Cinéma Parole ou Personnel puis appuyez sur ENTER Choisissez Standard pour les paramètres usine standard Choisissez Musique quand vous regardez une vidéo musicale ou un concert Choisissez Cinéma quand vo...

Страница 135: ...ctionner Langue privilégiée Appuyez sur les boutons ou pour choisir la langue souhaitée English Espagnol ou Français puis appuyez sur ENTER Appuyez sur le bouton EXIT pour quitter Langue privilégiée Sélection d une bande son à canaux multiples MTS Numérique Le système TV numérique est capable de réaliser la transmission simultanée de plusieurs pistes audio par exemple la traduction simultanée du p...

Страница 136: ...oix puis appuyez sur le bouton ENTER Appuyez sur le bouton EXIT pour quitter Choisissez Mono pour les canal qui émettent en mono ou si vous avez des difficultés à recevoir un signal stéréo Choisissez Stéréo pour les canal qui émettent en stéréo Choisissez SAP pour écouter le programme audio séparé qui est générale ment une traduction en langue étrangère Mode audio multipistes Sélection d une bande...

Страница 137: ...veau bas Moyen Règle le volume Mélodie au niveau moyen Haute Règle le volume Mélodie au niveau élevé Appuyez sur le bouton EXIT pour quitter DOLBY DIGITAL Fabriqué sous licence par Dolby Laboratories Dolby et le symbole en forme de double D sont des marques déposées de Dolby Laboratories Internal Haut parleur Sortie audio Optical L R Out HF AV S Vidéo Composant PC HDMI HF AV S Vidéo Composant PC H...

Страница 138: ...secondaire 1 Appuyez sur le bouton MENU pour afficher le menu Appuyez sur les boutons ou pour sélectionner Son puis appuyez sur le bouton ENTER 2 Appuyez sur les boutons ou pour sélectionner Sélect son puis appuyez sur le bouton ENTER 3 Appuyez sur les boutons ou pour sélectionner Principale ou Secondaire puis appuyez sur le bouton ENTER Appuyez sur le bouton EXIT pour quitter Principale Permet d ...

Страница 139: ...uillés canaux numériques 1 Appuyez sur le bouton MENU pour afficher le menu Appuyez sur les boutons ou pour sélectionner Chaîne puis appuyez sur le bouton ENTER 2 Appuyez sur les boutons ou pour sélectionner Effacer les canaux brouillés puis appuyez sur le bouton ENTER Cette procédure permet de détecter les canaux brouillés qui doivent être supprimés de la liste Pour arrêter la fonction de recherc...

Страница 140: ...uissance signal AFB On Dépl Intro Retour Tout Ajoute favorite Mode Liste par Défaut Tout Liste des canaux TV Dépl Intro Retour CH Liste des canaux Tout Dépl Intro Page Retour DTV Air 2 1 Air3 Air4 Air 5 Air 6 Air 7 DTV Air 7 1 Air 8 Air 9 Air 10 DTV Air 10 1 DTV Air 10 2 DTV Air 10 3 DTV Air 10 1 DTV Air 10 2 DTV Air 10 3 DTV Air 10 1 DTV Air 10 2 DTV Air 10 3 Air 12 DTV Air 13 1 DTV Air 13 2 DTV ...

Страница 141: ...ire peuvent faire partie de vos chaînes favorites Toutes vos chaînes préférées apparaissent comme Favorite Vous pouvez définir en favoris les chaînes que vous regardez fréquemment Liste des canaux Ajoute Dépl Intro Page Retour DTV Air 2 1 Air3 Air4 Air 5 Air 6 Air 7 DTV Air 7 1 Air 8 Air 9 Air 10 DTV Air 10 1 DTV Air 10 2 DTV Air 10 3 DTV Air 10 1 DTV Air 10 2 DTV Air 10 3 DTV Air 10 1 DTV Air 10 ...

Страница 142: ...e puis appuyez sur le bouton ENTER 4 Appuyez sur les boutons ou pour sélectionner Chaîne puis appuyez sur le bouton ENTER Pour basculer entre toutes les chaînes les chaînes ajoutées ou vos chaînes favorites utilisez le bouton P Mode rouge de la télécommande Bouton P Mode rouge Appuyez plusieurs fois pour sélectionner Tout Ajouté ou Favorite Vous pouvez afficher la liste de toutes les chaînes des c...

Страница 143: ...r les boutons ou pour sélectionner Chaîne puis appuyez sur le bouton ENTER 2 Appuyez sur les boutons ou pour sélectionner AFB puis appuyez sur le bouton ENTER 3 Appuyez sur les boutons ou pour sélectionner On puis appuyez sur le bouton ENTER Appuyez sur le bouton EXIT pour quitter Fonctions AFB lorsque l antenne est réglée sur Hertzien ou Câble Les paramètres seront sauvegardés séparément pour cha...

Страница 144: ...ou pour sélectionner Puissance signal puis appuyez sur le bouton ENTER Si l indicateur de puissance indique que le signal numérique est faible déplacez votre antenne de manière à augmenter la puissance du signal Continuez à régler l antenne jusqu à obtenir un signal maximum Appuyez sur le bouton EXIT pour quitter Contrairement aux chaînes analogiques dont la qualité de réception peut varier de nei...

Страница 145: ...oîte de dialogue des paramètres d affichage comporte une option de fréquence verticale la valeur correcte est 60 ou 60Hz Sinon cliquez sur OK et quittez la boîte de dialogue Modes d affichage Si le signal du système équivaut au mode de signal standard l écran se règle automatiquement Si le signal du système ne correspond pas au mode de signal standard réglez le mode en vous reportant le cas échéan...

Страница 146: ...ER Passez d abord en mode PC 2 Appuyez sur les boutons ENTER pour sélectionner Verrouiller l image 3 Appuyez sur les boutons ou ou pour sélectionner Grain ou Affiné puis appuyez sur le bouton ENTER Appuyez sur les boutons ou pour régler la qualité de l écran Des bandes verticales peuvent apparaître ou l image peut devenir floue Appuyez sur le bouton ENTER Appuyez sur le bouton EXIT pour quitter Ré...

Страница 147: ...r Configuration puis appuyez sur le bouton ENTER 2 Appuyez sur les boutons ou pour sélectionner PC cinéma maison puis appuyez sur le bouton ENTER 3 Appuyez sur les boutons ou pour sélectionner On ou Off puis appuyez sur le bouton ENTER Off Désactive les paramètres des fonctions écran en mode d entrée PC On Active les paramètres des fonctions écran en mode d entrée PC pour un rendu plus dynamique d...

Страница 148: ...ER 5 Appuyez sur les boutons ou pour nav iguer entre les paramètres Mois Jour Année Heure Minute ou am pm Définissez la date et l heure souhaitées en utilisant les boutons ou puis appuyez sur ENTER Appuyez sur le bouton EXIT pour quitter L heure s affiche chaque fois que vous appuyez sur le bouton INFO Vous pouvez régler directement le mois le jour les heures et les minutes en appuyant sur les bou...

Страница 149: ...r le bouton EXIT pour quitter En fonction de la station émettrice et du signal il est possible que la fonc tion de réglage automatique de l heure ne fonctionne pas correctement Dans un tel cas réglez l horloge manuelle ment L antenne ou le câble doit être branché pour que le réglage automatique ment de l horloge se fasse Dépl Intro Retour Choisissez le fuseau horaire où vous vous trouvez Fuseau ho...

Страница 150: ...tons ou pour régler le paramètre Minute 4 Appuyez sur le bouton pour sélectionner Activation Appuyez sur les boutons ou pour sélectionner On puis appuyez sur le bouton ENTER Appuyez sur le bouton EXIT pour quitter Appuyez plusieurs fois sur la touche SLEEP de la télécommande pour sélectionner le délai voulu Sleep Timer Régle les options de la minuterie de mise en veille TV Dépl Régler Return Minut...

Страница 151: ... Quand la minuterie ON est activée vous pouvez écouter un canal particulier ou lire du contenu comme des fichiers photos ou audio Assurez vous que l appareil USB est branché au téléviseur Appuyez sur la touche ou Lorsque vous avez terminé appuyez sur le bouton RETURN pour revenir au menu L heure s affiche chaque fois que vous appuyez sur le bouton INFO Vous pouvez régler directement les heures les...

Страница 152: ...ficher le menu Appuyez sur les boutons ou pour sélectionner Configuration puis appuyez sur le bouton ENTER Appuyez sur les boutons ou pour sélectionner Langue puis appuyez sur le bouton ENTER 2 Utilisez les boutons ou pour sélectionner la langue de votre choix English Espagnol ou Français Appuyez sur le bouton ENTER Appuyez sur le bouton EXIT pour quitter Description de la Fonction Configuration T...

Страница 153: ...puyez sur les boutons ou pour sélectionner On ou Off puis appuyez sur le bouton ENTER 4 Appuyez sur le bouton EXIT pour quitter Pour débrancher la console de jeu et brancher un autre appareil externe annulez le mode Jeu dans le menu Image Si vous affichez le menu TV en mode Jeu l écran bouge légèrement Le mode Jeu n est pas disponible en mode TV Configuration Plug Play Langue Français Heure Mode J...

Страница 154: ... CC3 Sous titres secondaires synchronisés Données de sous titres alternatives associ ées au programme Il s agit généralement de la langue secondaire CC4 Sous titres spéciaux non synchronisés Similaire à CC2 Texte1 Premier service de texte Il peut s agir de données varies non liées aux pro grammes Texte2 Deuxième service de texte Données supplémentaires généralement non liées aux programmes Texte3 ...

Страница 155: ...polices Cette option peut prendre les valeurs suivantes Par défaut Style0 à Style7 Vous pouvez modifier la police La valeur par défaut est Style0 Couleur avant plan Cette option peut prendre les valeurs suivantes Par défaut Blanc Noir Rouge Vert Bleu Jaune Magenta et Cyan Vous pouvez modifier la couleur des caractères La valeur par défaut est Blanc Couleur arrière plan Cette option peut prendre le...

Страница 156: ...ou pour sélectionner Économiseur énergie puis appuyez sur le bouton ENTER Sélectionnez l option souhaitée à l aide du bouton ou Off Bas Moyen Haute ou Auto Appuyez sur le bouton ENTER Off Désactive la fonction Économiseur d énergie Bas Règle le téléviseur au mode d économie d énergie bas Moyen Règle le téléviseur au mode d économie d énergie moyen Haute Règle le téléviseur au mode d économie d éne...

Страница 157: ...ille Pen écoute ou Toujours puis appuyez sur le bouton ENTER Off Le voyant LED ne s allume pas Mode veille Allume la diode en mode Veille Pen écoute Allume la diode lorsque vous regardez la télévision Toujours Témoins Le voyant LED s allume lorsque vous éteignez le télévi seur Appuyez sur le bouton EXIT pour quitter Réglage de la fonction Effet lumière Il est possible d activer ou de désactiver la...

Страница 158: ...s Moyen Haute Auto Appuyez sur les boutons ENTER Off Désactive la fonction de réduction du bruit à l écran Bas Règle le bruit à l écran au niveau bas Moyen Règle le bruit à l écran au niveau moyen Haute Règle le bruit à l écran au niveau élevé Auto Détecte et diminue automatiquement le bruit à l écran Appuyez sur le bouton EXIT pour quitter Réduction numérique des bruits Image TV Plus Nuance coul ...

Страница 159: ...ppuyez sur les touches de la télécommande lorsque l appareil est éteint dans l ordre suivant afin de remettre le code NIPà 0 0 0 0 Power Off Mute 8 2 4 Power On Utilisation de la fonction puce V Chip La fonction puce V exclut automatiquement les programmes qui sont considérés comme inappropriés pour les enfants L utilisateur doit d abord entrer un code NIP numéro d identification personnel avant d...

Страница 160: ...NTER Le message Entrez NIP s affiche Saisissez votre code NIP à 4 chiffres Comment configurer les restrictions à l aide des Contrôle parental TV Réglez d abord le numéro d identification personnel NIP et activez la fonction puce V Voir section précédente Les restrictions parentales peuvent être réglées à l aide de l une de ces deux méthodes Les guides TV ou la Classification MPAA V Chip Entrez NIP...

Страница 161: ... Les évaluations sec ondaires D L S V fonctionnent de la même façon voir section suivante 6 Comment régler les évaluations secondaires FV D L S et V Pour commencer sélectionnez l une des catégories TV Y TV Y7 TV G TV PG TV 14 ou TV MA voir Étape 4 page précédente et appuyez sur le bouton Un symbole apparaît pour chaque sous catégorie Lorsque le symbole est sélectionné appuyez sur le bouton ENTER p...

Страница 162: ...uveau les boutons ou pour parcourir les catégories MPAA G Tout public aucune restriction PG Accord parental souhaité PG 13 Parents vivement mis en garde R Les enfants de moins de 17ans doivent être accompag nés d un adulte NC 17 Aucun enfant de moins de 17 ans X Adultes uniquement NR Non évalué Perm Tout déverrouille tous les réglages du téléviseur Bloq Tout verrouille tous les réglages du télévis...

Страница 163: ...réglages du téléviseur Bloq Tout Verrouille tous les réglages du téléviseur C Émissions destinées aux enfants de moins de 8 ans C8 Émissions convenant généralement aux enfants de 8 ans et plus sans surveillance G Émissions grand public convenant à tous les auditoires PG Émissions à surveillance parentale 14 Émissions dont la teneur peut ne pas convenir en tout ou en partie aux personnes de moins d...

Страница 164: ...ur quitter Perm Tout Dévéverrouille tous les réglages du téléviseur Bloq Tout Verrouille tous les réglages du téléviseur G Général 8 ans Émissions non recommandées pour les jeunes enfants 13 ans Émissions pouvant ne pas convenir aux enfants de moins de 13 ans 16 ans Émissions ne convenant pas aux enfants de moins de 16 ans 18 ans Émissions réservées aux adultes V Chip Entrez NIP TV Enter PIN Retou...

Страница 165: ...m tout Appuyez sur cette touche pour déverrouiller toutes les catégories Bloq tout Appuyez sur cette touche pour verrouiller toutes les catégories Les niveaux de contrôle parental diffèrent selon la station de radiodiffusion Le nom du menu par défaut Catég américaine téléchargeable change en don nées téléchargées Même si vous réglez l affichage à l écran dans la langue souhaitée le menu Catég amér...

Страница 166: ...rminée Veuillez vérifier la version du logiciel une fois que la mise à niveau est terminée Mise à niveau du logiciel Ultérieurement Samsung mettra à disposition des mises à niveau pour le logiciel du téléviseur Veuillez communiquer avec le centre d appels de Samsung en composant le 1 800 SAMSUNG 7267864 pour avoir de l information au sujet de la procédure de téléchargement des mises à niveau et de...

Страница 167: ... mp3 et jpeg sont pris en charge Nous recommandons le format de fichier séquentiel jpeg Les fichiers jpeg progressifs utilisent beaucoup de mémoire et le décodage peut échouer Ne pas débrancher l appareil USB pendant qu il est en mode de chargement Ne sont pris en charge ni PTP Picture transfer protocol ni MTP Media transfer protocol Le temps de lecture d un fichier mp3 peut s afficher sous la for...

Страница 168: ...éremment en fonction du dispositif à mémoire USB branché au téléviseur 4 Appuyez sur la touche ou pour passer à une icône puis appuyer sur la touche ENTER Pour quitter le mode WISELINK appuyez sur la touche WISELINK de la télécommande Appuyez sur la touche WISELINK de la télécommande pour afficher le menu WISELINK Utilisation du menu WISELINK Entrée Liste source TV Entrer le nom WISELINK Anynet HD...

Страница 169: ... tiff ne seront pas affichés Les fichiers sont affichés sur une page Quinze photos miniatures sont affichées sur une page Les vignettes sont numérotées de gauche à droite et du haut vers le bas de 1 à 15 Certains types d appareils photo numériques USB et de périphériques audio peuvent ne pas être compatibles avec ce téléviseur Les dossiers sont affichés en premier et sont suivis de tous les fichie...

Страница 170: ...chiers MP3 automatiquement au cours du diaporama si la fonction Musique de fond par défaut est réglée à On Pour activer cette fonction les fichiers MP3 et autres fichiers de photos doivent se trouver dans le même dossier du dispositif à mémoire MSC 5 Appuyez sur la touche INFO durant le Diaporama pour régler l option Vitesse diaporama Musique de fond Sélection musique de fond Liste Appuyez sur la ...

Страница 171: ...nd en appuyant sur les touches ou et appuyez sur la touche ENTER Le dossier choisi sera mis en surbrillance Appuyez sur la touche MENU pour revenir à l écran du diaporama La musique de fond choisie joue Si vous désactivez la musique de fond même si les réglages de cette dernière sont fixés il n y aura pas de musique Liste L information fichier sauvegardée s affiche sous forme d un dossier ou d un ...

Страница 172: ...ndant un diaporama Pour reprendre le diaporama appuyer sur la touche PLAY PAUSE à nouveau Passer à la photo suivante Appuyer la touche droite de la télécommande permet de passer à la photo suivante Revenir à la photo précédente Appuyer la touche gauche de la télécommande permet de passer à la photo précédente Lorsqu on choisit un fichier de photos l information connexe est affichée du côté gauche ...

Страница 173: ...e photo appuyez sur la touche INFO pour ouvrir la fenêtre des options choisissez l option Rotation etappuyez sur la touche ENTER Chaque fois que vous faites cela la photo à l écran tourne 90 180 270 0 Pour quitter le mode WISELINK appuyez sur la touche WISELINK de la télécommande Le fichier de rotation n est pas sauvegardé L option Zoom diaporama est désactivée lorsque l option Rotation est choisi...

Страница 174: ...vrir la fenêtre des options choisissez l option Zoom et appuyez sur la touche ENTER Chaque fois que vous faites cela les options de zoom suivantes sont appliquées en ordre Il faut appuyer à chaque fois sur la touche INFO l option Rotation et la touche Enter pour faire un zoom Par exemple de x 2 à x 4 Zoom x2 Zoom avant de la photo x2 Zoom x4 Zoom avant de la photo x4 Zoom x1 Rétablit l image à sa ...

Страница 175: ...eure d une photo agrandie à l aide du zoom Pan Right Panoramiser vers la droite pour voir la partie droite d une photo agrandie à l aide du zoom Pan Left Panoramiser vers la gauche pour voir la partie gauche d une photo agrandie à l aide du zoom Pan Down END Panoramiser au bas d une photo agrandie à l aide du zoom Pan Up END Panoramiser au haut d une photo agrandie à l aide du zoom Pan Right END P...

Страница 176: ...ionné est affiché en tête de liste avec la durée de déroulement Pour régler le volume sonore appuyez sur la touche VOL ou VOL de la télécommande Pour couper le son appuyez sur la touche MUTE de la télécommande La touche FF REW ne fonctionne pas pendant la lecture du fichier Icônes d information sur les fonctions de fichiers musicaux affichées dans l angle supérieur gauche de l écran Icône Affichag...

Страница 177: ...as de reprise des de la lecture des fichiers musicaux Pour quitter le mode WISELINK appuyez sur la touche WISELINK de la télécommande Dossier supérieur 00 04 01 00 04 28 00 04 12 00 05 39 00 04 30 00 04 30 00 03 54 00 05 25 Dossier 1 001 Swan Song feat TBNY 002 Beatles Yesterday 003 Fall in Love 004 Tom Waits Time 005 Chuk Mangione Feel So good 007 Ryuichi Sakamoto Rain 008 Bon jovi This ain t a l...

Страница 178: ...la touche ou pour sélectionner l option puis appuyez sur la touche ENTER Suite Menu de configuration Le menu de configuration affiche les paramètres d utilisateur du menu WISELINK Dépl Intro Retour XTICK 861MB 994MB Free Vitesse diaporama Fast Musique de fond Off Sélection musique de fond rep musique On Écran de veille 5 min Dépl Intro Retour Vitesse diaporama Fast Musique de fond Off Sélection mu...

Страница 179: ...n Sélectionner pour configurer le délai d activation de l écran de veille L écran de veille s affiche si aucune touche n est enfoncée pendant 1 3 ou 5 minutes Pour quitter le mode WISELINK appuyez sur la touche WISELINK de la télécommande Vitesse diaporama Fast Musique de fond Off Sélection musique de fond rep musique On Écran de veille 5 min Dépl Intro Retour Rapide Normal Lent Vitesse diaporama ...

Страница 180: ...e entre la sortie audionumérique optique du téléviseur et l entrée audionumérique du récepteur Ne brancher qu un seul récepteur Il est possible d écouter le son en 5 1 canaux par les haut parleurs du cinéma maison Autrement les autres cas ne permettent que l écoute du son stéréo de 2 canaux Veiller à ce que l entrée audionumérique optique du cinéma maison et le téléviseur soient bien branchés afin...

Страница 181: ... touche ou pour sélectionner un appareil particulier suivie de la touche ENTER Le système commande l appareil sélectionné 2 S il est impossible de trouver l appareil désiré appuyer sur la touche ou pour sélectionner Recherche de connexions suivie de la touche ENTER Le message Configuration de la connexion Anynet s affiche Lorsque la recherche d appareil est terminée les appareils branchés sont énu...

Страница 182: ...ichier Recherche vers l arrière Recherche vers l avant Arrêt Lecture Pause Appareil avec syntoniseur intégré Après la permutation vers l appareil pendant l écoute d une émission télévisée CH Touche Appareil audio Lorsque le récepteur est activé Touches VOL Touche MUTE Anyview2 En mode d écoute de la télévision Lecture Pause La fonction Anynet n est accessible que lorsque la télécommande est réglée...

Страница 183: ...herche de canaux utilisation de WISELINK Je souhaite lancer Anynet Vérifier si l appareil Anynet est bien branché au téléviseur et vérifier si Anynet HDMICEC est activé dans le menu Configuration d Anynet Appuyer sur la touche TV de la télécommande du téléviseur pour permuter vers le téléviseur Appuyer ensuite sur la touche Anynet pour afficher le menu Anynet et sélectionner le menu désiré Je souh...

Страница 184: ...eure de la télécommande fenêtre de transmission Vérifiez les bornes de la batterie Message Vérifier signal câble Assurez vous que le câble d interface est solidement branché aux sources PC Message Mode non disponible Vérifiez la résolution maximale et la fréquence de l adaptateur vidéo Comparez ces valeurs aux données des modes Problème d écran en diffusion numérique Vérifiez la puissance du signa...

Страница 185: ...r pour modifier les paramètres d affichage Votre télévision prend en charge les fonctions d affichage multiscan dans le domaine de fréquence suivant Fréquence horizontale kHz 30 60 Fréquence verticale Hz 60 75 Taux de rafraîchissement maxi 60 Hz 1360 x 768 L image n est pas centrée sur l écran Réglez la position horizontale et verticale Ne réglez pas la position de l écran en Signal Numérique Si u...

Страница 186: ...le dans le trou situé sous le téléviseur 3 Insérez la vis dans le trou indiqué et serrez la Démonter la base 2 3 4 1 Placez la télévision face posée sur un chiffon doux ou un coussin sur une table 2 Retirez les 4 vis à l arrière de la télévision 3 Vous pouvez ensuite séparer la base du télévision 4 Fermez l ouverture en utilisant un cache ...

Страница 187: ...egarder les positions selon les procédures ci dessus 6 Vous pouvez sauvegarder trois positions propres aux touches rouge Choisir position 1 verte Choisir position 2 et jaune choisir position 3 Si vous appuyez sur une touche le téléviseur se déplace automatiquement à l angle sauvegardé correspondant 7 Si vous déplacez le téléviseur à partir d une position sauvegardée la dernière position est sauveg...

Страница 188: ...t de notre jeu d installation murale Ne pas utiliser de vis plus longues que les dimensions standard elles pourraient endommager l intérieur du téléviseur En ce qui a trait aux supports muraux qui ne sont pas conformes aux spécifications de vis standard VESA la longueur des vis peut différer selon leurs spécifications N utilisez pas de vis non conformes aux spécifications de vis standard VESA Ne s...

Страница 189: ...recte Figure 2 Figure 1 Câble Optionnel L emplacement du verrou Kensington peut varier en fonction du modèle Spécifications Modéle LN T2353H LN T2354H LN T2653H Taille de l écran diagonale 23 pouces 26 pouces Consommation Maximum 100 W 130 W Résolution PC 1360 x 768 60 Hz 1360 x 768 60 Hz Son Sortie 3W X 2 5W X 2 Dimensions WxDxH TV Avec support 586 x 79 x 406 mm 23 x 3 x 16 pouces 586 x 216 x 446...

Страница 190: ...kg 24 Ibs 21 kg 47 Ibs 18 kg 40 Ibs Considérations environnementales Température de fonctionnement Humidité au cours du fonctionnement Température de stockage Humidité du stockage 50 F à 104 F 10 C à 40 C 10 to 80 sans condensation 4 F à 113 F 20 C à 45 C 5 to 95 sans condensation 50 F à 104 F 10 C à 40 C 10 to 80 sans condensation 4 F à 113 F 20 C à 45 C 5 to 95 sans condensation Socle orientable...

Страница 191: ...Cette page est laissée intentionnellement en blanc ...

Отзывы: