background image

English-

77

A

P P E N D I X

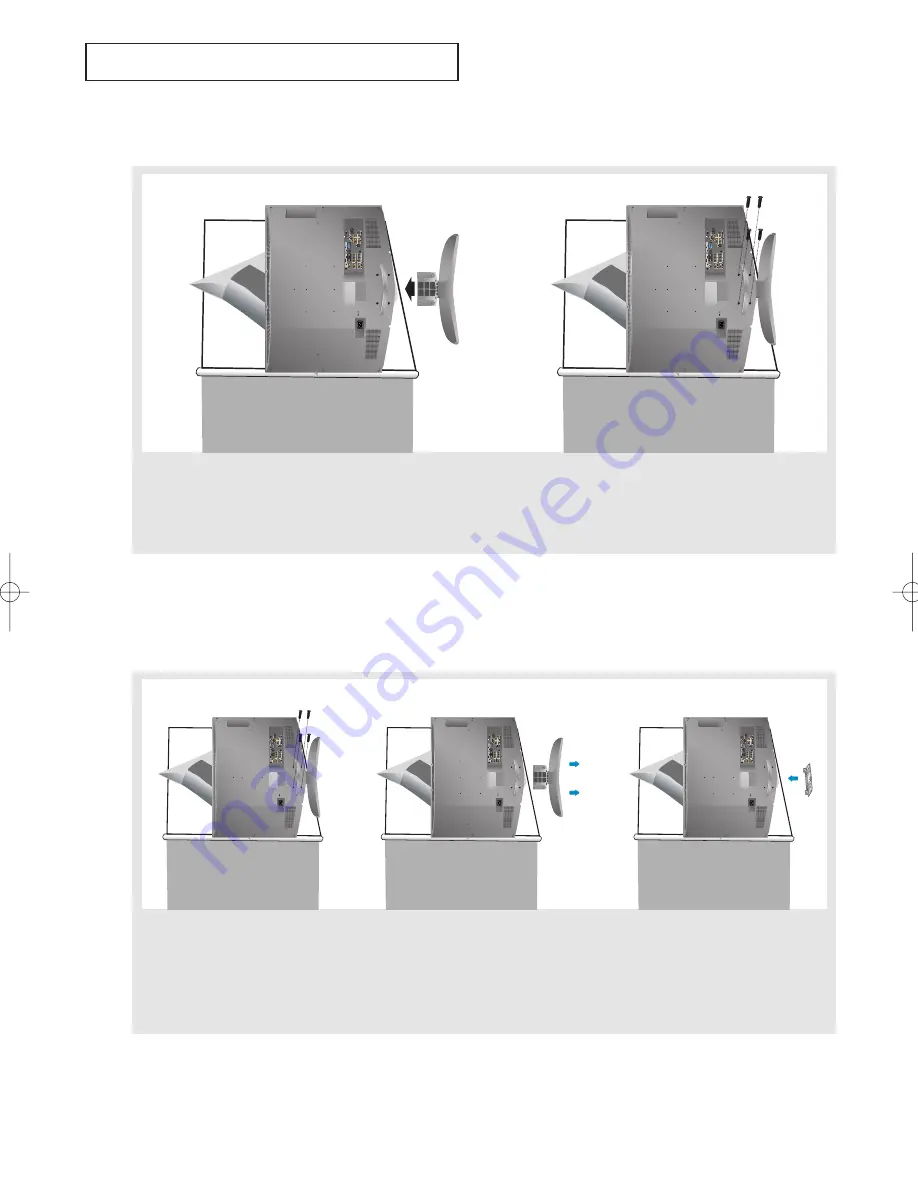
Installing the stand

Disconnecting the stand

1. 

Place the TV faced down on a soft cloth or cushion on a table.

2. 

Attach the stand to the TV set as shown in the picture.

3. 

Use the four screws to tightly fix the stand.

1. 

Place the TV faced down on a soft cloth or cushion on a table.

2. 

Remove four screws from the  back of the TV.

3. 

Separate the stand from the TV.

4. 

Cover the bottom hole with a cap.

<2>

<3>

<2>

<3>

<4>

BN68-00883S-01Eng.qxd  1/4/04 5:30 PM  Page 77

Содержание LN-R237W1

Страница 1: ...s Samsung Contacte con SAMSUNG WORLD WIDE Si tiene alguna pregunta o comentario referente a nuestros productos por favor contacte con nuestro Servicio de Atención al Cliente Country CANADA U S A Customer Care Center 1 800 SAMSUNG 7267864 1 800 SAMSUNG 7267864 Address Samsung Electronics Canada Inc Customer Service 55 Standish Court Mississauga Ontario L5R 4B2 Canada Samsung Electronique Canada Inc...

Страница 2: ...ixed for an extended period of time the amount of light transmission will also remain varied and as a result the borders may leave traces Digital Ready TV When you select the wide screen 16 9 mode to watch an SD grade digital broadcast and the set top box output is 1080i Digital Ready TV When the TV receives HD grade signals and the set top box output is 1080i When you watch a digital HD grade bro...

Страница 3: ...borders at the left right and the center of the screen remain fixed for an extended period of time the amount of light transmission will also remain varied and as a result the borders may leave traces When you watch a DVD CD or a video in wide screen 21 9 format on a wide screen 16 9 TV When you connect a computer or a game console to the TV and select the 4 3 screen mode If you connect a DVD play...

Страница 4: ...ter 15 Connecting a DVD Set top box via DVI 16 Connecting a DVD Set top box via HDMI 17 Connecting a PC 18 Chapter 3 Operation Turning the TV On and Off 19 Changing Channels 19 Using the Channel Buttons 19 Using the Number Buttons 19 Using the PRE CH Button to select the Previous Channel 19 Adjusting the Volume 20 Using Mute 20 Viewing the Display 21 Viewing the Menus 21 Plug Play Feature 22 Memor...

Страница 5: ... Position 54 Initializing the Screen Position or Color Settings 55 Chapter 8 Time Setting Setting the Clock 56 Setting the Sleep Timer 57 Setting the On Off Timer 58 Chapter 9 Function Description Selecting a Menu Language 60 Using the V Chip 61 Setting Up Your Personal ID Number PIN 61 How to Enable Disable the V Chip 63 How to Set up Restrictions Using the TV Parental Guidelines 64 How to Set up...

Страница 6: ...ast Brightness Sensor Adjusts the screen brightness automatically depending on the brightness of the surrounding environment SRS TruSurround XT SRS TruSurround XT provides a virtual Dolby surround system Convenience The TV utilizes the HDMI system to implement perfect digital sound and picture quality The Anynet system enables you to easily control Samsung audio video AV devices from this TV Chapt...

Страница 7: ...e the volume In the on screen menu use the VOL buttons as you use the and buttons on the remote control CH Press to change channels In the on screen menu use the CH buttons as you use the and buttons on the remote control Without the Remote Control You can turn on TV by using the Channel buttons POWER Press to turn the TV on and off POWER INDICATOR Blinks and turns off when the power is on and lig...

Страница 8: ...vate listening HDMI DVI IN R AUDIO L Connect to the HDMI jack of a device with HDMI output Use the HDMI DVI terminal for DVI connection to an external device You should use the DVI to HDMI cable or DVI HDMI Adaptor for the connection and the R AUDIO L terminal on DVI IN for sound output HDMI DVI IN terminal does not support PC AUDIO OUT Connect to the audio input jack on your amplifier ANT IN Conn...

Страница 9: ...d See page 20 MENU Displays the main on screen menu See page 21 CAPTION Controls the caption decoder See page 71 PIP Picture in Picture ON OFF See page 40 SLEEP Press to select a time for the TV to turn off automatically See page 57 PRE CH Tunes to the previous channel See page 19 CH and CH Channel UP Down Press CH or CH to change channels See page 19 VOL and VOL Press to increase or decrease the ...

Страница 10: ...ctivated On The right hand side of the screen shows the improved DNIe image The left hand side of the screen shows the original image See page 35 VCR DVD Functions Only Anynet mode Rewind Stop Play Pause Fast Forward SRS Selects TruSurround XT mode See page 45 P MODE Adjusts the TV picture by selecting one of the preset factory settings See page 29 P SIZE Press to change the screen size See page 3...

Страница 11: ...cal TV usage the batteries last for about one year 2 Install two AAA size batteries Make sure to match the and ends of the batteries with the diagram inside the compartment 1 Slide the cover out completely If the remote control doesn t work Check the following 1 Is the TV power on 2 Are the plus and minus ends of the batteries reversed 3 Are the batteries drained 4 Is there a power outage or is th...

Страница 12: ...ve two antennas see Separate VHF and UHF Antennas on page 8 Antennas with 300 ohm Flat Twin Leads If you are using an off air antenna such as a roof antenna or rabbit ears that has 300 ohm twin flat leads follow the directions below 1 Place the wires from the twin leads under the screws on a 300 75 ohm adaptor not supplied Use a screwdriver to tighten the screws 2 Plug the adaptor into the ANT IN ...

Страница 13: ... the back of the TV Separate VHF and UHF Antennas If you have two separate antennas for your TV one VHF and one UHF you must combine the two antenna signals before connecting the antennas to the TV This procedure requires an optional combiner adaptor available at most electronics shops 1 Connect both antenna leads to the combiner English 8 ANT IN UHF VHF UHF VHF ...

Страница 14: ... box This terminal might be labeled ANT OUT VHF OUT or simply OUT 2 Connect the other end of this cable to the ANT IN terminal on the back of the TV Connecting to a Cable Box that Descrambles Some Channels If your cable box descrambles only some channels such as premium channels follow the instructions below You will need a two way splitter an RF A B switch and four lengths of RF cable These items...

Страница 15: ...position for normal viewing Set the A B switch to the B position to view scrambled channels When you set the A B switch to B you will need to tune your TV to the cable box s output channel which is usually channel 3 or 4 English 10 CONNECTIONS 2 Connect this cable to a two way splitter 3 Connect an RF cable between an OUTPUT terminal on the splitter and the IN terminal on the cable box Incoming ca...

Страница 16: ...step 1 if you have not yet connected to an antenna or a cable system 1 Unplug the cable or antenna from the back of the TV 2 Connect the cable or antenna to the ANT IN terminal on the back of the VCR 3 Connect an RF cable between the ANT OUT terminal on the VCR and the ANT IN terminal on the TV Continued VCR Rear Panel TV Rear Panel RF Cable Option VCR Rear Panel Incoming Cable or Antenna ...

Страница 17: ...order Tape to view your VCR tape Each external input source device has a different back panel configuration When connecting an external device match the color of the connection terminal to the cable If you have a mono non stereo VCR use the Y connector not supplied to hook up to the left and right audio input jacks of the TV TV Rear Panel RF Cable Option Audio Cable Option VCR Rear Panel TV Rear P...

Страница 18: ...cable 1 To begin follow steps 1 3 in the previous section to connect the antenna or cable to your VCR and your TV Connecting an S VHS VCR Your Samsung TV can be connected to an S Video signal from an S VHS VCR This connection delivers a better picture as compared to a standard VHS VCR 2 Connect an audio cable between the AUDIO OUT jacks on the VCR and the AV IN R AUDIO L jacks on the TV TV Rear Pa...

Страница 19: ... match the color of the connection terminal to the cable Connecting a DVD Player The rear panel jacks on your TV make it easy to connect a DVD player to your TV 1 Connect an audio cable between the COMPONENT IN 1 or COMPONENT IN 2 R AUDIO L jacks on the TV and the AUDIO OUT jacks on the DVD player 2 Connect a component cable between the COMPONENT IN 1 or COMPONENT IN 2 PR PB Y jacks on the TV and ...

Страница 20: ...Set top box 2 Connect a component cable between the COMPONENT IN 1 or COMPONENT IN 2 PR PB Y jacks on the TV and the COMPONENT Y PB PR jacks on the Set top box Audio Cable Option Component Cable Option Set Top Box Rear Panel TV Rear Panel Audio Cable Option Set Top Box Rear Panel TV Rear Panel Connecting an Amplifier DVD Home Theater 1 Connect an audio cable between the AUDIO OUT R AUDIO L jacks o...

Страница 21: ... on the DVD player Set top box Connecting a DVD Set top box via DVI This can be applied only if there is the DVI Output connector on the external device DVI to HDMI Cable Option DVI to HDMI Cable Option DVD Player Rear Panel TV Rear Panel Audio Cable Option DVD Player Rear Panel TV Rear Panel Each external input source device has a different back panel configuration When connecting an external dev...

Страница 22: ...d for an HDMI to HDMI connection What is HDMI HDMI or high definition multimedia interface is a next generation interface that enables the transmission of digital audio and video signals using a single cable without compression Multimedia interface is a more accurate name for it especially because it allows multiple channels of digital audio 5 1 channels The difference between HDMI and DVI is that...

Страница 23: ...TV and the PC output connector on your computer Connecting a PC PC Video Cable Option TV Rear Panel 2 Connect a PC audio cable between PC IN AUDIO on the TV and the Audio Out of the sound card on your computer PC Audio Cable Option PC Video Cable Option TV Rear Panel CONNECTIONS ...

Страница 24: ...See pages 24 25 to memorize channels Using the PRE CH Button to select the Previous Channel 1 Press the PRE CH button The TV will switch to the last channel viewed To quickly switch between two channels that are far apart tune to one channel then use the number button to select the second channel Then use the PRE CH button to quickly alternate between them When you use the number buttons you can d...

Страница 25: ...or decrease the volume 1 Press MUTE and the sound cuts off The word will appear in the lower left corner of the screen 2 To turn mute off press the MUTE button again or simply press the VOL and VOL buttons Using Mute At any time you can temporarily cut off the sound using the MUTE button ...

Страница 26: ... the current settings 1 Press the INFO button on the remote control The TV will display the channel the type of sound and the status of certain picture and sound settings 1 With the power on press the MENU button The main menu appears on the screen It s left side has five icons Input Picture Sound Channel Setup The on screen menus disappear from the screen after about two minutes 2 Use the UP DOWN...

Страница 27: ...ote control The message Start Plug Play is displayed with OK selected 2 Select the appropriate language by pressing the UP DOWN buttons Press the ENTER button to confirm your choice 3 The message Check antenna input is displayed with OK selected Press the ENTER button OPERATION 4 Press the UP DOWN buttons to select Air STD HRC or IRC then press the ENTER button Continued ...

Страница 28: ...ss the LEFT RIGHT buttons to move to the Hour Minute or am pm Set the Hour Minute or am pm by pressing the UP DOWN buttons Refer to Setting the Clock on page 56 5 Press the ENTER button to select Start The TV will begin memorizing all of the available channels To stop the search before it has finished press the ENTER button with Stop selected ...

Страница 29: ...evision can begin memorizing the available channels you must specify the type of signal source that is connected to the TV i e an antenna or a cable system 1 Press the MENU button to display the menu Press the UP DOWN buttons to select Channel then press the ENTER button 2 Press the ENTER button Repeatedly press the UP DOWN buttons to cycle through these choices Air STD HRC or IRC all cable TV the...

Страница 30: ...he correct signal source Air STD HRC or IRC See steps 1 2 on the previous page 2 Press the UP DOWN buttons to select Auto Program Press the ENTER button 1 Press the MENU button to display the menu Press the UP DOWN buttons to select Channel then press the ENTER button 4 After all the available channels are stored the Channel menu reappears Press the EXIT button to exit Storing Channels in Memory A...

Страница 31: ...cluding an erased channel by using the number buttons on the remote control 1 Press the MENU button to display the menu Press the UP DOWN buttons to select Channel then press the ENTER button Press the UP DOWN buttons to select Add Delete Press the ENTER button Press the CH or CH button to select channel that you wish to add or delete Press the ENTER button to select Add or Delete Pressing the ENT...

Страница 32: ...lect the input source of your choice 1 Press the MENU button to display the menu Press the ENTER button to select Input 2 Press the ENTER button Press the UP DOWN buttons to select the Input source then press the ENTER button Alternate method Press the SOURCE button on the remote control to view an external signal source ...

Страница 33: ...ss the UP DOWN buttons to select Edit Name then press the ENTER button 2 Press the UP DOWN buttons to select AV1 AV2 S Video Component1 Component2 PC or HDMI input jack then press the ENTER button 3 Press the UP DOWN buttons to select VCR DVD D VHS Cable STB HD STB Satellite STB AV Receiver DVD Receiver Game Camcorder DVD Combo DHR DVD HDD Recoder or PC input source then press the ENTER button Pre...

Страница 34: ...the picture Choose Standard for the standard factory settings Choose Movie when watching movies Choose Custom if you want to adjust the settings according to personal preference see Customizing the Picture page 30 1 Press the MENU button to display the menu Press the UP DOWN buttons to select Picture then press the ENTER button 2 Press the ENTER button Alternate method Simply press the P MODE butt...

Страница 35: ...ple if you select Contrast pressing the RIGHT button increases it Press the EXIT button to exit 3 Press the UP DOWN button to select a particular item Contrast Brightness Sharpness Color or Tint then press the ENTER button 1 Press the MENU button to display the menu Press the UP DOWN buttons to select Picture then press the ENTER button You can select the option Contrast Brightness Sharpness Color...

Страница 36: ...ess the ENTER button 4 Press the UP DOWN buttons to select Cool2 Cool1 Normal Warm1 or Warm2 Press the ENTER button Press the EXIT button to exit Choose from the following Color Tone settings Cool2 Cool1 Normal Warm1 Warm2 according to personal preference The adjusted values are stored according to the selected Picture mode The Reset will be set for each picture mode Press the UP DOWN buttons to s...

Страница 37: ...creen vertically using the or button after selecting the by pressing the or button Pressing the button extends it upward and pressing the button extends it downward 4 3 Sets the picture to 4 3 normal mode This is the standard TV screen size Only the wide and 4 3 sizes can be selected when the Source is PC Supported screen resolution modes may differ depending on the model of the product Changing t...

Страница 38: ...e s cover to change the screen size 1 Press the UP DOWN buttons to select Zoom 2 Select by pressing the LEFT RIGHT buttons Use the UP DOWN button to move the picture up and down 3 After selecting use the UP DOWN button to magnify or reduce the picture size in a vertical direction Zoom ...

Страница 39: ...ar on the screen 1 Press the MENU button to display the menu Press the UP DOWN buttons to select Picture then press the ENTER button 2 Press the UP DOWN buttons to select Digital NR then press the ENTER button 3 Press the UP DOWN buttons to select Off Press the EXIT button to exit Freezing the Picture 1 Press the STILL button to freeze a moving picture Normal sound will still be heard Press again ...

Страница 40: ...splay the menu Press the UP DOWN buttons to select Picture then press the ENTER button DNIe Demo Off DNIe Demo mode is deactivated DNIe Demo On The right hand side of the screen shows the improved DNIe image The left hand side of the screen shows the original image The DNle Demo is designed to show the difference between the regular and DNIe pictures By default the product displays the picture wit...

Страница 41: ...ss the EXIT button to exit My Color Control My Color Control allows users to adjust colors to their preference by adjusting Pink Blue and Green using the predefined settings Blue Green Pink Standard and Custom without affecting other colors on the screen Easy Control This function doesn t work when the Source is in PC mode or PIP is set to on The sources are displayed in the following order Blue G...

Страница 42: ...ess the LEFT RIGHT buttons to increase or decrease the value of a particular item Press the EXIT button to exit 2 Press the UP DOWN buttons to select Detail Control then press the ENTER button Detail Control This function doesn t work when the Source is in PC mode or PIP is set to on This captures the current screen in a still image to adjust the color To reset the Detail Control select Reset by p...

Страница 43: ... the MENU button to display the menu Press the UP DOWN buttons to select Picture then press the ENTER button 2 Press the UP DOWN buttons to select Dynamic Contrast then press the ENTER button 3 Press the UP DOWN buttons to select Off Press the EXIT button to exit This function doesn t work when the Source is in PC mode or PIP is set to on ...

Страница 44: ... Press the UP DOWN buttons to select Picture then press the ENTER button 2 Press the UP DOWN buttons to select Brightness Sensor then press the ENTER button 3 Press the LEFT RIGHT buttons to select On Press the EXIT button to exit Screen brightness is adjusted automatically depending on the brightness of the surrounding environment This function doesn t work when the Source is in PC mode ...

Страница 45: ... Chip is in operation the PIP function cannot be used Activating Picture in Picture 1 Press the MENU button to display the menu Press the UP DOWN buttons to select Picture then press the ENTER button Press the UP DOWN buttons to select PIP then press the ENTER button 2 Press the ENTER button Press the UP DOWN buttons to select On Press the ENTER button If you turn the TV off while watching in PIP ...

Страница 46: ...WN buttons to select the desired channel in the PIP window Changing the PIP Channel 4 Press the UP DOWN buttons to select Swap then press the ENTER button Alternate method Press the SWAP button under the remote s cover When the main picture is set to TV AV1 AV2 S Video Component1 Component2 only HDMI can be selected and when the main picture is set to PC HDMI only TV AV1 AV2 S Video Component1 Com...

Страница 47: ... cannot choose the PIP option You may notice that the picture in the PIP window becomes slightly unnatural when you use the main screen to view a game or karaoke You can adjust picture position only by using the size menu Alternate method Press the SIZE button under the remote s cover Alternate method Press the POSITION button under the remote s cover PIP Settings Sub Picture Main Picture X X X X ...

Страница 48: ...tedly to select the Standard Music Movie Speech or Custom sound settings Press the EXIT button to exit 1 Press the MENU button to display the menu Press the UP DOWN buttons to select Sound then press the ENTER button Press the ENTER button Choose Standard for the standard factory settings Choose Music when watching music videos or concerts Choose Movie when watching movies Choose Speech when watch...

Страница 49: ...reference Alternatively you can use one of the automatic settings See the previous page 3 Press the LEFT RIGHT buttons to select a particular frequency to be changed Press the UP DOWN buttons to increase or decrease the value of a particular item Press the EXIT button to exit Note The Custom setting allows you to adjust frequencies to your preference The lowest frequency is 100 and 10K is the high...

Страница 50: ...menu Press the UP DOWN buttons to select Sound then press the ENTER button 3 Press the UP DOWN buttons to select Off 3D Mono or Stereo than Press the ENTER button Press the EXIT button to exit TruSurround XT SRS and symbol are trademarks of SRS Labs Inc TruSurround XT technology is incorporated under license from SRS Labs Inc Alternate method Simply press the SRS button on the remote control to ch...

Страница 51: ...Press the UP DOWN buttons to select Sound then press the ENTER button 3 Press the UP DOWN buttons to select Mono Stereo or SAP then press the ENTER button Press the EXIT button to exit Choose Mono for channels that are broadcasting in mono or if you are having difficulty receiving a stereo signal Choose Stereo for channels that are broadcasting in stereo Choose SAP to listen to the Separate Audio ...

Страница 52: ...ttons to select Sound then press the ENTER button 2 Press the UP DOWN buttons to select Auto Volume then press the ENTER button 3 Press the UP DOWN buttons to set Auto Volume On Press the EXIT button to exit Automatic volume control Reduces the differences in volume level among broadcasters ...

Страница 53: ...2 Press the UP DOWN buttons to select Internal Mute then press the ENTER button 3 Press the UP DOWN buttons to select On Then Press the ENTER button Press the EXIT button to exit Selecting the Internal Mute Sound output from the TV speakers is muted When Internal mute is set to On Sound menus except MTS and Sound Select cannot be adjusted ...

Страница 54: ...utton to display the menu Press the UP DOWN buttons to select Sound then press the ENTER button 2 Press the UP DOWN buttons to select Sound Select then press the ENTER button 3 Press the UP DOWN buttons to select Main or Sub Select Main to hear the main TV sound and select Sub to hear the PIP window sound Press the EXIT button to exit ...

Страница 55: ...ct Fine Tune then press the ENTER button 3 Press the LEFT RIGHT buttons to adjust the fine tuning 4 To store the fine tuning setting in the TV s memory press the ENTER button Press the EXIT button to exit If you do not store the fine tuned channel in memory adjustments are not saved Fine tuned channels that have been saved are marked with an asterisk on the right hand side of the channel number in...

Страница 56: ... your computer manufacturer or Samsung Dealer 1 First click on Control Panel on the Windows start menu 4 Navigate to the Settings tab on the display dialog box The correct size setting resolution Optimum LN R237W1 1360 x 768 pixels LN R238WA LN R238WXC 1280 x 720 pixels If a vertical frequency option exists on your display settings dialog box the correct value is 60 or 60 Hz Otherwise just click O...

Страница 57: ...and adjusts the frequency values and positions Press the PC button under the remote s cover to select the PC mode 1 Press the MENU button to display the menu Press the UP DOWN buttons to select Setup then press the ENTER button Press the UP DOWN buttons to select PC then press the ENTER button 2 Press the UP DOWN buttons to select Auto Adjustment then press the ENTER button Press the EXIT button t...

Страница 58: ... Press the PC button under the remote s cover to select the PC mode 2 Press the ENTER button to select Image Lock 1 Press the MENU button to display the menu Press the UP DOWN buttons to select Setup then press the ENTER button Press the UP DOWN buttons to select PC then press the ENTER button 3 Press the UP DOWN buttons to select Coarse or Fine then press the ENTER button Press the LEFT RIGHT but...

Страница 59: ...t PC then press the ENTER button Press the UP DOWN buttons to select Position then press the ENTER button 1 Press the MENU button to display the menu Press the UP DOWN buttons to select Setup then press the ENTER button 3 Press the UP DOWN buttons to adjust the V Position Press the LEFT RIGHT buttons to adjust the H Position Press the EXIT button to exit ...

Страница 60: ...over to select the PC mode 2 Press the UP DOWN buttons to select Image Reset then press the ENTER button Press the EXIT button to exit 1 Press the MENU button to display the menu Press the UP DOWN buttons to select Setup then press the ENTER button Press the UP DOWN buttons to select PC then press the ENTER button ...

Страница 61: ...IGHT buttons to select Minute Press the UP DOWN buttons until the correct Minute appears Press the LEFT RIGHT buttons to select am pm and adjust with the UP DOWN buttons Press the EXIT button to exit 2 Press the ENTER button to select Time then press the ENTER button to select Clock Set You can also set the time using the number buttons on the remote Setting the Clock Setting the clock is necessar...

Страница 62: ...select Setup then press the ENTER button Press the UP DOWN buttons to select Time then press the ENTER button 3 Press the UP DOWN buttons repeatedly until the correct time appears Press the EXIT button to exit 2 Press the UP DOWN buttons to select Sleep Timer then press the ENTER button Alternate method Press the SLEEP button on the remote The number on the screen changes from Off 30 60 90 120 150...

Страница 63: ...ck When you set the hours make sure the correct time of day am or pm appears to the right of the time You can also set the time using the number buttons on the remote 2 Press the UP DOWN buttons to select On Timer then press the ENTER button Press the UP DOWN buttons repeatedly to select the appropriate Hour Press the LEFT RIGHT buttons to select Minute Press the UP DOWN buttons repeatedly to sele...

Страница 64: ... No 4 To set the Off time press the UP DOWN buttons to select Off Timer Press the ENTER button and set the hours and minutes Follow the same procedure as in steps 2 and 3 above 5 When finished setting the timer press the EXIT button to exit Auto Power Off When you set the timer on your television will be turned off if you do not operate any controls for 3 hours after the TV has been turned on with...

Страница 65: ...e UP DOWN buttons to select Language Press the ENTER button 1 Press the MENU button to display the menu Press the UP DOWN buttons to select Setup then press the ENTER button 3 Press the UP DOWN buttons to select English Français Español or Português Press the EXIT button to exit ...

Страница 66: ...ny of the V Chip restrictions can be set up or changed Setting Up Your Personal ID Number PIN 1 Press the MENU button to display the menu Press the UP DOWN buttons to select Setup then press the ENTER button 2 Press the UP DOWN buttons to select V Chip then press the ENTER button 3 The Enter PIN screen will appear Enter your 4 digit PIN number The default PIN number for a new TV set is 0 0 0 0 Con...

Страница 67: ...s ENTER button The Change PIN screen will appear Choose any 4 digits for your PIN and enter them As soon as the 4 digits are entered the Confirm new PIN screen appears Re enter the same 4 digits When the Confirm screen disappears your PIN has been memorized Press the EXIT button to exit 4 After entering a valid PIN number the V Chip screen will appear Press the UP DOWN buttons to select Change PIN...

Страница 68: ... the ENTER button 2 Press the UP DOWN buttons to select V Chip then press the ENTER button 3 The Enter PIN screen will appear Enter your 4 digit PIN number 4 The V Chip screen will appear and V Chip Lock will be selected To enable the V Chip feature press the UP DOWN buttons so that the V Chip Lock is set to On Press the ENTER button Press the EXIT button to exit The default PIN number for a new T...

Страница 69: ...trictions can be set up using either of two methods The TV guidelines or the MPAA rating 1 Press the MENU button to display the menu Press the UP DOWN buttons to select Setup then press the ENTER button Press the UP DOWN buttons to select V Chip then press the ENTER button 2 The Enter PIN screen will appear Enter your 4 digit PIN number The default PIN number for a new TV set is 0 0 0 0 Continued ...

Страница 70: ...d over TV MA Mature audience 3 Press the UP DOWN buttons to select TV Parental Guidelines then press the ENTER button Note These categories consist of two separate groups TV Y and TV Y7 young children through age 7 and TV G through TV MA everybody else The restrictions for these two groups work independently If a household includes very young children as well as young adults the TV guidelines must...

Страница 71: ...oung adult group will be blocked TV G TV PG TV 14 and TV MA The sub ratings D L S V work together similarly See next section 6 How to set the FV D L S and V sub ratings First select one of these TV Ratings TV Y7 TV PG TV 14 or TV MA See Step 4 on previous page Next while the TV Rating is selected repeatedly press the LEFT or RIGHT buttons This will cycle through the available sub ratings FV L S D ...

Страница 72: ...Chip lock is on the TV will automatically block any programs that are coded with objectionable ratings either MPAA or TV Ratings 1 Press the MENU button to display the menu Press the UP DOWN buttons to select Setup then press the ENTER button Press the UP DOWN buttons to select V Chip then press the ENTER button 2 The Enter PIN screen will appear Enter your 4 digit PIN number The default PIN numbe...

Страница 73: ...press the ENTER button to temporarily disable the V Chip Lock 4 Repeatedly press the UP DOWN buttons to select a particular MPAA category When a category is selected its color changes to yellow G General audience no restrictions PG Parental guidance suggested PG 13 Parents strongly cautioned R Restricted Children under 17 should be accompanied by an adult NC 17 No children under age 17 X Adults on...

Страница 74: ...iate restriction Press the ENTER button to activate the restriction selected The B is indicated Press the EXIT button to exit The default PIN number for a new TV set is 0 0 0 0 E Exempt programming includes news sports documentaries and other information programming talk shows music videos and variety programming C Programming intended for children under age 8 C8 Programming generally considered a...

Страница 75: ...button 5 Press the UP DOWN button to select a appropriate restriction Press the ENTER button to activate the restriction selected The B is indicated Press the EXIT button to exit The default PIN number for a new TV set is 0 0 0 0 E Exempt programming includes news sports documentaries and other information programming talk shows music videos and variety programming G General 8 ans Not recommended ...

Страница 76: ...d video tapes also provide closed captions Most pre recorded commercial video tapes provide closed captions as well Check for the closed caption symbol in your television schedule and on the tape s packaging 1 Press the MENU button to display the menu Press the UP DOWN buttons to select Setup then press the ENTER button 2 Press the UP DOWN buttons to select Caption then press the ENTER button 4 De...

Страница 77: ...ext then press the ENTER button 6 Press the UP DOWN buttons to select Channel then press the ENTER button Press the UP DOWN buttons to select 1 or 2 then press the ENTER button 7 Press the UP DOWN buttons to select Field then press the ENTER button Press the UP DOWN buttons to select 1 or 2 then press the ENTER button Press the EXIT button to exit ...

Страница 78: ...e background If you wish to continue viewing the poor picture you must set the Blue Screen mode to Off 1 Press the MENU button to display the menu Press the UP DOWN buttons to select Setup then press the ENTER button 2 Press the UP DOWN buttons to select Blue Screen then press the ENTER button 3 Press the UP DOWN buttons to set Blue Screen On Press the EXIT button to exit ...

Страница 79: ... television is powered on or off 1 Press the MENU button to display the menu Press the UP DOWN buttons to select Setup then press the ENTER button 3 Press the UP DOWN buttons to select On Press the EXIT button to exit 2 Press the UP DOWN buttons to select Melody then press the ENTER button ...

Страница 80: ...r channel Press the SOURCE button Make sure the TV is plugged in Check the antenna connections No sound or sound is too low at maximum volume First check the volume of units connected to your TV digital broadcasting receiver DTV DVD cable broadcasting receiver VCR etc Then adjust the TV volume accordingly Check if Internal Mute is off Remote control malfunctions Replace the remote control batterie...

Страница 81: ...nd power indicator light blinks steadily On your computer check Power Signal Cable The TV is using its power management system Move the computer s mouse or press any key on the keyboard Image is not stable and may appear to vibrate when you have a computer connected to the PC input If the setting is not correct use your computer utility program to change the display settings NOTE Your TV supports ...

Страница 82: ... cushion on a table 2 Attach the stand to the TV set as shown in the picture 3 Use the four screws to tightly fix the stand 1 Place the TV faced down on a soft cloth or cushion on a table 2 Remove four screws from the back of the TV 3 Separate the stand from the TV 4 Cover the bottom hole with a cap 2 3 2 3 4 ...

Страница 83: ... the wall with wood screws after fitting anchors into the wall bracket Note If the bracket is not firmly fixed to the wall LCD TV can fall off 2 Turn the power off and unplug the power cord from the outlet Place the TV faced down on a soft cloth or cushion on a table Attach the set bracket onto the rear side of the TV set and secure the screws 3 Insert three Hangers of the set bracket into the gro...

Страница 84: ...system when using it in a public place The locking device has to be purchased separately The appearance and locking method may differ from the illustration depending on the manufacturer Please refer to the manual provided with the Kensington lock for proper use 1 Insert the locking device into the Kensington slot on the LCD TV Figure 1 and turn it in the locking direction Figure 2 2 Connect the Ke...

Страница 85: ...z 100 W 1360 x 768 60 Hz 3 W 3 W 22 95 x 3 54 x 17 44 inches 583 0 x 90 0 x 443 0 mm 22 95 x 8 11 x 19 10 inches 583 0 x 206 0 x 484 7 mm 18 96 lbs 8 6 kg 50 F to 104 F 10 C to 40 C 10 to 80 non condensing 4 F to 113 F 20 C to 45 C 5 to 95 non condensing LN R238WA LN R238WXC 23 inch AC110V 120V 60 Hz 100 W 1280 x 720 60 Hz 3 W 3 W 22 95 x 3 54 x 17 44 inches 583 0 x 90 0 x 443 0 mm 22 95 x 8 11 x ...

Страница 86: ...X 400 31 469 70 087 28 322 VESA 640 X 480 37 861 72 809 31 500 640 X 480 37 500 75 000 31 500 800 X 600 37 879 60 317 40 000 800 X 600 48 077 72 188 50 000 800 X 600 46 875 75 000 49 500 1024 X 768 48 364 60 000 65 000 1024 X 768 56 476 70 069 75 000 1024 X 768 60 023 75 029 78 750 1360 X 768 47 712 60 015 85 800 VESA 1280 X 720 45 000 60 000 74 250 LN R238WA LN R238WXC Mode Resolution Horizontal ...

Страница 87: ...Guide de l utilisateur Enregistrez vos produits Samsung en vous connectant sur www samsung com global register TÉLÉVISEUR TFT À ACL LN R237W1 LN R238WA LN R238WXC ...

Страница 88: ...ongtemps Cela pourrait provoquer une brûlure temporaire ou permanente de l image Remarque Si les bords gauche et droit et le centre de l écran restent longtemps affichés le volume de lumière transmis vont varier Cela aura pour conséquence de laisser des traces Télévision acceptant le numérique Lorsque vous sélectionnez le mode Écran large 16 9 pour regarder un programme numérique intégrant un déli...

Страница 89: ...ier Cela aura pour conséquence de laisser des traces Télévision avec le numérique intégré Écran large Lorsque la télévision reçoit les signaux d un programme numérique intégrant un délimiteur de début de trame elle reçoit des signaux normaux à 480p Télévision acceptant le numérique Écran large Lorsque la télévision reçoit les signaux d un programme numérique intégrant un délimiteur de début de tra...

Страница 90: ...lecteur de DVD via DVI 16 Connexion d un DVD boîtier décodeur à l aide du mode HDMI 17 Branchement d un PC 18 Chapitre 3 Fonctionnement Mise en marche et arrêt de la télévision 19 Changement des canal 19 Utilisation des boutons de canal 19 Utilisation des boutons numériques 19 Appuyez sur la touche PRE CH pour sélectionner la chaîne précédente 19 Réglage du volume 20 Utilisation de la fonction Mue...

Страница 91: ...ition de l écran 54 Initialiser la position de l écran et les paramètres des couleurs 55 Chapitre 8 Paramètre d heure Régler l horloge 56 Paramétrer le minuteur 57 Réglage de la minuterie de mise en marche arrêt 58 Chapitre 9 Description de la fonction Sélection d une langue de menu 60 Utilisation de la fonction puce V 61 Réglage de votre numéro d identification personnel NIP 61 Comment activer dé...

Страница 92: ...raste optimum Capteur luminance Règle automatiquement la luminosité de l écran suivant le niveau de luminosité ambiante SRS TruSurround XT SRS TruSurround XT offre un système surround Dolby virtuel Aspect pratique Le téléviseur utilise le système HDMI pour offrir une qualité d image et un son numérique parfait Le système Anynet vous permet de contrôler facilement les périphériques audio et vidéo A...

Страница 93: ...r ce bouton pour augmenter ou baisser le volume Dans le menu à l écran utilisez les boutons VOL de la même manière que les boutons ou de la télécommande CH Appuyez sur ce bouton pour changer de canal Dans le menu à l écran utilisez ces boutons CH de la même manière que les boutons ou de la télécommande ALIMENTATION Appuyez sur ce bouton pour allumer et teindre la télévision VOYANT D ALIMENTATION C...

Страница 94: ...nes pour une écoute individuelle HDMI DVI IN R AUDIO L Se connecte à la prise HDMI d un périphérique doté d une sortie HDMI Utilisez le terminal HDMI DVI pour les connexions DVI vers un périphérique externe Utilisez le câble DVI vers HDMI ou le raccord DVI HDMI pour cette connexion et la borne R AUDIO L DVI IN pour la sortie audio la borne HDMI DVI IN ne prend pas en charge le PC AUDIO OUT A conne...

Страница 95: ... 20 MENU Pour afficher le menu principal à l écran Voir page 21 CAPTION Contrôle le décodeur de sous titres Voir page 71 PIP Image Sur Image Activé Désactivé Voir page 40 SLEEP Appuyez pour sélectionner une heure d arrêt automatique de la télévision Voir page 57 PRE CH Syntonise sur la canal précédente Voir page 19 CH et CH Channel UP Down Appuyez sur CH ou CH pour changer de canal Voir page 19 VO...

Страница 96: ...ff désactivé Activé L image améliorée par DNIe apparaît sur la On droite de l écran L image d origine apparaît sur la gauche de l écran Voir page 35 Fonctions Magnétoscope DVD uniquement en mode Anynet Rembo binage Arrêt Lecture Pause Avance Rapide SRS Sélectionne le mode TruSurround XT Voir page 45 P MODE Réblez l image de la télévision en sélectionnant l un des paramètres usine prédéfinis Voir p...

Страница 97: ...vision les piles durent environ un an 2 Placez deux piles AAA Assurez vous de faire correspon dre les pôles et des iles avec le schéma situé à l intérieur du compartiment 1 Enlevez le panneau en le faisant glisser complètement La télécommande ne fonctionne pas Contrôlez les points suivants 1 La télévision est elle allumée 2 Les pôles des piles sont ils inversés 3 Les piles sont elles à plat 4 Y a ...

Страница 98: ...8 Si vous avez deux antennes voir Antennes VHF et UHF séparées page 8 Antennes avec câble bipolaire plat de 300 ohms Si vous utilisez une antenne hertzienne comme une antenne de toit ou une antenne en oreilles de lapin munie d un câble bipolaire plat de 300 ohms procédez comme suit 1 Placez les fils de votre câble bipolaire sous les vis de l adaptateur 300 75 ohms non fourni Utilisez un tournevis ...

Страница 99: ...u téléviseur Antennes VHF et UHF séparées Si vous disposez de deux antennes séparées pour votre télévision une VHF et une UHF vous devez combiner les deux signaux des antennes avant de les brancher à la télévision Cette procédure exige un multiplexeur adaptateur disponible dans la plupart des magasins d électronique 1 Branchez les deux câbles des antennes au multiplexeur Français 8 ANT IN UHF VHF ...

Страница 100: ...onction Cette prise peut s appeler ANT OUT VHF OUT ou simplement OUT 2 Branchez l autre extrémité de ce câble à la prise ANT IN située à l arrière de la télévision Branchement d une boîte de jonction servant à décrypter certaines canal Si votre boîte de jonction ne décrypte que certaines canal comme les canal dites premium suivez les instructions ci dessous Pour ce faire vous avez besoin d un sépa...

Страница 101: ... B pour une regarder les canal cryptées Lorsque vous placez l interrupteur A B sur B vous devez syntoniser votre télévision sur la canal de sortie de la boîte de jonction qui est habituellement la canal 3 ou 4 Français 10 CONNEXIONS 2 Branchez ce câble à un séparateur bidirectionnel 3 Branchez un câble de RF entre une des prises OUTPUT du séparateur et la prise IN de la boîte de jonction câble d a...

Страница 102: ...s encore branché d antenne ou de système de télévision par câble 1 Débranchez l antenne ou le câble de l arrière de la télévision 2 Branchez le câble ou l antenne à la prise ANT IN située à l arrière du magnétoscope 3 Connectez un câble RF entre la borne ANT OUT du magnétoscope et la borne ANT IN du téléviseur Panneau arriére du magnétoscope Pannear arrière de la télévision Câble RF Optionnel câbl...

Страница 103: ...ation arrière de chaque périphérique source externe est différente suivant les appareils Lorsque vous connectez un périphérique externe faites correspondre les couleurs du terminal de connexion et du câble Si vous avez un magnétoscope mono c est à dire qu il n est pas stéréo utilisez le connecteur Y non fourni pour le brancher aux prises d entrée audio droite et gauche de la télévision Pannear arr...

Страница 104: ...précédente pour brancher l antenne ou le câble à votre magnétoscope et à votre télévision Branchement d un magnétoscope S VHS Votre télévision Samsung peut recevoir un signal S Vidéo provenant d un magnétoscope S VHS Ce branchement donne une meilleure image par rapport à un magnétoscope VHS standard 2 Branchez les câbles audio entre les prises AUDIO OUT du magnétoscope et les prises AV IN R AUDIO ...

Страница 105: ...espondre les couleurs du terminal de connexion et du câble Branchement d un lecteur DVD Les prises du panneau arrière de votre télévision ont été spécialement conçues pour faciliter le branchement d un lecteur DVD 1 Connectez un câble audio entre les prises COMPONENT IN 1 ou COMPONENT IN 2 R AUDIO L du téléviseur et les prises AUDIO OUT du lecteur DVD 2 Connectez un câble composante entre les pris...

Страница 106: ... branchements pour un boîtier décodeur type sont indiqués ci dessous 1 Connectez un câble audio entre les prises COMPONENT IN 1 ou COMPONENT IN 2 R AUDIO L du téléviseur et les prises AUDIO OUT du boîtier décodeur 2 Connectez un câble composante entre les prises COMPONENT IN 1 ou COMPONENT IN 2 PR PB Y du téléviseur et les prises COMPONENT Y PB PR du boîtier décodeur Câble Audio Optionnel Câble co...

Страница 107: ...eur de DVD via DVI Ceci n est réalisable que si le périphérique externe dispose d un connecteur de sortie DVI Câble DVI vers HDMI Optionnel Câble DVI vers HDMI Optionnel Pannear arrière de la télévision Câble Audio Optionnel Pannear arrière de la télévision Panneau arriére du Boîtier décodeur Panneau arriére du Boîtier décodeur La configuration arrière de chaque périphérique source externe est dif...

Страница 108: ...u high definition multimedia interface interface multimédia haute définition est une interface de nouvelle génération qui permet la transmission de signaux numériques audio et vidéo à l aide d un simple câble et sans compression Interface multimédia est un nom plus approprié en particulier parce qu il autorise plusieurs canaux de son numérique canaux 5 1 La différence entre les modes HDMI et DVI r...

Страница 109: ...PC de votre ordinateur Branchement d un PC Câble vidéo PC Optionnel Pannear arrière de la télévision 2 Connectez un câble vidéo PC entre le connecteur PC IN AUDIO du téléviseur et le connecteur de sortie PC de votre ordinateur Câble audio PC Optionnel Câble vidéo PC Optionnel Pannear arrière de la télévision CONNEXIONS ...

Страница 110: ...t 25 pour mémoriser des chaînes Appuyez sur la touche PRE CH pour sélectionner la chaîne précédente 1 Appuyez sur le bouton PRE CH La télévision passe à la dernière canal regardée Pour passer rapidement d une canal à une autre canal éloignée accédez à la canal initiale puis utilisez les boutons numériques pour sélectionner la seconde canal Puis utilisez le bouton PRE CH pour passer rapidement de l...

Страница 111: ...e 1 Appuyez sur MUTE et le son est coupé Le mot apparaît dans le coin inférieur gauche de l écran 2 Pour désactiver le mode Mute appuyez de nouveau sur le bouton MUTE ou simplement sur les boutons VOL et VOL Utilisation de la fonction Muet A tout moment vous pouvez couper temporairement le son à l aide du bouton MUTE ...

Страница 112: ...s actuels 1 Appuyez sur le bouton INFO de la télécommande La télévision affiche la canal le type de son et l état de certains paramètres de son et d image 1 Une fois l appareil allumé appuyez sur le bouton MENU Le menu principal apparaît à l écran Cinq icônes s affichent sur la gauche Entrée Image Son Chaîne Configuration Les menus affichés à l écran disparaissent après environ deux minutes 2 A l ...

Страница 113: ...e message Start Plug Play la touche OK est alors sélectionnée 2 Sélectionnez la langue souhaitée en utilisant le bouton MONTER DESCENDRE Appuyez sur le bouton ENTER pour confirmer votre choix 3 Le message Vérifier sortie antenne le bouton OK est alors sélectionnée Appuyez sur le bouton ENTER button FONCTIONNEMENT 4 Appuyez sur les boutons MONTER DESCENDRE pour sélectionner Air STD HRC ou IRC puis ...

Страница 114: ...HE DROITE pour passer des Heure Minute ou am pm Définissez Heure Minute ou am pm en appuyant sur les boutons MONTER DESCENDRE référez vous à la page 56 Régler l horloge 5 Appuyez sur le bouton ENTER pour sélectionner Démarrer Le téléviseur commence la mémorisation de toutes les chaînes disponibles Pour arrêter la recherche avant la fin appuyez sur le bouton ENTER pour sélectionnez Arrêt ...

Страница 115: ...s devez spécifier le type de la source de signal reliée à la télévision c est à dire soit une antenne soit le câble 1 Appuyez sur le bouton MENU pour afficher le menu Appuyez sur les boutons MONTER DESCENDRE pour sélectionner Chaîne puis appuyez sur le bouton ENTER 2 Appuyez sur le bouton ENTER button Appuyez de façon répétée sur le bouton MONTER DESCENDRE pour passer en revue ces choix Air STD HR...

Страница 116: ... Voir les étapes 1 à 2 page précédente 2 Appuyez sur les boutons MONTER DESCENDRE pour sélectionner Prog auto Appuyez sur le bouton ENTER 1 Appuyez sur le bouton MENU pour afficher le menu Appuyez sur les boutons MONTER DESCENDRE pour sélectionner Chaîne puis appuyez sur le bouton ENTER 4 Une fois que toutes les canal disponibles sont enregistrées le menu Chaîne réapparaît Appuyez sur le bouton EX...

Страница 117: ...evée à l aide des boutons numériques de la télécommande 1 Appuyez sur le bouton MENU pour afficher le menu Appuyez sur les boutons MONTER DESCENDRE pour sélectionner Chaîne puis appuyez sur le bouton ENTER Appuyez sur les boutons MONTER DESCENDRE pour sélectionner Ajouter supprimer Appuyez sur le bouton ENTER Appuyez sur le bouton CH ou CH pour sélectionner la chaîne à ajouter ou supprimer Appuyez...

Страница 118: ...ctionner l écran de votre choix 1 Appuyez sur le bouton MENU pour afficher le menu Appuyez sur le bouton ENTER pour sélectionner Entrée 2 Appuyez sur le bouton ENTER Appuyez sur les boutons MONTER DESCENDRE pour sélectionner entrée source puis appuyez sur le bouton ENTER Autre méthode Appuyez sur le bouton SOURCE de la télécommande pour afficher une source de signal externe ...

Страница 119: ...sélectionner Entrer le nom puis appuyez sur le bouton ENTER 2 Appuyez sur les touches MONTER DESCENDRE pour sélectionner la prise d entrée AV1 AV2 S Vidéo Composant1 Composant2 PC ou HDMI puis appuyez sur la touche ENTER 3 Appuyez sur les touches MONTER DESCENDRE pour sélectionner la source d entrée Magnét DVD D VHS Câble STB HD STB Satellite STB Récepteur A V Récepteur DVD Jeu Caméscope Combo DVD...

Страница 120: ...rd pour utiliser les réglages d usine Choisissez Cinéma lorsque vous regardez un film Choisissez Personnel si vous souhaitez faire vous même vos réglages suivant vos préférences personnelles voir Personnalisation de l image page 30 1 Appuyez sur le bouton MENU pour afficher le menu Appuyez sur les boutons MONTER DESCENDRE pour sélectionner Image puis appuyez sur le bouton ENTER 2 Appuyez sur le bo...

Страница 121: ...aste et si vous appuyez sur le bouton DROITE le contraste augmente Appuyez sur le bouton EXIT pour quitter 3 Appuyez sur le bouton MONTER DESCENDRE pour sélectionner un élément Contraste Luminosité Netteté Couleur ou Teinte puis sur le bouton ENTER 1 Appuyez sur le bouton MENU pour afficher le menu Appuyez sur les boutons MONTER DESCENDRE pour sélectionner Image puis appuyez sur le bouton ENTER A ...

Страница 122: ... Appuyez sur les boutons MONTER DESCENDRE pour sélectionner Froide2 Froide1 Normale Chaude1 et Chaude2 Appuyez sur le bouton ENTER Appuyez sur le bouton EXIT pour quitter Choisissez parmi les paramètres de ton de couleur suivants Froide2 Froide1 Normale Chaude1 Chaude2 en fonction de vos préférences personnelles Les valeurs configurées sont stock ées en fonction du mode d image sélectionné La fonc...

Страница 123: ...uche ou après avoir sélectionné en appuyant sur la touche ou Appuyer sur la touche l étire vers le haut alors qu appuyer sur la touche l étire vers le bas 4 3 Pour régler l image en mode normal c à d 4 3 Cela correspond à la taille d écran standard Lorsque la source est le PC vous ne pouvez sélectionner que les affichages Large et 4 3 Les modes de résolution de l écran pris en charge peuvent diffé...

Страница 124: ...lle de l écran 1 Appuyez sur les boutons MONTER DESCENDRE pour sélectionner Zoom 2 Sélectionnez à l aide des boutons GAUCHE DROITE Utilisez les boutons MONTER DESCENDRE pour monter ou descendre l image 3 Après avoir sélectionné utilisez les boutons MONTER DESCENDRE pour agrandir ou réduire le format de l image dans le sens vertical Zoom ...

Страница 125: ...ppuyez sur le bouton MENU pour afficher le menu Appuyez sur les boutons MONTER DESCENDRE pour sélectionner Image puis appuyez sur le bouton ENTER 2 Appuyez sur les boutons MONTER DESCENDRE pour sélectionner RB numér puis appuyez sur le bouton ENTER 3 Appuyez sur les boutons ENTER pour sélectionner Off Appuyez sur le bouton EXIT pour quitter Gel de l image 1 Appuyer le bouton Calme pour geler une i...

Страница 126: ... Appuyez sur le bouton MENU pour afficher le menu Appuyez sur les boutons MONTER DESCENDRE pour sélectionner Image puis appuyez sur le bouton ENTER DNIe démo Désactivé Off Le mode DNIe démo est désactivé DNIe démo Activé On L image améliorée par DNIe apparaît sur la droite de l écran L image d origine apparaît sur la gauche de l écran La fonction DNIe démo est destinée à illustrer la différence av...

Страница 127: ...puis sur le bouton ENTER Appuyez sur le bouton EXIT pour quitter Commande couleur Commande couleur permet aux utilisateurs de régler les couleurs selon leurs préférences en réglant les tons de bleu de vert et de rose aux paramètres prédéfinis Bleu Vert Rose Standard et Personnel sans que cela affecte pour autant les autres couleurs de l écran Commande simple Cette option ne fonctionne pas si la so...

Страница 128: ...puyez sur les boutons GAUCHE DROITE pour augmenter ou diminuer la valeur d un élément Appuyez sur le bouton EXIT pour quitter 2 Appuyez sur les boutons MONTER DESCENDRE pour sélectionner Commande détail puis appuyez sur le bouton ENTER Commande détail Cette option ne fonctionne pas si la source est en mode PC ou si le mode ISI est activé Cette fonction capture l écran actuel dans une image fixe po...

Страница 129: ...menu Appuyez sur les boutons MONTER DESCENDRE pour sélectionner Image puis appuyez sur le bouton ENTER 2 Appuyez sur les boutons MONTER DESCENDRE pour sélectionner Contraste dynam puis appuyez sur le bouton ENTER 3 Appuyez sur les boutons MONTER DESCENDRE pour sélectionner Off Appuyez sur le bouton EXIT pour quitter Cette option ne fonctionne pas si la source est en mode PC ou si le mode ISI est a...

Страница 130: ... DESCENDRE pour sélectionner Image puis appuyez sur le bouton ENTER 2 Appuyez sur les boutons MONTER DESCENDRE pour sélectionner Capteur luminance puis appuyez sur le bouton ENTER 3 Appuyez sur les boutons GAUCHE DROITE pour sélectionner On Appuyez sur le bouton EXIT pour quitter La luminosité de l écran est réglée automatiquement suivant le niveau de luminosité ambiante Cette fonction n est pas d...

Страница 131: ...on ISI ne peut pas être utilisée Comment activer la fonction Image sur Image 1 Appuyez sur le bouton MENU pour afficher le menu Appuyez sur les boutons MONTER DESCENDRE pour sélectionner Image puis appuyez sur le bouton ENTER Appuyez sur les boutons MONTER DESCENDRE pour sélectionner ISI puis appuyez sur le bouton ENTER 2 Appuyez sur le bouton ENTER Appuyez sur les boutons MONTER DESCENDRE pour sé...

Страница 132: ...lectionner la chaîne voulue pour la fenêtre ISI Changer la chaîne de la fenêtre ISI 4 Appuyez sur les boutons MONTER DESCENDRE pour sélectionner Permutation puis appuyez sur le bouton ENTER Autre méthode Appuyez sur le bouton SWAP situé sous le panneau de la télécommande Lorsque l image principale est en mode TV AV1 AV2 S Vidéo Composant1 Composant2 seule la fonction HDMI peut être sélectionnée l ...

Страница 133: ...ouvez ajuster la position de l image en utilisant le menu Taille Autre méthode Appuyez sur le bouton SIZE situé sous le panneau de la télécommande Autre méthode Appuyez sur le bouton POSITION situé sous le panneau de la télécommande Programmation ISI Image Fenêtre Image principale X X X X X X O O X X X X X X O O X X X X X X O O X X X X X X O O X X X X X X O O X X X X X X X X O O O O O O X X O ISI ...

Страница 134: ...ue Cinéma Parole ou Personnel Appuyez sur le bouton EXIT pour quitter 1 Appuyez sur le bouton MENU pour afficher le menu Appuyez sur les boutons MONTER DESCENDRE pour sélectionner Son puis appuyez sur le bouton ENTER Appuyez sur le bouton ENTER Choisissez Standard pour les paramètres usine standard Choisissez Musique quand vous regardez une vidéo musicale ou un concert Choisissez Cinéma quand vous...

Страница 135: ...éférences personnelles sinon vous pouvez utiliser l un des paramètres automatiques Voir page suivante 3 Appuyez sur les boutons GAUCHE DROITE pour sélectionner la fréquence à modifier Appuyez sur les boutons MONTER DESCENDRE pour augmenter ou réduire la valeur d un élément spécifique Appuyez sur le bouton EXIT pour quitter Remarque Le paramètre Personnel vous permet de régler les fréquences à votr...

Страница 136: ...nu Appuyez sur les boutons MONTER DESCENDRE pour sélectionner Son puis appuyez sur le bouton ENTER 3 Appuyez sur les boutons MONTER DESCENDRE pour sélectionner Off Mono 3D ou Stéréo puis appuyez sur le bouton ENTER Appuyez sur le bouton EXIT pour quitter TruSurround XT SRS et le symbole sont des marques commerciales de SRS Labs Inc La technologie TruSurround XT est intégrée sous licence de SRS Lab...

Страница 137: ...her le menu Appuyez sur les boutons MONTER DESCENDRE pour sélectionner Son puis appuyez sur le bouton ENTER 3 Appuyez sur les boutons MONTER DESCENDRE pour sélectionner Mono Stéréo ou SAP puis appuyez sur le bouton ENTER Appuyez sur le bouton EXIT pour quitter Choisissez Stéréo pour les canal qui émettent en stéréo Choisissez Mono pour les canal qui émettent en mono ou si vous avez des difficultés...

Страница 138: ...uis appuyez sur le bouton ENTER 2 Appuyez sur les boutons MONTER DESCENDRE pour sélectionner Volume auto puis appuyez sur le bouton ENTER 3 Appuyez sur les boutons MONTER DESCENDRE pour activer le volume automatique Appuyez sur le bouton EXIT pour quitter Contrôle automatique du volume Réduit les différences de niveau volume entre les chaînes ...

Страница 139: ...pour sélectionner Sourdine int puis appuyez sur le bouton ENTER 3 Appuyez sur les boutons MONTER DESCENDRE pour sélectionner On puis appuyez sur le bouton ENTER Appuyez sur le bouton EXIT pour quitter Sélection du mode Internal Mute Silence Int La sortie audio des haut parleurs du téléviseur est désactivée Si vous activez le mode Sourdine int vous ne pourrez pas régler les menus Son à l exception ...

Страница 140: ...r les boutons MONTER DESCENDRE pour sélectionner Son puis appuyez sur le bouton ENTER 2 Appuyez sur les boutons MONTER DESCENDRE pour sélectionner Sélect son puis appuyez sur le bouton ENTER 3 Appuyez sur les boutons MONTER DESCENDRE pour sélectionne Principale ou Secondaire Sélectionnez Principale pour écouter le son de la télévision et Secondaire pour écouter le son de la fenêtre ISI Appuyez sur...

Страница 141: ...ez sur le bouton ENTER 3 Appuyez sur les boutons GAUCHE DROITE pour régler le réglage fin 4 Pour stocker les paramètres du réglage fin dans la mémoire de votre télévision appuyez sur le bouton ENTER Appuyez sur le bouton EXIT pour quitter Si vous ne mettez pas en mémoire la chaîne pour laquelle vous venez de procéder à un réglage fin notez que ces derniers seront perdus Les chaînes ayant eu droit ...

Страница 142: ...configuration Control Panel dans le menu Démarrer de Windows 4 Allez sur l onglet Paramètres Settings dans la boîte de dialogue Propriétés de l Affichage Réglage correct de la taille résolution Optimum LN R237W1 1360 x 768 pixels LN R238WA LN R238WXC 1280 x 720 pixels Si votre boîte de dialogue des paramètres d affichage comporte une option de fréquence verticale la valeur correcte est 60 ou 60Hz ...

Страница 143: ...Appuyez sur le bouton PC situé sous le panneau de la télécommande pour sélectionner le mode PC 1 Appuyez sur le bouton MENU pour afficher le menu Appuyez sur les boutons MONTER DESCENDRE pour sélectionner Configuration puis appuyez sur le bouton ENTER Appuyez sur les boutons MONTER DESCENDRE pour sélectionner PC puis appuyez sur le bouton ENTER 2 Appuyez sur les boutons MONTER DESCENDRE pour sélec...

Страница 144: ... le mode PC 2 Appuyez sur les boutons ENTER pour sélectionner Verrouiller l image 1 Appuyez sur le bouton MENU pour afficher le menu Appuyez sur les boutons MONTER DESCENDRE pour sélectionner Configuration puis appuyez sur le bouton ENTER Appuyez sur les boutons MONTER DESCENDRE pour sélectionner PC puis appuyez sur le bouton ENTER 3 Appuyez sur les boutons MONTER DESCENDRE pour sélectionner Grain...

Страница 145: ...bouton ENTER Appuyez sur les boutons MONTER DESCENDRE pour sélectionner Position puis appuyez sur le bouton ENTER 1 Appuyez sur le bouton MENU pour afficher le menu Appuyez sur les boutons MONTER DESCENDRE pour sélectionner Configuration puis appuyez sur le bouton ENTER 3 Appuyez sur les boutons MONTER DESCENDRE pour régler Position vert Appuyez sur les boutons GAUCHE DROITE pour régler Position h...

Страница 146: ...r le mode PC 2 Appuyez sur les boutons MONTER DESCENDRE pour sélectionner Rétablir l image puis appuyez sur le bouton ENTER 1 Appuyez sur le bouton MENU pour afficher le menu Appuyez sur les boutons MONTER DESCENDRE pour sélectionner Configuration puis appuyez sur le bouton ENTER Appuyez sur les boutons MONTER DESCENDRE pour sélectionner PC puis appuyez sur le bouton ENTER ...

Страница 147: ...R DESCENDRE jusqu a l apparition de la Minute exacte Appuyez sur les boutons GAUCHE DROITE pour sélectionner am pm puis faites votre réglage avec les boutons MONTER DESCENDRE Appuyez sur le bouton EXIT pour quitter 2 Appuyez sur les boutons ENTER pour sélectionner Heure puis appuyez sur le bouton ENTER pour sélectionner Réglage hor Vous pouvez également régler l horloge en utilisant les boutons nu...

Страница 148: ...yez sur le bouton ENTER Appuyez sur les boutons MONTER DESCENDRE pour sélectionner Heure puis appuyez sur le bouton ENTER 3 Appuyez plusieurs fois sur les boutons MONTER DESCENDRE jusqu à ce que l heure correcte soit affichée Appuyez sur le bouton EXIT pour quitter 2 Appuyez sur les boutons MONTER DESCENDRE pour sélectionner Mise veille puis appuyez sur le bouton ENTER Autre méthode Appuyez sur le...

Страница 149: ... la télévision Lorsque vous réglez l heure vérifiez que l heure est exacte am ou pm Vous pouvez également régler l horloge en utilisant les boutons numériques de la télécommande 2 Appuyez sur les boutons MONTER DESCENDRE pour sélectionner Minuteur ON puis appuyez sur le bouton ENTER Appuyez plusieurs fois sur les boutons MONTER DESCENDRE pour sélectionner les Heure appropriée Appuyez sur les bouto...

Страница 150: ...heure d arrêt appuyez sur les boutons MONTER DESCENDRE pour sélectionner Minuterie OFF Appuyez sur le bouton ENTER et réglez l heure et les minutes Suivez la même procédure qu aux étapes 2 et 3 ci dessus 5 Une fois le réglage de la minuterie terminé appuyez sur le bouton EXIT pour quitter Coupure en cas d absence Si la télévision a été allumée par la fonction Minuteur et qu elle reste plus de troi...

Страница 151: ...er Langue Appuyez sur le bouton ENTER 1 Appuyez sur le bouton MENU pour afficher le menu Appuyez sur les boutons MONTER DESCENDRE pour sélectionner Configuration puis appuyez sur le bouton ENTER 3 Appuyez sur les boutons MONTER DESCENDRE pour sélectionner Langue English Français Español ou Português Appuyez sur le bouton EXIT pour quitter ...

Страница 152: ... modifier les restrictions de la fonction puce V Réglage de votre numéro d identification personnel NIP 1 Appuyez sur le bouton MENU pour afficher le menu Appuyez sur les boutons MONTER DESCENDRE pour sélectionner Configuration puis appuyez sur le bouton ENTER 2 Appuyez sur les boutons MONTER DESCENDRE pour sélectionner V Chip puis appuyez sur le bouton ENTER 3 L écran Entrez NIP apparaît Entrez v...

Страница 153: ...de changement de code NIP apparaît Choisissez un code NIP à quatre chiffres et entrez le Dès que vous avez saisi les 4 chiffres l écran Confirmer le nouveau code PIN s affiche Saisissez de nouveau les mêmes 4 chiffres Lorsque l écran de confirmation disparaît votre code PIN est mémorisé Appuyez sur le bouton EXIT pour quitter 4 Une fois que vous avez entré un code NIP valide l écran V Chip apparaî...

Страница 154: ...uyez sur le bouton ENTER 2 Appuyez sur les boutons MONTER DESCENDRE pour sélectionner V Chip puis appuyez sur le bouton ENTER 3 L écran Entrez NIP apparaît Entrez votre code NIP à quatre chiffres 4 L écran V Chip apparaît et Blocage V Chip est sélectionné Pour activer la fonction puce V appuyez sur le bouton MONTER DESCENDRE pour régler le Blocage V Chip sur On Appuyez sur le bouton ENTER Appuyez ...

Страница 155: ...à l aide de l une de ces deux méthodes Les guides TV ou la Classification MPAA 1 Appuyez sur le bouton MENU pour afficher le menu Appuyez sur les boutons MONTER DESCENDRE pour sélectionner Configuration puis appuyez sur le bouton ENTER Appuyez sur les boutons MONTER DESCENDRE pour sélectionner V Chip puis appuyez sur le bouton ENTER 2 L écran Entrez NIP apparaît Entrez votre code NIP à quatre chif...

Страница 156: ...lic averti 3 Appuyez sur les boutons MONTER DESCENDRE pour sélectionner Contrôle parental TV puis appuyez sur le bouton ENTER Remarque Ces catégories forment deux groupes séparés TV Y et TV Y7 jeunes enfants et enfants de 7 ans et plus et de TV G à TV Ma tous les autres Les restrictions pour ces deux groupes fonctionnent indépen dam ment Si un foyer comporte de très jeunes enfants ainsi que des je...

Страница 157: ...TV G TV PG TV 14 et TV MA Les évaluations secondaires D L S V fonctionnent de la même façon voir section suivante 6 Comment régler les évaluations secondaires FV D L S et V Tout d abord mettez l une de ces évaluations TV en surbrillance TV Y7 TV PG TV 14 ou TV MA Voir étape 4 à la page précédente Puis une fois que l évaluation TV est sélectionnée appuyez de façon répétée sur le bouton GAUCHE DROIT...

Страница 158: ...ptées à l aide des évaluations MPAA Quand le verrouillage V Chip est activé la télévision bloque automatiquement tout programme codé avec des évaluations restrictives évaluations MPAA ou TV 1 Appuyez sur le bouton MENU pour afficher le menu Appuyez sur les boutons MONTER DESCENDRE pour sélectionner Configuration puis appuyez sur le bouton ENTER Appuyez sur les boutons MONTER DESCENDRE pour sélecti...

Страница 159: ...emporairement le verrouillage par la fonction V Chip 4 Appuyez sur les boutons MONTER DESCENDRE pour sélectionner une catégorie MPAA spécifique quand une catégorie est sélectionnée sa couleur devient bleue G Tout public aucune restriction PG Accord parental souhaité PG 13 Parents vivement mis en garde R Restriction Les enfants de moins de 17ans doivent être accompag nés d un adulte NC 17 Aucun enf...

Страница 160: ...R DESCENDRE pour entrer une restriction appropriée Appuyez sur la touche ENTER pour activer la restriction sélectionnée Le B s affiche Appuyez sur le bouton EXIT quitter Le code NIP par défaut d un nouveau téléviseur est 0 0 0 0 E Les émissions exemptes de restrictions incluent nouvelles sports documentaires et autres émissions d information interview variétés vidéo clips et émissions de variétés ...

Страница 161: ...uis appuyez sur le bouton ENTER 5 Appuyez sur la touche MONTER DESCENDRE pour entrer une restriction appropriée Appuyez sur la touche ENTER pour activer la restriction sélectionnée Le B s affiche Appuyez sur le bouton EXIT quitter Le code NIP par défaut d un nouveau téléviseur est 0 0 0 0 E Les émissions exemptes de restrictions incluent nouvelles sports documentaires et autres émissions d informa...

Страница 162: ... des sous titres codés La plupart des cassettes vidéo pré enregistrées vendues dans le commerce comprennent également des sous titres Contrôlez si votre programme de télévision ou l emballage de la cassette affichent le symbole des sous titres codés 1 Appuyez sur le bouton MENU pour afficher le menu Appuyez sur les boutons MONTER DESCENDRE pour sélectionner Configuration puis appuyez sur le bouton...

Страница 163: ...on ENTER 6 Appuyez sur les boutons MONTER DESCENDRE pour sélectionner Chaîne puis appuyez sur le bouton ENTER Appuyez sur les boutons MONTER DESCENDRE pour sélectionner 1 2 puis appuyez sur le bouton ENTER 7 Appuyez sur les boutons MONTER DESCENDRE pour sélectionner Champ puis appuyez sur le bouton ENTER Appuyez sur les boutons MONTER DESCENDRE pour sélectionner 1 2 puis appuyez sur le bouton ENTE...

Страница 164: ...e qualité vous devez régler le mode Écran Bleu sur Off 1 Appuyez sur le bouton MENU pour afficher le menu Appuyez sur les boutons MONTER DESCENDRE pour sélectionner Configuration puis appuyez sur le bouton ENTER 2 Appuyez sur les boutons MONTER DESCENDRE pour sélectionner Écran Bleu puis appuyez sur le bouton ENTER 3 Appuyez sur les boutons MONTER DESCENDRE pour mettre Écran Bleu sur On Appuyez su...

Страница 165: ...Appuyez sur le bouton MENU pour afficher le menu Appuyez sur les boutons MONTER DESCENDRE pour sélectionner Configuration puis appuyez sur le bouton ENTER 3 Appuyez sur les boutons ENTER pour sélectionner On Appuyez sur le bouton EXIT pour quitter 2 Appuyez sur les boutons MONTER DESCENDRE pour sélectionner Mélodie puis appuyez sur le bouton ENTER ...

Страница 166: ...que la télévision est branchée Vérifiez les branchements de l antenne Il n y a pas de son ou le son est trop bas alors que le volume est réglé au maximum Dans un premier temps vérifiez le volume pour les éléments branchés sur votre téléviseur récepteur de diffusion numérique DTV DVD récepteur de diffusion par câble magnétoscope etc Puis réglez le volume du téléviseur en conséquence Vérifiez que l ...

Страница 167: ...ur vérifiez l alimentation le câble signal La télévision est en mode gestion d énergie Déplacez la souris de l ordinateur ou appuyez sur n importe quelle touche du clavier Il est possible que l image ne soit pas stable et qu elle donne l impression de vibrer lorsqu un ordinateur est connecté à l entrée PC Si le réglage est incorrect utilisez le programme utilitaire de votre ordinateur pour modifie...

Страница 168: ...xez le support de la télévision comme indiqué dans l image 3 Fixez fermement le support à l aide des quatre vis 1 Placez la télévision face posée sur un chiffon doux ou un coussin sur une table 2 Retirez les 4 vis à l arrière de la télévision 3 Vous pouvez ensuite séparer la base du télévision 4 Fermez l ouverture en utilisant un cache 2 3 2 3 4 ...

Страница 169: ... les vis à bois après avoir fixé les chevilles dans le support mural Remarque Si le support n est pas fermement fixé au mur la télévision LCD risque de tomber 2 Coupez le courant puis débranchez le cordon de la prise Placez la télévision face posée sur un chiffon doux ou un coussin sur une table Fixez le support de la télévision à l arrière de la télévision puis vissez les vis 3 Placez les 3 croch...

Страница 170: ...ans le cas d une utilisation dans un endroit public Le dispositif de verrouillage doit être acheté séparément L aspect et la méthode de verrouillage peuvent différer de l illustration en fonction du fabricant Reportez vous au manuel fourni avec le verrouillage Kensington pour une utilisation correcte 1 Insérez le dispositif de verrouillage dans la fente Kensington de la télévision LCD Figure 1 et ...

Страница 171: ...37W1 23 inches AC110V 120V 60 Hz 100 W 1360 x 768 60 Hz 3 W 3 W 583 0 x 90 0 x 443 0 mm 22 95 x 3 54 x 17 44 inches 583 0 x 206 0 x 484 7 mm 22 95 x 8 11 x 19 10 inches 8 6 kg 18 96 lbs 10 C à 40 C 50 F à 104 F 10 à 80 sans condensation 20 C à 45 C 4 F à 113 F 5 à 95 sans condensation LN R238WA LN R238WXC 23 inches AC110V 120V 60 Hz 100 W 1280 x 720 60 Hz 3 W 3 W 583 0 x 90 0 x 443 0 mm 22 95 x 3 ...

Страница 172: ...le téléviseur fonctionne anormalement si un format vidéo non standard est sélectionné Le mode DVI ne prend pas en charge la fonction PC IBM 640 X 480 31 469 59 940 25 175 720 X 400 31 469 70 087 28 322 VESA 640 X 480 37 861 72 809 31 500 640 X 480 37 500 75 000 31 500 800 X 600 37 879 60 317 40 000 800 X 600 48 077 72 188 50 000 800 X 600 46 875 75 000 49 500 1024 X 768 48 364 60 000 65 000 1024 X...

Страница 173: ...ipo lea este manual para evitar fallas y guarde para futuras referencias Manual de instrucciones Gane premios cuando registre su producto en www samsung com global register TELEVISOR TFT LCD LN R237W1 LN R238WA LN R238WXC ...

Страница 174: ...la pantalla permanecen fijos un tiempo prolongado la intensidad de los haces de luz seguirá siendo variada y de este modo los bordes pueden dejar rastros TV compatible con Digital Cuando se selecciona la pantalla ancha 16 9 para mirar una difusión digital de grado SD y la salida del decodificador digital es 1080i TV compatible con Digital Cuando el televisor recibe señales de grado HD y la salida ...

Страница 175: ...ordes izquierdo derecho y central de la pantalla permanecen fijos un tiempo prolongado la intensidad de los haces de luz seguirá siendo variada y de este modo los bordes pueden dejar rastros Cuando se visualiza un DVD CD o un video en formato de pantalla ancha 21 9 en televisores de pantalla ancha 16 9 Al conectar un equipo informático o una consola de juegos con el televisor y seleccionar el modo...

Страница 176: ...DVD o un Decodificador digital mediante DVI 16 Conexión a un DVD receptor de TV digital a través de un HDMI 17 Conexión a un PC 18 Capítulo 3 Funcionamiento Encendido o apagado del TV 19 Cambio de canales 19 Mediante los botones de canal 19 Utilización de los botones numéricos 19 Utilización del botón PRE CH para seleccionar el canal anterior 19 Ajuste del volumen 20 Mediante Silencio 20 Visualiza...

Страница 177: ...a 54 Inicio de la configuración de Posición de la pantalla o del Color 55 Capítulo 8 Ajuste de la hora Configuración del Reloj 56 Configuración del Temporizador de sueño 57 Activación y desactivación del temporizador 58 Capítulo 9 Descripción de las funciones Selección del idioma de menú 60 Uso de V Chip 61 Ajuste del número de identificación personal código PIN 61 Cómo activar desactivar V Chip 6...

Страница 178: ...timo Sensor de Brillo Ajusta automáticamente la luminosidad de la pantalla dependiendo de la luminosidad ambiental SRS TruSurround XT SRS TruSurround XT proporciona un sistema surround Dolby virtual Adecuación El televisor utiliza el sistema HDMI para desarrollar un sonido digital y una calidad de imagen perfectos El sistema Anynet permite controlar de forma sencilla los dispositivos de audio y ví...

Страница 179: ...umentar o reducir el volumen En el menú de la pantalla utilice los botones VOL del mismo modo que los botones o del mando a distancia CH Pulse para cambiar de canal En el menú de la pantalla utilice estos botones CH del mismo modo que los botones o del mando a distancia ENCENDIDO Pulse para encender o apagar el TV INDICADOR DE ALIMENTACIÓN Parpadea y se apaga cuando se enciende el aparato y se ilu...

Страница 180: ... AUDIO L Conéctela a la toma HDMI de un dispositivo que tenga salida HDMI Use el terminal HDMI DVI para conectar el DVI a un dispositivo externo Debe usar el cable de DVI a HDMI o el adaptador de DVI HDMI para la conexión y el terminal R AUDIO L de DVI IN para la salida de sonido El terminal HDMI DVI IN no es compatible con el PC AUDIO OUT Conéctelo a la toma de la entrada de audio del amplificado...

Страница 181: ...Muestra el menú de pantalla principal Consulte la página 21 CAPTION Controla el decodificador de subtítulos Consulte la página 71 PIP Imagen sobre imagen Encendido Apagado Consulte la página 40 SLEEP Pulse para seleccionar una hora en la cual se apagará el TV automáticamente Consulte la página 57 PRE CH Sintoniza el canal anterior Consulte la página 19 CH y CH Subir Bajar Canal Pulse CH o CH para ...

Страница 182: ...antalla muestra la imagen mejorada del DNIe La parte izquierda de la pantalla muestra la imagen original Consulte la página 35 Funciones del vídeo DVD sólo el modo Anynet Rebobinar Detener Reproducir Pausa Avance rápido SRS Selecciona el modo TruSurround XT Consulte la página 45 P MODE Ajusta la imagen del TV al seleccionar uno de los valores predeterminados en fábrica O selecciona sus valores de ...

Страница 183: ... Con un uso normal del TV las pilas duran alrededor de un año 2 Coloque dos pilas de tamaño AAA Compruebe que los extremos y de las pilas concuerdan con el diagrama del interior del compartimiento 1 Haga deslizar totalmente la tapa El mando a distancia no funciona Compruebe lo siguiente 1 Está encendido el TV 2 Están invertidos los polos positivo y negativo de la batería 3 Se han agotado las bater...

Страница 184: ...s antenas consulte Antenas de VHF y UHF independientes en la página 8 Antenas de par de cables planos de 300 ohmios Si utiliza una antena externa de techo o de orejas de conejo de par de cables planos de 300 ohmios siga las indicaciones siguientes 1 Coloque los conductores del par de cables bajo los tornillos del adaptador de 300 75 ohmios no incluido Utilice un destornillador para apretar los tor...

Страница 185: ... la antena en la parte posterior del televisor Antenas de VHF y UHF independientes Si dispone de dos antenas independientes para el TV una de VHF y otra de UHF debe combinar ambas señales de la antena antes de conectarlas al TV Este procedimiento precisa un adaptador combinador especial disponible en la mayoría de tiendas de electrónica 1 Conecte ambos cables de antena al combinador Español 8 ANT ...

Страница 186: ...UT del decodificador Este terminal puede estar indicado como ANT OUT VHF OUT o OUT 2 Conecte el otro extremo del cable en el terminal ANT IN de la parte posterior del TV Conexión a un decodificador de algunos canales Si su decodificador sólo decodifica algunos canales como los canales de pago siga las instrucciones siguientes Necesitará un divisor de dos vías un conmutador de RF A B y cuatro largo...

Страница 187: ...el conmutador A B en la posición B para ver los canales codificados Cuando sitúe el conmutador A B en B deberá sintonizar el TV al canal de salida del decodificador que normalmente es el canal 3 o 4 Español 10 CONEXIONES 2 Conecte este cable al divisor de dos vías 3 Conecte el cable RF entre un terminal OUTPUT salida del divisor y el terminal IN entrada del decodificador cable entrante Divisor cab...

Страница 188: ... un sistema de cable sáltese el paso 1 1 Desconecte el cable o la antena de la parte posterior del TV 2 Conecte el cable o la antena en el terminal ANT IN de la parte posterior del reproductor de vídeo 3 Conecte el cable RF entre el terminal ANT OUT salida de antena del reproductor de vídeo y el terminal ANT IN del televisor Panel posterior del VCR Panel posterior del TV Cable RF Opcional Panel po...

Страница 189: ...ada dispositivo de fuente de entrada externa requiere una configuración distinta en el panel posterior Cuando conecte un dispositivo externo debe hacer coincidir los colores del terminal de conexión y del cable Si tiene un reproductor de vídeo mono sin estéreo use el conector Y no suministrado para conectar los conectores de entrada de audio izquierdo o derecho del TV Panel posterior del TV Cable ...

Страница 190: ...partado anterior para conectar la antena o el sistema de cable al reproductor de VCR y al TV Conexión de un reproductor de vídeo S VHS Este televisor Samsung se puede conectar a una señal S Video procedente de un reproductor de vídeo S VHS Esta conexión ofrece mejor calidad de imagen con relación a un reproductor de vídeo VHS normal 2 Conecte un juego de cables de audio entre los conectores AUDIO ...

Страница 191: ... los colores del terminal de conexión y del cable Conexión de un reproductor de DVD Los conectores del panel posterior del TV facilitan la conexión de un reproductor de DVD al TV 1 Conecte un cable de audio entre las tomas COMPONENT IN 1 o COMPONENT IN 2 R AUDIO L del televisor y las tomas AUDIO OUT del reproductor de DVD 2 Conecte un cable de componente entre las tomas COMPONENT IN 1 o COMPONENT ...

Страница 192: ... TV digital normal se muestran a continuación 1 Conecte un cable de audio entre las tomas COMPONENT IN 1 o COMPONENT IN 2 R AUDIO L del televisor y las tomas AUDIO OUT del receptor de televisión digital 2 Conecte un cable de componente entre las tomas COMPONENT IN 1 o COMPONENT IN 2 Y PB PR del televisor y las tomas COMPONENT Y PB PR del receptor de televisión digital Cable de Audio Opcional Cable...

Страница 193: ...ón digital Conexión de un DVD o un Decodificador digital mediante DVI Sólo es aplicable si hay un conector de salida de DVI en el dispositivo externo Cable DVI a HDMI Opcional Cable DVI a HDMI Opcional Panel posterior del TV Cable de Audio Opcional Panel posterior del TV Panel posterior del reproductor de DVD Panel posterior del reproductor de DVD Cada dispositivo de fuente de entrada externa requ...

Страница 194: ...ón de HDMI a HDMI Qué es HDMI HDMI o interfaz multimedia de alta definición es una interfaz de la siguiente generación que permite la transmisión de señales digitales de audio y de vídeo mediante un cable simple sin compresión La denominación interfaz multimedia es la más adecuada especialmente porque permite varios canales de sonido digital La diferencia entre los dispositivos HDMI y DVI es que e...

Страница 195: ...da de PC del ordenador Conexión a un PC Cable de vídeo de PC Opcional Panel posterior del TV 2 Conecte un cable de audio de PC entre PC IN AUDIO del televisor y la salida de audio de la tarjeta de sonido del ordenador Cable de audio de PC Opcional Cable de vídeo de PC Opcional Panel posterior del TV CONEXIONES ...

Страница 196: ...s páginas 24 25 para la memorización de los canales Utilización del botón PRE CH para seleccionar el canal anterior 1 Pulse el botón PRE CH El TV volverá al último canal visualizado Para conmutar rápidamente entre dos canales bastante distantes sintonice un canal y use los botones numéricos para seleccionar el segundo Después use el botón PRE CH para conmutar rápidamente entre ellos Si utiliza los...

Страница 197: ...olumen 1 Pulse el botón MUTE y el sonido se desconectará En la esquina inferior izquierda de la pantalla aparecerá la palabra 2 Para recuperar el sonido vuelva a pulsar MUTE o simplemente pulse los botones VOL y VOL Mediante Silencio Puede anular el sonido en cualquier momento pulsando el botón MUTE ...

Страница 198: ...ctual 1 Pulse el botón INFO del mando a distancia El TV visualizará el canal el tipo de sonido y el estado de determinados ajustes de sonido e imagen 1 Con el aparato encendido pulse el botón MENU En la pantalla aparece el menú principal En el lado izquierdo hay cinco iconos Entrada Imagen Sonido Canal Configuración Los menús en pantalla desaparecen transcurridos alrededor de dos minutos 2 Use los...

Страница 199: ...rece el mensaje Start Plug Play con el OK seleccionado 2 Seleccione el idioma correspondiente pulsando los botones ARRIBA ABAJO Pulse el botón ENTER para confirmar la selección 3 Aparece el mensaje Verif entrada de antena con el Aceptar seleccionado Pulse el botón ENTER FUNCIONAMIENTO 4 Pulse los botones ARRIBA ABAJO para seleccionar Aire STD HRC o IRC después pulse el botón ENTER Continúa ...

Страница 200: ...para desplazarse a la Hora Minuto o am pm Defina el valor de Hora Minuto o am pm pulsando los botones ARRIBA ABAJO Consulte Configuración del Reloj en la página 56 5 Pulse el botón ENTER para seleccionar Iniciar El televisor empezará a memorizar todos los canales disponibles Para detener la búsqueda antes de que finalice pulse el botón ENTER con Detener seleccionado ...

Страница 201: ...ibles debe indicar el tipo de origen de la señal conectada al TV es decir antena o sistema de cable 1 Pulse el botón MENU para visualizar el menú Pulse los botones ARRIBA ABAJO para seleccionar Canal y después pulse el botón ENTER 2 Pulse el botón ENTER Pulse varias veces el botón ARRIBA ABAJO para pasar por estas opciones Aire STD HRC o IRC todas las TV por cable después pulse el botón ENTER Puls...

Страница 202: ...cto Aire STD HRC o IRC Consulte los pasos 1 2 en la página anterior 2 Pulse los botones ARRIBA ABAJO para seleccionar Prog Auto Pulse el botón ENTER 1 Pulse el botón MENU para visualizar el menú Pulse los botones ARRIBA ABAJO para seleccionar Canal y después pulse el botón ENTER 4 Una vez memorizados todos los canales disponibles el menú Canal volverá a aparecer Pulse el botón EXIT para salir Alma...

Страница 203: ...uidos los borrados mediante los botones numéricos del mando a distancia 1 Pulse el botón MENU para visualizar el menú Pulse los botones ARRIBA ABAJO para seleccionar Canal y después pulse el botón ENTER Pulse los botones ARRIBA ABAJO para seleccionar Agregar Borrar Pulse el botón ENTER Pulse el botón CH o CH para seleccionar el canal que desee añadir o borrar Pulse el botón ENTER para seleccionar ...

Страница 204: ...sor Se usa para seleccionar la pantalla deseada 1 Pulse el botón MENU para visualizar el menú Pulse el botón ENTER para seleccionar Entrada 2 Pulse el botón ENTER Pulse los botones ARRIBA ABAJO para seleccionar Lista de Origen y después ENTER Método alternativo Pulse el botón SOURCE del mando a distancia para ver una fuente de señal externa ...

Страница 205: ...s botones ARRIBA ABAJO para seleccionar Editar Nombre y después pulse el botón ENTER 2 Pulse los botones ARRIBA ABAJO para seleccionar la toma de entrada AV1 AV2 S Video Componente1 Componente2 PC o HDMI y a continuación pulse el botón ENTER 3 Pulse los botones ARRIBA ABAJO para seleccionar la fuente de entrada Vídeo DVD D VHS Cable STB HD STB Satélite STB Receptor AV Receptor DVD Juego Filmadora ...

Страница 206: ...iguración estándar de fábrica Seleccione Cine cuando esté visualizando largometrajes Seleccione Favorito si desea ajustar la configuración según sus preferencias personales consulte la sección Personalización de imagen en la página 30 1 Pulse el botón MENU para visualizar el menú Pulse los botones ARRIBA ABAJO para seleccionar Imagen y después pulse el botón ENTER 2 Pulse el botón ENTER Método alt...

Страница 207: ...si selecciona Contraste pulse DERECHA para incrementarlo Pulse el botón EXIT para salir 3 Pulse el botón ARRIBA ABAJO para seleccionar un elemento concreto Contraste Luminosidad Definición Color o Tinte Después pulse el botón ENTER 1 Pulse el botón MENU para visualizar el menú Pulse los botones ARRIBA ABAJO para seleccionar Imagen y después pulse el botón ENTER Puede seleccionar la opción que dese...

Страница 208: ... Pulse los botones ARRIBA ABAJO para seleccionar Frío2 Frío1 Normal Tibio1 o Tibio2 Pulse el botón ENTER Pulse el botón EXIT para salir Puede elegir entre los distintos tonos de color Frío2 Frío1 Normal Tibio1 Tibio2 según sus preferencias personales Los parámetros ajustados se almacenan de acuerdo con el modo Imagen seleccionado La función Reiniciar afectará a cada modo de imagen Pulse los botone...

Страница 209: ...ical de la pantalla mediante los botones o después de seleccionar pulsando los botones o Si pulsa el botón se extiende hacia arriba si pulsa el botón se extiende hacia abajo 4 3 Establece la imagen en modo normal 4 3 Se trata del tamaño de pantalla de los televisores estándar Sólo se puede seleccionar el tamaño 4 3 cuando la fuente es PC Los modos de resolución de pantalla que se admiten pueden di...

Страница 210: ...l tamaño de la pantalla 1 Pulse el botón ARRIBA ABAJO para seleccionar Zoom 2 Seleccione pulsando los botones IZQUIERDA DERECHA Utilice el botón ARRIBA ABAJO para desplazar la imagen hacia arriba o abajo 3 Tras seleccionar utilice el botón ARRIBA ABAJO para ampliar o reducir el tamaño de la imagen en sentido vertical Zoom ...

Страница 211: ... para visualizar el menú Pulse los botones ARRIBA ABAJO para seleccionar Imagen y después pulse el botón ENTER 2 Pulse los botones ARRIBA ABAJO para seleccionar Digital NR y después pulse el botón ENTER 3 Pulse los botones ARRIBA ABAJO para seleccionar Apagado y después pulse el botón ENTER Pulse el botón EXIT para salir Congelación de la imagen 1 Pulse el botón STILL para congelar una imagen en m...

Страница 212: ...ones ARRIBA ABAJO para seleccionar Imagen y después pulse el botón ENTER Demo DNIe Apagado El modo Demo DNIe se desactiva Demo DNIe Encendido La parte derecha de la pantalla muestra la imagen mejorada del DNIe La parte izquierda de la pantalla muestra la imagen original El Demo DNIe se ha diseñado para mostrar la diferencia entre las imágenes habituales y DNIe De manera predeterminada el producto ...

Страница 213: ... pulse el botón ENTER Pulse el botón EXIT para salir Mi Ctrl de Color Mi Ctrl de Color permite que los usuarios ajusten los colores según sus preferencias ajustando Rosa Azul y Verde usando la configuración predefinida Azul Verde Rosa Normal y Favorito sin afectar a otros colores de la pantalla Control Fácil Esta función no se ejecuta si la fuente está en el modo PC o si el PIP está activado Las f...

Страница 214: ...l botón ENTER Pulse los botones IZQUIERDA DERECHA para aumentar o reducir el valor de una opción concreta Pulse el botón EXIT para salir 2 Pulse los botones ARRIBA ABAJO para seleccionar Ctrol Detalles y después pulse el botón ENTER Ctrol Detalles Esta función no se ejecuta si la fuente está en el modo PC o si el PIP está activado Se captura la pantalla y se congela la imagen para ajustar el color...

Страница 215: ...para visualizar el menú Pulse los botones ARRIBA ABAJO para seleccionar Imagen y después pulse el botón ENTER 2 Pulse los botones ARRIBA ABAJO para seleccionar Contraste Dinám y después pulse el botón ENTER 3 Pulse los botones ARRIBA ABAJO para seleccionar Apagado Pulse el botón EXIT para salir Esta función no se ejecuta si la fuente está en el modo PC o si el PIP está activado ...

Страница 216: ...ones ARRIBA ABAJO para seleccionar Imagen y después pulse el botón ENTER 2 Pulse los botones ARRIBA ABAJO para seleccionar Sensor de Brillo y después pulse el botón ENTER 3 Pulse los botones IZQUIERDA DERECHA para seleccionar Enc Pulse el botón EXIT para salir La luminosidad en la pantalla se ajusta automáticamente según la luminosidad ambiental Esta función no actúa cuando la fuente está en modo ...

Страница 217: ... PIP no se puede usar Activación de Imagen en imagen 1 Pulse el botón MENU para visualizar el menú Pulse los botones ARRIBA ABAJO para seleccionar Imagen y después pulse el botón ENTER Pulse los botones ARRIBA ABAJO para seleccionar PIP y después pulse el botón ENTER 2 Pulse el botón ENTER Pulse los botones ARRIBA ABAJO para seleccionar Encendido Pulse el botón ENTER Si mientras mira la televisión...

Страница 218: ...anal deseado en la ventana PIP Cambio del canal PIP 4 Pulse los botones ARRIBA ABAJO para seleccionar Cambio y después pulse el botón ENTER Método alternativo Pulse el botón SWAP bajo la tapa del mando a distancia Si la imagen principal está configurada en TV AV1 AV2 S Video Componente1 Componente2 sólo se puede seleccionar HDMI si la imagen principal está configurada en PC HDMI sólo se puede sele...

Страница 219: ...e seleccionar la opción PIP Puede notar que la imagen de la ventana PIP llega a ser ligeramente artificial cuando utiliza la pantalla principal para visualizar juegos o Karaoke Puede ajustar la posición de la imagen sólo usando el menú de tamaño Método alternativo Pulse el botón SIZE bajo la tapa del mando a distancia Método alternativo Pulse el botón POSITION bajo la tapa del mando a distancia Aj...

Страница 220: ...cionar los ajustes de sonido Normal Música Cine Diálogo o Favorito Pulse el botón EXIT para salir 1 Pulse el botón MENU para visualizar el menú Pulse los botones ARRIBA ABAJO para seleccionar Sonido y después pulse el botón ENTER Pulse el botón ENTER Elija Normal si desea usar los ajustes de fábrica Elija Música cuando mire vídeos musicales o conciertos Elija Cine cuando mire películas Elija Diálo...

Страница 221: ...ias personales También puede utilizar alguno de los ajustes automáticos Consulte la página siguiente 3 Pulse los botones IZQUIERDA DERECHA para seleccionar una frecuencia determinada que desea cambiar Pulse los botones ARRIBA ABAJO para aumentar o reducir el valor de una opción concreta Pulse el botón EXIT para salir Nota La configuración Favorito permite ajustar frecuencias según cada necesidad L...

Страница 222: ...e los botones ARRIBA ABAJO para seleccionar Sonido y después pulse el botón ENTER 3 Pulse los botones ARRIBA ABAJO para seleccionar Apagado Mono 3D o Estéreo pulse el botón ENTER Pulse el botón EXIT para salir TruSurround XT SRS y el símbolo son marcas comerciales de SRS Labs Inc La tecnología TruSurround XT está incorporada bajo licencia de SRS Labs Inc Método alternativo Pulse el botón SRS en el...

Страница 223: ...menú Pulse los botones ARRIBA ABAJO para seleccionar Sonido y después pulse el botón ENTER 3 Pulse los botones ARRIBA ABAJO para seleccionar Mono Estéreo y SAP pulse el botón ENTER Pulse el botón EXIT para salir Elija Mono para canales que emiten en monoaural o si tiene dificultades con la recepción de señales estereofónicas Elija Estéreo para canales que emiten en estéreo Elija SAP para escuchar ...

Страница 224: ...ionar Sonido y después pulse el botón ENTER 2 Pulse los botones ARRIBA ABAJO para seleccionar Vol Auto y después pulse el botón ENTER 3 Pulse los botones ARRIBA ABAJO para activar Auto Volumen Pulse el botón EXIT para salir Control automático de volumen Reduce las diferencias en el nivel de volumen entre las emisoras ...

Страница 225: ...O para seleccionar Silenc Int y después pulse el botón ENTER 3 Pulse los botones ARRIBA ABAJO para seleccionar Encendido y después pulse el botón ENTER Pulse el botón EXIT para salir Selección del silencio interno Se silencia la salida de sonido desde los altavoces del televisor Cuando Silenc Int está establecido en Encendido no se pueden ajustar los menús del sonido excepto MTS y Sel sonido ...

Страница 226: ...zar el menú Pulse los botones ARRIBA ABAJO para seleccionar Sonido y después pulse el botón ENTER 2 Pulse los botones ARRIBA ABAJO para seleccionar Sel sonido y después pulse el botón ENTER 3 Pulse los botones ARRIBA ABAJO para seleccionar Principal o Sub Seleccione Principal para oír el sonido principal del TV y seleccione Sub para oír el sonido de la ventana PIP Pulse el botón EXIT para salir ...

Страница 227: ...leccionar Sintonia Fina y después pulse el botón ENTER 3 Pulse los botones IZQUIERDA DERECHA para ajustar la sintonización fina 4 Para guardar el ajuste preciso en la memoria del TV pulse el botón ENTER Pulse el botón EXIT para salir Si no guarda en la memoria el canal ajustado con precisión los ajustes se perderán Los canales ajustados por el usuario que se han guardado están marcados con un aste...

Страница 228: ...ionario Samsung 1 Primero haga clic en Control Panel Panel de control en el menú Inicio de Windows 4 Seleccione la ficha Settings Configuración en el cuadro de diálogo La configuración de tamaño correcto resolución Óptimo LN R237W1 1360 x 768 pixels LN R238WA LN R238WXC 1280 x 720 pixels Si existe una opción de frecuencia vertical en el cuadro de diálogo de configuración de la pantalla el valor co...

Страница 229: ...y ajusta los valores y las posiciones de la frecuencia Pulse el botón PC del mando a distancia para seleccionar el modo PC 1 Pulse el botón MENU para visualizar el menú Pulse los botones ARRIBA ABAJO para seleccionar Configuración y después pulse el botón ENTER Pulse los botones ARRIBA ABAJO para seleccionar PC y después pulse el botón ENTER 2 Pulse los botones ARRIBA ABAJO para seleccionar Ajuste...

Страница 230: ...n PC del mando a distancia para seleccionar el modo PC 2 Pulse el botón ENTER para seleccionar Fijar la Imagen 1 Pulse el botón MENU para visualizar el menú Pulse los botones ARRIBA ABAJO para seleccionar Configuración y después pulse el botón ENTER Pulse los botones ARRIBA ABAJO para seleccionar PC y después pulse el botón ENTER 3 Pulse los botones ARRIBA ABAJO para seleccionar Grueso o Fino y de...

Страница 231: ...pulse el botón ENTER Pulse los botones ARRIBA ABAJO para seleccionar Posición y después pulse el botón ENTER 1 Pulse el botón MENU para visualizar el menú Pulse los botones ARRIBA ABAJO para seleccionar Configuración y después pulse el botón ENTER 3 Pulse los botones ARRIBA ABAJO para ajustar Posición V Pulse los botones IZQUIERDA DERECHA para ajustar Posición H Pulse el botón EXIT para salir ...

Страница 232: ...do PC 2 Pulse los botones ARRIBA ABAJO para seleccionar Reiniciar Imagen y después pulse el botón ENTER Pulse el botón EXIT para salir 1 Pulse el botón MENU para visualizar el menú Pulse los botones ARRIBA ABAJO para seleccionar Configuración y después pulse el botón ENTER Pulse los botones ARRIBA ABAJO para seleccionar PC y después pulse el botón ENTER ...

Страница 233: ...ulse repetidamente los botones ARRIBA ABAJO hasta que aparezca el minuto correcto Minuto Pulse los botones IZQUIERDA DERECHA para seleccionar am pm y ajuste con los botones ARRIBA ABAJO Pulse el botón EXIT para salir 2 Pulse el botón ENTER para seleccionar Tiempo y a continuación pulse el botón ENTER para seleccionar Config Reloj También puede establecer la hora usando los botones numéricos del ma...

Страница 234: ...nar Configuración y después pulse el botón ENTER Pulse los botones ARRIBA ABAJO para seleccionar Tiempo y después pulse el botón ENTER 3 Pulse los botones ARRIBA ABAJO en varias ocasiones hasta que aparezca la hora correcta Pulse el botón EXIT para salir 2 Pulse los botones ARRIBA ABAJO para seleccionar Temporizador y después pulse el botón ENTER Método alternativo Pulse el botón SLEEP en el mando...

Страница 235: ...onfigurar la hora compruebe que a la derecha aparezca correctamente la hora del día am o pm También puede establecer la hora usando los botones numéricos del mando a distancia 2 Pulse los botones ARRIBA ABAJO para seleccionar Temp enc y después pulse el botón ENTER Pulse los botones ARRIBA ABAJO para seleccionar la Hora adecuada Pulse los botones IZQUIERDA DERECHA para seleccionar Minuto Pulse los...

Страница 236: ...ajustar la hora de Temp apag pulse los botones ARRIBA ABAJO para seleccionar Temp apag Pulse el botón ENTER y establezca las horas y los minutos Siga el mismo procedimiento que en los pasos 2 a 3 anteriores 5 Cuando termine de ajustar el temporizador pulse el botón EXIT para salir Apagado automático Cuando se activa el temporizador su televisión se apagará si no se utiliza ningún control durante 3...

Страница 237: ... ABAJO para seleccionar Idioma Pulse el botón ENTER 1 Pulse el botón MENU para visualizar el menú Pulse los botones ARRIBA ABAJO para seleccionar Configuración y después pulse el botón ENTER 3 Pulse los botones ARRIBA ABAJO para seleccionar English Français Español o Português Pulse el botón EXIT para salir ...

Страница 238: ...ambiar las restricciones de V Chip Ajuste del número de identificación personal código PIN 1 Pulse el botón MENU para visualizar el menú Pulse los botones ARRIBA ABAJO para seleccionar Configuración y después pulse el botón ENTER 2 Pulse los botones ARRIBA ABAJO para seleccionar V Chip y después pulse el botón ENTER 3 Aparecerá la pantalla Ingresar Código Escriba un número PIN de cuatro dígitos El...

Страница 239: ...recerá la pantalla Cambiar código Elija 4 dígitos para el código PIN y escríbalos Cuando haya introducido los 4 dígitos aparecerá la pantalla Confirmar Nuevo Código Vuelva a introducir los 4 dígitos Cuando desaparezca la pantalla de confirmación su código quedará memorizado Pulse el botón EXIT para salir 4 Después de escribir el número de código PIN válido aparecerá la pantalla V Chip Pulse el bot...

Страница 240: ... pulse el botón ENTER 2 Pulse los botones ARRIBA ABAJO para seleccionar V Chip y después pulse el botón ENTER 3 Aparecerá la pantalla Ingresar Código Escriba un número PIN de cuatro dígitos 4 Aparecerá la pantalla V Chip y se seleccionará Bloqueo V Chip Para activar la función V Chip pulse el botón ARRIBA ABAJO para que Bloqueo V Chip se ajuste en Encendido Pulse el botón ENTER Pulse el botón EXIT...

Страница 241: ... pueden establecer mediante dos métodos Las guía de programas o la clasificación MPAA 1 Pulse el botón MENU para visualizar el menú Pulse los botones ARRIBA ABAJO para seleccionar Configuración y después pulse el botón ENTER Pulse los botones ARRIBA ABAJO para seleccionar V Chip y después pulse el botón ENTER 2 Aparecerá la pantalla Ingresar Código Escriba un número PIN de cuatro dígitos El número...

Страница 242: ...e 14 años TV MA Para adultos 3 Pulse los botones ARRIBA ABAJO para seleccionar Guías pater TV y después pulse el botón ENTER Nota Estas categorías constan de dos grupos separados TV Y y TV Y7 niños hasta los 7 años y desde TV G a TV MA todos los demás Las restricciones para estos dos grupos funcionan de manera independiente Si en la familia hay niños muy pequeños y adolescentes las guías de televi...

Страница 243: ... TV G TV PG TV 14 y TV MA Las subclasificaciones D L S V funcionan de manera similar Consulte la sección siguiente 6 Cómo establecer las subclasificaciones FV D L S y V Primero seleccione una de estas clasificaciones de TV TV Y7 TV PG TV 14 o TV MA consulte el Paso 4 en la página anterior Después mientras se selecciona la clasificación pulse varias veces el botón IZQUIERDA DERECHA Esto hará que se...

Страница 244: ...queo de V Chip está activado el televisor bloqueará automáticamente programas que estén codificados con clasificaciones rechazables de la MPAA o de televisión 1 Pulse el botón MENU para visualizar el menú Pulse los botones ARRIBA ABAJO para seleccionar Configuración y después pulse el botón ENTER Pulse los botones ARRIBA ABAJO para seleccionar V Chip y después pulse el botón ENTER 2 Aparecerá la p...

Страница 245: ... Chip 4 Pulse varias veces los botones ARRIBA ABAJO para seleccionar una categoría MPAA concreta Cuando se selecciona una categoría su color cambia al amarillo G Todos los públicos sin restricciones PG Se sugiere la compañía de un adulto PG 13 Menores acompañados de un adulto R Restringido Los niños menores de 17 años deben estar acompañados por un adulto NC 17 Prohibida la entrada a menores de 17...

Страница 246: ...a seleccionar la restricción apropiada Pulse el botón ENTER para activar la restricción seleccionada Está resaltada la B Pulse el botón EXIT para salir El número PIN predeterminado para un TV nuevo es 0 0 0 0 E La programación de exención incluye noticias deportes documentales y la programación de otra información programas de entrevistas y programas de variedades C Programación para niños menores...

Страница 247: ...el botón ENTER 5 Pulse los botones ARRIBA ABAJO para seleccionar la restricción apropiada Pulse el botón ENTER para activar la restricción seleccionada Está resaltada la B Pulse el botón EXIT para salir El número PIN predeterminado para un TV nuevo es 0 0 0 0 E La programación de exención incluye noticias deportes documentales y la programación de otra información programas de entrevistas y progra...

Страница 248: ...vídeo domésticas también ofrecen subtítulos La mayoría de DVD y cintas de vídeo comerciales también ofrecen subtítulos Compruebe el símbolo de los subtítulos del programa de televisión y en el empaque de la cinta 1 Pulse el botón MENU para visualizar el menú Pulse los botones ARRIBA ABAJO para seleccionar Configuración y después pulse el botón ENTER 2 Pulse los botones ARRIBA ABAJO para selecciona...

Страница 249: ...ués pulse el botón ENTER 6 Pulse los botones ARRIBA ABAJO para seleccionar Canal y después pulse el botón ENTER Pulse los botones ARRIBA ABAJO para seleccionar 1 o 2 y después pulse el botón ENTER 7 Pulse los botones ARRIBA ABAJO para seleccionar Campo y después pulse el botón ENTER Pulse los botones ARRIBA ABAJO para seleccionar 1 o 2 y después pulse el botón ENTER Pulse el botón EXIT para salir ...

Страница 250: ...visualizando la imagen deficiente debe ajustar el modo Pantalla Azul en Apagado 1 Pulse el botón MENU para visualizar el menú Pulse los botones ARRIBA ABAJO para seleccionar Configuración y después pulse el botón ENTER 2 Pulse los botones ARRIBA ABAJO para seleccionar Pantalla Azul y después pulse el botón ENTER 3 Pulse los botones ARRIBA ABAJO para establecer Pantalla Azul en Encendido Pulse el b...

Страница 251: ...paga 1 Pulse el botón MENU para visualizar el menú Pulse los botones ARRIBA ABAJO para seleccionar Configuración y después pulse el botón ENTER 3 Pulse los botones ARRIBA ABAJO para seleccionar Encendido Pulse el botón EXIT para salir 2 Pulse los botones ARRIBA ABAJO para seleccionar Melodía y después pulse el botón ENTER ...

Страница 252: ...o sonido Intente sintonizar otro canal Pulse el botón SOURCE Compruebe que el TV esté conectado Compruebe las conexiones de la antena No se percibe ningún sonido o muy bajo con el volumen al máximo Primero compruebe el volumen de los aparatos conectados al TV por ejemplo un receptor digital DTV DVD receptor de cable VCR etc A continuación ajuste el volumen del TV según sea más conveniente Comprueb...

Страница 253: ...luminoso de alimentación parpadea constantemente Compruebe lo siguiente en el equipo Alimentación Cable de señal El TV utiliza su sistema de gestión de energía Mueva el ratón del equipo o pulse una tecla del teclado La imagen no es estable y parece vibrar cuando se conecta el ordenador en la entrada de PC Si el ajuste no es correcto use la utilidad del ordenador para cambiar los ajustes de pantall...

Страница 254: ...na mesa 2 Acople el aparato de TV a la base según se muestra en la figura 3 Utilice los cuatro tornillos para fijar el soporte 1 Coloque hacia abajo el TV sobre un paño suave o un almohadón sobre una mesa 2 Desmonte los 4 tornillos de la parte posterior del TV 3 Separe el soporte del TV 4 Cubra con una tapa el orificio inferior 2 3 2 3 4 ...

Страница 255: ...e madera después de acoplar los anclajes en el soporte de pared Nota Si el soporte no está firmemente fijado en la pared el TV LCD puede caerse 2 Desconecte la alimentación y el cordón eléctrico de la toma de corriente Coloque hacia abajo el TV sobre un paño suave o un almohadón sobre una mesa Acople el soporte del aparato sobre la parte posterior del televisor y apriete los tornillos 3 Inserte lo...

Страница 256: ... usa en un lugar público El dispositivo de bloqueo debe adquirirse por separado La apariencia y el método de bloqueo pueden diferir de la ilustración según los fabricantes Consulte el manual proporcionado con el bloqueo Kensington para usarlo correctamente 1 Inserte el dispositivo de bloqueo en la ranura Kensington del TV LCD Figura 1 y gírelo en el sentido del bloqueo Figura 2 2 Conecte el cable ...

Страница 257: ...W 3 W 583 0 x 90 0 x 443 0 mm 22 95 x 3 54 x 17 44 pulg 583 0 x 206 0 x 484 7 mm 22 95 x 8 11 x 19 10 pulg 8 6 kg 18 96 lbs Entre 10 C y 40 C 50 F a 104 F Del 10 al 80 sin condensación Entre 20 C y 45 C 4 F a 113 F Del 5 al 95 sin condensación LN R238WA LN R238WXC 23 pulg CA110V 120V 60 Hz 100 W 1280 x 720 60 Hz 3 W 3 W 583 0 x 90 0 x 443 0 mm 22 95 x 3 54 x 17 44 pulg 583 0 x 206 0 x 484 7 mm 22 ...

Страница 258: ... entrelazado El aparato puede funcionar incorrectamente si se selecciona un formato de vídeo que no sea estándar El DVI no es compatible con la función PC IBM 640 X 480 31 469 59 940 25 175 720 X 400 31 469 70 087 28 322 VESA 640 X 480 37 861 72 809 31 500 640 X 480 37 500 75 000 31 500 800 X 600 37 879 60 317 40 000 800 X 600 48 077 72 188 50 000 800 X 600 46 875 75 000 49 500 1024 X 768 48 364 6...

Отзывы: