Samsung LN-R1550P Скачать руководство пользователя страница 53

Español-15

Instalación del software en el equipo (según Windows XP)

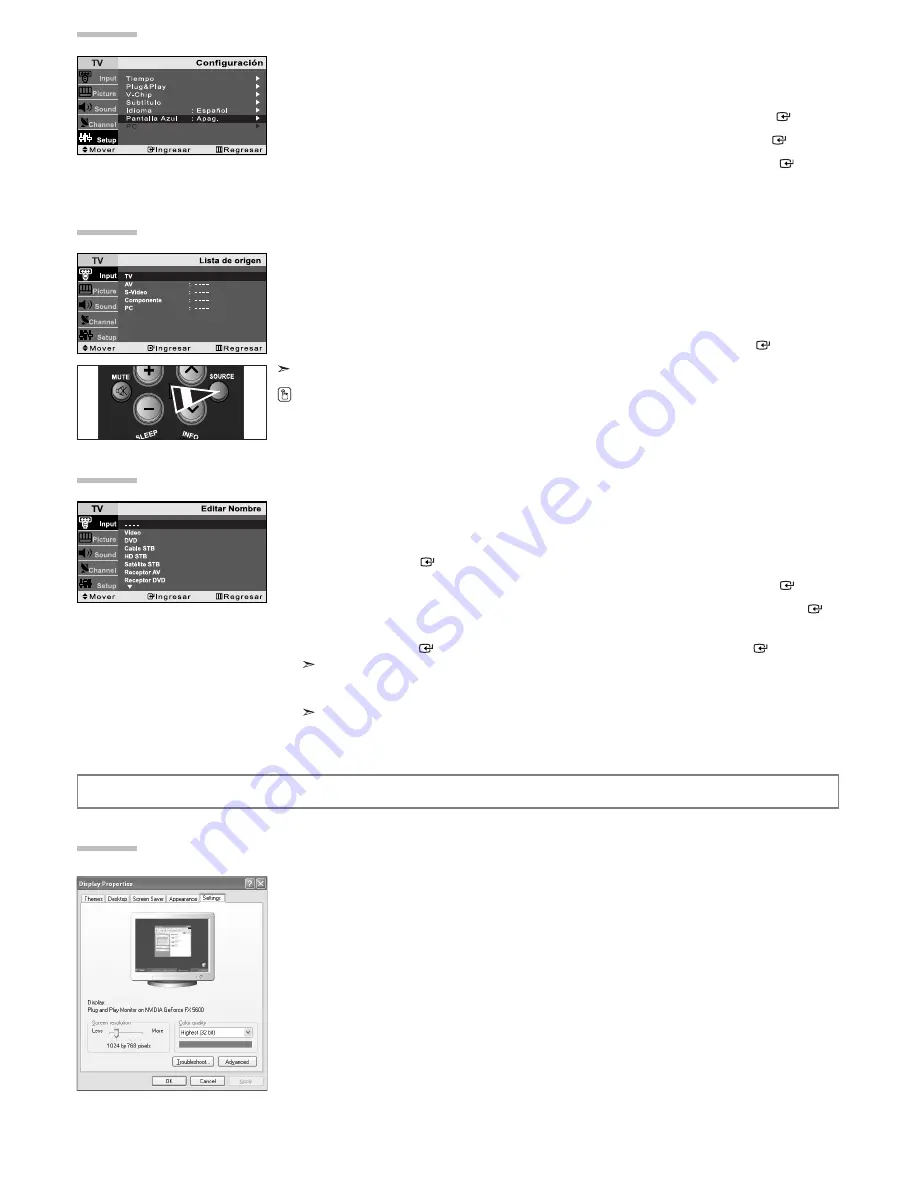
A continuación se muestra la configuración de visualización de Windows para un ordenador típico.
Probablemente la pantalla real de su PC sea distinta; dependerá de la versión concreta de Windows y de la 
tarjeta de vídeo que tenga. Pero aunque las pantallas reales tengan un aspecto diferente, se aplicarán los mis-
mos ajustes básicos y la misma información en la mayoría de los casos. 
(En caso contrario, póngase en contacto con el fabricante del ordenador o con el distribuidor de Samsung.)

1.

Primero, haga clic en “Control Panel (Panel de control)” en el menú Inicio de Windows.

2.

Cuando aparezca la pantalla del Panel de control, haga clic en 
“Appearance and Themes (Apariencia y Temas)” y aparecerá un cuadro de diálogo.

3.

Cuando aparezca la pantalla del Panel de control, haga clic en “Dispiay (Pantalla)” y aparecerá un
cuadro de diálogo.

4.

Seleccione la ficha “Settings (Configuración)” en el cuadro de diálogo.
La configuración de tamaño correcto (resolución): 
óptimo- LN-R1550P: 1024 x 768 / LN-R2050P: 800 x 600

Si existe una opción de frecuencia vertical en el cuadro de diálogo de configuración de la pantalla, 
el valor correcto es “60” o “60 Hz”. Si no, haga clic en “OK (Aceptar)” y salga del cuadro de diálogo.

PANTALLA DE PC

Para seleccionar la fuente

Puede elegir entre varias fuentes externas conectadas a los conectores de entrada del televisor.

1.

Pulse el botón 

MENU 

para visualizar el menú.

Pulse el botón 

para seleccionar “Entrada”.

2.

Pulse el botón 

para seleccionar “Lista de origen”.

3.

Pulse el botón 

para seleccionar origen entrada, en seguida y, después 

ENTER

.

Sólo puede seleccionar una fuente si está conectada al TV.

Edición del nombre de la fuente de entrada

Puede dar un nombre al dispositivo conectado en las tomas de entrada; de esta manera será más fácil seleccionar el
dispositivo de entrada.

1.

Pulse el botón 

MENU 

para visualizar el menú.

Pulse el botón 

ENTER

.

2.

Pulse el botón 

para seleccionar “Editar Nombre” y, después, pulse el botón 

ENTER

.

3.

Pulse el botón 

para seleccionar el dispositivo de entrada deseado y pulse el botón 

ENTER

.

4.

Pulse el botón 

para seleccionar el dispositivo de entrada deseado y 

pulse el botón 

ENTER

. Después de seleccionado el origen, pulse el botón 

ENTER

.

Las opciones disponibles son las siguientes.

- - - - -  Vídeo - DVD - Cable STB - HD STB - Satélite STB - Receptor AV - Receptor DVD

Juego - Filmadora - DVD combo - DHR - PC

DHR: Receptor DVD HDD

5.

Pulse el botón 

EXIT 

para salir.

Pulse el botón 

SOURCE 

del mando a distancia para ver una fuente de señal externa.

Ajuste del modo pantalla azul

Si no se recibe ninguna señal o la señal es muy débil, una pantalla azul sustituirá automáticamente el fondo ruidoso de
la imagen. Si desea continuar visualizando la imagen deficiente, debe ajustar el modo “Pantalla Azul” en “Apagado”.

1.

Pulse el botón 

MENU 

para visualizar el menú.

Pulse el botón 

para seleccionar “Configuración” y, después, pulse el botón 

ENTER

.

2.

Pulse el botón 

para seleccionar “Pantalla Azul” y, después, pulse el botón 

ENTER

.

3.

Pulse el botón 

para seleccionar “Enc.” u “Apag.” y, después, pulse el botón 

ENTER

.

4.

Pulse el botón 

EXIT 

para salir.

Содержание LN-R1550P

Страница 1: ...ce Consommateurs Samsung Contacte con SAMSUNG WORLD WIDE Si tiene alguna pregunta o comentario referente a nuestros productos por favor contacte con nuestro Servicio de Atenci n al Cliente Country CAN...

Страница 2: ...s traces de bordures gauche droite et au centre de l cran cause de la diff rence d mission de lumi re sur l cran La lecture d un DVD ou l utilisation d une console de jeu peut avoir un effet similaire...

Страница 3: ...urce 7 Storing Channels Automatically 8 Storing Channels Manually 8 Fine Tuning Channels 8 PICTURE CONTROL Using Automatic Picture Settings 9 Customizing the Picture 9 Adjusting the Color Tone 9 SOUND...

Страница 4: ...nstructions How to Adjust the Stand 1 2 1 Place the front of the TV onto a soft cloth or cushion on a table as in Figure 1 Align the TV bottom along the table edge 2 Press on the center of the TV back...

Страница 5: ...Timer on or off The buttons on the lower right panel control your TV s basic features including the on screen menu To use the more advanced features you must use the remote control The product color a...

Страница 6: ...that power on the unit is turned off When connecting an external device match the color of the connection terminal to the cable LN R1550P LN R2050P Use the rear panel jacks to connect an A V component...

Страница 7: ...ess 2 and 1 Press to increase or decrease the volume Press to temporarily cut off the sound Press to select a time for the TV to turn off automatically Displays the main on screen menu Use to select o...

Страница 8: ...channels When you press the CH or CH button the TV changes channels in sequence You will see all the channels that the TV has memorized The TV must have memorized at least three channels You will not...

Страница 9: ...change or reset the settings Language Select your language Air Cable Select your local cable company TV system Auto Program Selects between terrestrial antenna connection or your local cable company...

Страница 10: ...o select Channel then press the ENTER button 3 Press the or button to select Fine Tune then press the ENTER button 4 Press the or button to adjust the fine tuning 5 To store the fine tuning setting in...

Страница 11: ...s several settings which allow you to control picture quality 1 Press the MENU button to display the menu Press the or button to select Picture then press the ENTER button 2 Press the or button to sel...

Страница 12: ...signal conditions and it is inconvenient to adjust the volume every time the channel is changed Auto Volume automatically adjusts the volume of the desired channel by lowering the sound output when t...

Страница 13: ...ess the EXIT button to exit The TV automatically turn off when the timer reaches 0 You can also press the SLEEP button on the remote control to set the sleep time You can set the On Off timers so that...

Страница 14: ...previous section Parental restrictions can be set up using either of two methods The TV guidelines or the MPAA rating 1 Press the MENU button to display the menu Press the or button to select Setup t...

Страница 15: ...s the ENTER button to select U or B Press the EXIT button to save the settings and to clear all screens The V Chip will automatically block any category that is more restrictive For example if you blo...

Страница 16: ...select Caption then press the ENTER button 3 Press the ENTER button to select Caption 4 Press the or button to set caption Off or On then press the ENTER button 5 Depending on the particular broadcast...

Страница 17: ...ource List 3 Press the or button to select the Input source then press ENTER button You can only select a source if it is connected to your TV Editing the Input Source Name You can name the input devi...

Страница 18: ...utton to select Setup then press the ENTER button 3 Press the or button to select PC then press the ENTER button 4 Press the or button to select Position then press the ENTER button 5 Press the or but...

Страница 19: ...is plugged in Check the antenna connections First check the volume of units connected to your TV Digital broadcasting receiver DTV DVD cable broadcasting receiver VCR etc Then adjust the TV volume ac...

Страница 20: ...00 60 Hz AC 110 V 120 V 50 60 Hz 55 W 3 W 23 89 x 3 70 x 17 16 inches 607 0 x 94 0 x 436 0 mm 23 89 x 8 46 x 18 26 inches 607 0 x 215 0 x 464 0 mm 17 19 lbs 7 8 kg 50 F to 104 F 10 C to 40 C 10 to 80...

Страница 21: ...es 8 Mise en m moire manuelle des cha nes 8 Syntonisation fine des canal 8 CONTROLE DE L IMAGE Utilisation des param tres automatiques d image 9 Personnalisation de l image 9 R glage des tons des coul...

Страница 22: ...tilisation R glage du socle 1 2 1 Placez la partie avant du t l viseur sur une table en posant l cran sur un chiffon doux ou un coussin comme illustr la figure 1 Alignez le bas du t l viseur le long d...

Страница 23: ...nt d utiliser les fonctions de base de votre t l vision y compris le menu l cran OSD Pour utiliser les fonctions plus avanc es vous devez utiliser la t l com mande La couleur et la forme de l appareil...

Страница 24: ...que vous branchez un p riph rique externe faites correspondre les couleurs de la borne et du c ble LN R1550P LN R2050P Utilisez les prises du panneau arri re pour connecter un composant A V tel qu un...

Страница 25: ...r ce bouton pour augmenter ou baisser le volume Appuyez sur le bouton pour couper temporairement le son Appuyez pour s lectionner l heure laquelle la t l vision va automatiquement s arr ter Pour affic...

Страница 26: ...on change de canal de fa on s quentielle Vous pourrez voir toutes les canal que la t l vision a m moris es La t l vision doit avoir m moris au moins trois canal Vous ne pourrez pas voir les canal qui...

Страница 27: ...le bouton ENTER 3 Les param tres sont modifi s ou r initialis s Langue S lectionnez votre langue Air c ble S lectionnez votre compagnie de t l vision c bl e locale Prog auto Permet de choisir une con...

Страница 28: ...r Cha ne puis appuyez sur le bouton ENTER 3 Appuyez sur le bouton ou pour s lectionner Syn Pr cise puis appuyez sur le bouton ENTER 4 Appuyez sur le bouton ou pour r gler le r glage fin 5 Pour stocker...

Страница 29: ...ieurs param tres qui vous permettent de contr ler la qualit de l image 1 Appuyez sur le bouton MENU pour afficher le menu Appuyez sur le bouton ou pour s lectionner Imagen puis appuyez sur le bouton E...

Страница 30: ...ns de signaux et il n est pas tr s pratique de devoir ajuster le volume chaque fois qu on change de cha ne La fonction Volume auto ajuste automatiquement le volume de la cha ne choisie en baissant la...

Страница 31: ...puyez sur le bouton EXIT pour quitter Le t l viseur s teint automatiquement lorsque le minuteur atteint 0 Vous pouvez galement appuyer sur le bouton SLEEP de la t l commande pour r gler la dur e de ve...

Страница 32: ...ro d identification personnel NIP et activez la fonction puce V Voir section pr c dente Les restrictions parentales peuvent tre r gl es l aide de l une de ces deux m thodes Les guides TV ou la Classif...

Страница 33: ...cat gorie Appuyez sur le bouton ENTER pour s lectionner B ou D Appuyez sur me bouton EXIT 3 fois pour enregistrer les param tres et pour remettre z ro tous les crans La fonction puce V bloque automati...

Страница 34: ...Appuyez sur le bouton ou pour s lectionner Sous titres puis appuyez sur le bouton ENTER 3 Appuyez sur le bouton ENTER pour s lectionner Sous titres 4 Appuyez sur le bouton ou pour Off ou On les sous t...

Страница 35: ...outon ENTER pour s lectionner Liste source 3 Appuyez sur le bouton ou pour s lectionner entr e source puis appuyez sur le bouton ENTER Vous pouvez galement s lectionner toute source raccord e votre t...

Страница 36: ...z sur le bouton ou pour s lectionner PC puis appuyez sur le bouton ENTER 4 Appuyez sur le bouton ou pour s lectionner Position puis appuyez sur le bouton ENTER 5 Appuyez sur le bouton ou pour r gler l...

Страница 37: ...ch e V rifiez les branchements de l antenne Dans un premier temps v rifiez le volume pour les l ments branch s sur votre t l viseur R cepteur de radiodiffusion num rique TV num rique DVD r cepteur de...

Страница 38: ...110 V 120 V 50 60 Hz 55 W 3 W 607 0 x 94 0 x 436 0 mm 23 89 x 3 70 x 17 16 inches 607 0 x 215 0 x 464 0 mm 23 89 x 8 46 x 18 26 inches 7 8 kg 17 19 lbs 10 C 40 C 50 F 104 F 10 80 sans condensation 20...

Страница 39: ...los canales 8 CONTROL DE LA IMAGEN Uso de los par metros de imagen autom ticos 9 Personalizaci n de la imagen 9 Ajuste del Color del fondo 9 CONTROL DEL SONIDO Uso de los par metros de sonido autom t...

Страница 40: ...soporte 1 2 1 Coloque el frontal del televisor sobre un pa o suave o una almohadilla encima de una mesa tal como se muestra en la figura 1 Alinee la parte inferior del televisor con el borde de la mes...

Страница 41: ...controlan las funciones b sicas del TV incluyendo los men s en pantalla Para usar las funciones m s avanzadas debe usar el mando a distancia El color y la forma del producto pueden variar seg n el mod...

Страница 42: ...imentaci n Cuando conecte un dispositivo externo debe hacer coincidir los colores del terminal de conexi n y del cable LN R1550P LN R2050P Use las tomas del panel posterior para conectar componentes d...

Страница 43: ...2 y 1 Pulse para aumentar o reducir el volumen Pulse para desactivar moment neamente el sonido Pulse para seleccionar una hora en la cual se apagar el TV autom ticamente Muestra el men de pantalla pr...

Страница 44: ...CH o CH para cambiar los canales Cuando pulse el bot n CH o CH el TV cambiar los canales por orden Ver todos los canales que ha memorizado el TV El TV deber haber memorizado como m nimo tres canales...

Страница 45: ...i n Idioma Seleccione el idioma Aire Cable Seleccione el sistema de su compa a local de televisi n por cable Prog Auto Selecciona entre la conexi n de una antena terrestre o el sistema de televisi n d...

Страница 46: ...o para seleccionar Canal y despu s pulse el bot n ENTER 3 Pulse el bot n o para seleccionar Sintonia Fina y despu s pulse el bot n ENTER 4 Pulse el bot n o para ajustar la sintonizaci n fina 5 Para g...

Страница 47: ...ios valores que le permiten controlar la calidad de imagen 1 Pulse el bot n MENU para visualizar el men Pulse el bot n o para seleccionar Imagen y despu s pulse el bot n ENTER 2 Pulse el bot n o para...

Страница 48: ...misora tiene sus propias condiciones de se al y es muy inc modo ajustar el volumen cada vez que se cambia de canal Con la funci n Vol Auto el volumen del canal deseado se ajusta de forma autom tica re...

Страница 49: ...bot n EXIT para salir El televisor se apaga autom ticamente cuando el temporizador llega a 0 Tambi n puede pulsar el bot n SLEEP del mando a distancia para ajustar el temporizador Puede establecer lo...

Страница 50: ...cci n anterior Las restricciones del bloqueo de programas se pueden establecer mediante dos m todos Las gu a de programas o la clasificaci n MPAA 1 Pulse el bot n MENU para visualizar el men Pulse el...

Страница 51: ...o para seleccionar una categor a Pulse el bot n ENTER para seleccionar D o B Pulse tres veces el bot n EXIT para guardar los ajustes y suprimir las pantallas La opci n V chip bloquear autom ticamente...

Страница 52: ...pulse el bot n ENTER 3 Pulse el bot n ENTER para seleccionar Subt tulo 4 Pulse el bot n o para configurar la funci n de subt tulos en Apag u Enc y a continuaci n pulse el bot n ENTER 5 Dependiendo de...

Страница 53: ...o para seleccionar Entrada 2 Pulse el bot n o para seleccionar Lista de origen 3 Pulse el bot n o para seleccionar origen entrada en seguida y despu s ENTER S lo puede seleccionar una fuente si est c...

Страница 54: ...ionar Configuraci n y despu s pulse el bot n ENTER 3 Pulse el bot n o para seleccionar PC y despu s pulse el bot n ENTER 4 Pulse el bot n o para seleccionar Posici n y despu s pulse el bot n ENTER 5 P...

Страница 55: ...mpruebe las conexiones de la antena Primero compruebe el volumen de los aparatos conectados al TV Receptor de emisiones digitales DTV DVD receptor de emisiones por cable v deo etc A continuaci n ajust...

Страница 56: ...75 Hz 800 x 600 60 Hz AC 110 V 120 V 50 60 Hz 55 W 3 W 607 0 x 94 0 x 436 0 mm 23 89 x 3 70 x 17 16 pulgadas 607 0 x 215 0 x 464 0 mm 23 89 x 8 46 x 18 26 pulgadas 7 8 kg 17 19 lbs 10 C al 40 C 50 F a...

Отзывы: