10 Operating Instructions and Installation
10-2
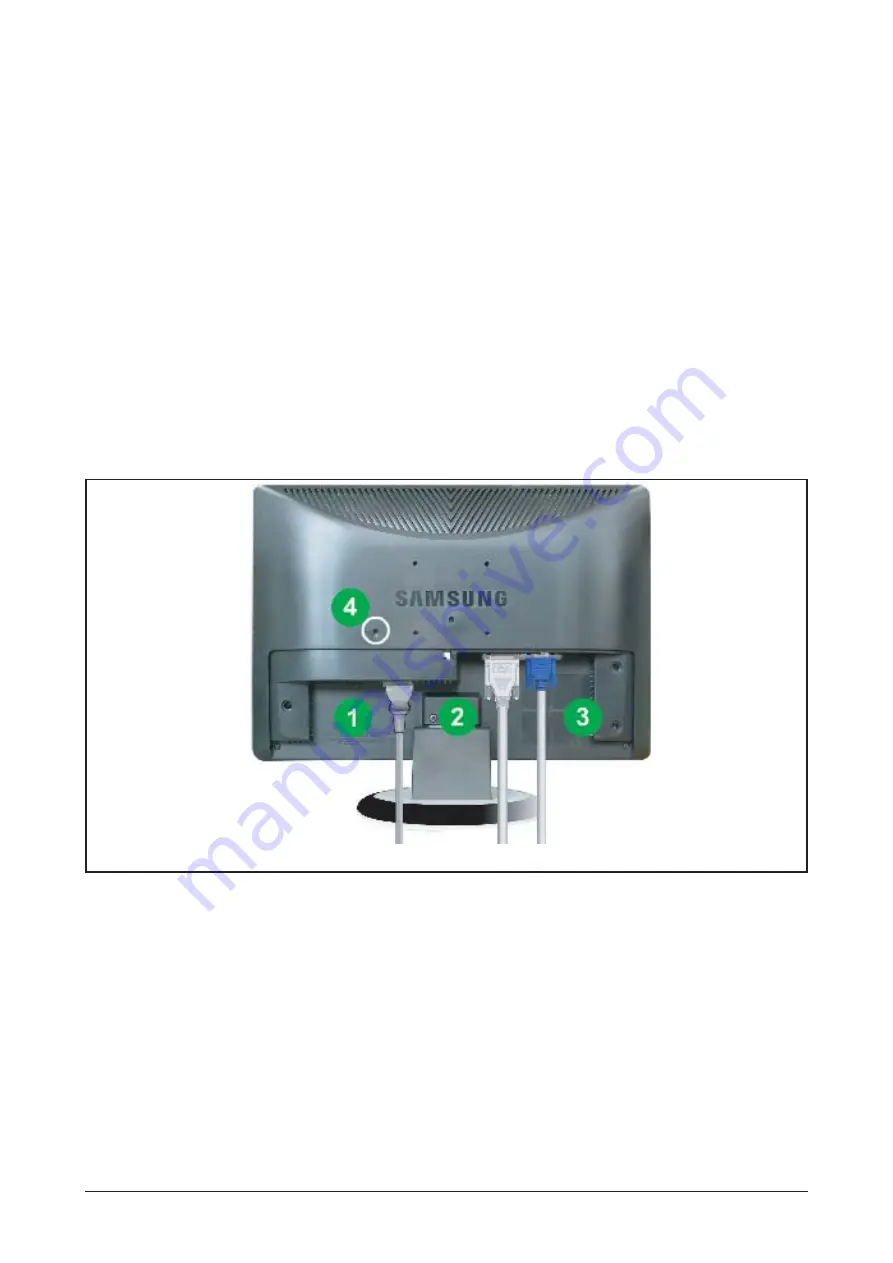
10-2 Rear
2,3. Adjust buttons
Adjust items in the menu.
4. Enter button / Source button
Activates a highlighted menu item. /
Push the 'SOURCE', then selects the video signal
while the OSD is off. (When the source button is
pressed to change the input mode, a message
appears in the left upper side of the screen
displaying the current mode -- analog or digital
input signal.)
Note : If you select the digital mode, you must con-
nect your monitor to the graphic card's port using
the DVI cable.
5. Auto button
When the 'AUTO' button is pressed, the Auto
Adjustment screen appears as shown in the ani-
mated screen on the center. Auto adjustment
allows the monitor to self-adjust to the incoming
video signal. The values of fine, coarse and posi-
tion are adjusted automatically. (Available in ana-
log mode only)
6. Power button
Use this button for turn the monitor on and off.
1. POWER port
Connect the power cord for your monitor to the power port on the back of the
monitor.
2. DVI IN (HDCP) port
Connect the DVI Cable to the DVI port on the back of your monitor.
(206NW/226NW= RGB IN Only)
3. RGB IN port
Connect the signal cable to the 15-pin, D-sub port on the back of your monitor.
4. Kensington Lock
The Kensington lock is a device used to physically fix the system when using it in
a public place.
(The locking device has to be purchased separately.
For using a locking device, contact where you purchase it.)
(The configuration at the back of the monitor may vary from product to product.)
Содержание LME20AS
Страница 12: ...11 Disassembly and Reassembly 11 3 10 Main PCB and IB Board Description Picture Description ...
Страница 15: ...13 Circuit Descriptions 13 2 Memo ...
Страница 25: ...Memo 14 Reference Infomation 14 10 ...
Страница 31: ...Memo 3 Alignments and Adjustments 3 6 ...
Страница 33: ...4 Troubleshooting 4 2 WAVEFORMS 2 1 3 4 ...
Страница 35: ...4 Troubleshooting 4 4 WAVEFORMS 6 5 7 ...
Страница 37: ...4 Troubleshooting 4 6 WAVEFORMS 9 5 ...
Страница 38: ...4 Troubleshooting 4 7 ...
Страница 39: ...4 Troubleshooting 4 8 ...
Страница 40: ...4 Troubleshooting 4 9 ...
Страница 41: ...Memo 4 Troubleshooting 4 10 ...
Страница 43: ...6 Electrical Parts List 6 2 Memo ...
Страница 44: ...7 Block Diagrams 7 1 7 Block Diagram 7 1 Block Diagram ...
Страница 45: ...7 Block Diagrams 7 2 Memo ...
Страница 47: ...9 Schematic Diagrams 9 2 This Document can not be used without Samsung s authorization ...
Страница 48: ...9 Schematic Diagrams 9 3 This Document can not be used without Samsung s authorization ...
Страница 49: ...9 Schematic Diagrams 9 4 Memo ...
Страница 53: ...9 Schematic Diagrams 9 2 This Document can not be used without Samsung s authorization ...
Страница 54: ...9 Schematic Diagrams 9 3 This Document can not be used without Samsung s authorization ...
Страница 55: ...9 Schematic Diagrams 9 4 Memo ...


