background image

English - 

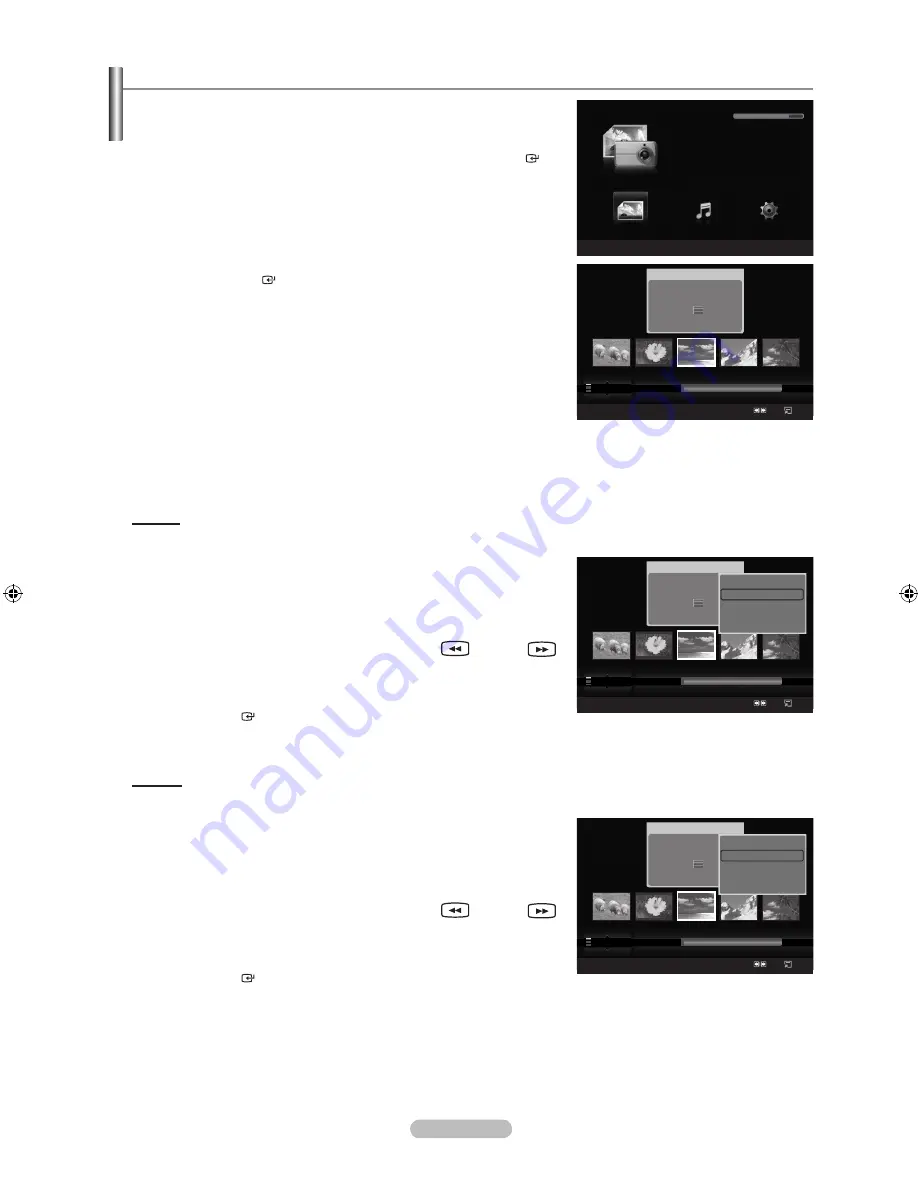
Sorting Photo List

You can sort photos in the Photo List by a particular standard.

1.

   Press the 

W.LINK

 button on the remote control to display the 

“WISELINK” menu.

2.

   Press the ◄ or ► button to select “Photo”, then press the 

ENTER


button. 

Photo files are displayed.

3.

   Press the ▲ or ▼ button to select a sorting standard.  

(“Monthly”, “Timeline”, “Color”, “Composition”, “Folder”, “Preference”)

The photos are sorted according to the newly selected sorting 

standard. 

4.

   Press the 

ENTER

   button to start the Slide Show in the order selected 

by the user.

Wiselink identifies the color and composition of images and groups 

them accordingly by analyzing the images on the USB device.
The “Composition” and “Color” information extracted from a photo file 

may be different from what you selected.
Photo information is automatically set. You can change the “Color”, 

“Composition”, and “Favourite”.
Photos for which information cannot be displayed are set as 

“Unclassified”. 
PTP does not support folder sort mode.

Monthly

Sorts photos by month.


It sorts and shows photos in the file by month. It sorts only by month 

(from January to December) regardless of year.

1.

  Select “Monthly” as the sorting standard in the Photo List. 

2.

   Press the ◄ or ► button to select from the sublist of files grouped by 

Month.

To move to the previous / next group, press the 

 (REW) or 


(FF) button.

3.

   Press the 

TOOLS

 button. Press the ▲ or ▼ button to select “Play 

Current Group”. 

4.

   Press 

ENTER 

 to play the selected group of photo files from the 

sublist.

Timeline

Sorts photos by time. 

It sorts and shows photos by date. It sorts by year and month from the 

earliest photo.

1.

  Select “Timeline” as the sorting standard in the Photo List. 

2.

   Press the ◄ or ► button to select from the sublist of files grouped by 

Timeline.

To move to the previous / next group, press the 

 (REW) or 


(FF) button.

3.

   Press the 

TOOLS

 button. Press the ▲ or ▼ button to select “Play 

Current Group”. 

4.

   Press 

ENTER 

 to play the selected group of photo files from the 

sublist.

Photo

SUM

 Device   

 Favourites Setting   

 Select   


Jump     Option

image_1.jpg

Month 

: Jan

Date 

: Jan.01.2008

Color 

: Gray

Composition : 

Folder 

: P-other

Favourite 

★ ★ ★

Monthly

Timeline

Color


Jan


Nov

Slide Show
Play Current Group
Delete
Information

2008

2008

Photo

SUM

 Device   

 Favourites Setting   

 Select   


Jump     Option

image_1.jpg

Month 

: Jan

Date 

: Jan.01.2008

Color 

: Gray

Composition : 

Folder 

: P-other

Favourite 

★ ★ ★

Preference

Monthly

Timeline


Jan


Nov

Slide Show
Play Current Group
Delete
Information

WISELINK

Photo

SUM

 Device      

e


Exit

Music

Setup

PHOTO

SUM

851.98MB/995.00MB Free

Photo

SUM

 Device   

 Favourites Setting   

 Select   


Jump     Option

image_1.jpg

Month 

: Jan

Date 

: Jan.01.2008

Color 

: Gray

Composition : 

Folder 

: P-other

Favourite 

★ ★ ★

Preference

Monthly

Timeline


Jan


Nov

BN68-01412T-00Eng.indb   53

2008-08-14   �� 2:44:09

Содержание LE37A676A1W

Страница 1: ...00 SAMSUNG 726 7864 0 10 Min www samsung com nl NORWAY 815 56 480 www samsung com no POLAND 0 801 801 881 022 607 93 33 www samsung com pl PORTUGAL 80820 SAMSUNG 726 7864 www samsung com pt SLOVAKIA 0800 SAMSUNG 726 7864 www samsung com sk SPAIN 902 1 SAMSU 72678 www samsung com es SWEDEN 0771 400 200 www samsung com se SWITZERLAND 0800 SAMSUNG 726 7864 www samsung com ch U K 0845 SAMSUNG 7267864 ...

Страница 2: ...n the left right and center of the screen caused by the difference of light emission on the screen Playing a DVD or a game console may cause a similar effect to the screen Damages caused by the above effect are not covered by the Warranty Displaying still images from Video games and PC for longer than a certain period of time may produce partial after images To prevent this effect reduce the brigh...

Страница 3: ...Television On and Off Automatically 38 Function Description Selecting a Menu Language 39 Activating the Child Lock 39 Setting Up Your Personal ID Number PIN 40 Setting up the Parental Lock 41 Setting the Subtitle 42 Selecting a Teletext Language 43 Selecting a Preference Language 43 Melody Entertainment Energy Saving 44 Upgrading the Software 45 Viewing Common Interface 46 Selecting the CI Common ...

Страница 4: ...asten two screw at position 2 Stand the product up and fasten the screws If you fasten the screws with the LCD TV placed down it may lean to one side The stand is installed for models with the screen size of 37 inch and above Installing the Wall Mount Kit Wall mount items sold separately allow you to mount the TV on the wall For detailed information on installing the wall mount see the instruction...

Страница 5: ...n the remote control 2 MENU Press to see an on screen menu of your TV s features 3 Press to increase or decrease the volume In the on screen menu use the buttons as you would use the and buttons on the remote control 4 C P Press to change channels In the on screen menu use the C P buttons as you would use the and buttons on the remote control 5 POWER INDICATOR Blinks and turns off when the power i...

Страница 6: ... should connect the Set Top Box to the DTV or DVD and connect the DTV or DVD to component connector PR PB Y on your set The PR PB and Y connectors on your component devices DTV or DVD are sometimes labeled Y B Y and R Y or Y Cb and Cr Connect RCA audio cables optional to R AUDIO L on the rear of your set and the other ends to corresponding audio out connectors on the DTV or DVD 3 HDMI IN 1 HDMI IN...

Страница 7: ...ite network 5 SERVICE Connector for SERVICE only Connect this to the jack on the optional wall mount bracket This will allow you to adjust the TV viewing angle using your remote control 6 COMMON INTERFACE Slot When not inserting CI CARD in some channels Scrambled Signal is displayed on the screen The pairing information containing a telephone number CI CARD ID Host ID and other information will be...

Страница 8: ...t the TV EXT 1 EXT 2 Connector Input Output Video Audio L R RGB Video Audio L R EXT 1 O O O Only TV or DTV output is available EXT 2 O O Output you can choose Inputs or outputs for external devices such as VCR DVD video game device or video disc players Kensington Lock depending on the model The Kensington Lock optional is a device used to physically fix the system when used in a public place If y...

Страница 9: ... will reduce the battery usage time Previous channel Temporary sound switch off P Next channel P Previous channel Displays the main on screen menu This function enables you to view and play photo and music files from an external device Returns to the previous menu a Control the cursor in the menu b Exit the on screen menu c Use this when connecting a SAMSUNG DMA Digital Media Adapter device throug...

Страница 10: ...on your set 2 Press the button on your set You also can press the POWER button or the TV DTV button on the remote control to turn the TV on The programme that you were watching last is reselected automatically 3 Press the numeric button 0 9 or channel up down button on the remote control or C P button on your set When you switch the set on for the very first time you will be asked to choose langua...

Страница 11: ... page 29 Picture Mode see page 27 Sound Mode see page 33 Sleep Timer see page 37 SRS TS XT see page 33 Energy Saving see page 44 Dual l ll see page 35 PIP see page 32 Auto Adjustment see page 49 Plug Play Feature When the TV is initially powered on basic settings proceed automatically and subsequently 1 Press the POWER button on the remote control The message Valitse calikkokieli myymälädemo kanav...

Страница 12: ...or button Set the Day Month Year Hour or Minute by pressing the or button You can also set the Month Day Year Hour and Minute by pressing the number buttons on the remote control 9 The message Enjoy your viewing is displayed When you have finished press the ENTER button If you want to reset this feature 1 Press the MENU button to display the menu Press the or button to select Setup then press the ...

Страница 13: ...ort numbers manually and clear any channels you do not wish to watch 1 Press the MENU button to display the menu Press the or button to select Channel then press the ENTER button 2 Press the or button to select Auto Store then press the ENTER button If a channel is locked using the Child Lock function the PIN input window appears refer to page 39 Enter your 4 digit PIN number 3 Press the or button...

Страница 14: ...hen the Country was set to Sweden or Denmark Press the or button to select Cable or Aerial Press the ENTER button When selecting Cable Frequency Displays the frequency for the channel Differs in each country Modulation Displays available modulation values Symbol Rate Displays available symbol rates Network ID Displays the network identification code Press the red button to start the scan for digit...

Страница 15: ...nished channels are updated in the channel list When selecting Aerial Channel Channel 21 to 69 in sequence are displayed depending on the country Frequency The frequency available in the Channel group is displayed Bandwidth The available bandwidths are 8 MHz Press the ENTER button to start the scan for digital services When it has finished channels are updated in the channel list When the Country ...

Страница 16: ... pressing the numeric buttons 0 9 If there is abnormal sound or no sound reselect the sound standard required Search When you do not know the channel numbers Press the or button to start the search The tuner scans the frequency range until the first channel or the channel that you selected is received on the screen Store When you store the channel and associated programme number Set to OK by press...

Страница 17: ...enter Please click on INFO button for the detailed information Channel Number Running Time Status Bar Parental Level Video Quality Information HD SD Sound Modes Subtitle or Teletext languages of Subtitle or Teletext and brief summary of the highlighted programme are included on the detailed information will be appeared if the summary is long Toggle between the Mini Guide or Full Guide Press the re...

Страница 18: ...lt Guide then press the ENTER button 3 Select Mini Guide or Full Guide using the or button and press the ENTER button 4 Press the EXIT button to exit You can select these options by simply pressing the GUIDE button on the remote control O Channel Full Guide Mini Guide Default Guide Mini Guide Channel List Channel Mode Added Ch Fine Tune Signal Information LNA Off Channel Full Guide Mini Guide Defa...

Страница 19: ...l List Red Channel Type Toggle between your TV Radio Data Other and All Green Zoom Enlarges or shrinks a channel number Yellow Select Selects multiple channel lists TOOLS Option Displays the Delete or Add Add to Favourite or Delete from Favourite Lock Timer Viewing Edit Channel Name Sort Select All Deselect All or Auto Store menu The Options menus may differ depending on the situation A gray colou...

Страница 20: ...to select a channel as a favourite channel Adding multiple channels to Favourites Press the or button to select the desired channel in the channel list Then press the yellow button Repeat the above operation to select multiple channels The mark appears to the left of the selected channels 5 Press the TOOLS button 6 Press the or button to select Add to Favourite then press the ENTER button The symb...

Страница 21: ... 0 0 0 If you want to change PIN number refer to 40 page 7 Press the EXIT button to exit Unlocking channels 4 Press the or button to select the channels you want to Unlock then press the TOOLS button 5 Press the or button to select Unlock then press the ENTER button 6 Enter your 4 digit PIN number The channel is unlocked and the mark also disappears The default PIN number of a new TV set is 0 0 0 ...

Страница 22: ...o exit Unlocking channels 4 Press the or button to select the channels you want to Unlock then press the TOOLS button 5 Press the or button to select Child Lock Setting then press the ENTER button 6 Enter your 4 digit PIN number The channel is unlocked and the mark also disappears The default PIN number of a new TV set is 0 0 0 0 If you want to change PIN number refer to 40 page 7 Press the or but...

Страница 23: ...servation refer to page 22 Only memorized channels can be reserved You can set the channel month day year hour and minute directly by pressing the number buttons on the remote control Press the CH LIST button on the remote control to bring up the channel lists Digital Program Guide and Viewing Reservation When a digital channel is selected and you press the button the Program Guide for the channel...

Страница 24: ...s the or button to select Cancel Schedules then press the ENTER button 6 Press the or button to select OK then press the ENTER button The viewing reservation has been canceled Press the EXIT button to exit Programmed Option Change Info Select to change a viewing reservation Cancel Schedules Select to cancel a viewing reservation Information Select to view a viewing reservation Select All Select al...

Страница 25: ...MENU button Press the or button to select Channel then press the ENTER button Press the or button to select Channel List then press the ENTER button 2 Press the or button to select a channel then press the TOOLS button 3 Press the or button to select Sort then press the ENTER button 4 Press the or button to move to the position in which you would like to change and then press the ENTER button 5 Re...

Страница 26: ...on to select Channel then press the ENTER button Press the or button to select Channel List then press the ENTER button 2 Press the or button to select the channel to be assigned a new name then press the TOOLS button 3 Press the or button to select Auto Store then press the ENTER button For further details on setting up options refer to page 11 12 If a channel is locked using the Child Lock funct...

Страница 27: ...Channel then press the ENTER button 3 Press the or button to select Fine Tune then press the ENTER button 4 Press the or button to adjust the fine tuning Press the ENTER button 5 Press the EXIT button to exit Fine tuned channels that have been saved are marked with an asterisk on the right hand side of the channel number in the channel banner To reset the fine tuning select Reset by pressing the o...

Страница 28: ...n can improve the reception a low noise preamplifier boosts the incoming signal 1 Press the MENU button to display the menu Press the or button to select Channel then press the ENTER button 2 Press the or button to select LNA then press the ENTER button 3 Press the or button to select Off or On Press the ENTER button 4 Press the EXIT button to exit While viewing an Analogue channel this function c...

Страница 29: ...n to exit When you make changes to Backlight Contrast Brightness Sharpness Colour or Tint G R the OSD will be adjusted accordingly In TV Ext AV S Video modes of the PAL system you cannot use the Tint Function In PC mode you can only make changes to Backlight Contrast and Brightness Settings can be adjusted and stored for each external device you have connected to an input of the TV The energy cons...

Страница 30: ...Blue Yellow Cyan or Magenta Press the ENTER button Red Green Blue In Colour you can adjust the RGB values for the selected colour Press the or button to select Red Green or Blue to change it Press the ENTER button Press the or button to decrease or increase the value of a particular item Press the ENTER button Reset Resets the colour space to the default values White Balance R Offset G Offset B Of...

Страница 31: ...nected to an input of the TV Temporary image retention may occur when viewing a static image on the set for more than two hours Wide Zoom Press the button to Select Position then press the ENTER button Press the or button to move the screen up down Then press the ENTER button Zoom Press the button to Select Position then press the ENTER button Press the or button to move the picture up and down Th...

Страница 32: ...mpensation Algorithm gives brighter clearer more detailed image to you DNIe technology will fit every signal into your eyes This function is not available in Movie and Standard mode HDMI Black Level Normal Low You can directly select the black level on the screen to adjust the screen depth This function is active only when the external input connects to HDMI RGB signals Movie Plus Off Low Medium H...

Страница 33: ... see page 27 2 Press the or button to select Picture Reset then press the ENTER button 3 Press the or button to select Reset Picture Mode or Cancel then press the ENTER button Press the EXIT button to exit Each mode can be reset Picture Reset Does not perform a screen reset Cancel Reset Picture Mode Enter Return Move Detailed Settings Picture Options Picture Reset Picture ...

Страница 34: ...DMI 4 PC TV Ext 1 Ext 2 AV Easy Setting 1 Press the TOOLS button on the remote control 2 Press the or button to select PIP then press the ENTER button 3 Press the or button to select On 4 Press the or button to select a particular item 5 Press the or button to select the required option 6 Press the EXIT or TOOLS button to exit Source You can select a source of the sub picture Size You can select a...

Страница 35: ...ruSurround delivers a compelling virtual surround sound experience through any two speaker playback system including internal television speakers It is fully compatible with all multichannel formats Easy Setting 1 Press the TOOLS button on the remote control 2 Press the or button to select SRS TS XT 3 Press the or button to select the Off or On 4 Press the EXIT or TOOLS button to exit TruSurround ...

Страница 36: ...and so it is not easy to adjust the volume every time the channel is changed This feature lets you automatically adjust the volume of the desired channel by lowering the sound output when the modulation signal is high or by raising the sound output when the modulation signal is low Select Speaker External Speaker TV Speaker If you want to hear the sound through separate speakers cancel the interna...

Страница 37: ...the current sound mode is displayed on the screen 1 Press the TOOLS button on the remote control 2 Press the or button to select Dual I II 3 Press the or button to select required option 4 Press the ENTER button Audio Type Dual 1 2 Default A2 Stereo Mono MONO Automatic change Stereo STEREO MONO Dual DUAL 1 DUAL 2 DUAL 1 NICAM Stereo Mono MONO Automatic change Stereo MONO STEREO Dual MONO DUAL 1 DU...

Страница 38: ...lect Clock Set then press the ENTER button 5 Press the or button to move to Day Month Year Hour or Minute Set the date and time you want by pressing the or button then press the ENTER button Press the EXIT button to exit The current time will appear every time you press the INFO button You can set the month day year hour and minute directly by pressing the number buttons on the remote control Time...

Страница 39: ...signal 1 Press the MENU button to display the menu Press the or button to select Setup then press the ENTER button Press the or button to select Time then press the ENTER button 2 Press the ENTER button to select Clock 3 Press the ENTER button to select Clock Mode Press the or button to select Auto then press the ENTER button 4 Press the EXIT button to exit Setup Plug Play Language English Time Ch...

Страница 40: ... Music Select the folder containing MP3 files on the USB device Photo Select the folder containing JPEG files on the USB device Repeat Select Once Everyday Mon Fri Mon Sat Sat Sun or Manual When Manual is selected press the button to select the desired day of the week Press the ENTER button over the desired day and the mark will appear Press the EXIT button to exit You can set the hour minute and ...

Страница 41: ...tton 3 Enter your 4 digit PIN number The default PIN number of a new TV set is 0 0 0 0 If you want to change PIN number refer to 40 page 4 Press the or button to select On Press the ENTER button 5 Press the EXIT button to exit You can lock some channels in Channel List refer to page 19 Child Lock is available only in TV mode If a channel is locked using the Child Lock function the PIN input window...

Страница 42: ...numeric buttons 0 9 The Confirm New PIN is displayed 6 Re enter your new PIN code to confirm by using the numeric buttons 0 9 The PIN is changed successfully message is displayed 7 Press the EXIT button to exit If you forget the PIN code press the remote control buttons in the following sequence which resets the PIN to 0 0 0 0 POWER Off MUTE 8 2 4 POWER On Setup Time Child Lock On Change PIN Paren...

Страница 43: ... default PIN code for a new TV set is 0000 If you want to change PIN number refer to 40 page 5 Press the ENTER button 6 Press the or button to select the age rating you want to lock out Press the ENTER button The Parental Rating item differs depending on the country The symbol will be displayed Allow All Press to unlock all TV ratings Block All Press to lock all TV ratings 7 Press the EXIT button ...

Страница 44: ...or Hard of hearing Press the ENTER button If the programme you are watching does not support the Hard of hearing function Normal automatically activates even though Hard of hearing mode is selected 7 Press the or button to select Subtitle Language then press the ENTER button 8 Select the appropriate language by pressing the or button Press the ENTER button to confirm your choice English is the def...

Страница 45: ...on to select required menu Primary Audio Language Secondary Audio Language Primary Subtitle Language Secondary Subtitle Language Primary Teletext Language Secondary Teletext Language Press the ENTER button 4 Select the appropriate language by pressing the or button Press the ENTER button to confirm your choice 5 Press the EXIT button to exit If you change the language setting the Subtitle Language...

Страница 46: ...e locked and can not be adjusted If you want to make Picture and Sound mode adjustments the Entertainment mode must be turned off If you set any of the three Entertainment modes to On SRS TruSurround XT function is not available The Entertainment settings are saved for each input source This function is not available in PC mode You can press the E MODE button on the remote control repeatedly to ch...

Страница 47: ...e TV will turn off and turn on automatically after completing the firmware upgrade Please check the firmware version after the upgrades are complete When software is upgraded video and audio settings you have made will return to their default factory settings We recommend you write down your settings so that you can easily reset them after the upgrade BY Channel Upgrades the software using the bro...

Страница 48: ...irection of the arrow right up to the end so that it is parallel with the slot 4 Check if you can see a picture on a scrambled signal channel Selecting the CI Common Interface Menu This enables the user to select from the CAM provided menu 1 Press the MENU button to display the menu Press the or button to select Setup then press the ENTER button 2 Press the or button to select Common Interface the...

Страница 49: ...ode can be selected by pressing the TV DTV button number buttons 0 9 and the P button on the remote control O To Edit the Input Source Name Name the device connected to the input jacks to make your input source selection easier 1 Press the MENU button to display the menu Press the or button to select Input then press the ENTER button Press the or button to select Edit Name then press the ENTER but...

Страница 50: ...ecommended D Sub Input Mode Resolution Horizontal Frequency kHz Vertical Frequency Hz Pixel Clock Frequency MHz Sync Polarity H V IBM 640 x 350 720 x 400 31 469 31 469 70 086 70 087 25 175 28 322 VESA 640 x 480 640 x 480 640 x 480 800 x 600 800 x 600 800 x 600 1024 x 768 1024 x 768 1024 x 768 1280 x 1024 1280 x 1024 1360 x 768 1600 x 1200 31 469 37 861 37 500 37 879 48 077 46 875 48 363 56 476 60 ...

Страница 51: ...then adjust the frequency as best as possible coarse and Fine tune again After the noise has been reduced readjust the picture so that it is aligned on the center of screen Press the or button to select Coarse or Fine then press the ENTER button Press the or button to adjust the screen quality Press the ENTER button PC Position Adjust the PC s screen positioning if it does not fit the TV screen Pr...

Страница 52: ... any data file damage or data loss Do not disconnect the USB device while it is loading MSC supports MP3 and JPEG files while a PTP device supports JPEG files only The sequential jpeg format is supported The higher the resolution of the image the longer it takes to display on the screen The maximum supported JPEG resolution is 15360x8640 pixels For unsupported or corrupted files the Not Supported ...

Страница 53: ... files saved on an USB memory device Photo List 1 Press the W LINK button on the remote control to display the WISELINK menu 2 Press the or button to select Photo then press the ENTER button Photo files are displayed This menu only shows files whose file extension is jpg Files of other formats such as bmp or tiff will not be displayed Press the Play ENTER button to start the Slide Show To move to ...

Страница 54: ...tem Selection Information Shows the number of photos that are selected by pressing the Yellow button 7 Help Items Red Device button Selects a connected device Green Favourites Setting button Changes the favourites setting for the selected photo Press this button repeatedly until the desired value appears Refer to page 55 Yellow Select button Selects photos from the photo list Selected photos are m...

Страница 55: ... files grouped by Month To move to the previous next group press the REW or FF button 3 Press the TOOLS button Press the or button to select Play Current Group 4 Press ENTER to play the selected group of photo files from the sublist Timeline Sorts photos by time It sorts and shows photos by date It sorts by year and month from the earliest photo 1 Select Timeline as the sorting standard in the Pho...

Страница 56: ...ss the or button to select Play Current Group 4 Press ENTER to play the selected group of photo files from the sublist Changing the composition information 1 Select Composition as the sorting standard in the Photo List and press the or button to select a photo Changing the information of multiple files Press the or button to select the desired photo in the Photo list Then press the yellow button R...

Страница 57: ...tton to select Play Current Group 4 Press ENTER to play the selected group of photo files from the sublist Changing the Favourites setting 1 Press the or button to select the desired photo in the Photo list Changing the information of multiple files Press the or button to select the desired photo in the Photo list Then press the yellow button Repeat the above operation to select multiple photos Th...

Страница 58: ...ot remove the read only files from the selected ones You cannot recover a deleted photo file Viewing the Photo Information The photo file information including the order of the file in the current directory the name the size the resolution the date modified and the path is displayed 1 Press the or button to select the desired photo in the Photo list 2 Press the TOOLS button 3 Press the or button t...

Страница 59: ... files will be used for the Slide Show Playing current group 1 Press the or button to select a sorting standard Monthly Timeline Color Composition Folder Preference 2 Press the or button to select the desired photo in the Photo list To move to the previous next group press the REW or FF button 3 Press the TOOLS button 4 Press the or button to select Play Current Group then press the ENTER button O...

Страница 60: ...deShow speed only during a slide show You can also change the speed of the Slide Show by pressing the REW or FF button during the Slide Show Rotate You can rotate images in full screen mode Press the or button to select Rotate then press the ENTER button Press the or button repeatedly to rotate the photo by the desired amount Whenever you press the button it rotates by 270 180 90 and 0 Whenever yo...

Страница 61: ...Speed You can select the slide show speed Press the or button to select Slide Show Speed Press the or button to select the desired option Fast Slow Normal You can select the SlideShow speed only during a slide show Background Music If you set Background Music to On the background music will be played when viewing photos one by one or in a Slide Show Press the or button to select Background Music P...

Страница 62: ...select BGM Mood Then press or button to select the desired BGM mood Press the ENTER button BGM mode option Energetic Rhythmical Sad Exciting Calm WISELINK identifies the mood of the music files and groups them accordingly by analyzing the music files on the USB device Picture Mode You can set the Picture mode Refer to page 27 Sound Mode You can set the Sound mode Refer to page 33 Information The p...

Страница 63: ...Folder Preference 3 View Groups Shows the sorting groups The sorting group including the currently selected music file is highlighted 4 Current Device Shows the currently selected device name Press the Red button to select a device WISELINK Photo SUM Device e Exit Music Setup Music SUM 851 98MB 995 00MB Free Music SUM Device Favourites Setting Select Jump Option Preference Title Artist Energetic J...

Страница 64: ...ress the TOOLS button 4 Press the or button to select Play Current Group 5 Press ENTER to play the selected group of music files from the sublist 5 Item Selection Information Shows the number of music files that are selected by pressing the Yellow button 6 Help Items Red Device button Selects a connected device Green Favourites Setting button Changes the favourites setting for the selected music P...

Страница 65: ... files and groups them accordingly by analyzing the music files on the USB device Mood information extracted from a music file may not always match the Mood option For example a file you think is Energetic may be extracted to the Exciting mood option 4 Press the or button to select the desired option then press the ENTER button The group information of the current file is updated and the file is m...

Страница 66: ...y Current Group 5 Press ENTER to play the selected group of music files from the sublist Changing the Favourites setting 1 Press the or button to select the desired music in the music list Changing the information of multiple files Press the or button to select the desired music in the music list Then press the yellow button Repeat the above operation to select multiple musics The mark appears to ...

Страница 67: ...leted music files Viewing the Information The music file information including the order of the file in the current directory the name the size the date modified and the path is displayed 1 Press the or button to select the desired music in the music list 2 Press the TOOLS button 3 Press the or button to select Information then press the ENTER button The information on the selected file appears Pr...

Страница 68: ...he start of the file 4 To exit WISELINK mode press the W LINK button on the remote control Playing the music group 1 Press the W LINK button on the remote control to display the WISELINK menu 2 Press the or button to select Music then press the ENTER button To move to the previous next group press the REW or FF button 3 Press the or button to select the desired music file 4 Press the TOOLS button ...

Страница 69: ...d Repeat Mode is On Music Once When all music files in the folder or the selected file are played once Repeat Mode is Off Music Play Pause When pressing the Play Pause ENTER button on the remote control while music is playing Repeating Music Play 1 While a Music file is playing press the TOOLS button 2 Press the or button to select Repeat Mode 3 Press the or button to select On or Off On Plays bac...

Страница 70: ...ore the screen saver appears Press the or button to select Screen Saver Run Time Press the or button to select 1 min 3 min or 5 min Information Select to viewing the information of the connected device Press the or button to select Information then press the ENTER button Remove Safely You can remove the device safely from the TV Refer to page 60 To exit WISELINK mode press the W LINK button on the...

Страница 71: ...DMI 2 HDMI 3 or HDMI 4 jack on the TV and the HDMI OUT jack of the corresponding Anynet device using an HDMI cable 2 Connect the HDMI IN jack of the home theater and the HDMI OUT jack of the corresponding Anynet device using an HDMI cable Connect the Optical cable between the Digital Audio Out Optical jack on your TV and the Digital Audio Input on the Home Theater When following the connection abo...

Страница 72: ...n Anynet devices connected to the TV are listed If you cannot find a device you want press the red button to scan for devices Only when you set Anynet HDMI CEC to On in the Setup menu the Device List menu appears 3 Press the or button to select to a particular device and press the ENTER button It is switched to the selected device Switching to the selected devices may take up to 2 minutes You cann...

Страница 73: ...ume MUTE button The Anynet function only works when the active source on the TV remote control is set to TV The button works only while in the recordable state You cannot control Anynet devices using the buttons on the TV You can control Anynet devices only using the TV remote control The TV remote control may not work under certain conditions In this case reselect the Anynet device The Anynet fun...

Страница 74: ...ertain situations Searching channels Operating WISELINK Pro Plug Play etc When connecting or removing the HDMI 1 3 cable please make sure to search devices again or turn your TV off and on again Check if the Anynet Function of Anynet device is set on I want to start Anynet Check if the Anynet device is properly connected to the TV and check if the Anynet HDMI CEC is set to On in the Anynet Setup m...

Страница 75: ...ng the teletext service Press it twice to overlap the teletext with the current broadcasting screen 7 1 sub page Used to display the available sub page 8 2 page up Used to display the next teletext page 9 3 page down Used to display the previous teletext page 0 0 mode Press to select the teletext mode LIST FLOF If you press it in the LIST mode it switches into the List save mode In the List save m...

Страница 76: ...justment then press the ENTER button TV Rear Panel Auto Wall Mount SERVICE Cable Not supplied The teletext pages are organized according to six categories Part Contents A Selected page number B Broadcasting channel identity C Current page number or search indications D Date and time E Text F Status information FASTEXT information Teletext information is often divided between several pages displaye...

Страница 77: ...Entering the menu 2 Pressing a Colour Red Green Yellow button moves the auto wall mount to the saved position You can move the wall mount to one of the 3 pre set positions by pressing the Red Position 1 Green Position 2 or Yellow Position 3 buttons If you adjust the Position after moving to a pre set position the position display will disappear For installation refer to the Installation Manual pro...

Страница 78: ...facturer Refer to the manual provided with the Kensington Lock for proper use The locking device has to be purchased separately Optional Figure 2 Figure 1 Cable The location of the Kensington Lock may be different depending on its model 1 Insert the locking device into the Kensington slot on the LCD TV Figure 1 and turn it in the locking direction Figure 2 2 Connect the Kensington Lock cable 3 Fix...

Страница 79: ...e purchase these additionally 2 Remove the screws from the center back of the TV put the screws into the clamps and then fasten the screws onto the TV again Screws may not be supplied with the product In this case please purchase the screws of the following specifications Screw Specifications For a 17 29 Inch LCD TV M4 X 15 For a 32 40 Inch LCD TV M6 X 15 3 Connect the clamps fixed onto the TV and...

Страница 80: ... malfunctions Replace the remote control batteries Clean the upper edge of the remote control transmission window Check the battery terminals Check signal cable message is displayed Check that the signal cable is firmly connected to the PC or video sources Check that the PC or video sources are turned on On PC mode Not Supported Mode message is displayed Check the maximum resolution and the freque...

Страница 81: ...3 F 5 to 95 non condensing Stand Swivel Left Right 20 20 Model Name LE46A676 LE52A676 Screen Size Diagonal 46 inches 52 inches PC Resolution Optimum 1920 x 1080 60 Hz 1920 x 1080 60 Hz Sound Output 10W x 2 10W x 2 Dimensions WxDxH Body With stand 1131 x 95 x 714 mm 1131 x 280 x 775 mm 1276 x 105 x 806 mm 1276 x 326 x 866 mm Weight With Stand 27 kg 35 kg Environmental Considerations Operating Tempe...

Отзывы: