background image

English - 

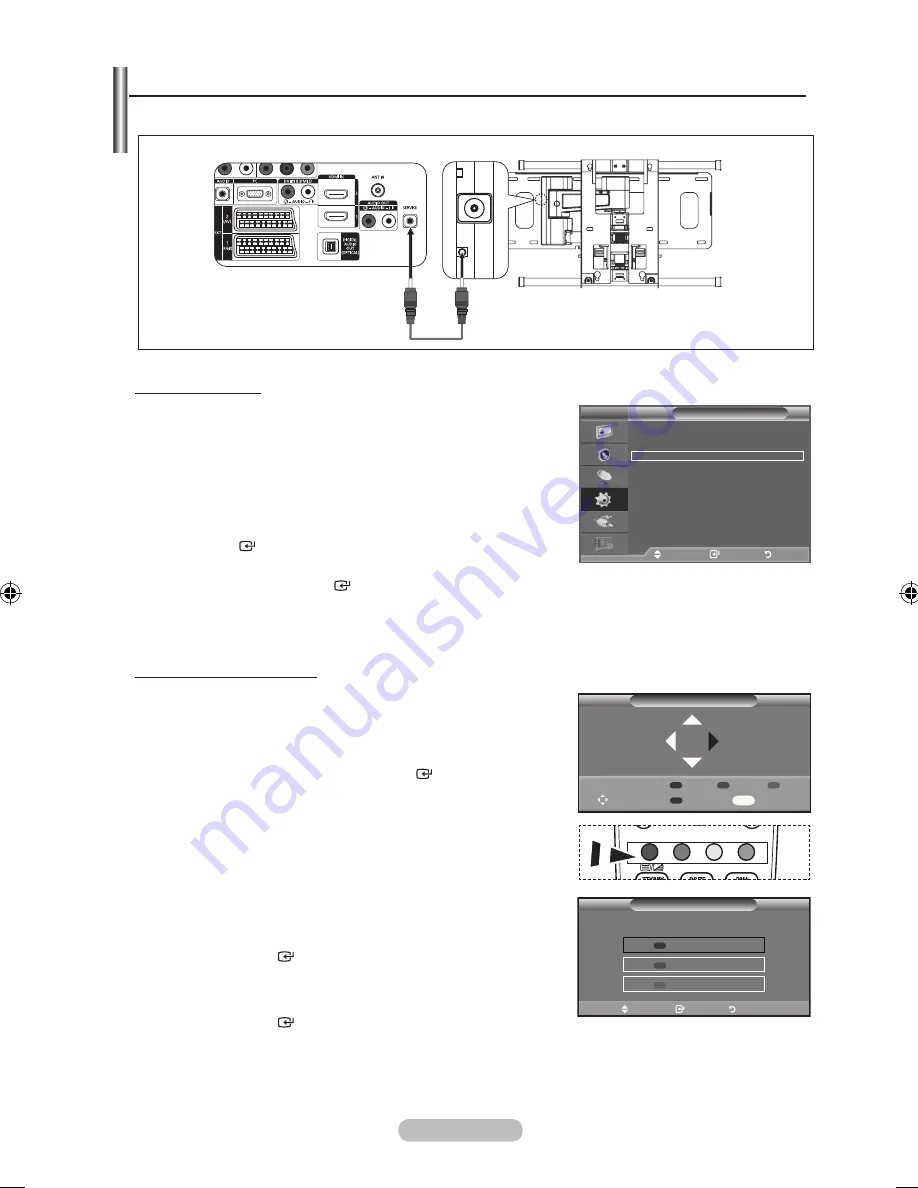
Once the auto wall mount is installed, your TV’s position can be easily adjusted.

Wall-Mount Adjustment 

(Sold separately) (depending on the model)

TV Rear Panel

Auto Wall-Mount

SERVICE Cable (Not supplied)

Entering the menu
1. 

Press the ▲, ▼, ◄ or ► button on your remote control.

The Wall Mount Adjustment screen is displayed.

If the Wall Mount Adjustment screen is not displayed when 

clicking on a direction


button while watching your TV, use 

the menu to display that screen.

•  Press the 

MENU

 butt on to display the menu.  

Press the ▲ or ▼ button to select “Setup”, then press the 

ENTER  

button.

•  Press the ▲ or ▼ button to select “Wall-Mount Adjustment”, 

then press the 

ENTER  

button.

Remembering the Position

Adjust to the desired position using the ▲,▼,◄,► buttons.

If you press an arrow button when no OSD is displayed on 

the TV screen, the Adjustment screen appears.

Press the 

INFO

 button to reset. Press the ◄ or ► button to 

select “Yes”, then press the 

ENTER  

button. 

The position is initialized to the default setting.

Press the blue button. 

Press the ▲ and ▼ buttons to select a save mode from either 

Position 1, Position 2 or Position 3 in order to save the current 

position.

To not save the current position, press the 

RETURN

 button.

When selecting a save mode, you cannot use the Colour 

buttons.

Press the 

ENTER  

button to save.

When Position1 is selected, the message "Current position 

saved as Position1" is displayed.

Press the 

ENTER  

button.

The saved Position appears on the left side of the OSD.

TV

Setup

Plug & Play 


Language 

: English 

Time 


Wall-Mount Adjustment 

Melody 

: Off 

Entertainment 

: Off 

Energy Saving 

: Off 


Move    

Enter 

Return

Save

Select a mode to Save.

Position1
Position
Position


Move  


Enter 

Return

Wall-Mount Adjustment

Adjust  

Save 

Center

INFO

Position  

1   


BN68-01464D-UK.indd   54

2008-03-18   �� 10:02:01

Содержание LE32A436T1D

Страница 1: ...s Thank you for purchasing this Samsung product To receive more complete service please register your product at www samsung com global register Model Serial No BN68 01464D 00 Contact SAMSUNG WORLDWIDE If you have any questions or comments relating to Samsung products please contact the SAMSUNG customer care centre BN68 01464D Cover indd 1 2008 03 18 10 04 05 ...

Страница 2: ...ges To prevent this effect reduce the brightness and contrast when displaying still images Precautions When Displaying a Still Image A still image may cause permanent damage to the TV screen WARNINGS Image retention commonly known as screen burn in can occur on most types of television if the same image is displayed continuously The most common causes of image retention are logos that remain stati...

Страница 3: ...el List Manually 29 Editing Your Favourite Channels 30 Selecting Channel List 32 Displaying Programme Information 32 Viewing the EPG Electronic Programme Guide Information 33 Using the Scheduled List 34 Setting the Default Guide 34 Viewing All Channels and Favourite Channels 35 Adjusting the Menu Transparency 35 Setting up the Parental Lock 36 Setting the Subtitle 37 Setting the Subtitle Mode 37 S...

Страница 4: ...lectric shock Remove the stand and cover the bottom hole with a cap and fasten with two screws 1 Connect your LCD TV and the stand Two or more people should carry the TV Make sure to distinguish between the front and back of the stand when assembling them 2 Fasten two screws at position 1 and then fasten two screw at position 2 Stand the product up and fasten the screws If you fasten the screws wi...

Страница 5: ... use the buttons as you use the and buttons on the remote control 4 Press to change channels In the on screen menu use the buttons as you use the and buttons on the remote control Without the Remote Control you can turn on the TV by using the Channel buttons 5 Speakers 6 Power Press to turn the TV on and off Remote Control Sensor Aim the remote control towards this spot on the TV Power Indicator B...

Страница 6: ...o corresponding component video out connectors on the DTV or DVD If you wish to connect both the Set Top Box and DTV or DVD you should connect the Set Top Box to the DTV or DVD and connect the DTV or DVD to component connector PR PB Y on your set The PR PB and Y connectors on your component devices DTV or DVD are sometimes labeled Y B Y and R Y or Y Cb and Cr Connect RCA audio cables optional to R...

Страница 7: ...your set and the other ends to corresponding audio in connectors on the Amplifier or DVD Home Theatre 5 ANT IN To view television channels correctly a signal must be received by the set from one of the following sources An outdoor aerial A cable television network A satellite network 6 SERVICE Connector for SERVICE only Connect this to the jack on the optional wall mount bracket This will allow yo...

Страница 8: ...d in a public place If you want to use a locking device contact the dealer where you purchased the TV The location of the kensington lock may be different depending on its model DIGITAL AUDIO OUT OPTICAL Connect to a Digital Audio Component When the HDMI IN jacks are connected the DIGITAL AUDIO OUT OPTICAL jack on the TV outputs 2 channel audio only If you want to hear 5 1 channel audio connect th...

Страница 9: ...en menu Displays the Channel List on screen Returns to the previous menu Control the cursor in the menu a Exit the on screen menu b Use this when connecting a SAMSUNG DMA Digital Media Adapter device through an HDMI interface and switching to DMA mode The DMA button is optional For more information on the operating procedures refer to the user manual of the DMA This button is available when Anynet...

Страница 10: ... also can press the POWER button or the TV DTV button on the remote control to turn the TV on The channel that you were watching last is reselected automatically 3 Press the numeric button 0 9 or channel up down button on the remote control or button on your set When you switch the set on for the very first time you will be asked to choose language in which the menus are to be displayed 4 To switc...

Страница 11: ... 26 Dual l ll see page 22 Auto Adjustment see page 45 1 With the power on press the MENU button The main menu appears on the screen The menu s left side has icons Picture Sound Channel Setup Input Digital Menu 2 Press the or button to select one of the icons Then press the ENTER button to access the icon s sub menu 3 Press the EXIT button to exit The on screen menus disappear from the screen after...

Страница 12: ...a cable is connected correctly 5 Select the appropriate country by pressing the or button Press the ENTER button to confirm your choice 6 The message Some DTV functions may not be available Digital Scan is displayed Press the or button to select Yes or No then press the ENTER button Yes First an Analogue TV search is performed and then a Digital TV ch auto search is per formed No Only an Analogue ...

Страница 13: ...ond to actual or desired programme numbers However you can sort numbers manually and clear any channels you do not wish to watch 1 Press the MENU button to display the menu Press the or button to select Channel then press the ENTER button 2 Press the ENTER button to select Country 3 Select the appropriate country by pressing the or button Press the ENTER button to confirm your choice Even though y...

Страница 14: ...l to be stored Press the or button to select C Air channel or S Cable channel Press the button then press the or button to select the required number You can also select the channel number directly by pressing the numeric buttons 0 9 If there is abnormal sound or no sound re select the sound standard required Search When you do not know the channel numbers Press the or button to start the search T...

Страница 15: ...nd audio 5 Press the or button to select Child Lock then press the ENTER button 6 Select On by pressing the or button then press the ENTER button 7 Press the or button to select Channel List then press the ENTER button 8 Move to the field by pressing the or button select a channel to be locked and press the ENTER button If you press the ENTER button again the symbol next to the channel disappears ...

Страница 16: ...put mode 1 Press the MENU button to display the menu Press the or button to select Channel then press the ENTER button 2 Press the or button to select Name then press the ENTER button 3 If necessary select the channel to be assigned to a new name by pressing the or button Press the ENTER button The selection bar is displayed around the name box 4 The following characters are available Letters of t...

Страница 17: ...n press the ENTER button Fine Tuning Channel Reception Channel Country United Kingdom Auto Store Manual Store Channel Manager Sort Name Fine Tune LNA Off TV Move Enter Return Fine Tune P 1 0 Reset Adjust Save Return If the TV is operating in a weak signal area the LNA function can improve the reception a low noise preamplifier boosts the incoming signal Not available in DTV or external input mode ...

Страница 18: ...ust be adjusted separately for each input source Changing the Picture Standard Picture Mode Standard Backlight 7 Contrast 95 Brightness 45 Sharpness 50 Colour 50 Tint G 50 R 50 Detailed Settings Picture Options Reset OK TV Move Enter Return Picture Mode Standard Backlight 7 Contrast 95 Brightness 45 Sharpness 50 Colour 50 Tint G 50 R 50 Detailed Settings Picture Options Reset OK TV Move Enter Retu...

Страница 19: ... the factory defaults picture settings by selecting the Reset Refer to Resetting the Picture Settings to the Factory Defaults on page 18 Adjusting the Custom Picture Picture Mode Standard Backlight 7 Contrast 95 Brightness 45 Sharpness 50 Colour 50 Tint G 50 R 50 Detailed Settings Picture Options Reset OK TV Move Enter Return 7 Backlight Move Adjust Return You can set detailed picture settings 1 P...

Страница 20: ...f a particular item Press the ENTER button Reset Resets the colour space to the default values White Balance R Offset G Offset B Offset R Gain G Gain B Gain Reset You can adjust the colour temperature for more natural picture colours R Offset G Offset B Offset R Gain G Gain B Gain Changing the adjustment value will refresh the adjusted screen Select the required option by pressing the or button th...

Страница 21: ...Use the function to see the full image without any cutoff when HDMI 720p 1080i or Component 1080i signals are input Auto Wide function is available only in TV DTV Ext 1 Ext 2 AV and S Video mode In PC Mode only 16 9 and 4 3 mode can be adjusted Settings can be adjusted and stored for each external device you have connected to an input of the TV Temporary image retention may occur when viewing a st...

Страница 22: ...o Demo you can view the applied DNIe and normal pictures on the screen for demonstration purposes Using this function you can view the difference in the visual quality DNIe Digital Natural Image engine This feature brings you more detailed image with 3D noise reduction detail enhancement contrast enhancement and white enhancement New image compensation Algorithm gives brighter clearer more detaile...

Страница 23: ...ed SRS technology that solves the problem of playing 5 1 multichannel content over two speakers TruSurround delivers a compelling virtual surround sound experience through any two speaker playback system including internal television speakers It is fully compatible with all multichannel formats Easy Setting 1 Press the TOOLS button on the remote control 2 Press the or button to select SRS TS XT 3 ...

Страница 24: ...o MONO STEREO Dual MONO DUAL 1 DUAL 2 DUAL 1 If the stereo signal is weak and an automatic switching occurs then switch to the Mono This function is only activated in stereo sound signal It is deactivated in mono sound signal This function is only available in Analogue TV mode Selecting the Sound Mode Anynet HDMI CEC Picture Mode Standard Sound Mode Custom Sleep Timer Off SRS TS XT Off Energy Savi...

Страница 25: ...ou wish to use the automatic On Off timers 1 Press the MENU button to display the menu Press the or button to select Setup then press the ENTER button 2 Press the or button to select Time then press the ENTER button 3 Press the ENTER button to select Clock Set 4 To Press the Move to Month Day Year Hour or Minute or button Set the Month Day Year Hour or Minute or button Confirm the setting ENTER bu...

Страница 26: ...mer Settings can be made You must set the clock first 4 Press the or button to select the required item below Press the or button to adjust to the setting satisfied On Time Select hour minute and On Off To activate timer with the setting satisfied set to On Off Time Select hour minute and On Off To activate timer with the setting satisfied set to On Repeat Select Once Everyday Mon Fri Mon Sat or S...

Страница 27: ...Switch the Entertainment function off Sports Provides the optimal picture and sound quality for sports You can enjoy more thrilling Colour and sound Cinema Provides the optimal picture and sound quality for cinema You can experience a richer picture and enhanced sound Game Provides the optimal picture and sound quality for games This mode accelerates the playing speed when using an external game c...

Страница 28: ... l ll Mono Move Adjust Exit Tools You can select among external sources connected to your TV s input jacks 1 Press the MENU button to display the menu Press the or button to select Input then press the ENTER button 2 Press the ENTER button again to select Source List Available signal sources TV Ext 1 Ext 2 AV S Video Component PC HDMI1 HDMI2 HDMI3 DTV You can choose only those external devices tha...

Страница 29: ...ess the ENTER button 3 Press the or button to select the device that you wish to edit Press the ENTER button 4 Press the or button to select the required device Press the ENTER button 5 Press the EXIT button to exit Editing the Input Source Names TV Input Source List TV Edit Name Anynet HDMI CEC Move Enter Return TV Edit Name Ext 1 Ext 2 AV S Video Component PC HDMI1 HDMI2 HDMI3 Move Enter Return ...

Страница 30: ...Full Guide Scheduled List Default Guide Channel Country Auto Store Manual Store Edit Favourite Channels Channel List Setup Menu Transparency Change PIN Parental Lock Subtitle Subtitle Mode Audio Format Audio Description Digital Text Time Zone Common Interface System Product Information Signal Information Software Upgrade Reset High Medium Low Opaque Off On Normal Hard of hearing Primary Audio Lang...

Страница 31: ...on message is displayed Updating the Channel List Manually You can specify the channel for a fast channel search 1 Press the MENU button to display the menu Press the or button to select Digital Menu then press the ENTER button 2 Press the or button to select Channel then press the ENTER button 3 Press the or button to select Manual Store then press the ENTER button 4 Press the or button to select...

Страница 32: ...utton to display the menu Press the or button to select Digital Menu then press the ENTER button 2 Press the or button to select Channel then press the ENTER button 3 Press the or button to select Edit Favourite Channels then press the ENTER button 4 Press the red button in the Edit Favourite Channels menu To add more channels refer to the step 5 on the previous description 5 If you want to check ...

Страница 33: ...ned to the other channel That is the two numbers are exchanged The Favourite Channels are automatically sorted in ascending order of channel numbers 7 Press the EXIT button to exit Preview 1 In the Edit Favourite Channels menu select the channel to be previewed by pressing the or button 2 Press the yellow button The selected channel is displayed on the screen Delete 1 In the Edit Favourite Channel...

Страница 34: ...all channels Your favourite channels are only displayed if they were previously set in the Editing Your Favourite Channels menu refer to page 30 6 Press the red or green button to display the previous or next channel List page 7 Press the or button to select a channel to be tuned Press the ENTER button The channel number name and an icon are displayed in the top left corner while changing the chan...

Страница 35: ...is cancelled with the clock icon gone For details about scheduling programmes refer to the next page View programme information Select a programme of your choice by pressing the button Press the INFO button when the programme of your choice is highlighted Toggle between the Now Next Guide or Full Guide Press the red button repeatedly Display the Favourites and the All Channels list Press the green...

Страница 36: ...red button The channel will be switched to the scheduled programme 5 Press the ENTER button to select an item and adjust with the or button You can also set hour and minute by pressing the number buttons on the remote control Channel Set the channel Time Set the time Date Set Year Month and Day Frequency Set the frequency Once Daily or Weekly 6 After setting the schedule Press the red button 7 Pre...

Страница 37: ...he list of channels that have been scanned by the channel list update All channels are displayed in the all channel mode Favourites favourite channels is the list of channels that has been set in the Edit Favourite Channels menu refer to page 30 Adjusting the Menu Transparency You can set the Transparency of the menu 1 Press the MENU button to display the menu Press the or button to select Digital...

Страница 38: ...nu then press the ENTER button 2 Press the or button to select Setup then press the ENTER button 3 Press the or button to select Change PIN then press the ENTER button The Enter PIN is displayed 4 Enter your current 4 digit PIN code by using the numeric buttons 0 9 The Enter New PIN is displayed 5 Enter your new PIN code by using the numeric buttons 0 9 The Confirm New PIN is displayed 6 Re enter ...

Страница 39: ...gh Hard of hearing mode is selected Selecting the Audio Format You can only hear Dolby Digital sound through the audio receiver connected through an optical cable You can only hear PCM sound through the main speaker When sound is emitted from both the main speaker and the audio receiver a sound echo may occur due to the decoding speed difference between the main speaker and the audio receiver In t...

Страница 40: ...tion This is an auxiliary audio function that provides an additional audio track for visually challenged persons This function handles the Audio Stream for the AD Audio Description when it is sent along with the Main audio from the broadcaster Users can turn the Audio Description On or Off and control the volume 1 Press the MENU button to display the menu Press the or button to select Digital Menu...

Страница 41: ...t information For service or repair please contact a Samsung approved dealer 1 Press the MENU button to display the menu Press the or button to select Digital Menu then press the ENTER button 2 Press the or button to select Setup then press the ENTER button 3 Press the or button to select System then press the ENTER button 4 Press the ENTER button again to select Product Information The Product In...

Страница 42: ...urrently broadcasting channels Standby Mode Upgrade On Off Press the ENTER button To continue software upgrade with master power on Select On by pressing the or button 45 minutes after entering standby mode a manual upgrade is automatically conducted Since the power of the unit is turned on internally the screen may be on slightly for the LCD product This phenomenon may continue for more than 1 ho...

Страница 43: ...common interface slot Insert the CAM in the direction of the arrow right up to the end so that it is parallel with the slot 4 Check if you can see a picture on a scrambled signal channel Selecting the CI Common Interface Menu This enables the user to select from the CAM provided menu 1 Press the MENU button to display the menu Press the or button to select Digital Menu then press the ENTER button ...

Страница 44: ...eferences returning all values to their default factory state 1 Press the MENU button to display the menu Press the or button to select Digital Menu then press the ENTER button 2 Press the or button to select Setup then press the ENTER button 3 Press the or button to select System then press the ENTER button 4 Press the or button to select Reset then press the ENTER button 5 The Enter PIN screen w...

Страница 45: ...ons of the selected menu are displayed Select the appropriate language by pressing the or button Press the ENTER button to confirm your choice If you change the language setting the Subtitle Language Audio Language and the Teletext Language of the Language menu refer to page 42 are automatically changed to the selected language The Subtitle Language Audio Language and the Teletext Language of the ...

Страница 46: ...indows XP When using an HDMI DVI cable connection you must use the HDMI IN 2 jack The interlace mode is not supported The set might operate abnormally if a non standard video format is selected Separate and Composite modes are supported SOG is not supported Display Modes Both screen position and size will vary depending on the type of PC monitor and its resolution The resolutions in the table are ...

Страница 47: ...e tune again After the noise has been reduced re adjust the picture so that it is aligned on the center of screen Press the or button to select Coarse or Fine then press the ENTER button Press the or button to adjust the screen quality Press the ENTER button Position Adjust the PC s screen positioning if it does not fit the TV screen Press the or button to adjusting the Vertical Position Press the...

Страница 48: ...y listen to 2 channel stereo sound in other cases Make sure to connect the Digital Audio IN Optical of the home theatre and the TV correctly to listen to TV sound through the home theatre However you cannot listen to sound from the BD recorder that is sent to the home theatre via the TV in 5 1 channel sound because the TV outputs only 2 channel stereo sound Please see the manual for the home theat...

Страница 49: ...ess the ENTER button 2 Press the or button to select Yes then press the ENTER button The Auto turn off function is enabled If you select No the Auto turn off function is cancelled Press the EXIT button to exit The Select Device setting of the TV remote control is to be set to TV to use the Anynet function If you set Auto Turn Off to No connected external devices are also turned off when the TV is ...

Страница 50: ...es may take up to 2 minutes You cannot cancel the operation during the switching operation The time required to scan for devices is determined by the number of connected devices When the device scan is complete the number of found devices is not displayed Although the TV automatically scans devices when it is turned on using the POWER button devices connected when the TV is on or under a specific ...

Страница 51: ...erating Status Available Buttons Anynet Device After switching to the device when the menu of the corresponding device is displayed on the screen Numeric buttons ENTER buttons Colour buttons EXIT button After switching to the device while playing a file Backward search Forward search Stop Play Pause Device with built in Tuner After switching to the device when you are watching a TV programme P but...

Страница 52: ...t Anynet HDMI CEC Press the or button to select Receiver then press the ENTER button 2 Press the or button to select to On then press the ENTER button Now you can listen to sound through the receiver 3 Press the EXIT button to exit When the receiver is set to On you can listen to the TV sound through the 2 channel receiver If the receiver is exclusively for a home theatre only supporting audio onl...

Страница 53: ...button on the TV remote control and select a device other than Anynet devices Press any of P CH LIST PRE CH and such to change to the TV mode Note that the channel button operates only when a tuner embedded Anynet device is not connected The Configuring Anynet connection message appears on the screen You cannot use the remote control when you are configuring Anynet or switching to a view mode Use ...

Страница 54: ... it twice to overlap the teletext with the current broadcasting screen 7 0 mode Press to select the teletext mode LIST FLOF If you press it in the LIST mode it switches into the List save mode In the List save mode you can save teletext page into list using the 8 store button 8 1 sub page Used to display the available sub page 9 2 page up Used to display the next teletext page 0 3 page down Used t...

Страница 55: ...age number or search status D Date and time E Text F Status information FASTEXT information Teletext information is often divided between several pages displayed in sequence which can be accessed by Entering the page number Selecting a title in a list Selecting a coloured heading FASTEXT system Press the TV DTV button to exit from the teletext display ...

Страница 56: ...ton when no OSD is displayed on the TV screen the Adjustment screen appears Press the INFO button to reset Press the or button to select Yes then press the ENTER button The position is initialized to the default setting 3 Press the blue button Press the and buttons to select a save mode from either Position 1 Position 2 or Position 3 in order to save the current position To not save the current po...

Страница 57: ...ct your nearest dealer The auto wall mount will not work when Anynet is operating 37 and 40 inch models are not compatible with the old electrically powered wall mount model WMN5090A Wall Mount Adjusment Adjust Save Center INFO Position1 Position 1 2 3 Using the Anti Theft Kensington Lock depending on the model The Kensington lock is a device used to physically fix the system when using it in a pu...

Страница 58: ...is interference is often due to the use of an indoor aerial Remote control malfunctions Replace the remote control batteries Clean the upper edge of the remote control transmission window Check the battery terminals Check signal cable message is displayed Check that the signal cable is firmly connected to the PC or video sources Check that the PC or video sources are turned on On PC mode Not Suppo...

Страница 59: ...nsiderations Operating Temperature Operating Humidity Storage Temperature Storage Humidity 10 C to 40 C 50 F to 104 F 10 to 80 non condensing 20 C to 45 C 4 F to 113 F 5 to 95 non condensing 10 C to 40 C 50 F to 104 F 10 to 80 non condensing 20 C to 45 C 4 F to 113 F 5 to 95 non condensing Stand Swivel Left Right 20 20 20 20 Model Name LE40A436 LE40A437 Screen Size Diagonal 40 inch PC Resolution 1...

Страница 60: ...k To avoid electric shock never touch the inside of this apparatus Only a qualified technician should open this apparatus Make sure to plug the power cord in until it is firmly inserted When removing the power cord make sure to hold the power plug when pulling the plug from the outlet Do not touch the power cord with wet hands If this apparatus does not operate normally in particular if there are ...

Страница 61: ... UK Only United Kingdom This Samsung product is warranted for a period of twelve 12 months from the original date of purchase against defective materials and workmanship In the event that warranty service is required you should return the product to the retailer from whom it was purchased However Samsung Authorised Dealers and Authorised Service Centres in other EC Countries will comply with the w...

Страница 62: ...or human health from uncontrolled waste disposal please separate this from other types of wastes and recycle it responsibly to promote the sustainable reuse of material resources Household users should contact either the retailer where they purchased this product or their local government office for details of where and how they can take this item for environmentally safe recycling Business users ...

Страница 63: ...This page is intentionally left blank ...

Отзывы: