background image

English-2

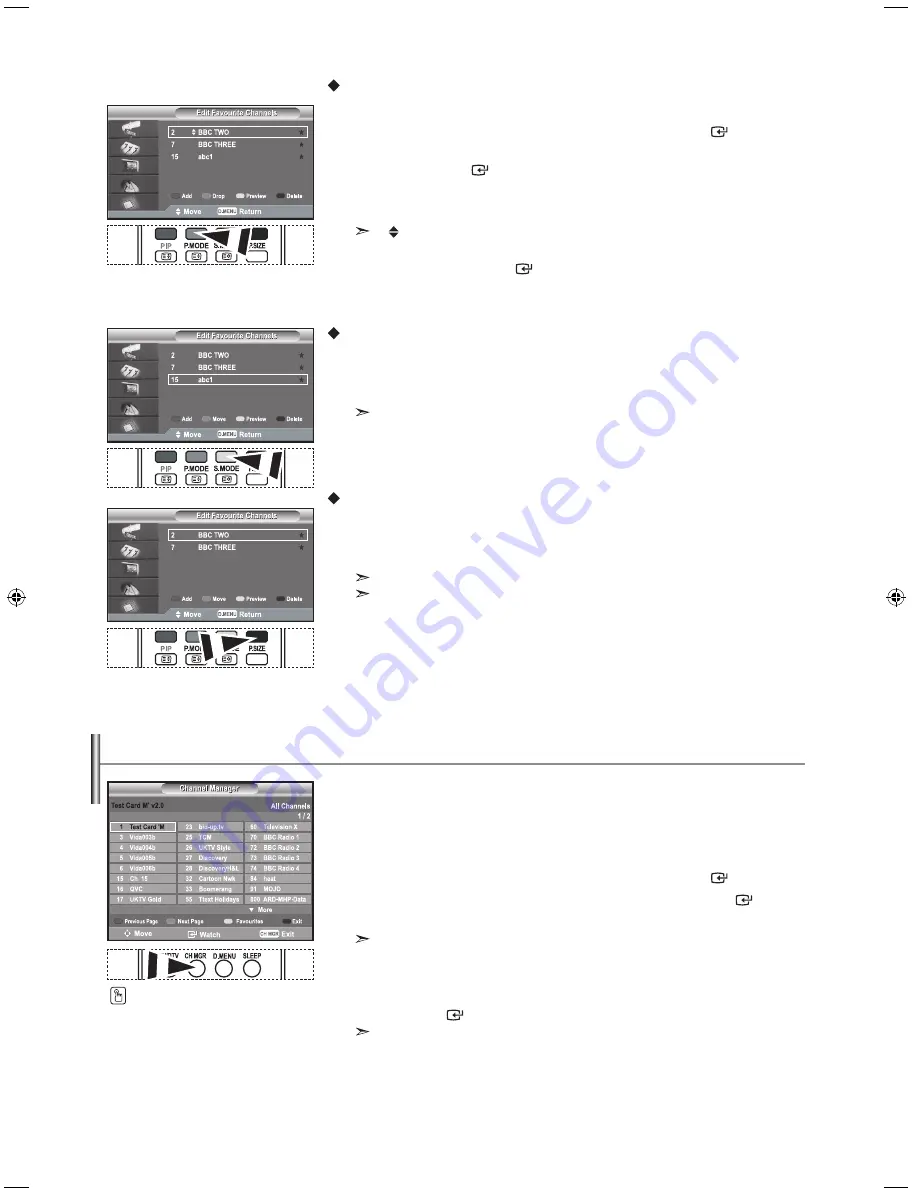
Move

1. 

Press the 

d.menu 

button to display the DTV menu.

2. 

Press the 

5

 or 

6

 button to select "Channel", then press the 

enter

 button.

3. 

Press the 

5

 or 

6

 button to select "Edit Favourite Channels",  


then press the 

enter

 button. 

4. 

Select the required channel using the 

5

 or 

6

 button.

5. 

Press the green button. 


A " " icon is displayed on the left side of the channel name.

6. 

Press the 

5

 or 

6

 button to select the channel that you want to move,  


and press the green or 

enter

 button.

7. 

Press the 

exit

 button to exit.

Preview

1. 

In the "Edit Favourite Channels" menu,  


select the channel to be previewed by pressing the 

5

 or 

6

 button.

2. 

Press the yellow button. 


The selected channel is displayed on the screen.

Delete

1. 

In the "Edit Favourite Channels" menu, select the channel to be deleted   


from the favourite channels list by pressing the 

5

 or 

6

 button.

2. 

Press the blue button. 


The selected channel and number will be deleted. 


To add a deleted channel back in to the favourite channel list, see "Add" on page 20.

You can exclude the channels you have chosen from the channels you have scanned.

When you scan through the stored channels, those you have chosen to skip are not 

displayed. All channels that you do not specifically choose to skip are displayed 

during scanning.

1. 

Press the 

d.menu 

button to display the DTV menu.

2. 

Press the 

5

 or 

6

 button to select "Channel", then press the 

enter

 button.

3. 

Press the 

5

 or 

6

 button to select "Channel Manager". Press the 

enter

 button.

4. 

Press the yellow button to toggle between your favourite channels and all channels. 


Your favourite channels are only displayed if they were previously set in the  


" Editing Your Favourite Channels" menu (refer to page 20~2).

5. 

Press the red or green button to display the previous or next channel manager page.

6. 

Press the 

5

 or 

6

 button to select a channel to be tuned.  


Press the 

enter

 button. 


  The channel number, name and an icon are displayed in the top left corner while changing 

the channel. The channel number and name are displayed if the channel is one of the all 
channels, and a  icon if the channel is one of the favourite channels.

7. 

Press the blue or 

Ch mgr

 button to exit from the channel manager.

Selecting Channel manager


You can select these options  by 

simply pressing the  

Ch mgr 

button 

on the remote control.

BN68-01007C-00Eng.indd   21

2006-03-03   ¿ÀÈÄ 3:03:24

Содержание LE26R74BD

Страница 1: ...sung Country BELGIUM CZECH REPUBLIC DENMARK FINLAND FRANCE GERMANY HUNGARY ITALIA LUXEMBURG NETHERLANDS NORWAY POLAND PORTUGAL RUSSIA SLOVAKIA SPAIN SWEDEN U K UKRAINE Customer Care Center 02 201 2418 844 000 844 38 322 887 09 693 79 554 08 25 08 65 65 0 15 Min 01805 121213 0 12 Min 06 40 985 985 199 153 153 02 261 03 710 0900 20 200 88 0 10 Min 231 627 22 0 801 801 881 80 8 200 128 8 800 200 0400...

Страница 2: ...ll images Précautions à prendre lors de l affichage d une image fixe Une image fixe peut causer des dommages irrémédiables à l écran du téléviseur N affichez pas une image fixe sur l écran LCD plus de 2 heures Cela pourrait provoquer une rémanence de l image à l écran Cette rémanence de l image est également appelée brûlure de l écran Pour éviter une telle rémanence de l image à l écran réduisez l...

Страница 3: ...ting the Sleep Timer 16 Switching the Television On and Off Automatically 16 Setting the Others Choosing Your Language 17 Using Game Mode 17 Setting the Blue Screen Mode Selecting the Melody 17 Using the Energy Saving Feature 18 Selecting the Source 18 Editing the Input Source Names 18 uSING The DTV FeATuRe Previewing the DTV Menu System 19 Updating the Channel List Automatically 19 Updating the C...

Страница 4: ... the screen size of 40 inch and above Installing the Stand Warranty card Service Network Card Safety Guide Registration Cards Not available in all locations The stand and stand screw may not be included depending on the model Wall mount items sold separately allow you to mount the TV on the wall For detailed information on installing the wall mount see the instructions provided with the Wall Mount...

Страница 5: ...olume In the on screen menu use the buttons as you use the 3 and 4 buttons on the remote control Press to change channels In the on screen menu use the buttons as you use the 5 and 6 buttons on the remote control Without the Remote Control you can turn on the TV by using the Channel buttons Speakers Power Indicator Blinks and turns off when the power is on and lights up in stand by mode Power Pres...

Страница 6: ...ur of the connection terminal to the cable Side Panel Jacks 26 inch model does not have the side panel jacks Rear Panel Jacks 26 inch Rear Panel Jacks 32 inch 37 inch 40 inch Connecting an Aerial or Cable Television Network To view television channels correctly a signal must be received by the set from one of the following sources An outdoor aerial A cable television network A satellite network ...

Страница 7: ...your set and the other end to the Video Card of your computer Connect the stereo audio cable optional to AUDIO PC IN on the rear of your set and the other end to Audio Out of the sound card on your computer Connecting Component Devices DTV DVD Connect component video cables optional to component connector PR PB Y on the rear of your set and the other ends to corresponding component video out conne...

Страница 8: ...text mode selection LIST FLOF Teletext sub page P Teletext next page P Teletext previous page Teletext cancel Teletext reveal Alternately select Teletext Double or Mix Fastext topic selection Teletext store The performance of the remote control may be affected by bright light This is a special remote control for the visually impaired and has Braille points on the Power Channel and Volume buttons V...

Страница 9: ... at any time to interrupt the memorization process 6 Press the ENTER button Select the Hour or Minute by pressing the or button Set the Hour or Minute by pressing the or button You can also set the hour and minute by pressing the number buttons on the remote control 7 Press the ENTER button to confirm your setting The DTV channel scan menu appears and the DTV channel is automatically updated If th...

Страница 10: ...ch stored channel which you wish to identify 1 Press the MENU button to display the menu Press the or button to select Channel then press the ENTER button 2 Press the or button to select Manual Store then press the ENTER button 3 Press the ENTER button to select Programme 4 To assign a programme number to a channel find the correct number by pressing the or button and then press the ENTER button Y...

Страница 11: ...h as children from watching unsuitable programmes by muting out video and audio Child Lock cannot be released using the buttons on the side Only the remote control can release the Child Lock setting so keep the remote control away from children 1 Press the MENU button to display the menu Press the or button to select Channel then press the ENTER button 2 Press the or button to select Channel Manag...

Страница 12: ...ress the or button to select Fine Tune then press the ENTER button 4 Press the or button to adjust the fine tuning Press the ENTER button 5 Press the EXIT button to exit Fine tuned channels that have been saved are marked with an asterisk on the right hand side of the channel number in the channel banner And the channel number turns red To reset the fine tuning select Reset by pressing the or butt...

Страница 13: ...k Your set has several settings which allow you to control picture quality 1 To select the desired picture effect follow the Changing the Picture Standard instructions number 1 to 4 2 Press the or button to select a particular item Press the ENTER button 3 Press the or button to decrease or increase the value of a particular item Press the ENTER button 4 Press the EXIT button to exit Adjusting the...

Страница 14: ...ect by pressing the or buttons Use the or button to move the picture up and down After selecting use the or button to magnify or reduce the picture size in the vertical direction Resetting the Picture Settings to the Factory Defaults Changing the Picture Size If the broadcast signal received by your TV is weak you can activate the Digital Noise Reduction feature to help reduce any static and ghost...

Страница 15: ...NTER button Select a source of the sub picture by pressing the or button and press the ENTER button The sub picture can serve different source selections based on what the main picture is set to 5 Press the or button to select Swap To interchange the main picture and the sub picture select Swap option and press the ENTER button The main picture and the sub picture are interchanged If main picture ...

Страница 16: ...ct Sound then press the ENTER button 2 Press the or button to select Equalizer then press the ENTER button 3 Press the or button to select a particular item Press the ENTER button 4 Press the or button to reach the required setting Press the ENTER button 5 Press the EXIT button to exit If you make any changes to these settings the Sound Mode is automatically switched to Custom Adjusting the Sound ...

Страница 17: ...ton to exit You can select this option when the PIP is set to On refer to page 13 If you want to hear the sound through separate speakers cancel the internal amplifier 1 Press the MENU button to display the menu Press the or button to select Sound then press the ENTER button 2 Press the or button to select Internal Mute then press the ENTER button 3 Press the or button to select On or Off Press th...

Страница 18: ...itches to standby mode when the timer reaches 0 You can set the On Off timers so that the set will Switch on automatically and tune to the channel of your choice at the time you select Switch off automatically at the time you select The first step is to set the television s clock 1 Press the MENU button to display the menu Press the or button to select Setup then press the ENTER button 2 Press the...

Страница 19: ...Adjust the sound using the equalizer The Reset Sound function is activated Selecting the Reset function after setting the equalizer resets the equalizer setting to the factory defaults Blue Screen If no signal is being received or the signal is very weak a blue screen automatically replaces the noisy picture background If you wish to continue viewing the poor picture you must set the Blue Screen m...

Страница 20: ...ted to your set only TV Ext 1 Ext 2 are activated in the Source List AV S Video Component PC HDMI DTV are activated only when they are connected to your set 3 Select the required device by pressing the or button Press the ENTER button Name the device connected to the input jacks to make your input source selection easier 1 Press the MENU button to display the menu Press the ENTER button to select ...

Страница 21: ...te channel list will not be deleted when the channel list is updated To stop the scan before it has finished press the ENTER button with STOP selected 5 Press the EXIT button to exit If the signal status is poor the No Service found Check the aerial connection message is displayed Press the D MENU button Guide Now Next Guide Full Guide Scheduled List Default Guide Now Next Full Guide Feature Subti...

Страница 22: ... currently stored channels 5 Press the or button to select a channel you want Press the ENTER button A icon is shown next to the selected channel and the channel will be added to the favourite channel list To undo press the ENTER button again Select All Select all channels currently displayed Select None Deselect all selected channels Preview Displays a currently selected channel s The Favorite Ch...

Страница 23: ...om the channels you have scanned When you scan through the stored channels those you have chosen to skip are not displayed All channels that you do not specifically choose to skip are displayed during scanning 1 Press the D MENU button to display the DTV menu 2 Press the or button to select Channel then press the ENTER button 3 Press the or button to select Channel Manager Press the ENTER button 4...

Страница 24: ...re included on the detailed information will be appeared if the summary is long Six channels are displayed To scroll between channels move to a channel using the or button To display page by page use the P or button Viewing the EPG Electronic Programme Guide Information The EPG Electronic Programme Guide information is provided by the broadcasters Programme entries may appear blank or out of date ...

Страница 25: ... the time Date Set Year Month and Day Frequency Set the frequency Once Daily or Weekly 6 After setting the schedule Press the red button 7 Press the EXIT button to exit The Scheduled list may be displayed in the EPG menu Save Save the adjusted schedule Cancle Cancel the adjusted schedule Add Programme Add a new schedule Edit Re adjust the selected schedule Delete Delete the selected schedule Using...

Страница 26: ...t No all channels will remain unchanged To edit the favourite channels refer to page 20 for more details 9 Press the EXIT button to exit All Channels is the list of channels that have been scanned by the channel list update All channels are displayed in the all channel mode Favourites favourite channels is the list of channels that has been set in the Edit Favourite Channels menu refer to page 20 ...

Страница 27: ...e or button to select Parental Lock then press the ENTER button 4 The Enter PIN is displayed 5 Enter your current 4 digit PIN code by using the numeric buttons 0 9 The options available in the Parental Lock group are displayed with the Parental Rating selected The default PIN code for a new TV set is 0000 If you enter an invalid PIN code the Invalid PIN code Please try again message is displayed 6...

Страница 28: ...R button to change the setting English is the default in cases where the selected language is unavailable in the broadcast 5 Press the EXIT button to exit While viewing a programme the subtitle can be selected While viewing a programme audio languages can be selected You can view your product information For service or repair please contact a Samsung approved dealer 1 Press the D MENU button to di...

Страница 29: ... button to select System then press the ENTER button 3 Press the or button to select Software Upgrade then press the ENTER button 4 To switch to an alternative version press the red button Press the blue button to reset activate the upgrade and restart 5 Press the EXIT button to exit This contains information on CAM inserted in the CI slot and displays it 1 Press the D MENU button to display the D...

Страница 30: ... factory state 1 Press the D MENU button to display the DTV menu 2 Press the or button to select System then press the ENTER button 3 Press the or button to select Reset then press the ENTER button 4 The Enter PIN screen will appear 5 Enter your current 4 digit PIN code by using the numeric buttons 0 9 The warning message is displayed All values will be reset by pressing the coloured buttons red g...

Страница 31: ...p menu mode If both languages are different select the same language with the Text language on the Setup menu Displaying the Teletext Information Selecting a Specific Teletext Page Press the number buttons on the remote control to enter the page number directly 1 Enter the three digit page number listed in the contents by pressing the corresponding numeric buttons 2 If the selected page is linked ...

Страница 32: ...tion Separate and Composite modes are supported SOG is not supported Display Modes Using Fastext to Select a Teletext Page Both screen position and size will vary depending on the type of PC monitor and its resolution The resolutions in the table are recommended All resolutions between the supported limits are supported Mode IBM VESA Resolution 640 x 480 720 x 400 640 x 480 640 x 480 800 x 600 800...

Страница 33: ...creen positioning if it does not fit the TV screen 1 Follow the Coarse and Fine Tuning of the Image Image Lock instructions number 1 to 3 2 Press the or button to select Position then press the ENTER button 3 Press the or button to adjusting the Vertical Position Press the or button to adjust the Horizontal Position Press the ENTER button 4 Press the EXIT button to exit Adjusting the PC Screen Aut...

Страница 34: ... move it further away Plug your set into a different mains socket Check the direction location and connections of your aerial This interference is often due to the use of an indoor aerial Replace the remote control batteries Clean the upper edge of the remote control transmission window Check the battery terminals Check that the signal cable is firmly connected to the PC or video sources Check tha...

Страница 35: ...0 20 LE26R73BD LE26R74BD LE32R73BD LE32R74BD LE37R74BD LE40R73BD LE40R74BD Stand Swivel Left Right Yes Model Name Screen Size Diagonal Power Supply Power Consumption PC Resolution Sound Output Dimension WxDxH Body With stand Weight With stand Environmental Considerations Operating Temperature Operating Humidity Storage Temperature Storage Humidity LE26R74BD 26 inch AC220 240V 50 Hz 120 W 1360 x 76...

Страница 36: ...This page is intentionally left blank ...

Страница 37: ...iseur 16 REGLAGE DES AUTRES OPTIONS Choix de la langue 17 Utilisation de Game Mode 17 Réglage du mode d écran bleu Sélection de mélodie 17 Utilisation de la fonction d économie d énergie 18 Sélection de la source 18 Modification du nom d une source d entrée 18 UTILISATION DE LA FONCTION DTV Aperçu du système de menu DTV 19 Mise à jour automatique de la liste des chaînes 19 Mise à jour manuelle de ...

Страница 38: ...s inclus Installation du support Carte de garantie Carte réseau de service Guide de sécurité Cartes d enregistrement N est pas disponible dans toutes les agences Selon le modèle il se peut que le socle et les vis ne soient pas inclus Les accessoires de montage mural vendus séparément vous permettent de fixer votre téléviseur au mur Pour plus d informations sur l installation du kit de montage mura...

Страница 39: ...z les boutons de la même manière que les boutons et de la télécommande Pour changer de canal Dans le menu à l écran utilisez les boutons de la même manière que les boutons et de la télécommande Vous pouvez allumer votre téléviseur sans votre télécommande à l aide de ces boutons Enceintes Voyant d alimentation Clignote puis s arrête lorsque le téléviseur est allumé S allume en mode Veille Alimentat...

Страница 40: ...hement à un réseau de télévision câblé ou hertzien Afin d afficher correctement les canaux de télévision un signal doit être reçu par le téléviseur moniteur depuis l une des sources suivantes Une antenne extérieure Un réseau de télévision câblée Un réseau satellite Entrée del alimentation Prises du panneau latéral Le modèle 26 pouce n est pas équipé de prises de panneau latéral Prises du panneau a...

Страница 41: ...re poste et à la carte vidéo de votre ordinateur Connectez le câble audio stéréo en option au connecteur AUDIO PC IN situé à l arrière de votre poste et au connecteur Audio Out de la carte son de votre ordinateur Branchement des périphériques composants moniteur lecteur DVD Connectez les câbles vidéo composante en option au connecteur composante PR PB Y situé à l arrière de votre poste et aux conn...

Страница 42: ...létexte Pause Télétexte Sélection de la taille du Télétexte Sélection du mode Télétexte LISTE FLOF Page secondaire Télétexte P Page Télétexte suivante P Page Télétexte précédente Annulation du Télétexte Affichage du Télétexte Vous pouvez également sélectionner Teletext Double ou Mix Sélection de sujets Fastext Mémorisation Télétexte Une lumière intense peut affecter le bon fonctionnement de la tél...

Страница 43: ...rocessus de mémorisation 6 Appuyez sur le bouton ENTER Sélectionnez l heure ou les minutes à l aide de la touche ou Validez l heure ou les minutes à l aide de la touche ou Vous pouvez également régler les heures et les minutes en appuyant sur les touches numériques de la télécommande 7 Appuyez sur le bouton ENTER pour confirmer votre choix Le menu de balayage du canal DTV s affiche et le canal DTV...

Страница 44: ...z sur le bouton MENU pour afficher le menu Appuyez sur le bouton ou pour sélectionner Canal puis sur la touche ENTER 2 Appuyez sur le bouton ou pour sélectionner Mémorisation Manuelle puis sur la touche ENTER 3 Appuyez sur le bouton ENTER pour sélectionner Programme 4 Pour attribuer un numéro de programme à un canal vous pouvez trouver le chiffre correspondant en appuyant sur le bouton ou puis app...

Страница 45: ...gardent des programmes inappropriés en désactivant la vidéo et l audio La sécurité enfant ne peut pas être désactivée à l aide des boutons du panneau latéral La télécommande étant le seul moyen de désactiver la sécurité enfant gardez la hors de portée des enfants 1 Appuyez sur le bouton MENU pour afficher le menu Appuyez sur le bouton ou pour sélectionner Canal puis sur la touche ENTER 2 Appuyez s...

Страница 46: ... fin puis sur la touche ENTER 4 Appuyez sur le bouton ou pour effectuer une syntonisation précise Appuyez sur le bouton ENTER 5 Appuyez sur le bouton EXIT pour quitter le menu Les chaînes réglées et mémorisées sont repérées par un astérisque placé à droite de leur numéro dans la bannière des chaînes Le numéro de la chaîne devient rouge Pour réinitialiser le réglage sélectionnez Réinitial à l aide ...

Страница 47: ...s permettent de contrôler la qualité de l image 1 Pour sélectionner l effet visuel souhaité observez les instructions 1 à 4 dans la section Modification de l image standard 2 Appuyez sur le bouton ou pour sélectionner un élément particulier Appuyez sur le bouton ENTER 3 Appuyez sur le bouton ou pour augmenter ou diminuer la valeur d un élément particulier Appuyez sur le bouton ENTER 4 Appuyez sur ...

Страница 48: ... de la touche ou Utilisez les touches ou pour monter ou descendre l image Après avoir sélectionné utilisez les touches ou pour agrandir ou réduire le format de l image dans le sens vertical Rétablir les paramètres de réglage de l image d usine Changement de la taille de l image Si le signal reçu par votre téléviseur est faible vous pouvez activer cette fonction pour réduire les parasites et les ré...

Страница 49: ...che ENTER Sélectionnez la Source de l image secondaire en appuyant sur le bouton ou puis appuyez sur le bouton ENTER L image secondaire peut provenir de différentes sources selon le réglage de l image principale 5 Appuyez sur le bouton ou pour sélectionner Intervertir Pour intervertir l image principale et l image secondaire sélectionnez l option Intervertir puis appuyez sur le bouton ENTER L imag...

Страница 50: ...ectionner Son puis sur la touche ENTER 2 Appuyez sur le bouton ou pour sélectionner Egaliseur puis sur la touche ENTER 3 Appuyez sur le bouton ou pour sélectionner un élément particulier Appuyez sur le bouton ENTER 4 Appuyez sur le bouton ou pour effectuer le réglage souhaité Appuyez sur le bouton ENTER 5 Appuyez sur le bouton EXIT pour quitter le menu Si vous modifiez ces paramètres le mode audio...

Страница 51: ...outon EXIT pour quitter le menu Vous pouvez sélectionner cette option lorsque la fonction PIP est activée Marche voir page 13 Pour écouter le son sur des haut parleurs différents supprimez l amplificateur interne 1 Appuyez sur le bouton MENU pour afficher le menu Appuyez sur le bouton ou pour sélectionner Son puis sur la touche ENTER 2 Appuyez sur le bouton ou pour sélectionner Silence Int puis su...

Страница 52: ... téléviseur passe automatiquement en mode veille lorsque la minuterie atteint 0 Vous pouvez activer ou désactiver la minuterie afin que Le téléviseur s allume automatiquement et se positionne sur la chaîne de votre choix au moment que vous avez choisi Le téléviseur s éteigne automatiquement au moment que vous avezchoisi La première étape consiste à régler l horloge du téléviseur 1 Appuyez sur le b...

Страница 53: ...on Réinitialiser les paramètres de son est activée Sélectionner la fonction Réinitialiser après avoir réglé l égaliseur rétablit ses paramètres par défaut Réglage du mode d écran bleu Sélection de mélodie Utilisation de Mode Jeu Ecran Bleu Si aucun signal n est reçu ou si le signal est très faible un écran bleu remplace automatiquement l arrière plan de l image parasité Pour continuer malgré tout ...

Страница 54: ... options TV Ext 1 Ext 2 sont activées dans Liste source Les options AV S Vidéo Composant PC et HDMI DTV ne sont activées qu en cas de connexion à votre poste 3 Sélectionnez le périphérique requis en appuyant à plusieurs reprises sur le bouton ou Appuyez sur le bouton ENTER Donnez un nom aux appareils connectés aux prises d entrée de manière à faciliter la sélection des sources d entrée 1 Appuyez s...

Страница 55: ...onction du modèle de CAM Système Information produit Informations de signal Mise à niveau du logiciel Interface commune Réinit Infos sur l application CI Menu Module Information Smart card information Language Software Download Mise à jour automatique de la liste des chaînes Vous pouvez mettre à jour la liste des chaînes lorsque votre opérateur ajoute de nouveaux services ou si vous déménagez 1 Ap...

Страница 56: ...uellement stockées 5 Appuyez sur le bouton ou pour sélectionner une chaîne Appuyez sur le bouton ENTER L icône est affichée près de la chaîne sélectionnée et cette dernière sera ajoutée à la liste des chaînes favorites Pour annuler appuyez une nouvelle fois sur le bouton ENTER Sélect tout Sélectionne toutes les chaînes actuellement affichées Sélect aucun Désélectionne toutes les chaînes sélectionn...

Страница 57: ...morisées celles que vous avez choisi d ignorer ne s affichent pas Toutes les chaînes que vous ne choisissez pas spécifiquement d ignorer s affichent lors du balayage 1 Appuyez sur le bouton D MENU pour afficher le menu DTV 2 Appuyez sur le bouton ou pour sélectionner Canal puis sur la touche ENTER 3 Appuyez sur le bouton ou pour sélectionner Gestionnaire de Chaînes puis sur la touche ENTER 4 Appuy...

Страница 58: ...texte et informations succinctes sur l émission mise en surbrillance s affiche si le résumé est trop long Six chaînes sont affichées Pour faire défiler les chaînes accédez à une chaîne à l aide du bouton ou Pour afficher une page à la fois utilisez le bouton P ou Affichage des informations du guide électronique des programmes EPG Les informations du guide électronique des programmes EPG sont fourn...

Страница 59: ...e fois Tous les jours ou Toutes les semaines 6 Après avoir effectué la programmation appuyez sur le bouton rouge 7 Appuyez sur le bouton EXIT pour quitter le menu La liste de programmation peut être affichée dans le menu EPG Sauvegarder Sauvegarde la programmation modifiée Annuler Annule la programmation modifiée Ajouter programme Ajoute une nouvelle programmation Modifier Modifie la programmation...

Страница 60: ...n les chaînes ne sont pas modifiées To edit the favourite channels refer to page 20 for more details 9 Appuyez sur le bouton EXIT pour quitter le menu La liste Toutes les chaînes contient les chaînes recherchées lors de la mise à jour de la liste des chaînes Dans ce mode toutes les chaînes sont affichées La liste Favourites Chaînes favorites contient les chaînes qui ont été choisies dans le menu C...

Страница 61: ...uton ou pour sélectionner Verrouillage parental puis sur la touche ENTER 4 Le Saisir Code PIN s affiche 5 Entrez votre code actuel à l aide des touches numériques 0 9 Les options disponibles dans le groupe Verrouillage parental s affichent et l option Classement parental est alors sélectionnée Le code par défaut d un nouveau téléviseur est 0000 Si vous entrez un code non valide le message Code non...

Страница 62: ...s disponible dans l émission regardée 5 Appuyez sur le bouton EXIT pour quitter le menu Lorsque vous regardez une émission vous pouvez activer les sous titres Lorsque vous regardez une émission vous pouvez choisir la langue de l audio Affichage d informations sur le produit Vous pouvez afficher les informations relatives à votre appareil Pour un entretien ou une réparation contactez un revendeur a...

Страница 63: ... ou pour sélectionner Mise à niveau du logiciel puis sur la touche ENTER 4 Pour passer à une autre version appuyez sur le bouton rouge Appuyez sur le bouton bleu pour réinitialiser l appareil activer la mise à jour et redémarrer 5 Appuyez sur le bouton EXIT pour quitter le menu Affichage de l interface commune Cette fonction affiche les informations stockées sur le module CAM inséré dans le logeme...

Страница 64: ...ges d usine 1 Appuyez sur le bouton D MENU pour afficher le menu DTV 2 Appuyez sur le bouton ou pour sélectionner Système puis sur la touche ENTER 3 Appuyez sur le bouton ou pour sélectionner Réinit puis sur la touche ENTER 4 L écran Saisir Code PIN s affiche 5 Entrez votre code actuel à l aide des touches numériques 0 9 Un message d avertissement s affiche Si vous appuyez successivement sur les b...

Страница 65: ...iguration En cas de différence sélectionnez la même langue que celle du menu Configuration Affichage des informations Télétexte Sélection d une page télétexte spécifique Appuyez sur les touches numériques de la télécommande pour entrer directement le numéro de page 1 Entrez le numéro de page à trois chiffres figurant dans la table des matières en appuyant sur les boutons numériques correspondants ...

Страница 66: ...dard est sélectionné Le mode DVI ne prend pas en charge la fonction PC Les modes séparé et composite modes sont pris en charge SOG n est pas pris en charge Modes d affichage Utilisation du système Fastext pour sélectionner une page télétexte La position et la taille de l écran varient en fonction du type et de la résolution du moniteur du PC Les résolutions du tableau sont recommandées toutes les ...

Страница 67: ... de l image Position Réglez la position de l écran du PC si elle n est pas adaptée à l écran du téléviseur 1 Suivez les instructions 1 à 3 de Réglage de base et réglage fin de l image Verrouillage Image 2 Appuyez sur le bouton ou pour sélectionner Position puis sur la touche ENTER 3 Appuyez sur le bouton ou pour régler la position horizontale Appuyez sur le bouton ou pour régler la position vertic...

Страница 68: ...éloignez le Branchez le téléviseur sur une autre prise Vérifiez l orientation l emplacement et les connexions de votre antenne Cette interférence est souvent due à l utilisation d une antenne intérieure Remplacez les piles de la télécommande Nettoyez la partie supérieure de la télécommande zone d émission des signaux Vérifiez les connecteurs des piles Assurez vous que le câble de signal est bien b...

Страница 69: ... 0 x 713 0 mm 24 0 kg 10 C 40 C 50 F 104 F 10 80 sans condensation 20 C 45 C 4 F 113 F 5 95 sans condensation Modèle Taille de l écran Diagonale Alimentation Consommation PC Résolution Son Sortie Dimension L x P x H TV Avec support Poids Avec support EnvConsidérationsenvironnementales Température de fonctionnement Humidité au cours du fonctionnement Température de stockage Humidité de stockage LE2...

Страница 70: ...Cette page est laissée intentionnellement en blanc ...

Страница 71: ...be mixed with other commercial wastes for disposal Comment éliminer ce produit déchets d équipements électriques et électroniques Applicable dans les pays de l Union Européen et aux autres pays européens disposant de systémes de collecte sélective Ce symbole sur le produit ou sa documentation indique qu il ne doit pas être éliminé en fin de vie avec les autres déchets ménagers L élimination incont...

Отзывы: