background image

English - 

RECOMMENDATIONS

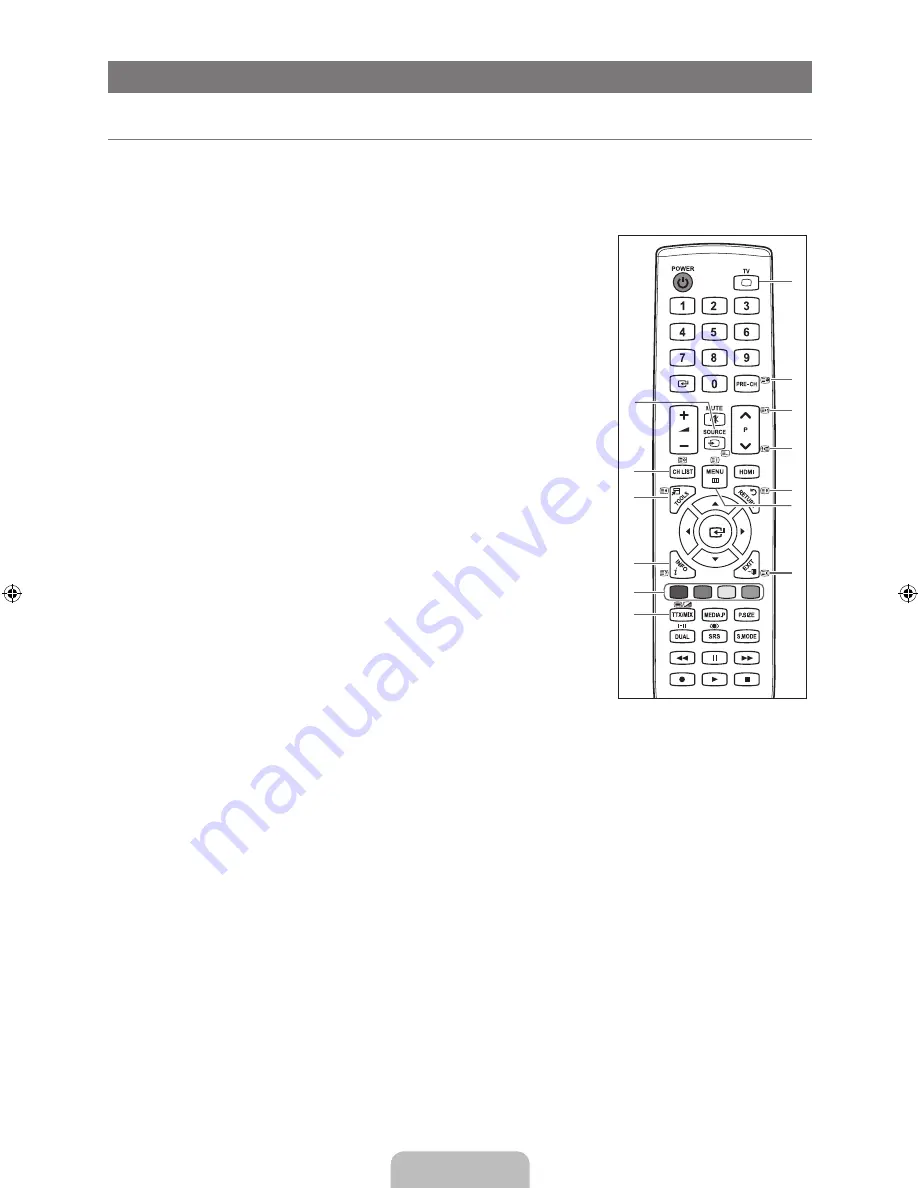
Teletext Feature

Most television stations provide written information services via Teletext. The index page of the Teletext service gives you 

information on how to use the service. In addition, you can select various options to suit your requirements by using the remote 

control buttons.

For Teletext information to be displayed correctly, channel reception must be stable. Otherwise, information may be missing or 

some pages may not be displayed.

1


0

 (mode)

Press to select the Teletext mode (LIST/ FLOF). If you press it in the LIST mode, it 

switches into the List save mode. In the List save mode, you can save Teletext page 

into list using the 

8

(store) button.

2


8

 (store)

Used to store the Teletext pages.

3


4

 (size)

Press to display the double-size letters in the upper half of the screen. For lower half 

of the screen, press it again. To display normal screen, press it once again.

4


5

 (reveal)

Used to display the hidden text (answers to quiz games, for example). To display 

normal screen, press it again.

5


Colour buttons (red/green/yellow/blue)

If the FASTEXT system is used by a broadcasting company, the different topics 

covered on a Teletext page are colour-coded and can be selected by pressing 

the coloured buttons. Press one of them corresponding to the required. The page 

is displayed with other coloured information that can be selected in the same 

way. To display the previous or next page, press the corresponding coloured 

button.

6


/

 (Teletext on/mix)

Press to activate Teletext mode after selecting the channel providing the Teletext 

service. Press it twice to overlap the Teletext with the current broadcasting screen.

7


:

 (exit)

Exit from the Teletext display.

8


1

 (sub-page)

Used to display the available sub-page.

9


2

 (page up)

Used to display the next Teletext page.

0


3

 (page down)

Used to display the previous Teletext page.

!


9

 (hold)

Used to hold the display on a given page if the selected page is linked with several 

secondary pages which follow on automatically. To resume, press it again.

@


6

 (index)

Used to display the index (contents) page at any time while you are viewing Teletext.

#


7

 (cancel)

Used to display the broadcast when searching for a page.

You can change Teletext pages by pressing the numeric buttons on the remote control. 

¦

N

N

1

2

3

5

6

4

8

7

9

0

!

#

@

[610]BN68-02042A-00Eng.indb   37

2009-03-17   �� 4:33:48

Содержание LA40B610

Страница 1: ... my NEW ZEALAND 0800 SAMSUNG 0800 726 786 www samsung com nz PHILIPPINES 1 800 10 SAMSUNG 726 7864 1 800 3 SAMSUNG 726 7864 02 5805777 www samsung com ph SINGAPORE 1800 SAMSUNG 726 7864 www samsung com sg THAILAND 1800 29 3232 02 689 3232 www samsung com th TAIWAN 0800 329 999 www samsung com tw VIETNAM 1 800 588 889 www samsung com vn SOUTH AFRICA 0860 SAMSUNG 726 7864 www samsung com za U A E 80...

Страница 2: ... it can cause screen image retention This image retention is also known as screen burn To avoid such image retention reduce the degree of brightness and contrast of the screen when displaying a still image Watching the LCD TV in 4 3 format for a long period of time may leave traces of borders displayed on the left right and centre of the screen caused by the difference of light emission on the scr...

Страница 3: ...Time 20 INPUT SUPPORT Input Menu 21 Support Menu 22 Media Play USB Connecting a USB Device 23 Media Play Function 24 Sorting the Photo List 25 Photo List Option Menu 26 Viewing a Photo or Slide Show 27 Slide Show Option Menu 28 Sorting the Music List 29 Music List Option Menu 30 Playing a Music 31 Using the Setup Menu 32 Music Play Option Menu 32 ANYNET Connecting Anynet Devices 33 Setting Up Anyn...

Страница 4: ... sources In the on screen menu use this button as you would use the ENTERE button on the remote control 2 MENU Press to see an on screen menu of your TV s features 3 y Press to increase or decrease the volume In the on screen menu use the y buttons as you would use the and buttons on the remote control 4 z Press to change channels In the on screen menu use the z buttons as you would use the and bu...

Страница 5: ...Cable Depending on the model Owner s Instructions Warranty card Safety Guide Registration Cards Please make sure the following items are included with your LCD TV If any items are missing contact your dealer Warranty card Safety Guide Registration Cards Not available in all locations The items colour and shape may vary depending on the model N N N ...

Страница 6: ... receivers supporting HDMI versions older than 1 3 are connected When connecting an older HDMI cable and there is no sound connect the HDMI cable to the HDMI IN 3 DVI jack and the audio cables to the DVI AUDIO IN jacks on the back of the TV If this happens contact the company that provided the DVD Blu ray player Cable Box Satellite receiver Set Top Box to confirm the HDMI version then request an u...

Страница 7: ... TV volume are adjusted separately 7 AUDIO OUT R AUDIO L Connect RCA audio cables to AUDIO OUT R AUDIO L on the rear of your set and the other ends to corresponding audio in connectors on the Amplifier or DVD Home Theatre 8 SERVICE Connector for service only 9 COMPONENT IN 1 2 Connect component video cables optional to component connector PR PB Y on the rear of your set and the other ends to corre...

Страница 8: ...d effect selection Use these buttons in the DMA Media Play and Anynet modes This remote can be used to control recording on Samsung recorders with the Anynet feature TV Selects the TV mode directly PRE CH Enables you to return to the previous channel you were watching MUTE M Press to temporarily cut off the sound P Press to change channels MENU Displays the main on screen menu HDMI Selects the HDM...

Страница 9: ...n the selected menu 1 Press the MENU button 2 The main menu appears on the screen The menu s left side has icons Picture Sound Channel Setup Input Application Support 3 Press the or button to select one of the icons 4 Then press the ENTERE button to access the icon s sub menu 5 Press the or button to select the icon s submenu 6 Press the or button to decrease or increase the value of a particular ...

Страница 10: ...the volume button on the TV When the volume OSD is displayed press and hold the MENU button on the TV for 5 seconds 4 Press the ENTERE button Select the appropriate area by pressing the or button Press the ENTERE button to confirm your choice 5 The channel search will start and end automatically Press the ENTERE button at any time to interrupt the memorization process After all the available chann...

Страница 11: ...e frequency range until the first channel or the channel that you selected is received on the screen Store When you store the channel and associated programme number Set to OK by pressing the ENTERE button Channel mode P Programme mode When completing tuning the broadcasting stations in your area have been assigned to position numbers from P00 to P99 You can select a channel by entering the positi...

Страница 12: ...l Channels Added Channels Favourites Press the TOOLS button to use the option menu Option menu items may differ depending on the channel status Add Delete You can delete or add a channel to display the channels you want All deleted channels will be shown on All Channels menu A gray coloured channel indicates the channel has been deleted The Add menu only appears for deleted channels You can also d...

Страница 13: ...l Deselect All Select All You can select all the channels in the channel list Deselect All You can deselect all the selected channels You can only select Deselect All when there is a selected channel Auto Store For detailed procedures on setting up options refer to page 9 If a channel is locked using the Child Lock function the PIN input window appears Channel List Option Menu in Programmed You ca...

Страница 14: ...ck light Contrast Adjusts the contrast level of the picture Brightness Adjusts the brightness level of the picture Sharpness Adjusts the edge definition of the picture Colour Adjusts colour saturation of the picture Tint G R Adjusts the colour tint of the picture In TV AV1 AV2 modes of the PAL system you cannot use the Tint G R Function When you make changes to Backlight Contrast Brightness Sharpn...

Страница 15: ...en Colour Space is set to Custom In Colour you can adjust the RGB values for the selected colour To reset the adjusted RGB value select Reset Red Adjusts the red saturation level of the selected colour Green Adjusts the green saturation level of the selected colour Blue Adjusts the blue saturation level of the selected colour Reset Resets the colour space to the default values White Balance You ca...

Страница 16: ... button Zoom Press the button to Select Position then press the ENTERE button Press the or button to move the picture up and down Then press the ENTERE button Press the button to Select Size then press the ENTERE button Press the or button to magnify or reduce the picture size in the vertical direction Then press the ENTERE button After selecting Screen Fit in HDMI 1080i 1080p or Component 1080i 1...

Страница 17: ... when the picture mode is set to Movie or Standard Picture Reset Reset Picture Mode Cancel Resets all picture settings to the default values Reset Picture Mode Current picture values return to default settings Viewing Picture in Picture You can use the PIP feature to simultaneously watch the TV tuner and one external video source This product has one built in tuner which does not allow PIP to func...

Страница 18: ...facturing D Sub and HDMI DVI Input Mode Resolution Horizontal Frequency KHz Vertical Frequency Hz Pixel Clock Frequency MHz Sync Polarity H V IBM 640 x 350 31 469 70 086 25 175 720 x 400 31 469 70 087 28 322 MAC 640 x 480 35 000 66 667 30 240 832 x 624 49 726 74 551 57 284 1152 x 870 68 681 75 062 100 000 VESA CVT 720 x 576 35 910 59 950 32 750 1152 x 864 53 783 59 959 81 750 1280 x 720 44 772 59 ...

Страница 19: ...by simply pressing the S MODE button on the remote control Standard Selects the normal sound mode Music Emphasizes music over voices Movie Provides the best sound for movies Clear Voice Emphasizes voice over other sounds Custom Recalls your customized sound settings Equalizer The sound settings can be adjusted to suit your personal preferences Mode Selects the sound mode among the predefined setti...

Страница 20: ...tput External Speaker Mute Sound Output Video No Signal Mute Mute Sound Select Main Sub When the PIP feature is activated you can listen to the sound of the sub PIP picture You can select this option when PIP is set to On Press the TOOLS button to display the Tools menu You can also set the sound of the sub picture by selecting Tools PIP Sound Select Sound Reset Reset All Reset Sound Mode Cancel Y...

Страница 21: ... Provides the optimal picture quality for SAMSUNG DVD Blu ray and Home Theatre products which support BD Wise You can enjoy a richer picture when using them connected to this Samsung TV Connect SAMSUNG products that have BD Wise using an HDMI cable BD Wise is available in HDMI mode When the BD Wise set to On the picture mode is automatically changed to the optimal resolution Child Lock Off On This...

Страница 22: ...ote control Sleep Timer The sleep timer automatically shuts off the TV after a preset time 30 60 90 120 150 and 180 minutes Press the TOOLS button to display the Tools menu You can also set the sleep timer by selecting Tools Sleep Timer To cancel the Sleep Timer function select Off Timer 1 Timer 2 Timer 3 Three different on off timer settings can be made You must set the clock first On Time Set th...

Страница 23: ...trol to view an external signal source TV mode can be selected by pressing the TV button You can also watch HDMI mode simply by pressing the HDMI button on the remote control TV AV1 AV2 Component1 Component2 PC HDMI1 HDMI2 HDMI3 DVI HDMI4 USB You can choose only those external devices that are connected to the TV In the Source List connected inputs will be highlighted and sorted to the top Inputs ...

Страница 24: ...he software already installed in the TV Alternative Software Backup shows the previous version that will be replaced Software is represented as Year Month Day_Version The more recent the date the newer the software version Installing the latest version is recommended By USB Insert a USB drive containing the firmware upgrade downloaded from samsung com into the TV Please be careful to not disconnec...

Страница 25: ...hat have been downloaded from a non free site cannot be played Digital Rights Management DRM is a technology that supports the creation of content the distribution and management of the content in an integrated and comprehensive way including the protection of the rights and interests of the content providers the prevention of the illegal copying of contents as well as managing billings and settle...

Страница 26: ...ia Play mode press the MEDIA P button on the remote control Removing a USB Memory Device Safely You can remove the device safely from the TV 1 Press the TOOLS button in the Media Play file list screen or while a Slide Show or music is being played 2 Press the or button to select Remove Safely then press the ENTERE button 3 Remove the USB device from the TV Screen Display Move to either Sort key Li...

Страница 27: ...he File List Section Press the Play ENTERE button to start the Slide Show in the order you selected To move to the previous next group press the π REW or μ FF button Photo information is automatically set The colour information extracted from a photo file may be different from your expectations You can change the colour and preference PTP does not support folder sort mode Basic View Shows the fold...

Страница 28: ...in order to move it from one colour group to another This does not change the actual colour of the photo The group information of the current file is updated and the photos are moved to the new colour group To change the information of multiple files select the files you want by pressing the Yellow button Deselect All When at least one file is selected You can deselect all files The c mark indicat...

Страница 29: ...File List Section select the photos contained in the desired group To move to the previous next group press the π REW or μ FF button Press the TOOLS button Press the or button to select Play Current Group then press the ENTERE button Only the photos in the sorting group including the selected files will be used for the Slide Show To perform a Slide Show with only the selected files Press the butto...

Страница 30: ...otated file is not saved Zoom You can magnify photos saved on a USB memory device x1 x2 x4 To move the enlarged photo image press the ENTERE button then press the buttons Note that when the enlarged picture is smaller than the original screen size the location change function doesn t work The enlarged file is not saved Background Music You can select background music when watching a Slide Show To ...

Страница 31: ...cannot set Favourites files Title Sorts the music titles in symbol number alphabet special order and shows the music file Artist Sorts the music file by artist in symbol number alphabet special order Mood Energetic Rhythmical Sad Exciting Calm Unclassified Sorts music files by the mood You can change the music mood information Genre Sorts music files by the genre Folder Sorts music files by the fo...

Страница 32: ...he group information of the current file is updated and the file is moved to the new group To change the information of multiple files select files by pressing the Yellow button Deselect All When at least one file is selected You can deselect all files The c mark indicating the corresponding file is selected is hidden Information The music file information including the name the size the date modi...

Страница 33: ...all music files in the folder or the selected file are repeated Repeat Mode is On q When all music files in the folder or the selected file are played once Repeat Mode is Off Playing the music group 1 Press the button to move to the Sort key Section 2 Press the or button to select a sorting standard 3 Press the or ENTERE button to move to the Group List Section 4 Press the Play button The files of...

Страница 34: ...rol Use Colour View On Off You can select sorting photos by colour If this option is set to On the loading time may be increased to collect colour information from the photos Music Repeat Mode On Off Select to repeatedly play music files Screen Saver Run Time 2 hours 4 hours 8 hours Select to set the waiting time before the screen saver appears Information Select to viewing the information of the ...

Страница 35: ...e HDMI OUT jack of the corresponding Anynet device using an HDMI cable 2 Connect the HDMI IN jack of the home theatre and the HDMI OUT jack of the corresponding Anynet device using an HDMI cable Connect only one Home Theatre You can connect an Anynet device using the HDMI 1 3 cable Some HDMI cables may not support Anynet functions Anynet works when the AV device supporting Anynet is in the Standby...

Страница 36: ...ete the number of devices found are not displayed Although the TV automatically searches the device list when the TV is turned on via the power button devices connected to the TV may not always be automatically displayed in the device list Press the red button to search for the connected device If you have selected external input mode by pressing the SOURCE button you cannot use the Anynet functio...

Страница 37: ... connected the recording devices are listed Press the or button to select a recording device and press the ENTERE button Recording begins When the recording device is not displayed select Device List and press the Red button to search devices 3 Press the EXIT button to exit You can record the source streams by selecting Recording device_name Pressing the button will record whatever you are current...

Страница 38: ...enu you want I want to exit Anynet Select View TV in the Anynet menu Press the SOURCE button on the TV remote control and select a device other than Anynet devices Press P and PRE CH to change the TV mode Note that the channel button operates only when a tuner embedded Anynet device is not connected The message Connecting to Anynet device appears on the screen You cannot use the remote control whe...

Страница 39: ... red green yellow blue If the FASTEXT system is used by a broadcasting company the different topics covered on a Teletext page are colour coded and can be selected by pressing the coloured buttons Press one of them corresponding to the required The page is displayed with other coloured information that can be selected in the same way To display the previous or next page press the corresponding col...

Страница 40: ...ses additional graphics or text is not transmitted Older TV s which do not support version 2 5 are not capable of displaying any additional graphics or text regardless of the Teletext transmission Press the TV button to exit from the Teletext display Installing the Stand 1 Attach your LCD TV to the stand Two or more people should carry the TV Make sure to distinguish between the front and back of ...

Страница 41: ...ith the Wall Mount items Contact a technician for assistance when installing the wall mounted bracket Samsung Electronics is not responsible for any damage to the product or injury to yourself or others if you elect to install the TV on your own Do not install your Wall Mount Kit while your TV is turned on It may result in personal injury due to electric shock Remove the stand and cover the bottom...

Страница 42: ...id the TV from falling 1 Put the screws into the clamps and firmly fasten them onto the wall Confirm that the screws have been firmly installed onto the wall You may need additional material such as an anchor depending on the type of wall Since the necessary clamps screws and string are not supplied please purchase these additionally 2 Remove the screws from the centre back of the TV put the screw...

Страница 43: ... indoor aerial Remote control malfunctions Replace the remote control batteries Clean the upper edge of the remote control transmission window Check the battery terminals Check signal cable message is displayed Check that the signal cable is firmly connected to the PC or video sources Check that the PC or video sources are turned on On PC mode Not Supported Mode message is displayed Check the maxi...

Страница 44: ...3 F 5 to 95 non condensing Stand Swivel Left Right 20 20 Model Name LA52B610 Screen Size Diagonal 52 inch PC Resolution Optimum 1920 x 1080 60 Hz Sound Output 10W X 2 Dimensions WxDxH Without Stand With stand 1276 x 81 x 806 mm 1276 x 308 x 863 mm Weight With Stand 31 kg Environmental Considerations Operating Temperature Operating Humidity Storage Temperature Storage Humidity 10 C to 40 C 50 F to ...

Страница 45: ...This page is intentionally left blank ...

Отзывы: