background image

LCD TV

user manual

imagine the possibilities

Thank you for purchasing this Samsung product. 

To receive more complete service, please register 

your product at

www.samsung.com/global/register

Model                         Serial No.                       

BN68-01717L-00

Contact SAMSUNG WORLDWIDE

If you have any questions or comments relating to Samsung products,  

please contact the SAMSUNG customer care centre. 

Country

Customer Care Centre   

Web Site

AUSTRALIA

1300 362 603 

www.samsung.com/au

CHINA

800-810-5858

400-810-5858

010-6475 1880

www.samsung.com/cn

HONG KONG:3698 - 4698

www.samsung.com/hk

INDIA

3030 8282

1-800-3000-8282 

1800 110011

www.samsung.com/in

INDONESIA

0800-112-8888

www.samsung.com/id

JAPAN

0120-327-527

www.samsung.com/jp

MALAYSIA

1800-88-9999

www.samsung.com/my

NEW ZEALAND

0800 SAMSUNG (0800 726 786)

www.samsung.com/nz

PHILIPPINES

1800-10-SAMSUNG(726-7864)

www.samsung.com/ph

SINGAPORE

1800-SAMSUNG(726-7864)

www.samsung.com/sg

THAILAND

1800-29-3232 

02-689-3232

www.samsung.com/th

TAIWAN

0800-329-999

www.samsung.com/tw

VIETNAM

1 800 588 889

www.samsung.com/vn

SOUTH AFRICA

0860-SAMSUNG(726-7864 )

www.samsung.com/za

U.A.E

800-SAMSUNG (726-7864) 

8000-4726

www.samsung.com/ae

BN68-01717L.indb   1

2008-08-18   �� 6:13:15

Содержание LA40A750

Страница 1: ...www samsung com cn HONG KONG 3698 4698 www samsung com hk INDIA 3030 8282 1 800 3000 8282 1800 110011 www samsung com in INDONESIA 0800 112 8888 www samsung com id JAPAN 0120 327 527 www samsung com jp MALAYSIA 1800 88 9999 www samsung com my NEW ZEALAND 0800 SAMSUNG 0800 726 786 www samsung com nz PHILIPPINES 1800 10 SAMSUNG 726 7864 www samsung com ph SINGAPORE 1800 SAMSUNG 726 7864 www samsung ...

Страница 2: ...a long period of time may leave traces of borders displayed on the left right and center of the screen caused by the difference of light emission on the screen Playing a DVD or a game console may cause a similar effect to the screen Damages caused by the above effect are not covered by the Warranty Displaying still images from Video games and PC for longer than a certain period of time may produce...

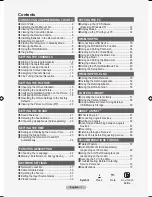
Страница 3: ...ork Connection 27 Cable Network Setup 29 Selecting the Source 30 Editing the Input Source Names 31 Product Guide 32 Setting the PC Setting up Your PC Software Based on Windows XP 33 Display Modes 33 Setting up the TV with your PC 34 WISELINK Pro Connecting a USB Device 35 Using the WISELINK Pro Function 36 Using and Sorting Photo List 38 Viewing a Photo or Slide Show 40 Using and Sorting the Music...

Страница 4: ...rs if you elect to install the TV on your own Do not install your Wall Mount Kit while your TV is turned on It may result in personal injury due to electric shock Remove the stand and cover the bottom hole with a cap and fasten with two screws List of Parts Please make sure the following items are included with your LCD TV If any items are missing contact your dealer Remote Control Batteries AAA x...

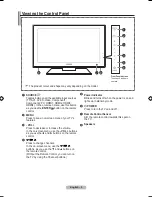
Страница 5: ... by mode 6 Power Press to turn the TV on and off 7 Remote Control Sensor Aim the remote control towards this spot on the TV 8 Speakers 2 MENU Press to see an on screen menu of your TV s features 3 VOL Press to decrease or increase the volume In the on screen menu use the VOL buttons as you use the and buttons on the remote control 4 Press to change channels In the on screen menu use the buttons as...

Страница 6: ...transmission of high definition digital video data and multiple channels of digital audio The HDMI DVI terminal supports DVI connection to an extended device with the appropriate cable not supplied The difference between HDMI and DVI is that the HDMI device is smaller in size has the HDCP High Bandwidth Digital Copy Protection coding feature installed and supports multi channel digital audio The T...

Страница 7: ...connected the sound from the built in speakers will be disabled 9 AUDIO OUT R AUDIO L Connect RCA audio cables to AUDIO OUT R AUDIO L on the rear of your set and the other ends to corresponding audio in connectors on the Amplifier or DVD Home Theatre 0 COMPONENT IN 1 2 Connect component video cables optional to component connector PR PB Y on the rear of your set and the other ends to corresponding...

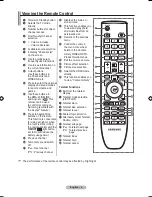
Страница 8: ...nction is convenient for using at night or when the room is dark Using the remote control with the ON OFF light button set to On will reduce the battery usage time Previous channel Temporary sound switch off P Next channel P Previous channel Displays the main on screen menu This function enables you to view and play photo and music files from an external device Returns to the previous menu a Contr...

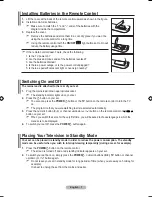
Страница 9: ...up on your set 2 Press the P button on your set You also can press the POWERP button or the TV button on the remote control to turn the TV on The programme that you were watching last is reselected automatically 3 Press the numeric button 0 9 or channel up down button on the remote control or button on your set When you switch the set on for the very first time you will be asked to choose language...

Страница 10: ...ou are viewing 1 Press the TOOLS button The Tools menu will appear 2 Press the or button to select a menu 3 Press the ENTER buttons to display change or use the selected items For a more detailed description of each function refer to the corresponding page Anynet HDMI CEC see page 62 Picture Mode see page 15 Sound Mode see page 21 Sleep Timer see page 23 SRS TS XT see page 21 Energy Saving see pag...

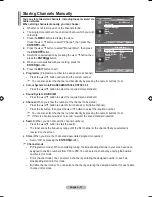
Страница 11: ... is connected correctly 5 Select the appropriate area by pressing the or button Press the ENTER button to confirm your choice 6 The Auto Store menu is displayed with the Start selected Press the ENTER button The channel search will start and end automatically Press the ENTER button at any time to interrupt the memorization process After all the available channels are stored the Clock Set menu appe...

Страница 12: ...he menu Press the or button to select Channel then press the ENTER button 2 Press the ENTER button to select Area 3 Select the appropriate area by pressing the or button Press the ENTER button to confirm your choice 4 Press the or button to select Auto Store then press the ENTER button 5 Press the ENTER button The TV will begin memorizing all of the available channels Press the ENTER button at any...

Страница 13: ... the or button to select C Air channel or S Cable channel Press the button then press the or button to select the required number You can also select the channel number directly by pressing the numeric buttons 0 9 If there is abnormal sound or no sound re select the sound standard required Search When you do not know the channel numbers Press the or button to start the search The tuner scans the f...

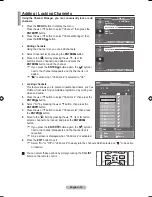
Страница 14: ... video and audio 5 Press the or button to select Child Lock then press the ENTER button 6 Select On by pressing the or button then press the ENTER button 7 Press the or button to select Channel List then press the ENTER button 8 Move to the field by pressing the or button select a channel to be locked and press the ENTER button If you press the ENTER button again the symbol next to the channel dis...

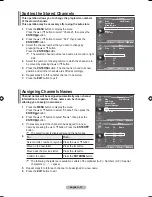
Страница 15: ...ames can be changed allowing you to assign new names 1 Press the MENU button to display the menu Press the or button to select Channel then press the ENTER button 2 Press the or button to select Name then press the ENTER button 3 If necessary select the channel to be assigned to a new name by pressing the or button Press the ENTER button The selection bar is displayed around the name box 4 To Then...

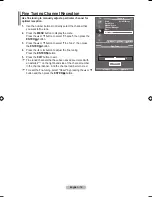
Страница 16: ... Tune then press the ENTER button 4 Press the or button to adjust the fine tuning Press the ENTER button 5 Press the EXIT button to exit Fine tuned channels that have been saved are marked with an asterisk on the right hand side of the channel number in the channel banner And the channel number turns red To reset the fine tuning select Reset by pressing the or button and then press the ENTER butto...

Страница 17: ...ust be adjusted separately for each input source You can also press the P MODE button on the remote control to select one of the picture settings Easy Setting 1 Press the TOOLS button on the remote control 2 Press the or button to select Picture Mode 3 Press the or button to select the desired picture mode 4 Press the EXIT or TOOLS button to exit Tools Anynet HDMI CEC Picture Mode Standard Sound M...

Страница 18: ...evel of brightness of the picture is reduced and then this will reduce the overall running cost Configuring Detailed Settings on the Picture You can set detailed picture settings 1 Press the MENU button to display the menu Press the ENTER button to select Picture 2 Press the ENTER button to select Mode Press the or button to select Standard or Movie then press the ENTER button 3 Press the or butto...

Страница 19: ... or increase the value of a particular item Press the ENTER button Reset Resets the colour space to the default values White Balance R Offset G Offset B Offset R Gain G Gain B Gain Reset You can adjust the colour temperature for more natural picture colours R Offset G Offset B Offset R Gain G Gain B Gain Changing the adjustment value will refresh the adjusted screen Select the required option by p...

Страница 20: ...the full image without any cutoff when HDMI 720p 1080i 1080p or Component 1080i 1080p signals are input In PC Mode only 16 9 and 4 3 mode can be adjusted Settings can be adjusted and stored for each external device you have connected to an input of the TV Temporary image retention may occur when viewing a static image on the set for more than two hours Wide Zoom Move the screen up down using the o...

Страница 21: ...on Plus Off Low Medium High Demo Removes drag from fast scenes with a lot of movement to provide a clearer picture This function is not available in PC mode If you enable 120Hz Motion Plus noise may appear on the screen If this occurs set 120Hz Motion Plus to Off or select one of the other options Blue Only Mode Off On This function is for AV device measurement experts This function displays the b...

Страница 22: ...on 3 Press the or button to select the On 4 Press the or button to select a particular item 5 Press the or button to select the required option 6 Press the EXIT or TOOLS button to exit PIP On Off You can activate or deactivate the PIP function Main picture Sub picture Component 1 2 TV AV1 AV2 HDMI 1 2 3 4 TV AV1 AV2 PC TV AV1 AV2 Source You can select a source of the sub picture Size You can selec...

Страница 23: ...ny two speaker playback system including internal television speakers It is fully compatible with all multichannel formats Easy Setting 1 Press the TOOLS button on the remote control 2 Press the or button to select SRS TS XT 3 Press the or button to select the Off or On 4 Press the EXIT or TOOLS button to exit TruSurround XT SRS and Symbol are trademarks of SRS Labs Inc TruSurround XT technology i...

Страница 24: ...ctivated you can listen to the sound of the sub PIP picture Main Used to listen to the sound of the main picture Sub Used to listen to the sound of the sub picture Selecting the Sound Mode You can set the sound mode in the Tools menu When you set to Dual I II the current sound mode is displayed on the screen 1 Press the TOOLS button on the remote control 2 Press the or button to select Dual I II 3...

Страница 25: ...on to select Time then press the ENTER button 3 Press the or button to select Sleep Timer then press the ENTER button 4 Press the or button repeatedly until the desired time appears Off 30 60 90 120 150 180 Press the ENTER button 5 Press the EXIT button to exit The TV automatically switches to standby mode when the timer reaches 0 Easy Setting 1 Press the TOOLS button on the remote control 2 Press...

Страница 26: ... buttons on the remote control Auto Power Off When you set the timer On the TV will eventually turn off if no controls are operated for 3 hours after the TV was turned on by timer This function is only available in timer On mode and prevents overheating which may occur if a TV is on for too long time Choosing Your Language When you start using your set for the first time you must select the langua...

Страница 27: ...for sports You can enjoy more thrilling colour and sound Cinema Provides the optimal picture and sound quality for cinema You can experience a richer picture and enhanced sound Game Provides the optimal picture and sound quality for games This mode accelerates the playing speed when using an external game console connected to the TV If you set any of the three Entertainment modes to On the setting...

Страница 28: ...Sets the TV to high energy saving mode Auto Automatically adjusts the brightness of the TV screen in accordance with the scenes Easy Setting 1 Press the TOOLS button on the remote control 2 Press the or button to select Energy Saving 3 Press the or button to select the Off Low Medium High or Auto 4 Press the EXIT or TOOLS button to exit Tools Anynet HDMI CEC Picture Mode Standard Sound Mode Custom...

Страница 29: ...DSL VDSL Cable TV IP Sharer LAN Cable Modem Cable You can connect the LAN via a Sharer Router LAN Cable The terminals the position of the port and the type of the external device may differ depending on the manufacturer If the IP address allocation by the DHCP server has failed turn the external modem off turn it on again after at least 10 seconds and then try again For the connections between the...

Страница 30: ...l and the IP Sharer with a LAN Cable The terminals the position of the port and the type of the external device may differ depending on the manufacturer If you are using a static IP address your ISP will inform you of the IP address subnet mask gateway and DNS You must enter these values to complete the network settings If you do not know the values ask your network administrator For the informati...

Страница 31: ...ual Setup then press the ENTERE button 5 Press the or button to move to an item and press the numeric button to configure the selected item Press the ENTERE button Select Network Test to check the network connectivity Network Test You can test or confirm the network connection status after setting up the network 3 Press the or button to select Network Test then press the ENTERE button The current ...

Страница 32: ...Samsung Electronics Service Center Selecting the Source You can select among external sources connected to your TV s input jacks 1 Press the MENU button to display the menu Press the or button to select Input then press the ENTER button 2 Press the ENTER button again to select Source List When no external device is connected to your set only TV is activated in the Source List AV1 AV2 S Video Compo...

Страница 33: ...ess the ENTER button 5 Press the EXIT button to exit When a PC with a resolution of 1920 x 1080 60Hz is connected to the HDMI IN 2 port you should set the HDMI2 mode to PC in the Edit Name of the Input mode Mode Custom Equalizer SRS TS XT Off Auto Volume Off Internal Mute Off Reset Move Enter Return TV Edit Name AV1 AV2 S Video Component1 Component2 PC HDMI1 sMore Move Enter Return VCR DVD Cable S...

Страница 34: ...using the and buttons Picture Quality Full HD 1080p 120Hz Motion Plus Entertainment Content Library Entertainment Mode Connectivity WISELINK Pro DLNA 4HDMI Anynet 5 Press the EXIT button to exit Using the Remote Control Button in Product Guide Menu Button Operations Yellow Button Shows the contents of the Product Guide sequentially AutoPlay Wheel Move the cursor and select an item ENTERE Select th...

Страница 35: ... CEA 1920 x 1080p 67 500 60 000 148 500 When using an HDMI DVI cable connection you must use the HDMI IN 2 jack The interlace mode is not supported The set might operate abnormally if a non standard video format is selected Separate and Composite modes are supported SOG is not supported Too long or low quality VGA cable can cause picture noise at high resolution modes 1920x1080 or 1600x1200 Settin...

Страница 36: ...d Fine tune again After the noise has been reduced readjust the picture so that it is aligned on the center of screen Press the or button to select Coarse or Fine then press the ENTER button Press the or button to adjust the screen quality Press the ENTER button Position Adjust the PC s screen positioning if it does not fit the TV screen Press the or button to adjusting the Vertical Position Press...

Страница 37: ...ction there may be a USB Compatibility problem Before connecting your device to the TV please back up your files to prevent them from damage or loss of data SAMSUNG is not responsible for any data file damage or data loss Do not disconnect the USB device while it is loading MSC supports MP3 and JPEG files while a PTP device supports JPEG files only The sequential jpeg format is supported The highe...

Страница 38: ...DLNA device connected to TV The selected USB device name appears at the bottom left of the screen 4 Press the or button to select an icon Photo Music Movie Setup then press the ENTERE button To exit WISELINK Pro mode press the W LINK button on the remote control Removing a USB Memory Device Safely You can remove the device safely from the TV 1 Press the TOOLS button in the WISELINK Pro file list s...

Страница 39: ...ame Press the Red button to select a device 6 Item Selection Information Shows the number of photos that are selected by pressing the Yellow button 7 Help Items Red Device button Selects a connected device Green Favourites Settings button Changes the favourites setting for the selected file Press this button repeatedly until the desired value appears Yellow Select button Selects file from the file...

Страница 40: ... menu Using and Sorting Photo List You can sort photos in the Photo List by a particular standard 1 Press the or button to select a sorting standard in the Photo list The photos are sorted according to the newly selected sorting standard To move to the previous next group press the π REW or µ FF button 2 Press the Play ENTERE button to start the Slide Show in the order selected by the user The inf...

Страница 41: ... preference Favourite You can change the photo preferences Changing the Favourites setting Select the desired photo in the Photo list then press the Green button repeatedly until the desired setting appears Favourite options Photo List Option Menu Slide Show Using this menu you can play a SlideShow using the photo files on the USB memory device Play Current Group Using this menu you can play a Sli...

Страница 42: ...then press the ENTERE button All files in the photo list will be used for the Slide Show During the slide show files are displayed in order from the currently shown file The Slide Show progresses in the order sorted in the Photo list Music files can be automatically played during the Slide Show if the Background Music is set to On Refer to page 42 While a photo list is displayed press the Play ENT...

Страница 43: ...lected files will be used for the Slide Show Slide Show Option Menu Stop Slide Show Start Slide Show You can start or stop a SlideShow Rotate You can rotate photos saved on a USB memory device Whenever you press the button it rotates by 270 180 90 and 0 Whenever you press the button it rotates by 90 180 270 and 0 If you have select Zoom the Rotate deactivated Zoom You can magnify photos saved on a...

Страница 44: ...ic Jee Album 1 2005 Pop Thanks Sad Darby Album 2 2005 Pop I Love You Calm Catherine Album 3 2005 Pop Better than yesterday F G H I J L P S T V Background Music On Off If you set Background Music to On the background music will be played when viewing photos one by one or in a Slide Show If you set Background Music to On a screen appears immediately where you can set the Background Music To use this...

Страница 45: ...t files by pressing the yellow button Favourite options Music List Option Menu Play Current Group Using this menu you can only play music files in the currently selected sorting group Delete Using this menu you can delete the selected music files Change Group You can change the mood information of music files The group information of the current file is updated and the file is moved to the new gro...

Страница 46: ... various functions from the Music menus Pause the music file Music function information icon When all music files in the folder or the selected file are repeated Repeat Mode is On When all music files in the folder or the selected file are played once Repeat Mode is Off Playing the music group 1 Press the or button to select a sorting standard Title Artist Mood Genre Folder Preference 2 Press the ...

Страница 47: ...ange the Favorite Sorting Standard for the Movie List Title It sorts and displays the Movie titles in symbol Number alphabet special order Timeline It sorts and shows movies by date It sorts by year and month from the earliest movie Folder If there are many folders in USB the movies files are shown in order in each folder The movie file in the Root folder is shown first and the others are shown in...

Страница 48: ...is played The selected file is displayed at the top with its playing time The playing duration of a movie file may be displayed as 00 00 00 if its playing time information is not found at the start of the file You can watch exciting gaming multimedia fi les but the gaming function is not supported Movie doesn t support subtitles for example not support smi srt and sub files etc and not support sub...

Страница 49: ... file in 20 second intervals Wheel Play the next file or the previous file Movie function information icon When all movie files in the folder or the selected file are repeated Repeat Mode is On When all movie files in the folder or the selected file are played once Repeat Mode is Off Playing the movie group 1 Press the or button to select a sorting standard Title Timeline Folder Preference 2 Press...

Страница 50: ...y from where it was stopped being played If Cont movie play help function was set On a pop up message will appear when you play movie file you want to play continuously Refer to page 49 4 To exit WISELINK Pro mode press the W LINK button on the remote control Movie Play Option Menu Repeat Mode You can play the movie repeatedly Picture Size Fit Play video at the TV screen size Original Play video a...

Страница 51: ...tton to select the desired option 4 Press the or button to select the option then press the ENTERE button To exit WISELINK Pro mode press the W LINK button on the remote control Slide Show Speed Fast Slow Normal Select to control the slide show speed Music Repeat Mode On Off Select to repeatedly play music files Movie Repeat Mode On Off Select to repeatedly play movie files Cont movie play help On...

Страница 52: ...ecting to the Network 1 When connecting to the network is complete set up the network on the TV A Wireless Internet connection does not support DLNA The first 3 digits subnet address of the IP addresses of the TV and the PC must be the same e g IP Address 123 456 789 XX 2 Run a Network Test to check the network settings Installing the DLNA Application To play content on the PC on the TV you have t...

Страница 53: ...upplied with the product Alternatively you can download the file from www samsung com 2 Install the SAMSUNG PC Share Manager as shown in the figures below 3 When the installation is complete the PC Share Manager icon appears on your Desktop Double click the icon to run the program ...

Страница 54: ...older and files 5 Click to synchronize the share status 6 The folders and files of the PC to be shared are listed 7 Folders shared by the user are listed File Property Shows information on the selected file or folder Method 1 Select a file or folder and select the File menu and then select the Property sub menu Method 2 Select a file or folder right click over the selected file or folder and then ...

Страница 55: ... click over the selected folder and then select Share Folder from the pop up menu Method 3 Locate the mouse pointer over a folder in the My Computer folder list in the left pane and drag drop the folder into the Shared Folders pane If a message appears asking you to confirm the shared folder select Yes Cancelling a Shared Folder You can cancel a shared folder on your PC Select a folder from the Sh...

Страница 56: ...il the Set Changed State menu is selected the changed state of the shared folder is not applied to the server Changes to the shared folders are not applied to your PC until you select the Set Changed State menu Method 1 Select the Share menu and select the Refresh DB sub menu Method 2 Click the Set Changed State icon Setting the Access Permission To enable the TV to find your PC the TV must be set...

Страница 57: ...e whether to start the PC server automatically when Windows starts Change server name You can rename the PC server Enter a new name and click OK The new name will appear at the top right of the window and will appear on the TV Help Version The program version information message box appears Name Modified Name Modified Name Name Modified ...

Страница 58: ...e Information Rotating the Photo file Viewing a Slide Show During a Slide Show option menu Play Pause Slide Show Speed Zoom Rotate Music Music List option menu Sorting Music List Viewing the Information Playing a music file Music Play Option Menu Play Pause Repeat Mode Movie Movie List option menu Sorting Movie List Viewing the Information Playing a Movie file Movie Play Option Menu Play Pause Rep...

Страница 59: ...sponding page VOL You can control the volume of the played content CONTENT Exit Content Library mode Contents Library contains text graphics images multimedia and other materials for informational and promotional purposes only Materials in Contents Library has been modified and keeps being revised and updated The Materials in the Contents Library may not be suitable for all audiences Information i...

Страница 60: ...king Starters Main Courses Desserts You can view various recipes that you can then easily follow step by step Enjoy these contents which give you great ideas for meals The recipes introduced in the Cooking contents on the Samsung TV are based on recipes published by Anness Publishing The copyrights of the Cooking contents and all issues related to them are reserved by Practical Pictures Game Dynam...

Страница 61: ...e exercises that can be enjoyed by the whole family This is beneficial health management content that provides stretching and massage exercises that can be enjoyed by the whole family The Basic Stretches contents for the Samsung TV are based on the book Stretching by Suzanne Martin which is published by DK and the Massage contents are based on the books published by Anness Publishing The copyright...

Страница 62: ...ts Download page 4 Download the contents onto the USB memory device Content Library only supports USB Mass Storage Class devices MSC MSC is a Mass Storage Class Bulk Only Transport device Examples of MSC are Thumb drives and Flash Card Readers Both USB HDD and HUB are not supported 5 Go to Content Library main menu by pressing Contents button or choosing Content Library Menu Input Content Library ...

Страница 63: ...HDMI 1 HDMI 2 HDMI 3 or HDMI 4 jack on the TV and the HDMI OUT jack of the corresponding Anynet device using the HDMI cable 2 Connect the HDMI IN jack of the home theatre and the HDMI OUT jack of the corresponding Anynet device using the HDMI cable Connect only one receiver You can connect an Anynet device using the HDMI 1 3 cable Some HDMI cables may not support Anynet functions Anynet works when...

Страница 64: ...ess the ENTER button 2 Press the or button to select Yes then press the ENTER button The Auto turn off function is enabled If you select No the Auto turn off function is cancelled Press the EXIT button to exit The Select Device setting of the TV remote control is to be set to TV to use the Anynet function If you set Auto Turn Off to Yes connected external devices are also turned off when the TV is...

Страница 65: ...ted devices may take up to 2 minutes You cannot cancel the operation during the switching operation The time required to scan for devices is determined by the number of connected devices When the device scan is complete the number of found devices is not displayed Although the TV automatically scans devices when it is turned on using the POWER button devices connected when the TV is on or under a ...

Страница 66: ...ating Status Available Buttons Anynet Device After switching to the device when the menu of the corresponding device is displayed on the screen Numeric buttons ENTER buttons Colour buttons EXIT button After switching to the device while playing a file Backward search Forward search Stop Play Pause Device with built in Tuner After switching to the device when you are watching a TV programme P butto...

Страница 67: ... properly operate If there is a power interruption to the TV when the Receiver is set to On by disconnecting the power cord or a power failure the TV Speaker may be set to Off when you turn the TV on again see page 22 Recording You can make a recording of a TV programme using a recorder Press the button Recording begins Only when the Anynet enabled recording device is connected The current TV prog...

Страница 68: ...t to exit Anynet Select View TV in Anynet menu Press the SOURCE button on the TV remote control and select a device other than Anynet devices Press any of P PRE CH and such to change to the TV mode Note that the channel button operates only when a tuner embedded Anynet device is not connected The Connecting to Anynet device message appears on the screen You cannot use the remote control when you a...

Страница 69: ...ext service Press it twice to overlap the teletext with the current broadcasting screen 7 1 sub page Used to display the available sub page 8 2 page up Used to display the next teletext page 9 3 page down Used to display the previous teletext page 0 0 mode Press to select the teletext mode LIST FLOF If you press it in the LIST mode it switches into the List save mode In the List save mode you can ...

Страница 70: ...rent page number or search indications Date and time Text Status information FASTEXT information Teletext information is often divided between several pages displayed in sequence which can be accessed by Entering the page number Selecting a title in a list Selecting a coloured heading FASTEXT system Press the TV button to exit from the teletext display ...

Страница 71: ...ears Press the INFO button to reset Press the or button to select Yes then press the ENtER button The position is initialized to the default setting Press the blue button Press the and buttons to select a save mode from either Position 1 Position 2 or Position 3 in order to save the current position To not save the current position press the REtURN button When selecting a save mode you cannot use ...

Страница 72: ...ur nearest dealer The auto wall mount will not work when Anynet and WIESLINK Pro are operating 40 and 46 inch models are not compatible with the old electrically powered wall mount model WMN5090A Using the Anti Theft Kensington Lock depending on the model The Kensington lock is a device used to physically fix the system when using it in a public place The appearance and locking method may differ f...

Страница 73: ...hase these additionally 2 Remove the screws from the center back of the TV put the screws into the clamps and then fasten the screws onto the TV again Screws may not be supplied with the product In this case please purchase the screws of the following specifications Screw Specifications For a 17 29 Inch LCD TV M4 X 15 For a 32 40 Inch LCD TV M6 X 15 3 Connect the clamps fixed onto the TV and the c...

Страница 74: ...functions Replace the remote control batteries Clean the upper edge of the remote control transmission window Check the battery terminals Check signal cable message is displayed Check that the signal cable is firmly connected to the PC or video sources Check that the PC or video sources are turned on On PC mode Not Supported Mode message is displayed Check the maximum resolution and the frequency ...

Страница 75: ...2 x 300 x 766 mm 1321 x 107 x 805 mm 1321 x 338 x 861 mm Weight With Stand 19 kg 29 kg 37 kg Environmental Considerations Operating Temperature Operating Humidity Storage Temperature Storage Humidity 10 C to 40 C 50 F to 104 F 10 to 80 non condensing 20 C to 45 C 4 F to 113 F 5 to 95 non condensing Stand Swivel Left Right 0 Design and specifications are subject to change without prior notice This ...

Отзывы: