background image

English - 

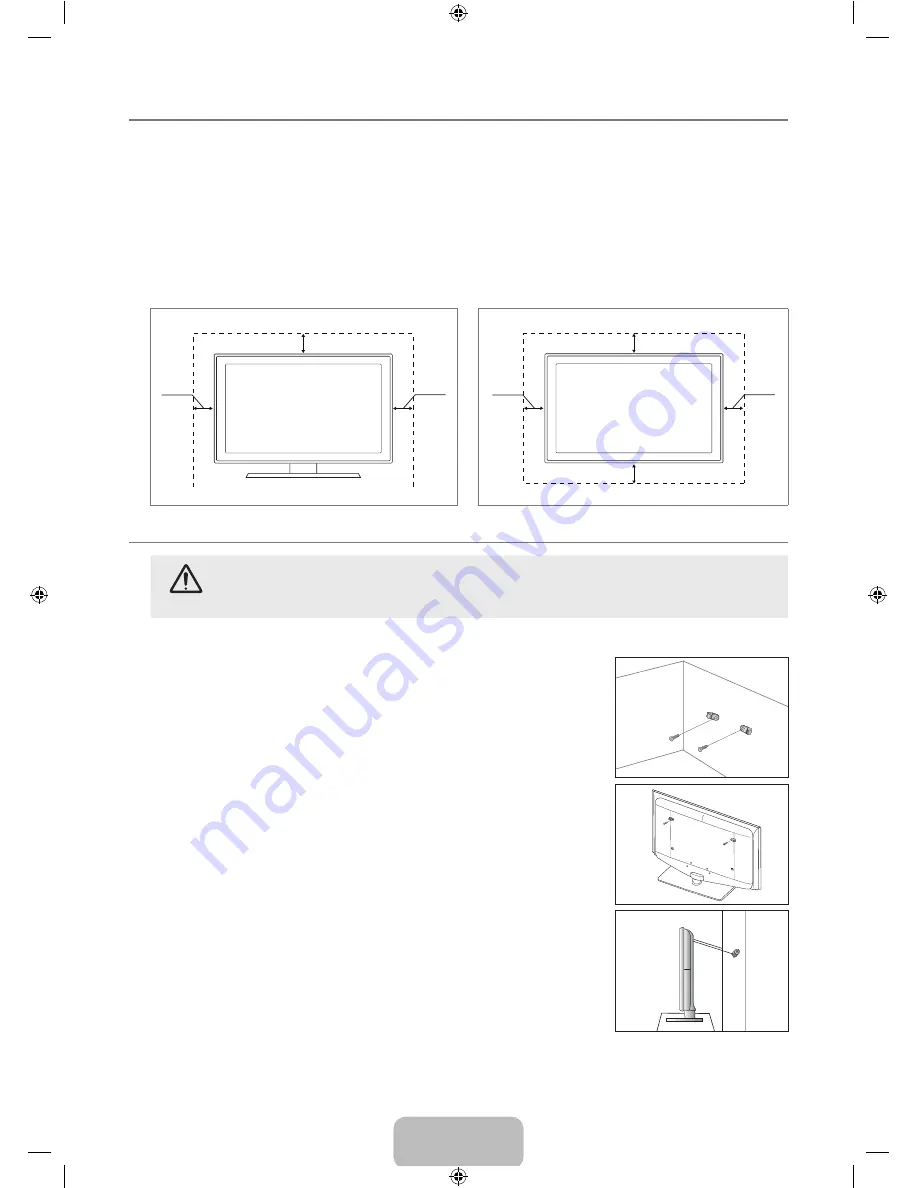
Securing the Installation Space

Keep the required distances between the product and other objects (e.g. walls) to ensure proper ventilation. 

Failing to do so may result in fire or a problem with the product due to an increase in the internal temperature of the product.

Install the product so the required distances shown in the figure are kept.

When using a stand or wall-mount, use parts provided by Samsung Electronics only.

If you use parts provided by another manufacturer, it may result in a problem with the product or an injury due to the 

product falling.

If you use parts provided by another manufacturer, it  may result in a problem with the product or fire due to an increase in 

the internal temperature of the product due to poor ventilation.

The appearance may differ depending on the product.

When installing the product with a stand

When installing the product with a wall-mount

Securing the TV to the Wall

Caution

: Pulling, pushing, or climbing on the TV may cause the TV to fall. In particular, ensure your children do 

not hang over or destabilize the TV; doing so may cause the TV to tip over, causing serious injuries or death. 

Follow all safety precautions provided on the included Safety Flyer. For added stability, install the anti-fall device 

for safety purposes, as follows.

To secure the TV:

Put the screws into the clamps and firmly fasten them onto the wall. Confirm that the 

screws have been firmly installed onto the wall.

You may need additional material such as an anchor depending on the type of 

wall.

Since the necessary clamps, screws, and string are not supplied, please 

purchase them separately.

Remove the screws from the centre back of the TV, put the screws into the clamps, 

and then fasten the screws onto the TV again.

Screws may not be supplied with the product. In this case, please purchase the 

screws of the following specifications. 

Screw Specifications

For a 17 ~ 29 Inch LCD TV: M4 X L15  

For a 32 ~ 40 Inch LCD TV: M6 X L15

Connect the clamps fixed onto the TV and the clamps fixed onto the wall with a strong 

cable.

Install the TV near to the wall so that it does not fall backwards.

It is safe to connect the string so that the clamps fixed on the wall are equal to or 

lower than the clamps fixed on the TV.

Remove the cable before moving the TV.

Verify all connections are properly secured. Periodically check connections for any 

sign of fatigue for failure. If you have any doubt about the security of your connections, 

contact a professional installer.

¦

N

•

•

N

¦

N

N

N

N

•

N
N

N

Wall

Wall

0 cm

0 cm

0 cm

0 cm

0 cm

0 cm

0 cm

[650_Aus]BN68-02089A_02Eng.indb   65

2009-08-21   ¿ÀÈÄ 1:42:57

Содержание LA32B650

Страница 1: ...LAND 0800 SAMSUNG 0800 726 786 www samsung com nz PHILIPPINES 1 800 10 SAMSUNG 726 7864 1 800 3 SAMSUNG 726 7864 1 800 8 SAMSUNG 726 7864 02 5805777 www samsung com ph SINGAPORE 1800 SAMSUNG 726 7864 www samsung com sg THAILAND 1800 29 3232 02 689 3232 www samsung com th TAIWAN 0800 329 999 www samsung com tw VIETNAM 1 800 588 889 www samsung com vn SOUTH AFRICA 0860 SAMSUNG 726 7864 www samsung c...

Страница 2: ...creen when displaying a still image Watching the LCD TV in 4 3 format for a long period of time may leave traces of borders displayed on the left right and centre of the screen caused by the difference of light emission on the screen Playing a DVD or a game console may cause a similar effect to the screen Damages caused by the above effect are not covered by the Warranty Displaying still images fr...

Страница 3: ...up Menu 43 Media Play DLNA Setting the DLNA Network 44 Installing the DLNAApplication 44 Using the DLNAApplication 45 Using the DLNA Function 48 ANYNET Connecting Anynet Devices 49 Setting Up Anynet 50 Switching between Anynet Devices 50 Recording 51 Listening through a Receiver Home theatre 51 Troubleshooting for Anynet 52 Content Library Using the Content Library 53 Using the TV Memory Contents ...

Страница 4: ...ERE button on the remote control 3 MENU Press to see an on screen menu of your TV s features 4 VOL Press to increase or decrease the volume In the on screen menu use the VOL buttons as you would use the and buttons on the remote control 5 CH Press to change channels In the on screen menu use the CH buttons as you would use the and buttons on the remote control 6 POWER INDICATOR Blinks and turns of...

Страница 5: ...the model Owner s Instructions Warranty card Safety Guide Registration Cards Please make sure the following items are included with your LCD TV If any items are missing contact your dealer Warranty card Safety Guide Registration Cards Not available in all locations The items colour and shape may vary depending on the model N N N 650_Aus BN68 02089A_02Eng indb 3 2009 08 21 ÀÈÄ 1 42 21 ...

Страница 6: ...DCP High Bandwidth Digital Copy Protection coding feature installed and supports multi channel digital audio The TV may not output sound and pictures may be displayed with abnormal colour when DVD Blu ray player Cable Boxes Satellite receivers supporting HDMI versions older than 1 3 are connected When connecting an older HDMI cable and there is no sound connect the HDMI cable to the HDMI IN 3 DVI ...

Страница 7: ...a Digital Audio component When a Digital Audio System is connected to the DIGITAL AUDIO OUT OPTICAL jack Decrease the volume of the TV and adjust the volume level with the system s volume control 5 1CH audio is possible when the TV is connected to an external device supporting 5 1CH SERVICE Connector for service only COMPONENT IN 1 2 Connect component video cables optional to component connector P...

Страница 8: ...ecorders with the Anynet feature ON OFF Pressing the ON OFF light button toggles between on and off When the remote control is on and a key is pressed on the remote control the remote control buttons will be lit for a moment Using the remote control with the ON OFF light button set to On will reduce the battery usage time PRE CH Enables you to return to the previous channel you were watching MUTE ...

Страница 9: ...ENU button 2 The main menu appears on the screen The menu s left side has icons Picture Sound Channel Setup Input Application Support 3 Press the or button to select one of the icons 4 Then press the ENTERE button to access the icon s sub menu 5 Press the or button to select the icon s submenu 6 Press the or button to decrease or increase the value of a particular item The adjustment OSD may diffe...

Страница 10: ...atically If not select Manual to set the clock 6 Press the or button to highlight the time zone for your local area Press the ENTERE button Australia only 7 The description for the connection method providing the best HD screen quality is displayed Check the description and press the ENTERE button 8 Press the or button to select See Product Guide or Watch TV then the ENTERE button See Product Guid...

Страница 11: ...umber You can also select the channel number directly by pressing the number 0 9 buttons If there is abnormal sound or no sound reselect the sound standard required Search When you do not know the channel numbers Press the or button to start the search The tuner scans the frequency range until the first channel or the channel that you selected is received on the screen Store When you store the cha...

Страница 12: ...ash Hits Sunday 900 f tn 901 ITV Play 902 Kerrang 903 Kiss 903 oneword 903 Smash Hits Street Hypn Kisstory No Information No Information No Information Freshmen O Watch Information Page Mini Guide 24 Hours Exit Mini Guide DTV Cable 900 f tn Street Hypnosis Booze Britain 2 00 2 30 5 00 Freshmen On Campus Watch Information Page Full Guide Exit To Then Watch a programme in the EPG list Select a progr...

Страница 13: ...ocked channel A reserved programme Channel List Option Menu in All Channels Added Channels Favourites Press the TOOLS button to use the option menu Option menu items may differ depending on the channel status Add Delete You can delete or add a channel to display the channels you want All deleted channels will be shown on All Channels menu A gray coloured channel indicates the channel has been dele...

Страница 14: ...may be necessary after using the auto store Select All Deselect All Select All You can select all the channels in the channel list Deselect All You can deselect all the selected channels by pressing the yellow button You can perform the add delete add to Favourites delete from Favourites or lock unlock function for multiple channels at the same time Select the required channels and press the yello...

Страница 15: ... Backlight Contrast Brightness Sharpness Colour or Tint G R the OSD will be adjusted accordingly In analogue TV AV1 AV2 modes of the PAL system you cannot use the Tint G R Function In PC mode you can only make changes to Backlight Contrast and Brightness Settings can be adjusted and stored for each external device you have connected to an input of the TV The energy consumed during use can be signi...

Страница 16: ...ure mode is Movie Size You can select the picture size which best corresponds to your viewing requirements Press the TOOLS button to display the Tools menu You can also set the size by selecting Tools Picture Size You can select these options by simply pressing the P SIZE button on the remote control Auto Wide Automatically adjusts the picture size to the 16 9 aspect ratio New Zealand Singapore on...

Страница 17: ...om Demo Removes drag from fast scenes with a lot of movement to provide a clearer picture This function is not available in PC mode If you enable 100Hz Motion Plus noise may appear on the screen If this occurs set 100Hz Motion Plus to off or select one of the other options Off Switches 100Hz Motion Plus off Clear Sets 100Hz Motion Plus to minimum Standard Sets 100Hz Motion Plus to medium Smooth Se...

Страница 18: ... of the sub picture by selecting Tools PIP Sound Select Main Used to listen to the sound of the main picture Sub Used to listen to the sound of the sub picture Using Your TV as a Computer PC Display Setting Up Your PC Software Based on Windows XP The Windows display settings for a typical computer are shown below The actual screens on your PC will probably be different depending upon your particul...

Страница 19: ...500 60 000 148 500 When using an HDMI DVI cable connection you must use the HDMI IN 3 DVI jack The interlace mode is not supported The set might operate abnormally if a non standard video format is selected Separate and Composite modes are supported SOG is not supported Too long or low quality VGA cable can cause picture noise at high resolution modes 1920x1080 or 1600x1200 Setting up the TV with ...

Страница 20: ...uages being broadcast Audio Format MPEG Dolby Digital Advanced digital channels only When sound is emitted from both the main speaker and the audio receiver a sound echo may occur due to the decoding speed difference between the main speaker and the audio receiver In this case use the TV Speaker function While viewing a digital channel this function can be selected The Audio Format appears accordi...

Страница 21: ...dures on setting up options refer to page 16 Sound Reset Reset All Reset Sound Mode Cancel You can restore the Sound settings to the factory defaults Reset Sound Mode Current sound values return to default settings Selecting the Sound Mode You can set the sound mode in the Tools menu When you set to Dual l ll the current sound mode is displayed on the screen Audio Type Dual 1 2 Default A2 Stereo M...

Страница 22: ...Off Time Set the hour minute and activate inactivate To activate timer with the setting you ve chosen set to Activate Volume Select the desired turn on volume level Source TV USB TV Memory You can select the TV TV Memory or USB device content to be played when the TV turns on automatically Select TV TV Memory or USB Make sure that an USB device is connected to your TV When there is only one photo ...

Страница 23: ...edures on setting up options refer to the descriptions on pages 26 28 Child Lock Off On This feature allows you to prevent unauthorized users such as children from watching unsuitable programme by muting out video and audio Before the setup screen appears the PIN number input screen appears Enter your 4 digit PIN number The default PIN number of a new TV set is 0 0 0 0 You can change the PIN by se...

Страница 24: ...hange the setting of the Primary Subtitle Language Primary Audio Language or the Primary Teletext Language of the Preference menu Digital Text Disable Enable New Zealand only If the programme is broadcast with digital text this feature is enabled MHEG Multimedia and Hypermedia Information Coding Experts Group An International standard for data encoding systems used in multimedia and hypermedia Thi...

Страница 25: ...s the position of the port and the type of the external device may differ depending on the manufacturer If the IP address allocation by the DHCP server has failed turn the external modem off turn it on again after at least 10 seconds and then try again For the connections between the external modem and the Sharer Router refer to the owner s manual of the corresponding product You can connect the T...

Страница 26: ...ll inform you of the IP address subnet mask gateway and DNS You must enter these values to complete the network settings If you do not know the values ask your network administrator For the information on how to configure and connect a Sharer Router refer to the owner s manual for the corresponding product You can connect the TV to the LAN directly without connecting it through a Sharer Router If ...

Страница 27: ...hannel for the wireless IP sharer that is not currently being used If the channel set for the wireless IP sharer is currently being used by another device nearby this will result in interference and communications may fail If you apply a security system other than the systems listed blow it will not work with the TV When applying the security key for the AP wireless IP sharer only the following is...

Страница 28: ...n if you have followed the procedures of your Internet service provider please contact Samsung Electronics Cable Network Setup Auto If you connect the LAN cable and it supports DHCP the Internet Protocol IP Settings are automatically configured 1 Set Network Type to Cable 2 Select Cable Network Setup 3 Set Internet Protocol Setup to Auto The Internet Protocol is set automatically 4 Select Network ...

Страница 29: ...s the PBC button on the AP access point within 2minutes and wait for connection Connecting by using PIN Select a PIN Personal Identification Number The message showing the PIN Code is displayed Input the PIN Code at AP device within 2minutes Select OK and wait for connection Try again if connecting operation doesn t work When the connection is not established although tried again reset the access ...

Страница 30: ... Only devices which support Ad hoc mode can be connected without DHCP 1 Set Network Type to Wireless 2 Select Wireless Network Setup 3 Set Internet Protocol Setup to Auto The Internet Protocol is set automatically 4 Select a network through Select a network 5 Select Network Test to check the network connectivity Wireless Network Setup Manual 1 Set Network Type to Wireless 2 Select Wireless Network...

Страница 31: ...VI DVI PC TV IPTV Blu ray HD DVD DMA When a PC with a resolution of 1920 x 1080 60Hz is connected to the HDMI IN 3 DVI port you should set the HDMI3 DVI mode to DVI PC in the Edit Name of the Input mode When connecting an HDMI DVI cable to the HDMI IN 3 DVI port you should set the HDMI3 DVI mode to DVI or DVI PC in the Edit Name of the Input mode In this case a separate sound connection is require...

Страница 32: ...tware version Installing the latest version is recommended By USB Insert a USB drive containing the firmware upgrade into TV Please be careful to not disconnect the power or remove the USB drive while upgrades are being applied The TV will turn off and turn on automatically after completing the firmware upgrade Please check the firmware version after the upgrades are complete When software is upgr...

Страница 33: ...sort key can display up to 10000 files MP3 files with DRM that have been downloaded from a non free site cannot be played Digital Rights Management DRM is a technology that supports the creation of content the distribution and management of the content in an integrated and comprehensive way including the protection of the rights and interests of the content providers the prevention of the illegal ...

Страница 34: ...List Section or File List Section using the Up and Down buttons After selecting a section press the or buttons to select an item 1 Current Sort key This field shows the current standard for sorting files Press the or button to change the standard for sorting files 2 View Groups Shows the detailed groups of the files sorted according the selected Sort key The sort group where the currently selected...

Страница 35: ...tes files Timeline Sorts photos by date It sorts by year and month from the earliest photo Colour Red Yellow Green Blue Magenta Black Gray Unclassified Sorts photos by colour You can change the photo colour information You should set the Use Colour View to on in the Setup menu before sorting photos by colour Folder Sorts photos by folder If there are many folders in USB the photos files are shown ...

Страница 36: ...re deleted You can only delete the files saved in the TV memory You cannot recover a deleted file Play Current Group Using this menu you can play a SlideShow using only the photo files in the currently selected sorting group Change Group When the Sort key is the Colour You can change a selected photo file s or group of files colour information in order to move it from one colour group to another T...

Страница 37: ...les of the selected group Alternatively 1 Select a Sort key and then in the File List Section select the photos contained in the desired group To move to the previous next group press the π REW or µ FF button 2 Press the TOOLS button 3 Press the or button to select Play Current Group then press the ENTERE button Only the photos in the sorting group including the selected files will be used for the...

Страница 38: ...ze the location change function doesn t work The enlarged file is not saved Background Music You can select background music when watching a Slide Show To use this feature there must be music and photo files stored on the USB device Loading music files is needed to change BGM mode Play music files in music category to load Background Music Off On Off Background music is not played On When the back...

Страница 39: ...he music mood information Genre Sorts music files by the genre Folder It sorts music files by the folder If there are many folders in USB the files are shown in order in each folder The music file in the Root folder is shown first and the others are shown in alphabetical order by name Preference FFF FFF FFF FFF Sorts music files by preference Favourites You can change the music files preferences C...

Страница 40: ...ncluding the name the size the date modified and the path is displayed You can view the music file information during Play Current Group using the same procedures Press the INFO button to viewing the information Remove Safely You can remove the device safely from the TV Playing Music Playing a music file 1 Press the button to select the File List Section 2 Press the or button to select a music fil...

Страница 41: ...le To deselect all selected files press the TOOLS button and select Deselect All 5 Press the Play ENTERE button The selected files will be played Music Play option Menu Music Play Option Menu Repeat Mode On Off You can play music files repeatedly Picture Setting Sound Setting You can configure the picture and sound settings Information The music file information is displayed Remove Safely You can ...

Страница 42: ...ress the TOOLS button The option menu changes according to the current status Play Current Group Using this menu you can only play movie files in the currently selected sorting group Copy Copy Current Group Copy the selected file When multiple files are selected Select the movie to copy Alternatively select multiple files by pressing the Yellow button Press the TOOLS button to select Copy or Copy ...

Страница 43: ...Decoder Audio codec Resolution avi AVI Divx 3 11 4 x 5 1 6 0 MP3 AC3 LPCM ADPCM 720x576 XviD 1920x1080 H 264 BP MP HP 1920x1080 MPEG4 SP ASP 1920x1080 Motion JPEG 800x600 mkv MKV Divx 3 11 4 x 5 1 6 0 MP3 AC3 LPCM ADPCM 720x576 XviD 1920x1080 H 264 BP MP HP 1920x1080 MPEG4 SP ASP 1920x1080 Motion JPEG 800x600 asf ASF Divx 3 11 4 x 5 1 6 0 MP3 AC3 LPCM ADPCM WMA 720x576 XviD 1920x1080 H 264 BP MP H...

Страница 44: ...File List Section 2 Press the or button to select the desired movie file 3 Press the Yellow button The c mark appears to the left of the selected movie file To deselect all selected files press the TOOLS button and select Deselect All 4 Repeat the above operation to select multiple movie files 5 Press the Play ENTERE button Only the selected file is played Playing movie continuously Resume Play If...

Страница 45: ...inuous movie playback Get the DivX VOD registration code Shows the registration code authorized for the TV If you connect to the DivX web site and register the registration code with a personal account you can download VOD registration file If you play the VOD registration using Media Play the registration is completed For more information on DivX VOD visit www DivX com Get the DivX VOD deactivati...

Страница 46: ...ger programme will be installed and the external modem using a LAN cable You can connect the TV to the PC directly without connecting it through a Sharer Router Installing the DLNA Application To play content on the PC on the TV you have to first install the application To use the DLNA function smoothly use the programme in the CD ROM supplied with the TV or use the Samsung PC Share Manager progra...

Страница 47: ...e installation is complete the PC Share Manager icon appears on your Desktop Double click the icon to run the programme N N Using the DLNA Application The Programme Screen Layout 1 3 4 5 6 7 2 1 Menus The following application menus are provided File Share Server and Help 2 Click to share the selected PC server folder 3 Click to cancel sharing 4 Click to refresh the PC folder and files 5 Click to ...

Страница 48: ... sub menu Method 2 Select a folder in My Computer right click over the selected folder and then select Share Folder from the popup menu Method 3 Locate the mouse pointer over a folder in the My Computer folder list in the left pane and drag drop the folder into the Shared Folders pane If a message appears asking you to confirm the shared folder select Yes Method 1 Method 2 Method 3 Cancelling a Sh...

Страница 49: ...ate icon Method 1 Method 2 Setting the Access Permission To enable the TV to find your PC the TV must be set to Set Device Policy in the Access Permission Settings window In addition the PC server and the TV must be on the same subnet Method Select the Share menu and select Set Device Policy Rejected items are represented in gray You can change the access permissions by using the Allow Accept Deny...

Страница 50: ...t an icon Photo Music Movie Setup then press the ENTERE button To exit DLNA mode press the MEDIA P button on the remote control DLNA does not support the following functions The Background Music and Background Music Setting functions Sorting files by preference in the Photo Music and Movie folders The Change Group Info function The Copy Delete function The Remove Safely function The REW FF π µ key...

Страница 51: ...l Audio Input on the Home Theatre When following the connection above the Optical jack only outputs 2 channel audio You will only hear sound from the Home Theatre s Front Left and Right speakers and the subwoofer If you want to hear 5 1 channel audio connect the DIGITAL AUDIO OUT OPTICAL jack on the DVD Satellite Box ie Anynet Device 1 or 2 directly to the Amplifier or Home Theatre not the TV Conn...

Страница 52: ...umber of devices found are not displayed Although the TV automatically searches the device list when the TV is turned on via the power button devices connected to the TV may not always be automatically displayed in the device list Press the red button to search for the connected device If you have selected external input mode by pressing the SOURCE button you cannot use the Anynet function Make su...

Страница 53: ...ices 3 Press the EXIT button to exit You can record the source streams by selecting Recording device_name Pressing the button will record whatever you are currently watching If you are watching video from another device the video from the device is recorded Before recording check whether the antenna jack is properly connected to the recording device To properly connect an antenna to a recording de...

Страница 54: ...utton on the TV remote control and select a device other than Anynet devices Press P CH LIST PRE CH and FAV CH to change the TV mode Note that the channel button operates only when a tuner embedded Anynet device is not connected The message Connecting to Anynet device appears on the screen You cannot use the remote control when you are configuring Anynet or switching to a view mode Use the remote ...

Страница 55: ... OBTAINED OR COMPLIED FROM SOURCES WE BELIEVE TO BE RELIABLE SAMSUNG CANNOT AND DOES NOT GUARANTEE THE ACCURACY VALIDITY TIMELINESS OR COMPLETENESS OF ANY INFORMATION OR DATA MADE AVAILABLE TO YOU FOR ANY PARTICULAR PURPOSE UNDER NO CIRCUMSTANCES INCLUDING NEGLIGENCE SHALL SAMSUNG BE HELD LIABLE WHETHER IN CONTRACT OR TORT FOR ANY DIRECT INDIRECT INCIDENTAL SPECIAL OR CONSEQUENTIAL DAMAGES ATTORNE...

Страница 56: ...nt items repeatedly and pressing the Yellow button My Contents You can check the content saved in the TV memory for each subitem of the Content Library Select a content item and press the ENTERE button You can play or delete the selected content item USB You can check the content saved on the USB device for each subitem of the Content Library Select a content item and press the ENTERE button You c...

Страница 57: ...changed country If Country is set to Others TV can t recognize your country In this case please select directly from the service country list If a certain content s font provided by contents provider is not supported on TV It may not be viewed normally For more information on how how to configure your country refer to page 8 You may experience slow operation or hesitation when using this function ...

Страница 58: ...button 2 Select desired User account then press the ENTERE button 3 Input the password When login succeeds User account will be displayed on the screen Before login at least one and more account should be registered If you want to create account refer to page 55 Using the Widget Gallery You can use Run Service Lock Install Service at the existing widget and you can see description of the widget se...

Страница 59: ...rvice Help Website Country Website UAE www samsung com Consumer television medi 2 0 Internet TV Australia www samsung com Consumer television medi 2 0 Internet TV China www samsung com 个人消费产品 电视产品 medi 2 0 Internet TV India www samsung com consumer products television medi 2 0 Internet TV Indonesia www samsung com Produk television medi 2 0 Internet TV Japan www samsung com 製品情報 液晶ディスプレイ medi 2 0 ...

Страница 60: ...ges 23 28 Connecting to a Wi Fi Ad hoc network 1 Connect the Samsung Wireless LAN Adapter to the USB1 HDD or USB2 port of the TV 2 For more information on how to configure Ad hoc network refer to refer to page 28 For information on configuring the mobile phone s network settings refer to the mobile phone manual 3 Set up the IP address SSID and password for the mobile phone in the Ad hoc Settings o...

Страница 61: ...letes the corresponding name on the list If the deleted mobile device turns on or tries to connect to the TV it may be shown on the list Setup Message On Off You can determine whether to use the message function the call arrivals text message contents and schedules set on the mobile phone Media On Off You can select whether to use the Media function that plays the contents videos photos music from...

Страница 62: ...vals You can configure the viewing settings for the text message SMS contents on the mobile phone For the procedures refer to the mobile phone manual Some special characters may be displayed as blank or broken characters Call Arrival Alarm If a call arrives while you are watching TV the alarm window appears If you select the OK button the call arrival alarm is confirmed and the alarm window is clo...

Страница 63: ...olution and format Media play control buttons Button Operations Move the cursor and select an item While playing a movie file Skip forwards or backwards through the movie file ENTERE Pressing the ENTERE button during play pauses the play Pressing the ENTERE button during pause resumes the play RETURN Return to the previous menu TOOLS Run various functions from the Photo Music and Movie menus INFO ...

Страница 64: ...f the FASTEXT system is used by a broadcasting company the different topics covered on a teletext page are colour coded and can be selected by pressing the coloured buttons Press one of them corresponding to the required The page is displayed with other coloured information that can be selected in the same way To display the previous or next page press the corresponding coloured button 6 teletext ...

Страница 65: ...ot capable of displaying any additional graphics or text regardless of the Teletext transmission Press the TV button to exit from the Teletext display Installing the Stand Preset Place the Guide Stand and Cover Neck onto the stand and fasten it using the screws Applicable to 32inch models only N 1 Attach your LCD TV to the stand Two or more people should carry the TV Make sure to distinguish betwe...

Страница 66: ...y result in personal injury due to electric shock Assembling the Cables Enclose the cables in the Holder Wire Cable so that the cables are not visible through the transparent stand Anti Theft Kensington Lock The Kensington Lock is a device used to physically fix the system when using it in a public place The appearance and locking method may differ from the illustration depending on the manufactur...

Страница 67: ...Flyer For added stability install the anti fall device for safety purposes as follows To secure the TV 1 Put the screws into the clamps and firmly fasten them onto the wall Confirm that the screws have been firmly installed onto the wall You may need additional material such as an anchor depending on the type of wall Since the necessary clamps screws and string are not supplied please purchase the...

Страница 68: ...e Colour Brightness Sharpness Adjust Energy Saving option in Setup menu Try picture reset to view the default picture setting Go to MENU Picture Picture Reset Dotted line on the edge of screen If picture size is set to Screen Fit change to 16 9 Change cable set top box resolution Picture is black and white with AV Composite input only Confirm Composite yellow cable is in yellow jack in source as w...

Страница 69: ... SOURCE button on the TV remote RF Cable Antenna Connection Cannot receive all channels Make sure Antenna cable is connected securely Please try Plug Play to add available channels to the channel list Go to MENU Setup Plug Play and wait for all available channels are stored Verify Antenna is positioned correctly Picture is distorted macroblock small block dots pixelization Compression of video con...

Страница 70: ...This function is only available with digital channels with an Antenna RF Coax connection TV is tilted to right or left side Remove the stand base from TV and reassemble Can not assemble stand base Make sure TV is placed on flat surface If can not remove screws from TV please use magnetized screw driver Channel menu is grey out unavailable Channel menu is only available when TV source is selected Y...

Страница 71: ... Swivel Left Right 20 20 Model Name LA46B650 LA55B650 Screen Size Diagonal 46 inch 55 inch PC Resolution Optimum 1920 X 1080 60 Hz 1920 X 1080 60 Hz Sound Output 10W x 2 15W x 2 Dimension WxDxH Without Stand With stand 1126 X 79 X 730 mm 1126 X 277 X 783 mm 1311 x 80 x 842 mm 1311 x 305 x 895 mm Weight With Stand 25 kg 35 kg Environmental Considerations Operating Temperature Operating Humidity Sto...

Отзывы: