background image

18

Before Installing the Product (Installation 

Guide)

This product can be installed and used with the exclusive Samsung stand sold separately by 

Samsung Electronics, and also can be wall-mounted.


"

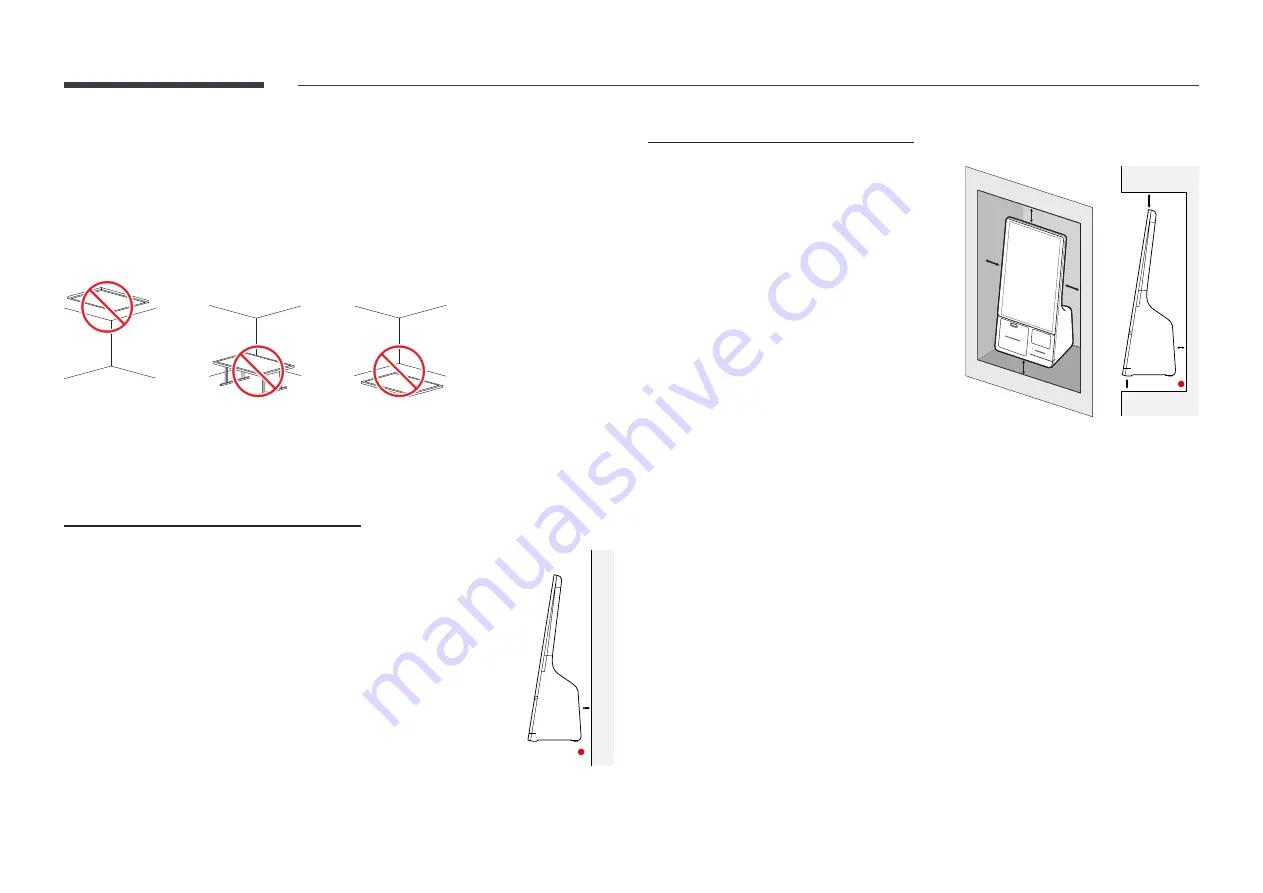
Do not use this model installed on a ceiling, floor, or table.

Ventilation


"

Contact Samsung Customer Service Centre for further details.

Installation on a Perpendicular Wall

A

 Minimum 15 mm

B

 Ambient temperature: 35 °C or less


"

When installing the product on a perpendicular wall, allow at least 15 

mm of space between the product and wall surface for ventilation and 

ensure that the ambient temperature is kept below 35 °C.

A

B

Installation on an Indented Wall

A

 Minimum 15 mm

Minimum 25 mm

Minimum 25 mm

Minimum 0 mm

Ambient temperature: 35 °C or less


"

When installing the product on an indented 

wall, allow minimum space between the 

product and walls as indicated in the figure 

for ventilation, and ensure that the ambient 

temperature is kept below 35 °C.

B

D

D

C

B

C

A

E

Содержание KM24A

Страница 1: ...on the product and the content in the manual is subject to change without prior notice to improve the performance Recommended hours of use per day of this product is under16 hours If the product is used for longer than 16 hours a day the warranty may be void For India Only This product is RoHS compliant For more information on safe disposal and recycling visit our website www samsung com in or con...

Страница 2: ...ome Kiosk App 20 App Management 21 App Information 21 Installing the Kiosk App 21 Developer Mode 21 Peripherals 22 Clone Product 23 Network Status 24 On Off Timer 25 On Timer 25 Off Timer 26 Holiday Management 26 All Settings 27 Menu Picture 28 OnScreen Display 31 Sound 32 Network 33 Network Settings Wired 34 Network Settings Wireless 36 Use WPS 38 Contents Before Using the Product Safety Precauti...

Страница 3: ...ommended prevention practices 79 License 80 Configuring the touchscreen monitor settings 53 Calibration 53 Controlling the screen 55 Touchscreen gestures 55 Notes 56 Multi Display Control Cable Connection 57 RS232C Cable 57 LAN cable 58 Connection 60 Control Codes 61 Using MDC 68 MDC Program Installation Uninstallation 68 Troubleshooting Guide Requirements Before Contacting Samsung Customer Servic...

Страница 4: ...SERVICEABLE PARTS INSIDE REFER ALL SERVICING TO QUALIFIED PERSONNEL This symbol indicates that high voltage is present inside It is dangerous to make any kind of contact with any internal part of this product AC voltage Rated voltage marked with this symbol is AC voltage This symbol indicates that this product has included important literature concerning operation and maintenance DC voltage Rated ...

Страница 5: ...r fire may result from a damaged cable Do not connect multiple products to a single power socket Overheated power sockets may cause a fire Insert the power plug all the way in so it is not loose An unsecure connection may cause a fire Clean any dust around the pins of the power plug or the power socket with a dry cloth A fire may result Connect the power plug to a grounded power socket Except for ...

Страница 6: ...t is being used The product may become damaged by an electric shock You can only assemble the power strip provided with the kiosk Using any other power strip cannot guarantee your safety Plug the unused outlets in the power strip with the provided cover Installation Warning Before moving the product turn off the power switch and disconnect the power cable and all other connected cables Damage to t...

Страница 7: ...installed in an unusual location the surrounding environment may cause a serious quality problem Therefore be sure to contact Samsung Customer Service Centre before installation Places where many fine dusts are generated places where chemicals are used places with too high or low temperatures places with a lot of moisture orwater transportation equipment such as vehicles airports and stations used...

Страница 8: ...ply an impact to the product The screen display may be damaged An electric shock or fire may result Do not insert metallic objects chopsticks coins hairpins etc or objects that burn easily paper matches etc into the product via the vent or input output ports etc If foreign substances enter the product be sure to power off the product and disconnect the power cord Then contact Samsung Customer Serv...

Страница 9: ...on the product Product failure or personal injury may result When you do not use the product for a long time due to vacation or other reason disconnect the power cord from the power socket Dust accumulation combined with heat can cause a fire electric shock or electric leakage Use the product at the recommended resolution and frequency Your eyesight may deteriorate Rest your eyes for more than 5 m...

Страница 10: ...hed on the screen may leave residues Clean the residues before watching the screen Do not strongly press and rub the product Damage to the product may result If you need to clean the glass part of the touchscreen models apply IPA Isopropyl Alcohol 70 or less on a smooth dry cloth such as superfine fibers or cotton flannels and gentlywipe with it IPA Isopropyl Alcohol is a colourless and flammable ...

Страница 11: ...teristics of high glossy products using a UV humidifier nearby may create white coloured stains on the product Contact Samsung Customer Service Centre if the inside of the product needs cleaning service fee will be charged ...

Страница 12: ...he pictures may look different from the actual components The RS232C adaptercan be used to connect to anothermonitorusing the D SUB 9 pin type RS232C cable Checking the Components Display Quick setup guide Warranty card Regulatory guide Power cord RS232C adapter Preparations Chapter 02 ...

Страница 13: ...13 Connection Box Power strip OCM cable Screw M4 L12 x 7 Screw M3 L5 x 11 Sheet cover x 2 EFT Terminal cover holder Screw M3 L8 x 2 EFT Terminal holder guide ...

Страница 14: ...ox includes all the payment related equipment QR code barcode reader A sensor for QR code and bar code recognition Optimum operation condition Distance from the sensor 100 150 mm Bar code length 30 60 mm QR code size 25 30 mm x 25 30 mm Receipt printer Prints receipt Powerbutton Turn on or off the product Press the button shortly to turn on the product Press and hold the button to turn off the pro...

Страница 15: ...and specifications are subject to change without prior notice to improve the performance This product does not support use of the remote control Parts Description Powerbutton Turns the product on or off Press the button shortly to turn on the product Press and hold the button to turn off the product ...

Страница 16: ...nects to a PC using a USB cable for TOUCH OUT to enable touch functions HDMI Connects to a source device using an HDMI cable LAN Connects to MDC and the Internet using a LAN cable 10 100 Mbps Use Cat7 STP Type cable for the connection STP Shielded Twist Pair USB 5V1 0A Connects to a USB device The USB ports on the product accept a maximum constant current of 1 0A If the maximum value is exceeded U...

Страница 17: ...ower Off from the Administrator menu and then select Power Off or Restart Home You can enter the Kiosk Home screen Tap Home from the Administrator menu Source You can select an input source Tap Source from the administrator menu Settings You can access the OSD menu to adjust functions and settings of the product To change settings select a menu item Tap Settings from the Administrator menu Volume ...

Страница 18: ... B Ambient temperature 35 C or less When installing the product on a perpendicularwall allow at least 15 mm of space between the product and wall surface forventilation and ensure that the ambient temperature is kept below 35 C A B Installation on an Indented Wall A Minimum 15 mm B Minimum 25 mm C Minimum 25 mm D Minimum 0 mm E Ambient temperature 35 C or less When installing the product on an ind...

Страница 19: ...ndard length or do not comply with the VESA standard screw specifications Screws that are too long may cause damage to the inside of the product Forwall mounts that do not comply with the VESA standard screw specifications the length of the screws may differ depending on the wall mount specifications Do not fasten the screws too firmly This may damage the product or cause the product to fall leadi...

Страница 20: ...an tap and hold one of four corners of the display to open the Administrator menu and then tap Home to access the Kiosk Home Chapter 03 Launch the installed Kiosk App If you have not installed a Kiosk App the App Management menu opens to proceed with the app installation This function may not be supported depending on the model ...

Страница 21: ...e Kiosk App from the web server or the USB device If you already have a Kiosk App installed you can uninstall it and then re install the new app Install from Web Server Select an app provider from the list or manually enter the URL of the web server to install a Kiosk App When you enter the URL of the web server manually you must enter both Install URL and the Update Domain Install from USB Device...

Страница 22: ...trator menu Home Peripherals Peripherals The displayed image may differ depending on the model You can check the information of the devices connected to each USB port This function may not be supported depending on the model ...

Страница 23: ...g file found on the external storage device Export this device s settings to the external storage device message appears 3 Select Export to export the settings When a duplicate file is found on the external storage device 1 Connect the external storage device then run the Clone Product function 2 The Cloning file found Please select an option message appears Select Import from External Storage or ...

Страница 24: ...24 Network Status Administrator menu Home Network Status Network Status The displayed image may differ depending on the model Check the current network and Internet connection ...

Страница 25: ...specified volume or input source On Timer Set the on timer by making a selection from one of the seven options Ensure you set the current time first On Timer1 On Timer 7 Setup Select Off Once Everyday Mon Fri Mon Sat Sat Sun or Manual If you select Manual you can choose the days you want On Timer to turn on your product The check mark indicates days you ve selected Time Set the hour and minute Vol...

Страница 26: ...ay Add Holiday Specify the period you want to add as a holiday Select the start and end dates of the holiday you want to add using the u d buttons and click the Done button The period will be added to the list of holidays Start Date Set the start date of the holiday End Date Set the end date of the holiday Delete Delete selected items from the list of holidays Edit Select a holiday item and then c...

Страница 27: ...27 All Settings Administrator menu Home All Settings All Settings The displayed image may differ depending on the model You can access the OSD menu to adjust functions and settings of the product ...

Страница 28: ...olour rises Range 2800K 16000K Enabled when Colour Tone is set to Off Advanced Settings Configure advanced picture settings to create your preferred picture Picture Enhancer Displays enhanced colour and sharpness HDR Mode or HDR10 Mode Automatically provide an optimal HDR effect based on the video source This function may not be supported depending on the model Colour Adjust the colour saturation ...

Страница 29: ...G ST 2084 and BT 1886 may change depending on the input video settings For models with the HDR Mode support the Gamma settings HLG ST 2084 and BT 1886 may change depending on the input video and HDR Mode settings If HDR Mode is set to Off HLG ST 2084 and BT 1886 settings may be available depending on the input video To adjust S Curve set HDR Mode to Off HLG ST 2084 BT 1886 S Curve Adjust the HLG S...

Страница 30: ...gital CleanView Reduces the noise of the picture to avoid distracting flickering HDMI Black Level Adjust the black level to optimize the HDMI picture brightness and contrast Film Mode Make frame transitions from oldervideo sources smoother This function is only available when the input signal is TV AV Component 480i 1080i or HDMI 1080i Dynamic Backlight Automatically adjust the backlight to provid...

Страница 31: ...imer You can set the timer for Screen Burn Protection The Screen Burn Protection feature stops automatically after a specified period of time Immediate Display Select the screen saveryou want to display immediately Message Display Source Info Select whether to display the source OSD when the input source changes No Signal Message Select whether to display the no signal OSD when no signal is detect...

Страница 32: ... pitch and enhance the richness of the sound output Available only when Sound Mode is set to Standard Auto Volume Automatically adjusts the volume level when you change video sources or content so the level remains the same To use the volume control of a connected source device set Auto Volume to Off Reset Sound Reset all sound settings to the factory defaults ...

Страница 33: ...s You can check the current network and Internet status Open Network Settings Configure network settings to connect to an available network Network Type Network Type menu may not be available in Wired models Configure the network connection mode ...

Страница 34: ...AN cable See the diagram below Note that the wall outlet is attached to a modem or router elsewhere in your house Modem port on the wall LAN RJ45 LAN LAN cable If you have a Dynamic Network you should use an ADSL modem or router that supports the Dynamic Host Configuration Protocol DHCP Modems and routers that support DHCP automatically provide the IP Address Subnet Mask Gateway and DNS values you...

Страница 35: ... Network Connection Values To view the Network connection values on most Windows computers follow these steps 1 Right click the Network icon on the bottom right of the screen 2 In the pop up menu that appears click Status 3 On the dialog that appears click the Support tab 4 On the Support Tab click the Details button The Network connection values are displayed The path to the settings depends on t...

Страница 36: ... network to transmit an encrypted security code called an Access or Security key The Security key is based on a Pass Phrase typically a word or a series of letters and numbers of a specified length you were asked to enterwhen you set up security foryourwireless network If you use this method of setting up the network connection and have a Security key foryour wireless network you will have to ente...

Страница 37: ...ter cannot be found after retrying select the Stop button The Add Network button appears 4 If the Enter the password for AP Name screen appears go to step 5 If you select a wireless router that does not have security go to step 7 5 If the router has security enter the Enter the password for AP Name Security key or PIN 6 When done select Done The network connection screen appears and the verificati...

Страница 38: ... yourwireless routerwithin the next two minutes Your product automatically acquires all the network setting values it needs and connects to your network If you want to use the WPS PIN select WPS PIN Go to yourwireless router s Settings enteryour PIN and then select OK 4 When the connection has been verified the Success Your device is connected to the Internet If you have any problems using online ...

Страница 39: ...dministrator to find the correct port number and then change the port number Enter the server IP address and port number Use 7001 as the port number If you are unable to connect to the server using port number 7001 check with your server administrator to find the correct port number and then change the port number For the MagicInfo Server user guide visit the following website http displaysolution...

Страница 40: ...ers directly from it NTP Settings Set up the server URL and time zone to use the network time DST Switches the DST Daylight Saving Time function on or off Start Date End Date and Time Offset are enabled only when DST is set to On Power On Delay When connecting multiple products adjust the power on time for each product to prevent power overload within the range 0 50 seconds Power Control Auto Powe...

Страница 41: ...required Auto Power Off Choose how long the display will wait before turning off after no user interaction is detected Temperature Control This function detects the internal temperature of the product You can specify the temperature range that is acceptable The default temperature is set to 77 C The recommended operating temperature for this product is 75 to 80 C The screen will become darker if t...

Страница 42: ...rd for the SNMP connection This function may not be supported depending on the model Server Security Status Displays the information of the MagicInfo server You can use this function when the product is connected to the MagicInfo or RM server Network Lock Block external network access You can register networks on the server to allow access Certificate Manager Manage the certificates installed on t...

Страница 43: ...ted for containing viruses Anynet HDMI CEC Anynet is a function that enables you to control all connected Samsung devices that support Anynet The Anynet system can be used only with Samsung devices that have the Anynet feature To be sure your Samsung device has this feature check if there is an Anynet logo on it Anynet works when the AV device supporting Anynet is in the standby or on status Anyne...

Страница 44: ...is set to On in the System menu I want to exit Anynet Set the Anynet HDMI CEC to Off in the System menu The message Connecting to Anynet device or Disconnecting Anynet device appears on the screen Please wait for a minute as it maybe configuring Anynet or switching to a view mode The Anynet device does not play You cannot use the play function when initial setup is in progress The connected device...

Страница 45: ...d must be saved as samsung in all small letters When there are multiple numbers of external USB connections the product will attempt to download the custom logo from the last device that has been connected to the product Custom logo file restrictions Images up to 50 MB in size can be used Supported image file samsung_image Supported file extensions jpg jpeg bmp png Videos up to 150 MB in size can ...

Страница 46: ...o their default settings We advise you to write down your settings so that you can easily reset them after the upgrade Update now Update the software to the latest version Current version This is the software version already installed in the product Contact Samsung You can view the address of the Samsung website the call centre phone number your product s model number software version Open Source ...

Страница 47: ...he product you want to connect We recommend using authorized cables for HDMI cable connections When connecting a PC or an external device make sure to connect the HDMI cable and Touch Out USB cable to the display before assembling the display with the connection box Connecting to a PC Do not connect the power cable before connecting all other cables Ensure you connect a source device first before ...

Страница 48: ...able supports digital video and audio signals and does not require an audio cable The picture may not display normally if at all or the audio may not work if an external device that uses an olderversion of HDMI mode is connected to the product If such a problem occurs ask the manufacturer of the external device about the HDMI version and if out of date request an upgrade Be sure to use an HDMI cab...

Страница 49: ...DMI DVI cable Supported resolutions include 1080p 50 60Hz 720p 50 60Hz 480p and 576p HDMI Connecting the LAN cable The supported ports may vary depending on the model LAN Use Cat7 STP Type cable for the connection 10 100 Mbps STP Shielded Twist Pair Changing the Input source On the Administrator menu you can tap Source to switch the screen to an external device connected to the product ...

Страница 50: ...screen The screen may not function properly if there is static Do not press hard on the touch screen with your finger tip Do not use a sharp object when tapping the screen The screen may break or get damaged Do not tap the screen while wearing a glove with a dirty finger or using something sharp such as your fingernail or a ballpoint pen The screen may not function properly Take extra care to ensu...

Страница 51: ...r touch input UPDD driver Linux Ubuntu 10 04 12 10 14 04 18 04 Above Linux The touch feature is available in Kernel version 3 0 or above To use the multi touch feature or change the display orientation a separate driver needs to be installed You may not be able to use touch function in some OS Linux distribution dependent Android Chrome may have limited touch capability Fedora 15 16 19 20 Above Op...

Страница 52: ... to the power outlet 3 After connecting the power cable tap Source on the Administrator menu 4 Connect the Touch Out USB cable to the TOUCH port of the product and the USB port of the PC Touch Out USB cable is not provided with the product TOUCH Connecting to a laptop ortablet PC A laptop or tablet PC can be connected to the product using the same method when connecting a desktop PC If touchscreen...

Страница 53: ...splay the page Touch this screen to identity it as the touchscreen If this is not the Tablet PC screen press Enter to move to the next screen To close the tool press Esc Configuring the touchscreen monitorsettings To properly use the touch function of the product in Windows go to Tablet PC Settings and calibrate the product First connect the touchscreen monitor before configuring the following set...

Страница 54: ...on the screen to return to the last calibration point Press the Esc button to close the tool Do not change your screen orientation until you have completed the calibration process 5 After calibration is complete the message Do you want to save the calibration data appears Select Yes to save changes Digitizer Calibration Tool Yes No Do you want to save the calibration data 6 The touchscreen monitor...

Страница 55: ...y tap the screen Use this gesture to select a feature or menu item It is similar to clicking on a mouse Drag Lightly touch and drag in any direction on the screen Use this gesture to move in a specific direction on a web page map or photo It is similar to dragging a mouse Double tap Tap the screen twice Use this gesture to run the selected program It is similar to double clicking on a mouse ...

Страница 56: ...s shown in the image Use this gesture to go to the previous or next picture or web page Notes To increase the touch input accuracy enlarge the font or icons Use a mouse as an additional input method in touchscreen mode for more precise control ...

Страница 57: ...h 15 m only shielded type Pin assignment 1 2 3 4 5 6 7 8 9 5 4 3 2 1 9 8 7 6 Connector Receptor Pin Signal 1 Detect data carrier 2 Received data 3 Transmitted data 4 Prepare data terminal 5 Signal ground Pin Signal 6 Prepare data set 7 Send request 8 Clear to send 9 Ring indicator Multi Display Control Control multiple display devices connected to a PC simultaneously Chapter 07 ...

Страница 58: ...P1 P1 P1 P2 P2 Connector Rx 3 1 Tx STEREO Tx 2 2 Rx PLUG Gnd 5 3 Gnd 3 5ø LAN cable Pin assignment 1 2 3 4 5 6 7 8 Pin Standard Colour Signal 1 White and orange TX 2 Orange TX 3 White and green RX 4 Blue NC 5 White and blue NC 6 Green RX 7 White and brown NC 8 Brown NC ...

Страница 59: ...nnector RJ45 Direct LAN cable PC to HUB HUB P1 P1 P2 P2 Signal P1 P2 Signal TX 1 1 TX TX 2 2 TX RX 3 3 RX RX 6 6 RX Cross LAN cable PC to LFD P1 P2 Signal P1 P2 Signal TX 1 3 RX TX 2 6 RX RX 3 1 TX RX 6 2 TX ...

Страница 60: ...232C IN ports of the PC and the product The supported ports may vary depending on the model Connection 1 RS232C Kiosk 1 PC Connection 2 RJ45 5 4 3 2 1 RJ45 LAN RJ45 LAN RJ45 LAN Kiosk 2 Kiosk 1 PC Kiosk 3 Connection 3 RJ45 LAN RJ45 Kiosk 1 PC ...

Страница 61: ...l mode control 0x5C 0 1 6 Safety Lock 0x5D 0 1 7 Video Wall On 0x84 0 1 8 Video Wall User Control 0x89 All communications take place in hexadecimals The checksum is calculated by adding up all values except the header If a checksum adds up to be more than 2 digits as shown below 11 FF 01 01 112 the first digit is removed E g Power On ID 0 Header Command ID Data length Data 1 Checksum 0xAA 0x11 1 P...

Страница 62: ...a length Ack Nak r CMD Val1 Checksum 0xAA 0xFF 3 N 0x11 ERR ERR A code showing what error has occurred Volume control Function The volume of a product can be adjusted using a PC Viewing volume state Get Volume Status Header Command ID Data length Checksum 0xAA 0x12 0 Setting the volume Set Volume Header Command ID Data length Data Checksum 0xAA 0x12 1 Volume Volume Volume value code to be set on a...

Страница 63: ...VI_video 0x21 HDMI1 0x22 HDMI1_PC 0x23 HDMI2 0x24 HDMI2_PC 0x25 DisplayPort 0x67 Kiosk App DVI_video HDMI1_PC and HDMI2_PC cannot be used with the Set command They only respond to Get commands MagicInfo is only available with models that contain the MagicInfo function Kiosk App is only available with models that support the app Ack Header Command ID Data length Ack Nak r CMD Val1 Checksum 0xAA 0xF...

Страница 64: ...ode can be activated on a product using a PC This control is only available on a product whose Video Wall is enabled Viewing video wall mode Get Video Wall Mode Header Command ID Data length Checksum 0xAA 0x5C 0 Setting the video wall Set Video Wall Mode Header Command ID Data length Data Checksum 0xAA 0x5C 1 Video Wall Mode Video Wall Mode A code used to activate Video Wall mode on a product 1 Fu...

Страница 65: ...Safety lock code to be set on a product Nak Header Command ID Data length Ack Nak r CMD Val1 Checksum 0xAA 0xFF 3 N 0x5D ERR ERR A code showing what error has occurred Video Wall On Function Turn Video Wall on or off on the product from your computer Get Video Wall On Off Status Header Command ID Data length Checksum 0xAA 0x84 0 Set Video Wall On Off Header Command ID Data length Data Checksum 0xA...

Страница 66: ... Data 1 Data 2 Checksum 0xAA 0x89 2 Wall_Div Wall_SNo Wall_SNo Product Number code assigned to the product 10x10VideoWall Model 1 100 Set Number Data 1 0x01 2 0x02 99 0x63 100 0x64 Ack Header Command ID Data length Ack Nak r CMD Val1 Val2 Checksum 0xAA 0xFF 4 A 0x89 Wall_ Div Wall_ SNo Nak Header Command ID Data length Ack Nak r CMD Val1 Checksum 0xAA 0xFF 3 N 0x89 ERR ERR A code showing what erro...

Страница 67: ...x5A 0x5B 0x5C 0x5D 0x5E 0x5F 6 0x61 0x62 0x63 0x64 0x65 0x66 0x67 0x68 0x69 0x6A 0x6B 0x6C 0x6D 0x6E 0x6F 7 0x71 0x72 0x73 0x74 0x75 0x76 0x77 0x78 0x79 0x7A 0x7B 0x7C 0x7D 0x7E N A 8 0x81 0x82 0x83 0x84 0x85 0x86 0x87 0x88 0x89 0x8A 0x8B 0x8C N A N A N A 9 0x91 0x92 0x93 0x94 0x95 0x96 0x97 0x98 0x99 0x9A 0x9B N A N A N A N A 10 0xA1 0xA2 0xA3 0xA4 0xA5 0xA6 0xA7 0xA8 0xA9 0xAA N A N A N A N A N ...

Страница 68: ...In the License Agreement window displayed select I accept the terms in the license agreement and click Next 5 In the displayed Customer Information window fill out all the information fields and click Next 6 In the displayed Destination Folder window select the directory path you want to install the program in and click Next If the directory path is not specified the program will be installed in t...

Страница 69: ...e Testing the Products Check if your product is operating normally by using the product test function If the screen remains blank while the power indicator blinks even when the product is correctly connected to a PC perform product testing 1 Power off both the PC and product 2 Disconnect all the cables from the product 3 Power on the product 4 If No Cable Connected is displayed the product is oper...

Страница 70: ...ed on the screen Check that products including source device are connected correctly with a cable Check that the source device connected to the product is powered on Depending on the type of external device the screen may not display properly In this case connect it with the HDMI Hot Plug function turned On Not Optimum Mode is displayed This message is displayed when a signal from the graphics car...

Страница 71: ...to appear corrupted in scenes featuring fast moving objects such as in a sports event or action video Low signal level or low picture quality may cause the display to appear corrupted This does not mean the product is defective A cell phone within a distance of one meter radius may cause static on analog and digital products The brightness and colourdo not look normal Go to Picture and adjust the ...

Страница 72: ...und card or software program Video is available but there is no sound If an HDMI cable or DP cable is connected check the audio output settings on the PC If a source device is used Check the audio output settings for the source device For example if your monitor is connected to HDMI you may need to change the audio option of yourvideo output device to HDMI If a DVI HDMI cable is used a separate au...

Страница 73: ...on a message Mode Not Supported appears The message Mode Not Supported appears if the input source resolution exceeds the maximum resolution of the display To resolve the issue change the PC resolution to a resolution supported on the display There is no sound from the speakers in HDMI modewhen a DVI HDMI cable is connected DVI cables do not transmit sound data Make sure to connect the audio cable...

Страница 74: ...o change HDMI CEC settings refer to the device user guide or contact the device manufacturer for assistance In power saving mode when the input source is DisplayPort PC displaysettings cannot be saved Go to System Power Control and set Max Power Saving to Off Alternatively configure the PC display output settings again Ensure the product is turned on When booting the PCwith the input source set to...

Страница 75: ...is closed Check the power and signal cable connection status and restart the product Press the Self Test button to check if the printerworks It is not the problem of the printer if it works QR code barcode sensor Check the power and signal cable connection status and restart the product If the recognition results are poor clean the sensorwith a smooth damp cloth and then wipe out the moisture and ...

Страница 76: ...r Resolution 640 480 Powerand signal USB Format UVC 1 1 Others Red Aimer White LED Plug and Play This monitor can be installed and used with any Plug and Play compatible systems Two way data exchange between the monitor and PC system optimizes the monitor settings Monitor installation takes place automatically However you can customize the installation settings if desired Due to the nature of the ...

Страница 77: ... 100 000 VESA 640 x 480 31 469 59 940 25 175 VESA 640 x 480 37 861 72 809 31 500 VESA 640 x 480 37 500 75 000 31 500 VESA 800 x 600 35 156 56 250 36 000 VESA 800 x 600 37 879 60 317 40 000 VESA 800 x 600 48 077 72 188 50 000 VESA 800 x 600 46 875 75 000 49 500 VESA 1024 x 768 48 363 60 004 65 000 VESA 1024 x 768 56 476 70 069 75 000 Resolution Horizontal Frequency kHz Vertical Frequency Hz Pixel C...

Страница 78: ...stomer requests software installation and setup for the product If a service technician removes cleans dusts or foreign materials inside of the product If customer requests an installation additionally after purchasing a product through home shopping or online A Product damage caused by customer s fault Product damage caused by customer s mishandling orwrong repair If a product damage is caused by...

Страница 79: ...information is a guide to prevent afterimage burn in Viewing a fixed screen for an extended period of time may cause afterimage burn in This problem is not included in warranty Recommended prevention practices Viewing a fixed screen for an extended period of time may cause afterimage burn ins or smudges If the product is not to be used for a long time turn it off or activate the Power Saving mode ...

Страница 80: ...LICENCE AND IS AUTHORISED TO BE USED ONLY IN CONNECTION WITH HEVC CONTENT THAT MEETS EACH OF THE THREE FOLLOWING QUALIFICATIONS 1 HEVC CONTENT ONLY FOR PERSONAL USE 2 HEVC CONTENT THAT IS NOT OFFERED FOR SALE AND 3 HEVC CONTENT THAT IS CREATED BY THE OWNER OF THE PRODUCT THIS PRODUCT MAY NOT BE USED IN CONNECTION WITH HEVC ENCODED CONTENT CREATED BY A THIRD PARTY WHICH THE USER HAS ORDERED OR PURC...

Отзывы: