background image

ENG

29

FUNCTIONS


In Bluetooth connection mode, the Bluetooth connection will be lost if the distance between the Soundbar 

and the Bluetooth device exceeds 16.4 ft.


The Soundbar automatically turns off after 5 minutes in the Ready state.


+

More About Bluetooth

Bluetooth is a technology that enables Bluetooth-compliant devices to interconnect easily with each other using a 

short wireless connection.


A Bluetooth device may cause noise or malfunction, depending on usage, if:


-

A part of your body is in contact with the receiving/transmitting system of the Bluetooth device or the 

Soundbar.


-

It is subject to electrical variation from obstructions caused by a wall, corner, or office partition.


-

It is exposed to electrical interference from same frequency-band devices including medical equipment, 

microwave ovens, and wireless LANs.


Pair the Soundbar with the Bluetooth device while they are close together.


The further the distance between the Soundbar and Bluetooth device, the worse the quality is.  

If the distance exceeds the Bluetooth operational range, the connection is lost.


In poor reception areas, the Bluetooth connection may not work properly.


The Bluetooth connection only works when it is close to the unit. The connection will be automatically cut off if the 

Bluetooth device is out of range. Even within range, the sound quality may be degraded by obstacles such as 

walls or doors.


This wireless device may cause electric interference during its operation.

USING THE SAMSUNG AUDIO REMOTE APP


+

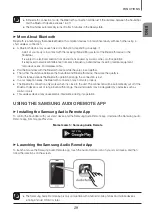
Installing the Samsung Audio Remote App

To control the Soundbar with your smart device and the Samsung Audio Remote app, download the Samsung Audio 

Remote app from Google Play store.

Market search : Samsung Audio Remote


+

Launching the Samsung Audio Remote App

To launch and use the Samsung Audio Remote app, touch the Audio Remote icon on your smart device, and then 

follow the directions on the screen.


The Samsung Audio Remote app is only compatible with Android mobile phones and mobile devices 

running Android OS 3.0 or later.

Содержание HW-KM45

Страница 1: ...oundbar Imagine the possibilities Thank you for purchasing this Samsung product To receive more complete service please register your product at www samsung com register User manual HW KM45 Wireless Subwoofer PS WK450 ...

Страница 2: ...des a clearer picture The unit is also equipped with the ARC function which lets you listen to sound from your TV through the Soundbar via an HDMI cable This function is only available if you connect the unit to an ARC compliant TV USB Host Support You can connect and play music files from external USB storage devices such as MP3 players USB flash memory etc using the Soundbar s USB HOST function ...

Страница 3: ...th the symbol is DC voltage Caution Consult Instructions for use This symbol instructs the user to consult the user manual for further safety related information WARNING To reduce the risk of fire or electric shock do not expose this appliance to rain or moisture To prevent injury this apparatus must be securely attached to the floor wall in accordance with the installation instructions CAUTION Do...

Страница 4: ...e wide blade or the third prong are provided for your safety If the provided plug does not fit into your outlet consult an electrician for replacement of the obsolete outlet 10 Protect the power cord from being walked on or pinched particularly at plugs convenience receptacles and the point where they exit from the apparatus 11 Only use attachments accessories specified by the manufacturer 12 Use ...

Страница 5: ...the AC plug from the wall outlet Unplug the unit if you intend to leave it unused for a long period of time 3 9 inch 3 9 inch 2 7 inch 3 9 inch During thunderstorms disconnect the AC plug from the wall outlet Voltage peaks due to lightning could damage the unit Protect the product from moisture i e vases and excess heat e g a fireplace or equipment creating strong magnetic or electric fields Unplu...

Страница 6: ...l 13 INSTALLATION 13 Installing the Soundbar 13 Installing the Wall Mount 18 CONNECTIONS 18 Connecting the Subwoofer 20 Connecting to a TV 20 Connecting to a TV Using a Digital Optical Cable 21 Connecting to a TV Using an HDMI Digital Cable 21 TV SoundConnect 23 Connecting to External Devices 23 Optical or Analog Audio Cable 24 HDMI Cable 24 USB 26 FUNCTIONS 26 Input Mode 27 Bluetooth 30 Software ...

Страница 7: ...the supplied accessories shown below The appearance of the accessories may differ slightly from the illustrations above Micro USB to USB adapter and HDMI cables are sold separately To purchase contact a Samsung Service Center or Samsung Customer Care For more information about the power supply and power consumption refer to the label attached to the product Label Bottom of main unit Remote Control...

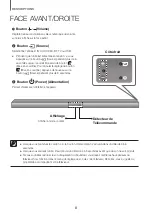
Страница 8: ...r more than 3 seconds sets the button to act as the Mute button To cancel the Mute button setup press the Source button for more than 3 seconds again 3 Power Button Turns the power on and off When you plug in the AC cord the power button will begin working in 4 to 6 seconds When you turn on this unit there will be a 4 to 5 second delay before it produces sound If you want to enjoy sound only from ...

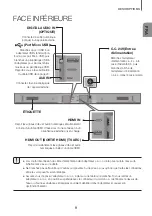
Страница 9: ...DMI IN HDMI OUT TV ARC DIGITAL AUDIO IN OPTICAL USB 5V 0 5A AUX IN DC 24V Power Supply In Connect the AC DC power adaptor to the power supply jack and then connect the AC DC power adaptor plug to a wall outlet DIGITAL AUDIO IN OPTICAL Connect to the digital optical output of an external device HDMI OUT TV ARC Outputs digital video and audio signals simultaneously using an HDMI cable HDMI IN Inputs...

Страница 10: ...he sound Pressing the SOUND button repeatedly cycles through the Surr Sound settings ON SURROUND SOUND OFF SURROUND SOUND SOUND EFFECT You can select from 6 different sound modes STANDARD Original Sound MUSIC CLEAR VOICE SPORTS MOVIE and NIGHT MODE depending on the content you want to listen to Select the STANDARD mode if you want to enjoy the original sound Press and hold the button for about 5 s...

Страница 11: ...woofer level using the Samsung Audio Remote mobile app press the buttons to decrease or increase the woofer level within 3 seconds of pressing the WOOFER button If the Soundbar is connected to a digital TV and the video appears out of sync with the audio press the SOUND CONTROL button to select AUDIO SYNC to sync the audio with the video Use the buttons to set the audio delay between 0 ms and 300 ...

Страница 12: ...ting this function VIZIO LG Sony Sharp PHILIPS PANASONIC TOSHIBA GRUNDIG Hisense RCA This function may not be compatible with your TV s remote depending on the remote control s manufacturer To turn off this function press the SOUND button for 5 seconds OFF TV REMOTE appears on the Soundbar s display INSTALLING THE BATTERY IN THE REMOTE CONTROL 1 Use a suitable coin to turn the remote control s bat...

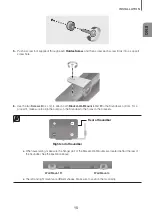
Страница 13: ...ate for the kind of wall you have plaster board iron board wood etc If possible fix the support screws into wall studs Purchase wall mounting screws according to the type and thickness of the wall you will mount the Soundbar on Diameter M5 Length 1 3 8 inches or longer recommended Connect cables from the unit to external devices before you install it on the wall Make sure the unit is turned off an...

Страница 14: ...arpened pencil tip through the center of the B TYPE images on each end of the Guide to mark the holes for the supporting screws and then remove the Wall Mount Guide 4 Using an appropriately sized drill bit drill a hole in the wall at each marking If the markings do not correspond to the positions of studs make sure you insert appropriate anchors or mollies into the holes before you insert the supp...

Страница 15: ... to the Soundbar s bottom For a proper fit make sure to align the bumps on the Soundbar to the holes on the brackets Rear of Soundbar Right end of Soundbar When assembling make sure the hanger part of the Bracket Wall Mounts are located behind the rear of the Soundbar See the illustration above Wall Mount L Wall Mount R The left and right mounts are different shapes Make sure to position them corr...

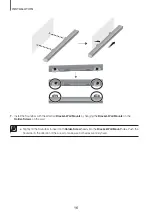
Страница 16: ...t Wall Mounts by hanging the Bracket Wall Mounts on the Holder Screws on the wall Slightly tilt the Soundbar to insert both Holder Screw heads into the Bracket Wall Mount holes Push the Soundbar in the direction of the arrow to make sure both sides are firmly fixed ...

Страница 17: ...all so that it does not fall off If the unit falls off it may cause an injury or damage the product When the unit is installed on a wall please make sure that children do not pull any of the connecting cables as this may cause it to fall For the optimal performance of a wall mount installation install the speaker system at least 2 inches 5 cm below the TV if the TV is mounted on the wall For your ...

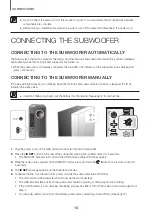
Страница 18: ...ow Important Before you begin put the battery into the remote See page 12 for instructions 1 Plug the power cords of the main unit and subwoofer into an AC wall outlet 2 Press the ID SET button on the rear of the subwoofer with a small pointed object for 5 seconds The STANDBY indicator turns off and the LINK indicator Blue LED blinks quickly 3 While the main unit is powered off in STANDBY mode pre...

Страница 19: ...ur operating environment If a steel concrete or metallic wall is between the main unit and the wireless subwoofer the system may not operate at all because the wireless signal cannot penetrate metal If the main unit doesn t make a wireless connection repeat steps 1 5 on the previous page to re set the connection between the main unit and wireless subwoofer The wireless receiving antenna is built i...

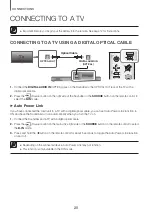
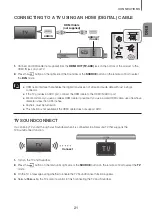
Страница 20: ...ide of the Soundbar or the SOURCE button on the remote control to select the D IN mode Auto Power Link If you have connected the main unit to a TV with a digital optical cable you can set Auto Power Link function to ON and have the Soundbar turn on automatically when you turn the TV on 1 Connect the Soundbar and a TV with a digital optical cable 2 Press the Source button on the main unit s right s...

Страница 21: ...h just a single connector If the TV provides an ARC port connect the HDMI cable to the HDMI IN ARC port We recommend you use a coreless HDMI cable if possible If you use a cored HDMI cable use one whose diameter is less than 0 55 inches Anynet must be turned on This function is not available if the HDMI cable does not support ARC TV SOUNDCONNECT You can enjoy TV sound through your Soundbar when it...

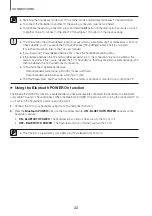
Страница 22: ...Soundbar so that they are within operational range and then re establish the TV SoundConnect connection TV SoundConnect Operational Ranges Recommended pairing range within 78 7 inches within 2m Recommended operational range within 16 4 ft 5m The Play Pause Next and Prev buttons on the Soundbar or Soundbar s remote do not control the TV Using the Bluetooth POWER On function The Bluetooth POWER On f...

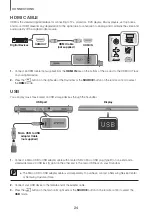
Страница 23: ... IN OPTICAL OPTICAL OUT AUX IN AUX OUT BD DVD player Set top box Game console Audio Cable not supplied Optical Cable AUX Cable 1 Connect AUX IN Audio on the main unit to the AUDIO OUT jack of the Source Device using an audio cable 2 Press the Source button on the right side of the Soundbar or the SOURCE button on the remote control to select the AUX mode Optical Cable 1 Connect DIGITAL AUDIO IN Au...

Страница 24: ...ide of the Soundbar or the SOURCE button on the remote control to select the HDMI mode USB You can play music files located on USB storage devices through the Soundbar DIGITAL AUDIO IN OPTICAL USB 5V 0 5A AUX IN HDMI IN HDMI OUT TV ARC DC 24V DIGITAL AUDIO IN OPTICAL USB 5V 0 5A AUX IN Display USB port 1 Connect a Micro USB to USB adapter cable with a male USB 2 0 Micro USB plug Type B on one end ...

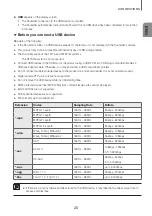
Страница 25: ...reader It may not operate properly Digital camera PTP protocols are not supported Do not remove the USB device while it is transferring files DRM protected music files MP3 WMA from commercial web sites cannot be played External HDDs are not supported Mobile phone devices are not supported File Format Type Compatibility list Extension Codec Sampling Rate Bitrate mp3 MPEG 1 Layer2 16KHz 48KHz 80kbps...

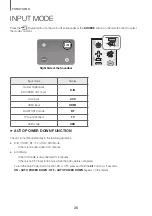
Страница 26: ...USB mode USB AUTO POWER DOWN FUNCTION The unit turns off automatically in the following situations D IN HDMI BT TV USB ARC Mode If there is no audio signal for 5 minutes AUX Mode If the AUX cable is disconnected for 5 minutes If there is no KEY input for 8 hours when the AUX cable is connected To turn the Auto Power Down function ON or OFF press and hold the p button for 5 seconds ON AUTO POWER DO...

Страница 27: ...the Stereo headset menu on the Bluetooth device You will see a list of scanned devices 4 Select AV Samsung Soundbar Kxxx K Series from the list When the Soundbar is connected to the Bluetooth device it will display Bluetooth device name BT on the front display The device name can only be displayed in English An underline _ will be displayed if the name is not in English If the Bluetooth device has...

Страница 28: ...ice s paired devices The Bluetooth device and the Soundbar must have been previously paired at least once Soundbar will appear in the Bluetooth device s searched devices list only when the Soundbar is displaying BT READY In the TV SoundConnect mode the Soundbar cannot be paired or connected to another Bluetooth device BLUETOOTH POWER ON BLUETOOTH POWER If a previously paired Bluetooth device tries...

Страница 29: ...er the distance between the Soundbar and Bluetooth device the worse the quality is If the distance exceeds the Bluetooth operational range the connection is lost In poor reception areas the Bluetooth connection may not work properly The Bluetooth connection only works when it is close to the unit The connection will be automatically cut off if the Bluetooth device is out of range Even within range...

Страница 30: ...jack on the main unit Updating firmware may not work properly if audio files supported by the Soundbar are stored in the USB storage device Do not disconnect the power or remove the USB device while updates are being applied The main unit will turn off automatically after completing the firmware update After the update all settings are reset to their factory default settings We recommend you write...

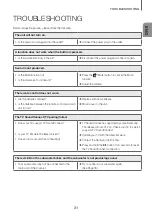
Страница 31: ... distance between the remote control and main unit too far Replace with new batteries Move closer to the unit The TV SoundConnect TV pairing failed Does your TV support TV SoundConnect Is your TV firmware the latest version Does an error occur when connecting TV SoundConnect is supported by some Samsung TVs released from 2012 on Check your TV to see if it supports TV SoundConnect Update your TV wi...

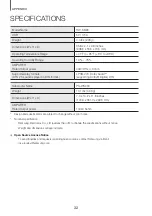
Страница 32: ...Audio supporting Dolby Digital DTS Subwoofer Name PS WK450 Weight 10 1 lbs 4 6Kg Dimensions W x H x D 7 0 x 14 2 x 11 8 inches 179 0 x 361 0 x 299 5 mm AMPLIFIER Rated Output power 140W 3ohm Design and specifications are subject to change without prior notice Nominal specification Samsung Electronics Co Ltd reserves the right to change the specifications without notice Weight and dimensions are ap...

Страница 33: ... must be retained by the customer and is the only acceptable proof of purchase It must be presented to the authorized service center at the time service is requested EXCLUSIONS WHAT IS NOT COVERED This warranty does not cover damage due to accident fire flood and or other acts of God misuse incorrect line voltage improper installation improper or unauthorized repairs commercial use or damage that ...

Страница 34: ...ronics Co Ltd All rights reserved Contact SAMSUNG WORLD WIDE If you have any questions or comments relating to Samsung products please contact the SAMSUNG customer care center Country Contact Center Web Site North America CANADA 1 800 SAMSUNG 726 7864 www samsung com ca support English www samsung com ca_fr support French U S A 1 800 SAMSUNG 726 7864 www samsung com us support ...

Страница 35: ...z les possibilités Merci d avoir acheté ce produit Samsung Pour recevoir un service plus complet veuillez enregistrer votre produit à l adresse www samsung com register Guide d utilisation HW KM45 Caisson des basses sans fil PS WK450 ...

Страница 36: ...t les signaux vidéo et audio par un seul câble et fournit une image plus claire L unité est aussi équipée d une fonction ARC qui vous permet d écouter le son de votre téléviseur par une connexion qui s établit avec le Soundbar en branchant un câble HDMI Cette fonction n est disponible que si vous branchez l unité à un téléviseur qui prend en charge la fonction ARC Prise en charge de l hôte USB Vou...

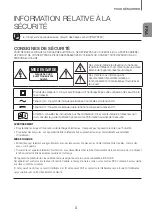
Страница 37: ...d utilisation Ce symbole indique à l utilisateur qu il doit consulter le guide d utilisation pour avoir de l information au sujet de la sécurité AVERTISSEMENT Pour réduire les risques d incendie ou de décharges électriques n exposez pas l appareil à la pluie ou à l humidité Pour éviter des blessures cet appareil doit être solidement fixé au plancher au mur conformément aux directives d installatio...

Страница 38: ...te 10 Protégez le cordon contre le piétinement ou les pincements en particulier près des fiches des prises murales et à leur point de sortie de l appareil 11 Utilisez uniquement les accessoires recommandés par le fabricant 12 Utilisez uniquement le chariot le socle le trépied le support ou la table recommandés par le fabricant ou vendus avec l appareil Si vous utilisez un meuble à roulettes déplac...

Страница 39: ...pendant une période prolongée 3 9 inch 3 9 inch 2 7 inch 3 9 inch Durant les orages débranchez la fiche c a de la prise murale Les pics de tension causés par la foudre pourraient endommager l unité Protégez le produit de l humidité p ex des vases de la chaleur excessive p ex un foyer ou de l équipement créant un puissant champ magnétique ou électrique Débranchez le câble d alimentation de la prise...

Страница 40: ...ande 13 INSTALLATION 13 Installation du Soundbar 13 Installation de la fixation murale 18 CONNEXIONS 18 Connexion du caisson des basses 20 Connexion à un téléviseur 20 Connexion à un téléviseur à l aide d un câble optique numérique 21 Connexion à un téléviseur à l aide d un câble HDMI Numérique 21 TV SoundConnect 23 Connexion à des périphériques externes 23 Câble audio optique ou analogique 24 Câb...

Страница 41: ...s accessoires peut différer légèrement des illustrations ci dessus Le câble HDMI et le câble adaptateur Micro USB USB sont vendus séparément Pour les acheter contactez un Centre de service Samsung ou le service clientèle Samsung Pour obtenir de l information sur la source d alimentation et la consommation électrique veuillez vous reporter à l étiquette apposée sur le produit Étiquette Arrière de l...

Страница 42: ...ppuyez de nouveau sur le bouton Source pendant plus de 3 secondes 3 Bouton Power Alimentation Permet d allumer et d éteindre l appareil 2 3 Côté droit Affichage Affiche le mode courant 1 Lorsque vous branchez le cordon c a le bouton d alimentation s activera dans un délai de 4 à 6 secondes Lorsque vous allumez l unité il faut prévoir un délai de 4 à 5 secondes avant que du son ne soit produit Si v...

Страница 43: ... ARC DIGITAL AUDIO IN OPTICAL USB 5V 0 5A AUX IN C C 24 V Entrée d alimentation Branchez l adaptateur d alimentation c a c c à la prise d alimentation puis branchez la fiche de l adaptateur d alimentation c a c c dans la prise murale DIGITAL AUDIO IN OPTIQUE Connectez la sortie numérique optique à un appareil externe HDMI OUT SORTIE HDMI TV ARC Reçoit simultanément les signaux vidéo et audio numér...

Страница 44: ...de l amplitude à votre expérience sonore Appuyer sur le bouton SOUND permet de parcourir les réglages Surr Sound ON SURROUND SOUND OFF SURROUND SOUND EFFET SONORE Vous pouvez sélectionner différents modes sonores STANDARD Original Sound MUSIC CLEAR VOICE SPORTS CINEMA et NIGHT MODE selon le type de sources que vous désirez écouter Sélectionnez le mode STANDARD si vous voulez profiter de la qualité...

Страница 45: ...on mobile Samsung Audio Remote utilisez les boutons pour augmenter ou diminuer le niveau du caisson des basses en moins de 3 secondes de l enfoncement du bouton WOOFER Si le Soundbar est branché à un téléviseur numérique et que la vidéo semble désynchronisée par rapport au son appuyez sur le bouton SOUND CONTROL pour sélectionner AUDIO SYNC et synchroniser le son et l image Utilisez les boutons po...

Страница 46: ...A GRUNDIG Hisense RCA Cette fonction pourrait ne pas être compatible avec la télécommande du téléviseur cela dépend du fabricant de la télécommande Pour désactiver cette fonction appuyez sur le bouton SOUNDpendant cinq secondes OFF TV REMOTE apparaît sur l écran du Soundbar INSERTION DES PILES DANS LA TÉLÉCOMMANDE 1 Utilisez une pièce de monnaie appropriée pour faire tourner le couvercle du logeme...

Страница 47: ...ou en fer bois etc Si cela est possible fixez les vis de fixation dans les poteaux muraux Des vis pour un montage mural doivent être achetées en fonction du type et de l épaisseur du mur sur lequel le Soundbar sera posé Diamètre M5 Longueur une longueur de 3 5 cm 1 3 8 po ou plus est recommandée Connectez les câbles de l unité à des périphériques externes avant de l installer sur le mur Assurez vo...

Страница 48: ... d un crayon dans le centre des images B TYPE TYPE B sur chaque extrémité du guide pour marquer les orifices de passage des vis de fixation puis retirez le Wall Mount Guide Guide de fixation murale 4 À l aide d un foret de dimension appropriée percez un orifice dans le mur sur chaque point de marquage Si les points de marquage ne correspondent pas aux positions des goujons assurez vous d insérer l...

Страница 49: ...r assurer un ajustement adéquat assurez vous d aligner les bourrelets du Soundbar avec les orifices des supports Arrière du Soundbar Extrémité droite du Soundbar Lors de l assemblage assurez vous que la partie suspendue des supports fixations murales se trouve à l arrière du Soundbar Consultez l illustration ci dessus Fixation murale de gauche Fixation murale de droite Les supports gauche et droit...

Страница 50: ... Mounts Supports fixations murales sur les Holder Screws Porte vis du mur Inclinez légèrement le Soundbar pour insérer les deux têtes des Holder Screw Porte vis dans les orifices du Bracket Wall Mount Support fixation murale Poussez le Soundbar dans la direction des flèches pour vous assurer que les deux côtés sont fermement fixés ...

Страница 51: ...be elle pourrait causer des blessures ou endommager le produit Si vous installez l unité sur un mur veuillez vous assurer que des enfants ne tireront pas sur un ou plusieurs câbles de connexion car cela pourrait entraîner la chute du produit Pour une performance optimale d une installation murale d un support installez le système d enceintes à une distance d au moins 5 cm 2 po sous le téléviseur s...

Страница 52: ...vant de commencer insérez la pile dans la télécommande Voir la page 12 pour des directives 1 Branchez les cordons d alimentation de l unité principale et du caisson des basses dans une prise murale c a 2 Appuyez sur le bouton ID SET DÉFINIR ID à l arrière du caisson des basses à l aide d un petit objet pointu pendant 5 secondes Le voyant VEILLE s éteint et le voyant DEL bleu LIEN clignote rapideme...

Страница 53: ...nnement d installation Si un mur de béton armé ou métallique sépare l unité principale et le caisson des basses sans fil le système pourrait ne pas fonctionner du tout en raison du fait que le signal sans fil ne peut pas pénétrer le métal Si l unité principale n établit pas la connexion sans fil répétez les étapes 1 à 5 de la page précédente pour rétablir la connexion entre l unité principale et l...

Страница 54: ... le mode D IN Auto Power Link Lien Mise en fonction automatique Si vous avez connecté l unité principale à un téléviseur à l aide d un câble optique numérique vous pouvez régler la fonction Lien de mise en fonction automatique à ACTIVÉ pour que le Soundbar se mette automatiquement en fonction lorsque vous allumez le téléviseur 1 Branchez le Soundbar et un téléviseur à l aide d un câble optique num...

Страница 55: ...I au port HDMI IN ARC Il est recommandé d utiliser un câble HDMI sans âme si possible Si vous utilisez un câble HDMI sans âme utilisez en un dont le diamètre est inférieur à 1 4 mm 0 55 po Anynet doit être activé Cette fonction n est pas accessible si le câble HDMI ne prend pas en charge l ARC TV SOUNDCONNECT Vous pouvez restituer le son du téléviseur par votre Soundbar branché à un téléviseur Sam...

Страница 56: ...la connexion TV SoundConnect Portée de fonctionnement de la fonction TV SoundConnect Portée d appariement recommandée moins de 2 m 78 8 po Portée de fonctionnement recommandée moins de 5 m 16 4 pi Les boutons Play Pause Lire Pause Next Suivant et Prev Précédent sur le Soundbar ou la télécommande du Soundbar ne commandent pas le téléviseur Utilisation de la fonction MISE SOUS TENSION Bluetooth La f...

Страница 57: ... IN OPTICAL OPTICAL OUT AUX IN AUX OUT lecteur BD DVD décodeur console de jeu Câble audio non fourni Câble optique Câble AUX 1 Branchez l entrée AUX IN Audio dans l unité principale à la prise AUDIO OUT de l appareil source en utilisant un câble audio 2 Appuyez sur le bouton Source du côté droit du Soundbar ou le bouton SOURCE de la télécommande pour sélectionner le mode AUX Câble optique 1 Branch...

Страница 58: ...it du Soundbar ou le bouton SOURCE de la télécommande pour sélectionner le mode HDMI USB Vous pouvez lire des fichiers musicaux présents sur des périphériques de stockage USB par l entremise du Soundbar DIGITAL AUDIO IN OPTICAL USB 5V 0 5A AUX IN HDMI IN HDMI OUT TV ARC DC 24V DIGITAL AUDIO IN OPTICAL USB 5V 0 5A AUX IN Affichage Port USB 1 Connectez un câble adaptateur USB doté d un connecteur Mi...

Страница 59: ...e la caméra numérique ne sont pas pris en charge Ne débranchez pas un périphérique USB en cours de transfert de fichiers Des fichiers musicaux avec protection DRM MP3 WMA d un site Web commercial ne peuvent pas être lus Les disques durs externes ne sont pas pris en charge Les périphériques mobiles ne sont pas pris en charge Liste de compatibilité des types de formats de fichiers Rallonge Codec Tau...

Страница 60: ... AUTOMATIQUE L unité s éteint automatiquement dans les situations suivantes Mode D IN HDMI BT TV USB ARC Si aucun signal audio n est reçu pendant 5 minutes Mode AUX Si le câble AUX est débranché pendant 5 minutes Si aucune CLÉ n est entrée pendant 8 heures lorsque le câble AUX est branché Pour activer et désactiver la fonction de mise en hors fonction automatique appuyez sur le bouton p pendant 5 ...

Страница 61: ...reo Headset Casque d écoute stéréo du dispositif Bluetooth Une liste d appareils détectés s affichera 4 Sélectionnez AV Samsung Soundbar Kxxx K Series dans la liste Lorsque le Soundbar est branché au dispositif Bluetooth il affiche Bluetooth device name BT Nom du dispositif Bluetooth BT sur la face avant Le nom du dispositif peut seulement apparaître en anglais Un trait de soulignement _ s affiche...

Страница 62: ...reils jumelés au dispositif Bluetooth Le dispositif Bluetooth et le Soundbar doivent avoir été précédemment appariés au moins une fois Soundbar apparaîtra dans la liste des appareils intelligents recherchés seulement si le Soundbar affiche BT READY BT PRÊT En mode TV SoundConnect le Soundbar ne peut pas être apparié ou connecté à un autre dispositif Bluetooth MISE EN FONCTION BLUETOOTH ALIMENTATIO...

Страница 63: ...itif Bluetooth plus la qualité se dégrade Si la distance dépasse la portée opérationnelle du Bluetooth la connexion est perdue Dans les zones où la réception est mauvaise la connexion Bluetooth pourrait ne pas fonctionner correctement La connexion Bluetooth fonctionne seulement si le dispositif Bluetooth se trouve à proximité de l unité La connexion sera automatiquement coupée si le dispositif Blu...

Страница 64: ...ale La mise à jour du micrologiciel pourrait ne pas fonctionner correctement si les fichiers audio pris en charge sont stockés dans le périphérique de stockage USB Ne débranchez pas le courant et ne retirez pas le périphérique USB pendant l exécution des mises à jour L unité principale s éteindra automatiquement après la fin du processus de mise à niveau Après la mise à jour tous les paramètres pa...

Страница 65: ...éloignées l une de l autre Remplacez les piles par des piles neuves Rapprochez vous de l unité L appariement TV SoundConnect téléviseur n a pas abouti Votre téléviseur prend il en charge la fonction TV SoundConnect Le micrologiciel de votre téléviseur est il à jour Une erreur se produit elle lors de la connexion TV SoundConnect est pris en charge par certains téléviseurs Samsung commercialisés à p...

Страница 66: ...tal DTS Nom du caisson de basses PS WK450 Poids 10 1 lb 4 6Kg Dimensions L x H x P 7 0 x 14 2 x 11 8 po 179 0 x 361 0 x 299 5 mm AMPLIFICATEUR Puissance de sortie nominale 140W 3ohm Cette conception et ces spécifications techniques sont susceptibles d être modifiées sans préavis Spécification nominale Samsung Electronics Co Ltd se réserve le droit d apporter des modifications aux spécifications an...

Страница 67: ...doit le présenter au Centre de service agréé au moment où il fait la demande d une réparation sous garantie EXCLUSIONS CE QUI N EST PAS COUVERT Cette garantie ne couvre pas les dommages causés par un accident un incendie une inondation un cas de force majeure un mauvais usage ou une tension incorrecte La garantie ne couvre pas une mauvaise installation une mauvaise réparation une réparation non au...

Страница 68: ... Tous droits réservés Comment contacter Samsung dans le monde Si vous avez des suggestions ou des questions concernant les produits Samsung veuillez contacter le Service Consommateurs Samsung Country Contact Center Web Site North America CANADA 1 800 SAMSUNG 726 7864 www samsung com ca support English www samsung com ca_fr support French U S A 1 800 SAMSUNG 726 7864 www samsung com us support ...

Отзывы: