background image

ENG

3

GETTING STARTED

fCC nOte (for U.S.a):

Class B fCC Statement

The included module(s) has been tested and found to 

comply with the limits for a Class B digital device, 

pursuant to Part 15 of the fCC rules. These limits are 

designed to provide reasonable protection against 

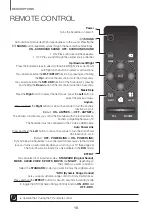
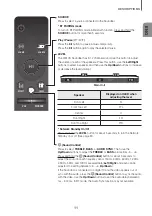
harmful interference in a residential installation. This 

equipment generates, uses and can radiate radio 

frequency energy and, if not installed and used in 

accordance with the instructions, may cause harmful 

interference to radio communications. However, there is 

no guarantee that interference will not occur in a 

particular installation. If this equipment does cause 

harmful interference to radio or television reception, 

which can be determined by turning the equipment off 

and on, the user is encouraged to try to correct the 

interference by one of the following measures:

• 

reorienting or relocating the receiving antenna.

• 

Increasing the separation between the equipment and 

receiver.

• 

Connecting the equipment to an outlet on a circuit 

different from that to which the receiver is connected.

• 

Consulting the dealer or an experienced radio/TV 

technician for help.

fCC radiation exposure Statement : 

This equipment complies with fCC radiation exposure 

limits set forth for an uncontrolled environment. 
This equipment should be installed and operated so 

there is at least 8 inches (20 cm) between the radiator 

and your body. This device and its antenna(s) must not 

be co-located or operated in conjunction with any other 

antenna or transmitter.

fCC Caution :

• 

any changes or modifications not expressly approved 

by the party responsible for compliance could void the 

user’s authority to operate this equipment. This device 

complies with Part 15 of the fCC rules. operation is 

subject to the following two conditions: (1) This device 

may not cause harmful interference, and (2) this device 

must accept any interference received, including 

interference that may cause undesired operation.

• 

This product satisfies fCC regulations when shielded 

cables and connectors are used to connect the unit to 

other equipment. To prevent electromagnetic 

interference with electric appliances, such as radios 

and televisions, use shielded cables and connectors 

for connections.

important Safety instructions

read these operating instructions carefully before using the unit. 

follow all the safety instructions listed below. Keep these 

operating instructions handy for future reference.

1)   read these instructions.

2)   Keep these Instructions.

3)   Heed all warnings.

4)   follow all instructions.

5)   Do not use this apparatus near water.

6)   Clean only with a dry cloth.

7)   Do not block any ventilation openings. Install in accordance 

with the manufacturer's instructions.

8)   Do not install near any heat sources such as radiators, heat 

registers, stoves, or other apparatus (including amplifiers) 

that produce heat.

9)   Do not defeat the safety purpose of the polarized or 

grounding-type plug. a polarized plug has two blades with 

one wider than the other. a grounding type plug has two 

blades and a third grounding prong. The wide blade or the 

third prong are provided for your safety. If the provided plug 

does not fit into your outlet, consult an electrician for 

replacement of the obsolete outlet.

10)   Protect the power cord from being walked on or pinched 

particularly at plugs, convenience receptacles, and the point 

where they exit from the apparatus.

11)   only use attachments/accessories specified by the 

manufacturer.

12)   Use only with the cart, stand, tripod, 

bracket, or table specified by the 

manufacturer, or sold with the apparatus. 

When a cart is used, use caution when 

moving the cart/apparatus combination to 

avoid injury from tip-over.

13)   Unplug this apparatus during lightning storms or when 

unused for long periods of time.

14)   refer all servicing to qualified service personnel. Servicing is 

required when the apparatus has been damaged in any 

way, such as when the power-supply cord or plug is 

damaged, liquid has been spilled or objects have fallen into 

the apparatus, the apparatus has been exposed to rain or 

moisture, does not operate normally, or has been dropped.

LiCenSeS

manufactured under license from Dolby Laboratories. 

Dolby, Dolby atmos, Dolby audio, Dolby Digital Plus, Pro 

Logic, and the double-D symbol are trademarks of Dolby 

Laboratories.

for DTS patents, see http://patents.dts.com. 

manufactured under license from DTS Licensing Limited. 

DTS, the Symbol, & DTS and the Symbol together are 

registered trademarks, and DTS 2.0 Channel is a 

trademark of DTS, Inc. © DTS, Inc. all rights reserved.

The terms HDmI and HDmI High-Definition multimedia 

Interface, and the HDmI Logo are trademarks or 

registered trademarks of HDmI Licensing LLC in the 

United States and other countries.

Содержание HW-K850/ZA

Страница 1: ...User manual Imagine the possibilities Thank you for purchasing this Samsung product To receive more complete service please register your product at www samsung com register HW K850 ...

Страница 2: ... symbol is AC voltage DC voltage Rated voltage marked with this symbol is DC voltage Caution Consult instructions for use This symbol instructs the user to consult the user manual for further safety related information WARNING To reduce the risk of fire or electric shock do not expose this apparatus to rain or moisture To prevent injury this apparatus must be securely attached to the floor wall in...

Страница 3: ... Read these operating instructions carefully before using the unit Follow all the safety instructions listed below Keep these operating instructions handy for future reference 1 Read these instructions 2 Keep these Instructions 3 Heed all warnings 4 Follow all instructions 5 Do not use this apparatus near water 6 Clean only with a dry cloth 7 Do not block any ventilation openings Install in accord...

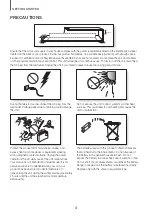
Страница 4: ...e product from moisture i e vases and excess heat e g a fireplace or equipment creating strong magnetic or electric fields Unplug the power cable from the AC wall socket if the unit malfunctions Your product is not intended for industrial use It is for personal use only Condensation may occur if your product has been stored in cold temperatures If transporting the unit during the winter wait appro...

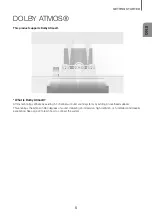
Страница 5: ...y Atmos Atmos technology enhances existing 5 1 channel surround sound systems by adding an overhead speaker This envelops the listener in 360 degrees of sound delivering an immersive high definition rich detailed and deeper experience See page 24 to learn how to connect the system ...

Страница 6: ...2 Connecting to a TV Using an HDMI Digital Cable 23 Connecting to a TV Using a Digital Optical Cable 24 Connecting to External Devices 24 Connecting Devices in Order to Use Dolby Atmos 25 HDMI Cable 25 Optical or Analog Audio Cable 26 FUNCTIONS 26 Input Mode 27 Bluetooth 29 Using the Multiroom App 31 Using the Network Standby On Function 32 Software Update 34 TROUBLESHOOTING 34 Troubleshooting 35 ...

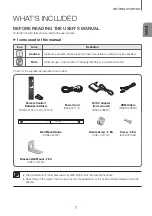
Страница 7: ... supplied accessories shown below SOUND SOURCE EFFECT LEVEL VOL WOOFER SOUNDBAR Remote Control Batteries AA Size AH59 02745A 4301 000101 Power Cord 3903 001117 AC DC Adapter for main unit BN44 00887A HDMI Cable BN39 01583C C TYPE 700mm CENTER LINE C C Wall Mount Guide AH63 04424A Holder Screw 2 EA AH61 04110A Screw 2 EA 6003 001334 Bracket Wall Mount 2 EA AH61 04119A The appearance of the accessor...

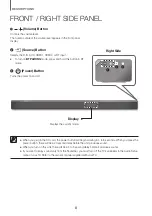
Страница 8: ...on and off 2 3 Right Side 1 Display Displays the current mode When you plug in the AC cord the power button will begin working in 4 to 6 seconds When you press the power button there will be a 20 second delay before the unit produces sound When you turn on this unit there will be a 4 to 5 second delay before it produces sound If you want to enjoy sound only from the Soundbar you must turn off the ...

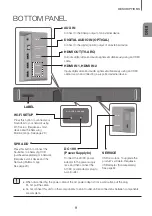
Страница 9: ...Soundbar to a Samsung HUB purchased separately or a network Requires a smart device and the Samsung Multiroom app See page 29 AUX IN Connect to the Analog output of an external device DIGITAL AUDIO IN OPTICAL Connect to the digital optical output of an external device HDMI OUT TV ARC Outputs digital video and audio signals simultaneously using an HDMI cable DC 19V Power Supply In Connect the AC DC...

Страница 10: ...e Right button for about 5 seconds to turn the Anynet function on or off Default ON ANYNET or OFF ANYNET The Anynet function lets you control the Soundbar with the remote from an Anynet compatible Samsung TV The Soundbar must be connected to the TV via an HDMI cable Auto Power Link Press and hold the Left button for about 5 seconds to turn the Auto Power Link function on or off Default OFF POWER L...

Страница 11: ...hen adjusting the level Front Left FL Front Top Left FTL Center C Front Right FR Front Top Right FTR Network Standby On Off Press and hold the LEVEL button for about 5 seconds to turn the Network Standby on or off See page 31 Sound Control Press to select TREBLE BASS or AUDIO SYNC Then use the Up Down buttons to adjust the TREBLE or BASS volume from 3 3 Press and hold the Sound Control button for ...

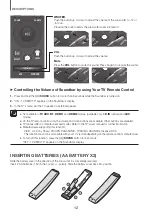
Страница 12: ...L E V E L V O L W O O F E R S O U N D B A R E F F E C T L E V E L V O L W O O F E R S O U N D B A R E F F E C T L E V E L V O L W O O F E R S O U N D B A R Controlling the Volume of Soundbar by using Your TV Remote Control 1 Press and hold the SOUND button for more than 5 seconds while the Soundbar is turned on 2 ON TV REMOTE appears on the Soundbar s display 3 In the TV s menu set the TV speaker ...

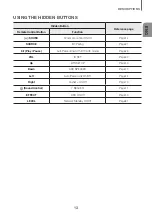
Страница 13: ...ontrol On Off Page 12 SOURCE BT Paring Page 27 p Play Pause Auto Power Down On Off AUX mode Page 26 VOL ID SET Page 20 Up WIFI SETUP Page 10 Down ADD SPEAKER Page 10 Left Auto Power Link On Off Page 23 Right Anynet On Off Page 10 Sound Control 7 Band EQ Page 11 EFFECT DRC On Off Page 10 LEVEL Network Standby On Off Page 31 ...

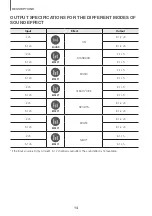
Страница 14: ...UND SOURCE EFFECT LEVEL VOL WOOFER MUSIC 2 1 ch 5 1 ch 3 1 ch 2 ch SOUND SOURCE EFFECT LEVEL VOL WOOFER CLEAR VOICE 3 1 ch 5 1 ch 3 1 ch 2 ch SOUND SOURCE EFFECT LEVEL VOL WOOFER SPORTS 3 1 2 ch 5 1 ch 3 1 2 ch 2 ch SOUND SOURCE EFFECT LEVEL VOL WOOFER MOVIE 3 1 2 ch 5 1 ch 3 1 2 ch 2 ch SOUND SOURCE EFFECT LEVEL VOL WOOFER NIGHT 3 1 ch 5 1 ch 3 1 ch If the input source is Dolby Atmos 3 1 2 channe...

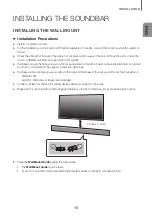
Страница 15: ...ate for the kind of wall you have plaster board iron board wood etc If possible fix the support screws into wall studs Purchase wall mounting screws according to the type and thickness of the wall you will mount the Soundbar on Diameter M5 Length 1 3 8 inches or longer recommended Connect cables from the unit to external devices before you install it on the wall Make sure the unit is turned off an...

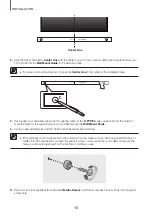
Страница 16: ...rough the center of the C TYPE images on each end of the Guide to mark the holes for the supporting screws and then remove the Wall Mount Guide 4 Using an appropriately sized drill bit drill a hole in the wall at each marking If the markings do not correspond to the positions of studs make sure you insert appropriate anchors or mollies into the holes before you insert the support screws If you use...

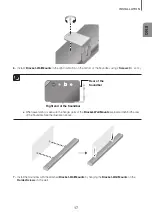
Страница 17: ...4 x L12 Rear of the Soundbar Right end of the Soundbar When assembling make sure the hanger parts of the Bracket Wall Mounts are located behind the rear of the Soundbar See the illustration above 7 Install the Soundbar with the attached Bracket Wall Mounts by hanging the Bracket Wall Mounts on the Holder Screws on the wall ...

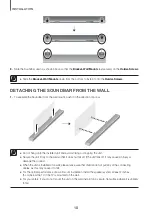
Страница 18: ...d striking or dropping the unit Secure the unit firmly to the wall so that it does not fall off If the unit falls off it may cause an injury or damage the product When the unit is installed on a wall please make sure that children do not pull any of the connecting cables as this may cause it to fall For the optimal performance of a wall mount installation install the speaker system at least 2 inch...

Страница 19: ...the wireless signal cannot penetrate metal The wireless receiving antenna is built into the wireless subwoofer Keep the unit away from water and moisture For optimal listening performance make sure that the area around the wireless subwoofer location is clear of any obstructions Automatic Connection 1 Connect a power supply to the subwoofer 2 Connect a power supply to the Soundbar and then press t...

Страница 20: ...ID SET POWER Rear of Subwoofer 2 Turn off the Soundbar 3 Press and hold the VOL button on the remote control for at least 5 seconds with the Soundbar turned off OFF L E V E L V O L W O O F E R S O U N D B A R E F F E C T L E V E L V O L W O O F E R S O U N D B A R L E V E L V O L W O O F E R S O U N D B A R E F F E C T L E V E L V O L W O O F E R S O U N D B A R 4 The ID SET message appears on the...

Страница 21: ...ion Red On Standby with the Soundbar main unit turned off Check the power supply to the Soundbar main unit Connection failed Connect again refer to the instructions on manual connection in the user manual Blue On Successfully connected normal operation Blinking Standby with the Soundbar main unit turned off Check the power supply to the Soundbar main unit Connection failed Connect again refer to t...

Страница 22: ...HDMI OUT TV ARC jack on the bottom of the product to the HDMI IN jack on your TV 2 Press the button on the right side of the Soundbar or the SOURCE button on the remote control to select the D IN mode HDMI is an interface that enables the digital transmission of video and audio data with just a single connector If the TV provides an ARC port connect the HDMI cable to the HDMI IN ARC port We recomm...

Страница 23: ... SOURCE button on the remote control to select the D IN mode Auto Power Link If you have connected the main unit to a TV with a digital optical cable you can set the Auto Power function ON to have the Soundbar turn on automatically when you turn the TV on 1 Connect the Soundbar and a TV with a digital optical cable not supplied 2 Press the button on the main unit s right side or the SOURCE button ...

Страница 24: ...from the HDMI IN 1 or HDMI IN 2 jack on the back of the product to the HDMI OUT jack on your digital device 2 Press the button on the right side of the Soundbar or the SOURCE button on the remote control to select the HDMI1 or HDMI2 mode 3 The selected HDMI mode is displayed on the Soundbar display panel and sound plays When Dolby Atmos operated the Blue LED on the right edge of the Soundbar will ...

Страница 25: ...mes equipped with one digital optical in jack and one analog audio AUX in jack giving you two ways to connect it to external devices Wi Fi SETUP SPK ADD AUX IN DIGITAL AUDIO IN OPTICAL HDMI OUT TV ARC HDMI IN 1 HDMI IN 2 DC 19V SERVICE DIGITAL AUDIO IN OPTICAL AUX IN AUX IN AUX OUT DIGITALAUDIO IN OPTICAL OPTICAL OUT BD DVD player Set top box Game console Optical Cable not supplied Audio Cable not...

Страница 26: ...ction The unit turns off automatically in the following situations D IN BT Mode If there is no audio signal for 5 minutes HDMI1 HDMI2 Mode If there is no audio signal for 15 minutes AUX Mode If the AUX cable is disconnected for 5 minutes If there is no KEY input for 8 hours when the AUX cable is connected Auto Power Down function can be turned off only in that case To turn off Auto Power Down func...

Страница 27: ...und by the Bluetooth device switch to BT PAIRING mode by pressing and holding the button on the main unit s right side or the SOURCE button on the remote control and then have the Bluetooth device search for the Soundbar again 4 Play music on the connected device You can listen to the music playing on the connected Bluetooth device over the Soundbar In BT mode the Play Pause Next Prev functions ar...

Страница 28: ...e terminating the connection Disconnection time may differ depending on the Bluetooth device In Bluetooth connection mode the Bluetooth connection will be lost if the distance between the Soundbar and the Bluetooth device exceeds 32 8 ft The Soundbar automatically turns off after 5 minutes in the Ready state More About Bluetooth Bluetooth is a technology that enables Bluetooth compliant devices to...

Страница 29: ...ireless router must be connected to the Internet 3 The smart device must be connected to the router via a Wi Fi connection Installing the Samsung Multiroom App To use the Soundbar with the Samsung Multiroom App you must download and then install the Samsung Multiroom App on your smart device You can download the app from Google Play or the App Store With the Samsung Multiroom App installed you can...

Страница 30: ...dbar to Your Network On your smart device select the Samsung Multiroom app Follow the directions on your smart device s screen You can use the following music sources with the Samsung Multiroom app Music files stored in your mobile phone various music sources and Internet radio Music in mobile phone Internet radio Music service AV Samsung Soundbar Kxxx ...

Страница 31: ... Network Standby On function by pressing the LEVEL button on the Soundbar s remote for more than 5 seconds You can turn the function off by pressing the LEVEL button again for more than 5 seconds Network Standby On is available only if the Soundbar is listed among the smart device s paired devices The Smart device and the Soundbar must have been previously paired at least once Soundbar will appear...

Страница 32: ... 0 Micro USB plug Type B on one end and a standard female 2 0 USB jack Type A on the other end to the micro USB jack on your Soundbar The Micro USB to USB adapter cable is sold separately To purchase contact a Samsung Service Center or Samsung Customer Care 2 Follow the steps below to download the product software Go to the Samsung website at samsung com sec search for the model name select the cu...

Страница 33: ...own your settings so that you can easily reset them after the update Note that updating firmware resets the subwoofer connection too If the connection to the subwoofer is not re established automatically after the update refer to page 19 If the software update fails check that the USB stick is not defective Mac OS users should use MS DOS FAT as the USB format Depending on the manufacturer some USB...

Страница 34: ...ug and connect it again Sound is not produced Is the Mute function on Is the volume set to minimum Press the VOL button to cancel the Mute function Adjust the volume The remote control does not work Are the batteries drained Is the distance between the remote control and main unit too far Replace with new batteries Move closer to the unit The red LED on the subwoofer blinks and the subwoofer is no...

Страница 35: ...nd the nearest recycling location go to our website www samsung com recyclingdirect or call 877 278 0799 a a Open Source License Notice For further information on Open Sources used in this product please visit the website http opensource samsung com a a License The Spotify Software is subject to third party licenses found here www spotify com connect third party licenses For more information about...

Страница 36: ...sult in service problems incorrect electrical line voltage fluctuations and surges customer adjustments and failure to follow operating instructions cleaning maintenance and environmental instructions that are covered and prescribed in the instruction book product removal or reinstallation reception problems and distortion related to noise echo interference or other signal transmission and deliver...

Страница 37: ...amsung com us support Samsung Electronics America Inc 85 Challenger Road Ridgefield Park NJ 07660 2016 Samsung Electronics Co Ltd All rights reserved The party responsible for product compliance Samsung Electronics Co LTD America QA lab of Samsung 19 Chapin Rd Building D Pine Brook New Jersey 07058 ...

Отзывы: