background image

11

ENG


CONNECTIONS

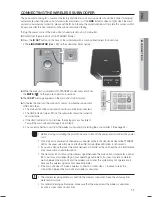
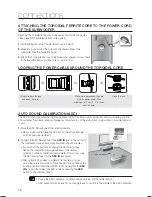
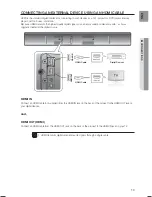
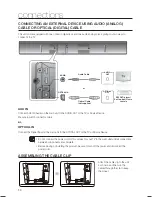
  CONNECTING THE WIRELESS SUBWOOFER

 The Subwoofer's linking ID is preset at the factory and the main unit and subwoofer should link (connect wirelessly) 
automatically when the main unit and subwoofer are turned on. If the 

LINK

 indicator does not light when the main 

unit and subwoofer are turned on, please set the ID by following the procedure below. Complete this process within 
30 seconds after the Link Indicator on the subwoofer starts blinking.

1. 

 Plug the power cords of the main unit and subwoofer into an AC wall outlet.

2. 

 Confirm that the main unit is off (in STANDBY Mode).

3. 

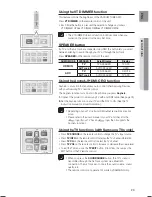
 Press the 

ID SET 

button on the back of the subwoofer with a small, pointed object for 5 seconds.

• 

 The 

LINK INDICATOR

 (Blue LED) on the subwoofer blinks quickly.


4. 

 While the main unit is powered off (in STANDBY mode), press and hold 
the 

MUTE

 ( 

 ) on the remote control for 5 seconds.

5. 

 The 

ID SET

 message appears on the main unit’s OLED display.

6. 

 To finalize the link, turn the main unit’s power on while the subwoofer’s 
LINK LED blinks.

• 

 The main unit and the subwoofer should now be linked (connected).

• 

 The LINK indicator (blue LED) on the subwoofer should be turned on 
and solid blue.

• 

 If the LINK indicator is not solid blue, the linking process has failed. 
Turn off the main unit and start again from Step 2.

• 

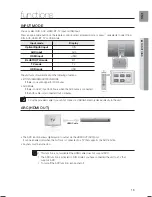
 You can enjoy better sound from the wireless subwoofer by selecting the a sound effect. (See page 24)


 Before moving or installing the product, be sure to turn off the power and disconnect the power 
cord.


 If the main unit is powered off, the wireless subwoofer will be in the standby mode and the STANDBY 
LED on the upper side will come on after the LINK indicator (Blue LED) blinks for 30 seconds.


 If you use a device that uses the same frequency (2.4GHz) as the unit near the unit, interference 
may cause some sound interruption.


 The transmission distance of the wireless signal between the main unit and subwoofer is about 
33 ft., but may vary depending on your operating environment. If a steel-concrete or metallic 
wall is between the main unit and the wireless subwoofer, the system may not operate at all, 
because the wireless signal cannot penetrate metal.


 If the main unit doesn't make a wireless connection, follow steps 1-5 above to retry the 
connection between the main unit and wireless subwoofer.


 The wireless receiving antenna is built into the wireless subwoofer. Keep the unit away from 
water and moisture.


 For optimal listening performance, make sure that the area around the wireless subwoofer 
location is clear of any obstructions.


TV

TV CH


S/W LEVEL

TONE

TV CH

S/W LEVEL

TONE

MUTE

HW-F850_XY_1112.indd   11

HW-F850_XY_1112.indd   11

2014-11-12     5:29:48

2014-11-12     5:29:48

Содержание HW-F850

Страница 1: ...l Surround Air Track Active Speaker System user manual imagine the possibilities Thank you for purchasing this Samsung product To receive more complete service please register your product at www samsung com register ...

Страница 2: ... unit features an Active Speaker System that provides high sound quality in a single slim unit This unit does not require any satellite loudspeakers or speaker cabling which are normally associated with conventional surround sound systems USB Host support You can connect and play music files from external USB storage devices such as MP3 players USB flash memory etc using the Air Track s USB HOST f...

Страница 3: ...ck do not expose this appliance to rain or moisture CAUTION TO PREVENT ELECTRIC SHOCK MATCH WIDE BLADE OF PLUG TO WIDE SLOT FULLY INSERT This apparatus shall always be connected to a AC outlet with a protective grounding connection To disconnect the apparatus from the mains the plug must be pulled out from the mains socket therefore the mains plug shall be readily operable CAUTION Do not expose th...

Страница 4: ...replace or equipment creating strong magnetic or electric fields Disconnect the power cable from the AC supply if the unit malfunctions Your product is not intended for industrial use It is for personal use only Condensation may occur if your product has been stored in cold temperatures If transporting the unit during the winter wait approximately 2 hours until the unit has reached room temperatur...

Страница 5: ...ess subwoofer 12 Attaching the toroidal ferrite core to the power cord of the subwoofer 12 Looping the power cable around the toroidal core 12 Auto sound calibration ASC 13 Connecting an external device using an HDMI cable 14 Connecting an external device using Audio analog cable or Optical digital cable 14 Assembling the cable clip FUNCTIONS 15 15 Input mode 15 ARC HDMI out 16 NFC 17 Bluetooth 19...

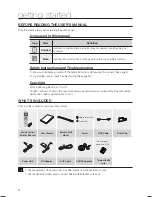
Страница 6: ...user s manual may be reproduced or copied without the prior written permission of Samsung Electronics Co Ltd WHAT S INCLUDED Check for the supplied accessories shown below SOURCE 3D SOUND TV CH TV CH VOL S W LEVEL AUTO POWER AUDIO SYNC AH59 02583A SMART VOL SPEAKER STANDARD MUTE TV SOURCE TV AUX USB BT MUSIC NEWS DRAMA CINEMA SPORTS GAME ASC TONE TV INFO VT DIMMER TV EXIT TV MUTE TV VOL TV VOL D I...

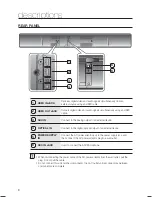
Страница 7: ...al Surround Air Track on and off 4 FUNCTION BUTTON Selects the D IN AUX HDMI BT TV USB input While the unit is powered on pressing the button for more than 3 seconds converts the button to the MUTE button To cancel MUTE button setup press the button for more than 3 seconds again When you turn on this unit there will be a 4 to 5 second delay before it produces sound Do not bring cellular phones or ...

Страница 8: ...the Analog output of an external device 4 OPTICAL IN Connect to the digital optical output of an external device 5 POWER SUPPLY IN Connect the AC power adaptor jack to the power supply jack and then connect the AC power adaptor plug to a wall outlet 6 ASC IN JACK Used to connect the ASC Microphone When disconnecting the power cable of the AC power adaptor from the wall outlet pull the plug Do not ...

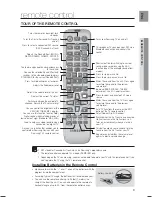
Страница 9: ...level Mutes the sound from the TV Press again to restore the sound to the previous volume level Individual BASS MIDDLE TREBLE adjustment Use VOL adjustment keys Exits TV functions the same as the EXIT button of the TV remote control Synchronizes the Air Track to a connected Optical source via the Optical jack so it turns on automatically when you turn on your TV Select Repeat File All Random Short...

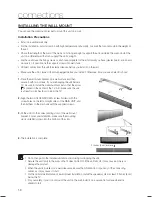
Страница 10: ...a TV be sure to install the wall mount bracket so that the arrow is placed in the center of the TV Also make sure the unit is at least two inches 5 cm below the TV 2 Align the two HOLDER SCREWs screw holders with the screw holes on the left and right sides of the MAIN UNIT and then fix them to the main unit with the supplied screws 3 Fit the unit into the corresponding slots of the wall mount brac...

Страница 11: ...r is not solid blue the linking process has failed Turn off the main unit and start again from Step 2 You can enjoy better sound from the wireless subwoofer by selecting the a sound effect See page 24 Before moving or installing the product be sure to turn off the power and disconnect the power cord If the main unit is powered off the wireless subwoofer will be in the standby mode and the STANDBY ...

Страница 12: ...me levels and frequency characteristics of the main unit and sub woofer to provide optimum sound 1 Place the ASC Microphone at the listening position Please make sure to place the ASC mic on the actual listening point for precise adjustment 2 Connect the ASC Microphone to the ASC IN jack on the Air Track The Calibration starts automatically and takes about 2 minutes If you turn off the Air Track o...

Страница 13: ...eo and audio as it was originally created at the digital source DC 24V ASC IN HDMI IN HDMI OUT AUX IN OPTICAL IN HDMI OUT HDMI IN HDMI Cable Digital Devices HDMI Cable HDMI IN Connect an HDMI cable not supplied from the HDMI IN jack on the back of the product to the HDMI OUT jack on your digital devices and HDMI OUT HDMI Connect an HDMI cable from the HDMI OUT jack on the back of the product to th...

Страница 14: ...t to the AUDIO OUT of the TV or Source Device Be sure to match connector colors or OPTICAL IN Connect the Digital Input on the main unit to the OPTICAL OUT of the TV or Source Device Do not connect the power cord of this product or your TV to the wall outlet until all connections between components are complete Before moving or installing this product be sure to turn off the power and disconnect t...

Страница 15: ...e is no KEY input for 8 hours when the AUX cable is connected If the AUX cable is disconnected for 20 minutes Use the provided cable if you cannot connect a USB flash memory device directly to the unit ARC HDMI OUT HDMI Cable The ARC function allows digital audio to output via the HDMI OUT ARC port It can be enabled only when the Air Track is connected to a TV that supports the ARC function Anynet...

Страница 16: ...e second device Warning NFC pairing may not be successful if you do not place your NFC device on the Air Track correctly If you see an Empty tag error message on your mobile device you must gently touch your NFC device to the Air Track again and be sure you match the NFC location on your mobile device to the NFC logo on the Air Track exactly The NFC function is built into Android devices running A...

Страница 17: ... cut off if the Bluetooth device is out of range Even within range the sound quality may be degraded by obstacles such as walls or doors This wireless device may cause electric interference during its operation To connect the Air Track to a Bluetooth device Check if the Bluetooth device supports the Bluetooth compliant stereo headset function Bluetooth device Connect 1 Press the BT button on the r...

Страница 18: ...escent lights and gas stoves use the same frequency range as the Bluetooth device which can cause electric interference To disconnect the Bluetooth device from the Air Track You can disconnect the Bluetooth device from the Air Track For instructions see the Bluetooth device s user manual The Air Track will be disconnected When the Air Track is disconnected from the Bluetooth device the Air Track w...

Страница 19: ...y connect to the TV Changing the Air Track from TV mode to any other mode will cancel the SoundShare connection If you want to cancel the existing pairing of the SAT to a TV and pair your SAT to a different TV Press the PLAY PAUSE button on the SAT for 5 seconds in the TV input mode to cancel the existing pairing You can now pair it to a different TV In the SoundShare mode you can control the volu...

Страница 20: ...with certain types of USB storage media The Air Track supports the FAT16 and FAT32 file systems The NTFS file system is not supported Connect USB devices directly to the USB port of the product Otherwise you may encounter a USB compatibility problem Do not connect multiple storage devices to the product via a multi card reader It may not operate properly Digital camera PTP protocols are not suppor...

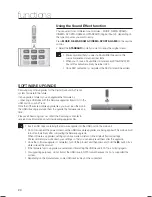
Страница 21: ... press the MUTE button on the remote control 2 To mute the TV press the TV MUTE button on the remote control 3 Press MUTE TV MUTE on the remote control again or press VOLUME to restore the sound Using the TONE function Press TONE on the remote control Each time the button is pressed the selection changes as follows TREBLE MIDDLE BASS Use the VOL button to adjust the setting to 6 6 Using the 3D SOU...

Страница 22: ...f after 20 minutes These functions are available only when the Anynet HDMI CEC is turned off Using the AUDIO SYNC function Video may appear out of synch with the audio if the Air Track is connected to a digital TV If this occurs adjust the audio delay time to match the video Press AUDIO SYNC on the remote control of this unit You can use the buttons to set the audio delay time between 0 ms and 300...

Страница 23: ...ing on your TV certain HDMI output resolutions may not work Please refer to the user s manual of your TV and check for the logo If your TV has an logo then it supports the Anynet function Using the TV functions with Samsung TVs only Press TV SOURCE on the remote control to change the TV s input source Press TV INFO on the remote control to display the TV channel information Press TV CH on the remo...

Страница 24: ...r Track Note that if there are multiple upgrade files you must load them onto the USB drive singly and use them to upgrade the firmware one at a time Please visit Samsung com or contact the Samsung call center to receive more information about downloading upgrades files Insert a USB drive containing the firmware upgrade into the USB port on the main unit Do not disconnect the power or remove the U...

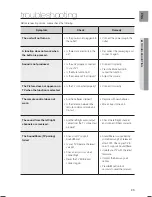
Страница 25: ...ected Is the TV connected properly Connect it correctly The remote control does not work Are the batteries drained Is the distance between the remote control and main unit too far Replace with new batteries Move closer to the unit The sound from the left right channels are reversed Are the left right audio output cables from the TV connected properly Check the left right channel and connect it the...

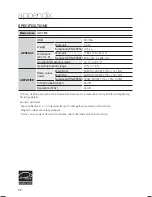
Страница 26: ...Front 50W CH 4OHM THD 1 1kHz Main Top 50W CH 4OHM THD 1 1kHz Subwoofer PS WF850 150W 3OHM THD 10 100Hz S N ratio analog input 65 dB Separation 1kHz 65 dB S N ratio distortion separation and usable sensitivity are based on measurement using AES Audio Engineering Society guidelines Nominal specification Samsung Electronics Co Ltd reserves the right to change the specifications without notice Weight ...

Страница 27: ...A E 800 SAMSUNG 726 7864 www samsung com ae support English www samsung com ae_ar support Arabic OMAN 800 SAMSUNG 726 7864 KUWAIT 183 2255 183 CALL BAHRAIN 8000 4726 QATAR 800 2255 800 CALL EGYPT 08000 726786 16580 www samsung com eg support ALGERIA 021 36 11 00 www samsung com n_africa support PAKISTAN 0800 Samsung 72678 www samsung com pk support TUNISIA 80 1000 12 www samsung com n_africa suppo...

Отзывы: