background image

23

ENG

  CONNECTIONS

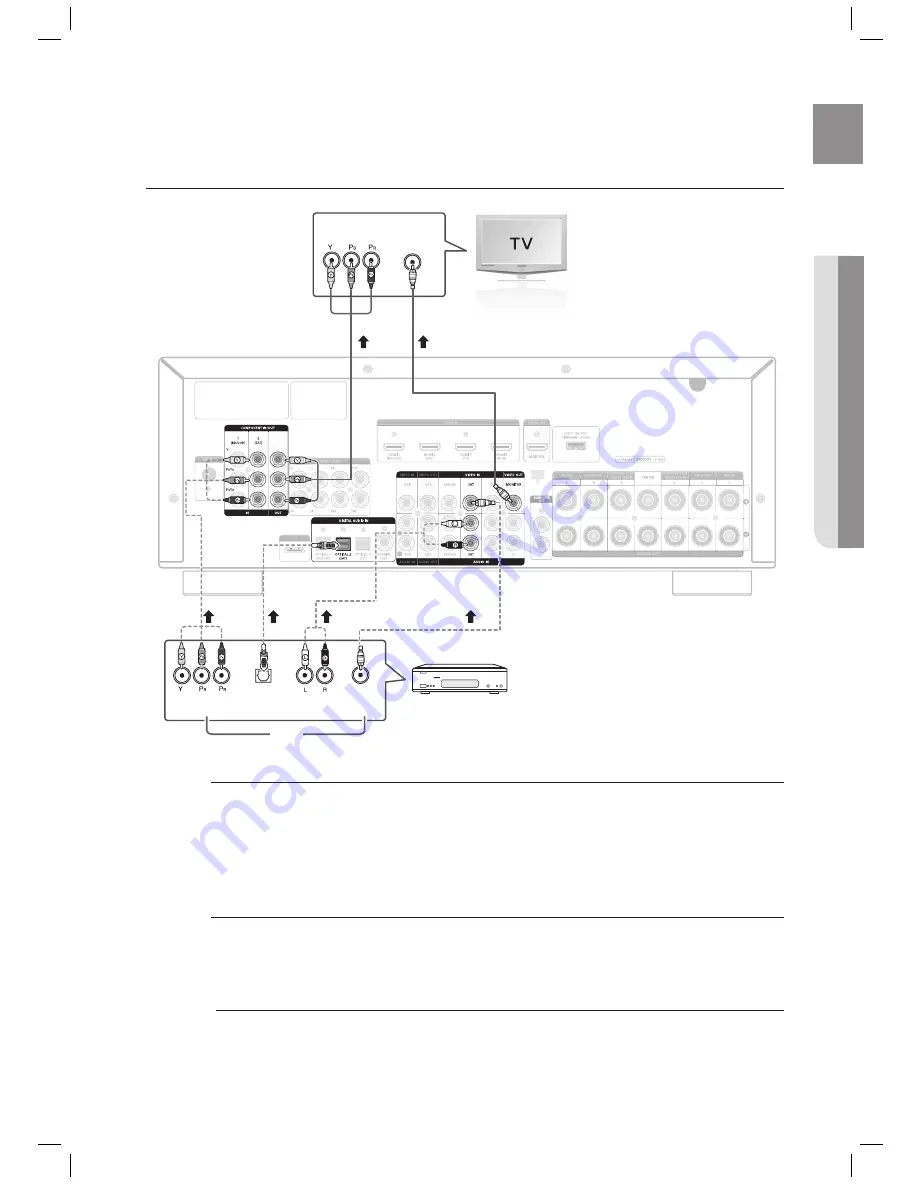
CONNECTING A CABLE, SATELLITE OR SET-TOP BOX

Video Connection

Connect a Component video cable(not supplied) from the COMPONENT IN (SAT) (P

R

, P

B

 and Y) jacks 

on the back of your AV Receiver to the Component Video Output jacks on your SAT.

OR

Connect a Video cable from the VIDEO IN (SAT) jack on the back of your AV Receiver to the Video 
Output jack on your SAT.

Audio Connection

Connect the Digital Input (OPTICAL 2) on your AV Receiver to the Digital Output of the SAT.

OR

Connect AUDIO IN (SAT) on your AV Receiver to the Audio Out of the SAT.

Disconnect the power plug from the outlet if you will not use this unit for a long period of time.
If the cable/set-top box has only one audio output jack, connect it to either the right or left audio input jack of 
the main unit. Connect the audio cable's red plug to the red jack and white cable to the white jack.

M

OPTICAL 
   OUT

AUDIO
  OUT

VIDEO
  OUT

COMPONENT
       OUT  

VIDEO
    IN

COMPONENT
          IN

or

or

or

SAT

(Cable/Satellite/Set-top box)

HW-C700-C770S-C770BS-XAA_0609.in23   23

HW-C700-C770S-C770BS-XAA_0609.in23   23

2010-06-09     5:07:02

2010-06-09     5:07:02

Содержание HW-C700B

Страница 1: ...or purchasing this Samsung product To receive more complete service please register your product at www samsung com register HW C700 HW C700B HW C770S HW C770BS HW C700 C770S C770BS XAA_0609 in1 1 HW C700 C770S C770BS XAA_0609 in1 1 2010 06 09 5 06 29 2010 06 09 5 06 29 ...

Страница 2: ...rs for connections FCC NOTE for U S A This equipment has been tested and found to comply with the limits for a Class B digital device pursuant to Part 15 of the FCC Rules These limits are designed to provide reasonable protection against harmful interference in a residential installation This equipment generates uses and can radiate radio frequency energy and if not installed and used in accordanc...

Страница 3: ...nings Install in accordance with the manufacturer s instructions 8 Do not install near any heat sources such as radiators heat registers stoves or other apparatus including amplifiers that produce heat 9 Do not defeat the safety purpose of the polarized or grounding type plug A polarized plug has two blades with one wider than the other A grounding type plug has two blades and a third grounding pro...

Страница 4: ...om the AC supply if the player malfunctions Your player is not intended for industrial use Use of this product is for personal use only Condensation may occur if your player or disc have been stored in cold temperatures If transporting the player during the winter wait approximately 2 hours until the unit has reached room temperature before using During thunderstorms disconnect the AC plug from th...

Страница 5: ...ssible It delivers sound quality that matches the clear and vivid images of high definition video DTS Provides a full range of 6 channels by converting a digital PCM or analog stereo signal using DTS digital matrix decoding iPod You can enjoy music files by connecting your iPod iPhone to the AV Receiver with the supplied iPod dock SFE Sound Field Effect Using 32bit Audio Digital Signal Processing Pr...

Страница 6: ...ing External Devices Your TV via HDMI 20 HDMI Function 21 Connecting to your TV 22 Connecting a DVD or BD Blu ray Player 23 Connecting a Cable Satellite or Set top Box 24 Connecting a VCR 25 Connecting a CD Player 26 Connecting 7 1 Channel Devices 27 Connecting an iPod 29 Connecting the FM Antenna 29 Connecting Aux Components BASIC FUNCTIONS OF YOUR AV RECEIVER 30 30 Before Using the AV Receiver 3...

Страница 7: ...4 Smart Volume 45 ASC Auto Sound Calibration Setup 46 DRC Setup 46 HDMI Setup 46 Variable Set OPERATION 47 47 Using the Surround Modes 48 Using the Subwoofer Selection Button 49 Listening to the Radio 50 Using an iPod 52 Convenient Functions 53 Software Upgrade MISCELLANEOUS 54 54 Operating Your TV With the Remote Control 56 Operating your DVD or BD player with the remote control TROUBLESHOOTING 5...

Страница 8: ...isplays the speaker audio input status listening mode etc 5 S DIRECT STEREO BUTTON Used to select the S DIRECT or STEREO mode 6 MULTI CH BUTTON Used to select a connected 7 1 multi channel player 7 AV SYNC BUTTON Used to select the Audio Delay Mode 8 VOLUME CONTROL Adjusts the volume level 9 POWER Turns the receiver on off 8 4 9 10 11 14 12 13 1 2 3 15 16 17 5 6 7 18 19 20 HW C700 C770S C770BS XAA...

Страница 9: ...ght Also used to select detailed options in the SOUND EFFECT mode and to change the tone level 15 ENTER BUTTON Used to select an item in the SETUP menu 16 TONE CONTROL BUTTON Used to set the bass treble level and tone to on off 17 ASC BUTTON Used to select the ASC Auto Sound Calibration mode 18 TUNING MODE BUTTON Used to select the Manual or Preset mode for FM radio 19 SELECT BUTTON Used to change...

Страница 10: ...10 Description REAR PANEL 1 2 3 4 5 8 9 10 18 19 6 7 11 12 13 14 15 16 17 HW C700 C770S C770BS XAA_0609 in10 10 HW C700 C770S C770BS XAA_0609 in10 10 2010 06 09 5 06 40 2010 06 09 5 06 40 ...

Страница 11: ...UDIO IN Receives the digital optical audio signal 10 COAXIAL IN JACK DIGITAL AUDIO IN Receives the digital coaxial audio signal 11 VCR VIDEO IN JACK Receives the video signal from a VCR 12 VCR VIDEO OUT JACK Outputs the video signal to a VCR 13 VIDEO IN JACKS Receives the video signal from a video player BD DVD SAT TV 14 VIDEO OUT JACK Outputs the video signal to video devices TV Projector etc 15 ...

Страница 12: ...IO INPUT INDICATORS Displays the audio input signal type of the currently connected external audio source 5 SPEAKER LEVEL INDICATOR Displays the speaker level 6 RADIO FREQUENCY INDICATORS Displays the current radio frequency range 7 MESSAGE DISPLAY Informs you of the status of the receiver 1 2 3 4 6 7 5 HW C700 C770S C770BS XAA_0609 in12 12 HW C700 C770S C770BS XAA_0609 in12 12 2010 06 09 5 06 41 ...

Страница 13: ...Do not expose the batteries to heat or a flame OPERATION RANGE OF THE REMOTE CONTROL The remote control can be used up to approximately 23 feet 7 meters in a straight line It can also be operated at a horizontal angle of up to 30 from the remote control sensor M INPUT SELECT TV SOURCE POWER AMP TV DIMMER SLEEP NEO 6 PROLOGIC AUDIO ASSIGN BD DVD TUNER MEMORY SUBWOOFER MO ST MUTE ASC iPod VOL TUNING ...

Страница 14: ...ER MEMORY SUBWOOFER MO ST MUTE ASC iPod VOL TUNING CH SETUP MENU RETURN EXIT INFO TV BD DVD SAT MULTI CH VCR AUX CD DSP 1 2 3 4 5 6 7 8 0 9 1 2 3 5 6 7 8 9 10 11 12 13 14 16 17 18 21 22 23 24 25 26 27 29 28 15 19 20 4 HW C700 C770S C770BS XAA_0609 in14 14 HW C700 C770S C770BS XAA_0609 in14 14 2010 06 09 5 06 42 2010 06 09 5 06 42 ...

Страница 15: ...ION SELECTOR BUTTONS Used to select an input source 16 INPUT SELECT TV SOURCE BUTTON Toggles to find and select an input source Press to select a connected TV s video source 17 DIMMER BUTTON Adjusts the brightness of the display 18 BD DVD BUTTON Used to select the BD DVD mode If you select the BD mode the button will flash orange If you select the DVD mode the button will flash green 19 SLEEP BUTT...

Страница 16: ...wer on Using the subwoofer s VOLUME control you can set the desired bass level See page 38 Setting the speaker level to set the subwoofer level in the menu Front Speakers Place these speakers in front of your listening position facing inwards about 45 toward you Place the speakers so that their tweeters will be at the same height as your ears Align the front face of the front speakers with the fro...

Страница 17: ...m above each one Using the Surround Back Speakers as Front Height Speakers Fasten 2 screws not supplied for each speaker on the wall above the front L and R speakers Install the Surround Back Speakers L R by fitting the holes on the back the Surround Back Speakers to the screws on the wall When you attach the speakers to the wall make sure to fasten them tightly so they do not fall off Speaker Confi...

Страница 18: ... the AV receiver match the colors of the connecting plugs 1 2 3 M 1 2 3 Black Red SURROUND R PS RC770S SURROUNDBACK R PS BC770S FRONT R PS FC770S CENTER PS CC770S ACTIVE SUBWOOFER BUILT IN POWER AMPLIFIER PS AW730 FRONT L PS FC770S SURROUND L PS RC770S SURROUNDBACK L PS BC770S Speakers are provided with model HW C770S HW C770BS only Model HW C700 C700B does not come with speakers One Active Subwoo...

Страница 19: ...n System HDCP This product supports HDCP Compatibility with a TV Supporting HDMI A TV with an HDMI jack Video Audio A TV with a DVI D jack TV supporting HDCP Video A TV with a DVI D jack TV not supporting HDCP Audio from SACD discs will not be heard with this connection To play a DVD disc whose copyright is protected by CPPM use a player supporting CPPM The quality of the audio output through the ...

Страница 20: ... ENTER button to select SETUP ENTER Press the buttons to select HDMI SETUP and then press the ENTER or button Press the buttons to select HDMI ANYNET and then press the ENTER or button Press the buttons to set ANYNET to ON To exit setup mode Press the SETUP MENU button SETUP OFF appears on the display and Setup Mode is exited If you use an HDMI cable to connect a Samsung TV to your AV Receiver you...

Страница 21: ...ks on your TV OR Connect the Video cable from the VIDEO OUT MONITOR jack on the back of your AV Receiver to the Video Input jack on your TV Audio Connection Connect the Digital Input OPTICAL 3 on your AV Receiver to the Digital Output of the TV OR Connect AUDIO IN TV on your AV Receiver to the Audio Out of the TV VIDEO IN OPTICAL OUT AUDIO OUT COMPONENT IN or or HW C700 C770S C770BS XAA_0609 in21 ...

Страница 22: ...D DVD jack on the back of your AV Receiver to the Video Output jack on your DVD BD player Audio Connection Connect the Digital Input OPTICAL 1 on your AV Receiver to the Digital Output of the DVD BD player OR Connect AUDIO IN BD DVD on your AV Receiver to the Audio Out of the DVD BD player DVD or BD Player OPTICAL OUT AUDIO OUT VIDEO OUT COMPONENT OUT COMPONENT IN VIDEO IN or or or HW C700 C770S C...

Страница 23: ...r to the Digital Output of the SAT OR Connect AUDIO IN SAT on your AV Receiver to the Audio Out of the SAT Disconnect the power plug from the outlet if you will not use this unit for a long period of time If the cable set top box has only one audio output jack connect it to either the right or left audio input jack of the main unit Connect the audio cable s red plug to the red jack and white cable...

Страница 24: ...ut jack on your VCR Audio Connection For playback Connect AUDIO IN VCR on your AV Receiver to the Audio Out of the VCR For recording Connect AUDIO OUT VCR on your AV Receiver to the Audio In of the VCR Disconnect the power plug from the outlet if you will not use this unit for a long period of time M AUDIO OUT VIDEO OUT AUDIO IN VIDEO IN VIDEO IN VCR For playback For recording HW C700 C770S C770BS...

Страница 25: ...er to the Audio Out of the CD player If the CD player has only one audio output jack connect it to either the right or left audio input jack of the main unit Connect the audio cable s red plug to the red jack and white cable to the white jack M CD player COAXIAL OUT AUDIO OUT or HW C700 C770S C770BS XAA_0609 in25 25 HW C700 C770S C770BS XAA_0609 in25 25 2010 06 09 5 07 09 2010 06 09 5 07 09 ...

Страница 26: ...o a DVD player SUPER AUDIO CD player or other device with 7 1 channel output FRONT SURROUND SURROUND BACK SUB WOOFER CENTER 5 1 CH 7 1 CH C SW SW C 7 1 Channel device HW C700 C770S C770BS XAA_0609 in26 26 HW C700 C770S C770BS XAA_0609 in26 26 2010 06 09 5 07 14 2010 06 09 5 07 14 ...

Страница 27: ...han IPOD AUDIO or IPOD VIDEO OR Turn off the AV Receiver Disconnect the iPod player from the iPod dock or remove the iPod dock connector from the AV receiver You must have the VIDEO Monitor or VCR output connected to your TV to view iPod video See page 24 Adjust the volume to a moderate level before you connect your iPod and AV Receiver When the unit is powered on and you connect an iPod the unit ...

Страница 28: ...been certified by the developer to meet Apple performance standards Apple is not responsible for the operation of this device or its compliance with safety and regulatory standards iPod is a trademark of Apple Inc registered in the U S and other countries iPhone is a trademark of Apple Inc M HW C700 C770S C770BS XAA_0609 in28 28 HW C700 C770S C770BS XAA_0609 in28 28 2010 06 09 5 07 23 2010 06 09 5 ...

Страница 29: ... the antenna cable close to the power cord Keep it as far away as possible If you experience poor FM reception use an external antenna CONNECTING AUX COMPONENTS You can connect external devices you use for a short time camcorder game console mobile equipment etc to the front of this unit for convenience 1 2 M AUDIO OUT VIDEO OUT Camcorder FM antenna supplied HW C700 C770S C770BS XAA_0609 in29 29 H...

Страница 30: ... Press the TUNING CH BD DVD SAT TV CD MULTI CH VCR AUX or iPod button You can directly select the desired function AUDIO SETUP Selecting a source device and connection jack Select the external devices you have connected to the receiver Press the SETUP MENU button Each time the button is pressed the mode switches between SETUP ENTER and SETUP OFF Press the ENTER button to select SETUP ENTER Press t...

Страница 31: ...lows For BD DVD function Ä Ä For SAT function Ä Ä For TV function Ä Ä For CD function Ä For AUX function Ä You can also change the input mode by pressing the AUDIO ASSIGN button on the front of your AV Receiver You can enjoy Dolby Digital or DTS if you connect the digital audio output jack of an external audio component to the optical or coaxial digital audio input jack on the main unit 1 2 M INPU...

Страница 32: ...DIO SETUP COAX BD DVD OPT 1 2 3 COAX SAT OPT 1 2 3 COAX TV OPT 1 2 3 COAX CD OPT 1 2 3 SPK SIZE SPK DISTANCE SPK LEVEL TEST TONE DPLIIX SETUP DPLIIZ SETUP NEO 6 SETUP EX ES SETUP A V SYNC MP3 ENHANCER SMART VOLUME ASC SETUP DRC SETUP HDMI SETUP VARIABLE SET TONE CONTROL HW C700 C770S C770BS XAA_0609 in32 32 HW C700 C770S C770BS XAA_0609 in32 32 2010 06 09 5 07 35 2010 06 09 5 07 35 ...

Страница 33: ...E NONE SMALL 60Hz 80Hz 100Hz 120Hz 150Hz 180Hz 200Hz SUBW CROVR YES NO LARGE NONE SMALL FRONT LARGE SMALL DPLIIX SETUP DPLIIZ SETUP NEO 6 SETUP EX ES SETUP A V SYNC MP3 ENHANCER SMART VOLUME ASC SETUP DRC SETUP HDMI SETUP VARIABLE SET TONE CONTROL LARGE NONE SMALL If Dolby Pro Logic IIz is set to On the Surround Back speaker SBL SBR is changed to the Front Height Speaker FHL FHR M HW C700 C770S C7...

Страница 34: ...WIDTH PANORAMA DIMENSION TONE 0 5 C IMAGE NEO 6 SETUP DPLIIZ SETUP OFF ON HEIGHT BASS TREBLE 6dB 6dB 1dB Step 6dB 6dB 1dB Step AUTO OFF ON EX ES SETUP A V SYNC MP3 ENHANCER SMART VOLUME ASC SETUP DRC SETUP HDMI SETUP VARIABLE SET HW C700 C770S C770BS XAA_0609 in34 34 HW C700 C770S C770BS XAA_0609 in34 34 2010 06 09 5 07 35 2010 06 09 5 07 35 ...

Страница 35: ...O 6 SETUP EX ES SETUP MP3 ENHANCER SMART VOLUME ASC SETUP OFF ON OFF ON MAX STD MIN DRC SETUP ON OFF ANYNET SYNC AUDIO HDMI SETUP AVR TV ON OFF OFF ON VARIABLE SET SETUP MENU TREE Continued DPLIIX SETUP START EQ ON EQ OFF HW C700 C770S C770BS XAA_0609 in35 35 HW C700 C770S C770BS XAA_0609 in35 35 2010 06 09 5 07 35 2010 06 09 5 07 35 ...

Страница 36: ...Speaker SPEAKER Possible Settings Default Setting FRONT Front LARGE SMALL SMALL CENTER Center LARGE SMALL NONE SMALL SURR Surround LARGE SMALL NONE SMALL SBACK Surround Back LARGE SMALL NONE SMALL FRONTH Front Height LARGE SMALL NONE NONE SUBW Subwoofer YES NO YES CROVR Crossover Frequency 60 80 100 120 150 180 200 Hz 100Hz LARGE Select when using large speakers You can listen to full range sound ...

Страница 37: ...ing position between 1ft 30ft 0 3 9 0m in intervals of 1ft 0 3m To exit setup mode Press the SETUP MENU button SETUP OFF appears on the display and Setup Mode is exited Setting Speaker Distance Set the distance from the speaker to listening position in intervals of 1ft 0 3m F L front left 1ft 30ft SW subwoofer 1ft 30ft F R front right 1ft 30ft SBL surround back left 1ft 30ft S L surround left 1ft ...

Страница 38: ...You can adjust it from 10 to 10dB in 1 step increments The sound gets quieter at 10dB and louder at 10dB To exit setup mode Press the SETUP MENU button SETUP OFF appears on the display and Setup Mode is exited Setting Speaker Level F L front left 10 10dB SW subwoofer 10 10dB F R front right 10 10dB SBL surround back left 10 10dB S L surround left 10 10dB SBR surround back right 10 10dB S R surroun...

Страница 39: ... ENTER button to select the speaker you want Each time you press the ENTER button F L Æ CEN Æ S W Æ F R Æ S R Æ SBR Æ SBLÆ S L will be selected in turn 2 Press the buttons to set the Test Tone mode you want You can adjust the speaker output level from 10 to 10dB by 1 step The sound gets quieter at 10dB and louder at 10dB Test Tone Output F L front left 10 10dB CEN center 10 10dB F R front right 10...

Страница 40: ...select the option you want and then press the ENTER or button PANORAMA You can set it ON or OFF This mode extends the front stereo image to include the surround speakers for an exciting wraparound effect with side wall imaging DIMENSION You can set from 7 to 7 Incrementally adjusts the sound field DSP from the front or surround C WIDTH You can set from 0 to 7 This sets the width of the center sound...

Страница 41: ...ou turn Dolby Pro Logic IIz on FRONTH in the speaker size mode and the Surround Back Speaker can not be changed to NONE SETTING TONE CONTROL This will enable you to adjust the bass and treble level Press the SETUP MENU button Each time the button is pressed the mode switches between SETUP ENTER and SETUP OFF Press the ENTER button to select SETUP ENTER Press the buttons to select TONE CONTROL and ...

Страница 42: ...want You can set C IMAGE from 0 to 5 This parameter adjusts the height of the center image through the front and center speakers 0 is the lowest while 5 is the highest To exit setup mode Press the SETUP MENU button SETUP OFF appears on the display and Setup Mode is exited NEO 6 mode cannot be used with Dolby Digital Dolly Digital Dolby true HD DTS DTS HD Master Audio Pro Logic works only for PCM a...

Страница 43: ...on Press the buttons to set the EX ES mode you want AUTO If the unit receives an audio signal that it can recognize it will select an optimal decoder for playback in 6 1 7 1 channels If the amplifier does not recognize the audio signal it will not play in 6 1 7 1 channel automatically ON Dolby Digital or DTS signal will be played in 6 1 7 1 channel using Dolby Digital Surround EX DTS ES decoder OFF...

Страница 44: ... the SETUP MENU button Each time the button is pressed the mode switches between SETUP ENTER and SETUP OFF Press the ENTER button to select SETUP ENTER Press the buttons to select MP3 ENHANCER and then press the ENTER or button Press the buttons to select ON or OFF SMART VOLUME This will regulate and stabilize the volume level against a drastic volume change when changing channels or during a scen...

Страница 45: ...ns are in the following sequence L C R SR SBR SBL SL SW EQ ON The ASC Auto Sound Calibration EQ mode is set to on EQ OFF The ASC Auto Sound Calibration EQ mode is set to off If you see a ASC READY message on the screen press the ENTER button to apply the measurement value And then unplug the ASC microphone To cancel the ASC Auto Sound Calibration setup This will be automatically reverted if you pr...

Страница 46: ...ected TV s speakers set it to TV Otherwise leave it on AVR to listen to audio from the A V receiver AVR HDMI audio is not output TV HDMI audio is output HDMI ANYNET ON OFF Anynet is a function that enables you to control other Samsung Devices with your Samsung TV s remote control ON Anynet is enabled OFF Anynet is disabled HDMI SYNC ON OFF The AV receiver can be set to automatically correct any de...

Страница 47: ...ll be selected in turn Press the UP DOWN button Each time you press the UP DOWN button STEREO Æ HALL 1Æ HALL 2 Æ J CLUB Æ CHURCH Æ ROCK Æ CLASSIC Æ LIVE Æ GAME Æ MOVIE Æ CONCERT Æ STADIUM will be selected in turn You can also select the SFE mode by pressing the DSP button on the remote control You cannot use Dolby Pro Logic llx mode for multi channel signals such as Dolby Digital and DTS Pro Logic...

Страница 48: ...nalog L C R SL SR SBL SBR SW EX ES Dolby D Surr EX Dolby Digital EX O O O O O DIGITAL L C R SL SR SBL SBR SW Dolby D 5 1ch Dolby Digital EX O O O O O DIGITAL L C R SL SR SBL SBR SW DTS ES DTS ES O O O O O dts ES L C R SL SR SBL SBR SW DTS 5 1ch DTS ES O O O O O dts L C R SL SR SBL SBR SW STEREO Dolby D 2ch Stereo O O DIGITAL L R SW Dolby D 2ch Surr Stereo O O DIGITAL L R SW L PCM Audio Stereo O O ...

Страница 49: ...it will help to reduce noise This function works only with the remote control Presetting radio stations You can preset up to 30 FM stations E g Setting station FM 89 10 in preset 2 Press the INPUT SELECT button to select FM Press the TUNING CH buttons on the remote control to select 89 10 Refer to step 2 above to tune in automatically and manually Press the MEMORY button on the main unit You can a...

Страница 50: ...button on the remote control to select IPOD AUDIO mode Press the PLAY button on the remote control to play The AV receiver starts playing from the first track of the iPod player You can use the remote control to control simple playback functions such as the PLAY PAUSE STOP SKIP buttons See page 28 for compatible iPods Compatibility depends on the software version of your iPod You can also select iP...

Страница 51: ...emote control to control simple playback functions such as the PLAY PAUSE STOP SKIP buttons If you press the PREV button within 3 seconds after the playback the player will stop playing and return to the list screen If you press the PREV button 3 seconds or later after the playback the player will move to the start screen of the current file Press the STOP button to stop playing and return to the l...

Страница 52: ...phone call Press the MUTE button MUTE appears on the display To output sound again Press the MUTE button again MUTE will disappear and sound will output Adjust the display You can adjust the brightness of the display Press the DIMMER button Each time you press this button the brightness changes as follows Dark Æ Bright SLEEP Mute and the Adjust Display functions can only be operated with the remot...

Страница 53: ... drive Upgrades will be possible by connecting a USB drive to the USB port located on your AV Receiver Insert a USB drive containing the firmware upgrade into the USB port on the back of the main unit Please be careful to not disconnect the power or remove the USB drive while upgrades are being applied The main unit will turn off automatically after completing the firmware upgrade When software is u...

Страница 54: ...termine which code works If the code matches the TV s code the TV will be turned off If TV is turned on or off when you press the POWER button of the remote control the setting is completed You can use the TV POWER VOLUME CHANNEL MENU and Numeric buttons 0 9 The remote control may not work on some brands of TVs Also some operations may not be possible depending on your brand of TV The remote contr...

Страница 55: ...KO 054 Daewoo 002 003 004 015 016 017 018 019 020 021 022 023 024 025 026 027 028 029 030 032 034 035 036 040 048 059 090 099 100 LOEWE OPTA 054 114 PHONOLA 054 112 114 Pioneer 063 066 080 091 RADIOLA 054 112 Portland 015 018 059 SCHNEIDER 054 Proton 040 AKAI 103 QUASAR 006 066 067 GRUNDIG 108 109 113 119 120 121 Daytron 040 Radio Shack 017 048 056 060 061 075 Dynasty 003 BLAUPUNKT 108 Emerson 003...

Страница 56: ...The remote control may not work on some brands of DVD Also some operations may not be possible depending on your brand of DVD The remote control will work with Samsung DVD BD by default 1 2 3 4 5 M BD player Brand Code List Brand Code Number Brand Code Number Brand Code Number DENON 003 032 ONKYO 004 014 TOSHIBA 004 018 DOONOON 019 OPTIMUS 011 YAMAHA 009 033 DMTECH 017 PANASONIC 021 ZENITH 004 024...

Страница 57: ...ut output cables connected properly Check the left right channel and connect it them correctly Can t receive radio broadcasts Is FM antenna connected properly Connect the antenna correctly If the input strength of antenna signal is weak install the FM antenna in a place with good reception There is no sound from surround speakers Are the surround speakers connected properly Is SURR surround incorr...

Страница 58: ...ROTECTION mark will disappear on the display and the unit will work properly If PROTECTION appears on the display check whether the speaker terminal is shorted and then turn on the unit again ASC Error List Error No VFD Message Action E01 HP CONCT Disconnect the headphones E02 NO MIC Connect the microphone E03 NOISY Take an appropriate action to reduce the surrounding noise E04 MIC LEVL The speake...

Страница 59: ...W CH Subwoofer speaker 8 Ω 150W CH Input sensitivity impedance 450mV 47kΩ S N ratio analog input 80dB Separation 1kHz 60dB FREQUENCY RESPONSE Analog input 20Hz 20kHz 3dB Digital input 96kHz PCM 20Hz 44kHz 3dB HDMI Input Compatible 1080p Output Compatible 1080p VIDEO OUTPUT TV format NTSC PAL Input level impedance 1Vp p 75 Ω Output level impedance 1Vp p 75 Ω Video frequency response 5Hz to 10kHz 3d...

Страница 60: ... by SAMSUNG or which damage this product or result in service problems incorrect electrical line voltage fluctuations and surges customer adjustments and failure to follow operating instructions cleaning maintenance and environmental instructions that are covered and prescribed in the instruction book product removal or reinstallation reception problems and distortion related to noise echo interfe...

Страница 61: ...7864 www samsung com Slovakia 0800 SAMSUNG 726 7864 www samsung com Spain 902 1 SAMSUNG 902 172 678 www samsung com Sweden 0771 726 7864 SAMSUNG www samsung com U K 0845 SAMSUNG 7267864 www samsung com Eire 0818 717100 www samsung com Area Contact Center Web Site Switzerland 0848 SAMSUNG 7267864 CHF 0 08 min www samsung com ch www samsung com ch_fr French Lithuania 8 800 77777 www samsung com Latv...

Страница 62: ...N THE US 1 800 SAMSUNG 7267864 www samsung com us Samsung Electronics America Inc 105 Challenger Road Ridgefield Park NJ 07660 0511 Code No AH68 02260R HW C700 C770S C770BS XAA_0609 in62 62 HW C700 C770S C770BS XAA_0609 in62 62 2010 06 09 5 07 43 2010 06 09 5 07 43 ...

Отзывы: