background image

ENG - 29

10  INSTALLING THE WALL MOUNT 

(OPTIONAL)

Installation Precautions


Install on a vertical wall only.


Do not install in a place with high temperature or humidity.


Verify whether the wall is strong enough to support the product’s weight. If not, reinforce the wall 
or choose another installation point.


• Purchase and use the fixing screws or anchors appropriate for the kind of wall you have (plaster 

board, iron board, wood, etc.). If possible, fix the support screws into wall studs.


Purchase wall mounting screws according to the type and thickness of the wall you want to mount 
the Soundbar on.


Diameter: M4


Length: 1.6 inches (40 mm) or longer recommended.


Connect cables from the unit to external devices before you install the Soundbar on the wall.


Make sure the unit is turned off and unplugged from the power source before you install it. 
Otherwise, it may cause an electric shock.

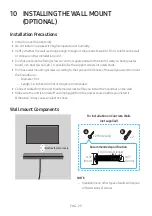
Wall mount Components

2 inches (5 cm) or more

For Installation on Concrete Walls  

(not supplied)

A

B

C

D

x 2 (M4 x L40)

A

B

C

D

x 2

1.6’’ (40 mm) or longer

0.15” 


(4 mm)

0.31” 

(8 mm)

Recommended specification

NOTE


– Installations on other types of walls will require 

different kinds of screws.

Содержание HW-C400

Страница 1: ...HW C400 Imagine the possibilities Thank you for purchasing this Samsung product To receive more complete service please register your product at www samsung com register FULL MANUAL ...

Страница 2: ...to consult the user manual for further safety related information WARNING To reduce the risk of fire or electric shock do not expose this appliance to rain or moisture To prevent injury this apparatus must be securely attached to the floor wall in accordance with the installation instructions This product contains chemicals known to the State of California to cause cancer and birth defects or othe...

Страница 3: ... Increasing the separation between the equipment and receiver Connecting the equipment to an outlet that is on a different circuit than the radio or TV Consulting the dealer or an experienced radio TV technician for help FCCRadiationExposureStatement This equipment complies with FCC radiation exposure limits set forth for an uncontrolled environment This equipment should be installed and operated ...

Страница 4: ...lug this apparatus during lightning storms or when unused for long periods of time 14 Refer all servicing to qualified service personnel Servicing is required when the apparatus has been damaged in any way such as power supply cord or plug is damaged liquid has been spilled or objects have fallen into the apparatus the apparatus has been exposed to rain or moisture does not operate normally or has...

Страница 5: ...ored in cold temperatures If transporting the unit during the winter wait approximately 2 hours until the unit has reached room temperature before using 5 The battery used with this product contains chemicals that are harmful to the environment Do not dispose of the battery in the general household trash Do not expose the battery to excess heat direct sunlight or fire Do not short circuit disassem...

Страница 6: ... 11 Using the Hidden Buttons Buttons with more than one function 16 Output specifications for the different sound effect modes 16 Adjusting the Soundbar volume with a TV remote control 17 04 ConnectingtheSoundbar 18 Connecting Electrical Power 18 05 UsingawiredconnectiontotheTV 19 Connecting using an Optical Cable 19 06 UsingawirelessconnectiontotheTV 20 Connecting via Bluetooth 20 07 Connectingan...

Страница 7: ...oundbar to a mobile device via NFC function 28 10 InstallingtheWallMount Optional 29 Installation Precautions 29 Wall mount Components 29 11 SoftwareUpdate 32 Reset 33 12 Troubleshooting 34 13 License 35 14 OpenSourceLicenseNotice 36 15 ImportantNotesAboutService 36 16 SpecificationsandGuide 37 Specifications 37 ...

Страница 8: ...about the power supply and power consumption refer to the label attached to the product Label Bottom of the Soundbar Main Unit To purchase additional components or optional cables contact a Samsung Service Center or Samsung Customer Care Design specifications are subject to change without prior notice The appearance of the accessories may differ slightly from the illustrations above ...

Страница 9: ...as described below W White LED W White LED M Multicolor LED W White LED W White LED The Multicolor LED changes to White Cyan Green Red Yellow Orange Purple and Blue depending on the mode or status Power Turns the power on and off Volume Adjusts the volume Source Press the Source button to change the mode Each time you change the mode the LED lights in white and then turns off LED Indicator WhiteOn...

Страница 10: ...V speaker to ExternalSpeaker BottomPaneloftheSoundbar POWER POWER DIGITAL AUDIO IN OPTICAL USB 5V 0 5A DIGITAL AUDIO IN OPTICAL HDMI ARC DIGITAL AUDIO IN OPTICAL USB 5V 0 5A POWER DIGITAL AUDIO IN OPTICAL HDMI ARC DIGITAL AUDIO IN OPTICAL USB 5V 0 5A POWER POWER Connect the Soundbar s AC power cable DIGITALAUDIOIN OPTICAL Connect to the digital optical output of an external device USB 5V0 5A Conne...

Страница 11: ...on HowtoUsetheRemoteControl SOUND MODE WOOFER TONE CONTROL CHLEVEL Power Turns the Soundbar on and off LED Indicator CyanBlinksX1 On Off RedBlinksX3 AutoPowerDownFunction The unit turns off automatically in the following situations In DigitalAudioIn Bluetooth USB mode if there is no audio signal for 18 minutes Source Press to select a source connected to the Soundbar Mute Press the Mute button to ...

Страница 12: ...ach time the mode changes the Multicolor LED blinks in white LED Indicator WhiteBlinksX1 Sync Nightmode Voiceenhancement If the video on the TV and audio from the Soundbar are not synchronized select Sync in Sound Control and then set the audio delay between 0 300 milliseconds by using the Up Down buttons Not available in USB or Bluetooth mode Sync is only supported for some functions Nightmode is...

Страница 13: ...2kHz 2 5kHz 5kHz 10kHz BluetoothPAIR Switch the Soundbar to Bluetooth pairing mode When you press the button the LED display changes as shown below Until pairing is complete the Multicolor LED changes as Red Green Blue in turn LED Indicator Red Green BlueBlinks Pairing Connectioniscomplete Cyan BlinksX3 p Play Pause You can also play or pause music by pressing the button in USB mode Up Down Left R...

Страница 14: ...ection request from a previously connected TV or Bluetooth device The setting is On by default Press and hold the SOUNDMODE button for more than 5 seconds to turn off the Bluetooth Power function DRC DynamicRangeControl On Off Lets you apply dynamic range control to Dolby Digital tracks Press and hold the SOUNDMODE button for more than 5 seconds while the Soundbar is powered off to turn DRC Dynami...

Страница 15: ...ush the button up or down to adjust the bass level between 6 to 6 To set the woofer bass volume level to 0 Default press the button Subwoofer is not included TONECONTROL By pressing the button you can adjust the volume of the treble or bass sound The desired item can be adjusted using the Up Down buttons This feature is available in all sound modes except Standard mode LED Indicator WhiteBlinksX1 ...

Страница 16: ...FER Up TV remote control On Off page 17 Left TV Auto connect On Off page 21 Sound Control 7 Band EQ page 13 SOUND MODE DRC On Off page 14 Bluetooth Power On Off page 14 Outputspecificationsforthedifferentsoundeffectmodes Effect Input Output Surround Sound 2 0 ch 2 0 ch 5 1 ch 2 0 ch Standard 2 0 ch 2 0 ch 5 1 ch 2 0 ch ...

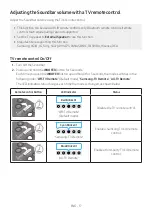
Страница 17: ... Each time you push the WOOFER button up and hold it for 5 seconds the mode switches in the following order Off TVRemote Default mode Samsung TVRemote All TVRemote The LED indicator status changes each time the mode is changed as shown below RemoteControlButton LEDIndicator Status S O U N D M O D E W O O F E R C H L E V E L T O N E C O N T R O L 5 Sec Off TV Remote Default mode RedBlinksX1 Disable...

Страница 18: ...r to the label attached to the product Label Bottom of the Soundbar Main Unit 1 Connect the power cord to the Soundbar 2 Connect the power cord to a wall socket BottomoftheSoundbarMainUnit POWER POWER DIGITAL AUDIO IN OPTICAL USB 5V 0 5A DIGITAL AUDIO IN OPTICAL HDMI ARC DIGITAL AUDIO IN OPTICAL USB 5V 0 5A POWER PowerCord NOTE If you unplug and reconnect the power cord when the product is turned ...

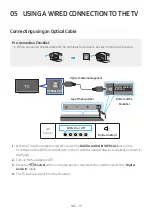
Страница 19: ...RC DIGITAL AUDIO IN OPTICAL USB 5V 0 5A Bottomofthe Soundbar OpticalCable notsupplied TopoftheSoundbar 1 With the TV and Soundbar turned off connect the DIGITALAUDIOIN OPTICAL port on the Soundbar and the OPTICAL output port on the TV with the optical cable not supplied as shown in the figure 2 Turn on the Soundbar and TV 3 Press the Source button on the top panel or remote control and then select...

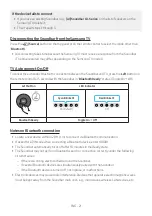
Страница 20: ...scomplete Cyan BlinksX3 When in Bluetooth mode 5 Sec Until pairing is complete the Multicolor LED changes as Red Green Blue in turn ReadytoconnectviaBluetooth 2 Select Bluetooth mode on the Samsung TV e g Home Menu Settings All Settings Sound Sound Output Bluetooth Speaker List AV Soundbar C4 Series Bluetooth 3 Select AV SoundbarC4 Series from the list on TV s screen An available Soundbar is indic...

Страница 21: ...thReady status Toggle On Off Leftbutton LEDIndicator 5 Sec CyanBlinksX1 On Default Off RedBlinksX1 BluetoothReady ToggleOn Off NotesonBluetoothconnection Locate a new device within 3 28 ft 1 m to connect via Bluetooth communication If asked for a PIN code when connecting a Bluetooth device enter 0000 The Soundbar automatically turns off after 18 minutes in the Ready state The Soundbar may not perf...

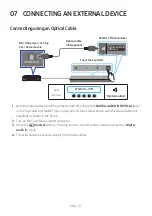
Страница 22: ...dbar BD DVDplayer Set top box Gameconsole 1 With the external device and Soundbar turned off connect the DIGITALAUDIOIN OPTICAL port on the Soundbar and the OPTICAL output port on the external device with the optical cable not supplied as shown in the figure 2 Turn on the Soundbar and external device 3 Press the Source button on the top panel or remote control and then select the Digital AudioIn m...

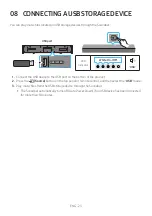
Страница 23: ...AUDIO IN OPTICAL USB 5V 0 5A USBport LED Indicator WhiteOn Off USB 1 Connect the USB device to the USB port on the bottom of the product 2 Press the Source button on the top panel or remote control and then select the USB mode 3 Play music files from the USB storage device through the Soundbar The Soundbar automatically turns off Auto Power Down if no USB device has been connected for more than 18...

Страница 24: ...28kbps Wave_Format_MSAudio2 16kHz 48kHz 56kbps 128kbps aac AAC 16kHz 96kHz 48kbps 320kbps AAC LC 16kHz 96kHz 128kbps 192kbps 5 1ch 320kbps HE AAC 24kHz 96kHz 48kbps 64kbps 5 1ch 160kbps wav 16kHz 48kHz up to 3000kbps flac FLAC 32kHz 192kHz 162kbps 8 100kbps If there are too many folders about 200 and files about 2000 stored on the USB device it may take the Soundbar some time to access and play fi...

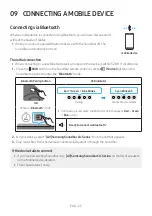
Страница 25: ...on on the Soundbar top panel to enter the Bluetooth mode BluetoothPairingbutton LEDIndicator SOUND MODE PAIR OR Red Green BlueBlinks Pairing Connectioniscomplete Cyan BlinksX3 When in Bluetooth mode 5 Sec Until pairing is complete the Multicolor LED changes as Red Green Blue in turn ReadytoconnectviaBluetooth 2 On your device select AV SamsungSoundbarC4 Series from the list that appears 3 Play mus...

Страница 26: ... Free function When connecting the Soundbar to a Bluetooth device place them as close to each other as possible The farther the Soundbar and Bluetooth device are from each other the lower the sound quality will become The Bluetooth connection may break when the devices are out of the effective range The Bluetooth connection may not function as intended in areas with poor reception A Bluetooth devi...

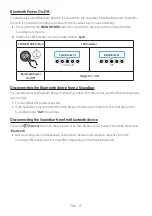
Страница 27: ...nksX1 BluetoothPower On Off ToggleOn Off DisconnectingtheBluetoothdevicefromaSoundbar You can disconnect a Bluetooth device from the Soundbar For instructions see the Bluetooth device s user manual The Soundbar will be disconnected If the Soundbar is disconnected from the Bluetooth device the multicolor LED indicator on the Soundbar blinks Red three times DisconnectingtheSoundbarfromtheBluetoothde...

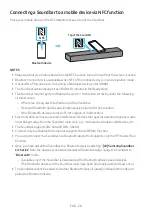
Страница 28: ...If the Bluetooth device is turned off not in place or malfunctions Electronic devices may cause radio interference Devices that generate electromagnetic waves must be kept away from the Soundbar main unit e g microwaves wireless LAN devices etc The Soundbar supports SBC data 44 1kHz 48kHz Connect only to a Bluetooth device that supports the A2DP AV function You cannot connect the Soundbar to a Blu...

Страница 29: ...studs Purchase wall mounting screws according to the type and thickness of the wall you want to mount the Soundbar on Diameter M4 Length 1 6 inches 40 mm or longer recommended Connect cables from the unit to external devices before you install the Soundbar on the wall Make sure the unit is turned off and unplugged from the power source before you install it Otherwise it may cause an electric shock...

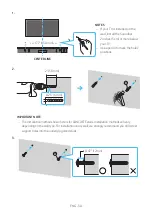
Страница 30: ...V Use a pencil to mark the holes positions 2 0 25 6 mm 2 50 mm A B C D IMPORTANTNOTE The installation method shown here is for CONCRETE walls Installation methods will vary depending on the wall type For installation on dry wall we strongly recommend you drill screw support holes into the underlying wood studs 3 A B C D 0 47 12mm ...

Страница 31: ... into the back of the Soundbar CAUTION Press the Soundbar down with sufficient force to fix it to the wall If the Soundbar is not firmly fixed to the wall it could be accidently detached resulting in personal injury Do not bump into or strike the Soundbar especially from the bottom The impact could detach the Soundbar from the wall resulting in personal injury ...

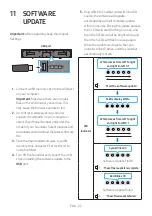
Страница 32: ...to a USB memory stick and select Extract Here to unzip the folder 4 Turn off the Soundbar and connect the USB stick containing the software update to the USB port 5 Plug USB into Soudbar and switch to USB source the software will update automatically and will complete update within 2 minutes During the update process the 5 LEDs will start flashing in a loop and then the 5 LEDs will all be bright w...

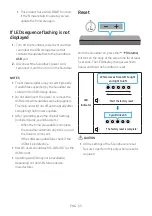
Страница 33: ...y after completing the firmware update After upgrading keep the original Settings include Volume sound field etc When the firmware update is complete the soundbar automatically turns on and the Voice UI comes out If the software update fails check if the USB stick is defective Mac OS users should use MS DOS FAT as the USB format Updating via USB may not be available depending on the USB storage de...

Страница 34: ...muted Adjust the volume When any external device STB Bluetooth device mobile device etc is connected adjust the volume of the external device For sound output of the TV select Soundbar Samsung TV Home Menu Settings All Settings Sound Sound Output Select Soundbar The cable connection to the Soundbar may be loose Remove the cable and connect again Remove the power cord completely reconnect and turn ...

Страница 35: ...dio and the double D symbol are trademarks of Dolby Laboratories Licensing Corporation Manufactured under license from Dolby Laboratories Confidential unpublished works Copyright 1992 2019 Dolby Laboratories All rights reserved For DTS patents see http patents dts com Manufactured under license from DTS Inc for companies headquartered in the U S Japan Taiwan or under license from DTS Licensing Lim...

Страница 36: ...a An engineer is called out to your home at your request and there is no defect in the product b You bring the unit to a repair center and there is no defect in the product You will be advised of the amount of the administration fee before any work is done or a home visit is made If you have a problem with this product we strongly recommend you read the appropriate section of this manual visit the...

Страница 37: ... to 35 C Operating Humidity Range 10 75 AMPLIFIER Rated Output power 20W x 2 Supported play formats LPCM 2ch Dolby Audio supporting Dolby Digital DTS Bluetooth Port deactivation method Press and hold the SOUNDMODE button for more than 5 seconds to turn off Bluetooth Power function NOTES Samsung Electronics Co Ltd reserves the right to change the specifications without notice Weight and dimensions ...

Страница 38: ... service problems incorrect electrical line voltage fluctuations and surges customer adjustments and failure to follow operating instructions cleaning maintenance and environmental instructions that are covered and prescribed in the instruction book product removal or reinstallation reception problems and distortion related to noise echo interference or other signal transmission and delivery probl...

Страница 39: ... Ltd All rights reserved QUESTIONS OR COMMENTS Country IN THE US 1 800 SAMSUNG 726 7864 www samsung com us support Samsung Electronics America Inc 85 Challenger Road Ridgefield Park NJ 07660 Samsung Service Center Web Site Address ...

Отзывы: