background image

ENG - 8

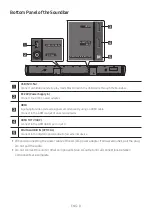
Bottom Panel of the Soundbar

HDMI OUT

(TV-ARC)

HDMI IN

USB (5V 0.5A)

DIGITAL AUDIO IN

(OPTICAL)

DC 24V

HDMI

HDMI TO TV

(ARC)

DIGITAL AUDIO IN (OPTICAL)

HDMI

HDMI TO  TV

(ARC)

DIGITAL AUDIO IN (OPTICAL)

DC 24V

USB (5V 0.5A)

HDMI OUT

(TV-ARC)

HDMI IN

USB (5V 0.5A)

DIGITAL AUDIO IN

(OPTICAL)

DC 24V

HDMI

HDMI TO TV

(ARC)

DIGITAL AUDIO IN (OPTICAL)

HDMI

HDMI TO  TV

(ARC)

DIGITAL AUDIO IN (OPTICAL)

DC 24V

USB (5V 0.5A)

HDMI OUT

(TV-ARC)

HDMI IN

USB (5V 0.5A)

DIGITAL AUDIO IN

(OPTICAL)

DC 24V

HDMI

HDMI TO TV

(ARC)

DIGITAL AUDIO IN (OPTICAL)

HDMI

HDMI TO  TV

(ARC)

DIGITAL AUDIO IN (OPTICAL)

DC 24V

USB (5V 0.5A)

USB (5V 0.5A)

Connect a USB device here to play music files stored on the USB device through the Soundbar.

DC 24V (Power Supply In)

Connect the AC/DC power adapter.

HDMI 

Inputs digital video and audio signals simultaneously using an HDMI cable.  
Connect to the HDMI output of an external device.

HDMI TO TV (ARC)

Connect to the HDMI (ARC) port on a TV.

DIGITAL AUDIO IN (OPTICAL)

Connect to the digital (optical) output of an external device.


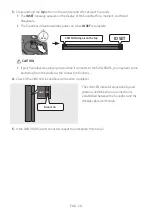
When disconnecting the power cable of the AC/DC power adapter from a wall outlet, pull the plug.  
Do not pull the cable.


Do not connect this unit or other components to an AC outlet until all connections between 
components are complete.

Содержание HW-B650/ZA

Страница 1: ...ung product To receive more complete service please register your product at www samsung com register Para evitar cualquier avería o daños lea detalladamente este manual de instrucciones antes de conectar y utilizar este aparato Conserve el manual para referencia futura Sólo México ...

Страница 2: ... This symbol indicates that the rated voltage marked with the symbol is AC voltage DC voltage This symbol indicates that the rated voltage marked with the symbol is DC voltage Caution Consult instructions for use This symbol instructs the user to consult the user manual for further safety related information WARNING To reduce the risk of fire or electric shock do not expose this appliance to rain ...

Страница 3: ...ight or other heat sources This could lead to overheating and cause the unit to malfunction 4 Protect the product from moisture i e vases and excess heat e g a fireplace or equipment creating strong magnetic or electric fields Unplug the power cable from the AC wall socket if the unit malfunctions Your product is not intended for industrial use It is for personal use only Condensation may occur if...

Страница 4: ...re than one function 13 Output specifications for the different sound effect modes 13 Adjusting the Soundbar volume with a TV remote control 14 04 ConnectingtheSoundbar 15 Connecting Electrical Power 15 Connecting the Soundbar to the Subwoofer 16 Connecting an SWA 9100S Sold Separately to your Soundbar 19 05 UsingawiredconnectiontotheTV 21 Method 1 Connecting a TV using an HDMI Cable 21 Method 2 C...

Страница 5: ...MobileDevice 29 Connecting via Bluetooth 29 10 InstallingtheWallMount 33 Installation Precautions 33 Wallmount Components 33 11 SoftwareUpdate 35 How to check the Firmware version 35 Update Procedure 36 If UPDATE is not displayed 36 12 Troubleshooting 37 13 License 39 14 OpenSourceLicenseNotice 40 15 ImportantNotesAboutService 40 16 SpecificationsandGuide 41 Specifications 41 ...

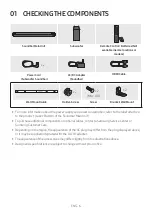
Страница 6: ...power supply and power consumption refer to the label attached to the product Label Bottom of the Soundbar Main Unit To purchase additional components or optional cables contact a Samsung Service Center or Samsung Customer Care Depending on the region the appearance of the AC plug may differ from the plug displayed above or it may be supplied integrated with the AC DC adapter The appearance of the...

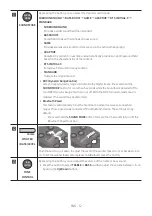
Страница 7: ...Selects the source input mode Inputmode Display Optical Digital input D IN ARC HDMI OUT input D IN TV ARC Auto conversion HDMI input HDMI BLUETOOTH mode BT USB mode USB To turn on BTPAIRING mode change the source to BT mode and then press and hold the Source button for more than 5 seconds When you plug in the AC cord the power button will begin working in 4 to 6 seconds When you turn on this unit ...

Страница 8: ...DMI TO TV ARC DIGITAL AUDIO IN OPTICAL DC 24V USB 5V 0 5A USB 5V0 5A Connect a USB device here to play music files stored on the USB device through the Soundbar DC24V PowerSupplyIn Connect the AC DC power adapter HDMI Inputs digital video and audio signals simultaneously using an HDMI cable Connect to the HDMI output of an external device HDMITOTV ARC Connect to the HDMI ARC port on a TV DIGITALAU...

Страница 9: ...ROL CHLEVEL Power Turns the Soundbar on and off SOUND MODE WOOFER TONE CONTROL CHLEVEL Source Press to select a source connected to the Soundbar SOUND MODE WOOFER TONE CONTROL CHLEVEL Mute Press the Mute button to mute the sound Press it again to unmute the sound SOUND MODE WOOFER TONE CONTROL CHLEVEL Volume C H L E V E L T O N E C O N T R O L W O O F E R S O U N D M O D E C H L E V E L T O N E C ...

Страница 10: ...s by using the Up Down buttons Not available in USB or BT mode NIGHTMODEON OFF This mode is optimized for nighttime viewing with the settings adjusted to bring the volume down but keep the dialog clear VOICEENHANCEON OFF This mode is makes it easier to hear spoken dialog in movies and TV The NIGHTMODE and VOICEENHANCEaudio function can be turned ON OFF by using the Up Down buttons Press and hold t...

Страница 11: ...n USB mode press the Up button MusicSkip Press the Right button to select the next music file Press the Left button to select the previous music file IDSET Press and hold the Up button for 5 seconds to complete IDSET when connecting to a wireless subwoofer or wireless rear speakers SOUND MODE WOOFER TONE CONTROL CHLEVEL Info Press the button to display information about the current function See pa...

Страница 12: ...DRC turned on loud sound is reduced The sound may be distorted BluetoothPower This feature automatically turns the Soundbar on when it receives a connection request from a previously connected TV or Bluetooth device The setting is On by default Press and hold the SOUNDMODE button for more than 5 seconds to turn off the Bluetooth Power function SOUND MODE WOOFER TONE CONTROL CHLEVEL WOOFER BASS LEV...

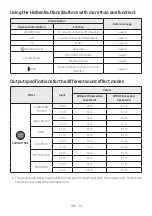
Страница 13: ...fferentsoundeffectmodes Effect Input Output WithoutWirelessRear SpeakerKit WithWirelessRear SpeakerKit SOUNDMODE Surround VOL WOOFER SOUND MODE Bluetooth POWER SURROUND SOUND 2 0 ch 3 1 ch 5 1 ch 5 1 ch 3 1 ch 5 1 ch BASS BOOST 2 0 ch 3 1 ch 5 1 ch 5 1 ch 3 1 ch 5 1 ch GAME 2 0 ch 3 1 ch 5 1 ch 5 1 ch 3 1 ch 5 1 ch ADAPTIVE 2 0 ch 3 1 ch 5 1 ch 5 1 ch 3 1 ch 5 1 ch DTS VIRTUAL X 2 0 ch 3 1 ch 5 1 ...

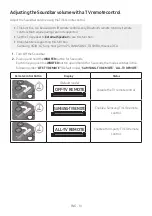
Страница 14: ... 2 Push up and hold the WOOFER button for 5 seconds Each time you push the WOOFER button up and hold it for 5 seconds the mode switches in the following order OFF TVREMOTE Default mode SAMSUNG TVREMOTE ALL TVREMOTE RemoteControlButton Display Status S O U N D M O D E W O O F E R C H L E V E L T O N E C O N T R O L 5 Sec OFF TVREMOTE Default mode Disable the TV remote control S O U N D M O D E W O ...

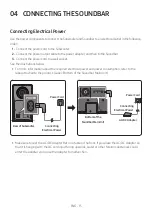
Страница 15: ...d electrical power and power consumption refer to the label attached to the product Label Bottom of the Soundbar Main Unit POWER RearofSubwoofer PowerCord Connecting ElectricalPower Bottomofthe SoundbarMainUnit AC DCAdapter Connecting ElectricalPower HDMI HDMI TO TV ARC DIGITAL AUDIO IN OPTICAL DC 24V USB 5V 0 5A HDMI OUT TV ARC DC 24V PowerCord Make sure to rest the AC DC Adapter flat on a table ...

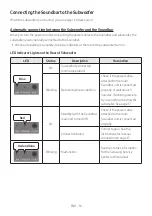
Страница 16: ...oofer LED Status Description Resolution Blue On Successfully connected normal operation Blinking Recovering the connection Check if the power cable attached to the main Soundbar unit is connected properly or wait about 5 minutes If blinking persists try manually connecting the subwoofer See page 17 Red On Standby with the Soundbar main unit turned off Check if the power cable attached to the main ...

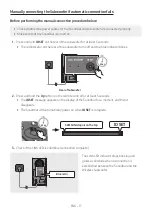
Страница 17: ...oofer turns off and the blue indicator blinks 5 Sec RearofSubwoofer 2 Press and hold the Upbutton on the remote control for at least 5 seconds The IDSET message appears on the display of the Soundbar for a moment and then it disappears The Soundbar will automatically power on when IDSET is complete SOUND MODE PAIR 5 Sec IDSET SAMSUNGlogoisonthetop 3 Check if the LINK LED is solid blue connection c...

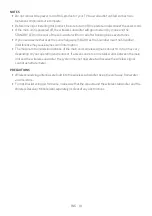
Страница 18: ... as the Soundbar near the Soundbar interference may cause some sound interruption The maximum transmission distance of the main unit s wireless signal is about 10 m but may vary depending on your operating environment If a steel concrete or metallic wall is between the main unit and the wireless subwoofer the system may not operate at all because the wireless signal cannot penetrate metal PRECAUTI...

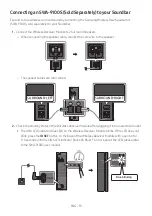
Страница 19: ...OWER IDSET L R SURROUNDSPEAKERSOUT SPEAKERIMPEDANCE 3Ω SURROUND RIGHT SURROUND LEFT SURROUND RIGHT 2 Check the standby status of the Wireless Receiver Module after plugging it into an electrical outlet The LINK LED indicator blue LED on the Wireless Receiver Module blinks If the LED does not blink press the IDSET button on the back of the Wireless Receiver Module with a pen tip for 5 6 seconds unt...

Страница 20: ...Glogoisonthetop CAUTION If your Soundbar was playing music when it connects to the SWA 9100S you may hear some stuttering from the woofer as the connection finalizes 4 Check if the LINK LED is solid blue connection complete STANDBY LINK STANDBY LINK BlueisOn The LINK LED indicator stops blinking and glows a solid blue when a connection is established between the Soundbar and the Wireless Receiver ...

Страница 21: ...nd mute Method1 ConnectingaTVusinganHDMICable CAUTION When both the HDMI cable and optical cable are connected the HDMI signal is received first To connect the HDMI cable between the TV and Soundbar be sure to connect the terminals marked ARC Otherwise the TV sound may not be output The recommended cable is HighSpeedHDMICablewithEthernet HDMI TO TV ARC HDMI IN ARC ConnecttotheHDMIIN ARC or eARC po...

Страница 22: ...sion of video and audio data with just a single connector If the TV provides an ARC port connect the HDMI cable to the HDMI IN ARC port We recommend you use a coreless HDMI cable if possible If you use a cored HDMI cable use one whose diameter is less than 14 mm This function is not available if the HDMI cable does not support ARC When the audio in a broadcast is encoded in Dolby Digital and the D...

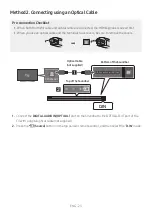
Страница 23: ...e and the terminals have covers be sure to remove the covers DIGITAL AUDIO IN OPTICAL OPTICAL OUT OpticalCable notsupplied BottomoftheSoundbar D IN TopoftheSoundbar 1 Connect the DIGITALAUDIOIN OPTICAL port on the Soundbar to the OPTICAL OUT port of the TV with a digital optical cable not supplied 2 Press the Source button on the top panel or remote control and then select the D IN mode ...

Страница 24: ...nel of the Soundbar for more than 5 seconds to display BTPAIRING 2 Select Bluetooth mode on the TV For more information see the TV s manual 3 Select AV SoundbarB6 Series from the list on TV s screen An available Soundbar is indicated with Needspairing or Paired on the TV s Bluetooth device list To connect the TV to the Soundbar select the message and then establish a connection When the TV is conn...

Страница 25: ...n on the remote control or press and hold the Source button on the top of the Soundbar for more than 5 seconds while the Soundbar is in BT mode NOTES If asked for a PIN code when connecting a Bluetooth device enter 0000 In Bluetooth connection mode the Bluetooth connection will be lost if the distance between the Soundbar and the Bluetooth device exceeds 10 meters The Soundbar automatically turns ...

Страница 26: ...le HDMICable BottomoftheSoundbar ExternalDevice HDMI TopoftheSoundbar 1 Connect an HDMI cable from the HDMI port on the bottom of the Soundbar to the HDMI OUT port on your digital device 2 Connect an HDMI cable from the HDMITOTV ARC port on the bottom of the Soundbar to the HDMI IN port on your TV 3 Press the Source button on the top panel or on the remote control and then select HDMI 4 HDMI mode ...

Страница 27: ... BottomoftheSoundbar D IN TopoftheSoundbar BD DVDplayer Set topbox Gameconsole 1 Connect DIGITALAUDIOIN OPTICAL on the main unit to the OPTICAL OUT port of the Source Device using a digital optical cable not supplied 2 Select D IN mode by pressing the Source button on the top panel or on the remote control ...

Страница 28: ...list Extension Codec SamplingRate Bitrate mp3 MPEG 1 Layer2 16kHz 48kHz 80kbps 320kbps MPEG 1 Layer3 16kHz 48kHz 80kbps 320kbps MPEG 2 Layer3 16kHz 48kHz 80kbps 320kbps MPEG 2 5 Layer3 16kHz 48kHz 80kbps 320kbps wma Wave_Format_MSAudio1 16kHz 48kHz 56kbps 128kbps Wave_Format_MSAudio2 16kHz 48kHz 56kbps 128kbps aac AAC 16kHz 96kHz 48kbps 320kbps AAC LC 16kHz 96kHz 128kbps 192kbps 5 1ch 320kbps HE A...

Страница 29: ...BTREADY if there is a connect record b When BTREADY appears press and hold the Source button on the top panel of the Soundbar for more than 5 seconds to display BTPAIRING 2 On your device select AV SamsungSoundbarB6 Series from the list that appears When the Soundbar is connected to the Bluetooth device BluetoothDeviceName BT appears in the front display 3 Play music files from the device connecte...

Страница 30: ...vices may cause radio interference Devices that generate electromagnetic waves must be kept away from the Soundbar main unit e g microwaves wireless LAN devices etc The Soundbar supports SBC data 44 1kHz 48kHz Connect only to a Bluetooth device that supports the A2DP AV function You cannot connect the Soundbar to a Bluetooth device that supports only the HF Hands Free function Once you have paired...

Страница 31: ...th Bluetooth is a technology that enables Bluetooth compliant devices to interconnect easily with each other using a short wireless connection A Bluetooth device may cause noise or malfunction depending on usage if A part of your body is in contact with the receiving transmitting system of the Bluetooth device or the Soundbar It is subject to electrical variation from obstructions caused by a wall...

Страница 32: ... Bluetooth device side switch Bluetooth on and select the Soundbar from the list of available devices the Soundbar will automatically connect to the Bluetooth device 3 A 2nd Bluetooth device can be paired and connected to the Soundbar using the same method If you attempt to connect a 3rd device a connected device that is not playing audio will lose its Bluetooth connection but will still be paired...

Страница 33: ...uds Purchase wall mounting screws according to the type and thickness of the wall you want to mount the Soundbar on Diameter M5 Length 35 mm or longer recommended Connect cables from the unit to external devices before you install the Soundbar on the wall Make sure the unit is turned off and unplugged from the power source before you install it Otherwise it may cause an electric shock WallmountCom...

Страница 34: ... drill bit drill a hole in the wall at each marking If the markings do not correspond to the positions of studs make sure you insert appropriate anchors into the holes before you insert the support screws If you use anchors make sure the holes you drill are large enough for the anchors you use 5 Push a screw not supplied through each Holder Screw and then screw each screw firmly into a support scr...

Страница 35: ...O IN OPTICAL If an update is offered you can update the firmware by connecting a USB device with the firmware update stored on it to the USB port on your Soundbar For more information about how to download update files go to the Samsung Electronics website at www samsung com Support Then select the product type or enter the model number of your Soundbar select the Software Apps option and then Dow...

Страница 36: ...e update is complete This product has a DUAL BOOT function If the firmware fails to update you can update the firmware again 7 Restore your settings on the Soundbar IfUPDATEisnotdisplayed 1 Turn off the Soundbar disconnect and then reconnect the USB storage device that contains the update files to the Soundbar s USB port 2 Disconnect the Soundbar s power cord reconnect it and then turn on the Soun...

Страница 37: ...ely reconnect and turn the power on Reset the product and try again See page 36 Subwooferdoesnotoutputanysound Check whether the LED indicator on the rear of the Subwoofer is on in blue Reconnect the Soundbar and Subwoofer if the indicator is blinking in blue or turned red See page 17 You may experience an issue if there is an obstacle between the Soundbar and Subwoofer Move devices to an area awa...

Страница 38: ...the selection Remove and reconnect the power plug then try again Reset the product and try again See page 36 Sounddropsoutwhenconnectedvia Bluetooth If your device that is connected via Bluetooth moves too far away from the Soundbar it may cause the sound to drop out Move the device closer to the Soundbar If a part of your body is in contact with the Bluetooth transceiver or the product is install...

Страница 39: ...iedmodelonly Your Samsung product is ENERGY STAR qualified in its factory default setting Change to certain features settings and functionality in this product can change the power consumption possibly beyond the limits required for ENERGY STAR qualification Environmental Protection Agency and Department of Energy ENERGY STAR is a joint program of the Government agencies designed to promote energy...

Страница 40: ... requests for questions regarding open sources contact Samsung Open Source http opensource samsung com 15 IMPORTANT NOTESABOUT SERVICE Figures and illustrations in this User Manual are provided for reference only and may differ from actual product appearance ...

Страница 41: ...dity Range 10 75 AMPLIFIER Rated Output power 180W 30Wx6 Supported play formats LPCM 2ch Dolby Audio supporting Dolby Digital DTS DTS Virtual X Subwoofer Name PS WB65D Weight 5 1 kg Dimensions W x H x D 184 0 x 346 0 x 295 0 mm AMPLIFIER Rated Output power 250W NOTES Samsung Electronics Co Ltd reserves the right to change the specifications without notice Weight and dimensions are approximate ...

Страница 42: ...ipt must be retained by the customer and is the only acceptable proof of purchase It must be presented to the authorized service center at the time service is requested EXCLUSIONS WHATISNOTCOVERED This warranty does not cover damage due to accident fire flood and or other acts of God misuse incorrect line voltage improper installation improper or unauthorized repairs commercial use or damage that ...

Страница 43: ... care Center HEADQUARTERS Samsung Electronics Canada Inc 2050 Derry Road West Mississauga Ontario L5N 0B9 Canada TEL 1 800 SAMSUNG 1 800 726 7864 www samsung com ca support Country Samsung Service Center Web Site North America CANADA 1 800 SAMSUNG 726 7864 www samsung com ca support English www samsung com ca_fr support French U S A 1 800 SAMSUNG 726 7864 www samsung com us support ...

Страница 44: ...sta a tierra Voltaje CA Este símbolo indica que la tensión nominal marcada con el símbolo es CA Voltaje CC Este símbolo indica que la tensión nominal marcada con el símbolo es CC Precaución consulte las instrucciones antes de usar Este símbolo indica que se debe consultar el manual del usuario para obtener información relacionada con la seguridad ADVERTENCIA Para reducir el riesgo de incendio o de...

Страница 45: ...tras fuentes de calor Podrían sobrecalentarla y provocar una avería en la unidad 4 Proteja el reproductor contra la humedad por ejemplo jarrones y calor excesivo p ej chimeneas o equipos que creen campos magnéticos o eléctricos potentes Desconecte el cable de alimentación de la fuente de CA si la unidad no funciona correctamente El producto no ha sido creado para uso industrial Este producto es só...

Страница 46: ...una función 13 Especificaciones de salida para los diferentes modos de efectos de sonido 13 Ajuste del volumen de la Soundbar con un control remoto de televisor 14 04 ConexióndelaSoundbar 15 Conexión del suministro eléctrico 15 Conexión de la Soundbar al subwoofer 16 Conexión del SWA 9100S se vende por separado a una Soundbar 19 05 UsodeunaconexiónconcablealTV 21 Método 1 Conexión de un televisor ...

Страница 47: ...uetooth 29 10 InstalacióndelSoportedemontajeenlapared 33 Precauciones para la instalación 33 Componentes de soporte 33 11 ActualizacióndelSoftware 35 Cómo comprobar la versión de firmware 35 Procedimiento de actualización 36 Si no aparece la opción UPDATE 36 12 SolucióndeProblemas 37 13 Licencia 39 14 AvisoSobreLicenciadecódigoabierto 40 15 NotaImportanteSobreelServicio 40 16 EspecificacionesyGuía...

Страница 48: ...uente de alimentación y el consumo de energía consulte la etiqueta pegada en el producto Etiqueta Parte inferior de la unidad principal de la Soundbar Para comprar componentes adicionales o cables optativos comuníquese con un Centro de Servicios de Samsung o con el Centro de Atención al Cliente de Samsung Según la región el enchufe de CA puede variar en apariencia o puede venir integrado con el ad...

Страница 49: ...oundbar Botón Fuente Permite seleccionar el modo de entrada Mododeentrada Pantalla Entrada digital óptica D IN Entrada ARC HDMI OUT D IN TV ARC Autoconversión Entrada HDMI HDMI Modo BLUETOOTH BT Modo USB USB Para encender el modo BTPAIRING cambie la fuente a modo BT y luego mantenga presionado el botón Fuente durante más de 5 segundos Cuando enchufe el cable de CA la tecla de alimentación funciona...

Страница 50: ...o USB aquí para reproducir archivos de música que se encuentran en el dispositivo USB a través de la Soundbar DC24V Entradadelafuentedealimentación Permite conectar el adaptador de energía CA CC HDMI Permite reproducir señales de audio y video digital de manera simultánea con un cable HDMI Permite conectar la Soundbar a la salida HDMI de un dispositivo externo HDMITOTV ARC Permite conectar la Soun...

Страница 51: ...oundbar SOUND MODE WOOFER TONE CONTROL CHLEVEL Fuente Presione el botón Fuente para seleccionar una fuente que esté conectada a la Soundbar SOUND MODE WOOFER TONE CONTROL CHLEVEL Silencio Presione el botón Silencio para silenciar el sonido Vuelva a presionarlo para reanudar el sonido SOUND MODE WOOFER TONE CONTROL CHLEVEL Volumen C H L E V E L T O N E C O N T R O L W O O F E R S O U N D M O D E C ...

Страница 52: ...GHTMODEON OFF Este modo está optimizado para ver contenido por la noche ya que la configuración se ajusta para bajar el volumen pero mantener la claridad del diálogo VOICEENHANCEON OFF Este modo hace que sea más fácil oír el diálogo hablado en las películas y contenido de TV Las funciones de audio NIGHTMODE y VOICEENHANCE se pueden activar o desactivar ON OFF mediante los botones Arriba Abajo Para...

Страница 53: ...l botón Arriba Saltearcanciones Presione el botón Derecha para seleccionar el próximo archivo de música Presione el botón Izquierda para seleccionar el archivo de música anterior IDSET Mantenga presionado el botón Arriba durante 5 segundos para completarIDSET al establecer la conexión con un altavoz de graves inalámbrico o altavoces traseros inalámbricos SOUND MODE WOOFER TONE CONTROL CHLEVEL Info...

Страница 54: ... sonidos fuertes Es posible que el sonido se distorsione BluetoothPower Esta función enciende automáticamente la Soundbar cuando recibe una solicitud de conexión de un televisor o dispositivo Bluetooth que se conectó anteriormente La función está encendida de manera predeterminada Mantenga presionado el botón SOUNDMODE durante más de 5 segundos para desactivar la función Bluetooth Power Encendido ...

Страница 55: ...mbrico SiConKitdeparlante traseroinalámbrico SOUNDMODE Surround VOL WOOFER SOUND MODE Bluetooth POWER SURROUND SOUND 2 0 canales 3 1 canales 5 1 canales 5 1 canales 3 1 canales 5 1 canales BASS BOOST 2 0 canales 3 1 canales 5 1 canales 5 1 canales 3 1 canales 5 1 canales GAME 2 0 canales 3 1 canales 5 1 canales 5 1 canales 3 1 canales 5 1 canales ADAPTIVE 2 0 canales 3 1 canales 5 1 canales 5 1 ca...

Страница 56: ...antenga presionado el botón WOOFER durante 5 segundos Cada vez que mantiene presionado el botón WOOFER durante 5 segundos el modo cambia en el siguiente orden OFF TVREMOTE Modo predeterminado SAMSUNG TVREMOTE ALL TVREMOTE Botonesdelcontrolremoto Pantalla Estado S O U N D M O D E W O O F E R C H L E V E L T O N E C O N T R O L 5 Sec OFF TVREMOTE Modo predeterminado Deshabilita el control remoto del...

Страница 57: ...ta pegada en el producto Etiqueta Parte inferior de la unidad principal de la Soundbar POWER Parteposteriordel Subwoofer Cablede alimentación Conexióndel suministroeléctrico Parteinferiordela unidadprincipaldela Soundbar AdaptadordeCA CC Conexióndel suministro eléctrico HDMI HDMI TO TV ARC DIGITAL AUDIO IN OPTICAL DC 24V USB 5V 0 5A HDMI OUT TV ARC DC 24V Cablede alimentación Asegúrese de colocar ...

Страница 58: ...amente funcionamiento normal Intermitente Se está recuperando la conexión Verifique si el cable de alimentación montado a la unidad de Soundbar principal está debidamente conectado o espere unos 5 minutos Si el parpadeo persiste intente conectar el subwoofer manualmente Consulte la página 17 Rojo Activado Modo De espera con la unidad principal de la Soundbar apagada Verifique si el cable de alimen...

Страница 59: ...woofer se apaga y el indicador azul parpadea 5 Sec ParteposteriordelSubwoofer 2 Mantenga presionado el botón Arriba en el control remoto al menos 5 segundos El mensaje IDSET aparece en la pantalla de la Soundbar durante un momento y luego desaparece La Soundbar se encenderá automáticamente cuando IDSET esté completo SOUND MODE PAIR 5 Sec IDSET EllogotipodeSAMSUNGseubica enlapartesuperior 3 Verifiq...

Страница 60: ...terferencia puede hacer que se interrumpa el sonido La distancia máxima de transmisión de la señal inalámbrica de la unidad principal es de aproximadamente 10 metros pero puede variar según su entorno operativo Si hay una pared metálica o de amalgama acero concreto entre la unidad principal y el subwoofer inalámbrico es posible que el sistema no funcione porque la señal inalámbrica no puede penetr...

Страница 61: ...E 3Ω POWER IDSET L R SURROUNDSPEAKERSOUT SPEAKERIMPEDANCE 3Ω SURROUND RIGHT SURROUND LEFT SURROUND RIGHT 2 Verifique el estado de espera del módulo receptor inalámbrico luego de enchufarlo a un tomacorriente El indicador LED de LINK LED azul en el módulo receptor inalámbrico parpadea Si el LED no parpadea presione el botón IDSET en la parte posterior del módulo receptor inalámbrico con la punta de...

Страница 62: ...RECAUCIÓN Si su Soundbar estaba reproduciendo música al momento de conectarse al SWA 9100S es posible que escuche una reproducción defectuosa del woofer a medida que la conexión finaliza 4 Verifique que el LINKLED no parpadeé conexión completa STANDBY LINK STANDBY LINK Elledazulestá encendido El indicador LINK LED deja de parpadear y queda encendido en azul intenso cuando se establece una conexión...

Страница 63: ...sorconuncableHDMI PRECAUCIÓN Cuando el cable HDMI y el cable óptico estén conectados al mismo tiempo la señal HDMI se recibe primero Para conectar el cable HDMI entre el TV y la Soundbar asegúrese de conectar las terminales marcadas como ARC De lo contrario es posible que el sonido del TV no se escuche El cable recomendado es High SpeedHDMICablewithEthernet HDMI TO TV ARC HDMI IN ARC Verifiqueel A...

Страница 64: ...digital de datos de video y audio con un único conector Si el televisor cuenta con un puerto ARC conecte el cable HDMI al puerto HDMI IN ARC Le recomendamos usar un cable HDMI sin núcleo de ser posible Si usa un cable HDMI con núcleo use uno de diámetro menor a 14 mm Esta función no está disponible si el cable HDMI no admite ARC Cuando el audio en una transmisión está codificado en Dolby Digital y...

Страница 65: ...as terminales tengan cubiertas asegúrese de quitarlas DIGITAL AUDIO IN OPTICAL OPTICAL OUT Cableóptico nosuministrado ParteinferiordelaSoundbar D IN PartesuperiordelaSoundbar 1 Conecte la toma DIGITALAUDIOIN OPTICAL de la Soundbar a la toma OPTICAL OUT del televisor con un cable óptico no suministrado digital 2 Presione el botón Fuente en el panel superior o en el control remoto y luego seleccione...

Страница 66: ... BTPAIRING 2 Seleccione el modo Bluetooth en el televisor Para obtener más información consulte el manual del televisor 3 Seleccione AV SoundbarB6 Series en la lista que aparece en la pantalla del televisor La Soundbar disponible aparece con la indicación Needspairing o Paired en la lista de dispositivos Bluetooth del televisor Para conectar la Soundbar seleccione el mensaje y establezca una conex...

Страница 67: ... presionado el botón Fuente en la parte superior de la Soundbar durante más de 5 segundos mientras la Soundbar está en modo BT NOTAS Si le pide un código PIN mientras conecta un dispositivo Bluetooth ingrese 0000 En el modo Conexión Bluetooth se perderá la conexión Bluetooth si la distancia entre la Soundbar y el dispositivo Bluetooth supera los 10 m La Soundbar se apaga automáticamente después de...

Страница 68: ...ordelaSoundbar Dispositivo externo HDMI PartesuperiordelaSoundbar 1 Conecte un cable HDMI desde el puerto HDMIen la parte inferior de la Soundbar hasta el puerto HDMI OUT de su dispositivo digital 2 Conecte un cable HDMI desde el puerto HDMITOTV ARC en la parte inferior de la Soundbar hasta el puerto HDMI IN de su TV 3 Presione el botón Fuente en el panel superioro en el control remoto yluego sele...

Страница 69: ...rtesuperiordelaSoundbar Reproductorde Blu ray Reproductorde DVD Decodificador Consoladejuegos 1 Conecte la DIGITALAUDIOIN OPTICAL de la unidad principal a la toma OPTICAL OUT del dispositivo fuente con un cable óptico no suministrado digital 2 Seleccione el modo D IN presionando el botón Fuente en el panel superior o en el control remoto ...

Страница 70: ...ado durante más de 20 minutos Listadecompatibilidad Extensión Códec Velocidaddemuestreo Velocidadenbits mp3 MPEG 1 Layer2 16kHz 48kHz 80 320 kbps MPEG 1 Layer3 16kHz 48kHz 80 320 kbps MPEG 2 Layer3 16kHz 48kHz 80 320 kbps MPEG 2 5 Layer3 16kHz 48kHz 80 320 kbps wma Wave_Format_MSAudio1 16kHz 48kHz 56 128 kbps Wave_Format_MSAudio2 16kHz 48kHz 56 128 kbps aac AAC 16kHz 96kHz 48 320 kbps AAC LC 16kHz...

Страница 71: ...de conexión b Cuando aparezca BTREADY mantenga presionado el botón Fuente en el panel superior de la Soundbar durante más de 5 segundos hasta que aparezca BTPAIRING 2 Seleccione AV SamsungSoundbarB6 Series en la lista Cuando una Soundbar está conectada al dispositivo Bluetooth aparecerá NombredeldispositivoBluetooth BT en la pantalla frontal 3 Reproduzca archivos de música que se encuentran en el ...

Страница 72: ... interferencias de radio Los dispositivos que generan ondas electromagnéticas deberán mantenerse alejados de la unidad principal de la Soundbar p ej dispositivos con redes LAN inalámbricas microondas etc La Soundbar admite datos SBC 44 1 kHz 48 kHz Conecte sólo a un dispositivo Bluetooth que admita la función A2DP AV No puede conectar la Soundbar a un dispositivo Bluetooth que admita solo la funci...

Страница 73: ...compatibles con Bluetooth puedan fácilmente interconectarse entre sí utilizando una conexión inalámbrica corta Un dispositivo Bluetooth puede causar ruidos o un funcionamiento defectuoso dependiendo del uso cuando Una parte del cuerpo está en contacto con el sistema de recepción transmisión del dispositivo Bluetooth o de Soundbar Exista variación eléctrica por obstrucciones causadas por una pared ...

Страница 74: ...IRING y luego en la parte lateral del dispositivo Bluetooth encienda el Bluetooth y seleccione la Soundbar en la lista de dispositivos disponibles para que la Soundbar se conecte automáticamente al dispositivo Bluetooth 3 Se puede emparejar y conectar un segundo dispositivo Bluetooth a la Soundbar usando el mismo método Si intenta conectar un tercer dispositivo uno de los dispositivos conectados q...

Страница 75: ...red Compre tornillos para realizar montajes en la pared según el tipo y el espesor de la pared en la que desea colocar la Soundbar Diámetro M5 Longitud Se recomienda 35 mm o más Conecte los cables de la unidad a los dispositivos externos antes de instalar la Soundbar en la pared Asegúrese de que la unidad esté apagada y desconéctela de la alimentación antes de instalarla De lo contrario se puede p...

Страница 76: ...da una de las marcas Si las marcas no coinciden con la posición de los pernos asegúrese de colocar pernos de expansión adecuados dentro de los orificios antes de colocar los tornillos de soporte Si utiliza pernos de expansión asegúrese de que los orificios que taladre sean lo suficientemente grandes para los pernos que va a utilizar 5 Pase un tornillo no suministrado por cada Tornillodesujeción y ...

Страница 77: ...en una actualización puede actualizar el firmware conectando el dispositivo USB con la actualización del firmware almacenada en mismo al puerto USB de la Soundbar Para obtener más información sobre cómo descargar los archivos de las actualizaciones visite el sitio web de Samsung Electronics en www samsung com Support Luego seleccione el tipo de producto o escriba el número de modelo de la Soundbar...

Страница 78: ...e una función DUAL BOOT Si falla la actualización del firmware puede actualizarlo nuevamente 7 Restablezca sus ajustes en la Soundbar SinoaparecelaopciónUPDATE 1 Apague la Soundbar desconecte y vuelva a conectar el dispositivo de almacenamiento que contiene los archivos actualizados al puerto USB de la Soundbar 2 Desconecte el cable de alimentación de la Soundbar vuelva a conectarlo y luego encien...

Страница 79: ... e intente nuevamente Consulte la página 36 Nosaleningúnsonidodelaltavozdegraves Compruebe si el indicador LED en la parte posterior del Subwoofer está encendido en color azul Vuelva a conectar la Soundbar y el Subwoofer si el indicador parpadea en azul o está en rojo Consulte la página 17 Puede haber problemas de funcionamiento si hay un obstáculo entre la Soundbar y el Subwoofer Mueva los dispos...

Страница 80: ...evamente durante 5 segundos para cambiar la selección Retire y vuelva a conectar el enchufe de alimentación luego intente nuevamente Inicie el producto e intente nuevamente Consulte la página 36 Nohaysonidocuandoseconectamediante Bluetooth Si el dispositivo que está conectado mediante Bluetooth se aleja demasiado de la Soundbar eso puede hacer que no haya sonido Acerque el dispositivo a la Soundba...

Страница 81: ...iedmodelonly Your Samsung product is ENERGY STAR qualified in its factory default setting Change to certain features settings and functionality in this product can change the power consumption possibly beyond the limits required for ENERGY STAR qualification Environmental Protection Agency and Department of Energy ENERGY STAR is a joint program of the Government agencies designed to promote energy...

Страница 82: ...itudes o preguntas sobre fuentes abiertas comuníquese con Samsung Open Source http opensource samsung com 15 NOTA IMPORTANTE SOBREEL SERVICIO Las figuras e ilustraciones de este Manual del usuario se facilitan sólo como referencia y pueden diferir del aspecto real del producto ...

Страница 83: ...tual X Nombre del subwoofer PS WB65D Consumo energético 110 127V 50 60Hz méxico sólo Consumo eléctrico 45W méxico sólo Peso 5 1 kg Dimensiones An x Al x Pr 184 0 x 346 0 x 295 0 mm AMPLIFICADOR Potencia nominal de salida 250W NOTAS Samsung Electronics Co Ltd se reserva el derecho a cambiar las especificaciones sin previo aviso Los pesos y dimensiones son aproximados La operación de este equipo est...

Страница 84: ...MSUNG 726 7864 www samsung com latin_en support English NICARAGUA 001 800 5077267 www samsung com latin support Spanish www samsung com latin_en support English PANAMA 800 0101 PUERTO RICO 1 800 682 3180 TRINIDAD TOBAGO 1 800 SAMSUNG 726 7864 VENEZUELA 0 800 100 5303 COLOMBIA Bogotá en el 600 12 72 Sin costo en todo el pais 01 8000 112 112 Y desde tu celular 726 www samsung com co support CHILE 80...

Отзывы: