background image

ENG

48

SETUP

2

1

4

3

In Stop mode,
press MENU
button.

Press Cursor
button to move to
‘Audio’ and then
press ENTER button.

In the Speaker
Setup, press the
ENTER button again.

Press Cursor     ,     , 

,    buttons to move

to the desired
speaker and then
press ENTER button.

For C, LS, and RS, each time the button
is pressed, the mode switches
alternately as follows: SMALL 

➝ 

NONE.

For L and R, the mode is set to SMALL.

47

SMALL : Select this when using the speakers.
NONE : Select this when no speakers are connected.

Depending on PRO LOGIC and STEREO settings, the speaker mode may vary (see page 55).

Note

Signal outputs and frequency responses from the speakers will automatically be adjusted according to your
speaker configuration and whether certain speakers are used or not.

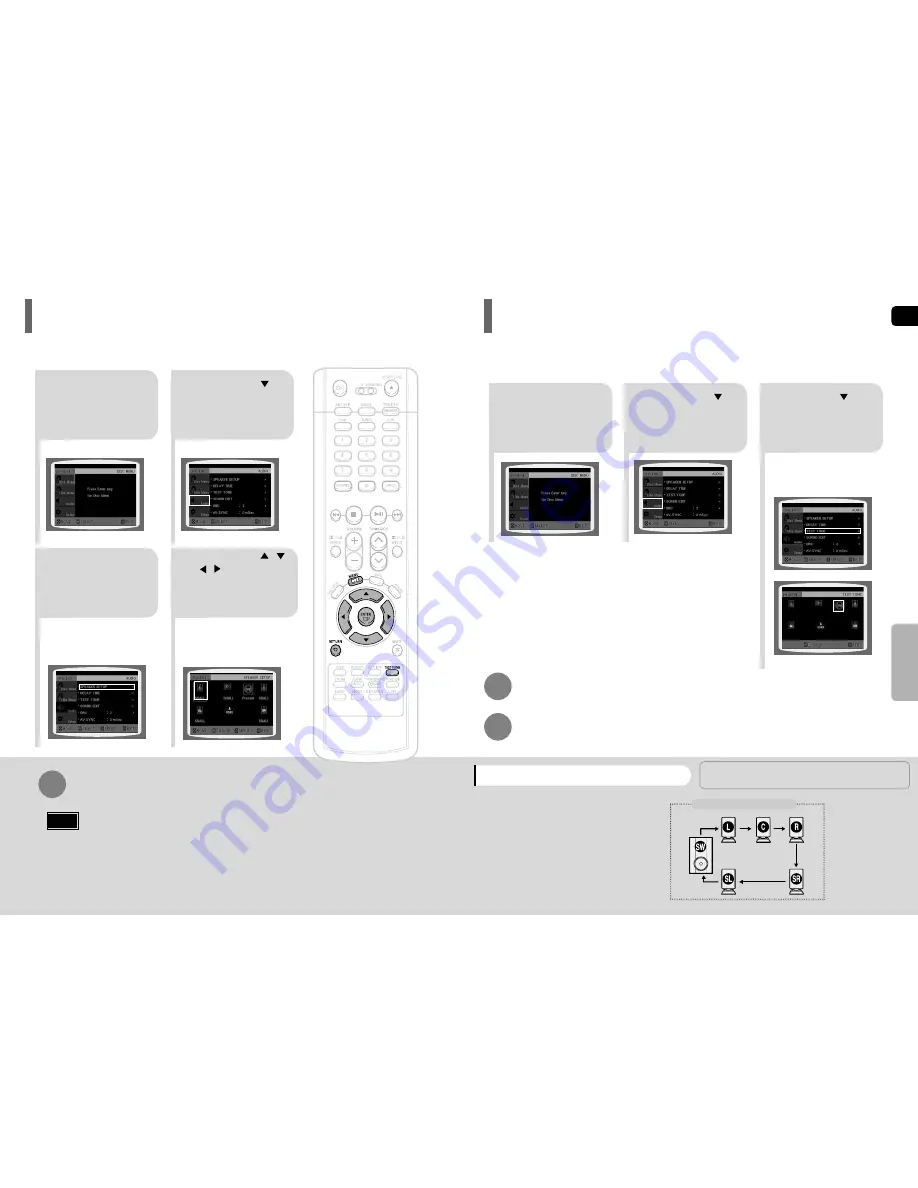
Setting the Speaker Mode

L: Front Speaker (L)

C: Center Speaker

SW: Subwoofer 

R: Front Speaker (R)

LS: Rear Speaker (L)

RS: Rear Speaker (R)

Press RETURN button to return to the previous level.

Press MENU button to exit the setup screen.

2

1

In Stop or no
disc mode,
press MENU
button.

Press Cursor
button to move to
‘Audio’ and then
press ENTER button.

3

Press Cursor      button
to move to ‘TEST
TONE’ and then press
ENTER button.

The test tone will be sent to L 

➝ 

➝ 

RS 

➝ 

LS 

➝ 

SW in order.  

If the ENTER button is pressed again
at this time, the test tone will stop.

To end the test tone, 
press TEST TONE button again.

Press TEST TONE button.

Test tone will be produced as follows:
When playing a DVD or CD, this will work 
only in Stop mode.

Use this function to check that each speaker is
correctly connected and that there is no problem.

Alternate method: press the TEST TONE button on the remote.

Multi-Channel Pro Logic Mode

Start

Use the Test Tone feature to check the speaker connections.

Setting the Test Tone

Содержание HT-P29

Страница 1: ...sc DVD Changer HT P29 Instruction Manual V I D E O COMPACT DIGITAL AUDIO SAMSUNG ELECTRONICS AMERICA INC SERVICE DIVISION 400 Valley Road Suite 201 Mount Arlington NJ 07856 1 800 SAMSUNG 1 800 726 786...

Страница 2: ...the unit Do not expose the unit to direct sunlight or other heat sources This could lead to overheating and malfunction of the unit The batteries used with this product contain chemicals that are harm...

Страница 3: ...WER LINES An outside antenna system should not be located in the vicinity of overhead power lines or other electric light or power circuits or where it can fall into such power lines or circuits When...

Страница 4: ...nnecting External Components 17 Connecting the FM Antenna 18 Before Using Your Home Theater 19 OPERATION Disc Playback 21 Selecting a Disc in the Disc changer 22 MP3 CD Playback 23 To play different f...

Страница 5: ...n both low bit rate and high bit rate e g 32Kbps 320Kbps the sound may skip during playback A maximum of 500 tracks can be played per CD A maximum of 300 folders can be played per CD DVD Digital Versa...

Страница 6: ...tton Stop button Rear Panel FM Antenna Connector External Video Device Input Output Connectors External Audio Device Input Connector 5 1 Channel Speaker Output Terminals Cooling Fan COMPONENT VIDEO OU...

Страница 7: ...rity to and to Use the correct type of batteries Batteries that look similar may differ in voltage Always replace both batteries at the same time Do not expose batteries to heat or flame PL II MODE bu...

Страница 8: ...nter speaker or place them slightly in front of the center speakers Center Speaker It is best to install it at the same height as the front speakers You can also install it directly over or under the...

Страница 9: ...s Progressive Scan FULL FRAME What is Progressive or Non Interlaced Scanning This function works only on TVs equipped with component video inputs Y Pr Pb that support Progressive Video It does not wor...

Страница 10: ...d rise and may damage it Do not obstruct the cooling fan or ventilation holes If the cooling fan or ventilation holes are covered with a newspaper or cloth heat may build up inside the unit and fire m...

Страница 11: ...ections called chapters Numbers are allotted to these sections These numbers are called title numbers and chapter numbers TITLE 1 TITLE 2 CHAPTER 1 CHAPTER 2 CHAPTER 1 CHAPTER 2 CHAPTER 3 Tracks Video...

Страница 12: ...ically selected when Disc Skip is pushed Selecting a Disc in the Disc changer 2 Load a disc Place a disc gently into the tray with the disc s label facing up Depending on the content of the disc the i...

Страница 13: ...ear and playback will start The appearance of the menu depends on the MP3 WMA disc 1 Press the OPEN CLOSE button to open the disc tray and then load the MP3 WMA disc 4 Press the STOP button to stop pl...

Страница 14: ...to the next slide 1 Press the OPEN CLOSE button Choose the appropriate JPEG disc in the tray 2 Playback starts automatically Each time the button is pressed the image makes the transition as follows...

Страница 15: ...reen The information display disappears from the screen CD appears on the TV screen If this symbol appears on the TV screen while buttons are being operated that operation is not possible with the dis...

Страница 16: ...pressed briefly during playback the previous or next chapter track or directory file will be played You cannot skip chapters consecutively TITLE 01 05 CHAPTER 002 040 TITLE 01 05 CHAPTER 004 040 MP3 S...

Страница 17: ...E Repeatedly plays the selected title GROUP Repeatedly plays the selected group RANDOM Plays tracks in random order A track that has already been played may be played again TRACK Repeatedly plays the...

Страница 18: ...utton to move to ANGLE display Press INFO button 1 3 Each time the button is pressed the angle changes as follows 3 Press Cursor or numeric buttons to select the desired angle 2 3 3 3 1 3 1 3 The Angl...

Страница 19: ...mation screen When playing an MP3 or JPEG disc you cannot use to move to a folder To move a folder press Stop and then press DVD CD MP3 JPEG 2 Press Cursor buttons or numeric buttons to select the des...

Страница 20: ...ess Cursor buttons to move to DISC MENU and then press ENTER button 3 Press ENTER button Press Cursor buttons to select the desired item You can use the menus for the audio language subtitle language...

Страница 21: ...he language was set to English OSD will be displayed in English 3 Selecting the Subtitle Language recorded on the disc Selecting the Disc Menu Language recorded on the disc Select Language and then pr...

Страница 22: ...different screen sizes you should adjust the aspect ratio to fit your TV or monitor For a standard TV select either 4 3LB or 4 3PS option according to personal preference Select 16 9 if you have a wi...

Страница 23: ...ENTER button Use this to restrict playback of adult or violent DVDs you do not want children to view Setting Parental Controls Rating Level 4 Enter the old password a new password and confirm new pas...

Страница 24: ...ess MENU button to exit the setup screen 45 DVD JPEG Select this to set the Samsung Logo image as your wallpaper Select this to set the desired image as your wallpaper COPY LOGO DATA will be displayed...

Страница 25: ...r Mode L Front Speaker L C Center Speaker SW Subwoofer R Front Speaker R LS Rear Speaker L RS Rear Speaker R Press RETURN button to return to the previous level Press MENU button to exit the setup scr...

Страница 26: ...EAKER Dc The distance from CENTER SPEAKER Ds The distance from SURROUND SPEAKER Ideal CENTER SPEAKER placement It is desirable to place all speakers within this circle Ideal SURROUND SPEAKER placement...

Страница 27: ...Adjusting Front Rear Speaker Balance You can select between 00 and 06 and OFF The volume decreases as you move closer to 6 Adjusting Center Rear Subwoofer Speaker Level The volume level can be adjuste...

Страница 28: ...ow volume at night Setting the DRC Dynamic Range Compression Video may look slower than the audio if it is connected to a digital TV If this occurs adjust the audio delay time to to match the video AV...

Страница 29: ...Press PL II EFFECT button to select Dimension then press the Cursor buttons to select the desired setting Note SETUP This function works only in Dolby Pro Logic MUSIC mode Dolby Pro Logic II Effect 55...

Страница 30: ...and then press button to select the preset station AutomaticTuning1 Press the Function button to select the FM Press the STOP button to select MANUAL and then press and hold button to automatically se...

Страница 31: ...Timer Function You can set the time that the Home Theater will shut itself off Convenient Functions MUTE flash in the display To switch the sound back on at the same volume as before press MUTE again...

Страница 32: ...ss POWER If the TV turns off or on the setting is complete TV DVDRECEIVER Note 1 2 3 4 5 6 7 8 9 10 11 12 13 14 15 16 17 18 19 20 21 22 23 24 25 26 27 28 29 SAMSUNG ANAM DAEWOO LG HITACHI JVC SHARP SO...

Страница 33: ...he region number of the DVD DVD discs purchased from abroad may not be playable CD ROMs and DVD ROMs cannot be played on this Home Theater Make sure that the rating level is correct Are you using a de...

Страница 34: ...nada 1483 Romanian 1564 Urdu 1149 Spanish 1301 Korean 1489 Russian 1572 Uzbek 1150 Estonian 1305 Kashmiri 1491 Kinyarwanda 1581 Vietnamese 1151 Basque 1307 Kurdish 1495 Sanskrit 1587 Volapuk 1157 Pers...

Страница 35: ...adjustments and failure to follow operating instructions cleaning maintenance and environmental instructions that are covered and prescribed in the instruction book product removal or reinstallation r...

Отзывы: