background image

4

 - English


Contents

GETTING STARTED

5

 Accessories

5

 Speaker 

Components

6

 Front 

Panel

7

 Rear 

Panel

8

 Remote 

Control

CONNECTIONS

9


Connecting the Speakers

12

  Attaching the Toroidal Ferrite Core to the Power 

Cord of the Wireless Receiver Module (SWA-
6000)

13

  Connecting to a TV and External Devices

14

  Connecting to a Network Router

SETTINGS

15

  The Initial Settings Procedure

16

  The Home Screen at a Glance

16

  Accessing the Settings Screen

17

  Settings Menu Functions

20

 Network 

Setup

23

 Wi-Fi 

Direct

24

 Upgrading 

Software

25

  Setting Up DLNA

PLAYING CONTENT

26

  Switching the Source Device

26

  Playing Commercial Discs

26

  Playing a Disc with User Recorded Content

27

  Playing Files on a USB Device 

28

  Controlling Video Playback

29

  Playing a Pre-Recorded Commercial Audio Disc

30

  Controlling Music Playback

31

  Playing Photo Contents

32

  Listening to the Radio

32

 Using 

Karaoke

33

 Using 

Bluetooth

35

  Using the Special Effects Remote Control 

Buttons

NETWORK SERVICES

37

 Using 

BD-LIVE™

37

 Using 

DLNA

37

 Apps

38

  Using Opera TV Store

39

 Screen 

Mirroring

APPENDIX

40

 Additional 

Information

41

  Disk and Format Compatibility

46

 Troubleshooting

49

 Specifications

51

 Licences

HT-H5500K_50K_50WK-ZK_0328.indd   4

HT-H5500K_50K_50WK-ZK_0328.indd   4

2014-03-28     5:22:50

2014-03-28     5:22:50

Содержание HT-H5500K

Страница 1: ... receive more complete service please register your product at www samsung com register 5 1CH Blu ray Home Entertainment System user manual HT H5500K HT H5550K HT H5550WK HT H5500K_50K_50WK ZK_0328 indd 1 HT H5500K_50K_50WK ZK_0328 indd 1 2014 03 28 5 22 32 2014 03 28 5 22 32 ...

Страница 2: ...ing the power cord from a wall outlet always pull on the power cord s plug Never unplug by pulling on the power cord Do not touch the power cord with wet hands If this apparatus does not operate normally in particular if there are any unusual sounds or smells coming from it unplug it immediately and contact an authorized dealer or service centre Maintenance of Cabinet Before connecting other compo...

Страница 3: ... viewers may experience discomfort while viewing 3D TV such as dizziness nausea and headaches If you experience any such symptom stop viewing 3D TV remove the 3D Active Glasses and rest Watching 3D images for an extended period of time may cause eye strain If you feel eye strain stop viewing 3D TV remove your 3D Active Glasses and rest A responsible adult should frequently check on children who ar...

Страница 4: ...p DLNA PLAYING CONTENT 26 Switching the Source Device 26 Playing Commercial Discs 26 Playing a Disc with User Recorded Content 27 Playing Files on a USB Device 28 Controlling Video Playback 29 Playing a Pre Recorded Commercial Audio Disc 30 Controlling Music Playback 31 Playing Photo Contents 32 Listening to the Radio 32 Using Karaoke 33 Using Bluetooth 35 Using the Special Effects Remote Control ...

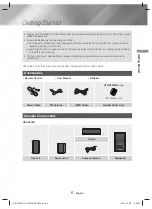
Страница 5: ... the product i e where you have failed to read this user manual The amount of such administration charge will be advised to you before any work or home visit is carried out Check the box for the accessories and speaker components listed or shown below Accessories Remote Control User Manual Batteries HT H5550WK only For Power cord Power Cable FM Antenna HDMI Cable Toroidal Ferrite Core Speaker Comp...

Страница 6: ...SOR DISPLAY DISC TRAY NFC When the product is on do not let children touch the product s surface It will be hot To upgrade the product s software through the USB jack you must use a USB flash drive When the product displays the Blu ray Disc menu you cannot start the movie by pressing the 6 button on the product or the remote To play the movie you must select Play Movie or Start in the disc menu an...

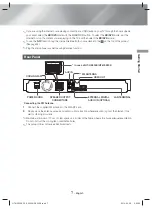
Страница 7: ...URROUND SURROUND COOLING FAN FM ANTENNA AUX IN HDMI OUT SPEAKER OUTPUT CONNECTORS POWER CORD LAN TERMINAL EXTERNAL DIGITAL AUDIO IN OPTICAL In case of HT H5500K HT H5550K Connecting the FM Antenna 1 Connect the supplied FM antenna to the FM ANT Jack 2 Slowly move the antenna wire around until you find a location where reception is good then fasten it to a wall or other rigid surface Maintain a min...

Страница 8: ...ou to repeat a title chapter track or disc Use to enter the Popup menu Title menu Select MONO or STEREO for radio broadcasts Search for active FM stations and to change channels Use to display the playback information when playing a Blu ray DVD disc or files To open and close the disc tray Press to exit the menu Press to select Home Cinema s mode BD DVD D IN AUX etc Use to set a preset radio frequ...

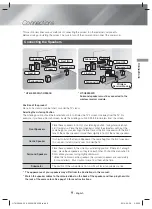
Страница 9: ...hat their tweeters will be at the same height as your ear Align the front face of the front speakers with the front face of the centre speaker or place them slightly in front of the centre speakers Centre Speaker It is best to install the Centre Speaker at the same height as the front speakers You can also install it directly over or under the TV Surround Speakers Place these speakers to the side ...

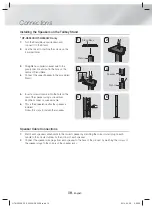
Страница 10: ...using a screwdriver And then connect a speaker cable 6 This is the appearance after the speaker is installed Follow this steps to install other speaker 2 4 1 3 Stand Base Stand Speaker Stand 5 6 Speaker Cable Connections 1 Match each speaker cable bundle to the correct speaker by matching the colour coded plug on each bundle to the coloured sticker on the bottom of each speaker 2 Connect the speak...

Страница 11: ...ou place a speaker near your TV set the screen colour may be distorted because of the magnetic field Place the wireless receiver module at the rear of the listening position If the wireless receiver module is too close to the product sound from the speakers may be disrupted because of interference If you use a device such as a microwave oven wireless LAN Card Bluetooth device or any other device t...

Страница 12: ...sure that the polarity is correct Keep the subwoofer speaker out of reach of children to prevent children from inserting their hands or alien substances into the duct hole of the subwoofer speaker Do not hang the subwoofer on the wall using the duct hole The wireless receiving antenna is built into the wireless receiver module Keep it away from water and moisture For optimal listening performance ...

Страница 13: ...o cable not supplied connect the AUDIO IN jack on the product to the AUDIO OUT jack on the external analogue component Select the AUX mode Be sure to match the colours on the cable plugs to the colours on the input and output jacks Method 2 OPTICAL Connecting an External Digital Audio Component Use to connect the digital audio output of digital signal components such as Cable Boxes and Satellite R...

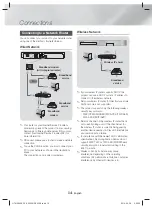
Страница 14: ... product can use a DHCP or static IP address to connect to the wireless network Set your wireless IP router to Infrastructure mode Ad hoc mode is not supported The product supports only the following wireless security key protocols WEP OPEN SHARED WPA PSK TKIP AES WPA2 PSK TKIP AES Select a channel on the wireless IP router that is not currently being used If the channel set for the wireless IP ro...

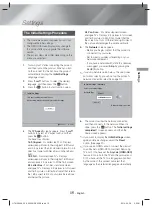
Страница 15: ...ct ratio but puts black bars above and below the picture 4 3 Pan Scan For older standard screen analogue TVs Displays 4 3 pictures in full screen and 16 9 pictures in Pan Scan format that fills the screen but cuts off the left and right sides of the picture and enlarges the middle vertically 5 The Network screen appears Before you begin confirm that the product is connected to your router Set to w...

Страница 16: ...N button and the main unit s button for mode switching 9 Settings Set various functions to suit your personal preferences To play or view video photo music files located on your PC you must connect your home cinema and PC to a home network and you must download install and configure the DLNA software on your PC See page 25 Accessing the Settings Screen 1 Select Settings on the Home screen and then...

Страница 17: ...ttached to the product The product will automatically adjust the 3D output to the screen size of the TV Carefully read the health and safety information before viewing 3D content See page 3 TV Aspect Ratio Lets you adjust the output of the product to the screen size of your TV See page 40 BD Wise BD Wise is Samsung s latest inter connectivity feature When you connect a Samsung product and a Samsun...

Страница 18: ...Return Channel Lets you direct the sound from the TV to the Home Cinema speakers Requires an HDMI connection and an Audio Return Channel ARC compatible TV If Audio Return Channel is set to on and you are using an HDMI cable to connect the product to the TV digital optical input will not work If Audio Return Channel is set to Auto and you are using an HDMI cable to connect the product to the TV ARC...

Страница 19: ...t BD Live Internet Connection Lets you allow or prohibit an Internet connection for the BD Live service System Initial Settings Lets you re run the Initial Settings procedure See page 15 Quick start You can turn on the power quickly by decreasing the boot time If this function is set to On Standby power consumption will be increased About 12W 20W Anynet HDMI CEC Anynet is a convenient function tha...

Страница 20: ...nnection To begin configuring your network connection follow these steps 1 In the Home screen select Settings and then press the E button 2 Select Network and then press the E button 3 Select Network Settings and then press the E button 4 Go to the instructions for Wired networks starting below or the instructions for Wireless networks See page 21 Wired Network Wired Automatic After following Step...

Страница 21: ...es select Return and then press the E button The home cinema verifies the network connection and then connects to the network Wireless Network You can set up a wireless network connection in three ways Wireless Automatic Wireless Manual WPS PBC Before you configure the wireless network connection disconnect any wireless network devices currently connected to the product or if applicable the produc...

Страница 22: ...When finished select Done and then press the E button The product searches for the network 6 The Network connection fail screen appears Use buttons to select IP Settings and then press the E button 7 Select the IP setting field and then set it to Enter manually 8 Select a network parameter to enter IP Address for example and then press E button Use the number keypad on your remote control to enter...

Страница 23: ...end that you turn off the Wi Fi Direct function on any device in which it is currently on 1 Turn on the Wi Fi Direct device and activate its Wi Fi Direct function 2 In the Home screen select Settings and then press the E button 3 Select Network and then press the E button 4 Select Wi Fi Direct and then press the E button The Wi Fi Direct devices that you can connect to appear Settings Display Audi...

Страница 24: ...3 Select Software Upgrade and then press the E button 4 Select one of the following methods By Online By USB Auto Upgrade Notification 5 Press the E button Directions for each method begin below If you want to cancel the upgrade while the upgrade software is downloading press the E button By Online Your product must be connected to the Internet to use the By Online function Remove all discs before...

Страница 25: ...les you to play music video and photo files located in your PC using this product To use DLNA you must connect the product to your PC via the network See page 14 and install the SAMSUNG PC Share Manager on the PC To Download the DLNA Software To use DLNA with your PC you must install DLNA software on your PC You can download the PC software and get detailed instructions for using DLNA from the Sam...

Страница 26: ...the disc tray 2 Place a disc gently into the disc tray with the disc s label facing up 3 Press the button to close the disc tray Playback starts automatically 4 If playback does not start automatically press the 6 button on the remote Disc Storage Management Holding Discs Fingerprints or scratches on a disc may reduce sound and picture quality or cause skipping Avoid touching the surface of a disc...

Страница 27: ...od 2 2 Use the buttons to select Photos Videos or Music and then press the E button Depending on how the contents are arranged you will see either folders individual files or both 3 If necessary use the buttons to select a folder and then press the E button 4 Select a file to view or play and then press the E button 5 Press the RETURN button to exit a folder or the EXIT button to return to the Hom...

Страница 28: ...C MENU During playback press this button to display the Disc menu TITLE MENU During playback press this button to display the Title menu If your disc has a playlist press the GREEN B button to go to the playlist POPUP MENU During playback press this button to display the Popup menu 3 Repeat Playback 1 During playback press the REPEAT button on the remote control 2 Press the buttons to select Off T...

Страница 29: ... Lets you set the desired subtitle language Angle To view a scene from another angle The Angle option displays the number of angles available to view 1 1 1 2 1 3 etc BONUSVIEW Video BONUSVIEW Audio Lets you set the desired Bonusview option Menu selections that appear only while a file plays Full Screen Lets you set the desired full screen size You can select Original Mode1 larger and Mode2 largest...

Страница 30: ...k speed will change 5 7 button Pauses a track 6 6 button Plays the currently selected track Repeating Tracks You can set the product to repeat tracks 1 During music playback press the TOOLS button 2 Use button to select Off Track or One All or Shuffle in Repeat Mode and then press the E button Creating a Music Playlist 1 If playing music from a commercial CD or DVD press the 5 or RETURN button The...

Страница 31: ...ot disconnect the device while ripping is in progress 8 If you want to cancel ripping press the E button and then select Yes Select No to continue ripping 9 When ripping is complete the Ripping completed message appears 10 Press the E button to go back to the Playback screen This function is not available for DTS Audio CDs This function may not be supported by some discs Ripping encodes music in t...

Страница 32: ...poor reception area select MONO for a clear interference free broadcast Presetting Stations Example Presetting FM 89 10 into memory 1 Press the FUNCTION button to select FM 2 Press the TUNING UP DOWN button to select 89 10 3 Press the TUNER MEMORY button NUMBER flashes on the display 4 Press the TUNER MEMORY button again Press the TUNER MEMORY button before NUMBER disappears from the display on it...

Страница 33: ...ncy band devices including medical equipment microwave ovens and wireless LANs Pair the Home Cinema with the Bluetooth device while the two are close together The further the distance is between the Home Cinema and the Bluetooth device the worse the quality is If the distance exceeds the Bluetooth operational range the connection is lost In poor reception sensitivity areas the Bluetooth connection...

Страница 34: ...ome Cinema Except when you disconnect the Home Cinema by changing functions the connected Bluetooth device will wait a certain time for a response from the Home Cinema before terminating the connection Disconnection time may differ depending on the Bluetooth device In Bluetooth connection mode the Bluetooth connection will be lost if the distance between the Home Cinema System and the Bluetooth de...

Страница 35: ... before making the connection If your smart phone is covered with a thick case the connection may not succeed NFC connection works even when the Home Cinema is turned off if Quick start is set to On However NFC connection will work only after the Home Cinema is turned on if the power cord had been disconnected and reconnected The is a trademark or registered trademark of NFC Forum Inc in the Unite...

Страница 36: ...joy various sound mode DSPOFF Select for normal listening CINEMA Reproduces realistic and powerful sound for movie sources MUSIC Suitable for whole music sources GAME Suited for playing video games and produces powerful sound M STEREO Multi Stereo Produces surround sound for 2 channel input sources POWER BASS Reinforce bass sound effect LOUD Improves bass sound characteristics according to output ...

Страница 37: ... Music and then press E 6 Use the button to select the folder with the kind of files you selected and then press E The File List is displayed 7 Select the file you want to view or play and then press E You can create Playlists from files on your PC in the same way you create playlists from files on USB devices and discs With a few exceptions you can control the playback of files on your PC in the ...

Страница 38: ...ll Apps press the 5 button for 5 seconds or more Using Opera TV Store At the Opera TV Store you will find high quality Internet video streaming social network and music streaming services Accessing Opera TV Store To access Opera TV Store select the Opera TV Store button on the Home screen and then press the E button To exit the Opera TV Store screen press the EXIT or RETURN button on your remote N...

Страница 39: ...e the buttons to select Screen Mirroring and then press E 2 Launch AllShare Cast on your smart phone or device 3 On your device find the name of the home cinema system in the list of available devices and then select it 4 The TV displays a connecting message for example Connecting to Android_92gb and then displays the connected message 5 In a few moments the screen of your device appears on the TV...

Страница 40: ... just loud noise If the HDMI device AV receiver TV is not compatible with compressed formats Dolby Digital DTS the audio signal outputs as PCM Regular DVDs do not have BONUSVIEW audio and Navigation Sound Effects Some Blu ray Discs do not have BONUSVIEW audio and Navigation Sound Effects This Digital Output setup does not affect the analogue L R audio or HDMI audio output to your TV It affects the...

Страница 41: ...SVIEW mode will also appear if the Blu ray Disc has a BONUSVIEW section This function changes both the primary and secondary subtitles at the same time The total number of primary and secondary subtitles respectively is displayed Playing JPEG files You can t enlarge the subtitle and PG graphics in the full screen mode Playing Content Using the TOOLS button while playing pictures If the home cinema...

Страница 42: ... cannot guarantee that this product will play every disc bearing the Blu ray Disc DVD or CD logo because disc formats evolve and problems and errors may occur during the creation of Blu ray Disc DVD and CD software and or the manufacture of discs Please contact the SAMSUNG Customer Care Centre at if you have questions or encounter difficulty when playing Blu ray Disc DVD or CD discs in this produc...

Страница 43: ... USB connection Your product supports USB storage media MP3 players digital cameras and USB card readers The product does not support folder or file names longer than 128 characters Some USB digital camera devices may not be compatible with the product Your product supports the FAT 16 FAT 32 and NTFS file systems Connect USB devices directly to the product s USB port Connecting through a USB cable...

Страница 44: ... The Seek skip function is not available if the file s index table is damaged Video decoder Supports up to H 264 Level 4 1 and AVCHD Does not support H 264 FMO ASO RS and VC1 SP MP AP L4 MPEG4 SP ASP Below 1280 x 720 60 frames max Above 1280 x 720 30 frames max Does not support GMC 2 or higher Audio decoder Supports WMA 7 8 9 and STD Does not support WMA sampling rate of 22050Hz mono AAC Max sampl...

Страница 45: ...puts only the main feature audio stream so that your AV receiver can decode the audio bitstream You will not hear BONUSVIEW audio or Navigation Sound Effects Decodes the main feature audio and BONUSVIEW audio stream together into PCM audio and adds Navigation Sound Effects then re encodes the PCM audio into DTS bitstream Decodes the main feature audio and BONUSVIEW audio stream together into PCM a...

Страница 46: ...t Turn off the power and then turn it back on Playback does not start Check the region number of the Blu ray DVD disc Blu ray DVD disc purchased from abroad may not be playable CD ROMs and DVD ROMs cannot be played on this product Make sure that the rating level is correct Playback does not start immediately when you press the 6 7 button Are you using a deformed disc or a disc with scratches on th...

Страница 47: ...9 Blu ray DVD discs in 16 9 Full mode 4 3 Letter Box mode or 4 3 Pan Scan mode but 4 3 Blu ray DVD discs are played in 4 3 mode only Refer to the Blu ray Disc jacket and then select the appropriate function The product is not working Example The power goes off or you hear a strange noise The Product is not working normally Press and hold the remote control s 5 button for 5 seconds in STANDBY mode ...

Страница 48: ...ay other kinds of files Video plays intermittently Check if the network is stable Check if the network cable is properly connected and if the network is overloaded The DLNA connection between the TV and PC is unstable IP addresses under the same subnetwork should be unique otherwise IP collision can cause an unstable connection Check if you have a firewall enabled If so disable the firewall functi...

Страница 49: ...ound speaker output 165W x 2 3 Subwoofer speaker output 170W 3 Frequency response Analogue input 20Hz 20kHz 3dB Digital input 20Hz 40kHz 4dB S N Ratio 70dB Channel separation 60dB Input sensitivity AUX 500mV Speaker Speaker system 5 1ch speaker system Front Surround Centre Subwoofer Impedance 3 3 3 3 Frequency range 200Hz 20kHz 200Hz 20kHz 200Hz 20kHz 50Hz 200Hz Output sound pressure level 84dB W ...

Страница 50: ...low 10Mbps are not supported Samsung Electronics Co Ltd reserves the right to change the specifications without notice Weight and dimensions are approximate Design and specifications are subject to change without prior notice For the power supply and Power Consumption refer to the label attached to the product SWA 6000 HT H5550WK only Weight 1 1 kg Dimensions W x H x D 76 2 x 228 6 x 152 4 mm Oper...

Страница 51: ...tered trademarks of HDMI Licensing LLC in the United States and other countries Oracle and Java are registered trademarks of Oracle and or its affiliates Other names may be trademarks of their respective owners This item incorporates copy protection technology that is protected by U S patents and other intellectual property rights of Rovi Corporation Reverse engineering and disassembly are prohibi...

Страница 52: ...5550WK 使用說明書 ᇄགሯሷ ᇄሢభถ ঢቝิ৪ ྯቩ ޘ ອă Ꮇሱ ৎଝཝෂࡼॲᇗLj ࡵጲሆᆀᐶᓖ ݿ ิࡼ ޘ ອ www samsung com register 5 1 聲道 Blu ray 家庭 娛樂系統 HT H5500K_50K_50WK ZK_T_C_0411 indd 1 HT H5500K_50K_50WK ZK_T_C_0411 indd 1 2014 04 11 5 26 53 2014 04 11 5 26 53 ...

Страница 53: ...部 只應該由有資格的技術人員打開本裝置 插入電源插頭時 請確保它已牢固地插入到 位 從牆上插座拔下電源插頭時 要捏住電 源插頭將其拔出 千萬不要拉電源線來拔出 電源插頭 不要用濕手觸摸電源線 如果本裝置工作不正常 尤其是在它發出 異常的聲音或異味時 請立即拔下電源插 頭並與授權經銷商或服務中心聯絡 外殼維護 在將其他組件連接到本產品前 請確保 將它們關閉 如果您突然將產品從很冷的地方搬到很暖和 的地方 則可能會在操作部件和鏡頭上產生 冷凝 從而導致光碟播放異常 如果發生這 種情況 請拔下播放機的電源插頭 等待兩 個小時 然後再將插頭連接至電源插座 然後再次插入光碟並嘗試播放 如果產品將長時間不使用或您要長時間出 門 請從電源插座拔下產品的電源插頭 尤其是兒童 老人或行動不便的人將獨自 留在家中時 灰塵堆積會使得電源線冒火花 發熱或 絕緣效能下降 從而可能導致觸電 漏 電或引發火災 如果您要...

Страница 54: ...D 電 視 摘下 3D 有源眼鏡並休息 成人應負責經常檢查使用 3D 功能的兒童 如果報告有任何眼睛疲勞 頭疼 頭暈或噁 心 讓孩子停止觀看 3D 電視並休息 請勿將 3D 有源眼鏡用於其他用途 例如 一般眼鏡 太陽鏡 護目鏡等 步行或走動時請勿使用 3D 功能或 3D 有 源眼鏡 否則可能導致您碰到物品 絆倒 和 或跌倒 並造成嚴重的人身傷害 如果要欣賞 3D 內容 請使用高速 HDMI 纜線將 3D 裝置 相容於 3D 的影音接收器 或電視機 連接到產品的 HDMI OUT HDMI 輸出 埠 在播放 3D 內容之前先戴上 3D 有源眼鏡 本產品只透過連接到 HDMI OUT HDMI 輸 出 埠的 HDMI 纜線輸出 3D 信號 在 3D 播放模式中的視頻解析度固定為原 始 3D 視頻的解析度 不能變更解析度 有些功能 例如 BD Wise 螢幕大小調整 和解像度調整 在 3D 播放...

Страница 55: ...5 設定 DLNA 播放內容 26 切換來源裝置 26 播放商業光碟 26 播放帶有使用者燒錄內容的光碟 27 播放 USB 裝置上的檔案 28 控制視訊播放 29 播放預先錄製的商業音頻光碟 30 控制音樂播放 31 播放相片內容 32 收聽廣播 32 使用卡拉 OK 33 使用藍芽 35 使用特效遙控器鍵 網絡服務 37 使用 BD LIVE 37 使用 DLNA 37 應用程式 38 使用 Opera TV Store 39 Screen Mirroring 畫面鏡像 附錄 40 其他資訊 41 光碟和格式相容性 46 故障排除 49 規格 51 授權 HT H5500K_50K_50WK ZK_T_C_0411 indd 4 HT H5500K_50K_50WK ZK_T_C_0411 indd 4 2014 04 11 5 27 13 2014 04 11 5 27 13 ...

Страница 56: ...但產品沒有缺陷 即您未能仔細閱讀本使用說明書 在進行任何工作或到府之前 我們將告知您這類管理費的金額 檢查包裝箱中是否包含下面列出或顯示的配件和揚聲器元件 附件 遙控器 使用說明書 電池 僅適用於 HT H5550WK 用於電源線 電源線 FM 天線 HDMI 纜線 環狀鐵氧體磁芯 音箱組件 HT H5500K 中置音箱 前置 x 2 環繞音箱 x 2 音箱纜線 x 6 重低音音箱 使用入門 HT H5500K_50K_50WK ZK_T_C_0411 indd 5 HT H5500K_50K_50WK ZK_T_C_0411 indd 5 2014 04 11 5 27 15 2014 04 11 5 27 15 ...

Страница 57: ...停止鍵 播放 暫停鍵 開啟 關閉鍵 音量控制鍵 電源鍵 5V 0 5A MIC 2 MIC 1 USB 咪高風 遙控器感測器 遙控器感測器 光碟托架 NFC 裝置工作時 請小心不要讓兒童觸摸產品表面 表面會很熱 要透過 USB 接口升級產品的軟件 必須使用 USB 快閃裝置 產品顯示 Blu ray 光碟功能表時 您無法透過按產品或遙控器上的 6 鍵播放影片 要 播放影片 必須在光碟功能表中選擇 Play Movie 播放影片 或 Start 開始 然後按 E 鍵 HT H5500K_50K_50WK ZK_T_C_0411 indd 6 HT H5500K_50K_50WK ZK_T_C_0411 indd 6 2014 04 11 5 27 22 2014 04 11 5 27 22 ...

Страница 58: ...使用卡拉 OK 功能之前插入咪高風插孔 背面板 SURROUND SURROUND 冷卻風扇 FM 天線 外部模擬音頻輸入 HDMI 輸出 音箱輸出介面 電源線 LAN 接線端 外部數位音訊 輸入 光學 對於 HT H5500K HT H5550K 連接 FM 天線 1 將提供的 FM 天線連接到 FM ANT插孔 2 在周圍緩慢移動天線 直至找到接收良好的位置 然後將其固定在牆上或其他固定表面 上 在家庭影院的所有邊緣至少保留 10 厘米的通暢空間 以確保適當的通風 請勿堵塞冷卻 風扇或通風孔 本產品無法接收 AM 廣播 HT H5500K_50K_50WK ZK_T_C_0411 indd 7 HT H5500K_50K_50WK ZK_T_C_0411 indd 7 2014 04 11 5 27 31 2014 04 11 5 27 31 ...

Страница 59: ...題功能表 選擇廣播的 MONO 單聲道 或 STEREO 立體聲 搜尋活動的 FM 電台以及變 更頻道 用來在播放 Blu ray DVD 光 碟或檔案期間顯示播放資 訊 打開和關閉光碟托架 按該鍵可退出功能表 按下可選取家庭影院的模 式 BD DVD D IN AUX 等 用於設定預設收音機頻率 TOOLS RETURN EXIT INFO KARAOKE HOME REPEAT 1 2 3 7 8 9 DISC MENU TITLE MENU 0 POPUP 4 5 6 MUTE MO ST TUNER MEMORY DPS EQ TV SOUND A B C D TUNING DOWN UP VOLUME FUNCTION 遙控器按鍵說明 確保電池的 和 端與電池盒內的圖示對 應 如果是正常使用電視機 電池可以使用大約一年 遙控器可在距離產品最遠約 7 米的直線範圍內使 用 電池規格...

Страница 60: ...幕保持 2 92 到 3 50 米的距離 前置音箱 將這些音箱放在聆聽位置的前方 約以 45 角朝向您 放置前置音箱 時 高音喇叭應與您的耳朵在同一高度 將前置音箱的正面與中置音箱 的正面對齊 或將其放在比中置音箱稍靠前的位置 中置音箱 最好將中置音箱裝在與前置音箱相同高度的位置 亦可將其直接裝於電 視機上方或下方 環繞音箱 將這些音箱放在聆聽位置的一側 如果沒有足夠的空間 請將這兩個音 箱面對面放置 將其放在離您耳朵上面 60 到 90 公分的位置 音箱面 向下略為傾斜 與前置和中置音箱不同的是 環繞音箱主要用於音效 而不會始終發 出聲音 重低音音箱 拶 検検䳚䞭 傗㶻㠲 㥥䞭媪㵫盨 柑 㙧傗Ѧ 揚聲器的外觀可能與本手冊中的插圖不相同 使揚聲器纜線與揚聲器背面的彩色標籤相符 然後將它們插入顏色相同的插孔中 如需詳細說明 請參閱第 10 頁 連接 HT H5500K_50K_50WK ZK...

Страница 61: ...孔中 4 將上音箱連接到組裝好的支架 5 使用螺絲刀將螺釘順時針插入到音箱背 面的孔中 然後連接音箱纜線 6 這是該音箱安裝後的外觀 按照此步驟 安裝其他音箱 揚聲器纜線連接 1 將每個線束上色彩編碼的插頭與每個音箱底部的彩色貼紙對應 使每個音箱線束與正確 的音箱相符 2 將每個音箱的音箱纜線插頭連接到本產品的背面 音箱插頭的色彩要與音箱插孔的色彩 一致 2 4 1 3 支架基座 支架 音箱 支架 5 6 HT H5500K_50K_50WK ZK_T_C_0411 indd 10 HT H5500K_50K_50WK ZK_T_C_0411 indd 10 2014 04 11 5 27 41 2014 04 11 5 27 41 ...

Страница 62: ...音箱 右 無線接收器模組 環繞音箱 左 環繞音箱 右 本產品僅可與 SWA 6000 連接 重低音音箱 中置音箱 前置音箱 左 如果將音箱放在電視機附近 螢幕色彩可能會因磁場干擾而失真 將無線接收器模組放在聆聽方位的後面 如果無線接收器模組過於接近本產品 音箱發 出的聲音可能會由於干擾而中斷 如果在本產品附近使用如微波爐 無線 LAN 卡 藍芽設備等裝置或採用 2 4 5 8GHz 頻 率的任何其他裝置 則音箱發出的聲音可能會由於干擾而中斷 HT H5500K_50K_50WK ZK_T_C_0411 indd 11 HT H5500K_50K_50WK ZK_T_C_0411 indd 11 2014 04 11 5 27 46 2014 04 11 5 27 46 ...

Страница 63: ...耍 以免由於音箱翻倒而造成傷害 將音箱纜線連接到音箱時 請確保極性 正確連接 請將重低音音箱放在兒童無法觸及的位置 以免他們把手或其他異物插入其導聲管 音孔 請勿透過導聲管 音孔 將重低音音箱掛在牆上 無線接收天線內建於無線接收器模組中 請遠離水源和潮濕的地方 為獲得最佳收聽效果 請確保無線接收器模組周圍沒有任何障礙物 在 2 聲道模式下 聽不到無線環繞音箱發出聲音 將環狀鐵氧體磁芯附加至無線接收器模組 SWA 6000 的電源線 僅適用於 HT H5550WK 如果您將環狀鐵氧體磁芯附加至無線接收器模組的電源線 它將有助於防止來自無線電訊號 的 RF 干擾 1 拉環狀鐵氧體磁芯的固定卡舌將其打開 2 將無線接收器模組的電源線繞兩個圈 3 如右邊的圖所示 將環狀鐵氧體磁芯附加至無線接收器 模組電源線 然後用力按環狀鐵氧體磁芯 直至它發出 卡塔 聲 附加鐵氧體磁芯的位置應儘可能靠近無線接收器...

Страница 64: ...裝置連接至家庭影院的兩種方法 方法 1 AUX IN 外部模擬音頻輸入 連接外部模擬設備 使用 RCA 音訊纜線 未提供 從本產品的 AUDIO IN 插孔連接到外部模擬設備上的 AUDIO OUT 插孔 選擇 AUX 模式 確保纜線插頭的色彩與輸入及輸出插孔的色彩一致 方法 2 OPTICAL 光學 連接外部數位音訊設備 用來連接電纜轉台器和衛星等數碼訊號元件的數碼音頻輸出 接收器 機頂盒 使用數碼光學纜線 未提供 將產品上的 OPTICAL DIGITAL AUDIO IN 插 孔連接至外接數碼裝置的 數碼光學輸出 插孔 選擇 D IN 模式 要觀看來自分線盒 衛星接收器的視訊 必須將其視訊輸出直接連接到您的電視機 本系統支援外部數位設備 32 kHz 或更高的數位採樣率 本系統僅支援 DTS 和 Dolby Digital 音訊 不支援 MPEG 音訊 一種位元串流格式 HT H55...

Страница 65: ... 本產品 可以使用 DHCP 或靜態 IP 地址連線到無 線網絡 將無線 IP 路由器設定為 Infrastructure 基 礎架構 模式 不支援 Ad hoc 專用 模 式 本產品僅支援下列無線安全金鑰通訊協 定 WEP OPEN SHARED WPA PSK TKIP AES WPA2 PSK TKIP AES 選擇目前未使用的無線 IP 路由器上的通 道 如果為無線 IP 路由器設定的通道正為附 近其他裝置所用 將會產生干擾和通訊 故障 遵照最新的 Wi Fi 認證規格 三星家庭影 院不支援在 802 11n 模式下執行的網絡 中使用 WEP TKIP 或 TKIP AES WPS2 混合 安全加密 無線 LAN 本身可能會引起干擾 具體取 決於操作條件 AP 效能 距離 障礙 其他無線電裝置的干擾等 HT H5500K_50K_50WK ZK_T_C_0411 indd 14 H...

Страница 66: ...9 圖像 以信箱格式顯示 保留 16 9 縱橫比 但是在圖像上下方放 置黑條 4 3 全景 適用於較舊的標準螢幕類比電 視 對於 4 3 圖像 以全螢幕顯示 對 於 16 9 圖像 以平移 掃描格式顯示 填滿螢幕 但是剪掉圖像的左右兩側並 垂直放大中間部分 5 網絡 畫面將會出現 在開始之前 請確認本產品已連接至 路由器 根據您的網絡環境 設為有線或無 線 如果您具有使用靜態 IP 位址的網絡 建議您按藍色 D 按鈕選取 跳過 如果您在這裡跳過網絡設定 或是網絡 設定無法正常工作 您可以在稍後設定 產品的網絡連線 請參閱第 20 頁 㾎 初始設定 網絡 選擇您的網絡類型 網絡類型 已連接網絡纜線 無線 有線 連接 6 本產品會先驗證網絡連線 然後再連接 至網絡 完成後 按 E 按鈕 初始 設定完成 畫面將會出現 然後首頁 畫面將會出現 再次顯示 初始設定 畫面並進行變更 請 選取 重設 選...

Страница 67: ...的裝置 8 功能 用於切換至外接裝置 以及藍芽連接的無 線電和模式切換 您可以使用遙控器的 FUNCTION 功能 按鈕和主裝置的 按 鈕進行模式切換 9 設定 設定各種功能以適應您的個人喜好 若要播放或觀賞位於 PC 上的視頻 相 片 音樂檔案 必須將家庭影院 和 PC 連接至家庭網絡 並且必須在 PC 上下 載 安裝和設定 DLNA 軟件 請參閱第 25 頁 存取設定螢幕 1 在主螢幕中選擇 設定 然後按 E 顯 示 設定 螢幕 設定 顯示 音頻 網絡 系統 語言 安全性 一般 支援 3D 設定 電視外觀比例 16 9 原始大小 BD Wise 關閉 解像度 自動 電影幀幅 24Fps 關閉 HDMI 色彩格式 自動 HDMI 深色技術 關閉 漸進模式 自動 2 若要存取 設定 畫面上的功能表 子功能 表和選項 請參閱遙控器說明 請參閱 第 17 頁 如果本產品處於停止模式超過 5 分...

Страница 68: ...2D 螢幕大小 輸入連接到本產品的電視機螢 幕尺寸 本產品自動將 3D 輸出的大小調 整為電視機螢幕大小 在觀賞3D 內容之前 請仔細閱讀健康和 安全資訊 請參閱第 3 頁 電視外觀比例 可讓您將本產品的輸出調整為電視機的螢幕 大小 請參閱第 40 頁 BD Wise BD Wise 是三星最新的互連功能 將具有 BD Wise 功能的三星產品和三星電視機透過 HDMI 彼此連接 並且產品和電視機上的 BD Wise 均已開啟時 產品以 Blu ray DVD 光碟 的視訊解像度和訊框速率輸出視訊 解像度 可讓您將 HDMI 視訊訊號的輸出解像度設定 為 BD Wise 自動 1080p 1080i 720p 576p 480p 該數字表示每個訊框的視訊掃 描行數 i 和 p 分別表示隔行掃描和逐行掃 描 行數越多 品質越高 電影幀幅 24Fps 如果連接至與 24Fs 相容的電視 則將 ...

Страница 69: ... 音訊回傳通道 可讓您將電視的聲音導向家庭影院揚聲器 需要 HDMI 連線和與 音訊回傳通道 ARC 相 容的電視 如果將 音訊回傳通道 設為 開啟 並且您 是使用 HDMI 纜線將產品連接至電視 數碼光學輸入將不起作用 如果將 音訊回傳通道 設為 自動 並且您 是使用 HDMI 纜線將產品連接至電視 則 會自動選取 ARC 或數碼光學輸入 數碼輸出 可讓您設定 數碼輸出 以與連接至本產品的 AV 接收器功能相符 如需詳細資訊 請參 閱數碼輸出選擇表 請參閱第 45 頁 動態範圍控制 可讓您將動態範圍控制套用到 Dolby Digital Dolby Digital Plus 和 Dolby TrueHD 音訊 自動 根據 Dolby TrueHD 音軌中的資 訊自動控制 Dolby TrueHD 音訊的動態 範圍 同時關閉 Dolby Digital 和 Dolby Digital Pl...

Страница 70: ...接裝置 智能手機 平板電腦等 連 接至產品時 使用該名稱來識別產品 BD Live 互聯網連接 可讓您允許或禁止 BD Live 服務的互聯網 連線 系統 初始設定 可讓您重新執行 初始設定 程序 請參閱 第 15 頁 快速啟動 您可以透過縮短開機時間來快速開啟電 源 如果將此功能設為 開啟 待機電源消耗 將會增大 約為 12W 20W Anynet HDMI CEC Anynet 是一種便捷功能 用於與具備 Anynet 功能的其他三星產品連結 可讓 您透過一個三星電視機遙控器控制這些產 品 要操作此功能 必須使用 HDMI 纜線 將本產品連接到 Anynet 三星電視機 BD 資料管理 可讓您管理透過支援 BD LIVE 服務的 Blu ray 光碟下載的內容 您可以檢視用作 BD Live 資料儲存體之 USB 裝置的資訊 包 括儲存空間 您還可以刪除 BD Live 資料 和變更裝...

Страница 71: ... LIVE 等功能 還可以透過 網絡連線升級產品的軟件 設定您的網絡連線 要開始設定您的網絡連線 請執行以下步 驟 1 在主螢幕中 選擇 設定 然後按 E 鍵 2 選擇 網絡 然後按 E 鍵 3 選擇 網絡設定 然後按 E 鍵 4 請閱讀從下面開始的有關有線 無線網絡 的說明 請參閱第 21 頁 有線網絡 有線 自動 執行上面的步驟 1 至 3 後 1 在 網絡設定 畫面中 將 網絡類型 變 更為 有線 然後選擇 連接 並按下 E 鍵 本產品會偵測有線連接 驗證網絡 連線 然後連線至網絡 2 完成後 反白顯示 確定 然後按下 E 鍵 有線 手動 如果您具有靜態 IP 位址或自動程序不起作 用 您就需要手動設定 網絡設定 值 執行上面的步驟 1 至 3 後 1 在 網絡設定 畫面中 將 網絡類型 變 更為 有線 然後選擇 連接 並按下 E 鍵 本產品會搜尋網絡 然後顯示連接 失敗的訊息 如果...

Страница 72: ...重複步驟 4 和 5 直到填寫了所有參數 為止 您可以向互聯網提供者索取網絡參數 值 7 完成輸入所有參數值之後 選取 返回 然後按 E 按鈕 家庭影院會先驗 證網絡連線 然後再連接至網絡 無線網絡 您可以透過以下三種方法設定無線網絡連 線 無線自動 無線手動 WPS PBC 在設定無線網絡連線之前 中斷目前連線至 本產品的任何無線網絡裝置或本產品目前的 有線連接 如果適用的話 無線 自動 按照 設定您的網絡連線 中步驟 1 到 3 操作 請參閱第 20 頁 1 在 網絡設定 畫面中 將 網絡類型 變更 為 無線 產品將搜尋並顯示可用網絡的 清單 㾎 㾎 網絡設定 選擇您的網絡類型 網絡類型 無線 無線網絡 m 移動 選擇 返回 您可以將Blu ray 播放機連接至互聯 網 請選擇要使用的無線網絡 WPS PBC 搜尋 si ap MIC KIMING_VTOWER 2 選擇所需的網絡 然...

Страница 73: ...按鈕直接輸入數 字 使用 按鈕選擇字母以輸入字 母 然後按下 E 鍵 完成後 選擇 完成 然後按下 E 鍵 本產品會搜尋網絡 6 網絡連線失敗畫面將會出現 使用 按鈕選擇 IP 設定 然後按下 E 鍵 7 選取 IP 設定 欄位 然後將其設為 手動 輸入 8 選取要輸入的網路參數 例如 IP地址 然後按 E 按鈕 使用遙控器上的數字 小鍵盤為參數輸入數字 您還可以使用 使用 按鈕來輸入數字 使用遙控器 上的 按鈕從參數的一個輸入欄位移 至另一個輸入欄位 完成一個值後 按 E 按鈕 9 按 或 按鈕移至另一個參數 然後 按照步驟 8 中的說明 為該參數輸入數 字 10 重複步驟 8 和 9 直到填寫了所有參數 為止 您可以向互聯網提供者索取網絡參數 值 11 完成後 選擇 返回 然後按下 E 鍵 安全密鑰 畫面將會出現 12 在 安全密鑰 畫面上 輸入網絡的安全代 碼或通行碼 使用遙控器上的...

Страница 74: ...啟了 Wi Fi Direct 功能的任何 裝置上關閉該功能 1 開啟 Wi Fi Direct 裝置並啟動其 Wi Fi Direct 功能 2 在主螢幕中 選擇 設定 然後按 E 鍵 3 選擇 網絡 然後按 E 鍵 4 選擇 Wi Fi Direct 然後按 E 鍵 您可以連接至的 Wi Fi Direct 裝置將會 出現 設定 顯示 音頻 網絡 系統 語言 安全性 一般 支援 Wi Fi Direct 設備名稱 HT H5500K 選取您要連接的 Wi Fi Direct 裝置 AndroidXXXXXXX 未連接 關閉 更新 5 您有三種方法可以完成 Wi Fi 連線 透過 Wi Fi 裝置 透過使用 PBC 的產品 透過使用 PIN 的產品 每種方法如下所述 透過 Wi Fi 裝置 1 在 Wi Fi 裝置上 按照用於連接至另一 個 Wi Fi Direct 裝置的裝置程序操作 ...

Страница 75: ...設定 然後按 E 鍵 2 選擇 支援 然後按 E 鍵 3 選擇 軟體升級 然後按 E 鍵 4 選取下列其中一種方法 從網絡中下載 從USB下載 自動升級通知 5 按 E 按鈕 下面開始說明每種方法的指引 如果下載升級軟件時要取消升級 請按 E 鍵 從網絡中下載 本產品必須連接至互聯網才能使用 從網絡 中下載 功能 在開始之前 請取出所有光 碟 1 選取 從網絡中下載 然後按 E 按鈕 正在連接至伺服器訊息便會出現 2 如果有更新可用 則一則快顯訊息會詢 問您是否要升級 如果選取 是 產品會 自動關閉 重新啟動 然後開始升級 3 將會顯示更新進度快顯視窗 更新完成 後 產品將再次自動關閉 4 按 電源 按鈕開啟產品 從USB下載 1 造訪 www samsung com 2 按一下頁面右上角的 SUPPORT 支援 3 在搜尋欄位中輸入產品的機型 在輸入 機型時 下拉清單會顯示與該機型相符 ...

Страница 76: ...接到電腦 請參閱第 14 頁 並在電腦上安裝 SAMSUNG PC Share Manager 下載 DLNA 軟件 若要將 DLNA 與電腦搭配使用 必須在 電腦上安裝 DLNA 軟件 可以從 Samsung com 網站下載電腦軟件並取得有關使用 DLNA 的詳細資料 1 造訪 www samsung com 2 按一下頁面頂端的 SUPPORT 支援 3 在搜尋欄位中輸入產品的型號 在您輸 入產品時 與型號相符的產品將顯示在 下拉清單中 4 在下拉清單中按一下本產品的型號 5 在隨後出現的頁面上 向下捲動 然後按一下 Firmware Manuals Download 韌體手冊與下載 6 按一下 Software 軟件 標籤 7 在軟件標籤上 按一下 DLNA 行右側的 EXE 圖示 8 在隨後出現的第一個快顯視窗中 按一 下 Send 傳送 在第二個快顯視窗中 按一下 Save F...

Страница 77: ...方法 3 當第一次連接裝置時 一個快顯視窗將會出 現 您可以在其中使用 按鈕變更來源 裝置 播放商業光碟 1 按下 按鈕以開啟光碟托盤 2 將光碟輕輕放入托盤 光碟的標籤面朝上 3 按下 按鈕以關閉光碟托盤 會自動開 始播放 4 如果播放未自動開始 請按遙控器上的 6 按鈕 光碟存放和管理 拿取光碟 光碟上的指紋或劃痕可能導 致聲音和畫質下降或跳過播 放 避免觸摸已燒錄資料的光碟之表面 拿住光碟的邊緣 避免在其表面留下指 紋 請勿在光碟上貼紙或膠帶 清潔光碟 如果光碟表面有指紋或灰塵 請以水稀釋溫和的清潔劑後進 行清潔 並使用軟布擦拭 清潔時 請從內向外輕輕擦拭 光碟 存放光碟 請勿置於陽光直射下 存放於涼爽通風處 存放在乾淨的保護套中並垂直存放 播放帶有使用者燒錄內容的光碟 您可以播放燒錄到 Blu ray DVD 或 CD 光碟 上的多媒體檔案 1 將使用者錄製的光碟放入光碟托盤中 然...

Страница 78: ...頻 音樂 Opera TV Store 更多 已連接新裝置 USB 磁碟 相片 視頻 音樂 如果該快顯視窗未出現 請參閱方法 2 2 使用 按鈕選擇 相片 視頻 或 音 樂 然後按下 E 鍵 視內容的排列方 式而定 您將會看到資料夾 個別檔案 或兩者 3 如有必要 請使用 按鈕選擇資 料夾 然後按下 E 鍵 4 選擇要檢視或播放的檔案 然後按下 E 鍵 5 按下 RETURN 鍵結束資料夾 或者按下 EXIT 鍵返回主螢幕 6 請參閱第 28 32 頁 以瞭解如何控制播 放 USB 裝置上的相片 視頻和音樂 方法 2 如果在連接USB 裝置之後開啟產品 1 開啟本產品 2 按 變更裝置 並選取 USB 裝置 3 在首頁畫面上使用 按鈕選取 相片 視頻 或 音樂 然後按 E 按鈕 4 如有必要 請使用 按鈕選擇資 料夾 然後按下 E 鍵 5 選擇要檢視或播放的檔案 然後按下 E 鍵 6 按下...

Страница 79: ...功能表 標題功能表 快顯 功能表和標題清單 DISC MENU 光碟功能表 在播放過程中 按此鍵可顯示光碟功能表 TITLE MENU 標題功能表 在播放過程中 按此鍵可顯示標題功能表 如果光碟中有播放清單 按綠色 B 按 鈕可移至播放清單 POPUP MENU 快顯功能表 在播放過程中 按此鍵可顯示快顯功能 表 3 重複播放 1 在播放過程中 按遙控器上的 REPEAT 重複 鍵 2 按 鍵選擇 關閉 標題 章節 全 部 或 重複 A B 然後按 E 鍵 重複 A B 1 在您要開始重複播放的位置 A 按下 E 鍵 2 在您要停止重複播放的位置 B 按下 E 鍵 3 要恢復正常播放 請再次按下 REPEAT 重複 鍵 4 按下 E 鍵 視光碟而定 螢幕中可能不會顯示所 有重複選項 畫面可能不會立即顯示 章節 或 標題 繼續按 按鈕 直到您的選擇出現 在適用的欄位中 若要恢復正常播放 再次...

Страница 80: ...語言 字幕 可讓您設定所需的字幕語言 角度 從另一個角度觀看場景 角度 選項會 顯示可用於觀看的角度 1 1 1 2 1 3 等 BONUSVIEW 視頻 BONUSVIEW 音頻 可讓您設定所需的 Bonusview 選項 僅當播放檔案時才顯示的功能表選項 全螢幕 可讓您設定所需的全螢幕大小 您可以選 取 原始大小 模式 1 較大 和 模式 2 最 大 資訊 選擇此項目可檢視視訊檔案資訊 視光碟或儲存裝置的不同 工具 功能 表可能會不相同 某些選項可能不會顯 示 建立視頻播放清單 建立視頻檔案播放清單的方法 與建立音樂 檔案播放清單的方法大致相同 如需說明 請參閱第 30 頁 播放預先錄製的商業音頻光碟 1 將音頻 CD CD DA 或 MP3 光碟插入到 光碟托盤中 對於音頻 CD CD DA 將自動自動播 放第一個曲目 依在光碟上錄製的順 序播放光碟上的曲目 對於 MP3 光碟 請按...

Страница 81: ...5 7 鍵 暫停曲目 6 6 鍵 播放目前所選的曲目 重複曲目 您可以將產品設定為重複曲目 1 在播放期間 按 TOOLS 工具 按鈕 2 使用 按鈕在 重複模式 中選取 關 閉 曲目 或 一個 全部 或 隨機式 然 後按 E 按鈕 建立音樂播放清單 1 如果播放商業 CD 或 DVD 中的音樂 請 按 5 或 RETURN 返回 按鈕 音樂清 單畫面將會出現 如果您要從使用者建 立的磁碟或 USB 裝置上的音樂建立播放 清單 請按照第 26 或 27 頁上的說明存 取音樂清單 2 按 按鈕移至所需檔案 然後按 黃色 C 按鈕選取該檔案 重複此過程 以選取其他檔案 3 如果您要選取所有檔案 請按 TOOLS 工具 按鈕 使用 按鈕選取 全選 然後按 E 如果您要取消選取 所有檔案 請按 TOOLS 工具 按鈕 選 取 取消全部選擇 然後按 E 㾎 CD a 變更裝置 選擇 工具 跳到頁面 ...

Страница 82: ...取 畫面將會出現 7 使用 按鈕選擇要在其中儲存轉檔檔 案的裝置 然後按下 E 鍵 在擷取進行時切勿中斷裝置 8 若要取消擷取 請按下 E 鍵 然後選 擇 是 選擇 否 則繼續擷取 9 在擷取完成時 將會出現 擷取完 成 的訊息 10 按下 E 鍵回到播放畫面 此功能不適用於 DTS 音訊 CD 某些光碟可能不支援此功能 擷取將音樂編碼 192kbps 速度的 mp3 格式 在曲目清單畫面上 您可以選擇 全選 或 取消全部選擇 使用 全選 選取所有曲目 然後按 E 按鈕 這會取消個別曲目選取 使用 取消全部選擇 可一次性取消選取 所有已選取的曲目 播放相片內容 您可以播放位於 DVD USB 流動裝置或 PC 上的相片內容 使用工具功能表 在播放過程中 按 TOOLS 工具 鍵 開始播放幻燈片 停止播放幻燈片 選取可播放 暫停幻燈片播放 幻燈片播放速度 選取此項以調整播放幻燈片速度 背景音...

Страница 83: ...在接收不良的區域 選擇 MONO 單聲道 以獲得更清晰 無干擾的廣播 預設電臺 例如 在記憶體中預設 FM 89 10 1 按 FUNCTION 功能 鍵選擇 FM 2 按 TUNING UP DOWN 向上 向下調 頻 鍵選擇 89 10 3 按 TUNER MEMORY 收音存台 鍵 此時顯示幕上會閃爍數字 4 再次按 TUNER MEMORY 收音存台 鍵 在顯示幕上的數字自行消失之前按 TUNER MEMORY 收音存台 鍵 按 TUNER MEMORY 收音存台 鍵 後 數位字從顯示螢幕消失並且電臺 儲存到記憶體中 5 要預設另一個電臺 請重複步驟 2 至 4 若要調頻到預設電台 請按 TUNING UP DOWN 向上 向下調頻 按鈕 使用卡拉 OK 您可以欣賞有音樂伴奏的卡拉 OK 1 將咪高風連接到產品的正面 2 在主螢幕中 選擇 設定 然後按 E 鍵 3 選擇 音頻 然後...

Страница 84: ... 影院的接收 傳輸系統時 由於牆壁 角落或辦公分區的障礙物導 致的電子差異 由相同頻帶裝置 包括醫療裝置 微波爐 和無線 LAN 引起的電子干擾 在家庭影院與藍芽裝置彼此靠近時 將它 們配對 家庭影院與藍芽裝置之間的距離越遠 品 質就越差 如果距離超出藍芽操作範圍 則連線會中斷 在接收敏感性較差的區域 藍芽連接可能 無法正常工作 如果沒有障礙物 家庭影院在所有方向的 有效接收範圍最遠皆為 10 米 如果距離 超出此範圍 連線將會自動中斷 即使在 此範圍內 聲音品質也可能會由於障礙物 如牆壁或門 而下降 此無線裝置在其作業期間可能會導致電子 干擾 將家庭影院連接到藍芽裝置 連接 藍芽裝置 在開始之前 請確認藍芽裝置支援符合藍芽 的立體聲耳機功能 1 按遙控器上的 FUNCTION 功能 按鈕顯 示 BT 訊息 2 在要連接的藍芽裝置上選擇藍芽功能 表 請參閱藍芽裝置的使用說明書 3 在藍芽裝...

Страница 85: ...影院的連接 按下家庭影院前面板上的 鍵從 BT 切 換到其他模式或關閉家庭影院 除非透過變更功能來中斷連接家庭影院 否 則連接的藍芽裝置在終止連線之前 將會等 待一定時間以獲取家庭影院的回應 視藍 芽裝置而定 中斷連線時間可能不同 在藍芽連線模式中 若家庭影院系統與 藍芽裝置之間的距離超過 10 米 藍芽連 線將會中斷 在藍芽裝置回到有效的範 圍內或者您重新啟動藍芽裝置後 必須 再次配對裝置與家庭影院以重新連線 在藍芽模式下 若藍芽裝置保留在就緒 狀態長達 5 分鐘 螢幕保護程式將會啟 動 若要重新連接藍芽裝置 請關閉螢 幕保護程式 然後連接裝置 若要關閉 螢幕保護程式 請按下遙控器上的任何 按鈕 音量按鈕 數字按鈕等 使用藍芽打開電源功能 當家庭影院已關閉時 透過藍芽連線將智能 裝置連接至產品會開啟家庭影院 當將交流電源線連接至交流電源時 快 速啟動 功能可以使用 若要使用此功能 請將 ...

Страница 86: ...線的位置 如果您的智能手機用厚厚的封套包住 連線可能失敗 若 快速啟動 設為 開啟 即使家庭影院已 關閉 NFC 連線也後仍然可用 不過 只 有在斷開然後重新連接家庭影院的電源 再開啟家庭影院之後 NFC 連線才可用 是 NFC Forum Inc 在美 國和其他國家 地區的商標 或註冊商標 在啟動和關閉期間 不能建 立藍芽連線的 NFC 標記 電池電量指示符閃爍時 藍 芽連線的 NFC 標記可能不 起作用 使用特效遙控器鍵 TV SOUND 電視聲音 鍵 TVSOUND 如果您擁有支援 Anynet HDMI CEC 的 電視 TV SOUND 電視聲音 按鈕可讓您 將電視的音頻導向家庭影院揚聲器或電視 揚聲器 若要使用該功能 請按照下面的 步驟操作 1 將 HDMI 纜線連接到電視及家庭影院 請參閱第 13 頁 2 在家庭影院和電視中將 Anynet HDMI CEC 設為 開啟 3 ...

Страница 87: ...靜音 電視揚聲器 輸出 電視揚聲器 輸出 DSP EQ DSP EQ 您可以享用各種聲音模式 DSPOFF 選取以進行正常聆聽 CINEMA 電影院 重現電影來源的身 臨其境般的雄渾有力的聲音 MUSIC 音樂 適合所有音樂來源 GAME 遊戲 最適合播放視頻遊戲並 產生雄渾有力的聲音 M STEREO 多聲道立體聲 為 2 聲道 輸入來源產生環繞聲 POWER BASS 增強低音 增強低音 效果 LOUD 大聲 根據輸出音量改良低音 特徵 NIGHT 夜晚 透過壓縮動態範圍針對 夜晚進行最佳化 柔化聲音 HT H5500K_50K_50WK ZK_T_C_0411 indd 36 HT H5500K_50K_50WK ZK_T_C_0411 indd 36 2014 04 11 5 28 38 2014 04 11 5 28 38 ...

Страница 88: ...LNA 共用伺服器正在電腦上執 行 3 在家庭影院上 選取 變更裝置 4 使用 按鈕在裝置清單中選取電腦 5 選取要觀看或播放的檔案種類 相片 視 頻 或 音樂 然後按 E 6 使用 按鈕選取含有所選取檔案 種類的資料夾 然後按 E 將會顯示 檔案清單 7 選取要觀看或播放的檔案 然後按 E 使用電腦上的檔案建立播放清單的方 法 與使用 USB 裝置和光碟上的檔案建 立播放清單的方法相同 雖然有少數幾個例外 但是控制電腦上 檔案播放的方式 與控制 USB 裝置和光 碟上檔案播放的方式相同 您還可以先在首頁畫面上選取 相片 視 頻 或 音樂 然後從出現的清單中選取電 腦 這樣來選取電腦上的檔案 應用程式 本家庭影院提供大量新聞 電影 天氣和其 他內容 您可以直接下載到家庭影院並在家 庭影院上享用 首先 檢查網絡並確保家 庭影院連接至互聯網 家庭影院必須連接至 互聯網才能使用 Apps 應用程...

Страница 89: ...串流服務 存取 Opera TV Store 若要存取 Opera TV Store 請在首頁畫面上選 取 Opera TV Store 按鈕 然後按 E 按鈕 若要退出 Opera TV Store 螢幕 請按遙控 器上的 EXIT 退出 或 RETURN 返回 按鈕 在 Opera TV Store 中導覽 當 Opera TV Store 畫面出現時 它會顯示分類 應用程式庫 使用遙控器上的 按鈕將高 亮顯示從一個應用程式移至另一個應用程式 選取應用程式 將高亮顯示移至所需的應用程式 然後按 E 按鈕 在隨後出現的快顯視窗中 選取 OPEN 開啟 以立即開啟該應用程式 或選 取 ADD TO MY APPS 新增至我的應用程式 以將該應用程式新增至 My Apps 我的應用 程式 按遙控器上的 RETURN 返回 按鈕 回到 Opera TV Store 畫面 依類別選取應用程式 為...

Страница 90: ... 無須線纜或無線路由器 1 從首頁畫面中 使用 按鈕選取 Screen Mirroring 畫面鏡像 然後按 E 2 在智能手機或裝置上啟動 AllShare Cast 3 在裝置上 在可用的裝置清單中找到家 庭影院系統的名稱並將其選中 4 電視會顯示正在連接訊息 例如 Connecting to Android_92gb 正在連接至 Android_92gb 然後顯示已連接訊息 5 一小會後 您裝置的螢幕將會出現在電 視螢幕上 使用 Screen Mirroring 畫面鏡像 功 能時 可能會出現視頻斷斷續續或音 頻滯後現象 具體視環境而定 家庭影院可連接至支援 AllShare Cast 的裝置 請注意 可能並不是所有含 有 AllShare Cast 的裝置都受支援 具 體視製造商而定 如需移動連線支援 的更多資訊 請參閱製造商的網站 藍芽傳輸可能會干擾 Screen Mirrori...

Страница 91: ...聽不 到任何聲音 或只能聽到很大的噪音 如果 HDMI 裝置 影音接收器 電視機 與壓縮格式 Dolby digital DTS 不相 容 則音訊信號以 PCM 輸出 普通 DVD 沒有 BONUSVIEW 音訊和導 覽音效 某些 Blu ray 光碟沒有 BONUSVIEW 音 訊和導覽音效 此 數碼輸出 設定不會影響輸出到電視 機的類比 左 右 音訊或 HDMI 音訊 在 產品連接到影音接收器時 將會影響光 纖和 HDMI 音訊輸出 如果播放 MPEG 音訊音軌 則無論 數 碼輸出 選擇 PCM 或位元流 如何 皆 會以 PCM 輸出音訊訊號 當 選擇揚聲器 被設定為 電視揚聲器 時 數碼輸出 被激活 BD Live 互聯網連接 使用 BD LIVE 內容時 Internet 連接可 能會受限制 Anynet HDMI CEC 根據電視機的類型 特定的 HDMI 輸出 解像度可能無法使...

Страница 92: ...顯示 此功能可同時修改主次字幕 主要和輔助字幕總數分別顯示 播放 JPEG 檔案 您不能在全螢幕模式下放大字幕和 PG 圖形 播放內容 播放畫面時使用 TOOLS 工具 鍵 如果將家庭影院連接至符合 BD Wise 的 電視 BD Wise 設為 開啟 圖像設定 功 能表將不會出現 除非音樂檔案與相片檔案位於相同的儲 存介質上 否則 背景音樂 功能將無法 正常工作 另外 聲音品質可能會受到 MP3 檔案的位元速率 相片的大小和編 碼方法影響 光碟和格式相容性 您的產品可以播放的光碟類型和內容 媒體 光碟類型 詳細資訊 視頻 Blu ray Disc 3D Blu ray Disc 以 BD RE 格式燒錄 的 BD ROM 或 BD RE R 光碟 DVD VIDEO DVD RW DVD R DVD RW DVD R DVD VIDEO 燒錄 的 DVD RW DVD RW V DVD ...

Страница 93: ...受限的操作 並且在播放期間 僅提供特定功能 請注意 這並非產品 缺陷 三星無法保證本產品可播放帶有 Blu ray 光碟 DVD 或 CD 徽標的每張光碟 因 為光碟格式在不斷發展 並且 Blu ray 光 碟 DVD 及 CD 軟件建立和 或光碟製 造期間也可能出現問題和錯誤 如果您在本產品中播放 Blu ray 光碟 DVD 或 CD 光碟時遇到問題或困難 請 聯絡三星客戶服務中心 亦請參閱本使 用說明書的其餘部分 以瞭解關於播放 限制的其他資訊 一些商用光碟和在其他地區購買的 DVD 光碟可能無法在本產品中播放 本產品可播放的光碟之徽標 Blu ray 光碟 3D Blu ray 光碟 BD LIVE Dolby DTS Java 英國 法國 德國 等國的 PAL 廣播系統 DivX 地區代碼 產品和光碟按地區編碼 這些地區代碼必須 相符才可播放光碟 如果代碼不符 光碟將 無法播放 ...

Страница 94: ...彩範圍 端視其視訊解像度和訊框速率而定 某 些 DivX MKV 和 MP4 格式的光碟可能 無法播放 支援的格式 關於 USB 連接的注意事項 您的產品支援 USB 儲存媒體 MP3 播放器 數 碼相機和 USB 讀卡器 本產品不支援長度超過 128 個字元的資料夾或檔 案名稱 某些 USB 數碼相機裝置可能與本產品不 相容 您的產品支援 FAT 16 FAT 32 和 NTFS 檔案系 統 將 USB 裝置直接連接到產品的 USB 埠 透過 USB 纜線連接可能會導致相容性問題 在多卡讀卡器中插入多個儲存裝置可能會導致讀 卡器無法正常工作 本產品不支援 PTP Peer to Peer 對等 協議 不要在 USB 裝置正在傳輸或錄製資料時 將其拔下 影像解像度越大 顯示影像所需的時間越長 本產品無法播放從商業網站下載的具有 DRM 數 位版權管理 之 MP3 檔案 本產品僅支援低於 3...

Страница 95: ...放期間可能會斷斷續續 如果檔案的索引表已損壞 則搜尋 跳過 功能不可用 視訊解碼器 最高支援 H 264 Level 4 1 和 AVCHD 不支援 H 264 FMO ASO RS 和 VC1 SP MP AP L4 MPEG4 SP ASP 低於 1280 x 720 最多 60 個訊框 高於 1280 x 720 最多 30 個訊框 音訊解碼器 支援 WMA 7 8 9 和 STD 不支援 WMA 22050Hz 單聲道取樣率 AAC 最高取樣率 96Khz 8 11 12 16 22 24 32 44 1 48 64 88 2 96 最高 位元速率 320kbps 支援的 DivX 字幕檔案格式 ttxt smi srt sub txt 杗嬓檔案支援 檔案副檔名 容器 音訊編解碼器 支援範圍 mp3 MP3 MP3 wma WMA WMA 取樣率 kHz 8 11 16 22 32...

Страница 96: ...gital 最高 PCM 5 1 聲道 Dolby Digital Dolby Digital Dolby Digital DTS 最高 PCM 5 1 聲道 DTS DTS DTS Blu ray 光 碟的定義 任意 將主要功 能音訊和 BONUSVIEW 音訊流一起解 碼為 PCM 音 訊並新增導覽 音效 僅輸出主要功能 音訊 流以便您 的影音接收器能 夠解碼音訊位元 流 您將不會聽 到 BONUSVIEW 音訊或 導覽音 效 將主要功能音 訊 和 BONUSVIEW 音訊流一起解碼 為 PCM 音訊並 新增導覽音效 然後將 PCM 音 訊重編碼為 DTS 位元流 將主要功能音訊 和 BONUSVIEW 音訊流一起解碼 為 PCM 音訊並 新增導覽音效 然後將 PCM 音訊重編碼為 Dolby digital 位 元流或 PCM 如果來源資料流是雙聲道或單聲道 則 重編碼 Dolby ...

Страница 97: ...的說明 沒有幫助 請關閉本產品 中斷電源線的連接 然後聯絡最近的授權經銷商或三星電子維修 中心 症狀 檢查 修理 無法退出光碟 電源線是否牢靠地插入插座 關閉電源 然後再次開啟 無法播放 檢查 Blu ray DVD 光碟的地區編號 從國外購買的 Blu ray DVD 光碟可能無法播放 CD ROM 和 DVD ROM 無法在本產品上播放 確保評級正確 按 6 7 按鈕時 播放 不立即開始 是否使用了損壞的光碟或光碟表面是否有劃痕 將光碟擦乾淨 無聲音 家庭影院在快速播放 慢速播放和分步動作播放過程中沒有 播放聲音 音箱是否正確連接 音箱自定義設定是否正確 光碟是否嚴重損壞 只能聽到幾個揚聲器發出 聲音 而不是所有 6 個 揚聲器都發出聲音 在某些 Blu ray DVD 光碟上 聲音只從前置音箱輸出 檢查音箱是否正確連接 調整音量 當播放來自 CD 廣播或電視的音頻時 裝置僅將聲音輸出...

Страница 98: ...畫面也不出 現 是否使用的光碟未包含功能表 無法變更長寬比 您可以用 16 9 全螢幕 模式 4 3 信箱模式 模式或 4 3 全景 模式播放 16 9 Blu ray DVD 光碟 但 4 3 Blu ray DVD 光碟 只能用 4 3 模式播放 請參閱 Blu ray 光碟包裝盒 然後選擇 相應的功能 產品不工作 範例 電源關閉或 聽到奇怪的噪音 本產品工作不正常 在 STANDBY 待機 模式下按住遙控器的 5 按鈕5 秒鐘 此操作會重設裝置 使用重設功能將清除所有儲存的設定 除非必要 請勿使用此功能 您忘記了評級密碼 在本產品中未插入光碟的前提下 長按產品的 5 鍵超過 5 秒 此時顯示幕上會出現 INIT 並且所有設定將還原為預設值 使用重設功能將清除所有儲存的設定 除非必要 請勿使用此功能 無法收聽廣播 天線是否正確連接 如果天線的輸入訊號較弱 請在接收良好的區域安裝外部 F...

Страница 99: ...看不 到檔案 DLNA 顯示僅顯示 相片 音樂 和 電影 檔案 它不會顯示 其他類型的檔案 播放視訊時斷斷續續 檢查網絡是否穩定 檢查網線是否正確連接且網絡是否超載 電視與電腦之間的 DLNA 連線不穩定 同一個子網絡下的 IP 地址應該是唯一的 否則 IP 衝突可能 會導致連線不穩定 檢查您是否啟用了防火牆 如果啟用了防火牆 請停用該功能 BD LIVE 家庭影院無法連接至 BD LIVE 伺服器 使用 網絡狀態 功能測試網絡連線是否活動 檢查 USB 儲存裝置是否連接到本產品 儲存裝置至少必須有 1GB 的可用空間 才能承載 BD LIVE 服 務 可以在 BD 資料管理 中檢查可用大小 請參閱第 40 頁 請檢查 BD Live 互聯網連接 功能表是否設定為 允許 所有 如果上述方法均無效 請聯絡內容供應商或更新至最新的固 件 使用 BD LIVE 服務時發 生錯誤 USB 記憶體裝...

Страница 100: ...音箱輸出 165W x 2 3Ω 重低音音箱輸出 170W 3Ω 頻率回應 模擬輸入 20Hz 20kHz 3dB 數碼輸入 20Hz 40kHz 4dB 訊噪比 70dB 聲道分離度 60dB 輸入靈敏度 AUX 500mV 音箱 音箱系統 5 1 聲道音箱系統 前置音箱 環繞音箱 中置音箱 重低音音箱 阻抗 3 Ω 3 Ω 3 Ω 3 Ω 頻率範圍 200Hz 20kHz 200Hz 20kHz 200Hz 20kHz 50Hz 200Hz 輸出聲壓級 84dB W M 84dB W M 84dB W M 84dB W M 額定輸入 165W 165W 170W 170W 最大輸入 330W 330W 340W 340W 規格 HT H5500K_50K_50WK ZK_T_C_0411 indd 49 HT H5500K_50K_50WK ZK_T_C_0411 indd 49 20...

Страница 101: ... 380 6 x 364 7 重量 單位 千克 HT H5500K 0 44 0 40 0 56 6 15 HT H5550K HT H5550WK 2 94 2 94 0 56 6 15 不支援網速小於或等於 10Mbps Samsung Electronics Co Ltd 保留隨時變更規格的權利 恕不另行通知 重量和尺寸為估計值 設計和規格如有變更 恕不提前通知 如需電源和功耗的詳細資訊 請參閱本產品隨附的標籤 SWA 6000 僅適用於 HT H5550WK 重量 1 1 千克 尺寸 寬 x 高 x 厚 76 2 x 228 6 x 152 4 毫米 工作溫度範圍 5 C 到 35 C 工作濕度範圍 10 到 75 輸出 165W x 2 CH 頻率範圍 20Hz 20KHz 訊噪比 65dB HT H5500K_50K_50WK ZK_T_C_0411 indd 50 HT H5...

Страница 102: ...ance 的商 標 服務標記或認證標記 詞語 HDMI 和 HDMI High Definition Multimedia Interface 以及 HDMI 標記是 HDMI Licensing LLC 在美國以及其他國家 地區的商標或註冊商標 Oracle 和 Java 是 Oracle 和 或其附屬機構的註冊商標 其他名稱可能是其各自所有者的商 標 本項目整合了複製保護技術 受到美國專利以及 Rovi Corporation 的其他智慧財產權保護 禁止進行 反向工程和反彙編 Blu ray Disc Blu ray 及徽標是 Blu ray Disc Association 的商標 本產品使用 Cinavia 技術限制擅自使用一些商業製作電影和視訊的副本及其音軌 偵測到禁止使用的未 授權副本時 將顯示一則訊息並且中斷播放或複製 Cinavia 技術的詳細資訊將在 Cinavia On...

Страница 103: ... 3000 8282 Toll Free 1800 266 8282 Toll Free 30308282 Non Toll Free www samsung com in support INDONESIA 0800112888 021 56997777 www samsung com id support JAPAN 0120 327 527 www samsung com jp support MALAYSIA 1800 88 9999 www samsung com my support PHILIPPINES 1 800 10 7267864 PLDT 1 800 8 7267864 Globe landline and Mobile 02 4222111 Other landline www samsung com ph support SINGAPORE 1800 SAMSU...

Отзывы: