background image

79

80

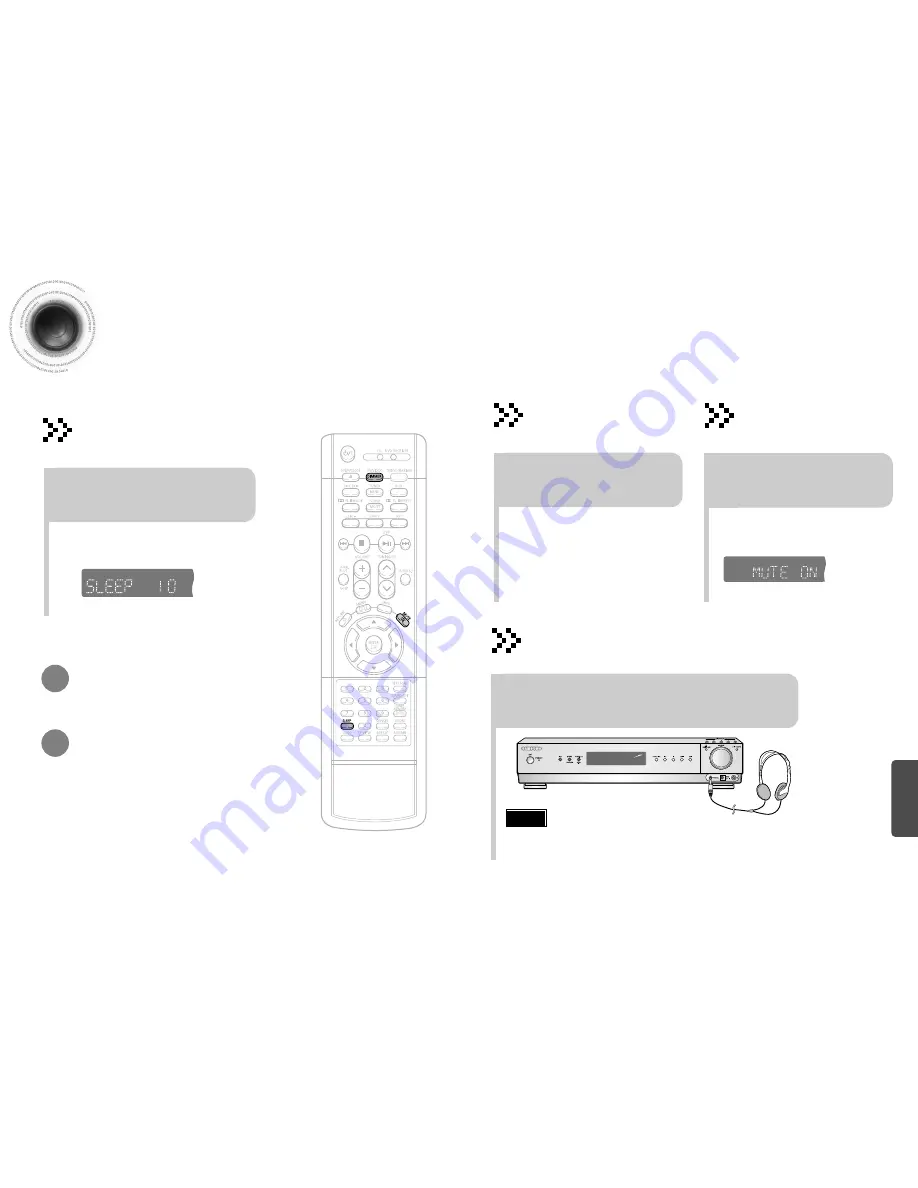
Convenient Functions

The remaining time before the DVD player will shut itself off is displayed.

Pressing the button again changes the sleep time from what you have set
earlier.

To confirm the sleep timer setting, press SLEEP button.

Each time the button is pressed, the brightness
changes as follows: 

SLIGHTLY DARK

DARK

BRIGHT

.

• 

"SLEEP" will be displayed. Each time the button is pressed,
the preset time changes as follows: 10 

➝ 

20 

➝ 

30 

➝ 

60 

90 

➝ 

120 

➝ 

150 

➝ 

OFF.

TITLE

CHAP

PRGM RDS RT

ST

TUNED

kHz

MHz

Press SLEEP button.

Sleep Timer Function

If you set the time in advance, 

the unit


automatically turns

off at the designated time. 

Adjusting Display Brightness

You can adjust the brightness of the display on the
main unit  

to improve video quality.

To cancel the sleep timer, press SLEEP button until
OFF appears on the display.

Press DIMMER button.

‘MUTE ON’ appears in the display.

To restore the sound, press the button again to 
select ‘MUTE OFF’.

Mute Function

This is useful when answering the door or a
telephone call.

Press MUTE button.

MISCELLANEOUS

TITLE

CHAP

PRGM RDS RT

ST

TUNED

kHz

MHz

Using Headphones

Use headphones (not supplied) for private listening pleasure.

Connect the headphones to the PHONES jack for private listening.

To prevent hearing damage, do not increase the
volume excessively when using headphones.

Caution

Содержание HT-DS665T

Страница 1: ...STEM HT DS665T Instruction Manual SAMSUNG ELECTRONICS AMERICA INC SERVICE DIVISION 400 Valley Road Suite 201 Mount Arlington NJ 07856 1 800 SAMSUNG 1 800 726 7864 www samsungusa com COMPACT DIGITAL AUDIO COMPACT DIGITAL VIDEO ...

Страница 2: ...unit Do not expose the unit to direct sunlight or other heat sources This could lead to overheating and malfunction of the unit The battery used with this product contain chemicals that are harmful to the environment Do not dispose of batteries in the general household trash PREPARATION CLASS 1 LASER PRODUCT This Compact Disc player is classified as a CLASS 1 LASER product Use of controls adjustme...

Страница 3: ...ing instructions POWER LINES An outside antenna system should not be located in the vicinity of overhead power lines or other electric light or power circuits or where it can fall into such power lines or circuits When installing an outside antenna system extreme care should be taken to keep from touching such power lines or circuits as contact with them might be fatal POLARIZATION This video prod...

Страница 4: ...6 RADIO OPERATION Listening to Radio 77 Presetting Stations 78 MISCELLANEOUS Convenient Functions 79 Operating a TV with the Remote Control 81 Before Calling for Service 83 Cautions on Handling and Storing Discs 85 Specifications 86 Notes on Terminology 87 Super Digital Sound Master Equipped with a new digital audio technology Auto Sound Calibration Magic Sound Field and Magic Headphone developed ...

Страница 5: ... in both low bit rate and high bit rate e g 32Kbps 320Kbps the sound may skip during playback A maximum of 500 tracks can be played per CD A maximum of 300 folders can be played per CD DVD Digital Versatile Disc offers fantastic audio and video thanks to Dolby Digital surround sound and MPEG 2 video compression technology Now you can enjoy these realistic effects in the home as if you were in a mo...

Страница 6: ... 1 5 indicator REPEAT indicator TRACK indicator TUNER indicator DSP indicator RADIO FREQUENCY indicator System Status Display SPEAKER indicator DTS Disc indicator Tuning Down Skip buttons Stop button Play Pause button Tuning Up Skip buttons Rear Panel FM Antenna Connector External Video Component Input Connectors External Audio Component Input Connector 5 1 Channel Speaker Output Terminals VIDEO O...

Страница 7: ... button SLOW MO ST button PL II EFFECT button Remote Control DISC SKIP button Play Pause button Tuning Preset CD Skip button Stop button AUX button TUNER BAND button To open the remote control cover push the top of the cover then slide downward Insert Remote Batteries The remote control can be used up to approximately 23 feet 7 meters in a straight line It can also be operated at a horizontal angl...

Страница 8: ...the front speaker you can adjust the rear speaker s angle by rotating it 30 to the right or left Note The speaker wires can be connected to either the front stand or the front Speaker arrangement Note 14 Installing speakers in the RRSS Rear Reflecting Surround System Configuration using stands Installing speakers on Front stands Follow the instructions and install the speaker as shown below Instal...

Страница 9: ...n the RRSS Rear Reflecting Surround System Configuration using wall mounts Installing the Front Rear speakers together on the wall Follow the instruction and install the speakers as shown below Install the rear speaker on the front speaker 1 Rear Speaker Front Speaker Connect the rear and front speaker wires to to the rear of front speaker 2 Fasten 2 screws separated on the wall 3 Hang the front r...

Страница 10: ...rews separately sold on the wall 3 Hang the front speaker on the wall 4 CONNECTIONS Front Speaker Cover Front Speaker 28cm Install the rear speaker on the rear stand 7 Connect the rear speaker wire on the bottom of rear stand 8 Fasten 2 screws separated on the wall 9 Hang the rear speaker on the wall 10 Unfasten and disconnect the screw on the bottom of rear stand 5 Assemble rear stand and bracket...

Страница 11: ...er speakers Center Speaker It is best to install it at the same height as the front speakers You can also install it directly over or under the TV Position of the DVD Player Place it on a stand cabinet shelf or under the TV stand Selecting the Listening Position The listening position should be located about 2 5 to 3 times the distance of the TV s screen size away from the TV Example For 32 TVs 2 ...

Страница 12: ... select the resolution switch to 1080i Since this product has an embedded Video Upscaler function with Faroudja DCDi technology it can enhance a 576i 480i DVD resolution output to 480p 720p 1080i You do not have to make separate adjustments since the Home Theater and TV will be automatically adjust themselves to the optimal resolution and aspect ratio if connected to HDMI If the TV is an HDTV and ...

Страница 13: ...TV Connect Audio In on the DVD player to Audio Out on the external analog component Be sure to match connector colors 2 Analog signal components such as a VCR or TV Press AUX on the remote control to select DIGITAL IN AUX1 AUX 2 Each time the button is pressed the selection changes as follows DIGITAL IN AUX 1 AUX 2 You can also use the FUNCTION button on the main unit The mode switches as follows ...

Страница 14: ...re reversed communication with the TV will fail and you will not be able to use the Anynet function Caution The cooling fan supplies cool air to the unit to prevent overheating Please observe the following cautions for your safety Make sure the unit is well ventilated If the unit has poor ventilation the temperature inside the unit could rise and may damage it Do not obstruct the cooling fan or ve...

Страница 15: ...the main unit to select DVD CD mode 1 Plug the main unit s power cord into the AC power supply 4 Press TV DVD RECEIVER button until the TV indicator llights In this manual the instructions marked with DVD are applicable to DVD VIDEO DVD AUDIO and DVD R RW discs Where a particular DVD type is mentioned it is indicated separately Depending on the content of the disc the initial screen may appear dif...

Страница 16: ...is pressed playback resumes from the stop position This function works only with DVDs If pressed twice STOP is displayed and if PLAY PAUSE button is pressed playback starts from the beginning To stop playback press STOP during playback Selecting a Disc in the Disc changer To select a specific disc press the corresponding DIRECT PLAY 1 2 3 4 5 buttons on the front panel or DISC SKIP on the remote c...

Страница 17: ... 4 Press the STOP button to stop playback To select another album and track repeat Steps 2 and 3 above 3 To change the album or track use Cursor buttons to select another album in Stop mode and then press the ENTER button OPERATION JPEG Disc Playback Images captured with a digital camera or camcorder or JPG files on a PC can be stored on a CD and then played back with this unit Press the OPEN CLOS...

Страница 18: ...being operated that operation is not possible with the disc currently being played Depending on the disc the disc information display may appear different Depending on the disc you can also select DTS DOLBY DIGITAL or PRO LOGIC 33 Note OPERATION Checking the Remaining Time CHAPTER REMAIN TITLE REMAIN CHAPTER ELAPSED TITLE ELAPSED Each time the REMAIN button is pressed Press the REMAIN button For c...

Страница 19: ... Fast Slow Playback Fast Playback DVD CD MP3 Press and hold Each time the button is held down during playback the playback speed changes as follows Press SLOW button Each time the button is pressed during playback the playback speed changes as follows Slow Playback DVD 35 Note OPERATION Something like you Back for good Love of my life More than words I need you My love Uptown girl DVDRECEIVER SMAR...

Страница 20: ...ck that has already been played may be played again TRACK Repeatedly plays the selected track DIR Repeatedly plays all tracks in the selected folder DISC Repeatedly plays the entire disc OFF Cancels Repeat Playback DVD CD MP3 JPEG OPERATION DVD VIDEO DVD AUDIO To Select a Repeat Playback Mode in the Disc Information Screen Press INFO button twice 1 Press Cursor button to move to REPEAT PLAYBACK di...

Страница 21: ...ssed the selected position will be stored in memory 3 Press Cursor buttons to select A and then press ENTER button at the beginning of the segment To return to normal playback press Cursor buttons to select OFF DVD CD Note Angle Function This function allows you to view the same scene in different angles DVD 2 Press Cursor button to move to ANGLE display 1Press INFO button 1 3 Each time the button...

Страница 22: ...on is pressed the zoom function will switch between On and Off When a movie is played in Widescreen format black bars at the top and bottom of the TV screen can be removed by pressing the EZ VIEW button You can select the desired image from a DVD Audio disc containing still images With some discs you may not be able to select images depending on how the disc was manufactured This function will not...

Страница 23: ...Chapter display Moving to a Chapter 01 05 025 040 1 17 30 1 1 5 Press Cursor buttons to move to time display Moving to a Specific Time Press the numeric buttons You can press on the remote control to move directly to the desired title chapter or track Depending on the disc you may not be able to move to the selected title or time 43 Selecting Audio Subtitle Language Depending on the number of lang...

Страница 24: ...ss MENU button to exit the setup screen Using Disc Menu You can use the menus for the audio language subtitle language profile etc DVD menu contents differ from disc to disc DVD 45 2 When you select the disc menu that is not supported by the disc the This menu is not supported message appears on the screen 1 In Stop mode press MENU button Press Cursor buttons to move to DISC MENU and then press EN...

Страница 25: ...n to move to Setup and then press ENTER button 4 Once the setup is complete if the language was set to English OSD will be displayed in English 3 Selecting the Subtitle Language recorded on the disc Selecting the Disc Menu Language recorded on the disc Select Language and then press ENTER button 5 Press Cursor button to select OSD Language and then press ENTER button Press Cursor button to select ...

Страница 26: ... different screen sizes you should adjust the aspect ratio to fit your TV or monitor For a standard TV select either 4 3LB or 4 3PS option according to personal preference Select 16 9 if you have a wide screen TV Select this to view a 16 9 picture in the full screen mode on your wide screen TV You can enjoy the wide screen aspect Select this to play a 16 9 picture in the letter box mode on a conve...

Страница 27: ...on Press Cursor button to move to Setup and then press ENTER button 4 The password is set to 7890 by default Once the setup is complete you will be taken to the previous screen If you have selected Level 6 you cannot view DVDs with Level 7 or higher The higher the level the closer the content is to violent or adult material 3 5 Press Cursor button to move to PARENTAL and then press ENTER button Pr...

Страница 28: ...ress ENTER button Enter the password and then press ENTER button SETUP Setting the Password You can set the password for the Parental rating level setting The password is set to 7890 by default Note If you have forgotten the rating level password do the following While the player is in the stop mode hold the main unit s button for longer than 5 seconds INITIALIZE appears on the display and all set...

Страница 29: ...back on PAUSE COPY LOGO DATA Setting the Wallpaper 2 1 3 In Stop mode press MENU button Press Cursor button to move to Setup and then press ENTER button Press Cursor button to move to LOGO and then press ENTER button To Change the Wallpaper 5 4 Press MENU button to exit the setup screen Press to select the desired USER and then press ENTER Select this to set the Samsung Logo image as your wallpape...

Страница 30: ... button to move to DVD VIDEO and then press ENTER button SETUP DVD Playback Mode DVD Play mode is set to DVD Audio as factory default setting Note Some DVD Audio discs contain DVD Video as well as DVD Audio To play back the DVD Video portion of the DVD Audio disc set the unit to DVD Video mode Set steps 1 4 again if you want to switch to DVD AUDIO Play mode When Selecting DVD Play Mode DVD VIDEO s...

Страница 31: ...and R the mode is set to SMALL Depending on PRO LOGIC and STEREO the speaker mode may vary Press RETURN button to return to the previous level Press MENU button to exit the setup screen 59 60 Note SETUP SMALL Select this when using the speakers NONE Select this when no speakers are installed 2 1 In Stop mode press MENU button Press Cursor button to move to Audio and then press ENTER button 3 Press...

Страница 32: ...then press ENTER button You can set the delay time for C between 00 and 05mSEC and for LS and RS between 00 and 15mSEC 4 3 5 Press Cursor button to move to DELAY TIME and then press ENTER button Press Cursor buttons to move to the desired speaker and then press ENTER button Press Cursor to set the Delay time Press RETURN button to return to the previous level Press MENU button to exit the setup sc...

Страница 33: ...usingthesetupscreen Method 2 When manually adjusting with the SOUND EDIT button 2 1 Adjusting Front Speaker Balance Adjusting Rear Speaker Balance Press SOUND EDIT button and then press Cursor 3 Adjusting Center Speaker Level 4 5 Adjusting Rear Speaker Level Adjusting Subwoofer Speaker Level Press RETURN button to return to the previous level Press MENU button to exit the setup screen 64 Press SOU...

Страница 34: ...level Press MENU button to exit the setup screen AV SYNC Setup Press RETURN button to return to the previous level Press MENU button to exit the setup screen Audio menu appears 2 1 Setup menu appears AV SYNC screen appears 3 Press Cursor buttons to move to Audio and then press ENTER button Press Cursor buttons to move to AV SYNC and then press ENTER button Press the MENU button 4 You can set the a...

Страница 35: ...his mode extends the front stereo image to include the surround speakers for an exciting wraparound effect with side wall imaging CENTER WIDTH Sound is output to the center speaker only The front left and right speakers produce phantom sound DIMENSION Incrementally adjusts the sound field DSP from the front or rear When playing a DVD disc encoded with two or more channels multi channel mode will b...

Страница 36: ...s will be toggled Select S LOGO ON to output the sound logo and select S LOGO OFF to disable the sound logo To check ASC that you have set 1 Press and hold the ASC button twice ASC CHECK appears on the display 2 Next briefly press the ASC button The speaker distance setting and level value for each channel will be displayed To cancel the ASC setup Press the ASC button The tone ouput stops CANCEL a...

Страница 37: ...kers reflect sound first against the side walls or ceiling and then against the rear wall Since you don t have to separately install the rear speakers it not only enhances space efficiency but also eliminates the need to arrange additional speaker wires You can install the speakers on stands or a wall Make sure to angle the rear speakers so that sound is reflected against the side walls The Rear s...

Страница 38: ...ay a Dolby Surround or 2 Channel disc or turn on the radio Each time you press the LSM button the mode display changes in the order shown below Each time you press the LSM button the mode display changes in the reverse order SETUP Depending on the disc being played the effect of each sound field may vary Note 74 SUPER 5 1 1 2 Press the SUPER 5 1 button to select SUPER 5 1 To cancel this function p...

Страница 39: ...ss the SURR PLUS button again This function works only with DVDs recorded in more than 2 channels The surround plus function does not work with 2 channel sources such as music CDs or MP3 CDs Note Virtual Headphone You can enjoy a realistic sound very similar to that of a 5 1 channel sound system using regular stereo headphones 1 2 Press the V H P button to select VIRTUAL ON To cancel this function...

Страница 40: ...ce free broadcast Press MO ST button to listen in Mono Stereo This applies only when listening to an FM station To tune in to a preset station press on the remote control to select a channel Refer to Step 2 on page 77 to automatically or manually tune in to a station 2 1 Each time the button is pressed the band switches between FM AM PRGM flashes in the display 3 Example Presetting FM 89 1 in the ...

Страница 41: ...advance the unit automatically turns off at the designated time Adjusting Display Brightness You can adjust the brightness of the display on the main unit to improve video quality To cancel the sleep timer press SLEEP button until OFF appears on the display Press DIMMER button MUTE ON appears in the display To restore the sound press the button again to select MUTE OFF Mute Function This is useful...

Страница 42: ...TV and press POWER If the TV turns off or on the setting is complete TV DVDRECEIVER Note MISCELLANEOUS 1 2 3 4 5 6 7 8 9 10 11 12 13 14 15 16 17 18 19 20 21 22 23 24 25 26 27 28 29 SAMSUNG ANAM DAEWOO LG HITACHI JVC SHARP SONY TOSHIBA SANYO MITSUBISHI MATSUSHITA TELEFUNKEN RCA PANASONIC SABA PHILIPS GRUNDIG ZENITH MIVAL NOBLEX EMERSON MAGNAVOX LOEWE THOMSON NORDMENDE LOEWE OPTA BLAUPUNKT SIEMENS T...

Страница 43: ... is being used within the required angle and distance Replace the batteries Select the correct mode TV DVD function of the remote The remote control does not work Only DVDs that are created with audio language and subtitles can use this feature Audio language and subtitles do not work The disc may not have been created with menus Menu screen does not appear even when the menu function is selected ...

Страница 44: ...e especially careful not to scratch discs when handling them Do not allow the discs to become contaminated with dirt Do not load cracked or scratched discs Caution Condensation may form if warm air comes into contact with cold parts inside the player When condensation forms inside the player the player may not operate correctly If this occurs remove the disc and let the player stand for 1 or 2 hou...

Страница 45: ...OT BE LIABLE FOR LOSS OF REVENUE OR PROFITS FAILURE TO REALIZE SAVINGS OR OTHER BENEFITS OR ANY OTHER SPECIAL INCIDENTAL OR CONSEQUENTIAL DAMAGES CAUSED BY THE USE MISUSE OR INABILITY TO USE THIS PRODUCT REGARDLESS OF THE LEGAL THEORY ON WHICH THE CLAIM IS BASED AND EVEN IF SAMSUNG HAS BEEN ADVISED OF THE POSSIBILITY OF SUCH DAMAGES NOR SHALL RECOVERY OF ANY KIND AGAINST SAMSUNG BE GREATER IN AMOU...

Отзывы: