14
1
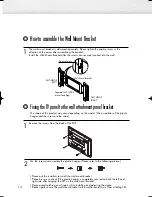
The wall mount bracket is delivered separately. Please tighten the captive screw in the
direction of the arrow after assembling the bracket.
Install the Wall Mount Bracket after the screws are securely inserted into the wall.
How to assemble the Wall Mount Bracket
1
Remove the screws from the back of the PDP.
2
Use the screw and assemble the plastic hanger. (Please refer to the following picture.)
Fixing the TV panel to the wall attachment panel bracket
The shape of the product may vary depending on the model. (The assemblies of the plastic
hanger and the screw are the same)
• Please ask the installers to install the wall mount bracket.
• Please be sure to check if the plastic hanger is completely secured on both the left and
right side after hanging the SET on the wall mount bracket.
• Please avoid catching your fingers while installing and adjusting the angle.
• Please tightly secure the wall mount bracket to the wall to avoid injury from a falling SET.
Captive Screws
Wall Mount Bracket
ASSY-HINGE
(RIGHT)
Separate ASSY-HINGE
into Left and Right.
ASSY-HINGE
(LEFT)
BN68-00991B-01Eng(002~031) 2/17/06 1:56 PM Page 14
Содержание HP-S4253
Страница 6: ......
Страница 18: ......
Страница 50: ......
Страница 96: ......
Страница 102: ......
Страница 132: ......
Страница 137: ...137 137 Dimensions HP S4253 JACK PANEL DETAIL 2 1 4 H x 18 3 4 W 5 3 4 UP FROM BOTTOM TOP VIEW FRONT VIEW...
Страница 138: ...138 SIDE VIEW REAR VIEW...
Страница 139: ...139 Dimensions HP S5053 JACK PANEL DETAIL 2 1 4 H x 18 3 4 W 5 3 4 UP FROM BOTTOM TOP VIEW FRONT VIEW...
Страница 140: ...140 SIDE VIEW REAR VIEW...
Страница 141: ...This page is intentionally left blank...
Страница 142: ...This page is intentionally left blank...
Страница 143: ...This page is intentionally left blank...


