background image

107

107

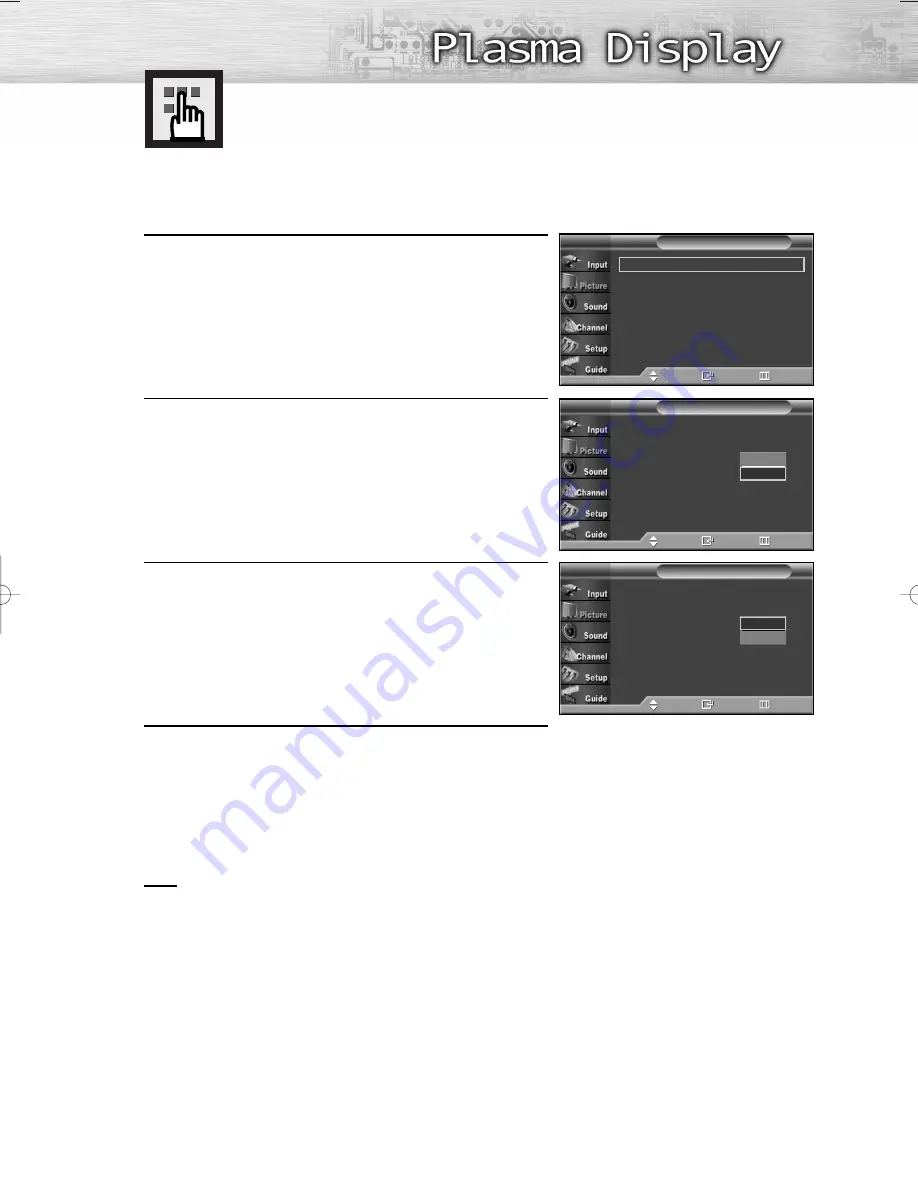
Digital Noise Reduction

If the broadcast signal received by your TV is weak, you can activate the Digital Noise Reduction
feature to help reduce any static and ghosting that may appear on the screen.

1

Press the MENU button. Press the 

or 

button to select

“Picture”, then press the ENTER button.

2

Press the 

or 

button to select “Digital NR”, then

press the ENTER button.

3

Press the 

or 

button to select “On” or “Off”, then

press the ENTER button.

4

Press the MENU button to exit.

Note

• The Digital NR function is available in all modes except PC.

Mode

: Dynamic

Size

: 16:9

Digital NR 

: On

DNIe Demo

: Off

My Color Control

Film Mode 

: Off

More

Picture

T V

Move

Enter

Return

Mode

: Dynamic

Size

: 16:9

Digital NR 

: On

DNIe Demo

: Off

My Color Control
Film Mode 

: Off

More

Picture

T V

Move

Enter

Return

Off

On

Mode

: Dynamic

Size

: 16:9

Digital NR 

: On

DNIe Demo

: Off

My Color Control
Film Mode 

: Off

More

Picture

T V

Move

Enter

Return

Off

On

BN68-00835A-00(104~115)  4/15/05  7:11 PM  Page 107

Содержание HP-R4252

Страница 1: ...Owner s Instructions HP R4252 HP R5052 This device is a Class B digital apparatus Register your product at www samsung com global register ...

Страница 2: ...ectual property rights of certain third parties In particular this product is licensed under the following US patents 5 991 715 5 740 317 4 972 484 5 214 678 5 323 396 5 539 829 5 606 618 5 530 655 5 777 992 6 289 308 5 610 985 5 481 643 5 544 247 5 960 037 6 023 490 5 878 080 and under US Published Patent Application No 2001 44713 A1 This license is limited to private non commercial use by end us...

Страница 3: ...ls which require sophisticated technology to produce However there may be few bright or dark pixels on the screen These pixels will have no impact on the performance of the product Avoid operating the TV at temperatures below 5 C 41 F A still image displayed too long may cause permanent damage to the PDP Panel Watching the PDP TV in 4 3 format for a long period of time may leave traces of borders ...

Страница 4: ...bleCARD is inserted into the slot the TV screen will show a message that CableCARD is inserted and necessary data such as channel information or subscription information will be downloaded from your digital cable service provider When you insert CableCARD for the first time this process may take few minutes depending on the amount of data your cable provider needs to send During this process the d...

Страница 5: ... originally encoded for broadcast This is a big advantage for DTV over analog TV there is no noise ghosting static or scratchy audio 3 How can I connect an antenna in my townhouse co operative apartment condominium or apartment The Federal Communications Commission s OTARD Rule part of the Telecommunications Act of 1996 allows residents of condominiums townhouse or members of neighborhood associat...

Страница 6: ...emote Control 47 Viewing an External Signal Source 49 Picture Control Changing the Picture Standard 52 Customizing the Picture Settings 53 Viewing the DNIe Demonstration 55 Changing the Screen Size 56 Viewing the Picture in Picture 58 Selecting the Sound Source 64 Setting the My Color Control Mode 65 Sound Control Customizing the Sound 70 Using Automatic Sound Settings 71 Setting the TruSurround X...

Страница 7: ...ing Closed Captions On Screen Text Messages Digital 112 Menu Transparency Level 114 Using the Energy Saving feature 115 Preventing Screen Burn in 116 Reducing the Effects of Screen Burn 117 Setting the Function Help 118 Using the V Chip 119 Electronic Program Guide 125 Reminder List 129 Using the CableCARD 131 Using the CableCARD Setup Function 132 Appendix Troubleshooting 136 Care and Maintenance...

Страница 8: ......

Страница 9: ...P L A S M A D I S P L A Y P A N E L General Information Your New Plasma Display Panel 10 Remote Control Buttons 13 Wall Installation Instructions 15 How to assemble the Stand Base 19 ...

Страница 10: ... Press to increase or decrease the volume Also used to select or adjust items on the on screen menu CH buttons Press CH or CH to change channels Also used to move up or down in the on screen menu ˆ Enter button Press to confirm a selection Ø Power button Press to turn the TV on and off Power indicator Power Off Blue Power On Off Remote Control Sensor Aim the remote control towards this spot on the...

Страница 11: ... Remote Control BN59 00462A AAA Batteries S VIDEO Cable HDMI Cable The following parts are sold separately and are available at most electronics stores Once you have unpacked your TV check to make sure that you have all the parts shown here If any piece is missing or broken call your dealer PC Cable PC Audio Cable Optical Cable Coaxial Cable ...

Страница 12: ...IN Connect to the audio output jack on your PC OPTICAL DIGITAL AUDIO OUT Connect to a Digital Audio component COAXIAL DIGITAL AUDIO OUT Connect to a Digital Audio component Anynet Please refer to the Anynet Owner s Instruction This jack is for connecting to other Samsung Anynet enabled devices COMPONENT IN 1 2 Video Y PB PR and audio L AUDIO R component inputs Ô CableCARDTM Insert the CableCARD in...

Страница 13: ...ts up Anynet devices MENU button Displays the main on screen menu ENTER button Confirms a selection Ô FAV CH button Press to switch to your favorite channels CH LIST button Displays the channel list Ò MODE button Selects a target device to be controlled by the Samsung remote control i e TV STB VCR CABLE or DVD Ú PRE CH button Tunes to the previous channel Æ SOURCE button Press to display all of th...

Страница 14: ...sequence These buttons change channels in the PIP window only CAPTION button Controls the caption decoder VCR DVD control buttons Controls VCR tape or DVD disc functions Stop Rewind Play Pause and Fast Forward µ RESET button If your remote control is not functioning properly take out the batteries and press the reset button for about 2 3 seconds Re insert the batteries and try using the remote con...

Страница 15: ...injury to yourself or others if you elect to perform the wall installation 3 This product is for installing on cement walls The product may not stay in place when installed on plaster or wood Installation Notes Parts Wall attachment panel is sold separately Check with your dealer Only use the components and accessories shipped with the panel Plastic Hanger 4 Screw 11 Screw 4 Anchor 11 1 Left 1 Rig...

Страница 16: ...ews on the wall bracket to adjust the length How to assemble the Wall Mount Bracket 3 Check the installation diagram and mark the drill points on the wall Use the 5 0 mm bit to drill holes deeper than 35 mm Fix each anchor in the corresponding hole Match each of the brackets and hinge holes to the corresponding anchor holes and insert and tighten the 11 screws Captive Screw Wall Bracket Hinge Righ...

Страница 17: ... Remove safety pin and insert the 4 product holders into the corresponding bracket holes Then place the product so that it is firmly fixed to the bracket Make sure to reinsert and tighten the safety pin to securely hold the product to the bracket PDP Wall Bracket Wall Mount the product on the wall bracket and make sure it is properly fixed to the left and right plastic hangers Be careful when inst...

Страница 18: ...to use the top center and not the left or the right side of the product to adjust the angle 1 Fix the product to the wall bracket 2 Hold the product at the top in the center and pull it forward direction of the arrow to adjust the angle See the figure to the right 3 You can adjust the bracket angle between 2 and 15 ...

Страница 19: ...amage to the screen Always store the TV upright 1 Using the 4 screws for securing the stand pegs and the monitor firmly attach the monitor to the stand pegs The exterior of the set may be different than the picture Warning Firmly secure the stand to the TV before moving it as the stand may fall and could cause serious injury ...

Страница 20: ......

Страница 21: ...V 23 Connecting CableCARD 25 Connecting a VCR 26 Connecting a Camcorder 27 Connecting a DVD Player 28 Connecting a DTV Receiver 29 Connecting to HDMI High Definition Multimedia Interface 30 Connecting a Digital TV Set Top Box 31 Connecting a Digital Audio System 32 Connecting to an Analog Amplifier 33 ...

Страница 22: ... VHF and UHF Antennas 22 Antennas with 75 ohm Round Leads If your antenna looks like this it has 75 ohm round leads 1 Plug the antenna lead into the ANT 2 IN AIR IN on the TV Use an antenna cable Sold Separately ...

Страница 23: ...a Cable Box 1 Plug the incoming cable into the ANT 1 IN CABLE IN on the TV Use an antenna cable Sold Separately Cable with a Cable Box that Descrambles All Channels 1 Find the cable connected to the ANTENNA OUT terminal on your Cable box This terminal might be labeled ANT OUT VHF OUT or simply OUT 2 Connect the cable to the ANT 1 IN CABLE IN on the TV Use an antenna cable Sold Separately ...

Страница 24: ...e splitter and the IN terminal of the Cable box 3 Connect a coaxial cable between the ANTENNA OUT terminal of the Cable box and the B IN terminal of the RF A B switch 4 Connect a coaxial cable between the other OUT terminal of the Cable box and the A IN terminal of the RF A B switch 5 Connect the last coaxial cable between the OUT terminal of the RF A B switch and the ANT 1 IN CABLE IN on the TV A...

Страница 25: ... number CableCARD ID Host ID and other information will be displayed in about 2 3 minutes If an error message is displayed please contact your service provider When the channel information configuration has finished the message Updating Completed is displayed indicating that the channel list is now updated The Channel list can now be displayed by pressing CH LIST button Notes Once the channel list...

Страница 26: ...VIDEO AUDIO output jacks on the VCR Note For better video use an S Video cable Note Please be sure to match the color coded input terminals and cable jacks Videotape Playback 1 Turn on your TV 2 Press the SOURCE button to select AV or S Video 3 Turn on your VCR insert a videotape and press the Play button How to Connect TV S Video cable Audio cable Video cable VCR Power cord ...

Страница 27: ...ote For better video use an S VIDEO cable Note Please be sure to match the color coded input terminals and cable jacks Viewing Tapes 1 Turn on your TV 2 Press the SOURCE button to select AV or S Video 3 Turn on your camcorder and set it to video mode For details refer to your camcorder owner s instructions 4 Insert the tape into the camcorder and press the Play button How to Connect Viewing camcor...

Страница 28: ... output jacks on the DVD player using a audio cable Note Please be sure to match the color coded input terminals and cable jacks To Play DVD 1 Turn on your TV 2 Press the SOURCE button to select Component 1 or Component 2 3 Turn on your DVD player insert a DVD disc and press the Play button For an explanation of component video see your DVD player s owner s instructions How to Connect 1 2 TV Audio...

Страница 29: ...ble Connect the AUDIO L R COMPONENT1 2 or DVI AUDIO IN input jacks on the TV with the AUDIO output jacks on the DTV receiver using an audio cable Note Please be sure to match the color coded input terminals and cable jacks To Watch DTV 1 Turn on your TV 2 Turn on your DTV receiver For an explanation of component video see your DTV receiver owner s instructions 3 Press the SOURCE button to select C...

Страница 30: ... HDMI output jack on the DTV Set Top Box using an HDMI cable Note Please make sure the HDMI source s power is on before selecting HDMI from the Source List on the TV To Watch DTV 1 Turn on your TV 2 Turn on your DTV receiver For an explanation of HDMI video see your DTV receiver owner s instructions 3 Press the SOURCE button to select HDMI How to Connect 1 2 TV DTV Set Top Box HDMI cable Power cor...

Страница 31: ...he screen in their digital form Connecting to HDMI High Definition Multimedia Interface DVI Compatible TV Connect the DVI AUDIO L R input jacks on the TV with the AUDIO output jacks on the Set Top Box using an audio cable Connect the HDMI input jack on the TV and the VIDEO output jack on the Set Top Box using an HDMI DVI cable How to Connect 1 2 Audio cable HDMI DVI cable From cable or Antenna Pow...

Страница 32: ... OPTICAL output jack on the TV Be certain to remove the black cover from the optical output before inserting the cable If your system has both coaxial and optical digital audio inputs SAMSUNG recommends you use the optical digital output on the TV Do not connect both optical and coaxial cables This may damage your audio system OPTICAL converts the electric signal into an optical light signal and t...

Страница 33: ...u must hook them up to an amplifier When an audio amplifier is connected to the AUDIO OUT AUDIO L R terminals Decrease the gain volume of the audio amplifier turn the TV s internal mute on and adjust the volume level with the volume control of the amplifier How to Connect 1 Analog Amplifier Audio cable Power cord ...

Страница 34: ......

Страница 35: ...P L A Y P A N E L Operation Turning the TV On and Off 36 Viewing the Menus and Displays 40 Memorizing the Channels 41 Adding and Erasing Channels 44 Setting Up Your Remote Control 47 Viewing an External Signal Source 49 ...

Страница 36: ...e checking the antenna input memorizing the channels and setting the time Note The Plug Play function operates after plugging in the TV for the first time 1 Press the POWER button on the remote control The message Menu language Channels and Time will be set is displayed Press the ENTER button then Select the language of the OSD menu is automatically displayed 2 Press the ENTER button to enter the ...

Страница 37: ...ress the or button to select STD HRC or IRC press the ENTER button Press the or button to select Start then press the ENTER button to memorize the channels Note STD HRC and IRC identify various types of cable TV systems Contact your local cable company to identify the type of cable system that exists in your particular area At this point the signal source has been selected Proceed to Storing Chann...

Страница 38: ...opriate time zone on the map of the United States Press the ENTER button If you have received a digital signal the time will be set automatically If not see page 100 to set the clock 7 The message Completed Time will be updated automatically is displayed When you have finished press the ENTER button The message will automatically disappear after a few seconds even if the ENTER button is not presse...

Страница 39: ...2 Press the ENTER button to select Plug Play 3 For further details on setting up options refer to the previous page Note Plug and Play can only be accessed in the TV mode Plug Play Language English Time V Chip Caption Menu Transparency Medium More Setup T V Move Enter Return Menu language Channels and Time will be set i Start ...

Страница 40: ...button to move to items in the menu Press the œ ENTER buttons to display change or use the selected items Press the ENTER button to enter items in the menu On screen menus disappear from the screen automatically after about two minutes or you can press the MENU or EXIT button on your remote control to exit the menu Displaying Status Information Press the INFO button on the remote control The TV wi...

Страница 41: ...s the MENU button Press the or button to select Channel then press the ENTER button 2 Press the or button to select Auto Program then press the ENTER button 3 Press the or button to select the antenna connection then press the ENTER button Notes Air Air antenna signal Cable Cable antenna signal Air Cable Air and Cable antenna signals If the CableCARD is inserted into the CableCARD slot on the rear...

Страница 42: ...able TV systems Contact your local cable company to identify the type of cable system that exists in your particular area At this point the signal source has been selected Proceed to Storing Channels in Memory on page 43 Auto Program T V Move Enter Return Select the cable system Digital Channel STD Analog Channel STD Start Auto Program T V Move Enter Return Select the cable system Digital Channel ...

Страница 43: ...on process Press the EXIT button to exit Note The TV must be connected to an antenna in order to receive digital TV signals Even if a particular channel is deleted from the memory you can always tune to that channel directly by using the number buttons on the remote control Notes All available DTV and analog channels are automatically stored in memory when channels are selected by directly accessi...

Страница 44: ...t above Press the EXIT button to exit Adding and Erasing Channels To add channels that were not memorized or to delete unwanted channels from memory Antenna Air Auto Program Add Delete Favorite Channels Name Fine Tune More Channel T V Move Enter Return Antenna Air Auto Program Add Delete Favorite Channels Name Fine Tune More Channel T V Move Enter Return Add Delete Enter Return Air 16 Not in memor...

Страница 45: ...ttons and then press ENTER button After the process of updating the channel information using CableCARD has been completed only the number of channels on the channel list can be directly accessed Using the PRE CH button to select the previous channel Press the PRE CH button The TV will switch to the last channel viewed To quickly switch between two channels that are far apart tune to one channel t...

Страница 46: ...1 digital press 7 then then 1 For channel 7 2 analog press 7 then then 2 Notes HD indicates the TV is receiving a Digital High Definition signal SD indicates the TV is receiving a Standard Definition signal For quick channel change press the number buttons then press the ENTER button DTV Cable 7 1 KYW HD HD DTV Cable 7 2 R SD Multi ...

Страница 47: ...sing the number buttons on your remote control enter three digits of the VCR or Cable box DVD player code listed on page 48 of this manual for your brand of VCR or Cable box DVD Make sure you enter three digits of the code even if the first digit is a 0 If more than one code is listed try the first one 5 Press the POWER button on the remote control Your VCR or Cable box DVD should turn on if your ...

Страница 48: ...48 Remote Control Codes VCR Codes DVD Codes Cable Box Codes ...

Страница 49: ...on 4 Press the MENU button to exit Notes When you connect equipment to the TV you can choose between the following sets of jacks AV S VIDEO COMPONENT 1 COMPONENT 2 PC or HDMI on the TV s rear panel HDMI input can only be selected when the external device is turned on Quick way to access viewing an external signal source Just press the SOURCE button on the remote control Source List TV Edit Name An...

Страница 50: ...ble STB HD STB Satellite STB PVR STB AV Receiver DVD Receiver GAME Camcorder DVD Combo PC VOD STB or TV Set other signal sources S Video Component 1 Component 2 PC or HDMI using the same method as listed above 4 Press the MENU button to exit 50 Source List TV Edit Name Anynet Input T V Move Enter Return AV S Video Component 1 Component 2 PC HDMI Edit Name T V Move Enter Return AV S Video Component...

Страница 51: ...re Control Changing the Picture Standard 52 Customizing the Picture Settings 53 Viewing the DNIe Demonstration 55 Changing the Screen Size 56 Viewing the Picture in Picture 58 Selecting the Sound Source 64 Setting the My Color Control Mode 65 ...

Страница 52: ...ng the day or when there is bright light in the room Choose Standard for the standard factory settings Choose Movie when viewing the movie Choose Custom if you want to adjust the settings according to personal preference see Customizing the Picture Settings page 53 Mode Dynamic Size 16 9 Digital NR On DNIe Demo Off My Color Control Film Mode Off More Picture T V Move Enter Return Mode T V Move Ent...

Страница 53: ...l TV Customizing the Picture Settings You can use the on screen menus to change the Contrast Brightness Sharpness Color Tint and Color Tone according to personal preference You can select Standard which automatically recalls your personalized picture settings 53 Mode T V Move Enter Return Mode Dynamic Contrast 100 Brightness 45 Sharpness 75 Color 55 Tint G 50 R 50 Color Tone Cool2 Reset Mode T V M...

Страница 54: ...lts select Reset by pressing the or button Press the ENTER button The previously adjusted settings will be reset to the factory defaults Mode T V Move Enter Return Mode Custom Contrast 80 Brightness 50 Sharpness 50 Color 50 Tint G 50 R 50 Color Tone Normal Reset Mode T V Move Enter Return Mode Custom Contrast 80 Brightness 50 Sharpness 50 Color 50 Tint G 50 R 50 Color Tone Normal Reset Mode T V Mo...

Страница 55: ...Off Switches off the DNIe Demo mode On Switches on the DNIe Demo mode 4 Press the MENU button to exit Note DNIeTM Digital Natural Image engine This feature brings you more a detailed image with 3D noise reduction and detail contrast and white enhancement Quick way to select DNIe Simply press the DNIe button under the cover of the remote control Mode Dynamic Size 16 9 Digital NR On DNIe Demo Off My...

Страница 56: ...Panorama Use this mode for the wide aspect ratio of a panoramic picture Zoom1 Magnifies the size of the picture on the screen Zoom2 Expands the Zoom1 format picture 4 3 Sets the picture to 4 3 normal mode Quick way to change the Screen size Simply press the P SIZE button under the cover of the remote control Mode Dynamic Size 16 9 Digital NR On DNIe Demo Off My Color Control Film Mode Off More Pic...

Страница 57: ...erts regular 4 3 aspect ratio screen to wide screen Zoom1 The screen size when Wide screen is vertically enlarged Zoom2 The screen size when the Zoom1 screen is vertically enlarged 4 3 Sets the picture to 4 3 normal mode Notes In TV VIDEO S VIDEO and COMPONENT 480i 480p modes all screen modes can be selected 16 9 Panorama Zoom1 Zoom2 4 3 In TV DTV COMPONENT 720p 1080i PC HDMI modes only 16 9 4 3 m...

Страница 58: ...d Off Note If the PIP On Off will not function check if the V Chip Lock refer to page 120 is On PIP does not function when the V Chip Lock is set to On Change the setting to Off and try it again 4 Press the MENU button to exit PIP Settings Note This TV has only one tuner and does not allow you to watch one TV channel in the main screen and another channel in the PIP screen Mode Dynamic Size 16 9 D...

Страница 59: ...nt1 Component2 or HDMI The signal from these inputs will not appear if you have not connected any equipment to the TV s respective input jacks 5 Press the MENU button to exit Notes The same Source can not be selected on both the main screen and subscreen PC is not available in PIP picture Mode Dynamic Size 16 9 Digital NR On DNIe Demo Off My Color Control Film Mode Off More Picture T V Move Enter ...

Страница 60: ...he image in the PIP window will appear on the main screen and vice versa Refer to page 58 Note If main picture is in PC mode Swap is not available 4 Press the MENU button to exit 60 Mode Dynamic Size 16 9 Digital NR On DNIe Demo Off My Color Control Film Mode Off More Picture T V Move Enter Return PIP On Source TV Swap Size Position PIP Channel DTV Air 3 0 PIP T V Move Enter Return PIP On Source T...

Страница 61: ... or button to select option you want then press the ENTER button 5 Press the MENU button to exit PIP On Source TV Swap Size Position PIP Channel DTV Air 3 0 PIP T V Move Enter Return PIP On Source TV Swap Size Position PIP Channel DTV Air 3 0 PIP T V Move Enter Return Mode Dynamic Size 16 9 Digital NR On DNIe Demo Off My Color Control Film Mode Off More Picture T V Move Enter Return PIP On Source ...

Страница 62: ... you want then press the ENTER button 5 Press the MENU button to exit Note The Double1 and Double2 mode cannot be selected in Position 62 Mode Dynamic Size 16 9 Digital NR On DNIe Demo Off My Color Control Film Mode Off More Picture T V Move Enter Return PIP On Source TV Swap Size Position PIP Channel DTV Air 3 0 PIP T V Move Enter Return PIP On Source TV Swap Size Position PIP Channel DTV Air 3 0...

Страница 63: ...Press the MENU button to exit Quick way to change the PIP channel Just press the CH or CH button under the cover of the remote control Mode Dynamic Size 16 9 Digital NR On DNIe Demo Off My Color Control Film Mode Off More Picture T V Move Enter Return PIP On Source TV Swap Size Position PIP Channel DTV Air 3 0 PIP T V Move Enter Return PIP On Source TV Swap Size Position PIP Channel DTV AIR 3 0 PI...

Страница 64: ...the or button to select Sound Select then press the ENTER button 3 Press the or button to select Main or Sub then press the ENTER button 4 Press the MENU button to exit Mode Custom Equalizer SRS TruSurround XT Off Multi Track Options Auto Volume Off Internal Mute Off More Sound T V Move Enter Return More Digital Output Dolby Digital Melody On Sound Select Main Sound T V Move Enter Return Main Sub ...

Страница 65: ...NTER button on the remote control for 3 seconds when there is no OSD on the screen will display the My Color Control menu Setting the My Color Control Mode My Color Control allows you to adjust colors according to your preference by adjusting skin sky and grass tones using the predefined settings Standard Custom Red Green Blue Yellow Pink White without affecting other colors on the screen There ar...

Страница 66: ...ote Images shown above may differ from the actual adjustment on the screen These images are presented for illustrative purposes Standard Picture Emphasizes Reds Emphasizes Clear Blues Emphasizes Yellows Emphasizes Warm Skin Colors Red Standard Green White Blue Yellow Pink Emphasizes Mild Greens Emphasizes Whites ...

Страница 67: ...o adjust the settings Press the or button to select other colors 6 Press the ENTER or MENU button to confirm the changes and return to the previous menu The original picture before adjustment is shown on the left side while the picture after adjustment is shown on the right side and an adjustment bar on the bottom of the screen Detail Control T V Move Enter Return Red 50 Green 50 Blue 50 Yellow 50...

Страница 68: ...e ENTER button 4 Press the or button to select Reset and press the ENTER button 5 The previously adjusted My Color Control Colors will be reset to the factory defaults 6 Press the MENU button to exit the menu Detail Control T V Move Enter Return Red 50 Green 50 Blue 50 Yellow 50 Pink 60 White 50 Reset Detail Control T V Move Enter Return Red 50 Green 50 Blue 50 Yellow 50 Pink 60 White 50 Reset Eas...

Страница 69: ... Automatic Sound Settings 71 Setting the TruSurround XT 72 Choosing a Multi Channel Sound MTS track Digital 73 Choosing a Multi Channel Sound MTS track Analog 74 Using the Auto Volume 75 Choosing a Digital Sound Format 76 Setting the On Off Melody 77 Selecting the Internal Mute 78 ...

Страница 70: ...the or button to increase or decrease the level of the particular frequency 4 Press the MENU button to exit Notes If you make any changes to the equalizer settings the sound mode is automatically switched to the custom mode L R Sound Balance Adjustment To adjust the sound balance of the L R speakers Bandwidth Adjustment 100 300 1K 3K 10K To adjust the level of different bandwidth frequencies Equal...

Страница 71: ...tomatic Sound Settings Your TV has automatic sound settings Standard Music Movie and Speech that are preset at the factory Or you can select Custom which automatically recalls your personalized sound settings 71 Quick way to access the picture setting Just press the S MODE button on the remote control Mode Custom Equalizer SRS TruSurround XT Off Multi Track Options Auto Volume Off Internal Mute Of...

Страница 72: ...eakers TruSurround delivers a compelling virtual surround sound experience through any two speaker playback system including internal television speakers It is fully compatible with all multichannel formats Mode Custom Equalizer SRS TruSurround XT Off Multi Track Options Auto Volume Off Internal Mute Off More Sound T V Move Enter Return Off 3D Mono Stereo Mode Custom Equalizer SRS TruSurround XT O...

Страница 73: ...R button to select Preferred Language Press the or button to choose the language English Spanish or French you want then press the ENTER button 4 Press the MENU button to exit Quick way to access the MTS menu Just press the MTS button on the remote control You can listen in a language other than the favorite language by pressing the MTS button Preferred Language English Multi Track Sound Stereo Mu...

Страница 74: ...reo Choose SAP to listen to the Separate Audio Program which is usually a foreign language translation Choosing a Multi Channel Sound MTS track Analog Depending on the particular program being broadcast you can listen to Mono Stereo or SAP 74 Quick way to access the MTS menu Just press the MTS button on the remote control repeatedly to select one of the settings Preferred Language English Multi Tr...

Страница 75: ... ENTER button 2 Press the or button to select Auto Volume then press the ENTER button 3 Press the or button to select On then press the ENTER button Pressing the or button will alternate between On and Off 4 Press the MENU button to exit Mode Custom Equalizer SRS TruSurround XT Off Multi Track Options Auto Volume Off Internal Mute On More Sound T V Move Enter Return Mode Custom Equalizer SRS TruSu...

Страница 76: ...our TV The digital sound outputs are connectors labeled Optical and Coaxial After connecting a digital audio component you must specify the transmission format Dolby or PCM as appropriate to your digital audio component 76 More Digital Output PCM Melody On Sound Select Main Sound T V Move Enter Return Manufactured under license from Dolby Laboratories Dolby and the double D symbol are trademarks o...

Страница 77: ... or Off then press the ENTER button 3 Press the MENU button to exit Setting the On Off Melody A melody sound can be set to come on when the TV is powered On or Off More Digital Output Dolby Digital Melody On Sound Select Main Sound T V Move Enter Return Mode Custom Equalizer SRS TruSurround XT Off Multi Track Options Auto Volume Off Internal Mute Off More Sound T V Move Enter Return Off On ...

Страница 78: ...menus except Multi Track Options and Digital Output cannot be adjusted The monitor and digital audio outputs Optical Coaxial remain enabled The VOL VOL and Mute buttons do not operate when the Internal Mute is set to On 78 Mode Custom Equalizer SRS TruSurround XT Off Multi Track Options Auto Volume Off Internal Mute On More Sound T V Move Enter Return Mode Custom Equalizer SRS TruSurround XT Off M...

Страница 79: ...ntrol Selecting the Antenna 80 Selecting Your Favorite Channels 81 Labeling the Channels 82 Viewing the Channel Lists 83 Editing the Channel Lists 84 Fine Tuning Analog Channels 85 Checking the Digital Signal Strength 86 LNA Low Noise Amplifier 87 ...

Страница 80: ... to ANT 1 IN CABLE IN select CABLE and if it is connected to ANT 2 IN AIR IN select Air If both ANT 1 IN and ANT 2 IN are connected select the antenna input you want If the antenna input is not selected properly noise may appear on the screen or Antenna Air Auto Program Add Delete Favorite Channels Name Fine Tune More Channel T V Move Enter Return Antenna Air Auto Program Add Delete Favorite Chann...

Страница 81: ... button to select a channel as a favorite channel then press the ENTER button Press the ENTER button again to deselect the selected channel 3 Press the MENU button to exit Notes Only memorized channels can be set as favorite channels Select All Press to select all channels Clear All Press to clear all channels To View Your Favorite Channels Press the FAV CH button repeatedly to jump from one favor...

Страница 82: ...next field which will be selected Select a second letter or digit by pressing the or button as above Repeat the process to select the last three digits When you have finished press the ENTER button to assign the new name To clear the entered channel name move to Clear by using the œ button and press the ENTER 3 Press the MENU button to exit Notes The names of digital broadcasting channels are auto...

Страница 83: ... previous channel list page Green button Press to display the next channel Yellow button Press to toggle between your favorite channels or all channels Blue or EXIT button Press to exit Alternate method Press the CH LIST button on the remote control to display a list of channels Quick way to view the Channel Lists Just press the CH LIST button on the remote control All Edit Favorite Channel List T...

Страница 84: ...to display the previous channel list page Green button Press to display the next channel Yellow button Press to toggle between your favorite channels or all channels Blue or EXIT button Press to exit 5 Press the MENU button to exit All Edit Favorite Channel List T V Move Enter Return Edit 2 1 4 6 8 10 12 13 1 TV 1 13 2 TV 1 13 3 TV 3 13 4 TV 4 17 19 23 28 32 10 44 62 69 98 NCAM H Channel List Add ...

Страница 85: ...fine tuning setting in the TV s memory press the ENTER button 4 To reset the fine tuning setting press the button to select Reset then press the ENTER button 5 Press the MENU button to exit Notes Only analog TV channels can be fine tuned will appear next to the name of fine tuned channels Fine Tune AIR 4 Fine Tuned Reset Adjust Save Return 10 Fine Tune AIR 4 Reset Move Enter Return 0 Antenna Air A...

Страница 86: ...ital channels 1 Press the MENU button Press the or button to select Channel then press the ENTER button 2 Press the or button to select Signal Strength then press the ENTER button If the signal strength meter indicates that the signal is weak physically adjust your antenna to increase the signal strength Continue to adjust the antenna until you find the best position with the strongest signal 3 Pr...

Страница 87: ...press the ENTER button 4 Press the MENU button to exit Notes LNA functions only when antenna is set to AIR and the settings will be stored separately in each channel See Selecting the Antenna on page 80 If the picture is noisy with the LNA set to On select Off The LNA setting must be made separately for each channel Channel T V Move Enter Return More Channel List Signal Strength LNA Off More Chann...

Страница 88: ......

Страница 89: ...P L A S M A D I S P L A Y P A N E L Connecting a PC and Operation Connecting a PC 90 Changing the Position of the Image 94 Picture Quality Adjustment 95 Image Reset 98 ...

Страница 90: ...nd the Audio input jacks PC AUDIO IN on the TV Notes Please be sure to match the color coded input terminals and cable jacks A PC will not operate when connected with a HDMI DVI cable To watch the PC screen 1 Turn on your TV 2 Press the SOURCE button on the remote control or SOURCE button on the front panel to select PC 3 Turn on your PC and check for PC system requirements Refer to pages 92 and 9...

Страница 91: ... setup It allows you to install your monitor in a Plug and Play compatible system without the usual setup hassles and confusion Your PC system can easily identify and configure itself for use with your TV This TV automatically tells the PC system its Extended Display Identification data EDID using Display Data Channel DDC protocols ...

Страница 92: ...k on the Monitor tab then set the Screen Refresh Rate with reference to the Display Modes Table Set the Vertical Frequency and Horizontal Frequency individually if you can do so instead of setting the Screen Refresh Rate 5 Press the OK button close the window then press the OK button on the Display Registration Information window Automatic re booting may commence at this moment 6 Shutdown the PC a...

Страница 93: ...rizontal frequency select mode exists select 60Hz vertical and 48 4KHz horizontal In some cases abnormal signals such as stripes might appear on the TV screen when the PC power is turned off or if the PC is disconnected If so press the SOURCE button on the remote control or SOURCE button on the front panel to enter the VIDEO mode Also make sure that the PC is connected Connect only a PC monitor to...

Страница 94: ...PC then press the ENTER button 3 Press the or button to select Position then press the ENTER button 4 Adjust the position of screen by pressing the œ button 5 Press the MENU button to exit Changing the Position of the Image Plug Play Language English Time V Chip Caption Menu Transparency Medium More Setup T V Move Enter Return Image Lock Position Auto Adjustment Image Reset PC T V Move Enter Retur...

Страница 95: ...the or button to select Setup then press the ENTER button 2 Press the or button to select PC then press the ENTER button 3 Press the or button to select Auto Adjustment then press the ENTER button The message Auto Adjustment in progress Please wait appears on the screen and the picture adjustments are automatically activated Image Lock Position Auto Adjustment Image Reset PC T V Move Enter Return ...

Страница 96: ...in to select Coarse Remove picture noise vertical stripes on the screen by pressing the œ or button If Coarse is not set properly vertical stripes will appear on the screen Press the or button to select another item 5 Press the MENU button to exit 96 Image Lock Position Auto Adjustment Image Reset PC T V Move Enter Return Coarse 50 Fine 0 Image Lock T V Move Enter Return Coarse 50 Plug Play Langua...

Страница 97: ...n to select Fine then press the ENTER button Remove picture noise on the screen by pressing the œ or button If Fine is not set properly noise will appear on the screen Press the or button to select another item 5 Press the MENU button to exit 97 Image Lock Position Auto Adjustment Image Reset PC T V Move Enter Return Coarse 50 Fine 0 Image Lock T V Move Enter Return Fine 0 Plug Play Language Engli...

Страница 98: ...ton 3 Press the or button to select Image Reset then press the ENTER button The message Image Reset is completed appears on the screen The previously adjusted settings will be reset to the factory defaults Image Lock Position Auto Adjustment Image Reset PC T V Move Enter Return Image Reset is completed Plug Play Language English Time V Chip Caption Menu Transparency Medium More Setup T V Move Ente...

Страница 99: ...P L A S M A D I S P L A Y P A N E L Time Setting Setting the Clock 100 Setting the On Off Timer 102 Setting the Sleep Timer 103 ...

Страница 100: ...elect Clock Set then press the ENTER button 5 Press the œ or button to move to Month Day Year Hour Minute or am pm Set the clock you want by pressing the or button then press the ENTER button 6 Press the MENU button to exit Notes The current time will appear every time you press the INFO button You can set the Month Day Year Hour and Minute directly by pressing the number buttons on the remote con...

Страница 101: ...e map of the United States then press the enter button 5 Press the or button to select DST Daylight Saving Time then press the ENTER button Press the or button to select Yes or No then press the ENTER button 6 Press the MENU button to exit Note Depending on the broadcast station and signal the auto time may not be set correctly If this occurs set the time manually 101 Clock Sleep Timer Off On Time...

Страница 102: ...ove to the next step Set other items using the same method as above To activate Off Timer with the setting entered set Activation to Yes by pressing or button When finished press the ENTER button 4 Press the MENU button to exit Note Auto Power Off When you set the timer On the television will eventually turn off if no controls are operated for 3 hours after the TV was turned on by the timer This f...

Страница 103: ...he button to select Activation Press the or button to select No then press the ENTER button 5 Press the MENU button to exit Setting the Sleep Timer The sleep timer automatically shuts off the TV after a preset time from 30 to 180 minutes Set sleep timer Sleep Timer T V Move Adjust Return Set sleep timer Sleep Timer T V Move Adjust Return Minute Activation No Minute Activation 30 Yes Plug Play Lang...

Страница 104: ......

Страница 105: ...110 Viewing Closed Captions On Screen Text Messages Analog 111 Viewing Closed Captions On Screen Text Messages Digital 112 Menu Transparency Level 114 Using the Energy Saving feature 115 Preventing Screen Burn in 116 Reducing the Effects of Screen Burn 117 Setting the Function Help 118 Using the V Chip 119 Electronic Program Guide 125 Reminder List 129 Using the CableCARD 131 Using the CableCARD S...

Страница 106: ...h Spanish or French Press the ENTER button 4 Press the MENU button to exit Plug Play Idioma Español Tiempo V Chip Subtítulo Transpar del menú Medio Más Configuración T V Mover Ingresar Regresar Plug Play Language English Time V Chip Caption Menu Transparency Medium More Setup T V Move Enter Return Plug Play Language English Time V Chip Caption Menu Transparency Medium More Setup T V Move Enter Ret...

Страница 107: ...s the ENTER button 3 Press the or button to select On or Off then press the ENTER button 4 Press the MENU button to exit Note The Digital NR function is available in all modes except PC Mode Dynamic Size 16 9 Digital NR On DNIe Demo Off My Color Control Film Mode Off More Picture T V Move Enter Return Mode Dynamic Size 16 9 Digital NR On DNIe Demo Off My Color Control Film Mode Off More Picture T ...

Страница 108: ...3 Press the or button to select On or Off then press the ENTER button 4 Press the MENU button to exit Note Film Mode is supported in TV VIDEO S VIDEO and COMPONENT 480i Mode Dynamic Size 16 9 Digital NR On DNIe Demo Off My Color Control Film Mode Off More Picture T V Move Enter Return Mode Dynamic Size 16 9 Digital NR On DNIe Demo Off My Color Control Film Mode Off More Picture T V Move Enter Retu...

Страница 109: ...select Blue Screen then press the ENTER button 3 Press the or button to select On or Off then press the ENTER button 4 Press the MENU button to exit More Blue Screen Off Color Weakness Off PIP Picture T V Move Enter Return More Blue Screen Off Color Weakness Off PIP Picture T V Move Enter Return Blue Screen is displayed when there is no signal from an external device in the External Mode regardles...

Страница 110: ...ENTER button Press the œ or button to change the value of the item then press the ENTER button Press the or button to select other items 5 Press the MENU button to exit Using the Color Weakness Enhancement Option This option adjusts the Red Blue or Green color to enhance the image according to the user s particular color weakness Color Weakness T V Enter Return Color Weakness Off Red 0 Green 0 Blu...

Страница 111: ...milar to CC2 Text1 First Text Service This may be various non program related data Text2 Second Text Service Additional data usually not program related Text3 Text4 Third and Fourth Text Services These data channels should be used only if Text1 and Text2 data bandwidths are not sufficient 5 Press the MENU button to exit Notes The Caption feature doesn t work in COMPONENT 480p 720p 1080i PC HDMI DV...

Страница 112: ... ENTER button 5 Press the or button to select Caption Options then press the ENTER button Notes Caption Options are available only when Service1 Service6 can be selected in Caption Mode Service1 6 in digital caption mode may not be available according to the broadcasting type Caption On Caption Mode Default Caption Options Caption T V Move Enter Return Caption On Caption Mode Service1 Caption Opti...

Страница 113: ...e the color of the letter The default is White Background Color This option consists of Default White Black Red Green Blue Yellow Magenta and Cyan You can change the background color of the caption The default is Black Foreground Opacity This option consists of Default Transparent Translucent Solid and Flashing You can change the opacity of the letter Background Opacity This option consists of Def...

Страница 114: ...to select Menu Transparency then press the ENTER button Press the or button to select level then press the ENTER button 3 Press the MENU button to exit Plug Play Language English Time V Chip Caption Menu Transparency Medium More Setup T V Move Enter Return Plug Play Language English Time V Chip Caption Menu Transparency Medium More Setup T V Move Enter Return High Medium Low Opaque ...

Страница 115: ...ion 4 Press the MENU button to exit Using the Energy Saving Feature This feature adjusts the screen brightness automatically depending on the surrounding lighting conditions More Energy Saving Standard Screen Burn Protection PC Function Help Off CableCARDTM CableCARDTM Setup Setup T V Move Enter Return More Energy Saving Standard Screen Burn Protection PC Function Help Off CableCARDTM CableCARDTM ...

Страница 116: ...You will also see the items Horizontal Dot Vertical Line and Time Pixel Shift Using this function you can minutely move pixels on the PDP in horizontal or vertical direction to prevent after image on the screen 4 Press the or button to select the item you wish to change then press the ENTER button Press the or button to change the value of the item then press the ENTER button Optimum condition for...

Страница 117: ...en for a long time 4 Press the MENU button to exit Notes To remove after images on the screen use either the All White or Signal Pattern function Although both functions remove after images on the screen Signal Pattern is more effective The after image removal function has to be executed for a long time approximately 1 hour to effectively remove after images on the screen If the after image is not...

Страница 118: ...he Function Help Displays help on the menu functions 118 More Energy Saving Standard Screen Burn Protection PC Function Help Off CableCARDTM CableCARDTM Setup Setup T V Move Enter Return More Energy Saving Standard Screen Burn Protection PC Function Help Off CableCARDTM CableCARDTM Setup Setup T V Move Enter Return Switches the Function Help on Plug Play Language English Time V Chip Caption Menu T...

Страница 119: ...N number Note The default PIN number of a new TV set is 0 0 0 0 3 The V Chip screen will appear Press the or button to select Change PIN then press the ENTER button 4 The Change PIN screen will appear Choose any 4 digits for your PIN and enter them As soon as the 4 digits are entered the Confirm new PIN screen appears Re enter the same 4 digits When the Confirm screen disappears your PIN has been ...

Страница 120: ...reen will appear To enable the V Chip feature press the ENTER button so that the V Chip Lock field is On Pressing the or button will alternate between On and Off Press the ENTER button 4 Press the MENU button to exit 120 V Chip Lock English TV Parental Guidelines MPAA Rating Change PIN V Chip T V Move Enter Return Plug Play Language English Time V Chip Caption Menu Transparency Medium More Setup T...

Страница 121: ...ter PIN will appear Enter your 4 digit PIN number 3 The V Chip screen will appear Press the or button to select TV Parental Guidelines then press the ENTER button 4 The TV Parental Guidelines screen will appear Press the or button to select one of the six ages based categories TV Y Young children TV Y7 Children 7 and over TV G General audience TV PG Parental guidance TV 14 Viewers 14 and over TV M...

Страница 122: ... the FV D L S and V sub ratings First select one of these TV Ratings TV Y TV Y7 TV G TV PG TV 14 or TV MA See Step 4 on previous page and press the button A symbol will be displayed for each sub rating While is selected press the ENTER button to go to a sub rating Press ENTER to block the sub rating To select a different TV Rating press the or button and then repeat the process Note The V chip wil...

Страница 123: ...o select a particular MPAA category Pressing the or button will cycle through the MPAA categories While a particular category is selected press the ENTER button to activate it A selected symbol will be displayed Press the ENTER button to block or unblock the category Note The V Chip will automatically block any category that is more restrictive For example if you block the PG 13 category then R NC...

Страница 124: ...hannels In this case use the V Chip function for an emergency escape 1 Press the MENU button Press the or button to select Setup then press the ENTER button 2 Press the or button to select V Chip then press the ENTER button 3 Enter your PIN number and press the or button to temporarily disable the V Chip Lock 124 Channel Is Locked by TV PG S Use the NUMBER buttons to enter your pin number to unloc...

Страница 125: ...ide D Scrolls backwards quickly 2 hours Press the Green button on the remote control E Displays titles and other details about upcoming programs of particular channels Highlight the program and press the INFO button to see additional and detailed information The availability of additional details depends on the broadcaster Use the œ buttons to search information about another channel F Scrolls for...

Страница 126: ...en press the ENTER button Mini Guide Displays the guide for one channel Full Guide Displays the guide for all channels 4 Press the MENU button to exit Mini Guide Full Guide Reminder List Default Guide Mini Guide Guide T V Move Enter Return Mini Guide Full Guide Reminder List Default Guide Mini Guide Guide T V Move Enter Return Mini Guide Full Guide Mini Guide Full Guide Reminder List Default Guide...

Страница 127: ...am guide for all channels Press again to switch to the program information for the selected channel Blue button Press to exit INFO button Press to view detailed information for the selected digital program 3 Press the Blue button or EXIT button to exit Notes You can also view information about a single channel by pressing the GUIDE button on the remote control The EPG should be pre set in Mini Gui...

Страница 128: ...mation from two hours ago Yellow button Press to view the program information for two hours from now Blue button Press to exit ENTER button Press to watch the current program or to add the program to reminder list 4 You may now Jump to a channel directly Use the or buttons to highlight the program in the column and press the enter button Obtain additional program details Highlight the title of a p...

Страница 129: ...de Press the or button to select programs you would like to see then press the enter button The symbol will be displayed Each press of the enter button will switch between Remind and Del Remind Del Delete 3 Press the MENU button to exit Note Up to 8 programs can be reminded Reminder List Mini Guide Full Guide Reminder List Default Guide Mini Guide Guide T V Move Enter Return Mini Guide 3 Program 1...

Страница 130: ...d then press the ENTER button To remove all programs press the œ or button to select Cancel All then press the ENTER button 2 Press the MENU button to exit Mini Guide Full Guide Reminder List Default Guide Mini Guide Guide T V Move Enter Return Mini Guide Full Guide Reminder List Default Guide Mini Guide Guide T V Move Enter Return Reminder List T V Enter Return Cancel All MON 1 17 1 56am 2 05am 1...

Страница 131: ...us Pairing Network Setup of the CableCARD provided by the service provider in CableCARD menu 1 Make sure the Cablecard is inserted Press the MENU button Press the or button to select Setup then press the ENTER button 2 Press the or button to select CableCARDTM then press the ENTER button 3 Press the EXIT button to exit Plug Play Language English Time V Chip Caption Menu Transparency Medium More Se...

Страница 132: ...utton 3 Press the ENTER button to select CableCARDTM Reset Using the CableCARD Setup Function Sets up the relevant options for CableCARD Plug Play Language English Time V Chip Caption Menu Transparency Medium More Setup T V Move Enter Return More Energy Saving Standard Screen Burn Protection PC Function Help Off CableCARDTM CableCARDTM Setup Setup T V Move Enter Return CableCARDTM Reset Channel Li...

Страница 133: ...2 Press the or button to select CableCARDTM Setup then press the ENTER button 3 Press the ENTER button to select Channel List Reorganization Plug Play Language English Time V Chip Caption Menu Transparency Medium More Setup T V Move Enter Return More Energy Saving Standard Screen Burn Protection PC Function Help Off CableCARDTM CableCARDTM Setup Setup T V Move Enter Return CableCARDTM Reset Channe...

Страница 134: ......

Страница 135: ...P L A S M A D I S P L A Y P A N E L Appendix Troubleshooting 136 Care and Maintenance 137 Specifications 138 Dimensions HP R4252 139 Dimensions HP R5052 141 ...

Страница 136: ... sure the TV is plugged in Check the antenna connections Check that the Mute feature is Off Try another channel Adjust the volume Press the MODE button to put your remote control in the TV mode Check the battery charge of the remote control Check if the power plug is connected Check to see that both the TV and the source are plugged in and turned on Adjust the Brightness or Contrast settings Adjus...

Страница 137: ...ear Do not place the TV on a rough and slanted surface such as cloth or paper Liquids Do not place liquids near or on the TV Cabinet Never open the cabinet or touch the parts inside Wipe your TV with a clean dry cloth Never use water cleaning fluids wax or chemicals Do not put heavy objects on top of the cabinet Temperature If your TV is suddenly moved from a cold to a warm place unplug the power ...

Страница 138: ... R OPTICAL DIGITAL OUT COAXIAL DIGITAL OUT 15W 15W 8Ω HP R4252 41 7 W x 29 1 H x 3 88 D inches Without Stand 41 7 W x 30 7 H x 13 4 D inches With Stand 39 8 Kg 87 74 lbs Without Stand 44 5 Kg 98 10 lbs With Stand HP R5052 48 43 W x 32 52 H x 3 72 D inches Without Stand 48 43 W x 34 47 H x 13 18 D inches With Stand 46 8Kg 103 17 lbs Without Stand 53 5Kg 117 95 lbs With Stand 380 W 1024 H x 768 V 42...

Страница 139: ...139 Dimensions HP R4252 JACK PANEL DETAIL 2 1 4 H x 18 3 4 W 5 3 4 UP FROM BOTTOM ...

Страница 140: ...140 ...

Страница 141: ...141 Dimensions HP R5052 JACK PANEL DETAIL 2 1 4 H x 18 3 4 W 5 3 4 UP FROM BOTTOM ...

Страница 142: ...142 ...

Страница 143: ...143 Memo ...

Страница 144: ...Memo ...

Страница 145: ...Memo ...

Страница 146: ...g Electronics America Service Division 400 Valley Road Suite 201 Mount Arlington NJ 07856 www samsung com Samsung Electronics Canada Inc Samsung Customer Care 7037 Financial Drive Mississauga Ontario L5N 6R3 www samsung ca BN68 00835A 00 ...

Отзывы: