background image

15

English

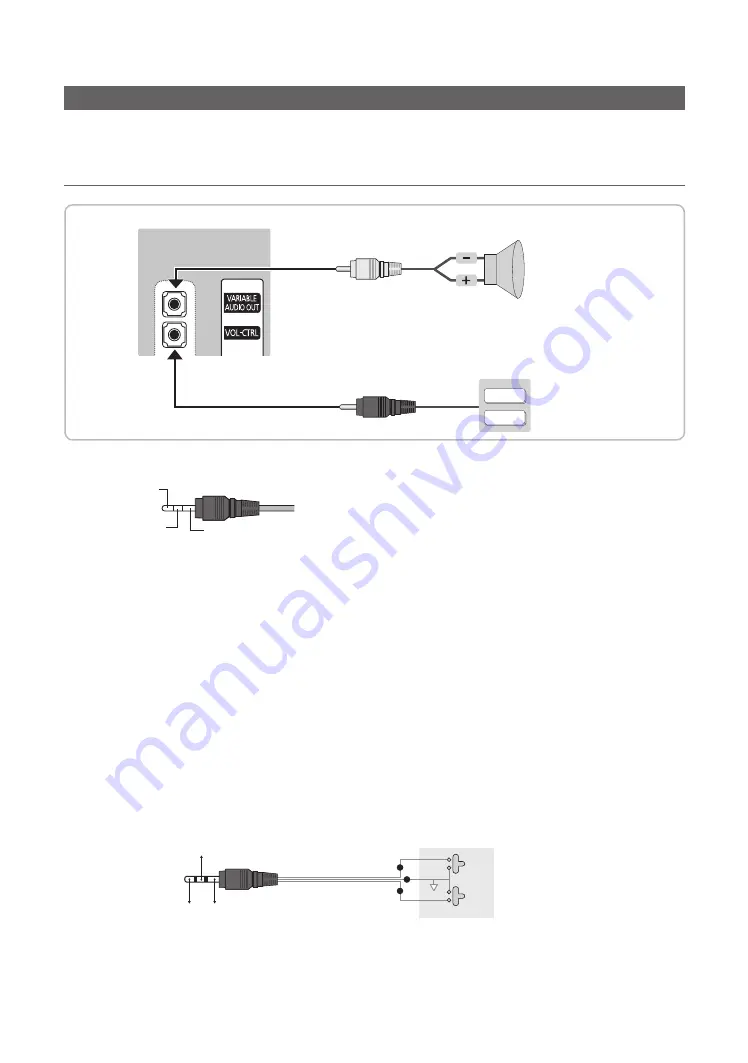
Connecting the Bathroom Speakers

You can connect the Bathroom Speakers using the following method.


¦

Connecting through the Variable Output (available without an external amplifier)

VOL+

VOL-

TV Rear Panel

Volume Control Box

Speaker

2

1

1. 

Connect the 

VARIABLE AUDIO OUT

 port of the TV to the Bathroom Wall Speakers of the hotel.

S

Speaker -

N/C

2. 

Connect the 

VOL-CTRL

 jack of the TV to the Volume Control Box Switch port on the Bathroom Wall of the hotel.


The maximum speaker output is 4W, 8Ω.


The 

VARIABLE AUDIO OUT

 port supports 

MONO

 sound out only.


• Installing the Volume Control


‒ If you configure the Volume Control Box as shown in the figure, you can control the volume of the bathroom 

speakers.


‒ The jack that connects the Volume Control Box to the TV is a 3.5mm normal Phone jack.


‒ Volume Control Box switch is a Tact switch.


Setting the Sub AMP Mode


0

: Turns the Sub AMP function off (PWM off).


1

:  Determines the Sub volume according to the main volume control. The sub volume is determined according to 

the Power On Volume, the Min Volume, and the Max Volume values of Hotel Mode.


2

: Determines the volume according to the bathroom control panel setting.


• Variable Output Port Specifications


Speaker Wire

: Use speaker cable no more than 82 feet (25m) in length.

VOL +

VOL -

1

2

3

Volume Control Box

VOL - DOWN (White 

1

)

VOL - UP (Black /Red 

2

)

GND (Shield Wire 

3

)

Содержание HG32AF690DKXZN

Страница 1: ...LED TV Installation manual Thank you for purchasing Samsung product To receive more service please registeryour product at www samsung com Model Serial No ...

Страница 2: ...ive mode Some operations may be restricted to prevents guests from cheating the TV system No main menu Interactive mode or Channel Menu Plug Play in Main Menu Stand Alone mode Limited Volume and Panel key lock or unlock Still image warning Avoid displaying still images like jpeg picture files or still image element like TV Program logo panorama or 4 3 image format stock or news bar at screen botto...

Страница 3: ... 11 Viewing the Remote Control 12 Connecting the TV to a SBB or STB 14 Connecting the Bathroom Speakers 15 Connecting the MediaHub HD 17 Connecting the RJP Remote Jack Pack 18 Setting the Hotel Option Data 20 Installing the Wall Mount 45 Securing the TV to the Wall 46 Anti theft Kensington Lock 46 Specifications 47 Dimensions 48 Licence 50 ...

Страница 4: ...ries AAA x 2 Samsung Smart Control sold separately Quick Setup Guide Wall mount Adapter x 4 Hotel Mount Kit Power Cord Data Cable Owner s Instructions Safety Guide Not available in all locations Cable Holder The stand and stand screw may not be included depending on the model The Data Cable may not be included depending on the SI Vendor Arrange the cables using the Cable Holder Depending on the co...

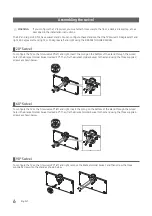
Страница 5: ...ssembling stand guide attached on the TV Place a soft cloth over the table to protect the TV and then place the TV on the cloth screen side down Insert the Stand Guide into the slot on the bottom of the TV Slide and assemble it to the end line in the direction of arrow Progress the assembly of screw in the manual s order 4 Tight the bottom screw first and upper screw last 3 1 3 1 3 2 3 2 2 3 2 1 2...

Страница 6: ...ft and right insert the prong on the bottom of the stand through the curved hole in the Bracket Holder Swivel marked 20 Then fix the Bracket Holder Swivel to the stand using the three supplied screws as shown below 60 Swivel To configure the TV so that it swivels 60 left and right insert the prong on the bottom of the stand through the curved hole in the Bracket Holder Swivel marked 60 Then fix th...

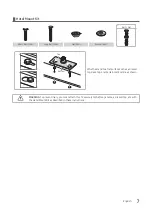
Страница 7: ...sher 2EA Top Bottom Affix the stand to a flat surface such as a dresser top desk top or entertainment centre as shown WARNING To prevent injury you must attach this TV securely to the floor a table a dresser top etc with the Hotel Mount Kit as described in these instructions ...

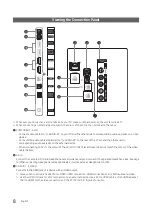
Страница 8: ...orresponding audio out jacks on the external device When connecting to AV IN the colour of the AV IN Y VIDEO jack Green does not match the colour of the video cable Yellow 2 HP ID Connect the cable to HP ID and Headphone Jack simultaneously and connect it to separated Headphone Box See page 16 When connecting Headphone to Headphone Box it works same as Headphone function 3 HDMI IN1 2 3 ARC Connect...

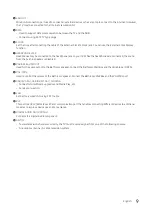
Страница 9: ... disabled 8 VARIABLE AUDIO OUT Used for the audio output to the Bathroom speaker Connect the Bathroom Wall Box and the Variable port RCA 9 VOL CTRL Used to control the volume of the Bathroom speaker Connect the Bathroom Wall Box and the VOLCTRL port 0 USB 5V 0 5A USB HDD 1 0A CLONING Connector for software upgrades and Media Play etc Service connection LAN Connect to a wired LAN using CAT 7 cable ...

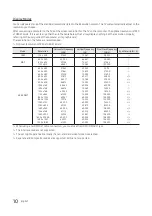
Страница 10: ...681 66 667 74 551 75 062 30 240 57 284 100 000 VESA DMT 640 x 480 640 x 480 640 x 480 800 x 600 800 x 600 800 x 600 1024 x 768 1024 x 768 1024 x 768 1152 x 864 1280 x 1024 1280 x 1024 1280 x 720 1280 x 800 1280 x 960 1366 x 768 1440 x 900 1600 x 900RB 1680 x 1050 1920 x 1080 31 469 37 861 37 500 37 879 48 077 46 875 48 363 56 476 60 023 67 500 63 981 79 976 45 000 49 702 60 000 47 712 55 935 60 00...

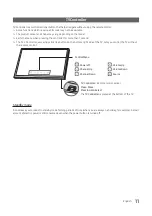
Страница 11: ...ller a small joy stick like button on the bottom right side of the TV lets you control the TV without the remote control Press Move Press Hold Select The TV Controller is placed at the bottom of the TV TV Controller Remote control sensor Power off Channel Up Channel Down Volume Up Volume Down Source Control Menu Standby mode Do not leave your product in standby mode for long periods of time when y...

Страница 12: ...y select frequently used functions Select on screen menu items and change menu values Return to the previous menu Buttons in the Channel List Contents Home menu etc Use these buttons in the Contents Home Display and select available video sources Electronic Programme Guide EPG display Cut off the sound temporarily Change channels Switch to the HOME Screen View the Contents Home Press to display in...

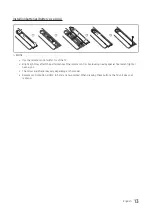
Страница 13: ...of the TV Bright light may affect the performance of the remote control Avoid using nearby special fluorescent light or neon signs The colour and shape may vary depending on the model Remote control button HOME 3D are not supported When pressing these buttons the TV unit does not respond ...

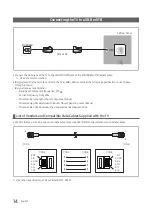
Страница 14: ...er centre frequency 37 9 Carrier Frequency Duty 50 Minimum Burst Length tburst 12 pulses 316 us Minimum Gap Time Between the burst tburst gap 16 pulses 422 us Minimum Gap Time between the data commands tpause 25 List of Vendors and Compatible Data Cables Supplied with the TV Confirm that you are using the correct data cable foryourvendor Refer to the code label on the data cables CON B CON A 1 6 6...

Страница 15: ...he Volume Control If you configure the Volume Control Box as shown in the figure you can control the volume of the bathroom speakers The jack that connects the Volume Control Box to the TV is a 3 5mm normal Phone jack Volume Control Box switch is a Tact switch Setting the Sub AMP Mode 0 Turns the Sub AMP function off PWM off 1 Determines the Sub volume according to the main volume control The sub ...

Страница 16: ...business desk for added convenience The installation procedures are given below Detailed Drawing of the Headphone Box HEADPHON BOX TV Rear Panel Headphone Box TV Headphones jack Whitewire Audio L Shield Wire TV HP ID jack Red wire White wire Red Wire Audio R Shield wire Headphone Box ...

Страница 17: ...diaHub HD is a hardware module that has different Audio Video inputs A V Audio PC HDMI and USB and corresponding outputs The corresponding output sources connect from MediaHub to the TV MediaHub communicates with the TV via RS232 Hot Plug Play is a function that allows hotel guests to connect an external source to the MediaHub MediaHub communicates with the TV by sending messages regarding Active ...

Страница 18: ... RJP The RJP Remote Jack Pack compatible with this Samsung TV is TeleAdapt TA 7610 TA 7650 HD and TA 7660 HD Plus RJP Remote Jack Pack RJP stands for Remote Jack Pack The RJP is a hardware module that has different Audio Video inputs A V Audio PC and HDMI and corresponding outputs The corresponding output sources are connected from RJP to TV The RJP communicates with the TV via RS232 Hot Plug Play...

Страница 19: ...ish communications between the TV and the RJP The following table shows the approximate time in seconds to switch from the TV to the input source based on the priority Scenario 1 When no inputs are connected Source To Connect AV 2 Sec PC 0 7 Sec HDMI 3 9 Sec Scenario 2 When two or more inputs are connected and an Input source is disconnected and then reconnected Source Disconnect To Connect Total ...

Страница 20: ...splaying when it was turned off Power On Channel Num When the TV is turned on it switches automatically to this channel Power On Channel Type Select channel band ATV analog air band DTV digital air band CATV analog cable band CDTV digital cable band IPTV Ip Channels Power On Volume User Defined Lets you set the Power On Volume manually See Power On Volume below Last Saved When the TV is turned on ...

Страница 21: ...llite only The Channel list Editorwill only show the selected antenna type channels Dynamic SI ON Check the DTV Programme channel number the TV channel editor is inaccessible OFF Do not check the DTV Programme channel number the DTV channel editor is accessible but additional channel Programme number update is not supported Channel Rescan Message When there is a mismatch between the data in the ch...

Страница 22: ...he TTX stream Time Channel The clock is set from the selected channel Standalone Manual TTX Time Channel Interactive Manual Auto TTX Time Channel Timer Type Enable or disable the alarm function WakeUp Enable the alarm function to turn on the device at the specified time OnOff Disable the alarm function and enable on or off timer Music Mode Music Mode AV Allows music output from an mp3 audio player...

Страница 23: ...k RJP External Source USB Pop up Screen When USB is connected to the TV Default a popup window appears Automatic This enters the USB content menu automatically Disable Neither the popup window nor the menu appears External Source Banner If set to On the TV displays the External Source Banner information when you change the TV source to another external input press the Info key or turn the TV on ON...

Страница 24: ...e Message Displays a the welcome message for 60 seconds when the TV turns on Edit Welcome Message Edits the Welcome Message Hospitality Logo Turns the Hospitality logo feature OFF BMP AVI BOTH If not OFF when the TV is turned on the Logo is displayed before the signal from the initial source for the amount of time set in Logo Display Time The DivX codec is not supported Hospitality Logo DL Downloa...

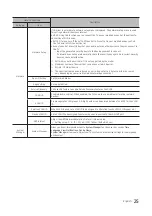
Страница 25: ...ps device The specifications above are based on our in house testing Actual performance may vary depending on your wired wireless network environment Apps ID Setting Set SmartHub Model Apps Setting Set up SmartHub Service Discovery Can use this feature to enable Service Discovery Features like DLNA LAN OUT Enable disable LAN Out When enabled the TV can work as a wired router for other network devi...

Страница 26: ...Setting User can change the password Password Reset Password is reset to 00000000 Security Mode Security Mode provides password protected administrative functionality to enable or disable features of Hospitality TV such as HDMI USB and TTX Use this option to turn security mode on or off After turning on security mode options such as USB HDMI and TTX Security are automatically enabled in the securi...

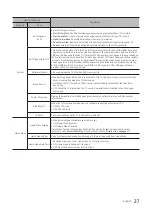
Страница 27: ...our SI STB or SBB does not have a problem contact to Samsung Service Software Update Lets you upgrade the TV SW with a USB memory stick Sound Bar Out If the Samsung Sound Bar device is connected to this TV this item lets you to select where the TV sound is outputted when the TV is turned on ON When the TV is turned on the TV sound is automatically outputted in the Sound Bar device only OFF When th...

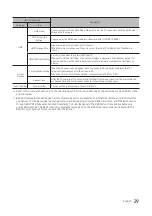
Страница 28: ...ugged in and the power is off OFF You can turn off the REACH Update Time function 1hour 1 hour after the TV s power is off 2hour 2 hours after the TV s power is off 12 00 am 12 00 am 2 00 am 2 00 am everyday 12 00 pm 12 00 pm everyday 2 00 pm 2 00 pm everyday REACH Update Immediate When set to On the TV will receive and update REACH Data from the REACH Server Modulator right after the power is off...

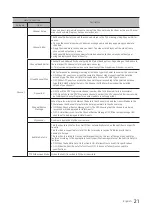
Страница 29: ...intains the TV s important features even after the screen is off When the TV is in Virtual Standby Mode it consumes about 9 5 W to 17 4 W Reboot Time After the TV power is off in Virtual Standby Mode if there is no input from the userwithin the set Reboot Time the TV will reboot and enterVirtual Standby Mode again Room Number Room Number You can set the room number of the TV s location Refer to th...

Страница 30: ...dit Welcome Message Hospitality Logo OFF Hospitality Logo DL Logo Display Time A welcome message can be up to 25 characters and it can be edited by changing the text in the Hotel Service menu The following is the list of characters supported by Welcome message Capital letters from A Z Welcome message can be edited by using the navigation colour enter key on the Remote in the Edit Welcome Message O...

Страница 31: ...tial value is OFF Can be set to OFF or BMP AVI BOTH When set to BMP AVI BOTH the Logo Download and Logo Time Display menu items become accessible Hospitality Logo DL This option lets you download the logo image to the TV s memory from a USB device A wait message appears while the image is being copied to the TV A Completed message appears when the copy operation finishes successfully The word Fail...

Страница 32: ...set 1 Insert a USB drive into the USB port on the rear of the TV 2 Enter the Interactive menu by pressing buttons in order MUTE 1 1 9 ENTER 3 Press the or button to select Clone USB to TV then press the ENTER button 4 When the message Clone USB to TV is displayed then press the ENTER button 5 You can Make sure USB cloning behavior Clone TV to USB Clone USB to TV Setting Auto Initialize OFF Clone T...

Страница 33: ...ues when the TV is turned off and then turned on again Note that Setting Auto Initialize works on cloned guest side menu values only Settings which have not been cloned are ignored The table below lists the settings that are restored to their cloned values when you set the Setting Auto Initialize function to on Menu Item Picture Picture Mode Picture Size Settings Picture Size Auto Wide 4 3 Screen ...

Страница 34: ...ary Teletext Language Secondary Teletext Language Primary Audio Language Secondary Audio Language General System Manager Time Clock Clock Mode Time Zone DST Time Zone GMT DST Language Auto Protection Time External Device Manager Anynet HDMI CEC Game Mode HDMI Black Level Keyboard Manager Keyboard Language Keyboard Type Eco Solution Energy Saving Mode Motion Lighting Auto Power Off Accessibility Au...

Страница 35: ... your TV Country Others Select the picture mode that best suits your viewing environment 1 2 3 Picture Mode Standard Next Previous Terr Cable Signal Detected Select each item and choose the correct setting Then select Next to search for channels Select the connected aerial that you want to use to get channels Aerial Next Terrestrial 2 3 Channel Type Digital Analogue Next Scan Channels Scanning for...

Страница 36: ... appears Configure your TV OSD Initially highlighted Others Select your Country and Picture Mode Then select the connected aerial that you want to use to get channels After Channel sanning is completed select Next Set Clock Mode DST Daylight saving time and Time Zone OSD Initially highlighted Clock Mode Auto DST Off Time Zone Eastern If the TV will be tuned to digital broadcast channels and these ...

Страница 37: ...he code Set ID OSD appears The following words appear Remote control code is set to X If you want to change the Remote control code enter the chosen digit X is the digit number This OSD displays until Exit is pressed Remote control code is set to 0 If you want to change the Remote control code enter the chosen digit For example TV and Remote will be set to ID code 1 if the user presses 1 The follo...

Страница 38: ...can enjoy Setting the Channel Bank EditorunderStand alone Mode 1 Enter the Hotel Standalone menu by MUTE 1 1 9 ENTER 2 Please select SI vendor Smoovie 3 find the new menu option Channel Bank Editor 4 Enter the Channel Bank Editor Hospitality Mode Standalone SI Vendor OFF d SI Vendor Smoovie d Channel d Channel Bank Editor Depending on model and region some menu items may not exist ...

Страница 39: ...rd Red Select the channel that will be used when remote has a RED CARD References of using SMOOVIE Remote Controller 1 If you select SMOOVIE as the SI Vendor you should use the SMOOVIE Remote Controller 2 With the Numeric keys of the remote controller users can select only the BANK1 channel To change the channel using the Green or Red Card please use channel up down keys 3 For the Channel guide or...

Страница 40: ...wser Solution Remote Jack Pack HMS External Source Virtual Standby HP Management Room Number Bathroom Speaker Eco Solution Logo Message Cloning Network r Channel Editor Depending on model and region some menu items may not exist Simple Steps forEditorunderStand alone Mode Step Broad Outline 1 Operate Channel Auto Store in Hotel Option Menu 2 Enter Channel Editor in Hotel Option Menu 3 Compile a ta...

Страница 41: ...wer off on user can use TV 9 Setup CH Bank Editor After power off on user can use TV 10 After power off on user can use TV Step Smovie TV used Satellite Mixed Channel Map On Satellite and Air or Cable both usedused Only Satellite used If the tv starts with Hotel P P If P P already done If the tv starts with Hotel P P If P P already done 1 Do the P P except channel store Enter Hotel menu Do P P all...

Страница 42: ... My Channel works in Standalone mode only SI Vendor in Standalone mode This does not work if Smoovie is selected This is in the Hotel Options in Hotel Menu Service Mode and can be turned on or off The option only works when it is set to on Mixed Channel Map Mixed Channel Map is a function to mix Air Cable and Satellite channels Except forAus Singapore NZ models Mixed Channel Map should be ON in or...

Страница 43: ...nect an HDMI cable from the HDMI OUT jack on the back of Sound Bar to the HDMI3 port supporting ARC on the hospitality TV 3 After the Sound Bar is connected to the hospitality TV when the TV turns on the Sound Bar automatically detects the TV and then automatically switches to Hotel Mode Sound BarHotel mode functional characteristics Power On Off is synchronized with the TV HDMI_CEC defaults to On...

Страница 44: ... set to On external source HDMI USB input and the TTX function will be disabled Password Setting This allows users to change the password Users must input the current password a new password and confirmation of the new password Password Reset This is to reset the password The default password is 00000000 Password Reset is visible only in the Factory menu by using the key combination of Info and Fa...

Страница 45: ... installation manual and all parts necessary for assembly are provided Do not use screws that do not comply with VESA standard screw specifications Do not use screws longer than the standard dimensions as they may cause damage to the inside of the TV set Forwall mounts that do not comply with the VESA standard screw specifications the length of the screws may differ depending on their specificatio...

Страница 46: ...ot fall backwards It is safe to connect the string so that the clamps fixed on the wall are equal to or lower than the clamps fixed on the TV Untie the string before moving the TV 4 Verify that all connections are properly secured Periodically check connections for any sign of fatigue for failure If you have any doubt about the security of your connections contact a professional installer Anti the...

Страница 47: ... 4 x 483 8 x 192 6 mm 972 9 x 570 1 x 54 0 mm 972 9 x 623 0 x 226 5 mm Weight Without Stand With Stand 5 7 kg 7 3 kg 9 7 kg 12 7 kg Model Name HG49AF690 HG55AF690 Display Resolution 1920 x 1080 1920 x 1080 Stand Swivel 20 60 90 20 60 90 Screen Size Diagonal 123 cm 138 cm Sound Output 20 W L 10 W R 10 W 20 W L 10 W R 10 W Dimensions WxHxD Body With stand 1105 8 x 645 0 x 54 6 mm 1105 8 x 698 0 x 22...

Страница 48: ...1 4 395 8 451 3 433 8 483 8 54 6 192 6 HG43AF690 972 9 943 9 532 1 559 6 570 1 623 0 54 0 226 5 HG49AF690 1105 8 1076 8 607 0 559 6 645 0 698 0 54 6 226 5 HG55AF690 1241 6 1212 6 683 4 559 6 721 4 774 3 54 5 226 5 Jack panel detail Rearview Detailed dimensions can be checked at Displaysolutions samsung com ...

Страница 49: ...90 HG49AF690 HG55AF690 Unit mm 559 6 70 0 152 0 R3 75 R9 5 135 0 226 5 168 7 NOTE All drawings are not necessarily to scale Some dimensions are subject to change without prior notice Refer to the dimensions prior to performing installation of your TV Not responsible for typographical or printed errors ...

Страница 50: ...HDMI Logo are trademarks or registered trademarks of HDMI Licensing LLC in the United States and other countries Open Source License Notice Open Source used in this product can be found on the following webpage http opensource samsung com Open Source Licence Notice is written only English ...

Страница 51: ... www samsung com ph support JAPAN 0120 363 905 www galaxymobile jp jp support INDIA 1800 40 SAMSUNG 1800 40 7267864 Toll Free www samsung com in support NEPAL 16600172667 Toll Free for NTC Only 9801572667 www samsung com in support BANGLADESH 09612300300 08000300300 Toll free www samsung com in support SRI LANKA 9411SAMSUNG 94117267864 www samsung com in support EGYPT 08000 7267864 16580 www samsu...

Отзывы: