background image

ŝ

200

Ş

Setting the Exposure

ƈ

Adjust the amount of light hitting the CCD by changing the aperture.

ƃ

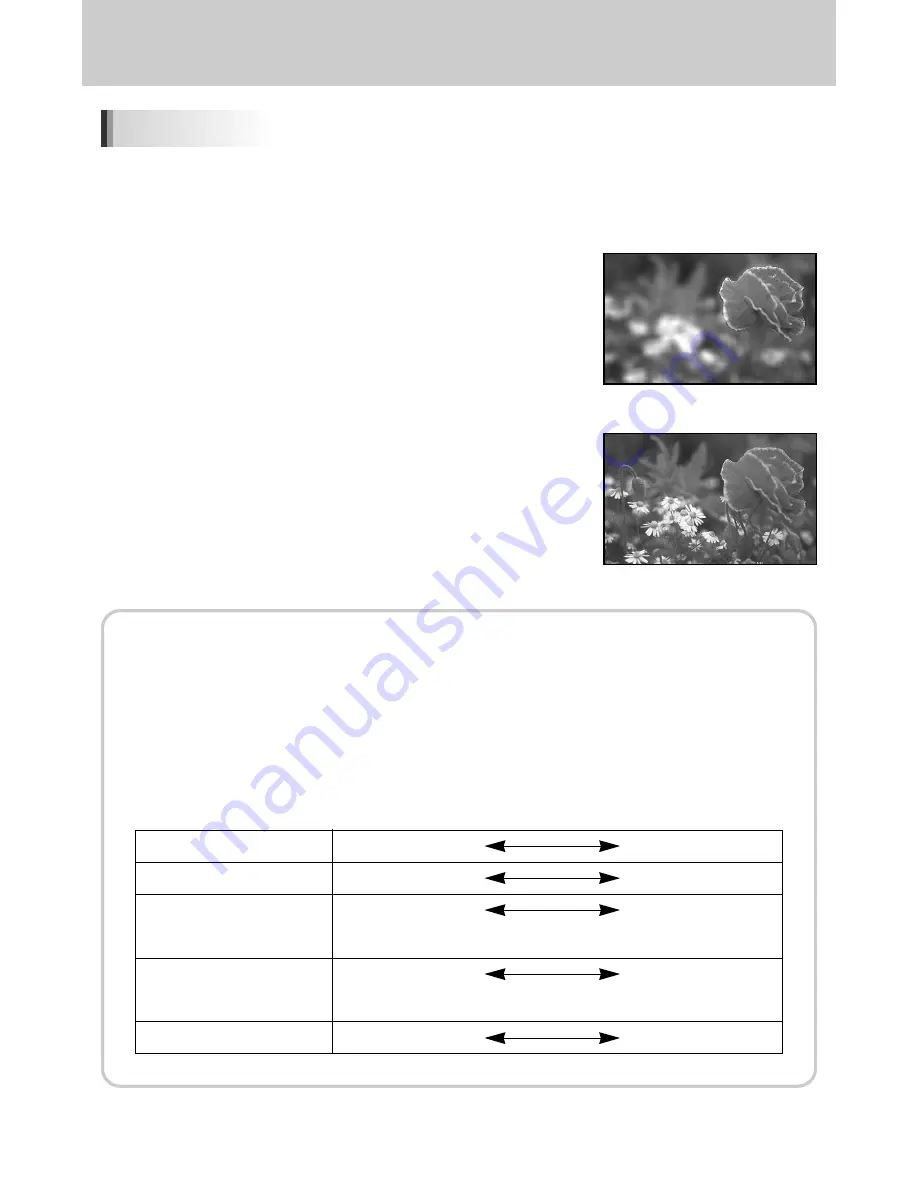
Opening the aperture (reduce the aperture value)

Objects closer and farther than the focused subject will be out of
focus. For instance, if you take a picture of flower against a
landscape with the aperture open, the landscape in front and
behind the flower will be blurred, emphasizing only the flower.

ƃ

Closing the aperture (increase the aperture value)

The range in focus expands forward and backward. 
For instance, if you take a picture of flower against a landscape
with a smaller aperture, the landscape in front and behind the
flower will be in focus.

Depth of Field

When you focus on a specific subject, there is a range in which objects closer and farther away will
also be in focus. This focused range is called the depth of field.

ƃ

The depth of field for the GX-10 differs depending on the lens but compared to a 35 mm
camera, the value is roughly one aperture setting lower (the focused range becomes shallower).

ƃ

The wider the wide-angle lens, and the farther away the subject, the greater the depth of field
(some zoom lenses do not have a scale for depth of field because of their structure).

Effect of Aperture

Depth of field

Shallow

Deep

Area of focus

Narrow

Wide

Open

Close

(Smaller value)

(Larger value)

Longer

Shorter

(Telephoto)

(Wider)

Distance to the subject

Near

Far

Aperture

Lens focal length

Содержание GX10 - Digital Camera SLR

Страница 1: ......

Страница 2: ...Windows and Windows logo are registered trademarks of Microsoft Corporation incorporated in the United States and or other countries Ҭ All brand and product names appearing in this manual are registered trademarks of their respective companies ſ Specifications are subject to change without prior notice DANGER DANGER indicates an imminently hazardous situation which if not avoided will result in de...

Страница 3: ...fect the cameraŖ s internal components and could cause a fire ƈ When in use do not cover the camera or AC Power Adapter This may cause heat to build up and distort the camera body or cause a fire Always use the camera and its accessories in a well ventilated area ƈ Do not attempt to modify this camera in any way This may result in fire injury electric shock or severe damage to you or your camera I...

Страница 4: ...doing so take care to avoid burns And then contact your dealer or Samsung Camera Service Centre ƈ The battery is expendable and its life is shortened through use If the battery capacity is reduced by half purchase new one ƈ After removing the batteries for about 110 hour 4 5 days the camera may be reset Precautions for Battery Usage ƈ Leaking overheating or burst batteries could result in fire or ...

Страница 5: ... the charger smokes or overheats stop using it immediately and contact your dealer or Samsung Camera Service Centre as soon as possible ƈ If water gets inside the camera stop using the camera and contact your dealer or Samsung Camera Service Centre It may cause fire or electric shock ƈ If the lightning flashes or thunder fills the air disconnect the power plug It may cause breakage fire or electri...

Страница 6: ...ōōōōōōōōōōōōōōōōōōōōōōōōōōōōōō18 ƈCapture Mode ōōōōōōōōōōōōōōōōōōōōōōōōōōōōōōōōōōōōō18 ƈPlayback mode ōōōōōōōōōōōōōōōōōōōōōōōōōōōōōōōōōōōōō21 ƃLCD Monitor Indicationsōōōōōōōōōōōōōōōōōōōōōōōōōōōōōōōōōō23 ƈWhile Power is On or Operating Mode Dial ōōōōōōōōōōōōōōōōōōōōōōōōō23 ƈCapture Mode ōōōōōōōōōōōōōōōōōōōōōōōōōōōōōōōōōōōōō24 ƈPlayback Mode ōōōōōōōōōōōōōōōōōōōōōōōōōōōōōōōōōōōōō25 ƈHistogram Display...

Страница 7: ...59 ƃOther Shooting Modes ōōōōōōōōōōōōōōōōōōōōōōōōōōōōōōōōōō60 ƈContinuous Shootingōōōōōōōōōōōōōōōōōōōōōōōōōōōōōōōōōōō60 ƈSelf Timer Shooting ōōōōōōōōōōōōōōōōōōōōōōōōōōōōōōōōōōō62 ƈRemote Control Shooting Remote Control F Sold Separately ōōōōōōōōōōōōōōōōō65 ƈUsing Mirror Lock Up Function to Prevent Camera Shake ōōōōōōōōōōōōōōōōōōō68 ƃUsing the Zoom Lensōōōōōōōōōōōōōōōōōōōōōōōōōōōōōōōōōōō69 ƃUsing t...

Страница 8: ...5 ƈSettings for All Images ōōōōōōōōōōōōōōōōōōōōōōōōōōōōōōōōō107 ƃPrinting Using PictBridgeōōōōōōōōōōōōōōōōōōōōōōōōōōōōōōōōō108 ƈSetting USB ōōōōōōōōōōōōōōōōōōōōōōōōōōōōōōōōōōōōōō109 ƈConnecting the Camera to the Printer ōōōōōōōōōōōōōōōōōōōōōōōōōōō110 ƈPrinting Single Images ōōōōōōōōōōōōōōōōōōōōōōōōōōōōōōōōō111 ƈPrinting All Images ōōōōōōōōōōōōōōōōōōōōōōōōōōōōōōōōōōō113 ƈPrinting Images Using the D...

Страница 9: ...LCD panel ōōōōōōōōōōōōōōōōōōōōō147 ƈReset Custom Function2 ōōōōōōōōōōōōōōōōōōōōōōōōōōōōōōōō148 ƃ SETUP MENU Menu Setting Items ōōōōōōōōōōōōōōōōōōōōōōōōōōōō149 ƈFormatting the Memory Cardōōōōōōōōōōōōōōōōōōōōōōōōōōōōōōō150 ƈTurning the Beep On and Offōōōōōōōōōōōōōōōōōōōōōōōōōōōōōōō151 ƈChanging the Date and Time and the Display Style ōōōōōōōōōōōōōōōōōōōōō152 ƈSetting the World Time ōōōōōōōōōōōōōōōōō...

Страница 10: ...ōōōōōōōōōōōō190 ƃFocusing ōōōōōōōōōōōōōōōōōōōōōōōōōōōōōōōōōōōōōōō192 ƃSetting the Exposure ōōōōōōōōōōōōōōōōōōōōōōōōōōōōōōōōōō199 ƃUsing the Built in Flash ōōōōōōōōōōōōōōōōōōōōōōōōōōōōōōōōō208 ƃUsing an External Flash Optional ōōōōōōōōōōōōōōōōōōōōōōōōōōōōō212 Software information ƃSoftware Notesōōōōōōōōōōōōōōōōōōōōōōōōōōōōōōōōōōōōō218 ƃAbout the software ōōōōōōōōōōōōōōōōōōōōōōōōōōōōōōōōōōō219 ƃSett...

Страница 11: ...re to read it and follow the instructions 3 Basic Operations Explains the basic procedures for taking playing back and printing still pictures 4 Menu Reference Understand how to use and access the buttons and menus of the GX 10 5 Function Reference Introduces functions to further enhance your GX 10 experience 6 Software information Explains software installation and how to use the program 7 Append...

Страница 12: ...e Contents of the Package ōōōōōōōōōōōōōōōōōō14 Names of Working Partsōōōōōōōōōōōōōōōōōōōōōōōōōō15 Using the Button Functions ōōōōōōōōōōōōōōōōōōōōōōōō18 LCD Monitor Indications ōōōōōōōōōōōōōōōōōōōōōōōōōō23 Viewfinder Indications ōōōōōōōōōōōōōōōōōōōōōōōōōōō27 LCD panel Indications ōōōōōōōōōōōōōōōōōōōōōōōōōōō29 1 Before Using Your Camera ...

Страница 13: ...ion in which the focus points on the viewfinder illuminate red ƃ Features a Digital Preview function for checking the image to ensure that the desired result is achieved ƃ Features a large 2 5 inch LCD monitor with 210 000 pixels and a brightness adjusting function for high precision viewing performance ƃ The large high resolution LCD monitor and clear menus make the camera easy to operate ƃ The S...

Страница 14: ... used with a 35 mm camera must be approximately 1 5 times longer than that of GX 10 To obtain a focal length framing the same area divide the focal length of the 35 mm lens by 1 5 Example To capture the same image as a 150 mm lens attached to a 35 mm camera 150 1 5 100 Use a 100 mm lens with the GX 10 Conversely multiply the focal length of the lens used with GX 10 by 1 5 to determine the focal le...

Страница 15: ...l equipment contact your nearest Samsung dealer or Samsung service centre Hot shoe cover Installed on camera Eyecup Installed on camera Viewfinder cap Body mount cover Installed on camera USB cable Video cable Software CD ROM Strap Charger SBC L6 AC cord Rechargeable battery SLB 1674 Operating Manual this manual Checking the Contents of the Package ...

Страница 16: ... control receiver LCD monitor Fn button AE L button Four way controller OK button Rear e dial Focus AF button Lens mount index Front e dial Flash pop up button Strap Exposure Bracket button Viewfinder Self Timer lamp Remote control receiver Card access lamp Optical Picture Stabilization lever Focus point selection dial Front Back RAW button Exposure Compensation LCD panel lamp button ...

Страница 17: ...erminal Side Top Cable switch port USB Video terminal Terminal Cover Card cover Memory Card Slot LCD panel Strap Front e dial Main Switch Strap Dioptre adjustment lever Shutter Button Green button Rear e dial Metering Lever Card cover lock Connection ports Memory Card Slot ...

Страница 18: ...ŝ17Ş Names of Working Parts Bottom Tripod socket Battery cover Lock lever Battery Chamber cover Battery Chamber Battery Holder Battery Chamber ...

Страница 19: ... the power on off p 41 and confirm the depth of field Preview p 190 ڻ Lens unlock button Press to detach lens p 47 ڼ Focus mode lever Switches between Autofocus mode p 192 and Manual focus mode p 197 ڽ RAW button Press to capture a JPEG and RAW file at the same time p 59 ھ Flash pop up button Press to pop up the built in flash p 72 ڹ ں ڻ ڼ ھ ڽ Capture Mode ...

Страница 20: ...roller ƊƌȜȞ to choose the next operation p 169 ھ Optical Picture Stabiliser button Switches on or off the OPS function p 55 ڿ Four way controller ƊƌȜȞ Uses it to move cursor or change items in menus and Fn menu ۀ OK button Saves the setting you selected in the menu ہ Focus position dial Press to select a focus position p 194 ۂ AF button Focuses on the subject and get the proper metering p 132 ۃ AE...

Страница 21: ... p 202 ں Mode dial Changes the camera modes p 171 ڻ Rear e dial Sets aperture ISO sensitivity values ڼ Green button Resets exposure settings and automatically adjusts the appropriate exposure in a M Manual mode ڽ Front e dial Sets shutter speed and EV compensation values ڹ ڻ ڼ ڽ ں ...

Страница 22: ...us or next image in magnified playback p 86 or adjust the digital filter p 93 ں Main switch Move to turn the camera on and off p 41 ڻ Shutter release button Press to switch to capture mode ڼ Rear e dial Sets the Exposure values Use it to enlarge an image or display multiple images at the same time p 86 Use to select a digital filter p 93 ڻ ...

Страница 23: ...n Press to switch to capture mode ڽ Fn button Press to display the Fn menu Press the four way controller ƊƌȜȞ to choose your next operation p 170 ھ Four way controller ƊƌȜȞ Uses it to move cursor or change items in menus Fn menu and playback screen ڿ OK button Saves the setting you selected in the menu or playback screen ۀ AE L button Locks the exposure of the shooting conditions p 205 Press to pr...

Страница 24: ...ted 11 only appears when World Time is On 1 Flash mode Active mode appears p 70 2 Drive mode Auto Bracket Multi Exposure p 60 3 Metering type p 202 4 AF mode p 192 5 Focus Point Information p 194 6 White balance p 76 7 Sensitivity p 82 8 Shooting mode Mode dial position p 171 9 e dial information p 142 10 Battery Status p 36 11 World time warning display p 153 12 Date and time p 152 13 Custom mode...

Страница 25: ...racket Multi Exposure p 206 127 11 Extended Bracket p 127 12 Image tone p 121 13 ISO sensitivity p 82 14 ISO range Auto p 83 15 White balance p 76 16 GM compensation value p 80 17 BA compensation value p 80 18 Colour space p 126 19 File type p 122 20 Recorded pixels p 122 21 Quality level p 123 22 Optical Picture Stabilization OPS p 55 23 AF mode p 192 24 Focus point location p 194 25 Lens focal l...

Страница 26: ...Flash Compensation Value 12 Folder name and Stored image number p 126 160 13 DPOF settings p 105 14 Protect icon p 103 15 AF mode 16 Focus point information 17 Lens focal length 18 Image tone 19 Sensitivity 20 White Balance Colour Temperature 21 WB compensation GM 22 WB compensation BA 23 File type 24 Image size 25 Quality 26 Colour Space 27 Date Time 28 Saturation 29 Sharpness 30 Contrast 31 Exte...

Страница 27: ...he distribution of brightness in recorded images If the bars in the histogram are higher towards the right the image may be too bright If the bars are higher on the left the image may be too dark If the lighting conditions are too bright to check the subject by using the LCD checking the histogram will enable more precise exposure control for the shots INFORMATION ƈ Brightness Histogram that distr...

Страница 28: ... when capturing or adjusting underlined when shutter speed can be adjusted with front e dial p 199 7 Aperture Aperture when capturing or adjusting underlined when aperture can be adjusted with rear e dial p 200 8 Focus indicator Appears when image is focused 9 Manual Focus Appears when the Manual Focus is selected 10 Exposure Bar Displays the Exposure Compensation Value p 184 The differences betwe...

Страница 29: ...4 The differences between the compensated Exposure and proper exposure will display In the M mode the exposure value can be different In the Sensitivity priority mode Shutter Aperture Priority mode ISO sensitivity will display ƃ The red indication of the focus point used for autofocus lights up and is superimposed on the view when the shutter release button is pressed halfway ƃ When AF Button Func...

Страница 30: ...emote control mode 5 Exposure Bar p 184 6 Auto Bracket p 206 7 Flash Exposure Compensation indicator p 75 8 Exposure compensation p 204 9 Battery status p 36 10 White Balance If Auto WB is selected no icon will display p 76 White Balance Compensation 11 ISO sensitivity warning p 138 12 RAW button RAW p 144 13 Number of recordable images EV compensation value PC Pb PC Personal Computer mass storage...

Страница 31: ...ŝ30Ş MEMO ...

Страница 32: ...ōōōōōōōōōōōōōōōōōōōōōōōō32 Connecting to a Power Source ōōōōōōōōōōōōōōōōōōōōōō33 Using the memory card ōōōōōōōōōōōōōōōōōōōōōōōōōō38 Turning the Camera On and Offōōōōōōōōōōōōōōōōōōōōōō41 Initial Settings ōōōōōōōōōōōōōōōōōōōōōōōōōōōōōōō42 Attaching the Lensōōōōōōōōōōōōōōōōōōōōōōōōōōōōō46 Adjusting the Viewfinder Dioptreōōōōōōōōōōōōōōōōōōōōōō48 2 Getting Started ...

Страница 33: ...g the Strap 1 Pass the end of the strap through the strap lug then secure on the inside of the clasp 2 Pass the other end of the strap through the other strap lug on the camera then secure on the inside of the clasp ...

Страница 34: ...he power is on ƃ Remove the batteries when you will not use the camera for a long while The batteries may leak ƃ If the date and time settings have been reset when you insert new batteries after a long while follow the procedure for Setting the Date and Time ƃ Insert batteries correctly Batteries inserted incorrectly may cause a camera breakdown Wipe the electrodes of the batteries before insertin...

Страница 35: ...the Ɗ mark on the battery facing toward the LCD monitor and insert the battery by pressing the battery lock lever as shown ڹ Insert the battery until the battery lock is locked To remove the battery press the battery lock lever as shown ڹ When the battery pops up slightly remove the battery ƃ We recommend using AC adapter when the camera is used for a long time or is connected to a computer INFORM...

Страница 36: ...ng LED 2 Put the battery on the charger as shown ƃ Proper operating temperatures of the Charger are 0 C 40 C The battery may not be charged under or over the operating temperature Red LED is blinking This is not the camera malfunction ƃ The period of quality guarantee of charger is 1 year and Lithium ion rechargeable battery is 6 months ƃ A Lithium ion battery is expendable If the working duration...

Страница 37: ... conditions 23Ű Approx 510 Min Approx 440 Min Approx 320 Min Approx 300 Min Normal recording Battery Operating Temperature Rechargeable battery SLB 1674 Playback time Flash photography 50 use 100 use ƃ Battery performance temporarily decreases while being used in cold conditions When using the camera in cold climates have extra batteries on hand and keep them warm in your pocket Battery performanc...

Страница 38: ...ure connections are secure between the camera AC adapter AC plug cord terminal and the power outlet Memory Card and data will be corrupted if disconnected while camera is recording or reading data ƃ Be sure to read the AC adapter SAC 82 operating manual when using the AC adapter ƃ The rechargeable batteries in your camera will not charge when connected to the AC adapter INFORMATION 1 2 3 4 ƈ AC ad...

Страница 39: ... ں Card cover opens ڻ 2 Have the front of the memory card facing toward the LCD monitor and insert the memory card ſ To remove the card push it as shown 3 Close the Card cover ſ Close the Card cover firmly or the camera will not turn on ƃ Do not remove the Memory Card while card access lamp is lit ƃ Always format new Memory Cards before use Also format Memory Cards used with other cameras Refer to...

Страница 40: ...Camera does not accept any liability for data that is deleted if 1 the Memory Card is mishandled by the user 2 the Memory Card is exposed to static electricity or electrical interference 3 the card has not been used for a long time 4 the card is ejected or the battery is removed while the data on the card is being recorded or accessed ƃ The Memory Card has a limited service life If it is not used ...

Страница 41: ...size and quality level depending on purpose Choose the appropriate number of recorded pixels and quality level for images on the CAPTURE MENU menu Ҹ Setting the Recorded Pixels p 122 Ҹ Setting the Quality Level p 123 The above table shows the approximate image storage capacity and recording time when using a 512 MB SD Memory Card The above figures may vary depending on the subject shooting conditi...

Страница 42: ...omatically turn off when you do not perform any operations within a set period of time Default setting is 1 minute You can change the setting on the Auto Power Off menu of the SETUP MENU menu To turn on the camera again rotate the main switch or refer to the followings Press the shutter button halfway down Press the Playback mode button Press the INFO button INFORMATION Turning the Camera On and O...

Страница 43: ...nguage in which the menus error messages etc are displayed from the following English Korean Chinese traditional simplified French German Spanish Portuguese Italian Swedish Dutch Danish and Russian 1 Language selection menu displays 2 Select a menu by using the four way controller ƊƌȜȞ The default setting is English 3 Press the OK button Setting the Display Language 4 Press the ƌ button The menu c...

Страница 44: ...s set In this case do the followings to reset the initial settings 1 Turn on the camera again 2 Select the SETUP MENU menu by pressing the Menu button 3 Select Language menu by pressing the four way controller Ɗƌ Select a desired language by pressing the four way controller ƊƌȜȞ and press the OK button Sub menu for selecting the language displays The language is changed To change the City and Date...

Страница 45: ...the current date and time and the display style Initial Settings Setting the Date and Time 7 Press the four way controller Ȟ The frame moves to the year ƃ If you press the Menu button during the initial settings the menu set at the moment is cancelled In this case the Language menu will display when the camera is turned on INFORMATION INITIAL SETTING Date Time Set Cancel Date Style yy mm dd Date 2...

Страница 46: ...ancel the setting operation and switch to Capture mode during initial settings by pressing the MENU button In this case the Initial Settings screen will appear again the next time you turn the camera on ƃ When you finish the settings and press the OK button the camera clock is reset to 00 seconds ƃ To set the exact time press the OK button when the time signal on the TV radio etc reaches 00 second...

Страница 47: ...ENU menu 1 Check that the camera is off 2 Remove the body mount cover ڹ and lens mount cover ں Be sure to put the lens down with the lens mount side facing upward to avoid damage 3 Align the red dots on the camera and the lens and secure by turning the lens clockwise until it clicks After attaching check that the lens is secure Also check that the red dots of the lens are on top and the attached p...

Страница 48: ...nt cover ڹ is a cover to prevent damage during shipping ƃ We assume no responsibility nor liability for accidents damages and malfunctions resulting from the use of lenses made by other manufacturers ƃ The camera body and lens mount incorporate lens information contacts and an AF coupler Dirt dust or corrosion may damage the electrical system Clean the contacts with a soft dry cloth INFORMATION ...

Страница 49: ... right Adjust the lever until the AF frame in the viewfinder is focused AF Frame ƃ Eyecup is attached to the viewfinder portion when camera leaves the factory Diopter adjustment is available with the eyecup attached However adjustment is easier with the eyecup removed as shown above To remove the eyecup pull upward and remove as shown on the right ƃ If it is difficult to see the viewfinder image c...

Страница 50: ...ōōōōōōōōōōōōōōōōōōōōōōōōōōō60 Using the Zoom Lens ōōōōōōōōōōōōōōōōōōōōōōōōōōō69 Using the Built in Flash ōōōōōōōōōōōōōōōōōōōōōōōōōō70 Using the White Balance ōōōōōōōōōōōōōōōōōōōōōōōōō76 Using the ISO sensitivityōōōōōōōōōōōōōōōōōōōōōōōōōō82 Playing Back Still Pictures ōōōōōōōōōōōōōōōōōōōōōōōōō84 Deleting Images ōōōōōōōōōōōōōōōōōōōōōōōōōōōōōō98 Protecting Images ōōōōōōōōōōōōōōōōōōōōōōōōōōōō103 Setti...

Страница 51: ...es among photographers the slowest recommended shutter speed for a handheld camera is generally 1 focal lengthx1 5 For example it is 1 75 of a second for a focal length of 50 mm and 1 150 of a second for 100 mm A tripod or OPS function should be used for shutter speeds slower than this ƃ When using a telephoto lens a tripod that is heavier than the total weight of the camera and lens is recommende...

Страница 52: ...lighting distance and motion 1 Set the mode dial to The camera will select the optimal capturing mode for the subject 2 Set the focus mode lever to SAF In this mode the shutter can be released when the image is focused Basic Shooting Operation Letting the Camera Choose the Optimal Settings ...

Страница 53: ...focus system operates The focus indicator appears in the viewfinder when the subject is in focus The flash pops up automatically when necessary Operating the shutter release button p 53 Hard to Autofocus Subjects p 54 Using the Built in Flash p 70 Selecting the Focusing Area AF Point ƃ You can preview the image in the LCD monitor and check the composition exposure and focus before taking the pictu...

Страница 54: ...der and LCD panel indicators and the autofocus system operates Pressing it down fully second position takes the picture Not pressed Pressed halfway first position Pressed fully second position ƃ Squeeze the shutter release button gently when taking a picture to prevent camera shake ƃ Practice pressing the shutter release button halfway to learn where the first position is ƃ The viewfinder indicato...

Страница 55: ...ject with the aid of the matte field in the viewfinder a Extremely low contrast subjects such as a white wall in the focus points range b Subjects which do not reflect much light within the focus points range c Fast moving objects d Strongly reflected light or strong backlighting bright background e If vertical or horizontal line patterns appear within the focus points range f Multiple subjects in...

Страница 56: ... When taking pictures in dimly lit locations such as indoors at night on cloudy days and in the shade When taking telephoto pictures Blurred picture Picture taken with the OPS function ƃ The OPS function does not compensate for blurring caused by movement of the subject To take pictures of a moving subject increase the shutter speed ƃ The OPS function may not fully reduce camera shake when taking ...

Страница 57: ... The camera is ready to take pictures when icon appears in the viewfinder ƃ Be sure to turn off the OPS switch when using the camera with a tripod ƃ The Shake Reduction function automatically turns off in the following situations When using self timer remote control shooting bulb shooting or wireless mode with an external flash INFORMATION OPS Optical Picture Stabilisation Shake Reduction Function...

Страница 58: ...ƃ When using a lens without the A Auto position on the aperture or with the aperture set to a position other than the s position set Use Aperture Ring on the CUSTOM2 MENU menu to On INFORMATION 1 Use the four way controller ȜȞ to set the Focal Length Select from the following focal length values The default setting is 35 8 10 12 15 18 20 24 28 30 35 40 43 50 55 65 70 77 85 100 120 135 150 180 200 ...

Страница 59: ...tabilisation ƃ If the focal length for your lens is not listed above select the value closest to the actual focal length ƃ When using a zoom lens select the actual focal length at the zoom setting in the same manner INFORMATION ...

Страница 60: ...l Press the Shutter button to take a picture ƃ When rotating the Mode dial and pressing the RAW button again the RAW function will be cancelled ƃ When using the RAW function it may take a time to save the image as the images are saved as RAW and JPEG file type ƃ When the Image taken with the RAW function is displayed on the LCD monitor only a JPEG image is displayed To view the RAW image use the s...

Страница 61: ...When you select RAW menu in the File Format menu the maximum number of continuous shots are 9 1 Press the Fn button The Fn menu appears Continuous Shooting 2 Press the four way controller Ɗ The Drive Mode options screen appears The Default is Single Frame Shooting Single Frame Shooting DRIVE Set Move Move Exit ...

Страница 62: ...t to Single frame shooting to stop Continuous shooting ſ Set Continuous in Remaining Count of the CUSTOM2 MENU menu The number of continuously recordable images buffer space appears when shutter is pressed halfway p 144 3 Use the four way controller ȜȞ to select 4 Press the OK button twice The camera is ready to take pictures 5 Press the shutter release button halfway The autofocus system operates...

Страница 63: ...e focus is adjusted each time the shutter is released while exposure metering timer is set shutter release button is pressed halfway if the focus mode is set to SAF Single mode p 192 ƃ Focusing is continuously active when the focus mode is set to CAF Continuous mode ƃ Note that in CAF the shutter will release when the shutter release button is pressed fully even if focusing is not complete ƃ The s...

Страница 64: ...ŝ63Ş Other Shooting Modes The Drive Mode options screen appears 2 Press the Fn button The Fn menu appears 3 Press the four way controller Ɗ Move Exit Continuous Shooting DRIVE Set Move ...

Страница 65: ...n fully the self timer lamp starts blinking slowly at first and then blinks rapidly for 2 seconds before the shutter is released The beep is heard and the rate increases The shutter will be released about 12 seconds after the shutter release button is pressed fully the shutter will be released about 2 seconds after the shutter release button is pressed fully 8 Turn the camera off after shooting ſ ...

Страница 66: ...oting The shutter will be released immediately the shutter release button on the remote control unit is pressed The shutter will be released 3 seconds after the shutter release button on the remote control unit is pressed 1 Mount the camera on to a tripod The Fn menu appears ƈ Remote Control for PENTAX DSLR Remote Controller F can be used with SAMSUNG DSLR Remote Control Shooting Remote Control F ...

Страница 67: ...n the subject first before operating with the remote control You can set AF in Remote Control to On in the custom function p 132 INFORMATION 7 Point the remote control unit towards the front of the camera and press the shutter release button on the remote control The maximum operating distance of the remote control unit is about 5 m from the front of the camera the shutter will be released immedia...

Страница 68: ...lling one side out and toward you when using accessories such as the viewfinder cap ƃ Turn the power off to stop the remote control operation after it has been activated ƃ The remote control may not operate in backlit conditions ƃ The remote control does not work while the flash is being charged ƃ When using the built in flash raise the flash into position first ƃ The remote control unit battery c...

Страница 69: ...ed Avoid camera shake when mirror pops up by using this method Follow the procedure below to take a picture with the mirror lock up 1 Mount the camera to a tripod 2 Use the Fn button and the four way controller Ɗ to select 2 sec Self Timer p 62 3 Focus on the subject 4 Press the shutter release button fully The mirror pops up and the picture is taken 2 seconds later AE lock is enabled with the exp...

Страница 70: ...e the picture 1 Turn the zoom ring to the right or left Turn the zoom ring clockwise for telephoto and counterclockwise for wide angle Wide Angle Telephoto ƃ Look through the viewfinder to compose your picture at the focal length that looks right for your purpose Turn the zoom ring right or left until you see the composition you want INFORMATION ...

Страница 71: ... We recommend taking a test shot to confirm this Discharges the flash automatically in dark or backlit locations The built in flash discharges manually When the pop up flash is closed the flash doesn t discharge When the flash is opened the flash will discharge Lights a red eye reduction light before automatic flash The built in flash discharges manually Lights a red eye reduction light before man...

Страница 72: ...ce The camera returns to a capture mode Selecting Flash Mode ƃ Available flash mode by recording mode O Selectable X Not selectable Auto discharge Fill in Flash Auto flash Redeye reduct Fill in Flash Red eye Slow speed sync Slow speed sync Red eye Trailing curtain sync A P Sv Tv Av TAv M B X USER O X X X X X X X X O X O O O O O O O O O O X X X X X X X X O X O O O O O O O O O X O O X O X X X X O X ...

Страница 73: ...he shutter release button fully The picture is taken 5 Push down on the portion indicated in the illustration to retract the flash 1 Set the mode dial to Auto mode 2 Press the button The built in flash pops up if necessary and begins charging When the flash is fully charged appears in the LCD panel and viewfinder p 27 29 Using Auto Discharge ...

Страница 74: ...s taken 5 Push down on the portion indicated in the illustration to retract the flash 2 Press the button The built in flash pops up if necessary and begins charging Regardless of the Flash mode the Fill in flash will be selected When the flash is fully charged appears in the LCD panel and viewfinder 1 Set the mode dial to any recording mode except for the Auto mode Using Fill in Flash ...

Страница 75: ...on the pre flash is discharged just before the shutter is released This reduces pupil dilation The main flash is then discharged while the pupils are smaller reducing the red eye effect To use the red eye reduction function set Auto Red eye reduction in Auto mode and Fill in Flash Red eye reduction or Slow speed sync Red eye reduction in other modes ƈ In daylight conditions the flash will eliminat...

Страница 76: ...ep interval Flash Compensation 1 2 EV 2 0 1 5 1 0 0 5 0 0 0 5 1 0 1 3 EV 2 0 1 7 1 3 1 0 0 7 0 3 0 0 0 3 0 7 1 0 ƃ blinks in the viewfinder when the flash pops up during Flash Compensation p 27 ƃ If the maximum flash output is exceeded when corrected to the plus side no compensation will be effective ƃ Compensating to the minus side may not effect the image if the subject is too close aperture is ...

Страница 77: ... 6000K For use when taking pictures under fluorescent lighting Select the type of fluorescent light from W white About 4200K N neutral white About 5000K and D daylight About 6500K For use when taking pictures under light bulb or other tungsten light It reduces the reddish colour tones in a picture About 2850K Flash For use when taking pictures using the built in flash About 5400K Use this to manua...

Страница 78: ...tral white Fluorescent light Cloudy Daylight Fluorescent light Shade Clear sky Colour Temperature The colour of light shifts towards blue as the colour temperature rises and towards red as the colour temperature falls Colour temperature describes this change in light colour in terms of absolute temperature K Kelvin This camera is capable of setting the white balance to enable taking pictures with ...

Страница 79: ...values provided in the camera This provides the optimum white balance for your surroundings Adjusting the White Balance Manually 3 Use the four way controller ƊƌȜȞ to select Manual 4 Press the four way controller ƌ The message screen appears 5 Fully display a white or gray sheet of paper in the viewfinder under the light to adjust white balance 6 Press the shutter release button fully Slide the fo...

Страница 80: ...by the real e dial You can select a desired white balance by using the four way controller ƊƌȜȞ ƃ No image is recorded when the shutter release button is pressed to adjust the white balance ƃ Press the Fn button when adjustment is unsuccessful to set again ƃ If picture is extremely overexposed or underexposed white balance may not be adjusted In this case set an appropriate exposure and re adjust ...

Страница 81: ...ppears 3 Use the four way controller ƊƌȜȞ to select a desired white balance WHITE BALANCE Auto Check Set AWB WHITE BALANCE Daylight Check Set 4 Press the four way controller Ɗƌ The White Balance fine tune screen appears Selecting Daylight WB DAYLIGHT Exit Set ſ After selecting a desired White Balance rotate the main switch to You can check the previous White Balance AWB WHITE BALANCE Daylight Chec...

Страница 82: ... WHITE BALANCE Auto Check Set 7 Press the OK button twice The camera is ready to take a picture with the set White Balance ƃ If the Green button is pressed during the White Balance setting the White Balance value is set to default ť0 ƃ When the colour temperature is change after selecting the colour temperature the following menu will display Change the menu with the Front and Rear e dial ƃ Set Fi...

Страница 83: ...SO 100 to 1600 ƃ Captured images can show more noise if higher Sensitivity is set ƃ Set this menu in CUSTOM1 MENU ISO Steps p 139 INFORMATION Setting the Sensitivity ISO SENSITIVITY AUTO 100 1600 Move Set 1 Press the Fn button The Fn menu appears 2 Use the four way controller Ȟ The ISO sensitivity menu appears 3 Use the four way controller ȜȞ to select a desired sensitivity Move Exit ...

Страница 84: ...nsitivity value of your choice is reached or exceeded p 138 INFORMATION ƈ Set range to automatically correct sensitivity when Sensitivity is set to Auto The sensitivity is automatically corrected in the range of ISO 100 400 by default Turn the front or rear e dial to set ISO SENSITIVITY in the Fn menu Front e dial Sets the lower sensitivity limit Rear e dial Sets the upper sensitivity limit Settin...

Страница 85: ... the largest file number is displayed on the LCD monitor ſ INFO button ƈ When an image is played back press the INFO button The recording information will be changed as followings ƃ Use the included Digimax Master software to play back using a PC Refer to the software instructions for details p 218 INFORMATION Playing Back Images INFO button INFO button INFO button INFO button ...

Страница 86: ...ou can rotate images 90 counterclockwise 1 Press the button after taking a picture The most recently captured image image with the largest file number is displayed on the LCD monitor 2 Press the four way controller ƌ The image is rotated 90 counterclockwise each time the button is pressed Playing Back Still Pictures Rotating Images Set Set Set ...

Страница 87: ...ved ƈ You can magnify images up to 20 times when displaying them on the LCD monitor 1 Press the button and use the four way controller ȜȞ to select an image The most recently captured image image with the largest file number is displayed first on the LCD monitor Enlarging Playback Images ...

Страница 88: ... Max 20 times Rear e dial Left reduce the image Max 1 2 times OK button displays the original size image INFO button display the information of image Front e dial holding the image enlargement scale the previous or the next image is displayed ſ The first calibration on the Rear e dial is 1 2 times You can change this in CUSTOM2 MENU Initial Zoom menu ƃ You can enlarge the image by following the sa...

Страница 89: ...to the left toward The multi image display screen appears Up to 16 thumbnail images will be displayed at once Use the four way controller ƊƌȜȞ to select an image A scroll bar appears at the right of the screen appears for an image that cannot be displayed Frame Scroll bar ƈ You can display 4 9 or 16 images on the LCD monitor at the same time Displaying Multiple Images Delete ...

Страница 90: ...images 3 The selected number of images display at once Displaying a Folder ƈ You can display the contents of folders in the multi image display screen 1 Turn the rear e dial to the left in the multi image display screen 2 Select the folder you want to display and press the OK button The images in the folder are displayed 3 Turn the rear e dial to the right towards or press the OK button A full scr...

Страница 91: ...ous playback use the menu screen displayed on the LCD monitor 1 Press the button and use the four way controller ȜȞ to select an image to be displayed first The most recently captured image image with the largest file number is displayed first on the LCD monitor 2 Press the Fn button The Fn menu appears Slideshow Move Exit ...

Страница 92: ...he slideshow from the PLAYBACK MENU menu p 168 ƃ Slideshow ends when one of the following is performed during playback or when paused ڹ Four way controller ƌ is pressed ں Shutter release button is pressed halfway or fully ڻ AF button is pressed ڼ Playback button is pressed ڽ Main switch is turned to the position ھ Mode dial is turned ڿ Menu button is pressed ſ ڹ After slideshow ends the camera swi...

Страница 93: ...eo cable to the video IN jack on the AV device 3 Turn on the AV device and the camera ƃ If you intend to use the camera continuously for a long period use of the AC adapter SAC 82 optional is recommended p 37 ƃ For AV equipment with multiple video IN jacks such as TVs check the operating manual of the AV device and select the video IN jack to which the camera is connected ƃ Ensure that the video o...

Страница 94: ...images using digital filters Processed images are saved under a different name Digital Filters 1 Press the Fn button in Playback mode The Fn menu appears 2 Press the four way controller Ȝ The screen for selecting the filter appears B W Set Back Move Exit ...

Страница 95: ...erent name 5 Set a desired filter by using the front and rear e dial SOFT SLIM Slim Filter Colour Filter SOFT SLIM COLOR SLIM Set Back Set Back Set Back Save image as a new file Save as Cancel Playing Back Still Pictures 3 Use the four way controller ȜȞ to select an image 4 Use the four way controller Ɗƌ to select a filter Select a filter and preview the effects on the image ...

Страница 96: ...Adds a colour filter to the image Selects from 18 filters 6 colors x 3 tones Creates a soft image by lightly fading the entire image Changes the horizontal and vertical ratio of images Adjusts height or width up to two times the original size Changes the brightness of images Adjusts in a range of 8 levels ſ When another image is selected with the four way controller ȜȞ the image appears in the set...

Страница 97: ...W file in Play mode Editing RAW Images 2 Press the Fn button The Fn menu appears 3 Press the four way controller ƌ 4 Press the OK button The parameters recorded in the image file appear ſ If you do not want to change the current parameters press the OK button again Move Exit Back Set Develop this image Change ...

Страница 98: ...ght Flash Manual Color Temperature Sensitivity 2 0 2 0 Sharpness 3 0 3 0 Saturation 3 0 3 0 Contrast 3 0 3 0 White Balance 5 Press the Fn button and then use the four way controller ƊƌȜȞ to change the parameter 6 After changing the parameter press the OK button The save confirmation screen appears 7 Use the four way controller Ɗ to select Save as 8 Press the OK button The edited image is saved und...

Страница 99: ...r ȜȞ to select an image to delete 2 Press the button The Delete screen appears 3 Use the four way controller Ɗ to select Delete 4 Press the OK button The image is deleted ƃ Deleted images cannot be restored ƃ Protected images cannot be deleted INFORMATION Deleting a Single Image Set All images Delete Cancel ...

Страница 100: ...screen appears 1 Press the button 4 Press the OK button All images are deleted 3 Use the four way controller Ɗ to select Delete All ƃ Deleted images cannot be restored ƃ Protected images cannot be deleted INFORMATION Deleting All Images Set Back Delete all images on memory card Delete All Cancel No image ...

Страница 101: ...mage image with the largest file number is displayed first on the LCD monitor 2 Turn the e dial to the left toward Nine thumbnail images appear ƃ Deleted images cannot be restored ƃ Protected images cannot be deleted ƃ Only files in the same folder can be selected at once INFORMATION Deleting Selected Images from Nine Image Display Delete ...

Страница 102: ...ted and appears Press Fn button to select all images the selection of images may take time to complete depending on the number of images 5 Press the button The Delete confirmation screen appears 7 Press the OK button The selected images are deleted 6 Use the four way controller Ɗ to select Select Delete Set Back All selected images are deleted Select Delete Cancel Delete ...

Страница 103: ...lete screen appears 3 Use the four way controller Ɗƌ to select deletion type Delete JPEG only JPEG format images among the selected images are deleted Delete RAW only RAW format images among the selected images are deleted Delete RAW JPEG RAW and JPEG format images among the selected images are deleted Set All images Delete JPEG Delete RAW Delete RAW JPEG Cancel 100 0080 Set All images Delete JPEG...

Страница 104: ...ith the largest file number are displayed first on the LCD monitor 2 Press the button The Protect screen appears 3 Use the four way controller Ɗ to select Protect 4 Press the OK button The selected image is protected ƃ Select Unprotect in Step 3 to cancel the Protect setting ƃ The symbol is displayed when playing back protected images p 25 26 INFORMATION Protecting Images from Deletion Protect Set...

Страница 105: ...s screen appears 3 Press the four way controller Ɗ to select Protect and press the OK button All images saved in the Memory Card are protected ſ Select Unprotect in Step 3 to cancel the Protect setting on all of the images Protecting All Images Set Back Protect all images Protect Unprotect ...

Страница 106: ...he button and use the four way controller ȜȞ to select an image Copies Selects the number of copies You can print up to 99 copies Date Specifies whether you want the date inserted on the print or not 2 Press the Fn button The Fn menu appears 3 Press the four way controller Ɗ The DPOF screen appears If DPOF settings have already been made for an image the previous number of prints and date setting ...

Страница 107: ...o playback status 5 Use the four way controller ȜȞ to choose whether to insert the date or not The date will be imprinted The date will not be imprinted ƃ Depending on the printer or printing equipment at the photo processing lab the date may not be imprinted on the pictures even if the DPOF setting was made ƃ To cancel DPOF settings set the number of copies to 00 in Step 4 and press the OK button...

Страница 108: ...ION Setting the Printing Service DPOF 1 Press the Fn button in Playback mode The Fn menu appears 2 Press the four way controller Ɗ The DPOF screen appears 3 Press the Fn button The screen for making DPOF settings for all images appears 4 Use the four way controller ȜȞ to choose the number of copies and whether to insert the date or not Refer to Steps 4 and 5 in ŗPrinting Single Images p 105 for de...

Страница 109: ... to a printer If the AC adapter is not used the printer may not work properly or the image data may be lost if the batteries run out of power while the camera is connected to the printer ƃ Do not disconnect the USB cable during data transfer ƃ Depending on the type of printer not all the settings made on the camera such as print settings and DPOF settings may be valid ƃ A printing error may occur ...

Страница 110: ...way controller Ɗƌ to select the SETUP MENU menu Press the four way controller Ȟ 3 Use the four way controller Ɗƌ to select USB 4 Press the four way controller Ȟ A pop up menu appears Setting USB SETUP MENU Move Exit Format Beep Date Time World Time Language Guide Display LCD Brightness English 3sec ť0 ...

Страница 111: ...ing is changed 7 Press the MENU button 1 Turn the camera off 2 Connect the camera and a PictBridge compatible printer using the USB cable supplied with the camera Connecting the Camera to the Printer SETUP MENU Set Cancel Video Out USB Auto Power Off Folder Name Sensor Cleaning Dust Removal Reset Computer Printer ...

Страница 112: ...he four way controller Ɗƌ to select Print One on the PictBridge menu 2 Press the OK button The Print one screen appears ƃ PictBridge menu is not displayed if USB is set to Computer INFORMATION Printing Single Images Set Move Select Printing Mode Print One Print All DPOF Auto Print Set Move Select Printing Mode Print One Print All DPOF Auto Print ...

Страница 113: ... confirmation screen appears Proceed to Step 12 to print the images by default To change the print settings go to Step 7 7 Press the Fn button The screen for changing print settings appears 8 Select Paper Size and press the four way controller Ȟ The Paper Size screen appears Set Cancel PictBridge Paper Size Paper Type Quality Border Status Standard Standard Standard Standard Back Date Print Print ...

Страница 114: ...t When the Paper Size is set to Standard images are printed according to the printer settings Paper Type Standard Best Better Good Quality Standard Super fine Fine Normal 12 Press the OK button twice The image is printed according to the settings Press the MENU button to cancel printing 1 Use the four way controller Ɗƌ to select Print All on the PictBridge menu 2 Press the OK button The Print all ...

Страница 115: ...the settings 4 Press the OK button The print settings confirmation screen appears Refer to Steps 7 and 11 of ŗPrinting Single Images p 112 and 113 for details on how to change the settings 5 Press the OK button on the print settings confirmation screen All the images are printed according to the settings Press the MENU button to cancel printing Printing Using PictBridge Back Print Date Total Print...

Страница 116: ...K button The print settings confirmation screen appears Refer to Steps 7 and 11 of ŗPrinting Single ImagesŘ p 112 and 113 for details on how to change the settings 4 Press the OK button on the print settings confirmation screen The images are printed according to the settings Press the MENU button to cancel printing ƈ When you have finished printing turn off the camera 1 Turn off the camera 2 Disc...

Страница 117: ...ŝ116Ş MEMO ...

Страница 118: ...ōōōōōōōōōōōōōōōōōōōōōō118 Using the Fn Menu ōōōōōōōōōōōōōōōōōōōōōōōōōōōō169 Using the Mode Dial ōōōōōōōōōōōōōōōōōōōōōōōōōōō171 4 Button Menu Mode dial Reference When using menus and Fn menu items which cannot be changed due to camera settings appear gray and cannot be selected ...

Страница 119: ...or 2 Press the four way controller Ȝ CUSTOM1 MENU CUSTOM2 MENU SETUP MENU and PLAYBACK MENU menu appear in order each time the four way controller ƌ is pressed CAPTURE MENU Move Exit Image Tone File Format JPEG Size JPEG Quality Saturation Sharpness Contrast CUSTOM1 MENU Move Exit Link AF Point AE Superimpose AF Area AF in Remote Control AF Button Function AF by Press Halfway EV Steps Metering Tim...

Страница 120: ...ess the MENU button to return to Capture or Playback mode ƃ Even after you press the MENU button and close the menu screen your settings will not be saved if the camera is turned off improperly such as by removing the batteries while the camera is on ƃ You can use the front e dial to move the menu page and the rear e dila to switch between the CUSTOM1 2 MENU SETUP MENU and PLAYBACK MENU menu when ...

Страница 121: ...es sharp or soft p 124 Contrast Sets the image contrast p 124 User set Registers current camera settings on the User mode p 125 Colour space Sets the colour space p 126 Extended Bracket Sets Extended Bracket shooting p 127 Multi exposure Sets Multi exposure shooting p 127 Memory Sets the settings to save when the power is turned off p 128 Exposure mode Registers current exposure mode on the User m...

Страница 122: ...t the basic colour tone of pictures The default setting is Bright Natural Images are finished naturally and suitable for retouching Bright Images are finished brightly with high contrast and sharp focus Setting the Image Tone CAPTURE MENU Set Cancel Image Tone File Format JPEG Size JPEG Quality Saturation Sharpness Contrast ...

Страница 123: ... Setting the JPEG Recorded Pixels 3872x2592 Captures images in JPEG format You can change the number of recorded pixels from JPEG Size in the CAPTURE MENU menu and the image quality level from JPEG Quality in the CAPTURE MENU menu The file size varies according to the settings RAW data is CCD output data saved without processing Effects such as White Balance Contrast Saturation and Sharpness are n...

Страница 124: ...s saved in JPEG format Standard compression rate suited for viewing as photographs or on your computer screen Image is saved in JPEG format Highest compression rate suitable for attaching to e mail or posting on websites Image is saved in JPEG format Best Better Good ƃ When the quality level is changed the number of recordable images at that quality level appears at the top right of the screen Set...

Страница 125: ...it Image Tone File Format JPEG Size JPEG Quality Saturation Sharpness Contrast CAPTURE MENU Set Cancel Image Tone File Format JPEG Size JPEG Quality Saturation Sharpness Contrast CAPTURE MENU Move Exit Image Tone File Format JPEG Size JPEG Quality Saturation Sharpness Contrast CAPTURE MENU Set Cancel Image Tone File Format JPEG Size JPEG Quality Saturation Sharpness Contrast ƃ Contrast Towards Hig...

Страница 126: ... can be stored Storing User Settings CAPTURE MENU Move Exit User Registration Color Space Extended Bracket Multi Exposure Memory of Settings OPS Saves current settings to USER Registration mode Set Back Off Off Auto Exposure mode Sharpness EV Compensation White Balance Flash mode Saturation Drive mode File Format Extended Bracketing Steps Type JPEG Size Flash Exposure Compensation JPEG Quality Exp...

Страница 127: ...tration Color Space Extended Bracket Multi Exposure Memory of Settings OPS Colour Space Colour ranges for various input output devices such as digital cameras monitors and printers differ This colour range is called the colour Space To recreate different colour spaces in different devices standard colour spaces have been proposed This camera supports sRGB and AdobeRGB sRGB is mainly used for devic...

Страница 128: ...ť2 ť1 Contrast ť3 ť2 ť1 Available Number of images 2 9 images the exposure is adjusted automatically according to the number of shots CAPTURE MENU Move Exit User Registration Color Space Extended Bracket Multi Exposure Memory of Settings OPS Off Off Auto Set Back Set Back CAPTURE MENU Extended Bracket CAPTURE MENU Extended Bracket Extended Bracket Extended Bracket White Balance Saturation Sharpnes...

Страница 129: ...reate again from the first picture ƃ After completing the Multi Exposure shooting the settings for Multi Exposure will be canceled INFORMATION ƈ You can select which settings to save when the camera is turned off Flash Drive White Balance ISO Sensitivity EV Compensation Settings Flash Drive White Balance Sensitivity Exposure Compensation Auto Bracket Playback Information New files are named using ...

Страница 130: ...rmation such as focal length the OPS menu appears Set Focal Length manually on the OPS menu For more information see Setting the Shake Reduction Function p 55 Exposure mode CAPTURE MENU Set Cancel Exposure Mode User Registration Color Space Extended Bracket Multi Exposure Memory of Settings OPS ƈ You can store the current camera settings and easily retrieve them simply by setting the mode dial to ...

Страница 131: ...teps for ISO sensitivity p 139 p 131 p 131 p 132 p 133 p 135 p 136 p 138 p 139 AF in remote control AF Button Function AF by Press Halfway Fine tune when AWB Auto EV Compensation ISO warning Reset Custom Function Superimpose AF Area Link AF Point and AE CUSTOM1 MENU Menu Setting Items Sets whether to adjust AE and Focusing Area in multi segment metering based on AF point Sets whether to display th...

Страница 132: ... Off On Off On On 1 2EV 10sec Off Exposure is set separately from AF point On Exposure is set in accordance with AF point On The exposure sets according to the AF point Off The exposure sets regardless of the AF point CUSTOM1 MENU Set Back Link AF Point AE Off On Exposure value for multi segment metering set despite AF Point position CUSTOM1 MENU Move Exit Link AF Point AE Superimpose AF Area AF i...

Страница 133: ...NU Set Back AF in Remote Control Off On AF is not operated when released with the remote control unit ƈ Set whether to perform AF while the AF button is pressed or not perform AF while the AF button is pressed The default is Enable AF AF Button Function CUSTOM1 MENU Move Exit Link AF Point AE Superimpose AF Area AF in Remote Control AF Button Function AF by Press Halfway EV Steps Metering Time Off...

Страница 134: ...s not perform AF when the shutter release button is pressed halfway CUSTOM1 MENU Set Back AF by Press Halfway On Off AF operates when shutter release button is pressed halfway ƈ Sets the adjustment steps for exposure The default setting is 1 2 EV step EV Steps CUSTOM1 MENU Move Exit Link AF Point AE Superimpose AF Area AF in Remote Control AF Button Function AF by Press Halfway EV Steps Metering T...

Страница 135: ...ets the exposure metering time to 30 seconds CUSTOM1 MENU Set Back Metering Time 10sec 3sec 30sec Sets exposure metering timer to 10 seconds ƈ Locks the exposure value when the focus is locked The default setting is Off AE L with AF locked CUSTOM1 MENU Move Exit AEL with AF Locked Program Line Auto EVC Fine tune when AWB WB when using flash Color Temp Unit Noise Reduction Off Normal Off Off Kelvin...

Страница 136: ...proper exposure cannot be determined The default is Off Auto EV Compensation CUSTOM1 MENU Move Exit AEL with AF Locked Program Line Auto EVC Fine tune when AWB WB when using flash Color Temp Unit Noise Reduction Off Normal Off Off Kelvin On The exposure does not compensate when the exposure cannot be accurately calculated automatically The exposure compensates automatically when the automatic expo...

Страница 137: ...MENU Set Back Fine tune when AWB Off On Fine tune is disabled when White Balance is set to AWB ƈ Sets whether to fix white balance when flash is discharged The default is Unchanged WB when using flash CUSTOM1 MENU Move Exit AEL with AF Locked Program Line Auto EVC Fine tune when AWB WB when using flash Color Temp Unit Noise Reduction Off Normal Off Off Kelvin On Unchanged The WB is not changed whe...

Страница 138: ...are converted to Kelvin and displayed CUSTOM1 MENU Set Back Color Temp Unit Kelvin Mired Color temperature can be set in steps of 100K Mired ƈ Sets whether to use Noise Reduction in slow speed shooting The default is On Noise Reduction CUSTOM1 MENU Move Exit AEL with AF Locked Program Line Auto EVC Fine tune when AWB WB when using flash Color Temp Unit Noise Reduction Off Normal Off Off Kelvin On ...

Страница 139: ...arning appears in the viewfinder when the set sensitivity is set or exceeded ISO Warning CUSTOM1 MENU Move Exit ISO Warning ISO Steps Reset Custom1 Off 1 EV Off ISO warning is not displayed ISO 400 ISO warning is displayed when ISO 400 is set or exceeded ISO 800 ISO warning is displayed when ISO 800 is set or exceeded ISO 1600 ISO warning is displayed when ISO 1600 is set CUSTOM1 MENU Set Back ISO...

Страница 140: ...sensitivity according to the EV setting CUSTOM1 MENU Set Back ISO Steps 1 EV Step As EV Steps ISO sensitivity steps are set to 1 EV ƈ Resets all the settings in the Custom Function 1 menu to the defaults The default is Cancel Reset Custom Function 1 CUSTOM1 MENU Move Exit ISO Warning ISO Steps Reset Custom1 Off 1 EV Reset Resets the settings Cancel Does not reset the settings CUSTOM1 MENU Set Back...

Страница 141: ...button is pressed halfway Release in Charging Sets to release shutter while the built in flash is charging Initial Zoom Sets the initial magnification of the zoom playback Auto Rotation Sets to automatically rotate images when playing back Saving Rotation Info Sets whether to save rotation information when shooting Light of Top LCD Sets whether to illuminate the LCD panel Resets all the settings i...

Страница 142: ...lly Av Shift The shutter speed is locked and the aperture is adjusted automatically CUSTOM2 MENU Move Exit Bracketing Order Green Button in M Use Aperture Ring E Dial in Program E Dial in Sv E Dial in Tv E Dial in Av 0 P Off Tv Av ISO Tv Av CUSTOM2 MENU Move Exit Bracketing Order Green Button in M Use Aperture Ring E Dial in Program E Dial in Sv E Dial in Tv E Dial in Av 0 P Off Tv Av ISO Tv Av CU...

Страница 143: ... aperture ring is not set to the A Auto position CUSTOM2 MENU Move Exit Bracketing Order Green Button in M Use Aperture Ring E Dial in Program E Dial in Sv E Dial in Tv E Dial in Av 0 P Off Tv Av ISO Tv Av CUSTOM2 MENU Set Back Use Aperture Ring Off On Pictures cannot be taken when the aperture ring position is other than A CUSTOM2 MENU Move Exit Bracketing Order Green Button in M Use Aperture Rin...

Страница 144: ...reen Button in M Use Aperture Ring E Dial in Program E Dial in Sv E Dial in Tv E Dial in Av 0 P Off Tv Av ISO Tv Av CUSTOM2 MENU Set Back E Dial in Tv Front Shutter Speed Rear Not Available CUSTOM2 MENU Move Exit Bracketing Order Green Button in M Use Aperture Ring E Dial in Program E Dial in Sv E Dial in Tv E Dial in Av 0 P Off Tv Av ISO Tv Av CUSTOM2 MENU Set Back E Dial in Av Front Not Availabl...

Страница 145: ...s Normal 1time The setting is reset after taking a picture Continue The setting is retained when the RAW button is pressed again CUSTOM2 MENU Move Exit Set RAW Button Remaining Count Release in Charging Preview Method Initial Zoom Auto Rotation Saving Rotation Info 1time Off 1 2X On On CUSTOM2 MENU Set Back Set RAW Button 1time Continue Returns to the previous setting after one shooting CUSTOM2 ME...

Страница 146: ...ield in the viewfinder Digital You can check the composition exposure and focus on the LCD CUSTOM2 MENU Move Exit Set RAW Button Remaining Count Release in Charging Preview Method Initial Zoom Auto Rotation Saving Rotation Info 1time Off 1 2X On On CUSTOM2 MENU Set Back Release in Charging Off On Disables shutter release while the built in flash is charging CUSTOM2 MENU Move Exit Set RAW Button Re...

Страница 147: ...images taken vertically do not rotate automatically Initial magnification of the zoom playback CUSTOM2 MENU Move Exit Set RAW Button Remaining Count Release in Charging Preview Method Initial Zoom Auto Rotation Saving Rotation Info 1time Off 1 2X On On CUSTOM2 MENU Set Back Initial Zoom 1 2 times 2 times 4 times 8 times 16 times Magnification for starting zoom playback set to 1 2x CUSTOM2 MENU Mov...

Страница 148: ...uminate when pressing the LCD panel lamp button Off The LCD panel will not illuminate when pressing the LCD panel lamp button CUSTOM2 MENU Move Exit Set RAW Button Remaining Count Release in Charging Preview Method Initial Zoom Auto Rotation Saving Rotation Info 1time Off 1 2X On On CUSTOM2 MENU Set Back Saving Rotation Info On Off Saves rotation information when shooting CUSTOM2 MENU Move Exit Li...

Страница 149: ... Custom Function 2 menu to the defaults The default is Cancel Reset Custom Function2 Reset The settings will reset Cancel The settings will not reset CUSTOM2 MENU Move Exit Light of Top LCD Reset Custom2 On CUSTOM2 MENU Set Back Reset Custom2 Reset Cancel ...

Страница 150: ... output format to the TV monitor p 158 USB Sets the USB cable connection PC or printer p 159 Auto Power Off Sets the time to turn off automatically p 159 Folder Name Sets the method used to add file numbers p 160 Sensor Cleaning Locks the mirror in the up position for cleaning the CCD p 161 162 Dust Removal Remove the dust of the CCD sensor p 163 Reset p 164 Refer to the software instructions for ...

Страница 151: ... The memory will not be formatted SETUP MENU Move Exit Format Beep Date Time World Time Language Guide Display LCD Brightness English 3sec ť0 SETUP MENU Set Back Format Format Cancel All data deleted ſ When formatting is completed camera mode is changed to the Capture or Playing back mode ƃ Do not open the card cover while formatting Memory Card The card may be damaged beyond use ƃ Formatting will...

Страница 152: ...an set AF sound AE Lock RAW button Self timer and Remote Control No beep sound Beep is not activated SETUP MENU Move Exit Format Beep Date Time World Time Language Guide Display LCD Brightness English 3sec ť0 SETUP MENU Set Back Beep Beep AF Sound AE Lock RAW Self Timer Remote Control SETUP MENU Set Back Beep Beep AF Sound AE Lock RAW Self Timer Remote Control Beep Beep On Beep Off ...

Страница 153: ...the Date Time SETUP MENU Set Back Date Time Type yy mm dd 24h Date 2006 10 Time 13 00 01 SETUP MENU Set Cancel Date Time Type yy mm dd 24h Date 2006 10 Time 13 00 01 SETUP MENU Set Cancel Date Time Type yy mm dd 24h Date 2006 10 Time 13 00 01 SETUP MENU Set Cancel Date Time Type yy mm dd 24h Date 2006 10 Time 13 00 01 ƃ Date Setting SETUP MENU Set Back Date Time Type yy mm dd 24h Date 2006 10 Time...

Страница 154: ... way controller ȜȞ to select On or Off 4 Press the four way controller ƌ The selection frame moves to The city with blinks 5 Press the four way controller Ȟ The screen for magnifying the Destination region appears Use the four way controller ȜȞ to magnify the region 6 Press the four way controller ƌ The frame moves to city Applies time of city set in Destination Applies time of city set in Hometow...

Страница 155: ...lect On if the Destination city uses daylight saving time DST 11 Press the MENU button twice The camera is ready to take pictures 10 Press the OK button The World Time setting is saved ƃ See ŗList of World Time Cities p 155 for cities that can be specified as a destination ƃ Select in Step 4 to set the city and DST setting ƃ appears on the guide display screen if World Time is On p 23 24 INFORMATI...

Страница 156: ...n Paris Amsterdam Copenhagen Rome Berlin Stockholm Athens Helsinki Moscow Africa Dakar West Asia Algiers Johannesburg Istanbul Cairo Jerusalem Region City Africa Nairobi West Asia Jeddah Tehran Dubai Karachi Kabul Male Delhi Colombo Katmandu Dacca East Asia Yangon Bangkok Kuala Lumpur Vientiane Singapore Phnom Penh Ho chi Minh Jakarta Hong Kong Beijing Shanghai Manila Taipei Seoul Tokyo Guam Ocean...

Страница 157: ...e Time World Time Language Guide Display LCD Brightness English 3sec ť0 SETUP MENU Set Back Language Deutsch Español Português Italiano Svenska English Français ƈ Set to display time of guides on the LCD monitor when main switch is on or Exposure mode is changed The default is 3Sec Guide Display Time Off 3Sec 10Sec 30Sec Guide Display Time SETUP MENU Move Exit Format Beep Date Time World Time Lang...

Страница 158: ...ee ƃ You can select 7 0 7 steps of LCD brightness Adjusting the Brightness of the LCD Monitor ໓ ჿ႐ ධෂ ᇥಝစ ᆰမઃణ ཀ ጫໟ ዹཫጩ ళ SETUP MENU Move Exit Format Beep Date Time World Time Language Guide Display LCD Brightness English 3sec ť0 SETUP MENU Set Cancel Format Beep Date Time World Time Language Guide Display LCD Brightness ...

Страница 159: ...U S A Canada Japan South Korea Taiwan Mexico ƃ PAL Australia Austria Belgium China Denmark Finland Germany U K Holland Italy Kuwait Malaysia New Zealand Singapore Spain Sweden Switzerland Thailand Norway ƃ When using a TV as an external monitor you will need to select the external or AV channel of the TV ƃ There will be a digital noise on the external monitor but it is not a malfunction ƃ If the i...

Страница 160: ...t this menu when connecting to a printer ƈ You can set the camera to turn off automatically if unused after a certain length of time The default is 1Min Setting Auto Power Off ໓ ჿ႐ ධෂ ᇥಝစ ᆰမઃణ ཀ ጫໟ ዹཫጩ ళ SETUP MENU Move Exit Video Out USB Auto Power Off Folder Name Sensor Cleaning Dust Removal Reset NTSC Computer 1min Standard SETUP MENU Set Cancel Video Out USB Auto Power Off Folder Name Sensor C...

Страница 161: ...ng Dust Removal Reset NTSC Computer 1min Standard SETUP MENU Set Cancel Video Out USB Auto Power Off Folder Name Sensor Cleaning Dust Removal Reset Standard Date The folder name is assigned in the form of XXXSSCAM XXX is a sequential number from 100 to 999 The two digits of the month and day on which the picture was taken are assigned as the folder name in the form of XXX_MMDD Example 101_0101 for...

Страница 162: ... warning message Not enough battery remaining to clean sensor is displayed on the LCD monitor ƃ If you are not using the AC adapter please use batteries with ample capacity remaining A warning beep will sound if the battery capacity becomes low during cleaning Please stop cleaning immediately ƃ Do not put the tip of the blower inside the lens mount area If the power is turned off this could cause ...

Страница 163: ...n the CCD Use a brush less blower to remove dirt and dust from the CCD Using a blower with a brush may scratch the CCD Do not wipe the CCD with a cloth 8 Turn the camera off 9 Attach the lens after the mirror returns to its original position SETUP MENU Set Back Sensor Cleaning Mirror Up Cancel Mirror up to clean CCD Turn the power off to end ...

Страница 164: ...omputer 1min Standard SETUP MENU Set Back Dust Removal Dust Removal Dust Removal Removes the dust by shaking the CCD Start up Action Shakes the CCD to remove the dust ƃ Removing Dust SETUP MENU Set Back Dust Removal Dust Removal ƃ Removing the dust when turning on the camera select by using the four way controller ȜȞ Press the OK button to remove the dust Start up Action Start up Action ...

Страница 165: ...uage Video Out User set1 and User set2 Reset Reset Resets all settings Cancel Does not reset camera settings SETUP MENU Move Exit Video Out USB Auto Power Off Folder Name Sensor Cleaning Dust Removal Reset NTSC Computer 1min Standard SETUP MENU Set Back Reset Reset Cancel ...

Страница 166: ...es one after another p 168 ƈ Perform settings related to playback and editing images in the PLAYBACK MENU menu p 165 p 166 p 167 p 167 Exposure Warning Quick View Digital Preview Digital filter Exposure warning ƈ Sets to display over exposed area warning during Instant Review or Playback The default is Off PLAYBACK MENU Move Exit Exposure Warning Quick View Digital Preview Digital Filter Slide Sho...

Страница 167: ...f PLAYBACK MENU Set Cancel Display Time Histogram Exposure Warning 1sec 3sec 5sec Off PLAYBACK MENU Quick View Set Back Display Time Histogram Exposure Warning 1sec PLAYBACK MENU Quick View Set Back Display Time Histogram Exposure Warning 1sec PLAYBACK MENU Quick View Set Back Display Time Histogram Exposure Warning 1sec PLAYBACK MENU Move Exit Exposure Warning Quick View Digital Preview Digital F...

Страница 168: ... about the menus Histogram Exposure Warning Use the four way controller ȜȞ to select On on or Off off The default is Off Off PLAYBACK MENU Move Exit Exposure Warning Quick View Digital Preview Digital Filter Slide Show Off 1sec 3sec PLAYBACK MENU Digital Preview Set Back Histogram Exposure Warning PLAYBACK MENU Digital Preview Set Back Histogram Exposure Warning PLAYBACK MENU Move Exit Exposure Wa...

Страница 169: ... about the menus Interval Set image display interval to 3sec 5sec 10sec or 30sec Repeat Set whether or not to play back repeatedly PLAYBACK MENU Set Cancel Interval Repeat 3sec 5sec 10sec 30sec PLAYBACK MENU Slide Show Set Back Interval Repeat 3sec PLAYBACK MENU Slide Show Set Back Interval Repeat 3sec PLAYBACK MENU Move Exit Exposure Warning Quick View Digital Preview Digital Filter Slide Show Of...

Страница 170: ...ethod of flash discharge p 70 75 Sensitivity Sets the sensitivity p 82 83 Ɗ ƌ Ȝ Ȟ ƈ Press the Fn button while taking a picture The Fn menu appears Drive Mode White Balance Capture Mode Selects Continuous shooting Self Timer or Remote control Adjusts the colour for the colour of the light source illuminating the subject Move Exit p 60 68 p 76 81 ...

Страница 171: ...ther p 90 91 Converts the RAW file to the JPEG file Ɗ Ȝ p 96 97 p 93 95 RAW converting ƌ Using the Fn Menu Playback Mode ſ When a JPEG file is played back Converting RAW file menu can not be set ſ When a RAW file is played back DPOF and Digital Filter menu can not be selected Playing back a JPEG file ಒൂ Move Exit Playing back a RAW file Move Exit Edits captured images to black and white or sepia t...

Страница 172: ...tter speed and aperture to the proper exposure according to the set sensitivity Lets you set the desired aperture for controlling the depth of field Use it to obtain a blurred or sharp background Lets you set the desired shutter speed for expressing moving subjects Take pictures of fast moving subjects that look still or subjects that give a sense of movement Automatically sets shutter speed and a...

Страница 173: ...he proper exposure according to the brightness of the subject Lets you set shutter speed and aperture to capture the picture with creative intent Lets you capture images that require slow shutter speeds such as fireworks and night scenes Locks shutter speed at 1 180 second Use this when using an External flash that does not automatically change the shutter speed Lets you capture images with settin...

Страница 174: ...al to 2 Check the Shutter speed and Aperture value on the viewfinder and LCD panel ƃ Shutter speed Aperture value AE Lock Exposure value Auto bracket Multi exposure and Flash compensation are not set in the Auto mode ƃ Set the aperture to the A position while holding down the auto lock button when using a lens with an aperture ring INFORMATION Using the AUTO mode ...

Страница 175: ...d and Aperture value on the viewfinder and LCD panel ƃ You can change the program line Set the Program Line in the CUSTOM1 MENU menu p 135 ƃ You can automatically correct the sensitivity if appropriate exposure cannot be set with the set criteria Set ISO Sensitivity to Auto in the Fn menu p 82 ƃ Set the aperture to the A position while holding down the auto lock button when using a lens with an ap...

Страница 176: ... aperture will blink in the viewfinder and on the LCD panel Press the Green button to return to Hyper program automatic exposure ƈ To change the aperture You can switch to Aperture Priority automatic exposure by turning the rear e dial in P Hyper program mode You can only set the aperture to a value that is in relation to shutter speed If the brightness changes and the shutter speed is outside the...

Страница 177: ... adjust the sensitivity The shutter speed aperture value and sensitivity are displayed in the viewfinder and on the LCD panel ƃ Turn the front e dial while pressing the button and change the EV Compensation value ƃ Set the sensitivity in increments of 1 2 EV or 1 3 EV Set in ISO Steps in the CUSTOM1 MENU menu p 139 ƃ You cannot set the sensitivity in ISO Sensitivity in the Fn menu ƃ Set the apertu...

Страница 178: ...zing subject movement Aperture value is automatically set to give the appropriate exposure depending on the shutter speed ſ Effect of Aperture and Shutter Speed p 199 1 Set the mode dial to Tv 2 Turn the front e dial and adjust the shutter speed The shutter speed and aperture value are displayed in the viewfinder and on the LCD panel Using the Tv Shutter Priority Mode ...

Страница 179: ...n menu p 82 ƃ Set the aperture to the A position while holding down the auto lock button when using a lens with an aperture ring INFORMATION Exposure Warning If the subject is too bright or too dark the aperture value will blink in the viewfinder and on the LCD panel If the subject is too bright choose a faster shutter speed If it is too dark choose a slower shutter speed When the aperture value i...

Страница 180: ...e The depth of field is shallower and the front and back of the focused object is blurred when aperture is set to a small value Shutter speed is automatically set to appropriate exposure depending on the aperture value ſ Effect of Aperture and Shutter Speed p 199 1 Set the mode dial to Av 2 Turn the rear e dial and adjust the aperture value The shutter speed and aperture value are displayed in the...

Страница 181: ...enu p 82 ƃ Set the aperture to the A position while holding down the auto lock button when using a lens with an aperture ring Using the Mode Dial INFORMATION Exposure Warning If the subject is too bright or too dark the shutter speed will blink in the viewfinder and on the LCD panel If the subject is too bright set the aperture smaller larger number and when too dark open the aperture further smal...

Страница 182: ... sets the sensitivity so that shutter speed and aperture will give the proper exposure according to the brightness of the subject 1 Set the mode dial to TAv 2 Turn the front e dial and adjust the shutter speed The shutter speed aperture value and sensitivity are displayed in the viewfinder and on the LCD panel 3 Turn the rear e dial and adjust the aperture value ...

Страница 183: ... M Hyper manual Mode ŝ182Ş Using the Mode Dial ƃ Turn the front e dial while pressing the button to change the EV Compensation value ƃ Set the shutter speed and aperture values in increments of 1 2 EV or 1 3 EV Set in EV Steps in the CUSTOM1 MENU menu p 133 ƃ Settings other than Auto are not available in ISO Sensitivity in the Fn menu ƃ Set the aperture to the A position while holding down the aut...

Страница 184: ...e rear e dial ƃ When the sensitivity is set to Auto and exposure mode is set to M Manual mode the sensitivity is the lowest sensitivity ƃ The viewfinder indicator blinks when the difference from appropriate exposure is over ť3 0 ƃ Set the shutter speed and aperture values in increments of 1 2 EV or 1 3 EV Set in EV Steps in the CUSTOM1 MENU menu p 133 ƃ Set the aperture to the A position while hol...

Страница 185: ...nged the combination of shutter speed and aperture changes while exposure is retained Example If the shutter speed is 1 125 sec and aperture is F5 6 and is recorded with the AE L button and the shutter speed is changed to 1 30 sec with the front e dial the aperture automatically changes to F11 ƈ The EV bar appears in the LCD panel and viewfinder in M Manual mode The appropriate exposure is set whe...

Страница 186: ... is pressed in M Manual mode You can choose from the following three adjustment methods in Green Button in M in the CUSTOM2 MENU menu 1 Program Line The aperture and shutter speed are adjusted automatically 2 Tv Shift The aperture is locked and the shutter speed is adjusted automatically 3 Av Shift The shutter speed is locked and the aperture is adjusted automatically ...

Страница 187: ...era shake when using B Bulb mode Connect the cable switch to the cable switch terminal ƃ Bulb shooting is available when using the remote control shooting mode p 65 The shutter remains open as long as the shutter release button of the optional remote control is held down ƃ Noise reduction is a process to reduce noise image roughness or unevenness caused by low shutter speed Set Noise Reduction in ...

Страница 188: ...e ƃ Press the Green button to retain the shutter speed at 1 180 sec and automatically adjust the aperture ƃ When the sensitivity is set to Auto and exposure mode is set to X Flash X Sync Speed mode the sensitivity is set to the minimum value set on the Setting the Range of Automatic Correction in AUTO p 83 INFORMATION Using the USER Mode ƈ You can store the current camera settings and easily retri...

Страница 189: ...ŝ188Ş MEMO ...

Страница 190: ...omposition Exposure and Focus Before Shooting ōōō190 Focusing ōōōōōōōōōōōōōōōōōōōōōōōōōōōōōōōōō192 Setting the Exposure ōōōōōōōōōōōōōōōōōōōōōōōōōōō199 Using the Built in Flashōōōōōōōōōōōōōōōōōōōōōōōōōō208 Using an External Flash Optional ōōōōōōōōōōōōōōōōōōōō212 5 Basic Function ...

Страница 191: ...ile the main switch is on Displaying the Optical Preview Checking the Composition Exposure and Focus Before Shooting ƈ You can use the preview function to check the depth of field composition exposure and focus before taking a picture There are 2 preview methods ſ Set in Preview Method in the CUSTOM2 MENU menu p 145 The default setting is Digital Preview ƈ Displaying the Preview Display the Optica...

Страница 192: ...hutter release button halfway to end Digital Preview and start focusing The image displayed in Digital Preview is not saved ſ In the digital preview mode the image can be enlarged by using the rear e dial You can check the composition exposure and focus with the four way button ƊƌȜȞ on the LCD monitor ƃ You can display the Bright Dark area warning or histogram in Digital Preview Set in Digital Pre...

Страница 193: ...n is pressed halfway to focus on the subject and the focus is locked at that position and CAF Continuous mode where the subject is kept in focus by continuous adjustment while the shutter release button is pressed halfway Using Autofocus When the shutter release button is pressed halfway to focus on the subject the focus is locked at that position The subject is kept in focus by continuous adjustm...

Страница 194: ... In CAF Continuous mode focus is adjusted continuously tracking the moving object as long as the shutter release button is kept pressed halfway ƃ The shutter cannot be released until the subject is in focus in SAF Single mode If the subject is too close to the camera move back and take the picture Adjust the focus manually if the subject is difficult to focus p 54 197 ƃ In SAF Single mode press th...

Страница 195: ... optimum AF point even if the subject is not centered Sets the focusing area to one of the eleven points in the AF area Sets the focusing area to the center of the viewfinder Select Auto Center ƃ Set with the AF point switching dial ƃ AF point is not displayed in the viewfinder when Off is selected for Superimpose AF Area in the CUSTOM1 MENU menu INFORMATION Selecting the Focusing Area AF Point ...

Страница 196: ...hrough the viewfinder and check the position of the subject 3 Use the four way controller ƊƌȜȞ to select the desired AF point The AF point lights red in the viewfinder Superimpose AF Area and you can check where you set the AF point Setting the Focus Position in the Viewfinder ...

Страница 197: ...Center the subject to focus in the viewfinder and press the shutter release button halfway The focus indicator appears and you will hear a beep when the subject comes into focus if it is blinking the subject is not in focus 3 Lock the focus Keep the shutter release button pressed halfway The focus will remain locked Fixing the Focus Focus Lock 4 Re compose the picture while keeping the shutter rel...

Страница 198: ...s ƈ You can manually adjust the focus using the focus indicator 1 Set the focus mode lever to MF 2 Look through the viewfinder press the shutter release button halfway and turn the focusing ring The focus indicator appears and you will hear a beep when the subject comes into focus Focus indicator Adjusting the Focus Manually Manual Focus Using the Focus Indicator ...

Страница 199: ...e subject looks sharp on the screen ƈ You can manually adjust the focus using the viewfinder matte field ƃ Use the matte field in the viewfinder when the subject is difficult to focus p 54 197 and the focus indicator will not stay lit ƃ The beep can be turned off p 151 INFORMATION Using the Viewfinder Matte Field ...

Страница 200: ...rike the CCD Adjusting the shutter speed alters the amount of light striking the CCD ƃ Using slower shutter speed If the subject is moving the image will be blurred because the shutter is open longer It is possible to enhance the effect of motion rivers waterfalls waves etc by intentionally using a slower shutter speed ƃ Using faster shutter speed Choosing a faster shutter speed will allow freezin...

Страница 201: ...scape in front and behind the flower will be in focus Depth of Field When you focus on a specific subject there is a range in which objects closer and farther away will also be in focus This focused range is called the depth of field ƃ The depth of field for the GX 10 differs depending on the lens but compared to a 35 mm camera the value is roughly one aperture setting lower the focused range beco...

Страница 202: ...n a portion of the subject there is a range in which object closer and farther will also be in focus This focused range is called the depth of field If you use Depth of Field confirmation you can check the depth of field in the viewfinder before taking a picture 1 Focus on the subject 2 Turn the main switch to while looking through the viewfinder You can check the depth of field in the viewfinder ...

Страница 203: ... can link the exposure and AF point in the focusing area during multi segment metering p 131 INFORMATION ƃ Set with the metering mode lever ƈ The scene in the viewfinder is metered in 16 different zones as shown in the illustration when using the multi segment metering This mode automatically determines what level of brightness is in which portion Multi segment metering Center weighted metering Sp...

Страница 204: ...creases as the pattern height increases center This mode does not automatically compensate for backlit scenes ƈ With spot metering brightness is measured only within a limited area at the center of the screen as shown in the illustration You can use this in combination with the AE lock p 205 when the subject is extremely small and proper exposure is difficult to obtain Using the Center Weighted Me...

Страница 205: ...s pressed button 2 Confirm the compensation value in the viewfinder is displayed during compensation blinks when the flash is popped up if the flash compensation is set ƃ Exposure compensation is not available when the exposure mode is set to Auto M Manual B Bulb and X Flash synchro mode ƃ The exposure compensation cannot be cancelled by turning the camera off or by setting any other exposure mode...

Страница 206: ...hen the AE L button is pressed The beep can be turned off p 151 ƃ AE lock is not available when the exposure mode is Auto B Bulb or X Flash synchro mode ƃ The combination of shutter speed and aperture value changes depending on the zooming position even while the AE lock is engaged when using a zoom lens for which maximum aperture varies depending on the focal length However the exposure value doe...

Страница 207: ...ation when the number of frames is set to 3 Normal exposure Under exposure Over exposure 1 Set the number of frames Turn the front e dial while pressing the Exposure bracket button Select OFF no frames 3 or 5 2 Set the step interval Turn the rear e dial while pressing the Exposure Bracket button The available bracketing amounts in EV Steps in the CUSTOM1 MENU menu p 133 Changing the Exposure and S...

Страница 208: ...cusing works for each frame After about twice as much time as the exposure metering timer default setting is 20 seconds the camera returns to settings for taking the first picture ƃ You can combine Auto Bracket with the built in flash or external flash P TTL auto only to change only the flash output continuously However when using an external flash holding the shutter release button down to take t...

Страница 209: ... ambient brightness ƈ Using the Flash in Av Aperture Priority Mode You can set the desired aperture to take a flash photograph when you want to change the depth of field or shoot a subject farther away The shutter speed automatically changes with the ambient brightness The shutter speed shifts automatically anywhere from 1 180 sec to a slow shutter speed that reduces camera shake The slowest shutt...

Страница 210: ...ƃ Slow speed sync slows the shutter speed Use a tripod or OPS to avoid camera shake The picture will also blur if the subject moves ƃ Slow speed sync shooting can also be performed with an external flash INFORMATION ƈ You can use slow speed sync when shooting portraits with the sunset in the background ƈ Using M Manual Mode 1 Set the mode dial to M M Manual mode is set 2 Set the shutter speed unde...

Страница 211: ...ed aperture Minimum flash distance L2 Maximum flash distance L1 5 The value 5 used in the formula above is a fixed value which applies only when using the built in flash alone Example When sensitivity is ISO 200 and aperture value is F4 L1 15 6 4 approx 3 9 m L2 3 9 5 approx 0 8 m Therefore the flash can be used in a range of about 0 8 m to 3 9 m The flash cannot be used when the distance is less ...

Страница 212: ... Guide number Shooting distance When sensitivity is ISO 200 and shooting distance is 5 2 m aperture value is F 15 6 5 2 3 If the resulting number 3 in the above example is not available as a lens aperture the smaller number that is closest 2 8 in the above example is generally used Calculating Aperture Value from Shooting Distance ...

Страница 213: ... See the SEF 54PZF SEF 36PZF operating manual for details ſ When using an external flash it is recommended to use the high precision SEF 54PZF SEF 36PZF as it is capable of P TTL auto flash mode Red eye reduction flash O O Automatic flash discharge O O Auto viewfinder check X X P TTL auto flash appropriate sensitivity 200 to 3200 O O Slow speed sync O O Flash exposure compensation O O AF illuminat...

Страница 214: ...ZF SEF 54PZF 3 Set the SEF 36PZF SEF 54PZF flash mode to P TTL auto 4 Confirm that the SEF 36PZF SEF 54PZF is fully charged and then take the picture 85mm 77mm 50mm 35mm 28mm 24mm 20mm 18mm 70mm 50mm 28mm 24mm 48mm 34mm 19mm 16mm 58mm 85mm 24mm 35mm Lens focal length SEF 36PZF LCD panel Exposure metering timer Off Exposure metering timer On ƃ P TTL auto is only available with the SEF 36PZF SEF 54P...

Страница 215: ...rn the mode dial and set the exposure mode to Tv or M 3 Turn on the SEF 36PZF SEF 54PZF 4 Set the SEF 36PZF SEF 54PZF sync mode to HS high speed flash sync 5 Confirm that the SEF 36PZF SEF 54PZF is fully charged and then take the picture ƃ The will light in the viewfinder when the flash is ready fully charged ƃ High speed flash sync is only available when the shutter speed is faster than 1 180 sec...

Страница 216: ...NFORMATION Wireless Flash Control P TTL Flash Mode The following information is exchanged between the two SEF 36PZF SEF 54PZF flash units before the flash is discharged when the SEF 36PZF SEF 54PZF is used for wireless flash Press the shutter release button fully 1 The cameraŖ s flash discharges a pre flash the cameraŖ s flash mode is transmitted 2 The external flash unit discharges a pre flash th...

Страница 217: ...EF 36PZF SEF 54PZF is set as the slave unit or with the wireless function the preflash for red eye reduction will trigger the external flash Do not use red eye reduction when using a slave unit ƃ See the SEF 36PZF SEF 54PZF operating manual for details INFORMATION ƈ As with the built in flash red eye reduction is available with an external flash Red Eye Reduction ...

Страница 218: ...ication softwareōōōōōōōōōōōōōōōōōōōō220 Removable Disk ōōōōōōōōōōōōōōōōōōōōōōōōōōōōō223 Removing the removable disk ōōōōōōōōōōōōōōōōōōōōōō225 Digimax Masterōōōōōōōōōōōōōōōōōōōōōōōōōōōōōō227 Digimax RAW Converterōōōōōōōōōōōōōōōōōōōōōōōōō232 6 Software information Explains software installation and how to use the program ...

Страница 219: ...ge caused by inappropriate use ϛUsing a Hand made PC or a PC and OS that has not been guaranteed by the manufacturer is not covered by the Samsung warranty ϛBefore reading this manual you should have a basic knowledge of computers and O S Operating Systems For Windows For Macintosh Windows 2000 ME XP Mac OS 10 2 or later Minimum 256MB RAM XP 512MB Minimum 256MB RAM 250MB of available hard disk spa...

Страница 220: ... automatic setup program according to the capability of your computer If the frame does not show run the Windows Explorer and select setup exe in the CD ROM Drive root directory ƃ PDF documents of user manual are included in the Software CD ROM supplied with this camera Search the PDF files with WindowŖ s explorer Before opening the PDF files you must install the Adobe Reader included in the Softw...

Страница 221: ... the PC and can be edited by an image editing program ƈ You can visit the Samsung web site through the internet http www samsungcamera com English http www samsungcamera co kr Korean 1 Install the Digimax Master by following the instructions shown on your PC monitor Setting up the application software Click Click Click Click Click Click Click Click ...

Страница 222: ...e USB cable 3 Turn the camera power on The Found New Hardware Wizard will open and the computer will recognize the camera ſ If your OS is Windows XP an image viewer program will open If the download window of Digmax Master opens after starting Digimax Master the camera driver was setup successfully Click Click ...

Страница 223: ...ƈ Connecting the camera to a PC 1 Press the MENU button and select the SETUP MENU menu 2 Set USB on camera to Computer 3 Connect the PC to the camera with the USB cable SETUP MENU Set Cancel Video Out USB Auto Power Off Folder Name Sensor Cleaning Dust Removal Reset Computer Printer Starting PC mode Setting up the application software ...

Страница 224: ...Connect the camera to your PC with the USB cable 2 On your computer s desktop display select My Computer and double click Removable Disk ƍ DCIM ƍ 100SSCAM The image files will then be displayed 3 Select an image and press the right mouse button 4 A pop up menu will open Click the Cut or Copy menu Cut cuts a selected file Copy copies files 5 Click a folder where you want to paste the file ...

Страница 225: ... can copy or move the image files ƃ We recommend that you should copy the images to the PC to view them Opening images directly from the removable disk may be subject to unexpected disconnection ƃ When you upload a file that is not taken by this camera to the Removable Disk the Camera cannot display this image message will be displayed on the LCD monitor in the PLAY mode and message is displayed i...

Страница 226: ...inks you have to wait until the lamp is turned off 3 The Unplug or Eject Hardware window will open Select the USB Mass Storage Device and click the Stop button 4 The Stop a Hardware device window will open Select the USB Mass Storage Device and click the OK button 2 Double click the Unplug or Eject Hardware icon on the task bar 5 A Safe to Remove Hardware window will open Click the OK button Click...

Страница 227: ...t the camera to the Macintosh and turn the camera power on 4 A new icon will be displayed on the desktop after connecting the camera to the MAC 1 Double click a new icon on the desktop and the folder in the memory will be displayed 2 Select an image file and copy or move it to MAC ƃ For Mac OS 10 0 or later First complete uploading from computer to camera and then remove the removable disk with th...

Страница 228: ...igimax Master ƍ Digimax Master ƃ Downloading images 1 Connect the camera to your PC 2 A window for downloading images will display after connecting the camera and your PC To download the captured images select the Select All button Select desired folder in the window and click the Select All button You can save captured images and selected folder If you click the Cancel button downloading will be ...

Страница 229: ...n be made as you want and images will be downloaded After selecting a folder that was made before images will be downloaded 5 Click Next button 6 A window will open as shown alongside The destination of the selected folder will be displayed on the upper side of the window Click the Start button to download the images 7 Downloaded images will be displayed Digimax Master Click Click ...

Страница 230: ... window ڻ Media type selection menu You can select image viewer image edit movie edit functions in this menu ڼ Preview window You can preview a image or a movie clip and check the multi media information ڽ Zoom bar You can change preview size ھ Folder display window You can see the folder location of the selected image ڿ Image display window Images of the selected folder are displayed ſ Refer to t...

Страница 231: ...etouch You can change image or insert effects on the image See the Help menu ں Drawing tools Tools for editing an image ڻ Image display window a selected image displays in this window ڼ Preview window You can preview the changed image ſ A still image edited with Digimax Master can t be played back on the camera ſ Refer to the Help menu in Digimax Master for further information ƃ Image edit You can...

Страница 232: ...n Produce You can save the edited multi media as a new file name You can select AVI Windows media wmv Windows media asf and movie clip for this camera avi MPEG 4 file types ں Frame display window You can insert multi media in this window ſ Some movie clips that were compressed with a codec that is not compatible with the Digimax Master can t play back in the Digimax Master ſ Refer to the Help menu...

Страница 233: ... Exposure value Contrast and gamma value Sharpness You can edit the Sharpness of the image Aberration You can change the chromatic aberration Vignetting You can add the Vignetting on the captured image Curve You can change the color and contrast of an image ڻ Image display window a selected image displays in this window ڼ Image tray the selected image is diplayed You can edit several images at a t...

Страница 234: ...ōōōōōōōōōōōōōōōōōōōōōōōōōōō241 Troubleshooting ōōōōōōōōōōōōōōōōōōōōōōōōōōōōō243 Main Specificationsōōōōōōōōōōōōōōōōōōōōōōōōōōōō248 Glossary ōōōōōōōōōōōōōōōōōōōōōōōōōōōōōōōōō250 Index ōōōōōōōōōōōōōōōōōōōōōōōōōōōōōōōōōōō254 7 Appendix Explains troubleshooting introduces optional accessories and provides various resources ...

Страница 235: ...x2592 O p 122 Quality Level O p 123 Saturation O p 124 Sharpness O p 124 Contrast O p 124 User setting p 125 Color space sRGB O p 126 Off O p 127 ABť1 O p 127 Off O p 127 Memory setting O p 128 Optical Picture Stablisation OPS 35 Focus range O p 55 Exposure mode P O p 129 ƃ Recording mode menu Extended bracket Multi exposure Saturation Sharpness Contrast Type White Balance Number of shots Auto exp...

Страница 236: ...V Steps 1 2 EV O p 133 Meter Operating Time 10 Sec O p 134 AE L with AF locked Off O p 134 Program Line Normal O p 135 Auto EV Compensation Off O p 135 Fine tune when AWB Off O p 136 WB when using flash No O p 136 Color temp steps Kelvin O p 137 Noise Reduction On O p 137 ISO Warning Off O p 138 Sensitivity Steps 1 EV O p 139 Reset Custom Function1 p 139 ƃ User setting1 menu Item Reset settings in...

Страница 237: ...al in Tv mode O p 142 143 e dial in Av mode O p 142 143 One touch RAW 1 time O p 144 Recordable Image No Recordable Image No O p 144 Release when Chrging Off O p 145 Preview Method Optical Preview O p 145 Initial zoom display 1 2X O p 146 Auto Image Rotation On O p 146 Saving rotation info On O p 147 Illuminate LCD panel On O p 147 Reset Custom Function2 p 148 ƃ User setting2 menu Item Reset setti...

Страница 238: ...Language According to default setting X p 156 Guide display 3 sec O p 156 Brightness Level ť0 O p 157 Video Out NTSC X p 158 USB PC O p 159 Auto Power Off 1min O p 159 Folder Name Std O p 160 Sensor Cleaning X p 161 X p 163 Off O p 163 Reset Custom Function2 p 164 ƃ Set up menu Date Adjust Dust Removal World Time Hometown City Hometown DST Destination City Destination DST Dust Removal Cleaning whe...

Страница 239: ... brightness setting for the brightness filter and the color setting for the color filter can be saved reset Default Setting Reset Setting Page Drive Mode Single frame shooting O p 60 Flash Mode Fill in flash O p 70 White Balance Auto O p 76 Sensitivity Auto O p 82 DPOF O p 105 Digital Filter B W O p 93 Slideshow 3 sec O p 90 ƃ Fn menu RAW Display Recorded Pixels 10M Quality Level Super fine O Item...

Страница 240: ...essories Accessories for PENTAX DSLR can be used with SAMSUNG DSLR ƃ Auto Flash SEF 36PZF SEF 54PZF This is an auto flash unit with a maximum guide number of 54 ISO 100 m 36 ISO 100 m Its features include slave sync flash contrast control sync flash AF spot beam high speed sync wireless flash and front rear curtain sync Flash Accessories ...

Страница 241: ...ŝ240Ş Optional Accessories ƃ Camera Case SCP D2 ƃ The accessories below are the same as the accessories that are packaged with the camera Viewfinder cap Eyecup Strap Camera Case Others ...

Страница 242: ...ed or has been formatted on a computer or other device and is not compatible with this camera Use after formatting with the camera A locked Memory Card is inserted in the camera Unlock the Memory Card p 39 The selected rotated image is protected Remove protection from the image The inserted card cannot be used on a camera Insert a usable card The batteries are exhausted Install new batteries in th...

Страница 243: ... images are RAW files or images captured with other cameras Appears when digital filter is started from Fn menu for images captured with other cameras No file set with DPOF Set DPOF and print p 105 There is an error with the printer and the file cannot be printed Fix error and print Printer has run out of paper Put paper in printer and print The image is not stored Settings not stored RAW images c...

Страница 244: ...ss shutter release button fully Alternatively use manual focus p 197 Position subject in focus frame in middle of viewfinder If the subject is outside the focusing area aim the camera at the subject and lock the focus press shutter release button halfway then compose picture and press the shutter release button fully Move away from the subject and take a picture Problem Cause Remedy Camera does no...

Страница 245: ... Manual discharge or Manual flash Redeye reduct p 70 Set transfer mode to Computer Change the transfer mode to Printer Set transfer mode to Printer p 159 Turn on the Shake Reduction switch Shake Reduction function is not set Properly If a lens for which focal length information cannot be acquired is used set the Focal Length on the OPS menu Shutter speed is too low for Shake Reduction function to ...

Страница 246: ... the batteries out and put them back in again Then turn the power on The mirror will retract After the procedure is done if the camera operates correctly it does not require any repairs Refer to the software instructions for details on connecting the camera to a PC p 218 Problem Cause Remedy Shake Reduction does not work Move away from the subject or turn off the Shake Reduction function and use a...

Страница 247: ...ough the USB hub if the PC and the hub are not compatible Wherever possible connect the camera to the PC directly Case 5 Are other USB cables connected to the PC ƍ The camera may malfunction when it is connected to the PC at the same time as another USB cable In this case disconnect the other USB cable and connect only one USB cable to the PC Case 6 When I open the Device Manager by clicking Start...

Страница 248: ...will start If the problem happens continuously set the Legacy USB Support to disable and re start the PC The Legacy USB Support is in the BIOS setup menu The BIOS setup menu differs from the PC manufacturers and some BIOS menus don t have Legacy USB Support If you can t change the menu by yourself contact the PC manufacturer or BIOS manufacturer Case 9 The camera is connected to the USB port locat...

Страница 249: ...000sec 30sec 1 3EV step or 1 2EV step with Bulb TTL open aperture 16 segment Metering Multi Center weighted Spot Compensation ť3 1 3EV or 1 2EV steps ISO Equivalent Auto 100 200 400 800 1600 Type Built in retractable P TTL Manual pop up flash Auto Fill in Auto Red eye Fill in Red eye Front curtain synchro Front curtain synchro Red eye Rear curtain synchro Guide Number 11 at ISO 100 28mm wide angle...

Страница 250: ... camera settings Type Single image Thumbnails Slide show Editing Rotate Digital Filter Digital Filter B W Sepia Soft Slim Brightness Digital Output Connector USB 2 0 HI SPEED Video Output NTSC PAL user selectable DC Power Input Connector DC 8 3V 2A 100 240V Lithium Ion Battery SLB 1674 Charger SBC L6 AC adapter SAC 82 optional Dimensions WxHxD 142x101x71 5mm excluding the projecting parts of the c...

Страница 251: ...s no compensation the second is under exposed and the third is over exposed Bright Portion Over exposed area in the image loses contrast and appears white Camera Shake Blur When the camera moves while the shutter is open the entire image appears blurred This occurs more often when shutter speed is low Prevent camera shake by raising the sensitivity using the flash or by using a faster shutter spee...

Страница 252: ...e depth of field DNG RAW file DNG Digital Negative is a general purpose RAW file format designed by Adobe Systems When images captured in proprietary RAW formats are converted to DNG format support and compatibility for the images increases significantly DPOF Digital Print Order Format Rules for writing information onto a card with recorded images regarding the specific images and number of copies...

Страница 253: ... Noise Reduction Process to reduce noise image roughness or unevenness caused by slow shutter speed NTSC PAL These are video output formats NTSC is mainly used in Japan North America and South Korea PAL is mainly used in Europe and in China Quality Level This refers to the image compression ratio The lower the compression the more detailed the image The image becomes rougher as the compression rat...

Страница 254: ...ngth of time that the shutter is open and light strikes the CCD The amount of light that strikes the CCD can be changed by altering the shutter speed sRGB standard RGB International standard of colour space established by the IEC International Electrotechnical Commission This is defined from colour space for PC monitors and is also used as the standard colour space for Exif Vignetting Vignetting o...

Страница 255: ... Priority modeōōōōō172 179 B B W Digital Filter ōōōōōōōōō 93 95 Batteries ōōōōōōōōōōōōōōō33 Beep ōōōōōōōōōōōōōōōō151 Bright ōōōōōōōōōōōōōōōō165 Bright Portionōōōōōōōōōōōōō165 Built in flash ōōōōōōōōōōōōōō70 B Bulb Mode ōōōōōōōōōō172 186 Bulb Mode B ōōōōōōōōōōō172 186 C Cable Switch ōōōōōōōōōōō 68 186 Capture Information ōōōōōōōōō23 24 Card access lamp ōōōōōōōōōōō15 CCD Cleaning ōōōōōōōōōōōō161 Cen...

Страница 256: ...ōōō23 156 H High Speed Flash Sync Modeōōōōōō214 Histogramōōōōōōōōōōōōōōō26 I Image Tone ōōōōōōōōōōōōō121 INFO button ōōōōōōōōōōōōōō84 Instant Review ōōōōōōōōōōōō166 ISO Sensitivity ōōōōōōōōōōōōō82 ISO Sensitivity Warning Display ōōōōō138 L Language ōōōōōōōōōōōōōō156 Last Memory ōōōōōōōōōōōōō128 Lens ōōōōōōōōōōōōōōōōō46 Lens unlock button ōōōōōōōōō18 47 M Main switch ōōōōōōōōōōōōōō41 MF Manual focu...

Страница 257: ...ōōōōōōō100 Selecting the Focusing Area ōōōōōō194 Self Timerōōōōōōōōōōōōōōō62 Sensitivity ōōōōōōōōōōōōōōō82 Sepia Digital Filter ōōōōōōōōōōō95 Shade White Balance ōōōōōōōōō76 Sharpness ōōōōōōōōōōōōōō124 Shutter Priority Mode Tv ōōōōōō171 177 Shutter release buttonōōōōōōōōōō53 Shutter speed ōōōōōōōōōōōō199 Single mode SAF ōōōōōōōōōō192 Slideshowōōōōōōōōōōōōōōō90 Slim Digital Filter ōōōōōōōōōōō95 Spo...

Страница 258: ...e of material resources Household users should contact either the retailer where they purchased this product or their local government office for details of where and how they can take this item for environmentally safe recycling Business users should contact their supplier and check the terms and conditions of the purchase contract This product should not be mixed with other commercial wastes for...

Страница 259: ...ference by one or more of the following measures Reorientate or relocate the receiving antenna Increase the separation between the equipment and receiver Connect the equipment into an outlet on a circuit different from that to which the receiver is connected Consult the dealer or an experienced radio TV technician for help ƈ CAUTION Changes or modifications not expressly approved by the manufactur...

Страница 260: ...ŝ259Ş MEMO ...

Страница 261: ...ŝ260Ş MEMO ...

Страница 262: ...6 D 65824SCHWALBACH TS GERMANY TEL 49 0 6196665303 FAX 49 0 6196665366 TECHNISCHESERVICEHOTLINE 0080045263727 nurkostenfreifurAnrufeausDeutschland DieAdressenIhrerKundendienstesowiedie GarantiebestimmungenentnehmenSiebitteausdem beiliegendenFaltblatt SAMSUNGINTERNATIONAL WARRANTYCERTIFICATE INTERNET www samsungcameras de TIANJINSAMSUNGOPTO ELECTRONICSCO LTD NO 9ZHANGHENGSTREET MICRO ELECTRONIC IND...

Отзывы: