background image

27

Getting started

Use widgets

 ›

Widgets are small applications that provide convenient 

functions and information on your Home screen.

The widgets available may vary depending on your 

region or service provider.

In the application list, select 

Widgets

 to open the widget 

panel.
Scroll left or right on the widget panel to find a widget.

Tap and hold a widget to add it to the Home screen.

Access applications

Launch applications and take full advantage of features on 

your device. You can reorganise the application list to match 

your preferences, or download applications from the Internet 

to enhance your device’s functionality.

On the Home screen, select 

 to access the application 

list.
Scroll left or right to another screen.

You can also select one of the dots at the bottom of the 

screen to move directly to the corresponding screen.
Select an application.

Select 

 to return to the previous screen. Select 

 to 

return to the Home screen.

Содержание GT-P7500/M16

Страница 1: ...GT P7500 usermanual...

Страница 2: ...the actual product The contents of this manual may differ from the product or from software provided by service providers or carriers and are subject to change without prior notice Access the Samsung...

Страница 3: ...mmercial or other purposes is an infringement of copyright laws Samsung is not liable for such copyright infringement by users Please keep this manual for future reference Instructional icons Before y...

Страница 4: ...ectronics Trademarks SAMSUNG and the SAMSUNG logo are registered trademarks of Samsung Electronics The Android logo Google Google Maps Google Mail YouTube Google Play Store Google Latitude and GoogleT...

Страница 5: ...s is an official DivX Certified device that plays DivX video Visit www divx com for more information and software tools to convert your files into DivX videos ABOUT DIVXVIDEO ON DEMAND This DivX Certi...

Страница 6: ...evice 18 Use the touch screen 19 Use motions 21 Lock or unlock the touch screen and the keys 22 Get to know the Home screen 23 Access applications 27 Launch multiple applications 29 Customise your dev...

Страница 7: ...54 Talk 56 Messenger 57 Google 58 Social Hub 58 Entertainment 59 Camera 59 Video player 67 Gallery 69 Photo editor 71 Music Player 73 Music Hub 77 Personal information 78 Contacts 78 S Planner 81 Memo...

Страница 8: ...Downloads 100 eBook 100 My Files 101 Polaris Office 102 Search 104 SIMToolkit 104 Task manager 104 World clock 105 Settings 106 Access the setting options 106 Wi Fi 106 Bluetooth 106 Data usage 106 Mo...

Страница 9: ...services 111 Security 111 Language and input 112 Back up and reset 115 Dock 115 Date and time 116 Accessibility 116 Motion 117 Developer options 117 About device 118 Troubleshooting 119 Safety inform...

Страница 10: ...nctions that are not covered by your manufacturer s warranty The items supplied with your device and available accessories may vary depending on your region or service provider You can buy additional...

Страница 11: ...unction 1 Power Reset Lock key 2 Volume key 3 Speaker 4 Light sensor 5 Multifunction jack 6 SIM card slot 7 Headset jack1 8 Front camera lens 9 Microphone 1 Connecting a headset to your device imprope...

Страница 12: ...Assembling 12 Rear view Number Function 10 Rear camera lens 11 Internal antenna 12 Flash...

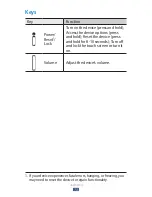
Страница 13: ...ss the device options press and hold Reset the device press and hold for 8 10 seconds Turn off and lock the touch screen or turn it on Volume Adjust the device s volume 1 If your device experiences fa...

Страница 14: ...UMTS or HSDPA services you can purchase a Universal Subscriber Identity Module USIM card Open the cover of the SIM card slot 1 Insert the SIM or USIM card with the gold coloured 2 contacts facing down...

Страница 15: ...vice to a Samsung Service Centre Use only Samsung approved chargers and cables Unapproved chargers or cables may cause batteries to explode or damage your device When your battery is low the device wi...

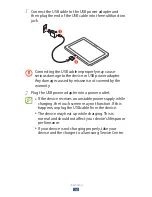
Страница 16: ...suse is not covered by the warranty Plug the USB power adapter into a power outlet 2 If the device receives an unstable power supply while charging the touch screen may not function If this happens un...

Страница 17: ...remain close to the electrical socket while charging Reduce the battery consumption Your device provides options that help you save battery power By customising these options and deactivating features...

Страница 18: ...You must sign in to Google or create a Google account to use applications that interact with the Google server To turn off your device press and hold the Power key and then select Power off OK Follow...

Страница 19: ...tact with liquids The touch screen may malfunction in humid conditions or when exposed to liquids Leaving the touch screen idle for extended periods may result in afterimages screen burn in or ghostin...

Страница 20: ...ap and hold Tap an item and hold it for more than 2 seconds Drag Tap an item and move it to a new location Double tap Tap an item twice quickly Flick Briskly scroll up down left or right to move throu...

Страница 21: ...he application list select Settings Display Screen timeout Use motions Built in motion recognition allows you to perform actions by moving your device or making gestures with your hands To use these f...

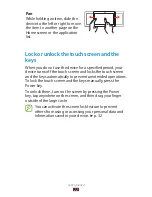
Страница 22: ...e turns off the touch screen and locks the touch screen and the keys automatically to prevent unintended operations To lock the touch screen and the keys manually press the Power key To unlock them tu...

Страница 23: ...tom of the screen you can quickly navigate screen view system information and more 6 Number Function 1 Return to the previous screen 2 Return to the Home screen 3 Open the list of recent applications...

Страница 24: ...Connected to GPRS network Connected to EDGE network Connected to HSDPA network Wi Fi AP connected Bluetooth feature activated GPS based services in use Connected to computer Power saving mode activate...

Страница 25: ...the interface from rotating when you rotate the device Power saving Activate or deactivate Power saving mode Notification Hide or show notification icons Mobile data Activate or deactivate the data c...

Страница 26: ...n place two fingers on the screen and 1 pinch them together to switch to Edit mode Add remove or reorganise panels 2 To remove a panel tap and hold the panel s thumbnail image and then drag it to the...

Страница 27: ...the Home screen 3 Access applications Launch applications and take full advantage of features on your device You can reorganise the application list to match your preferences or download applications...

Страница 28: ...categories In the application list select 1 Edit Tap and hold an application icon 2 Organise applications 3 To move the application drag it to a new location To add the application to a new folder dra...

Страница 29: ...llows you to multitask by running multiple applications at the same time To launch multiple applications select while using an application Then select another application to launch from the Home scree...

Страница 30: ...urn on or off the touch tones In the application list select Settings Sound Touch sounds Adjust the device s volume Press theVolume key up or down 1 Select 2 and drag the sliders to adjust the volume...

Страница 31: ...n detect the level of ambient light and adjust the brightness of the display automatically You can also manually set the brightness of the display The brightness of the display will affect how quickly...

Страница 32: ...rget your password take your device to a Samsung Service Centre to reset it Samsung is not responsible for the loss of passwords or private information or other damages caused by illegal software Set...

Страница 33: ...ock your device with the PIN that is supplied with your SIM or USIM card Once the SIM or USIM lock is enabled you must enter the PIN each time you turn on the device or access applications that requir...

Страница 34: ...In the application list select 1 Settings Security SIM Change Alert Select 2 Sign in To create a Samsung account select Create new account Enter the email address and password for your Samsung 3 acco...

Страница 35: ...text input method Select on the system bar and select a text input method Enter text with the Google voice input feature To add input languages for voice recognition select the 1 language Add more lan...

Страница 36: ...7 Clear your input 8 Start a new line 9 Add an item from the clipboard 10 Insert an emoticon Open the emoticon panel tap and hold Enter text with the Swype keypad Tap the first character of a word an...

Страница 37: ...ap and hold a key to enter characters that appear above the key When you tap and hold a key until the character list appears you can enter special characters symbols and numbers You can also use the f...

Страница 38: ...plication Tap and hold a passage of text 1 Drag 2 or to select the text to be copied Select 3 Copy or Cut to add the text to the clipboard In another application place the cursor at the point where 4...

Страница 39: ...ite webpages This feature may be labelled differently depending on your region or service provider Available icons may vary depending on your region or service provider Browse a webpage In the applica...

Страница 40: ...istory 9 Activate the URL field 10 Bookmark the current webpage While browsing a webpage access the following options To zoom in or out place two fingers on the screen and slowly spread them apart or...

Страница 41: ...printers To change the browser settings select Settings Search for information by voice This feature may be unavailable depending on your region or service provider In the application list select 1 In...

Страница 42: ...Copy link URL To delete the bookmark select Delete bookmark To set the webpage as your browser s homepage select Set as homepage Download a file from the Internet When you download files or applicatio...

Страница 43: ...der In the application list select 1 Latitude The device joins Latitude automatically Select 2 Add friends an option Select a friend or enter an email address and select 3 Add friends Select 4 Yes Whe...

Страница 44: ...ult select Search Results To view your current location select To switch to the compass view of the map that changes orientation when you move the device select To search for a place nearby select To...

Страница 45: ...and easy way to shop for mobile applications This feature may be unavailable depending on your region or service provider Your device will save user files from downloaded applications to the internal...

Страница 46: ...n list select 1 Navigation Enter your destination with the following methods 2 Speak destination Enter your destination by voice Type destination Enter your destination with the virtual keypad Contact...

Страница 47: ...pics Read feeds In the application list select 1 Pulse Select 2 to update feeds Scroll up or down to select a feed source 3 Scroll left or right and select a feed 4 While reading a feed use the follow...

Страница 48: ...With fully optimised applications from Samsung Apps your device becomes even smarter Explore the useful applications on offer and enhance your mobile life In the application list select 1 Samsung App...

Страница 49: ...our region or service provider Play a video In the application list select 1 YouTube Select a video 2 Select 3 to view a full screen Control playback with the following keys 4 4 Number Function 1 Paus...

Страница 50: ...Select your Google account if it is linked toYouTube 3 Alternatively you can select Add account and set up an account to sign in toYouTube Select 4 UPLOAD a video If you are uploading a video for the...

Страница 51: ...list select 1 Messaging Add recipients 2 Enter phone numbers manually and separate them with a semicolon or a comma Select phone numbers from your contact list by selecting Select the text field and...

Страница 52: ...he application list select 1 Messaging Your messages are grouped by contact as a message thread Select a contact 2 Select a multimedia message to view more details 3 Google Mail Learn to send or view...

Страница 53: ...t Select an email message 3 From the message view use the following options To move to the next or previous message scroll right or left To reply to the message select To reply to the message and incl...

Страница 54: ...ientation Email Learn to send or view email messages via your personal or company email account Set up an email account In the application list select 1 Email Enter your email address and password 2 S...

Страница 55: ...message select 6 If you are offline or outside your service area the message will be held in the message thread until you are online and inside your service area View an email message In the applicat...

Страница 56: ...some Samsung printers To change the email settings select Settings To save an attachment to your device select the attachment tab The options available may vary depending on the email account or devi...

Страница 57: ...versation screen opens Enter and send your message 3 To add more contacts to the conversation select Add to chat To use video chat select To use voice chat select Select 4 End chat to end the conversa...

Страница 58: ...lete the account setup Select a social network feature 2 Social Hub Social Hub allows you to access all types of messages from one location You can view and respond to messages without opening other a...

Страница 59: ...The camera turns off automatically when you do not use it for a specified period The memory capacity may differ depending on the scene or shooting conditions Take a photo In the application list selec...

Страница 60: ...ently used options p 66 2 Change the camera settings 3 View the storage location 4 Switch to the camcorder 5 Take a photo 6 View photos you have taken Tap where you want to focus on the preview screen...

Страница 61: ...photo as your wallpaper or a contact image select Set picture as To print the photo viaWi Fi or USB select Print Your device is compatible only with some Samsung printers To edit the photo with the im...

Страница 62: ...trait Switch to the front camera to take a photo of yourself Flash Change the flash setting You can turn on or off the flash manually or set the camera to use the flash when needed Shooting mode Chang...

Страница 63: ...w the grid lines on the preview screen GPS tag Set the camera to include location information for your photos To improve GPS reception avoid shooting in locations where the signal may be obstructed su...

Страница 64: ...ourself Change the recording mode for attaching to a message or for saving normally Select the length of the delay before the camcorder records a video Adjust the exposure value to change the brightne...

Страница 65: ...certified device select To send the video to others or share it select To delete the video select To start a slide show select Tap the screen to stop the slide show To change the name of a file selec...

Страница 66: ...visibility Set to improve the contrast of the display in bright sunlight Guidelines Set to view the grid lines on the preview screen Reset Reset camcorder settings Edit the shortcut icons You can add...

Страница 67: ...e an error may occur when you try to open the file Playback quality may vary by content type Some files may not play properly depending on how they are encoded Play a video In the application list sel...

Страница 68: ...LNA certified device 9 Select a sound effect 10 Insert a bookmark 11 Skip to the next file Scan forwards in the file tap and hold During playback select to access the following options To send the vid...

Страница 69: ...o play next Set the video player to play the next file automatically Colour tone Select a colour tone Outdoor visibility Set to improve the contrast of the display in bright sunlight Gallery Learn to...

Страница 70: ...de show select Tap the screen to stop the slide show To add the image to the clipboard select Copy to clipboard To crop a section from the image select Crop To rotate the photo anti clockwise select R...

Страница 71: ...egment of the video select Trim To listen to audio via a Bluetooth headset select Via Bluetooth You cannot use this option if you connect a headset to your device s headset jack To change the video pl...

Страница 72: ...ize To reverse the selection select Inverse Edit the image with the following tools 5 Tool Function Rotate Rotate or flip the image Resize Resize the image by dragging the rectangle or selecting 100 a...

Страница 73: ...y by content type Some files may not play properly depending on how they are encoded Add music files to your device Start by transferring files to your device Download from the Internet p 39 Download...

Страница 74: ...track 3 Mute the sound 4 Scan forwards or backwards in the file by dragging or tapping the bar 5 Activate Shuffle mode 6 Restart playback Skip to the previous file tap within 3 seconds Scan backwards...

Страница 75: ...k SRS CS Headphone delivers a 5 1 surround sound experience over standard headphones or earbuds when listening to multichannel content such as DVD movies During playback select to access the following...

Страница 76: ...music player settings In the application list select 1 Music Player Select 2 Settings Change the following options 3 Option Function Advanced SoundAlive Select a sound effect Advanced Play speed Chan...

Страница 77: ...earch for and buy your favourite songs You can also add music files to your wish list and play them This feature may be unavailable depending on your region or service provider In the application list...

Страница 78: ...e application list select 1 Contacts Contacts Select a memory location 2 Enter contact information 3 Select 4 Save to add the contact to memory Find a contact In the application list select 1 Contacts...

Страница 79: ...acts By creating groups of contacts you can manage multiple contacts and send a message to an entire group In the application list select 1 Contacts Groups Enter a name and customise the settings for...

Страница 80: ...at to or from your device s USB storage Import contact files In the application list select 1 Contacts Contacts Select 2 Import Export Import from USB storage Select a memory location 3 Select an opti...

Страница 81: ...an event type at the top of the screen 3 Enter the details of the event and select 4 Save Change the view mode In the application list select 1 S Planner Select a view mode 2 Year All months in the ye...

Страница 82: ...ecting Share via Stop an event or task alarm If you set a reminder for a calendar event or task an alarm will sound at the specified time Tap the right bottom of the system bar to open the 1 notificat...

Страница 83: ...om accidental deletion select To print the memo viaWi Fi or USB select Your device is compatible only with some Samsung printers To send the memo to others select Pen memo Learn to create freehand mem...

Страница 84: ...Data transfers may fail when using a USB hub Connect with Samsung Kies Ensure that Samsung Kies is installed on your computer You can download the program from the Samsung website Samsung Kies will w...

Страница 85: ...he 2 notifications panel Select 3 Connected as a media device Media device MTP Transfer files between your device and the computer 4 Connect as a camera device You can connect your device to a compute...

Страница 86: ...iction indoors but cannot be operated outdoors Activate theWi Fi feature In the application list select Settings and then drag the Wi Fi switch to the right TheWi Fi feature running in the background...

Страница 87: ...icated as a protected network and then 2 select Show advanced options Select the 3 WPS drop down menu Select 4 Push button Connect Press theWPS button on the AP within 2 minutes 5 Connect with aWPS PI...

Страница 88: ...P settings 5 Select 6 Connect CustomiseWi Fi settings In the application list select 1 Settings Wi Fi Advanced Change the following options 2 Option Function Network notification Set the device to not...

Страница 89: ...necessary Select 4 Scan Select a device 5 When the owner of the other device accepts the connection the devices are connected Send data viaWi Fi Select a file or item from an appropriate application...

Страница 90: ...ng on the network connection Play your files on another device In the application list select 1 AllShare Select 2 My device Select a media category 3 a file Select a player 4 Playback begins on the se...

Страница 91: ...settings for sharing media files To allow other DLNA certified devices to access media files on your device you must activate media sharing In the application list select 1 AllShare Change the followi...

Страница 92: ...Tethering and portable hotspot Select 2 PortableWi Fi hotspot to activate mobile network sharing viaWi Fi Select 3 Configure Mobile HotSpot to configure network settings to use your device as an AP Op...

Страница 93: ...network sharing via USB To stop sharing the network connection clear the tick box next to USB tethering The sharing method may differ depending on the computer s operating system Share your device s...

Страница 94: ...devices especially those that are not tested or approved by the Bluetooth SIG may be incompatible with your device Do not use the Bluetooth feature for illegal purposes for example pirating copies of...

Страница 95: ...tem from an appropriate application 1 Select an option for sending data via the Bluetooth 2 feature The method for selecting an option may vary by data type Search for and pair with a Bluetooth device...

Страница 96: ...vehicle with sun protection film Do not touch or cover the area around the antenna with your hands or other objects while using the GPS functions This feature may be unavailable depending on your reg...

Страница 97: ...figured with Internet access If you have trouble accessing the Internet you must edit the connections If you are not sure what information to enter ask yourVPN administrator To use this feature you mu...

Страница 98: ...er or download them from the Internet IPSec server certificate Select a server certificate that theVPN server will use to identify you You can import certificates from theVPN server or download them f...

Страница 99: ...next to the alarm To delete an alarm select Stop an alarm When the alarm sounds To stop the alarm select and then drag your finger outside of the large circle To silence the alarm for the snooze peri...

Страница 100: ...1 Downloads Select a download category 2 To open a downloaded file select the log 3 To delete a log select the tick box and select eBook Open and read book files on your device You can also search for...

Страница 101: ...flac Sound wav amr awb mid mxmf xmf rtttl rtx ota imy Others doc docx pdf ppt pptx txt xls xlsx htm html vcf vcs vnt jad jar Some file formats are not supported depending on the device s software If a...

Страница 102: ...file folder select the tick boxes and select or To delete files or folders select the tick boxes and select To change the name of a file or a folder select the tick box and select Rename To view file...

Страница 103: ...the document select To start a slide show in a PowerPoint document select Tap the screen to move to the next slide Select to exit the slide show To zoom in or out place two fingers on the screen and...

Страница 104: ...eyword into your device s microphone Select a search result 3 SIMToolkit Use a variety of additional services offered by your service provider Depending on your SIM or USIM card this application may b...

Страница 105: ...ur device Storage View the used and available memory in your device Help View information about using the task manager World clock Learn to view the time in another region In the application list sele...

Страница 106: ...nformation over short distances Data usage Keep track of your data usage amount Mobile data Set to use data connections on any mobile network Set mobile data limit Set a limit for the mobile data usag...

Страница 107: ...USB tethering Set to use your device as a wireless modem by making a USB connection with a computer PortableWi Fi hotspot Set to use your device as a wireless access point for other devices Configure...

Страница 108: ...work Select automatically Set the device to select the first available network Sound Change the settings for various sounds on your device Volume Adjust the volume for various sounds on your device Vi...

Страница 109: ...nch with the quick launch shortcut The shortcut icon will change according to the application you specify Screen timeout Select the length of time that the device waits before turning off the display...

Страница 110: ...with a web server Brightness Set to adjust the brightness in Power saving mode Brightness Adjust the brightness for Power saving mode Screen timeout Select the length of time that the device waits bef...

Страница 111: ...the settings for securing your device Screen lock Activate the screen lock feature Owner information Enter your information that is shown on the locked screen Encrypt device Set a password to encrypt...

Страница 112: ...evice You can allow device administrators to apply new policies to your device Unknown sources Set to download applications from any source If you do not select this option you can download applicatio...

Страница 113: ...t words based on your input and show word suggestions XT9 advanced settings Change the advanced settings for XT9 mode and set up your own dictionary Automatic full stop Set the device to insert a full...

Страница 114: ...se the first letter of a sentence automatically Show complete trace Set to show the traces of your finger on the keypad Word suggestion Set the device to predict words based on your input and show wor...

Страница 115: ...g mode Pointer speed Adjust the pointer speed for the mouse or trackpad connected to your device Back up and reset Change the settings for managing settings and data Back up my data Set to back up you...

Страница 116: ...he current time manually Select time zone Select a time zone Use 24 hour format Set to show the time in 24 hour format or 12 hour format Select date format Select a date format Accessibility Accessibi...

Страница 117: ...rowsing webpages Pan to edit Set to move an item to another page when you tap and hold the item and then slide the device to the left or right Developer options Change the settings for application dev...

Страница 118: ...opening and closing pop up windows Transition animation scale Select a speed for switching between screens Do not keep activities Set to end a running application when you launch a new application Li...

Страница 119: ...can disable this feature by using Lock SIM card PUK Your SIM or USIM card is blocked usually as a result of entering your PIN incorrectly several times You must enter the PUK supplied by your service...

Страница 120: ...t version If the touch screen is scratched or damaged take your device to a Samsung Service Centre Your device freezes or has fatal errors If your device freezes or hangs you may need to close applica...

Страница 121: ...you receive error messages when launching the camera try the following Charge the battery Free some memory by transferring files to a computer or deleting files from your device Restart the device If...

Страница 122: ...m If the tips above do not solve the problem contact a Samsung Service Centre A connection is not established when you connect the device to a computer Ensure that the USB cable you are using is comp...

Страница 123: ...device Do not charge the battery with chargers that are not approved by the manufacturer Do not use your device during a thunderstorm Your device may malfunction and your risk of electric shock is in...

Страница 124: ...device only on the side of your body that is opposite the pacemaker Do not use your device in a hospital or near medical equipment that can be interfered with by radio frequency If you use medical equ...

Страница 125: ...avy traffic can be hazardous Do not take notes or look up phone numbers Jotting down a to do list or flipping through your address book takes attention away from your primary responsibility of driving...

Страница 126: ...ice only on flat surfaces If your device falls it may be damaged Do not store your device in very hot or very cold areas It is recommended to use your device at temperatures from 5 C to 35 C Your devi...

Страница 127: ...on in the room and do not hold the screen too close to your eyes Seizures or blackouts can occur when you are exposed to flashing lights while watching videos or playing Flash based games for extende...

Страница 128: ...f radio frequency RF energy Protect your hearing and ears when using a headset Excessive exposure to loud sounds can cause hearing damage Exposure to loud sounds while driving may distract your attent...

Страница 129: ...or acrylic could cause injury to your hands and face Take the device to a Samsung Service Centre to have it repaired Do not use the device for anything other than its intended use Avoid disturbing oth...

Страница 130: ...fully read the permissions screen when downloading applications Be particularly cautious with applications that have access to many functions or to a significant amount of your personal information Ch...

Страница 131: ...upplier and check the terms and conditions of the purchase contract This product and its electronic accessories should not be mixed with other commercial wastes for disposal This EEE is compliant with...

Страница 132: ...NESS LEGALITY OR COMPLETENESS OF ANY CONTENT OR SERVICE MADE AVAILABLETHROUGH THIS DEVICE AND UNDER NO CIRCUMSTANCES INCLUDING NEGLIGENCE SHALL SAMSUNG BE LIABLE WHETHER IN CONTRACT ORTORT FOR ANY DIR...

Страница 133: ...are DLNA 90 Bluetooth 94 GPS connections 96 mobile network sharing 92 USB connections 84 VPN connections 97 Wi Fi 86 contacts copying moving 79 creating 78 creating groups 79 finding 78 importing expo...

Страница 134: ...device 85 as wireless modem 93 with Samsung Kies 84 withWindows Media Player 85 video player 67 using the notifications panel 25 using widgets 27 indicator icons 24 Internet 39 key functions 13 maps...

Страница 135: ...Index 135 videos playing 67 71 recording 63 uploading toYouTube 50 VPN connections 97 web browser 39 Wi Fi 86 world clock 105 YouTube 49...

Страница 136: ...provider www samsung com English EU 08 2012 Rev 1 0 To install Samsung Kies PC Sync Download the latest version of Samsung Kies from 1 the Samsung website www samsung com kies and install it on your c...

Отзывы: