background image

Getting started

25

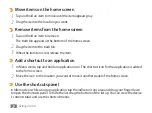
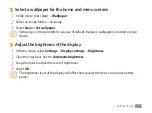
Select a wallpaper for the home and menu screens

In Idle mode, press [

1

]

ĺ

Wallpaper

.

Select an image folder 

2

ĺ

 an image.

Select 

3

Save

 or 

Set wallpaper

.

Samsung is not responsible for any use of default images or wallpapers provided on your 
device.

Adjust the brightness of the display

In Menu mode, select 

1

Settings

ĺ

Display settings

ĺ

Brightness

.

Clear the check box next to 

2

Automatic brightness

.

Drag the slider

3

to adjust the level of brightness.

Select 

4

OK

.

The brightness level of the display will affect how quickly the device consumes battery 
power.

Содержание Galaxy Tab 8.9 LTE

Страница 1: ...in touch with versatile messaging and video calling applications read books and newspapers on the go stay up to date on the latest news sports and weather manage your multimedia and business files and browse the web for maps business locations and more Read me first Please read all safety precautions and this guide carefully before using your device to ensure safe and proper use The descriptions i...

Страница 2: ...s caused by third party applications Samsung is not liable for performance issues or incompatibilities caused by user editing of registry settings You may upgrade your mobile device s software by accessing www samsungmobile com Sound sources wallpapers and images provided in this device are licenced for limited use between Samsung and their respective owners Extracting and using these materials fo...

Страница 3: ... to your device or other equipment Note notes usage tips or additional information Ź Refer to pages with related information for example Ź p 12 represents see page 12 ĺ Followed by the order of options or menus you must select to perform a step for example In Menu mode select Settings ĺ Wireless and network represents Settings followed by Wireless and network Square brackets device keys for exampl...

Страница 4: ...amsung Electronics Trademarks SAMSUNG and the SAMSUNG logo are registered trademarks of Samsung Electronics The Android logo Google Search Google Maps Google Mail YouTube Android Market and GoogleTalk are trademarks of Google Inc Bluetooth is a registered trademark of the Bluetooth SIG Inc worldwide Oracle and Java are registered trademarks of Oracle and or its affiliates Other names may be tradem...

Страница 5: ...sociated logos are trademarks of DivX Inc and are used under license Covered by one or more of the following U S patents Pat 7 295 673 7 460 668 7 515 710 7 519 274 All other trademarks and copyrights are the property of their respective owners ...

Страница 6: ...DivX video DivX Certified to play DivX video up to HD 720p including premium content May play DivX video up to HD 1080p LCD resolution 1024x600 ABOUT DIVXVIDEO ON DEMAND This DivX Certified device must be registered in order to play purchased DivXVideo on Demand VOD movies To obtain your registration code locate the DivXVOD section in your device setup menu Go to vod divx com for more information ...

Страница 7: ...rt the SIM or USIM card 13 Insert a memory card optional 15 Getting started 18 Turn your device on and off 18 Get to know your device 20 Use the touch screen 22 Get to know the home screen 24 Access applications 26 Customise your device 27 Enter text 30 Contents ...

Страница 8: ...e web pages 35 Bookmark your favourite web pages 35 Reading ebooks 36 Using Wi Fi 37 Activate theWLAN feature 37 Find and connect to aWLAN 37 Using Bluetooth 38 Activate the Bluetooth feature 38 Find and pair with other Bluetooth enabled devices 38 ...

Страница 9: ...Contents 10 Connecting to a PC 39 Connect with Samsung Kies 39 Synchronise withWindows Media Player 40 Connect as a mass storage device 40 Safety precautions 42 ...

Страница 10: ...damage or malfunctions that are not covered by your manufacturer s warranty The items supplied with your device may vary depending on the software and accessories available in your region or offered by your service provider You can obtain additional accessories from your local Samsung dealer The supplied accessories perform best for your device Accessories other than the supplied ones may not be c...

Страница 11: ...lode or damage your device When your battery is low the device will emit a warning tone and display a low battery message The battery icon will also be empty and turn red If the battery level becomes too low the device will automatically power off Recharge your battery to continue using your device Connect the PC data cable to the USB power adapter and then plug the end of the PC data 1 cable into...

Страница 12: ...a cable from the device While charging the device may heat up This is normal and should not affect your device s lifespan or performance If your device is not charging properly bring your device and the charger to a Samsung Service Centre When the battery is fully charged the battery icon is no longer moving unplug the travel 3 adapter from the device and then from the power outlet Insert the SIM ...

Страница 13: ...ver to the SIM card slot on the side of the device 1 Insert the SIM or USIM card 2 Place the SIM or USIM card into the device with the gold coloured contacts facing down Do not insert a memory card into the SIM card slot Close the cover of the SIM card slot 3 ...

Страница 14: ...n your device on and off To turn on your device Press and hold 1 If you turn on your device for the first time follow the on screen instructions to set up your 2 device To turn off your device press and hold and then select Power off ĺ Yes ...

Страница 15: ...vate Flight mode go to Settings ĺ Wireless and network ĺ Flight mode You can also press and hold and then select Flight mode To deactivate Flight mode and use wireless connections go to Settings ĺ Wireless and network and clear the check box next to Flight mode Switch to the silent mode In Idle mode press and hold and then select Silent mode Open the shortcuts panel from the top of the screen and ...

Страница 16: ...Gettingstarted 17 Get to know your device Device layout 12 13 14 15 16 17 6 1 2 5 8 7 7 4 3 10 9 11 ...

Страница 17: ... 2 Headset jack 3 Light sensor 4 Mouthpiece 5 Home key 6 Menu key 7 Speaker 8 Multifunction jack 9 Internal antenna 10 Flashbulb 11 Rear camera lens 12 Power key Number Function 13 Volume key 14 Memory card slot 15 SIM card slot 16 Back key 17 Search key ...

Страница 18: ...ilable on the current screen Home Return to the home screen Open the list of recent applications press and hold Back Return to the previous screen Search In Idle mode open the Google search application Open the search input window while using some applications Use the touch screen Your device s touch screen lets you easily select items or perform functions Learn basic actions to use the touch scre...

Страница 19: ...ects small electrical charges emitted by the human body For best performance tap the touch screen with your fingertip The touch screen will not react to touches of sharp tools such as a stylus or pen You can control your touch screen with the following actions Tap Touch once with your finger to select or launch a menu option or application Drag Tap and drag your finger up down left or right to mov...

Страница 20: ...uch screen and automatically locks the touch screen to prevent any unwanted device operations To manually lock the touch screen press To unlock turn on the screen by pressing and drag right until Unlock appears If you set a screen lock you need to enter your PIN or password or draw a pattern Get to know the home screen When the device is in Idle mode you will see the home screen From the home scre...

Страница 21: ...s red release the item 3 Add a shortcut to an application In Menu mode tap and hold an application icon The shortcut icon for the application is added 1 to the home screen Move the icon to the location you want or move it another panel of the home screen 2 Use the shortcuts panel In Idle mode or while using an application tap the indicator icons area and drag your finger down to open the shortcuts...

Страница 22: ...creen Press to return to the home screen Organise applications You can reorganise the applications in the application list by changing their order In Menu mode press 1 ĺ Edit Tap and hold an application 2 Drag the application icon to the location you want 3 Press 4 ĺ Save Access recent applications Press and hold 1 to open the list of applications you have accessed recently Select an application 2...

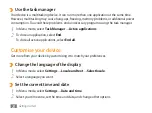
Страница 23: ...nu mode select 1 Task Manager ĺ Active applications To close an application select 2 End To close all active applications select End all Customise your device Get more from your device by customising it to match your preferences Change the language of the display In Menu mode select 1 Settings ĺ Locale and text ĺ Select locale Select a language you want 2 Set the current time and date In Menu mode...

Страница 24: ...sponsible for any use of default images or wallpapers provided on your device Adjust the brightness of the display In Menu mode select 1 Settings ĺ Display settings ĺ Brightness Clear the check box next to 2 Automatic brightness Drag the slider 3 to adjust the level of brightness Select 4 OK The brightness level of the display will affect how quickly the device consumes battery power ...

Страница 25: ...nce you set a screen lock your device will require an unlock code each time you turn it on or unlock the touch screen If you forget your PIN or password bring your device to a Samsung Service Centre to reset it Before bringing your device to a Samsung Service Centre remember to make backup copies of all important data stored on your device Samsung is not responsible for any loss of security codes ...

Страница 26: ...nlock key PUK to unblock the SIM or USIM card If you block your SIM or USIM card by entering an incorrect PUK bring the card to your service provider to unblock it Enter text You can enter text by selecting characters on the virtual keypads You cannot enter text in some languages To enter text you should change the writing language to one of the supported languages Change the text input method Tap...

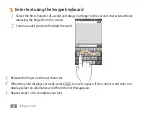
Страница 27: ...acter without 1 releasing the finger from the screen Continue until you have finished the word 2 Release the finger on the last character 3 When the word displays correctly select 4 to insert a space If the correct word does not display select an alternative word from the list that appears Repeat steps 1 4 to complete your text 5 ...

Страница 28: ... the following keys 6 4 1 3 2 5 Number Function 1 Change case 2 Access the Swype tip screen Open the help information tap and hold 3 Switch between Symbol mode and ABC Number mode 4 Delete characters 5 Start a new line 6 Insert a space ...

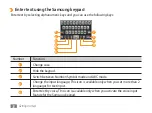
Страница 29: ... 1 2 4 5 9 6 10 3 Number Function 1 Change case 2 Hide the keypad 3 Switch between Number Symbol mode and ABC mode 4 Change the input language This icon is available only when you set more than 2 languages for text input 5 Enter text by voice This icon is available only when you activate the voice input feature for the Samsung keypad ...

Страница 30: ...the internet Learn to access the internet and browse web pages You can connect to the internet anywhere an access point or wireless hotspot is available For more information see the Browser section of the user manual You may incur additional charges for accessing the web and downloading data For details contact your service provider The web browser menu may be labelled differently depending on you...

Страница 31: ...an also tap and hold to view the recent internet history To open a list of saved bookmarks frequently visited pages and recent internet history select To reload the current web page select To open a new window or switch between the currently open windows select To add a new window select and access another web page on the new window Bookmark your favourite web pages In Menu mode select 1 Browser P...

Страница 32: ...elect OK Select 5 OK Reading ebooks Learn to open and read book files For more information see the eBook section of the user manual In Menu mode select 1 eBook Select a book from the bookshelf 2 While reading a book use the following options 3 To move pages drag your finger left or right or tap near the left or right margin of a page To bookmark the current page select ...

Страница 33: ...WLAN can be operated in the EU without restriction indoors but cannot be operated outdoors in France Activate theWLAN feature In Menu mode select 1 Settings ĺ Wireless and network ĺ Wi Fi settings Select 2 Wi Fi to activate theWLAN feature Find and connect to aWLAN In Menu mode select 1 Settings ĺ Wireless and network ĺ Wi Fi settings The device will automatically search for availableWLANs Select ...

Страница 34: ...te the Bluetooth feature Find and pair with other Bluetooth enabled devices In Menu mode select 1 Settings ĺ Wireless and network ĺ Bluetooth settings ĺ Scan devices Select a device 2 Enter a PIN for the Bluetooth wireless feature or the other device s Bluetooth PIN if it has one 3 and select OK Alternatively select Accept to match the PIN between your device and the device When the owner of the o...

Страница 35: ...msung Kies Ensure that Samsung Kies is installed on your PC You can download the program from the Samsung website www samsungmobile com In Menu mode select 1 Settings ĺ Wireless and network ĺ USB settings ĺ Samsung Kies Press 2 to return to Idle mode Using the PC data cable connect the multifunction jack on your device to a PC 3 Run Samsung Kies and use wireless connections or copy data and files ...

Страница 36: ... installed When connected a pop up window will appear on the PC OpenWindows Media Player to synchronise music files 4 Edit or enter your device s name in the pop up window if necessary 5 Select and drag the music files you want to the sync list 6 Start synchronisation 7 Connect as a mass storage device You can connect your device to a PC as a removable disk and access the file directory If you ins...

Страница 37: ...unction jack on your device to a PC 4 When connected select 5 Mount Open the folder to view files on the PC 6 Copy files from the PC to your device or memory card 7 When you are finished select 8 Turn Off To disconnect the device to the PC click the USB device icon on theWindows task bar and click the option to safely remove the mass storage device Then remove the PC data cable from the PC Otherwi...

Страница 38: ...cord Do not bend or damage the power cord Do not use your device while charging or touch your device with wet hands Do not short circuit the charger or the battery Do not drop or cause an impact to the charger or the battery Do not charge the battery with chargers that are not approved by the manufacturer Do not use your device during a thunderstorm Your device may malfunction and your risk of ele...

Страница 39: ... Protect the device batteries and chargers from damage Avoid exposing your device and batteries to very cold or very hot temperatures Extreme temperatures can cause the deformation of the device and reduce the charging capacity and life of your device and batteries Prevent batteries from contacting metal objects as this can create a connection between the and terminals of your batteries and lead t...

Страница 40: ...sing a hearing aid contact the manufacturer for information about radio interference Some hearing aids may be interfered with by the radio frequency of your device Contact the manufacturer to ensure the safety of your hearing aid Turn off the device in potentially explosive environments Turn off your device in potentially explosive environments Always comply with regulations instructions and signs...

Страница 41: ...due to the radio frequency of your device Electronic devices in your car may malfunction due to radio frequency of your device Contact the manufacturer for more information Comply with all safety warnings and regulations regarding mobile device usage while operating a vehicle ...

Страница 42: ... damage to your device can void your manufacturer s warranty Do not use or store your device in dusty dirty areas Dust can cause your device to malfunction Do not store your device on slopes If your device falls it can be damaged Do not store your device in hot or cold areas Use your device at 20 C to 45 C Your device can explode if left inside a closed vehicle as the inside temperature can reach ...

Страница 43: ...device to come in contact with magnetic fields for extended periods of time Do not store your device near or in heaters microwaves hot cooking equipment or high pressure containers The battery may leak Your device may overheat and cause a fire Do not drop your device or cause impacts to your device The screen of your device may be damaged If bent or deformed your device may be damaged or parts may...

Страница 44: ...g on the device Hold the device upright as you would with a traditional phone Speak directly into the mouthpiece Avoid contact with your device s internal antenna Touching the antenna may reduce the call quality or cause the device to transmit more radio frequency than necessary Hold the device with a relaxed grip press the keys lightly use special features that reduce the number of keys you have ...

Страница 45: ...his can cause explosion or fire Do not paint your device Paint can clog moving parts and prevent proper operation If you are allergic to the paint or metal parts of the device stop using the device and consult your physician When cleaning your device Wipe your device or charger with a towel or a rubber Clean the terminals of the battery with a cotton ball or a towel Do not use chemicals or deterge...

Страница 46: ...your device Allowing unqualified personnel to service your device may result in damage to your device and will void your manufacturer s warranty Handle SIM cards or memory cards with care Do not remove a card while the device is transferring or accessing information as this could result in loss of data and or damage to the card or device Protect cards from strong shocks static electricity and elec...

Страница 47: ...e maximum value This is because the device is designed to operate at multiple power levels so as to use only the power required to reach the network In general the closer you are to a wireless base station antenna the lower the power output Before a new model device is available for sale to the it does not exceed the exposure limit established by the FCC Tests for each model are performed in posit...

Страница 48: ... of this product Waste Electrical Electronic Equipment Applicable in the European Union and other European countries with separate collection systems This marking on the product accessories or literature indicates that the product and its electronic accessories e g charger headset USB cable should not be disposed of with other household waste at the end of their working life To prevent possible ha...

Страница 49: ...ice belong to third parties and are protected by copyright patent trademark and or other intellectual property laws Such content and services are provided solely for your personal noncommercial use You may not use any content or services in a manner that has not been authorised by the content owner or service provider Without limiting the foregoing unless expressly authorised by the applicable con...

Страница 50: ... will remain available for any period of time Content and services are transmitted by third parties by means of networks and transmission facilities over which Samsung has no control Without limiting the generality of this disclaimer Samsung expressly disclaims any responsibility or liability for any interruption or suspension of any content or service made available through this device Samsung is...

Страница 51: ...ea Code No GH68 XXXXXA English EU 01 2011 Rev 1 0 To install Kies PC Sync Download the latest version of Kies from the Samsung website 1 www samsungmobile com and install it on your PC In Menu mode select 2 Settings ĺ Wireless and network ĺ USB settings ĺ Samsung Kies Using a PC data cable connect your device to your PC 3 Refer to the Kies help for more information ...

Страница 52: ... in different rooms Samsung is not responsible for the loss interception or misuse of data sent or received via the Bluetooth wireless feature Always ensure that you share and receive data with devices that are trusted and properly secured If there are obstacles between the devices the operating distance may be reduced Some devices especially those that are not tested or approved by Bluetooth SIG ...

Страница 53: ... services select Bluetooth services Find and pair with other Bluetooth enabled devices In Menu mode select 1 Settings Connectivity Bluetooth Search Select a device 2 Enter a PIN for the Bluetooth wireless feature or the other 3 device s Bluetooth PIN if it has one and select Done Alternatively select Yes to match the PIN between your device and the device When the owner of the other device enters ...

Страница 54: ...elete the paired device select Delete Send data using the Bluetooth wireless feature Select a file or item such as a contact calendar event 1 memo task or media file from an appropriate application or My files Select 2 an option for sending via Bluetooth Search for and pair with a Bluetooth enabled device 3 Receive data using the Bluetooth wireless feature Enter the PIN for the Bluetooth wireless ...

Страница 55: ...ce s wireless networking capabilities to activate and connect to any wireless local area network WLAN compatible with the IEEE 802 11 b g n standards You can connect to the internet or other network devices anywhere an access point or wireless hotspot is available Your device uses non harmonised frequency and is intended for use in all European countries TheWLAN can be operated in the EU without r...

Страница 56: ...ction profile for the network appears Customise the connection profile of the selectedWLAN 3 Option Function Name View the name of the profile Security type View the security type of theWLAN AP EAP method Select an EAP method This option is available depending on the selected security type User name Enter your user name This option is available depending on the selected security type Password Ente...

Страница 57: ...o delete all details of the connection profile select Forget Connect to aWLAN using aWi Fi Protected Setup WPS In Menu mode select 1 Settings Connectivity Wi Fi Select 2 WPS PBC or WPS PIN depending on the AP device type Press aWPS button on the AP device within 2 minutes 3 Or enter a PIN on the AP device and select Start within 2 minutes Mobile AP ...

Страница 58: ...enna Increase the separation between the equipment and receiver Connect the equipment into an outlet on a circuit from that to which the receiver is connected Consult the dealer or an experienced radio TV technician for help The device may cause TV or radio interference if used in close proximity to receiving equipment The FCC can require you to stop using the device if such interference cannot be...

Отзывы: