background image

24

Getting Ready

Use Earphones

Connect and use the AKG Tuning High-quality 
Earphone with Microphone (USB Type-C) (sample).
•  Other than AKG Tuning High-quality Earphone with 

Microphone (USB Type-C) (sample) may not be 
compatible with this product.

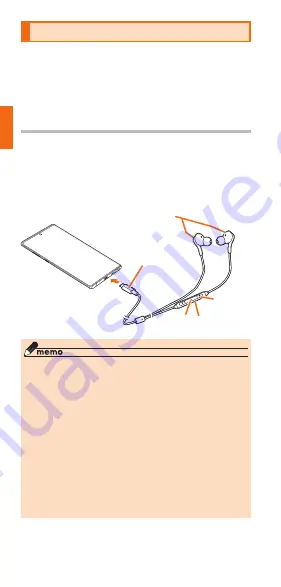
Using AKG Tuning High-quality Earphone 

with Microphone (USB Type-C) (sample)

Connect the connection plug of the 
AKG Tuning High-quality Earphone with 
Microphone (USB Type-C) (sample) to 
the external connection terminal of the 
product

Earphone

Switch

Microphone

(back side)

Volume key

Connection plug


◎ You can perform the following operations by 

pressing the switch of the AKG Tuning High-quality 
Earphone with Microphone (USB Type-C) (sample).


- Press the switch : Play/Pause the music in 

the "Play Music" application. You also can 
answer/end an incoming call.


- Hold the switch for more than one second : 

Google searching is available.


◎ The AKG Tuning High-quality Earphone with 

Microphone (USB Type-C) (sample) is the 
dedicated product that supports the digital 
output of this product. The AKG Tuning High-
quality Earphone with Microphone (USB Type-C) 
(sample) may not support other than this product.

Содержание Galaxy Note10+

Страница 1: ...or ick down Galaxy Online Manual In addition you can also refer to Online Manual Japanese available on the au homepage https www au com online manual scv45 Japanese This Manual This manual is describe...

Страница 2: ...Japanese For detailed descriptions on various functions use the Online Manual Japanese on your product with the following operations On the home screen flick up or flick down Galaxy Online Manual In a...

Страница 3: ...mplified as shown below Side key Volume key Button Explanation History button Display the recently used applications and the suggested apps etc The recently used apps also can be displayed on the hist...

Страница 4: ...en tap 1 then enter a phone number of the other party and tap On the Applications screen Settings General management On the home screen flick up or flick down 2 then tap Settings on the Application sc...

Страница 5: ...screenshots for body color Aura Glow are provided as examples Descriptions in this manual are based on the operations of portrait screen Menu items icons buttons on the screen may be different from th...

Страница 6: ...ard 13 Attaching Removing a MicroSD Memory Card 16 Charging 19 Turning the Power on off 21 Locking the Screen Canceling the Screen Lock 23 Use Earphones 24 Taking out S Pen 25 Replacing Tip of S Pen 2...

Страница 7: ...replacement and tweezers In addition two different kinds of the pen tip hard type and soft type one by one are provided for replacement so you can experience the various writing touch AKG Tuning High...

Страница 8: ...eady Please purchase a specified charging equipment sold separately The battery is built into the product Illustrations used in this manual are just images for explanations They may be different from...

Страница 9: ...7 Getting Ready Names of Parts and their Functions Bottom side y x z q w v Top side p q r t u s Front side Back side l a c b e b d k g o m f Right side Left side h i j n...

Страница 10: ...rightness Also operate the product by detecting motion of hand gesture f Flash Light g Ultra Wide camera h Wide angle camera i Telephoto camera j DepthVision camera k mark l Wireless charging position...

Страница 11: ...affect calling quality communication quality 4 The product use it for both a receiver and a speaker The volume will incrementally rise to the set volume so that loud sounds do not come out of the spe...

Страница 12: ...et damaged And be aware not to press the Side key and volume key Attaching the Clear case sample aHook a of the Clear case sample with the product and attach the Clear case sample in the orientation i...

Страница 13: ...ction Do not use force to attach or remove An error message will be displayed when the au IC card is not properly inserted or if something is wrong with the au IC card Do not lose the au IC card after...

Страница 14: ...ving sending and initial settings of au mail Setting up PIN code Checking the phone number and mail address of the product Besides the above some functions requiring your phone number might not be ava...

Страница 15: ...detach the Clear case sample Attaching the au IC card aInsert the tip of the SIM card removal tool sample into the au IC card microSD memory card tray eject hole in a straight line The au IC card micr...

Страница 16: ...n the au IC card microSD memory card tray If the au IC card is not fitted correctly the card may get jammed in the product when you insert the tray Notch IC metallic part dInsert the au IC card microS...

Страница 17: ...the tool in a straight line might result in damage or a fault bPull out the au IC card microSD memory card tray in a straight line If you turn the au IC card microSD memory card tray upside down the...

Страница 18: ...ory card Attaching a microSD memory card aInsert the tip of the SIM card removal tool sample into the au IC card microSD memory card tray eject hole in a straight line The au IC card microSD memory ca...

Страница 19: ...ert the tray dInsert the au IC card microSD memory card tray in a straight line all the way into the au IC card microSD memory card slot If you turn the au IC card microSD memory card tray upside down...

Страница 20: ...in a straight line If you turn the au IC card microSD memory card tray upside down the au IC card or the microSD memory card may be falled cRemove the microSD memory card from the au IC card microSD...

Страница 21: ...unctions charging time may increase If charging does not start for a while even if you insert the USB Type C plug into the USB Type C connection terminal make sure whether the connection is correct If...

Страница 22: ...Adapter 02 sold separately into the AC 100 V outlet bWith the engraved side up insert the USB Type C plug of the TypeC Common AC Adapter 02 sold separately straight into the external connection termi...

Страница 23: ...r au logo disappears continue to press lower side of the volume key When Safe mode starts Safe mode appears on the lower left corner of the screen To terminate Safe mode restart the product Back up an...

Страница 24: ...e key over 2 seconds The terminal option screen is displayed b Power off Power off Force restarting aPress and hold Side key and lower side of volume key simultaneously for over 7 seconds Note that as...

Страница 25: ...automatically turns off and is locked in approximately 5 seconds When you carry in your bag to put the product prevent erroneous please set the screen lock always Also please do not press Side key of...

Страница 26: ...the product Earphone Switch Microphone back side Volume key Connection plug You can perform the following operations by pressing the switch of the AKG Tuning High quality Earphone with Microphone USB...

Страница 27: ...to pull it straight out When you insert the S Pen into the slot slide it all the way in and push the S Pen knock part once Then check that it is not sticking out at all Replacing Tip of S Pen Replaci...

Страница 28: ...it The pen tip of the pen tip replacement has two different types pen tip according to the material of feeling at input One is the hard type pen tip for replacement the other one is the soft type pen...

Страница 29: ...rs automatically Follow the guidance to make the settings Depending on the settings setting contents and displays may differ STEP START a Japanese English OK STEP 1 Checking the info a Tap the Details...

Страница 30: ...select Skip this for now Next To recover the data follow the on screen instructions STEP 3 Wireless LAN Wi Fi function setting a b Tap Wi Fi network to connect Tap Skip to set later Enter a password...

Страница 31: ...unt 1 For myself For my child 2 Enter your First name and Last name Next c d Enter your birthday and select gender Next Select Create your own Gmail address 3 enter an address Next e f Enter your pass...

Страница 32: ...ss of Gmail or phone number and tap Next And then follow the on screen instructions 2 In this manual select For myself To create account for child follow the on screen instructions 3 You can also sele...

Страница 33: ...ether to protect the product When protecting the product select Face recognition Fingerprints Pattern PIN or Password When not protecting the product Not now Skip anyway STEP 6 Functions Service setti...

Страница 34: ...Accept 2 Set Galaxy account as required 3 e Finish 4 1 Tap No thanks to disable the functions 2 Tap to to disable the functions 3 If you do not set the Galaxy account Skip Skip 4 After Initial setting...

Страница 35: ...ve set an au ID you can use various au services including au Simple Payment Service which offers you a simple way to purchase applications from au Smart Pass and Google Play After Initial settings you...

Страница 36: ...34 Getting Ready e f Next OK g h Allow 4 Check the apps to install 5 Next i j Check the content to set Next Finish 6...

Страница 37: ...e four digit security code you wrote on the application form 4 A confirmation screen is displayed for application permission several times Continue by following the on screen instructions 5 If Select...

Страница 38: ...signal conditions in Japan If you do this in a place with poor signal strength or while you are moving the settings may not be correct Initial settings can not perform with Wi Fi communication Dependi...

Страница 39: ...g the au mail address Close If you only change the model the au mail address you have used appears Checking how to use au mail application a b On the home screen c Operation guide Tap the item which y...

Страница 40: ...omatically decided by initial setup aOn the home screen Change Address Setting Filter If the confirmation screen is displayed follow the on screen instructions b To change mail address enter the secur...

Страница 41: ...rver If your previous au phone does not have the au Settings Menu use the au Cloud app If you restore data using a microSD memory card save the data using your previous au phone to a microSD memory ca...

Страница 42: ...res address book contacts etc automatically to the au server using Data Storage App application you can set up by following procedure On the Applications screen Settings au Settings Menu Backup Settin...

Страница 43: ...llow cFollow the onscreen instructions If you do not select Allow you may be unable to activate the app function or the function may be restricted To change the permission setting on the Applications...

Страница 44: ...ation 119 and Regional Coast Guard Headquarters 118 are collectively referred to as the emergency call receiving agency Use au s VoLTE LTE network to connect to Japanese emergency services You cannot...

Страница 45: ...ermines that human lives and health are in danger they will be able to acquire the caller s location information during the call or within a certain period of time after the call If you make an emerge...

Страница 46: ...en the Incoming call pop up screen appears tap Decline Setting Wireless LAN Wi Fi Function aOn the Applications screen Settings Connections Wi Fi bTap to cSelect the Wi Fi network Connect When connect...

Страница 47: ...regularly in order to use it comfortably a b On the Applications screen au au tool support Repair and Delivery Support If the confirmation screen is displayed confirm the contents and follow the on sc...

Страница 48: ...oll free Business hours 9 00 20 00 7 days a week For theft loss damage toll free Repair and Delivery Support Center For theft loss damage toll free From non au mobile phones general subscriber phones...

Отзывы: