background image

Содержание FTQ387LWGX

Страница 1: ..._the possibilities Thank you for purchasing this Samsung product Toreceive more complete service please register your product at www samsung com global register...

Страница 2: ...irections You get more efficient energy consumption and more even cooking Steam Quick cleaning Thanks to Steam Quick TM Samsung s unique technology for light duty cleaning jobs keeping your oven spick...

Страница 3: ...vice center for help Note ANTI TIP DEVICE _ ARNING To reduce the risk of tipping the range the range must be secured by a properly installed Anti Tip device Refer to the installation manual for instru...

Страница 4: ...eriously injured Do not leave children alone Children should not be left alone or unattended in an area where appliance is in use They should never be allowed to sit or stand on any part of the applia...

Страница 5: ...ll expose a portion of the heating element to direct contact and may result in ignition of clothing Proper relationship of utensil to burner will also improve efficiency Glazed cooking utensils Only c...

Страница 6: ...k this vent or place plastic or heat sensitive items on it Placement of oven racks Always place oven racks in the desired location while the oven is cool If the rack must be moved while the oven is ho...

Страница 7: ...llowed to accumulate on the hood or filter When flaming foods under the hood turn the fan on GLASS CERAMIC COOKING SURFACES DO NOT TOUCH SURFACE UNITS OR AREAS NEAR UNITS Surface units may be hot even...

Страница 8: ...9 The oven control panel 20 Setting the clock 21 Minimum and maximum settings 21 Setting the kitchen timer 22 Using the oven racks 23 Baking 24 Convection baking 26 Convection roasting 28 Timed cookin...

Страница 9: ...e 19 for more information Automatic oven light switch Self steam clean latch _iii ii Glass surface Oven door g drawer Gasket Convection fan Shelf position I WHAT S INCLUDED WITH YOUR RANGE Wire racks...

Страница 10: ...ot touch the surface units until they nave COoleaaown The surface may oe still be hot ana burns nay occur if the glass surface is toucnea before it has coolea aown sufficient y Immediately c_ean spu_s...

Страница 11: ...rned off Glows until the unit is cooled to approximately 150 R Cooking areas 0 0 Z The cooking areas on your range are identified by permanent circles on the glass cooking surface For the most efficie...

Страница 12: ...ion to the setting you want At both the off and high settings the knob clicks into position 000 OFF LO HI 4 6 Dual surface unit control knob left front The dual surface unit has 2 cooking sizes to sel...

Страница 13: ...e surface unit turn the control knob to the large burner C settings B COO OFF HI LO 8 2 2 8 LO HI LO 6 4 0 0 The aiea between the high and off settings is not appropriate f0r co0kingl CAUTION _ When c...

Страница 14: ...overed with a lid or aluminum foil to maintain food quality Always start with hot food Eating uncooked or cold food placed on the warming center could result in illness 1 Turn the warming center on Pr...

Страница 15: ...made of determines how evenly and quickly heat is transferred from the surface element to the pan bottom ALUMINUM Excellent heat conductor Some types of food will cause the aluminum to darken Anodize...

Страница 16: ...enting marks and scratches Do not use glass cookware It may scratch the cooktop Do not place a trivet or wok ring between the cooktop and the pan These items can mark or scratch the cooktop Make sure...

Страница 17: ...could damage the interior finish Do not put liquid or water in the warming drawer All foods placed in the warming drawer should be covered with a lid or aluminum foil When warming pastries or breads...

Страница 18: ...drawer off The warming drawer cannot be used during a self cleaning cycle Recommended settings Low Medium High Rolls soft empty dinner plates Gravies eggs biscuits pastries casseroles vegetables rolls...

Страница 19: ...KITCHEN TIMER ON OFF Press to select the timer feature 6 DELAY START Use along with Bake Conv Bake Conv Roast Cooking Time and Self Clean pads to set the oven to start and stop automatically at a time...

Страница 20: ...o select PM This step is skipped in the 24 hour display mode 3 Enter the present time Enter the current time in hours and minutes on the number pad eg 1 3 0 for 1 30 4 Exit the set up Press the SET ST...

Страница 21: ...at will beep when the set time has elapsed It does not start or stop cooking functions The feature can be used during any of the other oven functions How to set the timer 1 Turn the timer on Press the...

Страница 22: ...oven racks in positions 2 and 5 Place the cookware as shown in the figures below Fig 1 Fig 2 Before using the racks The oven has three racks Each rack has stops that need to be placed correctly on th...

Страница 23: ...ant to cancel baking or if you have finished press the CLEAR OFF pad _ Place food in the oven after preheating if the recipe calls for it Preheating is very important for good results when baking cake...

Страница 24: ...ck place the oven rack in position 4 If cooking on multiple racks place the oven racks in positions 2 and 5 or positions 2 4 and 6 When baking a cake using the bake mode will produce better results Ho...

Страница 25: ...st rolls Quick Bread loaf 8x4 Biscuits Muffins 4 4 4 3 4 3 4 4 4 4 Pizza 325 350 325 350 325 35O 350 375 325 350 350 375 4OO 375 425 400 425 Fresh 12 17 14 18 29 36 18 22 13 18 45 55 9 14 15 19 23 26...

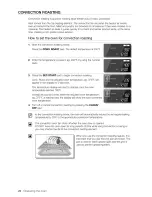
Страница 26: ...perature eg 375 F will appear in the display for 2 seconds The temperature display will start to change once the oven temperature reaches 150 F A beep will sound 6 times when the adjusted oven tempera...

Страница 27: ...med rare 5 8 3 6 3 4 12 15 16 20 21 25 3 8 1 1_ _ 3 4 6 8 35O 35O 375 325 325 325 325 35O 15 25 20 30 17 23 12 16 11 15 8 12 20 25 45 75 total time 170 160 180 180 180 180 170 180 325 325 25 30 30 35...

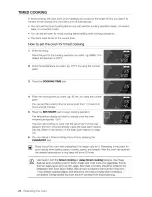
Страница 28: ...display will start to change once the oven temperature reaches 150 F The oven will continue to cook until the set amount of time has elapsed then turn off automatically unless the keep warm feature w...

Страница 29: ...5 Enter the cooking time you want eg 45 min by using the number pad You can set the cooking time for any amount of time from 1 minute to 9 hours and 99 minutes 6 Press the DELAY START pad AM PM is no...

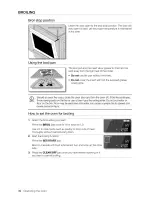
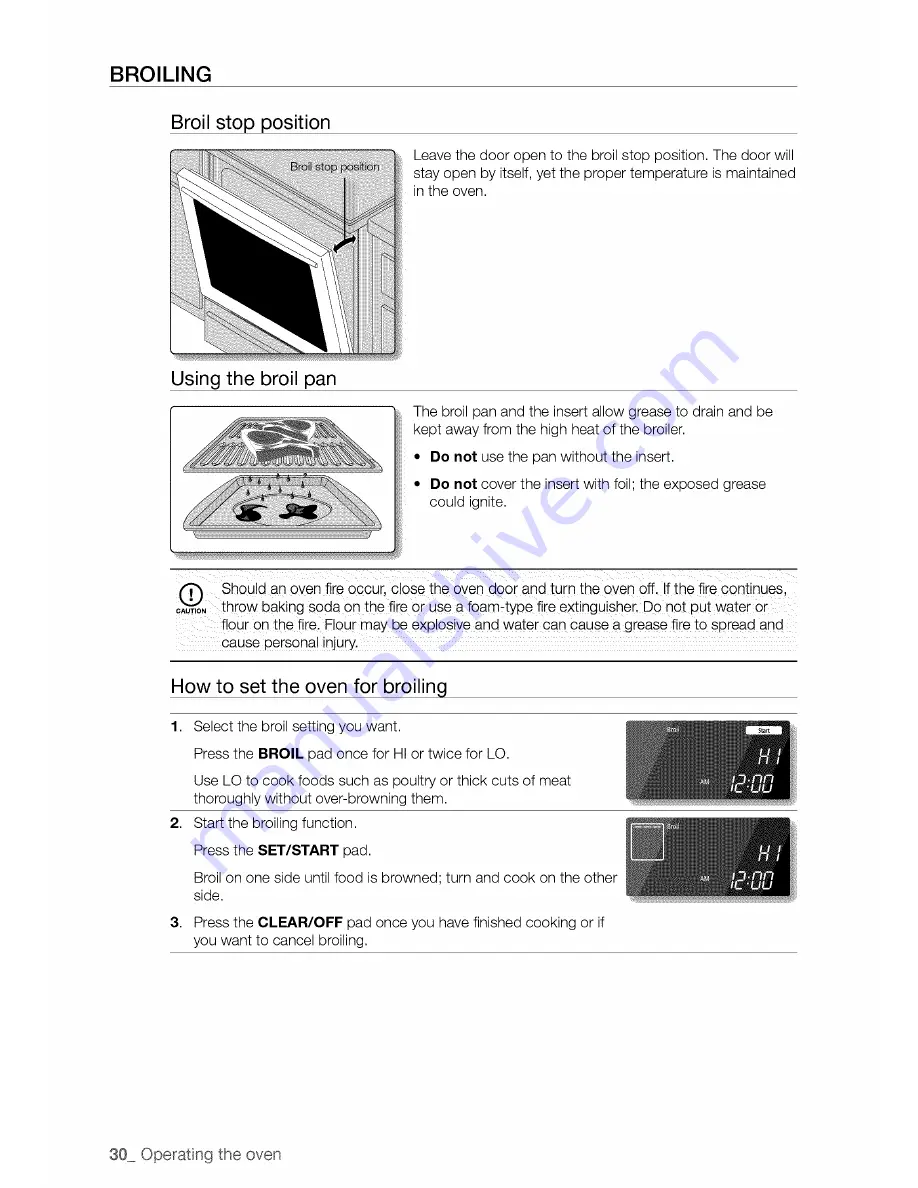
Страница 30: ...e continues _AUT o throw baking soda on the fire or use a foam type fire extinguisher Do not put water or flour on the fire Flour may be explosive and water can cause a grease fire to spread and cause...

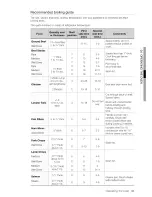
Страница 31: ...han 1 thick Cook through before browning Pan frying is recommended Slash fat Broil skin side down first Cut through back of shell Spread open Brush with melted butter before broiling and halfway throu...

Страница 32: ...ault temperature is 350 R Use the number pad to enter the temperature you want eg 375 F Press the CUSTOM COOK pad the number of times corresponding to where you want to store the setting eg for recipe...

Страница 33: ...r in the display Because these functions produce the best results when started while the oven is cool we recommend that you wait until the oven has cooled down and Hot disappears from the display To a...

Страница 34: ...operations or may be set to activate after a timed or delay timed cooking operation How to use the keep warm feature 1 Press the KEEP WARM pad 2 Press the SET START pad 3 Press the CLEAR OFF pad at a...

Страница 35: ...or ON Pressing the 0 number pad changes the mode between 12 Hr and Hr 3 Press the SET START pad Fahrenheit or Celsius temperature selection The oven control can be programmed to display temperatures...

Страница 36: ...he SET START pad Thermostat adjustment The temperature in the oven has been preset at the factory When first using the oven be sure to follow recipe times and temperatures If you think the oven is too...

Страница 37: ...so they cannot be activated accidentally How to activate the control lockout feature 1 Press the CLEAR OFF pad for 3 seconds The display will show LOGand a Lock icon continuously as well as the curren...

Страница 38: ...ature is 350 R 2 Enter the temperature you want eg 375 F by using the number pad 3 Press the SET START pad The temperature display will start to change once the oven temperature reaches 150 F 4 5 Pres...

Страница 39: ...f cleaning cycle is complete Stand to tne side of the oven when opening the door to allow hot air or steam to escape The oven may still be VERY HOT Before a self cleaning cycle Fig 1 Fig 2 _ Don thand...

Страница 40: ...CLEAN pad 2 Press the DELAY START pad 3 Using the CLOCK AM PM and number pads enter the time you want the clean cycle to start 4 Press the SET START pad The display will show Delay Self clean and Lock...

Страница 41: ...ay Because these functions produce the best results when started while the oven is cool we recommend that you wait until the oven has cooled down and Hot disappears from the display After a steam clea...

Страница 42: ...r For more difficult residue and built up grease apply a liquid detergent directly onto the area and leave for 30 to 60 minutes Wipe with a damp cloth and dry Do not use abrasive cleaners on any of th...

Страница 43: ...will turn slightly blue and the finish will be dull After the self cleaning cycle is complete and the oven has cooled rub the sides of the racks with wax paper or a cloth containing a small amount of...

Страница 44: ...han tho se _ _recemmended Removing burned on residue 1 Allow the cooktop to cool 2 Spread a few drops of ceramic cooktop cleaner on the entire burned residue area 3 4 5 Using the included cleaning pad...

Страница 45: ...y spillovers such as jellies fudge candy syrups or melted plastics can cause pitting of the surface of your cooktop This is not covered under the warranty You should clean the spill while it is still...

Страница 46: ...th sides of the door at the top Close the door to the door removal position which is approximately 5 degrees from vertical Fig 1 Lift door up and out until the hinge arm is clear of the slot Fig 2 5 F...

Страница 47: ...sh down on the left glide lever and pull up on the right glide lever _ Lever Push down on the left guide 3 Pull the warming drawer away from the range How to replace the warming drawer 1 Replace the s...

Страница 48: ...isconnect power 3 Turn the glass bulb cover in the back of the oven counterclockwise to remove 4 Turn the bulb counterclockwise to remove it from its socket f Remove Replace Glass bulb cover Bulb 5 Re...

Страница 49: ...A fuse in your home may be blown will not turn on or the circuit breaker tripped The cooktop controls are set improperly The surface unit stops glowing when changed to a lower setting Place the oven...

Страница 50: ...ll turn on If required call your local electric company for service The oven light will Tighten or replace the bulb not turn on Call for service Oven smokes excessively during broiling The light bulb...

Страница 51: ...procedures Make sure bottoms of cookware are clean before use and use cookware with smooth bottoms Brown streaks or Use the blade scraper to remove soil specks See the section on care and cleaning of...

Страница 52: ...or the circuit breaker tripped condensation in the drawer The controls are not set correctly There is liquid present in the drawer Uncovered foods The temperature is set too high Food dries out in Moi...

Страница 53: ...ing or connectors not supplied or authorized by SAMSUNG which damage this product or result in service problems incorrect electrical line voltage fluctuations and surges customer adjustments and failu...

Страница 54: ...QUESTIONS OR COMMENTS IN THE US 1 800 SAMSUNG 726 7864 www samsung com us IN CANADA 1 800 SAMSUNG 726 7864 www samsung com ca DG68 00196A...

Отзывы: